1
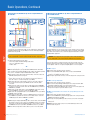
Discovery Networks
Frequently Asked Questions
You Won’t Believe Your Eyes And Ears
Ready to take your television viewing experience
to the next level? That’s what you get with
High-Definition TV from Mediacom. HDTV
delivers the most vivid possible picture, so real
that the images on the screen seem to be right
in front of you. This imagery is reinforced by
crystal clear, digital audio that delivers
every possible sound.
HDTV
With a bigger picture, better resolution
and the best possible audio, HDTV is
truly the future of television.
What’s the visible difference between HDTV
and our current television system?
Will I be able to view closed captioning
with HDTV Service?
One word – resolution. Television images are actually composites
of many horizontal lines. More lines mean better picture quality.
Regular televisions feature a maximum of 480 interlaced lines in
the picture. HDTV uses 720 to 1080 lines, allowing viewers the
opportunity to see more detail than ever before, such as specks of
color in an actor’s eyes.
To enable closed captions on the HD set top you must access
the On-Screen Menu. Begin by powering ON your HDTV and
powering OFF the set top box. Press the MENU button on either
your Mediacom remote or the set top box front panel to call up the
On-Screen Menu. You may use either the front panel or the remote
to navigate the display. Arrow down to the Closed Caption Menu
option. Use the right arrow button to select the option to enable
closed captions. Press the POWER or MENU button to exit the menu
and save your settings.
Will I be able to see more of the picture
with HDTV?
Absolutely. HDTV’s widescreen format is a 16:9 aspect ratio –
just like a movie theater. Widescreen format creates a panoramic
effect for the viewer, conveying more scenery and action.
By comparison, a standard TV has an aspect ratio of 4:3.
What’s the difference between HD-capable
and HD-ready TVs?
Today, HDTV is available in two forms: HD-ready and HD-capable.
HD-ready sets have built-in HDTV receivers. This built-in receiver,
however, is not compatible with Mediacom’s HDTV receiver/
converter. HD-capable sets are, essentially, monitors that require an
external receiver/converter. In both cases, a Mediacom HDTV digital
converter is required.
Why doesn’t the picture always display in full screen
when I’m tuned to a high-definition channel?
Not all programs are in high-definition format; therefore, programs
will not always be full-screen. Not every show currently broadcast
by an HD station is in HD format. You can assume that if you are
getting a picture on the HD channel, your equipment is functioning
properly. You may want to check your HD monitor (TV set) settings
(consult the HD monitor’s user manual).
40
PAUSE | SPRING/SUMMER 2008
What HDTV programming does Mediacom offer? * †**
Mediacom customers who have an HDTV with a digital tuner can
receive their local broadcasters* in HD at no additional charge.
Mediacom digital customers with an HD converter can receive ESPN
HD, ESPN2 HD, HD Theater, TNT HD, TBS HD, CNN HD and their
regional sports networks* in HD at no additional charge.
If you subscribe to HBO, Showtime or Starz premium services, you
receive their HD channels at no additional charge.
An optional $6.95 package of HD service (HD Pak) consists of
Universal HD, HDNet, HDNet Movies and MOJO*.
Where can I find a complete HDTV set top box
user manual?
You can read and print off an HD manual at our website
www.mediacomcc.com.
How do I get started?
Simply call Mediacom to schedule an appointment for home
installation at 1-888-333-4039.
* Not all services are available in all areas.
† HDTV programming is limited to the programming provided by Mediacom in HDTV format
by the programming provider and is subject to change.
** Rates subject to change for all pricing.
www.mediacomcable.com
Basic Operations
1 Getting Started
To begin using your HDTV service, turn on power to both the set top box and your
HDTV:
Step 1: Using the Mediacom remote, turn on the set top box by pressing the CABLE
button to set it in cable mode, then the POWER button.
Step 2: With the Mediacom remote, turn on the HDTV by pressing the TV button, then
the POWER button, or, using your HDTV remote, follow your TV manufacturer’s
instructions for turning on your HDTV.
NOTE: Not all TVs are compatible with the Mediacom remote.
2 To View a High-Definition Channel
Step 1: On your TV’s remote, press the VIDEO INPUT MODE button (refer to your TV’s
manual for clarification) as necessary until you reach the HDTV Video Input noted
on the previous page.
Step 2: On the Mediacom remote, press the CABLE button to set the remote in cable
mode.
Step 3: Use the remote to access high-definition channels in any of the following ways:
a. Press the CHANNEL UP/DOWN buttons to scroll to a high-definition channel.
b. Press the applicable number keys to go to a specific channel number.
c. Browse, using the Interactive Program Guide (IPG).
3 Important Safety Instructions
4 Important Information to Protect Your HDTV Display
Sidebars
When a standard-definition
program is viewed on a
wide-screen HDTV, the HDTV
may center the image on
the screen with black, gray
or white margins (known as
sidebars) on either side in
order to retain the 4:3 aspect
ratio.
Letterboxing
In a similar fashion, when
wide-screen (16:9 aspect
ratio) content is transmitted to
a 4:3 TV screen, the content
provider may add black
margins on the top and bottom
of the screen to ensure that
the entire width of the picture
is visible. This is known as
“letterboxing.”
A
Publication
Persistent viewing of programs
with sidebars or letterboxing over
long periods of time may degrade
the picture quality of your HDTV
by reducing your HDTV’s ability to
display colors evenly across the
screen.
With your TV’s remote, press
the FORMAT (aspect ratio) button
(if available) as needed, stretching
or zooming to adjust the picture
display until any black (or gray/
white) sidebars are eliminated.
(Since letterboxing is done by
the content provider, letterboxed
programs cannot always be
completely zoomed to fill the
screen. (See your TV’s manual for
details.) Pausing DVDs or videos
for extended periods of time can
also cause burn-in. Mediacom will
not be held responsible for any
burn-in on your HDTV set.
The On-Screen Menu
Use the On-Screen Menu* to tailor your HD set top box to the capabilities of your
HDTV. This allows the HD set top box to automatically optimize both standard and
high-definition video, based on your HDTV and personal preferences. To access the
On-Screen Menu, power ON your HDTV and power OFF the HD set top box. Press the
MENU button on either your remote control or the HD set top box front panel to call
up the On-Screen Display.* You may use either the HD set top box front panel or the
remote control to navigate the display.
• The arrow on the left indicates the position of the cursor.
• Press the5and6buttons to select the setting you wish to change.
• Press the4button to select an option for that setting.
• To exit the setting and move to another setting, use the5and6buttons.
• Press the POWER or MENU button to exit the menu and save your settings.
TV TYPE
The first user setting is TV TYPE. Your selection tells the HD set top box what type of
TV you have and how you prefer to watch widescreen programming.Your choices are
16:9, 4:3 Letterbox or 4:3 Pan Scan.
• Choose 16:9 if you have a wide screen HDTV.
• Choose 4:3 Letterbox if you have a standard TV and you prefer to watch
widescreen programming in its original aspect ratio.
• Choose 4:3 Pan Scan if you have a standard screen TV and you prefer that
widescreen programming is cropped to fill your screen. Think of this last choice
as watching a theater-style movie that has been reformatted to fit your standard
screen TV.
Y Pb Pr OUTPUT
Next, use the down arrow to select Y Pb Pr OUTPUT. This setting indicates the
picture resolution you prefer when watching high-definition programming. The
choices, listed in order of highest to lowest picture resolution, are 1080i, 720p, 480p
and 480i. Your selection will depend on which format(s) your HDTV supports. To
maximize your high-definition viewing experience, refer to your television set owner’s
manual and use the4button to choose the setting that indicates the highest picture
resolution that your television will support.
4:3 OVERRIDE
Finally, use the down button arrow to select 4:3 OVERRIDE. By selecting 480i or
480p, you are telling the HD set top box to send standard-definition programming
to your TV in its original broadcast format. Select OFF and the HD set top box will
default to the resolution selected in the Y Pb Pr OUTPUT setting above. To exit and
save changes, press the POWER or MENU button. For more details on configuring
your HD set top box output settings, including setting closed caption preferences, see
the Motorola HD set top box user guide or visit www.motorola.com/broadband.
HDTV
Ventilate
The high-definition set top box has been designed to operate reliably in a well ventilated household environment. Slots and openings in the unit cabinet are provided for
ventilation. These openings should never be blocked by placing the product on a bed,
sofa, rug or similar surface. The unit should be positioned with at least two inches of
space above and on all sides.
Safety Instructions
Step 1: Position the set top box with at least two inches of space above and on all sides.
Step 2: Do not block the slots and openings in the set top box.
Step 3: Do not place anything on top of the set top box.
Step 4: Do not position the set top box in an enclosed space that would restrict air
flow around the unit.
Step 5: Do not position the set top box near any external heat source that could raise
the temperature around the unit.
5 Avoiding Sidebar or Letterbox Damage (Burn-In)
*If the On-Screen Menu does not appear on your HDTV screen, your TV may not support the default, standard-definition
setting (480i). Use the HD set top box front panel LED to view and change your settings.
PAUSE | SPRING/SUMMER 2008
41
Basic Operations, Continued
7 Connecting the HD/DVR Set Top Box to a High-Definition TV
and VCR
HDTV
If you intend to use a standard stereo VCR, use this configuration to watch both HD
and standard-definition video on your HDTV, as well as record and play standarddefinition video via your VCR.
42
WARNING: Do not plug in the set top box power cord to a wall outlet until you
have completed ALL connections between the DCT and other components.
You will need the following connector cables:
• 1 set of two-pronged red & white RCA-type audio cables
• 2 sets of “Y” audio splitter cables
• 2 S-Video cables
– OR –
• 2 sets of single-pronged RCA-type video cables
NOTE: The inputs/outputs on your specific VCR and HDTV determine which video
cables you will need. If your VCR and HDTV accepts S-Video, this should be your first
choice, as it is considered the higher standard-definition video output.
Step 1: Using the coaxial cable from an active wall outlet, connect the cable to the
CABLE IN coaxial input on the set top box.
Step 2: Locate the Y Pb Pr inputs on your HDTV and the Y Pb Pr outputs on the set
top box. (These connectors are color-coded on the set top box as follows: Y =
green; Pb = blue; Pr = red. Colors may vary on your HDTV.)
Step 3: Using a three-jack component video connector, connect the Y output on
the set top box to the Y input on your HDTV. Do the same for the Pb and Pr
connections.
Step 4: Connect the single connector end of a Y audio splitter cable to AUDIO OUT
R (red) on the set top box. Insert the other ends into AUDIO IN R on your VCR and
AUDIO IN R on your HDTV.
Step 5: Use the second splitter cable to connect AUDIO OUT L (pink) on the set top
box to the AUDIO IN L connections on both the VCR and the HDTV.
Step 6: Use the two-pronged RCA cable to connect AUDIO OUT L & R on your VCR to
AUDIO IN L & R on your HDTV.
Step 7a: Using an S-Video cable, connect the S-VIDEO output on the set top box to
the S-VIDEO IN on your VCR. Then use the second S-Video cable to connect the
S-VIDEO output on the VCR to S-VIDEO IN on your HDTV.
– OR –
Step 7b: Using your single-pronged RCA-type video connector cable, connect the VIDEO
OUT (yellow) connector on the set top box to the VIDEO IN connector on your VCR.
Next, use the second single-pronged RCA-type video connector cable to connect
the VIDEO OUT connector on your VCR to the VIDEO IN connector on your HDTV.
NOTE: You will need to purchase all other cables if you chose to use the optional
outputs on the HD set top box such as the HDMI and OPTICAL SPDIF outputs.
PAUSE | SPRING/SUMMER 2008
8 Connecting the HD/DVR Set Top Box to a High-Definition TV
and Home Theater
Using this illustration, you can connect a stereo or home theater receiver to take full
advantage of the set top box’s rich digital audio features. To integrate a VCR or DVD
player with a home theater receiver, consult the equipment manufacturer’s manual
provided with the equipment.
WARNING: Do not plug in the set top box power cord to a wall outlet until you
have completed ALL connections between the DCT and other components.
There are three options to configure your audio connection to include your home
theater. Configure your audio setup to match the audio inputs on your home theater
receiver. Options 1 and 2 are of equal sound quality. Option 3 is of lesser quality.
OPTION 1 – Optical
Step 1: Follow steps 1 through 3 in basic operation 7.
Step 2: Locate the OPTICAL SPDIF output on the set top box and the OPTICAL
SPDIF input on your digital home theater receiver. This input may also be labeled
“Toslink” on your digital home theater receiver.
Step 3: Using an optical audio connector, connect the output on the set top box to the
input on your digital home theater receiver.
OPTION 2 – RCA-Type Digital Audio
Step 1: Follow steps 1 through 3 in basic operation 7.
Step 2: Locate the orange RCA-type SPDIF output on the set top box and the RCAtype SPDIF or digital audio input on your home theater receiver.
Step 3: Using a single-pronged RCA-type audio connector, connect the output on the
set top box to the input on your home theater receiver.
OPTION 3 – Baseband Audio Connector Cables: two-pronged RCA-type audio cable
(red & pink)
Step 1: Follow steps 1 through 3 in basic operation 7.
Step 2: Locate the AUDIO OUT L (pink) and R (red) outputs on the set top box and the
AUDIO IN L & R inputs on your HDTV.
Step 3: Using a two-pronged RCA-type audio connector, connect the L & R outputs
on the set top box to the L & R inputs on your HDTV. Remember L will go to L, and
R will go to R.
NOTE: When using your audio receiver, it is recommended that you mute or turn
down the volume on your TV.
www.mediacomcable.com
9 HD/DVR Set Top Box Back Panel
10 Troubleshooting Tips
The rear panel of the set top box consists of three types of interfaces: audio, video
and data. The following information describes each connection and its use.
1
2
3
4
5 6 7
8
9
General Troubleshooting Tips
• Properly plug your television and HD set top box into an electrical outlet. (If a light
switch controls the outlet, make sure it’s turned on.)
• Make sure all cables are properly connected and connections are finger tight.
• Make sure power indicator light on the set top box is on.
• Make sure TV power is on and the TV is tuned to channel 3 or the correct video input.
• If your setup includes a VCR and/or stereo, make sure they are properly connected
to the set top box.
Blue Screen or Other VCR-Related Problems
• Make sure your VCR is tuned to channel 3 or to the correct video input.
• Press the TV/VCR button on your VCR.
10 11
Key
12
13
14 15 16 17 18
Description
1. Cable In
This connector receives the incoming signal from your cable
service provider.
2. RF Out
RF video output
3. Optical SPDIF The OPTICAL SPDIF connector is an SPDIF optical digital output
connection that carries Dolby Digital 5.1 audio or PCM audio. It
is used to connect the DCT to a stereo tuner or A/V receiver to
provide surround-sound, theater style audio.
L and R (left and right) RCA connectors for loop-through audio
from audio equipment.
5. SPDIF
The orange coaxial SPDIF connector is a digital output connection
that carries Dolby Digital 5.1 audio or PCM audio. It is used to
connect the DCT to a stereo tuner or A/V receiver to provide surround-sound, theater-style audio.
6. Video In*
RCA type video input from a TV, VCR, camcorder, or other device.
7. Video Out
RCA type video output to a VCR or TV.
8. Ethernet*
Ethernet 10/100Base-T port.
9. AC Power
AC power connector:
• The bottom plug is an input for the AC power cord.
• The top plug is a switched power outlet for a device such as
a TV or VCR.
10. IR
This connector enables the DCT to control a VCR while recording
a selected program. Not all electronic program guides support
this feature.
11. S-Video
This connector is used to deliver high-quality, standard-definition
video to external devices that accept S-Video inputs, such as a
high-end VCR or TV.
12. Audio Out
L and R (left and right) RCA type stereo audio output jacks.
13. Y Pb Pr
These connectors are used to deliver component video to an
HD-ready TV or monitor. Though capable of delivering standarddefinition video to your TV or monitor, these cables are necessary
to deliver high-definition video.
14. HDMI
HDMI video output to an HDTV (can connect to a DVI input using
an HDMI-to-DVI converter cable)
Interactive Guide with No Program Listing
• Disconnect the power cord from the electrical outlet and wait at least 10
seconds. Plug the power cord back into the electrical outlet to begin reloading
the interactive guide information. This will take about 30 minutes to complete.
While the guide is reloading information, you will be able to watch TV and change
channels with your remote, but on-screen programming listings will not be
available until the reloading process is complete.
No Sound
• Verify that the mute function has not been activated on your TV and/or HD set top box.
• Make sure the volume is turned up on your TV or home theater system.
• If you are using a stereo receiver or home theater system, verify that the audio
connections are correct.
Blank Screen or Snowy Picture
• If you are using the cable TV/RF input, make sure your TV and/or VCR are tuned
to channel 3.
• If you are using the line/RCA inputs, make sure your TV and/or VCR are tuned
to the correct line input.
HDTV
4. Audio In*
Absence of Graphics, Closed Captions, or Program Guides on the TV Screen
• The HD set top box cannot generate graphics on all video outputs at all times.
• If the HD set top box is set to 1080i, 720p, or 480p output format, graphics are
only available on the high-definition video outputs (DVI and component video).
• If the HD set top box is set to 480i, graphics are available on all video outputs.
• If the HD set top box is connected to a standard-definition TV, verify that the HD
set top box is configured to use the 480i output mode.
More Troubleshooting Help
• If you need additional help, please call Mediacom at 1-888-333-4039.
Mediacom Premium HD Services*
Mediacom HD Pak Services*
15. TV Passcard TV passcard interface.
16. USB*
USB 2.0 connector for devices such as keyboards, joysticks,
scanners, disk storage, PCs, printers, or digital cameras.
17. SATA*
Connector for optional external hard drive.
18. IEEE 1394*
IEEE 1394 connector for connecting to audio and video devices
such as a DTV.
*These connectors are not currently enabled.
A
Publication
Mediacom HD Family Basic*
* Not all channels available in all areas. Channels subject to change. Channels must originate in HD - Format
to be displayed in HD. HD Pak rates is a separate monthly fee and requires a subscription to Family Cable.
Premium services require monthly subscription.
PAUSE | SPRING/SUMMER 2008
43