1
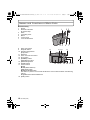
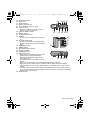
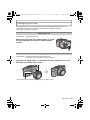
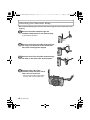
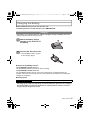
DMC-GX1X&GX1K&GX1EB-VQT3U05_eng.book 1 ページ 2011年10月26日 水曜日 午後5時11分 Basic Operating Instructions Digital Camera/ Lens Kit/Body Model No. DMC-GX1X/DMC-GX1K DMC-GX1 Before use, please read these instructions completely. More detailed instructions on the operation of this camera are contained in “Operating Instructions for advanced features (PDF format)” in the supplied CD-ROM. Install it on your PC to read it. Web Site: http://www.panasonic-europe.com Model number suffix “EB” denotes UK model. VQT3U05 EB until 2011/11/21 DMC-GX1X&GX1K&GX1EB-VQT3U05_eng.book 2 ページ 2011年10月26日 水曜日 午後5時11分 Dear Customer, We would like to take this opportunity to thank you for purchasing this Panasonic Digital Camera. Please read these Operating Instructions carefully and keep them handy for future reference. Please note that the actual controls and components, menu items, etc. of your Digital Camera may look somewhat different from those shown in the illustrations in these Operating Instructions. Carefully observe copyright laws. • Recording of pre-recorded tapes or discs or other published or broadcast material for purposes other than your own private use may infringe copyright laws. Even for the purpose of private use, recording of certain material may be restricted. Information for Your Safety WARNING: TO REDUCE THE RISK OF FIRE, ELECTRIC SHOCK OR PRODUCT DAMAGE, • DO NOT EXPOSE THIS APPARATUS TO RAIN, MOISTURE, DRIPPING OR SPLASHING AND THAT NO OBJECTS FILLED WITH LIQUIDS, SUCH AS VASES, SHALL BE PLACED ON THE APPARATUS. • USE ONLY THE RECOMMENDED ACCESSORIES. • DO NOT REMOVE THE COVER (OR BACK); THERE ARE NO USER SERVICEABLE PARTS INSIDE. REFER SERVICING TO QUALIFIED SERVICE PERSONNEL. THE SOCKET OUTLET SHALL BE INSTALLED NEAR THE EQUIPMENT AND SHALL BE EASILY ACCESSIBLE. ∫ Product identification marking Product Location Digital Camera Bottom Battery charger Bottom ∫ About the battery pack CAUTION Danger of explosion if battery is incorrectly replaced. Replace only with the same or equivalent type recommended by the manufacturer. Dispose of used batteries according to the manufacturer’s instructions. • Do not heat or expose to flame. • Do not leave the battery(ies) in an automobile exposed to direct sunlight for a long period of time with doors and windows closed. Warning Risk of fire, explosion and burns. Do not disassemble, heat above 60 xC or incinerate. 2 VQT3U05 (ENG) DMC-GX1X&GX1K&GX1EB-VQT3U05_eng.book 3 ページ Caution for AC mains lead For your safety, please read the following text carefully. This appliance is supplied with a moulded three pin mains plug for your safety and convenience. A 5-ampere fuse is fitted in this plug. Should the fuse need to be replaced please ensure that the replacement fuse has a rating of 5-ampere and that it is approved by ASTA or BSI to BS1362. Check for the ASTA mark Ï or the BSI mark Ì on the body of the fuse. If the plug contains a removable fuse cover you must ensure that it is refitted when the fuse is replaced. If you lose the fuse cover the plug must not be used until a replacement cover is obtained. A replacement fuse cover can be purchased from your local dealer. CAUTION! IF THE FITTED MOULDED PLUG IS UNSUITABLE FOR THE SOCKET OUTLET IN YOUR HOME THEN THE FUSE SHOULD BE REMOVED AND THE PLUG CUT OFF AND DISPOSED OF SAFELY. THERE IS A DANGER OF SEVERE ELECTRICAL SHOCK IF THE CUT OFF PLUG IS INSERTED INTO ANY 13AMPERE SOCKET. If a new plug is to be fitted please observe the wiring code as stated below. If in any doubt please consult a qualified electrician. 2011年10月26日 水曜日 午後5時11分 ∫ IMPORTANT The wires in this mains lead are coloured in accordance with the following code: Blue: Neutral, Brown: Live. As these colours may not correspond with the coloured markings identifying the terminals in your plug, proceed as follows: The wire which is coloured Blue must be connected to the terminal which is marked with the letter N or coloured Black or Blue. The wire which is coloured Brown must be connected to the terminal which is marked with the letter L or coloured Brown or Red. WARNING: DO NOT CONNECT EITHER WIRE TO THE EARTH TERMINAL WHICH IS MARKED WITH THE LETTER E, BY THE EARTH SYMBOL Ó OR COLOURED GREEN OR GREEN/YELLOW. THIS PLUG IS NOT WATERPROOFKEEP DRY. ∫ Before use Remove the connector cover. ∫ How to replace the fuse The location of the fuse differ according to the type of AC mains plug (figures A and B). Confirm the AC mains plug fitted and follow the instructions below. Illustrations may differ from actual AC mains plug. 1. Open the fuse cover with a screwdriver. Figure A Figure B Fuse cover 2. Replace the fuse and close or attach the fuse cover. Figure A Figure B Fuse (5 ampere) Fuse (5 ampere) (ENG) VQT3U05 3 DMC-GX1X&GX1K&GX1EB-VQT3U05_eng.book 4 ページ 2011年10月26日 水曜日 午後5時11分 ∫ About the battery charger CAUTION! • DO NOT INSTALL OR PLACE THIS UNIT IN A BOOKCASE, BUILT-IN CABINET OR IN ANOTHER CONFINED SPACE. ENSURE THE UNIT IS WELL VENTILATED. TO PREVENT RISK OF ELECTRIC SHOCK OR FIRE HAZARD DUE TO OVERHEATING, ENSURE THAT CURTAINS AND ANY OTHER MATERIALS DO NOT OBSTRUCT THE VENTILATION VENTS. • DO NOT OBSTRUCT THE UNIT’S VENTILATION OPENINGS WITH NEWSPAPERS, TABLECLOTHS, CURTAINS, AND SIMILAR ITEMS. • DO NOT PLACE SOURCES OF NAKED FLAMES, SUCH AS LIGHTED CANDLES, ON THE UNIT. • DISPOSE OF BATTERIES IN AN ENVIRONMENTALLY FRIENDLY MANNER. • The battery charger is in the standby condition when the AC power supply cord is connected. The primary circuit is always “live” as long as the power cord is connected to an electrical outlet. ∫ Cautions for Use • Do not use any other USB connection cables except the supplied one. • Always use a genuine Panasonic HDMI mini cable (RP-CDHM15, RP-CDHM30; optional). Part numbers: RP-CDHM15 (1.5 m) (5 feet), RP-CDHM30 (3.0 m) (10 feet) • Always use a genuine Panasonic AV cable (DMW-AVC1; optional). • Always use a genuine Panasonic remote shutter (DMW-RSL1; optional). Keep this unit as far away as possible from electromagnetic equipment (such as microwave ovens, TVs, video games etc.). • If you use this unit on top of or near a TV, the pictures and/or sound on this unit may be disrupted by electromagnetic wave radiation. • Do not use this unit near cell phones because doing so may result in noise adversely affecting the pictures and/or sound. • Recorded data may be damaged, or pictures may be distorted, by strong magnetic fields created by speakers or large motors. • Electromagnetic wave radiation generated by microprocessors may adversely affect this unit, disturbing the pictures and/or sound. • If this unit is adversely affected by electromagnetic equipment and stops functioning properly, turn this unit off and remove the battery or disconnect AC adaptor (DMW-AC8E; optional). Then reinsert the battery or reconnect AC adaptor and turn this unit on. Do not use this unit near radio transmitters or high-voltage lines. • If you record near radio transmitters or high-voltage lines, the recorded pictures and/or sound may be adversely affected. 4 VQT3U05 (ENG) DMC-GX1X&GX1K&GX1EB-VQT3U05_eng.book 5 ページ 2011年10月26日 水曜日 午後5時11分 Information for Users on Collection and Disposal of Old Equipment and used Batteries These symbols on the products, packaging, and/or accompanying documents mean that used electrical and electronic products and batteries should not be mixed with general household waste. For proper treatment, recovery and recycling of old products and used batteries, please take them to applicable collection points, in accordance with your national legislation and the Directives 2002/96/EC and 2006/ 66/EC. By disposing of these products and batteries correctly, you will help to save valuable resources and prevent any potential negative effects on human health and the environment which could otherwise arise from inappropriate waste handling. For more information about collection and recycling of old products and batteries, please contact your local municipality, your waste disposal service or the point of sale where you purchased the items. Penalties may be applicable for incorrect disposal of this waste, in accordance with national legislation. For business users in the European Union If you wish to discard electrical and electronic equipment, please contact your dealer or supplier for further information. [Information on Disposal in other Countries outside the European Union] These symbols are only valid in the European Union. If you wish to discard these items, please contact your local authorities or dealer and ask for the correct method of disposal. Note for the battery symbol (bottom two symbol examples): This symbol might be used in combination with a chemical symbol. In this case it complies with the requirement set by the Directive for the chemical involved. Cd (ENG) VQT3U05 5 DMC-GX1X&GX1K&GX1EB-VQT3U05_eng.book 6 ページ 2011年10月26日 水曜日 午後5時11分 Contents Information for Your Safety...............................................................................................2 Care of the camera ...........................................................................................................7 Accessories ......................................................................................................................8 Names and Functions of Main Parts...............................................................................12 Changing the Lens..........................................................................................................15 Attaching the Shoulder Strap..........................................................................................16 Charging the Battery.......................................................................................................17 • Charging ...................................................................................................................17 Inserting and Removing the Card (optional)/the Battery.................................................18 About the Card................................................................................................................19 • About cards that can be used with this unit ..............................................................19 Setting Date/Time (Clock Set) ........................................................................................20 Selecting the Recording Mode........................................................................................21 Taking a Still picture .......................................................................................................23 • Taking pictures using the Touch Shutter function ....................................................23 Taking Pictures using the Automatic Function (Intelligent Auto Mode) ..........................24 • Recording using Intelligent Auto Plus Mode .............................................................25 Taking Pictures with Defocus Control Function ..............................................................26 Recording Motion Pictures..............................................................................................27 • Recording still pictures while recording motion pictures ...........................................27 Compensating the Exposure ..........................................................................................28 Easily set a suitable exposure (one push AE) ................................................................29 Using the function button ................................................................................................30 Playing Back Pictures/Motion Pictures ...........................................................................31 • Playing Back Pictures ...............................................................................................31 • Playing Back Motion Pictures ...................................................................................32 Deleting Pictures.............................................................................................................33 Switching the display of the LCD Monitor .......................................................................34 Setting the Menu.............................................................................................................35 Setting the Quick Menu ..................................................................................................36 Types of menus ..............................................................................................................37 About the supplied software ...........................................................................................43 • Installing supplied software ......................................................................................44 Reading the Operating Instructions (PDF format) ..........................................................45 Specifications..................................................................................................................46 6 VQT3U05 (ENG) DMC-GX1X&GX1K&GX1EB-VQT3U05_eng.book 7 ページ 2011年10月26日 水曜日 午後5時11分 Care of the camera Do not subject to strong vibration, shock, or pressure. • The lens, LCD monitor, or external case may be damaged if used in below conditions. It may also malfunction or image may not be recorded. – If you drop or hit the camera. – If you press hard on the lens or the LCD monitor. This camera is not dust/splash/water proof. Avoid using the camera in a location with a lot of dust, water, sand, etc. • Liquid, sand and other foreign material may get into the space around the lens, buttons, etc. Be particularly careful since it may not just cause malfunctions, but it may become unrepairable. – Do not use in places with a lot of sand or dust. – Do not use in places where water can come into contact with this unit such as when using it on a rainy day or on the beach. Do not place your hands inside the mount of the digital camera body. Since the sensor unit is a precision apparatus, it may cause a malfunction or damage. ∫ About Condensation (When the lens or the LCD monitor is fogged up) • Condensation occurs when the ambient temperature or humidity changes. Be careful of condensation since it causes lens and LCD monitor stains, fungus and camera malfunction. • If condensation occurs, turn the camera off and leave it for about 2 hours. The fog will disappear naturally when the temperature of the camera becomes close to the ambient temperature. (ENG) VQT3U05 7 DMC-GX1X&GX1K&GX1EB-VQT3U05_eng.book 8 ページ 2011年10月26日 水曜日 午後5時11分 Accessories Check that all the accessories are supplied before using the camera. Product numbers correct as of October 2011. These may be subject to change. 1 Digital Camera Body (This is referred to as camera body in these operating instructions.) 2 Interchangeable Lens “LUMIX G X VARIO PZ 14–42 mm/F3.5–5.6 ASPH./POWER O.I.S.” (This is referred to as lens in these operating instructions. This is attached to the camera body at the time of purchase.) 3 Lens Cap (This is attached to the interchangeable lens at the time of purchase.) 4 Lens Rear Cap¢1 5 Body Cap¢1 6 Interchangeable Lens “LUMIX G VARIO 14– 42 mm/F3.5 –5.6 ASPH./MEGA O.I.S.” (This is referred to as lens in these operating instructions.) 7 Lens Hood 8 Lens Cap (This is attached to the interchangeable lens at the time of purchase.) 9 Lens Rear Cap (This is attached to the interchangeable lens at the time of purchase.) 10 Body Cap (This is attached to the camera body at the time of purchase.) 11 Body Cap (This is attached to the camera body at the time of purchase.) 12 Battery Pack (Indicated as battery pack or battery in the text) Charge the battery before use. 13 Battery Charger (Indicated as battery charger or charger in the text) 14 AC Mains Lead 15 USB Connection Cable 16 CD-ROM • Software: Use it to install the software to your PC. 17 CD-ROM • Operating Instructions 18 Hot shoe cover (This is attached to the camera body at the time of purchase.) 19 Shoulder Strap ¢1 At purchase, these parts are supplied fitted together. • SD Memory Card, SDHC Memory Card and SDXC Memory Card are indicated as card in the text. • The card is optional. • Description in these operating instructions is based on the interchangeable lens (H-PS14042). • Consult the dealer or your nearest Service Centre if you lose the supplied accessories. (You can purchase the accessories separately.) 8 VQT3U05 (ENG) DMC-GX1X&GX1K&GX1EB-VQT3U05_eng.book 9 ページ 2011年10月26日 水曜日 午後5時11分 1 2 DMC-GX1X 2 H-PS14042 VYF3443 DMC-GX1K 6 H-FS014042 DMC-GX1 11 5 4 3 VKF4385 VFC4605 3 7 8 VYC1009 10 9 VYF3201 VFC4315 VKF4385 4 12 13 14 VKF4385 DMW-BLD10E 15 16 K1HY08YY0017 17 DE-A94A 18 VFF0867 VKF4970 K2CT39A00002 19 VFC4765 ¢2 Supplied in DMC-GX1X only ¢3 Supplied in DMC-GX1K only ¢4 Supplied in DMC-GX1 only (ENG) VQT3U05 9 DMC-GX1X&GX1K&GX1EB-VQT3U05_eng.book 10 ページ 2011年10月26日 水曜日 午後5時11分 Sales and Support Information Customer Communications Centre • For customers within the UK: 0844 844 3899 • For customers within Ireland: 01 289 8333 • For further support on your product, please visit our website: www.panasonic.co.uk Direct Sales at Panasonic UK • Order accessory and consumable items for your product with ease and confidence by phoning our Customer Communications Centre Monday–Thursday 9:00 a.m.–5:30 p.m., Friday 9:30 a.m.–5:30 p.m. (Excluding public holidays) • Or go on line through our Internet Accessory ordering application at www.pas-europe.com. • Most major credit and debit cards accepted. • All enquiries transactions and distribution facilities are provided directly by Panasonic UK. • It couldn’t be simpler! • Also available through our Internet is direct shopping for a wide range of finished products. Take a browse on our website for further details. 10 VQT3U05 (ENG) DMC-GX1X&GX1K&GX1EB-VQT3U05_eng.book 11 ページ 2011年10月26日 水曜日 午後5時11分 ∫ Optional Accessories Lithum Ion Battery DMW-BLD10 AC Adaptor¢1 DMW-AC8 DC Coupler¢1 DMW-DCC9 Live Viewfinder DMW-LVF2 Flash DMW-FL220, DMW-FL360, DMW-FL500 Remote Shutter DMW-RSL1 Zoom Lever DMW-ZL1¢2 MC Protector DMW-LMCH37¢3, DMW-LMC52¢4 ND Filter DMW-LND37 ¢3, DMW-LND52¢4 PL Filter (Circular Type) DMW-LPL37¢3, DMW-LPL52¢4 Lens Cap DMW-LFC37¢3, DMW-LFC52¢4 Lens Rear Cap DMW-LRC1 Body Cap DMW-BDC1 Tripod Adaptor¢5 DMW-TA1 AV Cable DMW-AVC1 HDMI mini Cable RP-CDHM15, RP-CDHM30 Interchangeable Lens H-PS45175, H-PS14042, H-VS014140, H-FS100300, H-FS045200, H-FS014042, H-FS014045, H-F007014, H-F008, H-ES045, H-X025, H-H020, H-H014 The 3D Interchangeable Lens H-FT012 Mount Adaptor DMW-MA1, DMW-MA2M, DMW-MA3R Class 10 64 GB SDXC Memory Card Class 10 32 GB SDHC Memory Card Class 10 16 GB SDHC Memory Card Class 10 8 GB SDHC Memory Card Class 10 4 GB SDHC Memory Card Class 6 32 GB SDHC Memory Card Class 6 16 GB SDHC Memory Card Class 6 8 GB SDHC Memory Card Class 6 4 GB SDHC Memory Card Class 4 16 GB SDHC Memory Card Class 4 8 GB SDHC Memory Card Class 4 4 GB SDHC Memory Card Class 4 2 GB SD Memory Card RP-SDU64GE1K RP-SDA32GE1K/RP-SDU32GE1K RP-SDA16GE1K/RP-SDU16GE1K RP-SDA08GE1K/RP-SDU08GE1K RP-SDU04GE1K RP-SDQ32GE1K RP-SDQ16GE1K RP-SDQ08GE1K RP-SDQ04GE1K RP-SDN16GE1A RP-SDN08GE1A RP-SDN04GE1A RP-SDN02GE1A • This unit is compatible with UHS-I standard SDHC/SDXC memory cards. Some optional accessories may not be available in some countries. ¢1 The AC Adaptor (optional) can only be used with the designated Panasonic DC Coupler (optional). The AC adaptor (optional) cannot be used by itself. Do not attempt to use AC adaptor in other devices. ¢2 The interchangeble lens (H-PS14042) is not used. ¢3 When the interchangeble lens (H-PS14042) is used ¢4 When the interchangeble lens (H-FS014042) is used ¢5 Use if the attached lens is in contact with the tripod pedestal. (ENG) VQT3U05 11 DMC-GX1X&GX1K&GX1EB-VQT3U05_eng.book 12 ページ 2011年10月26日 水曜日 午後5時11分 Names and Functions of Main Parts ∫ Camera body 1 Sensor 2 Self-timer indicator/ AF Assist Lamp 3 Flash 4 Lens fitting mark 5 Mount 6 Lens lock pin 7 Lens release button 1 4 5 2 3 6 7 8 Flash open button 8 9 10 11 9 Playback button 10 [AF/AE LOCK] button/ [Fn2] button 11 Rear dial 12 Touch screen/LCD monitor 13 [Fn1] button 14 [Q.MENU] button/ Delete/Return button 15 [MENU/SET] button 16 [AF/MF] button 12 13 14 15 16 17 18 17 Cursor buttons 3/ISO 1/WB (White Balance) 2/AF Mode button 4/[DRIVE MODE] button This button in picture record mode will allow the user to select between the following options. Single/Burst/Auto bracket/Self-timer 18 [DISP.] button 12 VQT3U05 (ENG) VQT3U05~Body1_eng.fm 13 ページ 2011年10月28日 金曜日 午後4時17分 19 20 21 22 23 24 Stereo microphone Mode dial Shutter button Motion picture button Focus distance reference mark Hot shoe cover • Keep the Hot Shoe Cover out of reach of 25 26 27 28 Camera ON/OFF switch Status indicator Intelligent Auto button Speaker • Do not cover the speaker with your fingers, 19 children to prevent swallowing. 23 29 Shoulder strap eyelet • Be sure to attach the shoulder strap when using the camera to ensure that you will not drop it. [REMOTE] socket [HDMI] socket [AV OUT/DIGITAL] socket Tripod receptacle Card/Battery door DC coupler cover • When using an AC adaptor, ensure that the • • • • 24 25 26 27 29 etc. 30 31 32 33 34 35 20 21 22 28 30 31 32 Panasonic DC coupler (DMW-DCC9; optional) and AC adaptor (DMW-AC8E; 33 34 35 36 optional) are used. Do not attempt to use AC adaptor in other devices. Always use a genuine Panasonic AC adaptor (DMW-AC8E; optional). When using an AC adaptor, use the AC Mains Lead supplied with the AC adaptor. It is recommended to use a fully charged battery or AC adaptor when recording motion pictures. If while recording motion pictures using the AC adaptor and the power supply is cut off due to a power outage or if the AC adaptor is disconnected etc., the motion picture being recorded will not be recorded. 36 Release lever (ENG) VQT3U05 13 DMC-GX1X&GX1K&GX1EB-VQT3U05_eng.book 14 ページ 2011年10月26日 水曜日 午後5時11分 ∫ Lens H-PS14042 (LUMIX G X VARIO PZ 14–42 mm/ F3.5–5.6 ASPH./POWER O.I.S.) 37 38 39 37 38 39 40 41 42 43 44 45 14 Lens surface Zoom lever Focus lever Contact point Lens fitting mark Tele Focus ring Wide Zoom ring VQT3U05 (ENG) 40 41 H-FS014042 (LUMIX G VARIO 14 – 42 mm/F3.5 –5.6 ASPH./MEGA O.I.S.) 42 37 43 44 45 40 41 DMC-GX1X&GX1K&GX1EB-VQT3U05_eng.book 15 ページ 2011年10月26日 水曜日 午後5時11分 Changing the Lens By changing the lens, you will increase your picture taking-options and further your enjoyment of the camera. Change the lens using the following procedure. • Check that the camera is turned off. Detaching the lens Preparations: Attach the lens cap. While pressing on the lens release button B, rotate the lens toward the arrow until it stops and then remove. Attaching the lens Preparations: Remove the lens rear cap from the lens. • If the body cap is fitted to the camera, remove it. Align the lens fitting marks A (red marks) and then rotate the lens in the direction of the arrow until it clicks. • Do not press the lens release button B when you attach a lens. (ENG) VQT3U05 15 DMC-GX1X&GX1K&GX1EB-VQT3U05_eng.book 16 ページ 2011年10月26日 水曜日 午後5時11分 Attaching the Shoulder Strap • We recommend attaching the shoulder strap when using the camera to prevent it from dropping. Pass the shoulder strap through the shoulder strap eyelet on the camera body. A: Shoulder strap eyelet Pass the end of the shoulder strap through the ring in the direction of the arrow and then pass it through the stopper. Pass the end of the shoulder strap through the hole on the other side of the stopper. Pull the other side of the shoulder strap and then check that it will not come out. • Perform steps 1 to 4 and then attach the other side of the shoulder strap. 16 VQT3U05 (ENG) DMC-GX1X&GX1K&GX1EB-VQT3U05_eng.book 17 ページ 2011年10月26日 水曜日 午後5時11分 Charging the Battery ∫ About batteries that you can use with this unit The battery that can be used with this unit is DMW-BLD10E. Charging • The battery is not charged when the camera is shipped. Charge the battery before use. • Charge the battery with the charger indoors. Attach the battery paying attention to the direction of the battery. Connect the AC mains lead. • The [CHARGE] indicator A lights up and charging begins. ∫ About the [CHARGE] indicator The [CHARGE] indicator turns on: The [CHARGE] indicator is turned on during charging. The [CHARGE] indicator turns off: The [CHARGE] indicator will turn off once the charging has completed without any problem. (Disconnect the charger from the electrical socket and detach the battery after charging is completed.) ∫ Charging time Charging time Approx. 120 min • The indicated charging time is for when the battery has been discharged completely. The charging time may vary depending on how the battery has been used. The charging time for the battery in hot/cold environments or a battery that has not been used for a long time may be longer than normal. (ENG) VQT3U05 17 DMC-GX1X&GX1K&GX1EB-VQT3U05_eng.book 18 ページ 2011年10月26日 水曜日 午後5時11分 Inserting and Removing the Card (optional)/ the Battery • Check that this unit is turned off. • We recommend using a Panasonic card. Slide the release lever in the direction of the arrow and open the card/ battery door. • Always use genuine Panasonic batteries (DMW-BLD10E). • If you use other batteries, we cannot guarantee the quality of this product. Battery: Being careful about the battery orientation, insert all the way until you hear a locking sound and then check that it is locked by lever A. Pull the lever A in the direction of the arrow to remove the battery. Card: Push it securely all the way until you hear a “click” while being careful about the direction in which you insert it. To remove the card, push the card until it clicks, then pull the card out upright. B: Do not touch the connection terminals of the card. 1:Close the card/battery door. 2:Slide the release lever in the direction of the arrow. 18 VQT3U05 (ENG) DMC-GX1X&GX1K&GX1EB-VQT3U05_eng.book 19 ページ 2011年10月26日 水曜日 午後5時11分 About the Card About cards that can be used with this unit The following cards which conform to the SD video standard can be used with this unit. (These cards are indicated as card in the text.) Remarks SD Memory Card (8 MB to 2 GB) • Use a card with SD Speed Class¢ with “Class 4” or higher when recording motion pictures. • SDHC Memory Card can be used with SDHC Memory Card or SDXC Memory Card compatible equipment. SDHC Memory Card (4 GB to 32 GB) SDXC Memory Card (48 GB, 64 GB) • SDXC Memory Card can only be used with SDXC Memory Card compatible equipment. • Check that the PC and other equipment are compatible when using the SDXC Memory Cards. http://panasonic.net/avc/sdcard/information/SDXC.html • This unit is compatible with UHS-I standard SDHC/SDXC memory cards. • Only the cards with capacity listed left can be used. ¢ SD Speed Class is the speed standard regarding continuous writing. Check via the label on the card, etc. e.g.: Note • Keep the Memory Card out of reach of children to prevent swallowing. (ENG) VQT3U05 19 DMC-GX1X&GX1K&GX1EB-VQT3U05_eng.book 20 ページ 2011年10月26日 水曜日 午後5時11分 Setting Date/Time (Clock Set) The clock can be setup with the following procedure at the time of purchase. Change the clock setting in [CLOCK SET] of the [SETUP] menu. For details, read the PDF. • The clock is not set when the camera is shipped. Turn the camera on. • The status indicator 1 lights when you turn this unit on. ON OFF Touch [CLOCK SET]. Touch the items you wish to set (Year/Month/ Day/Hours/Minutes), and set using [3]/[4]. • You can continue to switch the settings by continuously touching [3]/[4]. • Touch [RETURN] to cancel the date and time settings without setting a date and time. To set the display order and the time display format. • Touch [STYLE] to display the settings screen for setting display order/time display format. Touch [SET] to set. Touch [SET] in the confirmation screen. 20 VQT3U05 (ENG) DMC-GX1X&GX1K&GX1EB-VQT3U05_eng.book 21 ページ 2011年10月26日 水曜日 午後5時11分 Selecting the Recording Mode ∫ To select a Recording Mode with the mode dial Select the mode by rotating the mode dial. • Rotate the mode dial slowly to select the desired mode A. ∫ To select Intelligent Auto Mode Press [¦]. • [¦] button will light up when it is switched to Intelligent Auto Mode. • The Recording Mode selected by the mode dial is disabled while the [¦] button is lit. Intelligent Auto Mode The subjects are recorded using settings automatically selected by the camera. Programme AE Mode The subjects are recorded using your own settings. Aperture-Priority AE Mode The shutter speed is automatically determined by the aperture value you set. Shutter-Priority AE Mode The aperture value is automatically determined by the shutter speed you set. Manual Exposure Mode The exposure is adjusted by the aperture value and the shutter speed which are manually adjusted. Custom Mode Use this mode to take pictures with previously registered settings. Scene Mode This allows you to take pictures that match the scene being recorded. Creative Control Mode Record while checking the image effect. (ENG) VQT3U05 21 VQT3U05~Body1_eng.fm 22 ページ 2011年10月28日 金曜日 午後4時18分 ∫ Scene Mode [PORTRAIT] This mode allows you to improve the appearance of the persons concerned and make their skin tones look healthier. [SOFT SKIN] This mode enables the texture of their skin to appear even softer than with [PORTRAIT]. (It is effective when taking pictures of people from the chest up.) [SCENERY] For recording broad vistas. [ARCHITECTURE] For recording buildings in sharp focus. [SPORTS] For recording scenes including quickly moving objects with suitable settings. [PERIPHERAL DEFOCUS] For recording with the subject emphasised against a defocused background. [FLOWER] Flowers outdoors are recorded with natural colours in macro settings. [FOOD] For recording food in natural colours. [OBJECTS] For recording jewellery and other small objects with clarity and brightness, and crisp colours. [NIGHT PORTRAIT] For clearly recording both a human subject and a night view in the background. [NIGHT SCENERY] This allows you to take vivid pictures of the nightscape. [ILLUMINATIONS] Illuminations are photographed beautifully. [BABY1] For recording with settings optimised for the recording of babies and pets. In addition, for setting birthdays and names and having these appear when you play back the recording. [BABY2] [PET] [PARTY] For recording with more natural colours when recording inside. [SUNSET] This allows you to take vivid pictures of the red colour of the sun. ∫ Creative Control Mode [EXPRESSIVE] This is a pop art style image effect that emphasises the colour. [RETRO] This is a soft image effect that gives the appearance of a tarnished photograph. [HIGH KEY] This effect brightens the image as a whole and creates a soft and light ambience. [LOW KEY] This effect creates a dark and peaceful atmosphere in the image as a whole, making bright areas stand out. [SEPIA] A sepia colour image effect. [HIGH DYNAMIC] From dark areas to light areas, this effect creates a well-balanced light across the entire image. [TOY EFFECT] This effect produces vignetting, making it look like the image was taken with a toy camera. [MINIATURE EFFECT] This is an imaging effect which defocuses the surroundings to make it look like a diorama. 22 VQT3U05 (ENG) DMC-GX1X&GX1K&GX1EB-VQT3U05_eng.book 23 ページ 2011年10月26日 水曜日 午後5時11分 Applicable modes: Taking a Still picture Selecting the Recording Mode. Press the shutter button halfway to focus. A Aperture value B Shutter speed • Aperture value and shutter speed are displayed. (It will flash in red if the correct exposure is not achieved, except when set to flash.) • When the image is correctly focused, the picture will be taken, since the [FOCUS PRIORITY] is set initially to [ON]. AB Press the shutter button fully (push it in further), and take the picture. Taking pictures using the Touch Shutter function Just by touching the subject to focus, it will focus on the subject and take the picture automatically. 1 Touch [ 2 Touch [ × ]. • Icon will change to [ ]. ], and taking a picture with the Touch Shutter function becomes possible. 3 Touch the subject you wish to focus on, and then take a picture. • AF area with same function as [Ø] in AF mode is displayed at the position you touch, and picture is taken when it is focused when the AF mode is set to [š], [ ], [ 4 Touch [ ], or [Ø]. ] to cancel the Touch Shutter function. (ENG) VQT3U05 23 DMC-GX1X&GX1K&GX1EB-VQT3U05_eng.book 24 ページ 2011年10月26日 水曜日 午後5時11分 Taking Pictures using the Automatic Function (Intelligent Auto Mode) In this mode, the camera makes the optimal settings for the subject and scene, so we recommend it when you wish to leave the settings to the camera and record without thinking about them. Press [¦]. • [¦] button will light up when it is switched to Intelligent Auto Mode. [¦] button is turned off during recording to prevent the light reflecting on glass or similar, but this is not a malfunction. • [¦] button is turned off when it is pressed again, and it will be set to the [REC] Modes selected by the mode dial. • Defocus control can be set by touching [ ] on the recording screen and then touching [ × ]. • When the subject is touched, AF Tracking function works. ∫ Scene Detection When the camera identifies the optimum scene, the icon of the scene concerned is displayed in blue for 2 seconds, after which its colour changes to the usual red. 24 VQT3U05 (ENG) DMC-GX1X&GX1K&GX1EB-VQT3U05_eng.book 25 ページ 2011年10月26日 水曜日 午後5時11分 Recording using Intelligent Auto Plus Mode The brightness and colour optimally set by the camera can be easily matched to your preferences. This mode is useful for those who would like the settings made by the camera to match their preferences but do not like dealing with detailed settings. Press [MENU/SET] when in Intelligent Auto Mode. Press 3/4/2/1 to select the Intelligent Auto Mode Menu [¦] and then press 1. Press 1 to select [ [MENU/SET]. ] and then press Setting brightness 1 Press the rear dial to display the setting screen. • Each press of the rear dial switches among brightness 2 Touch the slide bar to set. • Setting can also be performed by rotating the rear dial. setting, Defocus Control and end operation. Setting colour 1 Press 1 ( 2 Touch the slide bar to set. • This will adjust the colour of the image from a reddish ) to display the setting screen. colour to a bluish colour. • Setting can also be performed by rotating the rear dial. • Pressing the 1 cursor button again returns to the recording screen. (ENG) VQT3U05 25 VQT3U05~Body1_eng.fm 26 ページ 2011年10月27日 木曜日 午後4時12分 Applicable modes: Taking Pictures with Defocus Control Function You can easily set the blurriness of the background while checking the screen. Touch [ ]. Touch [ × ] to display the setting screen. Touch the slide bar to set. • Setting can also be performed by rotating the rear dial. Recording of pictures or motion pictures. • It is also possible to record a picture by touching [ ]. • Defocus Control operation can be ended by touching [ 26 VQT3U05 (ENG) ]. DMC-GX1X&GX1K&GX1EB-VQT3U05_eng.book 27 ページ 2011年10月26日 水曜日 午後5時11分 Applicable modes: Recording Motion Pictures • Screen here is an example of when the Recording Mode is set to [ ] (Programme AE Mode). Start recording by pressing the motion picture button. A C A Elapsed recording time B Available recording time • Recording of motion picture appropriate for each mode is possible. • The recording state indicator (red) C will flash while recording B motion pictures. Stop the recording by pressing the motion picture button again. Recording still pictures while recording motion pictures Still pictures can be recorded even while recording a motion picture. (simultaneous recording) During motion picture recording, press the shutter button fully to record a still picture. • Simultaneous recording indicator A is displayed while recording still pictures. • You can also take pictures using the Touch Shutter function. A (ENG) VQT3U05 27 DMC-GX1X&GX1K&GX1EB-VQT3U05_eng.book 28 ページ 2011年10月26日 水曜日 午後5時11分 Applicable modes: Compensating the Exposure Use this function when you cannot achieve appropriate exposure due to the difference in brightness between the subject and the background. Look at the following examples. Underexposed Properly exposed Compensate the exposure towards positive. Overexposed Compensate the exposure towards negative. Press the rear dial to switch to Exposure Compensation operation. Rotate the rear dial to compensate the exposure. A Exposure Compensation value B [EXPO.METER] • Select [0] to return to the original exposure. • Rotate the rear dial to display the [EXPO.METER]. 28 VQT3U05 (ENG) A B DMC-GX1X&GX1K&GX1EB-VQT3U05_eng.book 29 ページ 2011年10月26日 水曜日 午後5時11分 Easily set a suitable exposure (one push AE) With one push AE, you can easily achieve a suitable exposure setting when the exposure setting is too bright or too dark. ( , , modes only) At purchase, one push AE is assigned to the [Fn1] button. How to tell if the exposure is not adequate • If the aperture values and shutter speed blink red A when the shutter button is pressed halfway. • If the Manual Exposure Assistance is anything other than when in mode. A 1 2 Set the [Fn BUTTON SET] of the [CUSTOM] menu to [ONE PUSH AE]. • The initial setting for [Fn1] is [ONE PUSH AE]. (When exposure is not adequate) Press [Fn1]. ョㄏヒ • The exposure meter is displayed, and the aperture and shutter speed are changed to give a suitable exposure. Which items of the settings change will depend on the Recording Mode. (ENG) VQT3U05 29 DMC-GX1X&GX1K&GX1EB-VQT3U05_eng.book 30 ページ 2011年10月26日 水曜日 午後5時11分 Using the function button The recording functions etc. registered in the [Fn BUTTON SET] of the [CUSTOM] menu can be assigned to the [Fn1], [Fn2] (function) buttons, [Fn3] and [Fn4] icon. You can use the assigned functions by pressing the buttons for [Fn1] and [Fn2] and by touching the icons for [Fn3] and [Fn4]. • To use [Fn2], set the [AF/AE LOCK /Fn2] of the [CUSTOM] menu モョバモユチロヰヤレ ョㄏビ ョㄏヒ to [Fn2]. Select [Fn1], [Fn2], [Fn3] or [Fn4] from the [Fn BUTTON SET] in the [CUSTOM] menu and press [MENU/SET]. Select the function you want to assign and press [MENU/SET]. • Assign your favourite function to [Fn1], [Fn2], [Fn3] and [Fn4]. • Exit the menu after it is set. 30 VQT3U05 (ENG) DMC-GX1X&GX1K&GX1EB-VQT3U05_eng.book 31 ページ 2011年10月26日 水曜日 午後5時11分 Playing Back Pictures/Motion Pictures Playing Back Pictures Press [(]. Forward or rewind the image by dragging the screen horizontally. Forward: drag from right to left Rewind: drag from left to right Using the Playback Zoom Touch the part to enlarge firmly. A 1k>2k>4k>8k>16k A The zoom position indication • You can also enlarge/reduce the picture by rotating the rear dial. • The more a picture is enlarged, the more its quality deteriorates. • You can move the enlarged part by dragging the image. • Picture will return to the original size (1k) by touching [ ]. • When you touch [ ], the magnification becomes lower. (ENG) VQT3U05 31 DMC-GX1X&GX1K&GX1EB-VQT3U05_eng.book 32 ページ 2011年10月26日 水曜日 午後5時11分 Playing Back Motion Pictures The motion picture file formats that can be played back on this unit are AVCHD recorded on a Panasonic Digital Camera (LUMIX) (excluding AVCHD Progressive), MP4, and QuickTime Motion JPEG. Press [(]. Select a picture with a Motion Picture icon ([ and then touch [ ] to play back. ]) A A Motion picture icon B The motion picture recording time • After playback starts, the elapsed playback time is displayed on the screen. For example, 8 minutes and 30 seconds is displayed as [8m30s]. ∫ Operations performed during Motion Picture Playback 32 Play/Pause Stop Fast rewind Fast forward Frame-by-frame rewind (while pausing) Frame-by-frame forward (while pausing) Reduce volume level Increase volume level VQT3U05 (ENG) B DMC-GX1X&GX1K&GX1EB-VQT3U05_eng.book 33 ページ 2011年10月26日 水曜日 午後5時11分 Deleting Pictures Once deleted, pictures cannot be recovered. To delete a single picture Select the picture to be deleted, and then touch [ ]. Touch [DELETE SINGLE]. • Confirmation screen is displayed. Picture is deleted by selecting [YES]. To delete multiple pictures (up to 100¢) or all the pictures ¢ Burst group will be treated as a single picture. (All the pictures in the selected burst group will be deleted.) Touch [ ]. Touch [DELETE MULTI] or [DELETE ALL]. • [DELETE ALL] > Confirmation screen is displayed. Picture is deleted by selecting [YES]. • It is possible to delete all pictures except the ones set as favourite when [ALL DELETE EXCEPTÜ] is selected with the [DELETE ALL] set. (When [DELETE MULTI] is selected) Touch the picture to be deleted. (repeat this step) • [‚] appears on the selected pictures. Touching again cancels the setting. (When [DELETE MULTI] is selected) Touch [OK]. • Confirmation screen is displayed. Picture is deleted by selecting [YES]. (ENG) VQT3U05 33 DMC-GX1X&GX1K&GX1EB-VQT3U05_eng.book 34 ページ 2011年10月26日 水曜日 午後5時11分 Switching the display of the LCD Monitor Press [DISP.] to change. DISP. (In Recording Mode) • Screen will switch as follows: (Example of LCD monitor display) L AFS A B C D L 0 AFS 98 0 98 With information Without information With information (tilt sensor display) Without information (tilt sensor display) (In Playback Mode) • Screen will switch as follows: (Example of LCD monitor display) L 1/98 A B C D 34 0 16 0 AWB AFS P STD. 10:00 1.DEC.2011 s 100-0001 RGB With information Detailed information display Histogram display Without information VQT3U05 (ENG) 0 WB AWB ISO 160 F3.5 60 60 F3.5 F3.5 60 0 ISO160 1/98 100-0001 DMC-GX1X&GX1K&GX1EB-VQT3U05_eng.book 35 ページ 2011年10月26日 水曜日 午後5時11分 Setting the Menu Press [MENU/SET]. Select the menu item by pressing 3/4 or by rotating the rear dial. • Select the item at the very bottom, and press 4 or or rotate the rear dial right to move to the next screen. Press [MENU/SET] or the rear dial. • Depending on the menu item, its setting may not appear or it may be displayed in a different way. Select the settings by pressing 3/4 or by rotating the rear dial. • The figure on the right is an example of setting or [I.DYNAMIC] from [OFF] to [HIGH]. Press [MENU/SET] or the rear dial to set. ∫ Close the menu Press [ ] several times or press the shutter button halfway. ∫ Switching to other menus e.g.: Switching to the [SETUP] menu from [REC] Mode menu 1 Press 2. A Menu toggle icon 2 3 Press 4 or rotate the rear dial to select the [SETUP] menu icon [ ]. Press 1 or the rear dial. • Select a menu item next and set it. A or (ENG) VQT3U05 35 DMC-GX1X&GX1K&GX1EB-VQT3U05_eng.book 36 ページ 2011年10月26日 水曜日 午後5時11分 Setting the Quick Menu By using the Quick Menu, some of the menu settings can be easily found. Press [Q.MENU] to display the Quick Menu. ヲハヮユワヶ Touch the menu item. • Menu item can be switched by touching [ ]/[ ]. Select and touch the setting. Touch [EXIT] to exit menu once the setting is completed. ∫ Change the Quick Menu to your preferred item 1 Touch [ 2 Select the menu in the top row and drag it to the bottom row. 3 36 ]. A Items that can be setup as Quick Menus. B Items that can be displayed in the Quick Menu screen. • If there is no empty space in the bottom row, drag it into the menu item to be replaced. New item can be set replacing the old item. • When the item is dragged from the bottom row to the top row, the setting will be cancelled and that space will become empty. A B Touch [EXIT]. • It will return to screen of above step 1. Touch [EXIT] to switch to the recording screen. VQT3U05 (ENG) DMC-GX1X&GX1K&GX1EB-VQT3U05_eng.book 37 ページ 2011年10月26日 水曜日 午後5時11分 Types of menus ∫ [REC] Mode Menu This menu lets you set the aspect ratio, number of pixels and other aspects of the pictures you are recording. • [PHOTO STYLE], [METERING MODE], [I.RESOLUTION], [I.DYNAMIC] and [DIGITAL ZOOM] are common to both the [REC] Mode menu and [MOTION PICTURE] Mode menu. Changing these settings in one of these menus is reflected in other menu. [PHOTO STYLE] You can select effects to match the type of image you wish to record. You can adjust the colour and image quality of the effects. [ASPECT RATIO] Sets the aspect ratio of the image. [PICTURE SIZE] Set the number of pixels. [QUALITY] Set the compression rate at which the pictures are to be stored. [FACE RECOG.] Sets the focus and exposure automatically prioritising registered faces. [QUICK AF] Speeds up the focusing that takes place when you press the shutter button. [METERING MODE] Sets the light metering method for measuring brightness. [FLASH] Sets the manner in which the flash works. [RED-EYE REMOVAL] Automatically detects red-eye caused by the flash and corrects the image data accordingly. [FLASH SYNCHRO] Sets the flash synchronisation method. [FLASH ADJUST.] Adjusts the amount of light released by the flash. [I.RESOLUTION] Records pictures with more defined outlines and sense of clarity. [I.DYNAMIC] (Intelligent Automatically corrects contrast and exposure. dynamic range control) [ISO LIMIT SET] When the ISO sensitivity is set to [AUTO] or [ ], an optimal ISO sensitivity is set with the selected value as an upper limit. [ISO INCREMENTS] The ISO sensitivity settings values changes in steps of 1/3 EV or 1 EV. [LONG SHTR NR] You can eliminate the generated noise by recording with a slower shutter speed. [SHADING COMP.] If the screen periphery darkens as a result of lens characteristics, the brightness in this region will be corrected. (ENG) VQT3U05 37 DMC-GX1X&GX1K&GX1EB-VQT3U05_eng.book 38 ページ 2011年10月26日 水曜日 午後5時11分 [EX. TELE CONV.] When the number of pixels is set to anything other than [L], the Tele effect is increased without degradation in image quality. [DIGITAL ZOOM] Increases the Tele effect. The higher the level of magnification, the greater the degradation in image quality. [BURST RATE] Sets the burst speed for burst recording. [AUTO BRACKET] Sets single/burst recording, correction width and recording sequence for Auto Bracket recording. [SELF-TIMER] Sets the time until recording for self-timer recording. [COLOR SPACE] Set this when you want to correct the colour reproduction of the recorded pictures on a PC, printer etc. [STABILIZER] When camera shake is sensed during recording, the camera corrects it automatically. ∫ [MOTION PICTURE] Mode Menu This menu lets you set the [REC MODE], [REC QUALITY], and other aspects for motion picture recording. • [PHOTO STYLE], [METERING MODE], [I.RESOLUTION], [I.DYNAMIC] and [DIGITAL ZOOM] are common to both the [REC] Mode menu and [MOTION PICTURE] Mode menu. Changing these settings in one of these menus is reflected in other menu. – For details, refer to the explanation for the corresponding setting in [REC] Mode menu. [REC MODE] Sets the file format for the motion pictures you record. [REC QUALITY] This sets up the picture quality of motion pictures. [PICTURE MODE] Sets the recording method for still pictures during motion picture recording. [CONTINUOUS AF] Continues to focus on the subject for which focus has been achieved. [EX. TELE CONV.] If the [REC QUALITY] is set to other than [FSH] and [FHD], the Tele effect is increased. [WIND CUT] This prevents the recording of wind-noise automatically. [MIC LEVEL DISP.] Set whether or not the mic levels are displayed on the screen. [MIC LEVEL ADJ.] Adjust the sound input level to 4 different levels. [FLICKER RED.] The shutter speed can be fixed to reduce the flicker or striping in the motion picture. 38 VQT3U05 (ENG) DMC-GX1X&GX1K&GX1EB-VQT3U05_eng.book 39 ページ 2011年10月26日 水曜日 午後5時11分 ∫ [CUSTOM] Menu Operation of the unit, such as displaying of the screen and button operations, can be set up according to your preferences. Also, it is possible to register the modified settings. [CUST. SET MEM.] Registers the current camera settings as custom set. [AF/AE LOCK /Fn2] Assigns AF/AE lock or Fn2 (function button) to the [AF/AE LOCK]/[Fn2] button. [Fn BUTTON SET] You can assign various recording and other functions to the function button. [HISTOGRAM] This allows you to set either to display or not display the histogram. [GUIDE LINE] This will set the pattern of guide lines displayed when taking a picture. [HIGHLIGHT] When the Auto Review function is activated or when playing back, white saturated areas appear blinking in black and white. [EXPO.METER] Set whether or not to display the exposure meter. [AF/AE LOCK] Sets the fixed content for focusing and exposure when the AF/ AE lock is on. [AF/AE LOCK HOLD] This will set the operation of [AF/AE LOCK] button when taking a picture with fixed focus or exposure. [DIRECT FOCUS AREA] Moves the AF area or MF assist using the cursor button when recording. [FOCUS PRIORITY] It will set so no picture can be taken when it is out of focus. [SHUTTER AF] Set whether or not the focus is adjusted automatically when the shutter button is pressed halfway. [PINPOINT AF TIME] Sets the time for which the screen is enlarged when the shutter button is pressed halfway with Auto Focus Mode set to [ ]. [AF ASSIST LAMP] AF assist lamp will illuminate the subject when the shutter button is pressed half-way making it easier for the camera to focus when recording in low light conditions. [AF+MF] You can set the focus manually after the automatic focus has finished. [MF ASSIST] When you set the focus manually, the display is enlarged. [MF GUIDE] When you set the focus manually, an MF guide that allows you to check the direction to achieve focus is displayed. (ENG) VQT3U05 39 VQT3U05~Body1_eng.fm 40 ページ 2011年10月28日 金曜日 午後4時19分 [POWER ZOOM LENS] Sets the screen display and lens operations when using an interchangeable lens that is compatible with power zoom (electrically operated zoom). [LVF DISP.STYLE] This will set the display style of the Optional Live Viewfinder. [LCD DISP.STYLE] This will set the display style of the LCD monitor. [¦ BUTTON SWITCH] It is possible to set how the [¦] button to toggle to Intelligent Auto Mode will operate. [ BUTTON] Enables/disables the motion picture button. [ REC AREA] This changes the angle of view during motion picture recording and still picture recording. [REMAINING DISP.] This will switch display between the number of recordable pictures and available recording time. [PLAY ON LCD] When you switch from Recording Mode to Playback Mode, the LCD monitor switches on. [TOUCH SETTINGS] Enables/disables the Touch operation. [TOUCH SCROLL] This allows you to set the speed of continuously forwarding or rewinding pictures using touch operation. [DIAL GUIDE] Set whether or not to display the dial operation guide. [MENU RESUME] The last operated menu position is saved even if the camera is turned off. [PIXEL REFRESH] It will perform optimisation of imaging device and image processing. [SENSOR CLEANING] Dust reduction to blow off the debris and dust that have affixed to the front of the imaging device is performed. [SHOOT W/O LENS] When no lens is attached to the camera, the shutter is set to cut out. 40 VQT3U05 (ENG) DMC-GX1X&GX1K&GX1EB-VQT3U05_eng.book 41 ページ 2011年10月26日 水曜日 午後5時11分 ∫ Setup Menu This menu lets you perform the clock settings, select the operating beep tone settings and set other settings which make it easier for you to operate the camera. [CLOCK SET] Setting Date/Time. [WORLD TIME] Sets the times for the region where you live and your holiday destination. [TRAVEL DATE] Departure date and return date of the travel as well as the name of the travel destination can be set. [BEEP] Set the volume for electronic noises and the electronic shutter noise. [VOLUME] Adjust the volume of the speaker to any of 7 levels. [LCD DISPLAY]/ [VIEWFINDER] Brightness, colour, or red or blue tint of the LCD monitor/ Optional Live Viewfinder is adjusted. [LCD MODE] The brightness of the LCD monitor can be adjusted depending on how bright it is around the camera. [ECONOMY] Suppresses the unit power consumption to prevent the battery being run down. [AUTO REVIEW] Set the length of time that the picture is displayed after taking the still picture. [USB MODE] Sets the communication method when connecting using the USB connection cable (supplied). [VIDEO OUT] Set to match the colour television system in each country. [TV ASPECT] Set to match the type of TV. [HDMI MODE] Sets the HDMI output image format when playing back via an HDMI mini cable (optional). [VIERA Link] Equipment that supports the VIERA Link will connect automatically. [3D PLAYBACK] Setup the output method for 3D pictures. [MENU GUIDE] Set the screen that is displayed when the mode dial is set to / . [LANGUAGE] Set the language displayed on the screen. [VERSION DISP.] This enables the firmware versions of the camera and lens to be checked. [NO.RESET] Returns the image file number to 0001. [RESET] The [REC] or [SETUP]/[CUSTOM] menu settings are reset to the initial settings. [FORMAT] The card is formatted. (ENG) VQT3U05 41 DMC-GX1X&GX1K&GX1EB-VQT3U05_eng.book 42 ページ 2011年10月26日 水曜日 午後5時11分 ∫ [PLAYBACK] Mode Menu This menu lets you set the Protection, Cropping or Print Settings, etc. of recorded pictures. [2D/3D SETTINGS] Switches the playback method for 3D images. [SLIDE SHOW] Selects the type etc. of the images and plays back in order. [PLAYBACK MODE] Selects the type etc. of the images and plays back only particular images. [TITLE EDIT] Input texts (comments) on the recorded pictures. [TEXT STAMP] Stamps the recorded pictures with recording date and time, names, travel destination, travel date etc. [VIDEO DIVIDE] Splits the recorded motion picture in two. [RESIZE] Reduces the image size (number of pixels). [CROPPING] Crops the recorded image. [ASPECT CONV.] Changes the aspect ratio of images recorded with an aspect ratio of [16:9] for printing. [ROTATE] Rotate pictures manually in 90o steps. [ROTATE DISP.] This mode allows you to automatically display pictures vertically if they were recorded holding the camera vertically. [FAVORITE] Marks can be added to images, and images can be set as favourites. [PRINT SET] Sets the images for printing and the number of prints. [PROTECT] Protects images to prevent deletion by mistake. [FACE REC EDIT] Removes or changes information relating to personal identity. 42 VQT3U05 (ENG) DMC-GX1X&GX1K&GX1EB-VQT3U05_eng.book 43 ページ 2011年10月26日 水曜日 午後5時11分 About the supplied software The supplied CD-ROM includes the following software. Install the software on to your computer before use. • PHOTOfunSTUDIO 7.0 HD Edition (Windows XP/Vista/7) This software allows you to acquire pictures to the PC, and also categorise these acquired pictures by their recording date or the model name of the camera used. You can resize pictures and add effects to the pictures. Various printing functions, such as layout printing, and writing function to CD-R¢ are supported too. If you forgot to set the date on the digital camera, you can add the date of recording to pictures with this software. Also, [AVCHD] motion pictures can be loaded and written to DVD. ¢ This can be used only if the [Recording] tab is displayed on the [Properties] of the CD/DVD drive on the PC. • QuickTime (Windows XP/Vista/7) This software is required for creating panorama pictures and for replay in “PHOTOfunSTUDIO 7.0 HD Edition”. You can also play back motion pictures (.MP4/.MOV extension) recorded on a digital camera. This is included as standard in Mac OSs. • SILKYPIX Developer Studio (Windows XP/Vista/7, Mac OS X v10.4/v10.5/v10.6/v10.7) This is software to edit RAW format images. Using RAW files recorded on this camera allows images to be edited with a higher quality. Edited images can be saved in a format (JPEG, TIFF, etc.) that can be displayed on a personal computer. For details on how to use the SILKYPIX Developer Studio, refer to the “Help” or the Ichikawa Soft Laboratory’s support website: http://www.isl.co.jp/SILKYPIX/english/p/support/ • LoiLoScope 30 day full trial version (Windows XP/Vista/7) LoiLoScope is a video editing software where that draws out the full power of your PC. Creating videos is as easy as organizing cards on top of a desk. Use your music, picture and video files to create videos to share with your friends and family by burning it to a DVD, uploading it to websites, or simply share your videos with your friends via e-mail. – This will only install a shortcut to the trial version download site. For more information on how to use LoiLoScope, read the LoiLoScope manual available for download at the link below. Manual URL: http://loilo.tv/product/20 (ENG) VQT3U05 43 DMC-GX1X&GX1K&GX1EB-VQT3U05_eng.book 44 ページ 2011年10月26日 水曜日 午後5時11分 Installing supplied software • Before inserting the CD-ROM, close all running applications. Check the environment of your PC. • Operating environment of “PHOTOfunSTUDIO 7.0 HD Edition” – OS: WindowsR XP (32bit) SP2/SP3, Windows VistaR (32bit) or SP1/SP2, WindowsR 7 (32bit/64bit) or SP1 – CPU: PentiumR III 500 MHz or higher (WindowsR XP), PentiumR III 800 MHz or higher (Windows VistaR), PentiumR III 1 GHz or higher (WindowsR 7) – Display: 1024k768 pixels or more (1920k1080 pixels or more recommended) – RAM: 512 MB or more (WindowsR XP/Windows VistaR), 1 GB or more (WindowsR 7 32bit), 2 GB or more (WindowsR 7 64bit) – Free hard disk space: 450 MB or more for installing software • Refer to the operating instructions of “PHOTOfunSTUDIO 7.0 HD Edition” (PDF) for further operating environment. • For details on SILKYPIX Developer Studio 3.1 SE, please read the support site given on P43. Insert the CD-ROM with the supplied software. • When you insert the supplied CD-ROM, the install menu will start. Click on the [Recommended Installation]. • Proceed with installation according to messages appearing on the screen. Note • The software compatible with your PC will be installed. • “PHOTOfunSTUDIO 7.0 HD Edition” is not compatible with Mac. • On the Mac, SILKYPIX can be installed manually. 1 Insert the CD-ROM with the supplied software. 2 Double-click on the automatically displayed folder. 3 Double-click the icon in the application folder. 44 VQT3U05 (ENG) DMC-GX1X&GX1K&GX1EB-VQT3U05_eng.book 45 ページ 2011年10月26日 水曜日 午後5時11分 Reading the Operating Instructions (PDF format) More detailed instructions on the operation of this camera are contained in “Operating Instructions for advanced features (PDF format)” in the supplied CD-ROM. Install it on your PC to read it. ∫ For Windows Turn the PC on and insert the CD-ROM containing the Operating Instructions (supplied). Select the desired language and then click [Operating Instructions] to install. Double click the “Operating Instructions” shortcut icon on the desktop. ∫ When the Operating Instructions (PDF format) will not open You will need Adobe Acrobat Reader 5.0 or later or Adobe Reader 7.0 or later to browse or print the Operating Instructions (PDF format). Insert the CD-ROM containing the Operating Instructions (supplied), click A and then follow the messages on the screen to install. (Compatible OS: Windows XP SP3/Windows Vista SP2/Windows 7) • You can download and install a version of Adobe Reader that you can use with your OS from the following Web Site. http://get.adobe.com/reader/otherversions ∫ To uninstall the Operating Instructions (PDF format) Delete the PDF file from the “Program Files\Panasonic\Lumix\” folder. ∫ For Mac Turn the PC on and insert the CD-ROM containing the Operating Instructions (supplied). Open the “Manual” folder in the CD-ROM and then copy the PDF file with the desired language inside the folder. Double click the PDF file to open it. (ENG) VQT3U05 45 DMC-GX1X&GX1K&GX1EB-VQT3U05_eng.book 46 ページ 2011年10月26日 水曜日 午後5時11分 Specifications Digital Camera Body (DMC-GX1): Information for your safety Power Source: DC 8.4 V Power Consumption: 2.6 W (When recording with LCD Monitor) [When the Interchangeable lens (H-PS14042) is used] 2.7 W (When recording with LCD Monitor) [When the Interchangeable lens (H-FS014042) is used] 1.6 W (When playing back with LCD Monitor) [When the Interchangeable lens (H-PS14042) is used] 1.7 W (When playing back with LCD Monitor) [When the Interchangeable lens (H-FS014042) is used] Camera effective pixels 16,000,000 pixels Image sensor 4/3q Live MOS sensor, total pixel number 16,680,000 pixels, Primary colour filter Digital Zoom Max. 4k Extra Tele Conversion (Except for the maximum picture size for each aspect ratio) ON/OFF simple enlargement (compatible with lenses from other manufacturers) Focus Auto Focus/Manual Focus, Face Detection/AF Tracking/23-area-focusing/ 1-area-focusing/Pinpoint (Touch focus area selection possible) Shutter system Focal-plane shutter Burst recording 46 Burst speed 20 pictures/second (Super high speed), 4.2 pictures/second (High speed), 3 pictures/second (Middle speed), 2 pictures/second (Low speed) Number of recordable pictures 9 pictures (when there are RAW files) VQT3U05 (ENG) Depends on the capacity of the card (when there are no RAW files) DMC-GX1X&GX1K&GX1EB-VQT3U05_eng.book 47 ページ 2011年10月26日 水曜日 午後5時11分 ISO sensitivity (Standard Output Sensitivity) AUTO/ /160/200/400/800/1600/3200/6400/12800 (1/3 EV step change possible) Minimum Illumination Approx. 9 lx (when i-Low light is used, the shutter speed is 1/25th of a second) [When the Interchangeable lens (H-PS14042) is used] Approx. 9 lx (when i-Low light is used, the shutter speed is 1/25th of a second) [When the Interchangeable lens (H-FS014042) is used] Shutter speed B (Bulb) (Max. approx. 120 seconds), 60 seconds to 1/4000th of a second Taking still pictures during motion picture recording Motion picture priorities: 1/25th of a second to 1/16000th of a second Still picture priorities: B (Bulb) (Max. approx. 120 seconds), 60 seconds to 1/4000th of a second Metering range EV 0 to EV 18 White Balance Auto White Balance/Daylight/Cloudy/Shade/Incandescent lights/Flash/White set1/White set2/White Balance K set Exposure (AE) Programme AE (P)/Aperture-priority AE (A)/Shutter-priority AE (S)/Manual exposure (M)/AUTO Exposure Compensation (1/3 EV Step, j5 EV to i5 EV) Metering Mode Multiple/Centre weighted/Spot LCD monitor 3.0q TFT LCD (3:2) (Approx. 460,000 dots) (field of view ratio about 100%) Touch screen Flash Built-in pop up flash GN 7.6 equivalent (ISO160 · m) Flash range: Approx. 40 cm (1.32 feet) to 6.8 m (22.4 feet) [When the Interchangeable lens (H-PS14042) is mounted, WIDE, [ISO AUTO] is set] Flash range: Approx. 1.0 m (3.29 feet) to 6.8 m (22.4 feet) [When the Interchangeable lens (H-FS014042) is mounted, WIDE, [ISO AUTO] is set] AUTO, AUTO/Red-Eye Reduction, Forced ON, Forced ON/ Red-Eye Reduction, Slow Sync., Slow Sync./Red-Eye Reduction, Forced OFF (ENG) VQT3U05 47 VQT3U05~Body3_eng.fm 48 ページ 2011年10月28日 金曜日 午後4時19分 Flash synchronization speed Equal to or smaller than 1/160th of a second Microphone Stereo Speaker Monaural Recording media SD Memory Card/SDHC Memory Card/SDXC Memory Card Picture size Still picture When the aspect ratio setting is [X] 4592k3448 pixels, 3232k2424 pixels, 2272k1704 pixels When the aspect ratio setting is [Y] 4576k3056 pixels, 3232k2160 pixels, 2272k1520 pixels When the aspect ratio setting is [W] 4576k2576 pixels, 3232k1824 pixels, 1920k1080 pixels When the aspect ratio setting is [ ] 3424k3424 pixels, 2416k2416 pixels, 1712k1712 pixels Recording quality Motion pictures Quality [AVCHD] When set to [FSH]: 1920k1080 pixels (50i¢ recording/ Approx. 17 Mbps)/ When set to [SH]: 1280k720 pixels (50p¢ recording/ Approx. 17 Mbps) (¢Sensor output is 25 frames/sec.) [MP4] When set to [FHD]: 1920k1080 pixels (25 frames/sec., Approx. 20 Mbps)/ When set to [HD]: 1280k720 pixels (25 frames/sec., Approx. 10 Mbps)/ When set to [VGA]: 640k480 pixels (25 frames/sec., Approx. 4 Mbps) RAW/RAWiFine/RAWiStandard/Fine/Standard/MPOiFine/ MPOiStandard Recording file format Still Picture Motion pictures Audio compression 48 VQT3U05 (ENG) RAW/JPEG (based on “Design rule for Camera File system”, based on “Exif 2.3” standard, DPOF corresponding)/MPO AVCHD/MP4 AVCHD Dolby Digital (2 ch) MP4 AAC (2 ch) DMC-GX1X&GX1K&GX1EB-VQT3U05_eng.book 49 ページ 2011年10月26日 水曜日 午後5時11分 Interface Digital “USB 2.0” (High Speed) ¢ Data from the PC can not be written to the camera using the USB connection cable. Analogue video/ audio NTSC/PAL Composite (Switched by menu) Audio line output (monaural) Terminal [REMOTE] φ 2.5 mm jack [AV OUT/DIGITAL] Dedicated jack (8 pin) [HDMI] MiniHDMI TypeC Dimensions Approx. 116.3 mm (W)k67.8 mm (H)k39.4 mm (D) [4.58q (W)k2.67q(H)k1.55q (D)] (excluding the projecting parts) Mass Approx. 318 g/0.70 lb [with the card and battery] Approx. 272 g/0.60 lb (camera body) Approx. 413 g/0.91 lb [with the Interchangeable lens (H-PS14042), card and battery] Approx. 483 g/1.06 lb [with the Interchangeable lens (H-FS014042), card and battery] Operating temperature 0 oC to 40 oC (32 oF to 104 oF) Operating humidity 10%RH to 80%RH Battery Charger (Panasonic DE-A94A): Information for your safety Input: AC 110 V to 240 V, 50/60 Hz, 0.2 A Output: DC 8.4 V, 0.65 A Battery Pack (lithium-ion) (Panasonic DMW-BLD10E): Information for your safety Voltage/capacity: 7.2 V/1010 mAh (ENG) VQT3U05 49 VQT3U05~Body3_eng.fm 50 ページ 2011年10月28日 金曜日 午後4時20分 Interchangeable Lens (H-PS14042) “LUMIX G X VARIO PZ 14–42 mm/F3.5–5.6 ASPH./POWER O.I.S.” Focal length f=14 mm to 42 mm (35 mm film camera equivalent: 28 mm to 84 mm) Aperture type 7 diaphragm blades/circular aperture diaphragm Aperture range F3.5 (Wide) to F5.6 (Tele) Minimum aperture value F22 Lens construction 9 elements in 8 groups (4 aspherical lenses, 2 ED Lens) Nano surface coating Yes In focus distance 0.2 m (0.66 feet) (Wide to focal length 20 mm) to ¶ (from the focus distance reference line), 0.3 m (0.99 feet) (focal length 21 mm to Tele) to ¶ (from the focus distance reference line) Maximum image magnification 0.17k (35 mm film camera equivalent: 0.34k) Optical Image Stabiliser Available [O.I.S.] switch None (Setting of the [STABILIZER] is done in [REC] menu.) Mount “Micro Four Thirds Mount” Angle of view 75x (Wide) to 29x (Tele) Filter diameter 37 mm (1.46 inch) Max. diameter Approx. 61 mm (2.40 inch) Overall length Approx. 26.8 mm (1.06 inch) (from the tip of the lens to the base side of the lens mount when the lens barrel is recessed) Mass Approx. 95 g/0.21 lb 50 VQT3U05 (ENG) VQT3U05~Body3_eng.fm 51 ページ 2011年10月28日 金曜日 午後4時21分 Interchangeable Lens (H-FS014042) “LUMIX G VARIO 14– 42 mm/F3.5 – 5.6 ASPH./MEGA O.I.S.” Focal length f=14 mm to 42 mm (35 mm film camera equivalent: 28 mm to 84 mm) Aperture type 7 diaphragm blades/circular aperture diaphragm Aperture range F3.5 (Wide) to F5.6 (Tele) Minimum aperture value F22 Lens construction 12 elements in 9 groups (1 aspherical lens) In focus distance 0.3 m (0.99 feet) to ¶ (from the focus distance reference line) Maximum image magnification 0.16k (35 mm film camera equivalent: 0.32k) Optical Image Stabiliser Available [O.I.S.] switch None (Setting of the [STABILIZER] is done in [REC] menu.) Mount “Micro Four Thirds Mount” Angle of view 75x (Wide) to 29x (Tele) Filter diameter 52 mm (2.05 inch) Max. diameter Approx. 60.6 mm (2.39 inch) Overall length Approx. 63.6 mm (2.50 inch) (from the tip of the lens to the base side of the lens mount) Mass Approx. 165 g/0.36 lb (ENG) VQT3U05 51 VQT3U05~BCover_eng.fm 52 ページ 2011年10月28日 金曜日 午後4時21分 • G MICRO SYSTEM is a lens exchange type digital camera system of LUMIX based on a Micro Four Thirds System standard. • Micro Four Thirds™ and Micro Four Thirds Logo marks are trademarks or registered trademarks of Olympus Imaging Corporation, in Japan, the United States, the European Union and other countries. • Four Thirds™ and Four Thirds Logo marks are trademarks or registered trademarks of Olympus Imaging Corporation, in Japan, the United States, the European Union and other countries. • SDXC Logo is a trademark of SD-3C, LLC. • “AVCHD” and the “AVCHD” logo are trademarks of Panasonic Corporation and Sony Corporation. • Manufactured under license from Dolby Laboratories. Dolby and the double-D symbol are trademarks of Dolby Laboratories. • HDMI, the HDMI Logo, and High-Definition Multimedia Interface are trademarks or registered trademarks of HDMI Licensing LLC in the United States and other countries. • HDAVI Control™ is a trademark of Panasonic Corporation. • QuickTime and the QuickTime logo are trademarks or registered trademarks of Apple Inc., used under license therefrom. • Adobe is a trademark or registered trademark of Adobe Systems Incorporated in the United States and/or other countries. • Mac and Mac OS are trademarks of Apple Inc., registered in the U.S. and other countries. • Windows and Windows Vista are either registered trademarks or trademarks of Microsoft Corporation in the United States and/or other countries. • Other names of systems and products mentioned in these instructions are usually the registered trademarks or trademarks of the manufacturers who developed the system or product concerned. This product is licensed under the AVC patent portfolio license for the personal and non-commercial use of a consumer to (i) encode video in compliance with the AVC Standard (“AVC Video”) and/or (ii) decode AVC Video that was encoded by a consumer engaged in a personal and non-commercial activity and/or was obtained from a video provider licensed to provide AVC Video. No license is granted or shall be implied for any other use. Additional information may be obtained from MPEG LA, LLC. See http://www.mpegla.com. EU Pursuant to at the directive 2004/108/EC, article 9(2) Panasonic Testing Centre Panasonic Marketing Europe GmbH Winsbergring 15, 22525 Hamburg, Germany Panasonic Corporation Web Site: http://panasonic.net Panasonic Corporation 2011 VQT3U05 F1111KD0


![操作ガイド[BlackBerry Bold]](http://vs1.manualzilla.com/store/data/006610136_2-7a5b23cd4f44de5fc0078deaf66992bf-150x150.png)