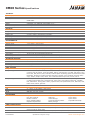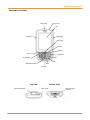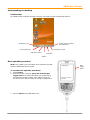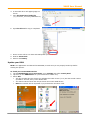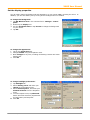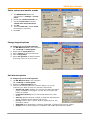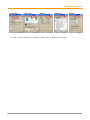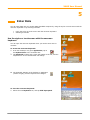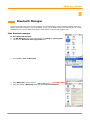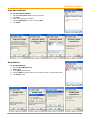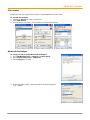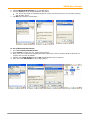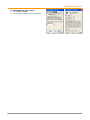
1
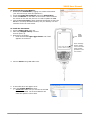
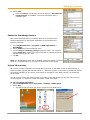
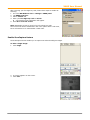
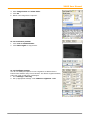
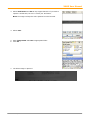
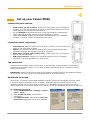
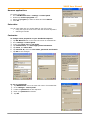
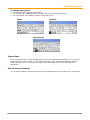
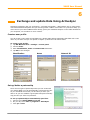
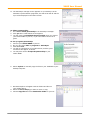
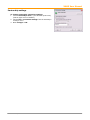
XM60 User Guide
Version 1
Jan. 2008
XM60 User Manual
Janam Technologies LLC
ii
XM60 User Manual
CONTENTS
Chapter 1: Introduction
About the Janam XM60
Hardware features
Specifications
Hardware overview
1-1
1-1
1-2
1-3
Chapter 2: Get Started
Unpack your Janam XM60
Recommended host computer configuration/requirements
Update your desktop software
Attach the hand strap
Install/charge the battery
Remove the battery from spare charging well
Turn on the XM60
Understanding the desktop
Boot-uploader procedure
Update your ROM
Check your current ROM
Download the correct BIN file
Install the latest ROM
Troubleshooting tips
Reset the XM60
2-1
2-1
2-1
2-1
2-2
2-2
2-2
2-3
2-3
2-4
2-4
2-5
2-5
2-6
2-7
Chapter 3: Bar Code Scanning
Demonstration and setup
Enable the ScanWedge feature
Unlock 2D scanning
Enable ScanCapture feature
3-1
3-2
3-2
3-3
Chapter 4: Set Up Your Janam XM60
Locate front panel controls
Locate back panel components
Tap versus click
Recalibrate the screen
Use the regional and language features
Open applications
Remove applications
Enter data
Customize
Set the date, time and time zone
Format the date, time and numbers
Set the display properties
Select volume and enable sounds
Change keypad options
Set internet options
4-1
4-1
4-1
4-1
4-2
4-2
4-3
4-3
4-3
4-4
4-4
4-5
4-6
4-6
4-6
Chapter 5: Enter Data
Use the stylus or touch screen with the onscreen keyboard
Import data
Use the barcode scanner
5-1
5-2
5-2
Chapter 6: ActiveSync
Create a user profile
Set up/delete a partnership
Partnership settings
6-1
6-1
6-4
Chapter 7: 802.11 Wireless Configuration
Wireless local area network access
7-1
Janam Technologies LLC
iii
XM60 User Manual
Chapter 8: Bluetooth Manager
Start Bluetooth manager
Scan Device Wizard
Bond Wizard
Send files
File browser
Bluetooth ActiveSync
Settings
8-1
8-2
8-2
8-3
8-4
8-4
8-6
Chapter 9: Beam Information
Turn beam on/off
Beam information
9-1
9-2
Chapter 10: Regulatory and Maintenance
Regulatory and safety approvals
Battery warning
General information
Operating instructions
Janam Technologies LLC
10-1
10-2
10-2
10-3
iv
XM60 User Manual
1
Introduction
The XM Series rugged mobile computer delivers all the built-in capabilities that today’s business
applications demand. Plus, it’s smaller, lighter and far less expensive than comparable products. Designed
for maximum value and performance, the XM60 is a cost-effective mobile solution for Windows® CE
applications.
About the Janam XM60
The XM60 delivers powerful computing performance packaged in a small, light and truly pocketable mobile
computer. It features a color, quarter-VGA display, Freescale™ MX21 processor, backlit numeric keypad,
WLAN and Bluetooth. The XM60 weighs less than 10 ounces, meets IP54 sealing requirements and
withstands multiple 4-foot/1.2m drops to concrete across a wide temperature range.
Further enhancing its value, the XM60 features integrated 1D barcode scanning as well as built-in 2D
barcode scanning capability. Janam’s 2D scanning solution enables users to upgrade barcode scanning
capability from 1D to 1D/2D on any device at any time with a simple firmware upgrade. With Adaptus®
Imaging Technology, the XM Series easily reads all types of barcode symbologies including linear,
stacked and 2D. It offers the flexibility to adapt as business needs change, without the need to invest in
new hardware.
Hardware features
•
•
•
•
•
•
•
•
•
•
•
•
•
Microsoft® Windows® CE 5.0
Brilliant QVGA color display
High-performance 1D and 2D barcode scanning capability
Backlit numeric keypad
64MB SDRAM/64MB NAND
NAND flash backup of OS, applications and user data
User-accessible mini-SD memory slot
Weighs less than 10 ounces
Sealed to IP54 standards
Rugged design: withstands multiple 4-foot/1.2 meter drops to concrete
Enterprise-class WLAN with WPA security protocols
Bluetooth WPAN data communications
Full system of accessories
Janam Technologies LLC
1-1
XM60 Series Specifications
TECHNICAL
Operating System
Processor
Memory
Expansion
Battery
Backup Battery
Microsoft® Windows® CE 5.0
Freescale™ MX21-266MHz
64MB SDRAM
64MB NAND
User accessible mini-SD slot; compatible with up to 2GB mini-SD card
Swappable 3.7V 1880mAh rechargeable Li-ion
Rechargeable 20mAH Ni-MH
PHYSICAL
Dimensions
Weight
Keypad
Display Size
Display Type
Touch Panel
1.20” H x 3.11” W x 5.75” L / 30.5mm H x 79mm W x 146mm L
9.88oz / 280g
Backlit numeric keypad
2.17” W x 2.95” L / 55.0mm W x 75.0mm L
262K colors TFT QVGA (240x320)
Analog resistance type; stylus input
ENVIRONMENTAL
Operating Temp
Storage Temp
Humidity
Drop
Water & Dust
Vibration
Electro Static Discharge (ESD)
Sterilization
Ambient Light
14º to 122º F / -10º to 50º C
-4º to 140º F / -20º to 60º C
5% to 90% RH (no condensation)
Multiple 4ft / 1.2m drops to concrete on all sides across a wide temperature range
IP54 Category II
0.03 G2/Hz from 20Hz to 2kHz; 1 hour random wave per axis
+/- 15kVDC air; +/- 8kVDC contact
76.9% to 81.4% concentration alcohol rub
450ft-candelas (artificial light); 8000ft-candelas (sunlight)
INTERFACE FEATURES
Audio
Alerts
LED Indicators
Scan Triggers
Speaker and Microphone
Vibration, LED indicators, audio beep
Tri-color
Left, right, center buttons
DATA CAPTURE
Imager
1D Symbologies
2D Symbologies
DATA COMMUNICATION
IrDA
USB
WPAN
WLAN
1D/2D HHP Adaptus® Imaging Technology; 752 x 480 pixel CMOS area imager
China Post, Codabar, Codablock F, Code 11, Code 16K, Code 32 Pharmaceutical (PARAF), Code 39,
Code 49, Code 93 and 93i, Code 128, EAN-8, EAN-13, Interleaved 2 of 5, ISBT 128, Matrix 2 of 5,
Korea Post, MSI, Plessey Code, PosiCode, Reduced Space Symbology (RSS-144, RSS Limited, RSS
Expanded), Straight 2 of 5 IATA (two-bar start/stop), Straight 2 of 5 Industrial (three-bar start/
stop), Telepen, Trioptic Code, UPC-A, UPC-A with Extended Coupon Code, UPC-E, UPC-E1
PDF417 (EAN-UCC Composite, MicroPDF417, PDF417, TCIF Linked Code 39, TLC39), 4-CB
(4-State Customer Barcode), Australian Post, Aztec Code, Aztec Mesas, British Post, Canadian
Post, Data Matrix, ID-tag (UPU 4-State), Japanese Post, KIX (Netherlands) Post, MaxiCode, OCR,
Planet Code, Postnet, QR Code
Standard v1.2 (up to 115,200bps)
v1.1 client (up to 12Mbps), OTG support
Bluetooth v1.2
IEEE 802.11b radio, 2.4GHz
ACCESSORIES
Single Slot Cradle Kit
Four Slot Cradle Kit
Modem Cradle Kit
Larger Capacity Battery
Magnetic Stripe Reader
SAFETY/REGULATORY
Safety
EMI
RF
010908XM60ss6
RFID Reader
Cable Cup
Vehicle Charger
Synching/Charging Cables
Battery Charger
Stylus 5-Pack
Stylus Tether
Nylon Holster
Adjustable Handstrap
UL 60950-1, CSA C22.2 No. 60950-1, EN60950, GS
FCC Part 15 Class B, EN 55022 Class B (CE-EMC), EN 55024 (CE:EMC), AS/NZS CISPR 22 (C-Tick),
ICES-003 Class B, SRRC, NOM
FCC Part 15.27, ETS 300 328, ETS 300 826, AS/NZS 4771, IC RSS102, IC RSS210
Specifications subject to change.
Janam Technologies LLC
XM60 User Manual
Hardware overview
Indicator LED
Power On/Off
LCD
Left Trigger
Right Trigger
Scan Trigger
Function
Backspace
Home
Navigation
Space
Programmable
Shift
Alpha/Numeric shift
Enter
Connector
Top View
Barcode Scan Window
Janam Technologies LLC
Bottom View
Power On/Off
Syncing/Charging
Connector
1-3
XM60 User Manual
Hand Strap Connector
Stylus
Speaker
Battery Compartment
IrDA Window
Stylus Slot
Reset Button
Microphone
Battery Door
Battery Screw
Janam Technologies LLC
1-4
XM60 User Manual
2
Get Started
Unpack your Janam XM60
Make sure you have the following:
• Janam XM60 handheld computer
• Janam authorized battery
• Hand strap
• Charging accessory (ordered/packed separately) with one of the following kits:
Single-slot cradle kit
Four-slot cradle kit
USB syncing/charging cable with AC adapter
Serial syncing/charging cable with AC adapter
Recommended host computer configuration/requirements
The Janam XM Series Development Kit helps assist programmers with the development of applications for
Janam XM Series rugged barcode scanners running the Microsoft® Windows® CE 5.0 operating system. It
contains all necessary details and instructions for developing applications that access Janam XM Series
libraries, including scanning, imaging and hardware utilities.
The development kit is designed for use with Microsoft® eMbedded Visual C++ 4.0 (SP4 or above) or
Microsoft Visual Studio 2005.
•
•
•
•
•
•
•
IBM-compatible host computer with Pentium 450 MHz processor or higher
Microsoft Windows XP or Microsoft Windows 2000 operating system
128 MB RAM
100 MB available hard disk space
CD-ROM drive
One available serial port
Mouse
Update your desktop software
Microsoft ActiveSync software is available at the Microsoft web site at http://www.microsoft.com.
Attach the hand strap
1.
Push the thin, looped portion of the strap through the left or right side of hand strap connector on the
back on the handheld.
2. Thread the Velcro part of the strap through the loop at the bottom of the terminal and pull tight.
Janam Technologies LLC
2-1
XM60 User Manual
Install the battery
IMPORTANT Battery Warning!
CAUTION: Use only Janam-approved batteries.
There is the risk of explosion if battery is replaced by an incorrect type.
Always dispose of used batteries according to the instructions.
1.
2.
3.
4.
To access the battery compartment, turn the locking-screw counterclockwise to open the latch
and remove battery cover.
Position the battery lift strap against the back of battery well, ensuring tab extension is on left side.
Place a Janam Lithium-ion rechargeable battery in and snap into place.
Replace the battery cover by positioning the top prongs first and sliding into place. Tighten lockingscrew by turning clockwise.
To charge the battery:
Important Note: The main battery charges the backup battery in the XM60. Once the main battery is
fully charged, do not remove it from the unit for 24 hours. If the battery is removed during this period,
the device cannot maintain any user data.
To charge the battery using the USB syncing/charging cable or serial charging cable:
1. Connect the power supply to the USB syncing/charging cable or serial/syncing charging cable.
2. Connect snap-on end of USB syncing/charging cable or serial/syncing charging cable to bottom of
XM60, making sure the word TOP on the connector faces front.
3. Insert country-specific AC plug, and plug in the power supply.
4. The LED will illuminate to confirm connection (orange indicates charging, green indicates fully charged
and red indicates fault).
5. The battery is fully charged in approximately two hours.
To
1.
2.
3.
4.
charge the battery using the single-slot or four-slot cradle:
Connect the power supply to the cradle.
Connect the line cord to the appropriate power supply.
Plug in the power supply.
Insert the XM60 into the cradle. Important: Proper insertion is required to ensure connection. Be
sure to insert the device as follows:
•
Place the XM60 in cradle well (seating the device without trying to join connectors).
•
Tilt-rotate the XM60 forward (bringing the top end of the unit forward) as you apply downward
pressure to fully insert in cradle well, joining connectors.
5. The LED will illuminate to confirm connection (orange indicates charging, green indicates fully charged
and red indicates fault).
6. The battery is fully charged in approximately two hours.
Remove the battery from spare battery charging well
Do not force-pull the battery from charging well. Follow these instructions to remove the battery:
1. While gently holding down with thumb, slip index finger down against the battery so that you feel the
edge where the battery meets the cradle.
2. Press down and forward with index finger to lift battery edge.
Turn on the XM60
The first time the device is turned on, calibrate the screen using the stylus.
The stylus is located on the back of the device. To calibrate, simply follow the
on-screen instructions and remember to save your settings.
Note: If your XM60 came pre-loaded with a custom software application, a
welcome utility may not appear. If this happens, follow the on-screen
instructions.
Janam Technologies LLC
2-2
XM60 User Manual
Understanding the desktop
Command bar
Your XM60 mobile computer desktop includes a command bar with the following features.
Toggle between desktop
and applications
MS Windows icon
Current application
USB Socket status
Keypad/input panel
Time/date
Battery
Boot-uploader procedure
NOTE: Only update your boot-loader when requested. All data
stored in NAND flash will be erased.
USB appears
Right
trigger
button
To run the boot-uploader procedure:
1.
2.
3.
Insert battery.
While the device is booting, press and hold the right
trigger button (an older boot-loader may require using
the left trigger button instead) until “USB” is shown on
the device or the device screen will change to purple/blue.
Or screen will change to
purple/blue.
Connect device using USB cable to PC.
Janam Technologies LLC
2-3
XM60 User Manual
4.
5.
A removable drive will appear/popup on
the PC.
Copy the latest boot-loader file
(e.g., Bootloader_20070403_BABBOXM60.bin).
6.
Eject the drive after copy is completed.
7.
8.
9.
Device screen will turn to white and ROM update process will start.
Wait for 30 seconds.
Remove the battery.
Update your ROM
NOTE: ALL applications and data will be DELETED, so make sure you are properly backed up before
starting this process.
To
1.
2.
3.
check your current ROM version:
Tap the MS Windows icon or start menu, go to settings and select control panel.
Tap twice on the XM60 Panel icon (use scroll down to locate icon).
Select Info.
•
This first number after the device type indicates the build version (2.0.0) and the second number
(070628 or June 28, 2007) is the release date.
•
The scanner ID info shows the unique scanner ID on each XM60 device.
•
Note: this number will be requested if you purchase the 2D unlock code.
Janam Technologies LLC
2-4
XM60 User Manual
To download the correct BIN file:
1. Download the latest ROM by logging in to Janam PartnerZone.
(You will need a login name and password.)
2. Accept the terms and conditions, and go to PartnerZone.
3. Locate the BIN file for the XM60. If the version number matches
the version on the web site, there is no need to update the ROM.
4. Click the arrow at right to begin download. Remember to store the
BIN file in an easily accessible location, like your desktop. You will
need this file for the next section.
To install the latest ROM:
1. Remove battery door from unit.
2. Place fully charged battery in device.
Unit will power up.
3. While device is booting:
•
Press and hold the right trigger button until "USB"
appears on the device.
USB
Please insert USB cable
Wait for USB drive popup
4.
Connect device using USB cable to PC.
5.
6.
A removable drive will appear on PC.
Copy the suitable BIN file to drive.
•
IMPORTANT: Make sure you use the correct BIN
file for each model. The incorrect BIN file will
cause the system to fail to boot.
Janam Technologies LLC
Right
trigger
button
If this message
doesn’t appear,
refer to the bootloader update
procedure in the
next section.
2-5
XM60 User Manual
7.
Eject the drive after update is completed.
•
Device screen will turn purple, and the update
ROM process will proceed.
•
Device will boot up within three minutes.
8.
After a hard reset of the device (see next section),
the new ROM will be updated in your mobile computer.
To troubleshoot during ROM update:
The following helps resolve any issues that might be encountered during the ROM update process.
Description
Resolution
Explanation
The scanner turns on
when pressing the right
scanner button.
Return to the main application
display of the device, remove the
battery and restart the ROM
installation process.
In some situations, the application may
cause the device to focus on the
scanner. It is best to perform the
upgrade process from the main
application display.
The front LED is staying
on and the device is nonfunctional.
Perform a soft reset of the
device.
It is possible that the ROM update
process was unexpectedly terminated
and the device needs a reboot.
Windows is not
recognizing the device.
• Disconnect the sync cable from
the device and perform a soft
reset. With the cable already
plugged into the host computer,
reconnect the XM60.
• Perform reset first.
Sometimes, Windows attempts to find
the device and the appropriate driver,
but it takes too long, so the process
aborts. Typically, on the second (or
sometimes third) attempt, Windows will
properly discover the device.
Windows finds the device,
but the My Computer
screen is not displaying
an associated removable
drive.
Same as previous resolution.
The speed of the host computer and the
version of Windows XP being used may
impact the process.
The letters USB are not
displaying on the screen
of the device.
Hard reset the device, and restart
the ROM update process.
This can happen when the process is
aborted and the updated ROM file has
been placed on the removable drive. In
some situations, the letters USB may no
longer appear, and you will need to
presume the update will take place.
That means, the device has a bootprogram that can still connect with
Windows, but the display is no longer
functional.
Janam Technologies LLC
2-6
XM60 User Manual
Reset the XM60
To soft reset:
In most situations, a soft reset restarts the device and saves all stored records and entries. However, any
data that has not been saved will be lost during a soft reset. To perform a soft reset, do the following:
1. Remove the battery door from the back of the unit.
2. Locate the reset button.
3. Using the stylus, press the reset button (one time).
4. Replace the battery door.
To hard reset:
A hard reset returns the XM60 to factory settings, removing ALL applications and data from the device. Be
sure that all data is backed up before performing a hard reset.
To perform a hard reset, do the following:
1. Remove the battery door from the back of the unit.
2. Locate the reset button.
3. While holding the arrow-up key, located on the front panel, right side of the computer, use the stylus to
press the reset button (once). Continue to hold the arrow-up key.
4. After the reset has occurred and the calibration screen appears on the screen, release the arrow-up
key.
IMPORTANT NOTE about battery door: XM60 mobile computers feature a battery door removal
detection switch. This is designed to protect against data loss if the battery is removed during data
collection or processing. The system will not fully operate when the battery cover is removed. As a result
of this feature, XM60 devices automatically create a safe state until the battery cover is secured, meaning
a device will power-down until the battery door is closed. It will then recall and resume from the user’s
most recent screen when the battery door is fully in place.
Power-down: Upon performing a reset, you may find that the device automatically powers-down shortly
after the reset begins to take. This is a normal function of the battery door removal detection switch; the
reset will hold. Simply secure the battery door and the XM60 device will resume activity at the last
screen. While there is no technical reason to rush to secure the battery door, you may avoid the powerdown activity by quickly securing the battery door.
Janam Technologies LLC
2-7
XM60 User Manual
Janam Technologies LLC
2-8
XM60 User Manual
3
Barcode Scanning
The XM60 provides an easy migration path so that minimal application code changes are required for
barcode scanning applications.
Barcode scanning demonstration and setup
To run the demo:
1. Tap the MS Windows icon > programs > XM60 Applications >
ScanDemo.
2. Three menus will appear (setup, OCR, options) on the top of the screen.
3.
4.
5.
6.
7.
8.
In the setup menu, select hardware test to review all the functions of
the scanner and determine if everything is working properly.
Select each item individually to verify that all hardware is working
properly.
Tap OK to return to the main demo.
Select setup > symbology config.
Tap enable all to let the scanner decide the best method of decoding the
barcode.
Tap OK to save.
Janam Technologies LLC
3-1
XM60 User Manual
9.
Select scan.
•
Point the scanner at a barcode, and press any of the barcode scan
trigger buttons on the XM60. The results will display after a
successful scan.
Enable the ScanWedge feature
When the ScanWedge feature is enabled, data can be entered into the
specified application by opening the application on the handheld and
scanning a barcode.
1.
2.
3.
4.
Go to MS Windows icon > programs > XM60 applications >
ScanWedge.
Select enable from the ScanWedge menu.
Choose setup > symbology config from the top menu. You can then
select enable all to enable every type of barcode or manually select the
barcode symbologies you need.
Tap OK.
Note: The ScanWedge function will be disabled if manual scanning is initiated
either by a command API or by using the Janam Barcode Test program.
Unlock 2D scanning
All of Janam’s mobile computers can be upgraded in the field to read both 1D and 2D barcodes with a
simple firmware upgrade (Part Number 2D-XP-1). With each upgrade, a key code is provided that unlocks
2D scanning capability on the device. To purchase an upgrade for your XM60, contact your authorized
Janam dealer.
You will need to provide the product imager ID number so the appropriate five-digit key code sequence
can be assigned. To access the imager ID number, follow these steps:
To get your imager ID number:
1. Tap the MS Windows icon or start menu > settings > XM60 panel.
2. Select Info.
•
The scanner ID info shows the unique number for each XM60 device.
Janam Technologies LLC
3-2
XM60 User Manual
After receiving your five-digit key code, follow these steps to enable 2D
scanning.
1. Go to the MS Windows icon > settings > XM60 panel.
2. Tap XM60 panel icon.
3. Select scanner tab.
4. Enter your five-digit key code > unlock.
•
A successful unlock notification will appear.
5. Press X to close the screen.
Note: Remember to keep a record of your five-digit key code.
The unlock code will be maintained in the unit’s system after a soft reset,
but it will need to be re-entered after a hard reset.
Enable ScanCapture feature
The ScanCapture demo enables you to capture normal and intelligent images.
To take a single image:
1. Click single.
2.
3.
A preview appears on the screen.
Click save.
Janam Technologies LLC
3-3
XM60 User Manual
4.
5.
6.
Enter image’s name and select folder.
Click OK.
Below is the image that is captured.
To use continuous preview:
1. Click cont or continue button.
2. Click button again to stop preview.
To use intelligent capture:
You can use intelligent capture to scan a signature or address that is
located some distance away from a barcode. This feature supports PDF417,
Code 128, Code 39 and Aztec symbologies.
1. Go to settings > intel img.
2. Set up appropriate settings. Click address or signature > OK.
Janam Technologies LLC
3-4
XM60 User Manual
3.
Select intel button and aim at any support barcode. If you need to
capture a 2D barcode, be sure to unlock your 2D feature.
Note: the image is always the same position from the barcode.
4.
Select save.
5.
6.
Enter image name and save to appropriate folder.
Click OK.
7.
The below image is captured.
Janam Technologies LLC
3-5
XM60 User Manual
Janam Technologies LLC
3-6
XM60 User Manual
4
Set up your Janam XM60
Locate front panel controls
•
•
•
Power button (on top of device). Pressing the power button turns the handheld
computer on (if it is off) and returns to the last screen that was displayed. Press the
power button to turn the handheld computer off.
Use the backlight to illuminate the screen in low-light conditions. Hold down the
power button for about two seconds to turn the backlight on and off.
Janam XM60 screen. Displays the applications and data stored in your handheld
computer. It is touch-sensitive and responds to the stylus.
Locate back panel components
•
•
•
•
Stylus channel. Holds the stylus. To use the stylus, remove it from the channel and
hold it as you would a pen or pencil.
IR port. Uses infrared technology to transmit and receive data to and from other
handheld computers, and to perform ActiveSync operations.
Reset button (located under battery cover). Under normal use, you should not
have to use the reset button.
USB/serial connector. Connects your handheld computer to a PC via a USB or
serial cable or by inserting XM60 into a Janam cradle.
Tap versus click
Tapping is the basic action used to execute tasks, so use the stylus to tap elements on your handheld
computer’s touch-sensitive screen. You can drag the stylus to select text, or use the stylus to drag the
slider of any scroll bar.
IMPORTANT: Always use the point of the stylus for tapping or making strokes on the handheld computer
screen. Do not use a pen, pencil or any other sharp object to write on the screen.
Recalibrate the screen
The first time you start the Janam XM60 handheld computer, setup instructions appear onscreen. These
instructions include a calibration screen, or digitizer. Calibration aligns the internal circuitry of the
handheld computer with its touch-sensitive screen so your handheld computer can detect the task you
want to perform when you tap an element on the screen. You can also recalibrate your screen at any time.
To recalibrate your screen:
1. Tap the MS Windows icon > settings > control
panel > stylus.
2. Select double tap menu, and follow the
instructions.
3. Tap calibration menu, and follow the on-screen
instructions, tapping the screen where indicated.
Janam Technologies LLC
4-1
XM60 User Manual
Use the regional and language features
Your Janam XM60 comes with a variety of regional, language and input
settings that are preset before your device is shipped. To change these
settings, follow the directions below.
WARNING: If you change to a language other than English, you will have
to perform a hard reset, which will erase all data on your handheld
computer. If you have data you need to save, perform an ActiveSync
operation before you change languages.
To update the regional settings:
1. Select the MS Windows Explorer icon in the command bar >
settings > control panel.
2. Tap the regional settings icon (you may need to scroll down to find
the icon).
3. Change your locale using the dropdown menu and tap OK.
•
See customize section (format date, time and numbers) below to
further edit number, currency, time and date language and appearance.
4. Tap language tab to set the language used for the menus, dialog and alerts. The default is English.
5. Tap input to change the input language used when the device is started.
6. Perform a hard reset of your device IF you change to a language other than English.
Open applications
You can use the MS Windows Explorer icon in the left corner of your
command bar to open any application installed on your handheld computer.
To open an application:
1. Tap the MS Windows icon > programs.
2. Select the application you want to open.
Janam Technologies LLC
4-2
XM60 User Manual
Remove applications
To
1.
2.
3.
4.
remove a program:
Go to MS Windows icon > settings > control panel.
Double-tap remove programs icon.
Select the program you want to delete and click remove.
Click OK.
Enter data
You can enter data into your Janam XM60 in one of five ways:
•
Using the stylus or touch screen with the onscreen keyboard
•
Scanning a barcode
Customize
To change owner properties on your handheld computer:
1. Tap MS Windows icon in the lower left corner of command bar.
2. Go to settings > control panel.
3. Locate the owner icon and tap twice.
4. Tap identification, and enter appropriate information.
5. Tap notes, and enter data.
6. Tap network ID, and enter user name, password and domain.
7. Tap OK to save changes.
To set up a password:
1. Tap MS Windows icon in the lower left corner of command bar.
2. Go to settings > control panel.
3. Locate the password icon and tap twice.
4. Enter your password as desired.
5. Tap OK.
Janam Technologies LLC
4-3
XM60 User Manual
Set the date, time and time zone preferences
To set the date:
1. Tap MS Windows icon in the command bar > settings > control
panel.
2. Tap on calendar date to change, select new time and choose your
time zone from the dropdown menu.
3. Click OK to close.
Format numbers, currency, time and date
When selecting a country and time, date and number formats, keep the following in mind:
• When you select a country, the time, date, and number formats are adjusted, as well as the week’s
starting day.
• The time setting defines the format for the time of day.
To change number, currency, time and date settings:
1. Tap MS Windows icon on the command bar > settings > control panel.
2. Tap twice on regional settings icon.
3. In the region tab, tap on customize.
4.
Using the dropdown menus, make your changes and click OK to save the changes.
Number
Janam Technologies LLC
Currency
Time
Date
4-4
XM60 User Manual
Set the display properties
You can easily change the background and appearance on your Janam XM60, including the colors. In
addition, you can save battery life by turning off the backlight when not needed.
To change the background:
1. Tap MS Windows icon in the command bar > settings > control
panel.
2. Double-tap on display icon.
3. Use the dropdown menu or tap browse to change the background
on your device.
4. Tap OK.
To
1.
2.
3.
change the appearance:
Tap on the appearance tab.
Change scheme using the dropdown menu.
Make changes to any item, including the desktop, buttons and menu
background.
4. Click OK.
To change backlight preferences:
1. Tap backlight tab.
2. Select battery power and make your
change in the dropdown menu.
3. Select external power, and make your
minutes selection from the dropdown
menu.
4. To further adjust levels, tap advanced
button and make necessary adjustments
for both battery and AC power.
5. Click OK.
Janam Technologies LLC
4-5
XM60 User Manual
Select volume and enable sounds
1. Tap MS Windows icon in the
2.
3.
4.
5.
6.
command bar > settings > control
panel.
Double-tap volume & sounds icon.
Tap the volume tab and choose
volume level and preferences.
Tap OK.
Tap the sounds tab, choose sound,
previewing it if necessary.
Click OK.
Change keypad options
To change key size on soft keyboard:
1. Tap MS Windows icon in the command
2.
3.
4.
5.
bar > settings > control panel.
Double-tap on input panel icon.
Select options on the input panel tab.
Click on large keys.
Select use gestures to add this feature
by clicking in the box to get a check.
Set internet options
To change key size on soft keyboard:
1. Tap MS Windows icon in the command
bar > settings > control panel.
2. Double-tap internet options icon.
3. There are six different tabs in the internet options, so you can
customize your XM60 to meet your network requirements.
•
General (at right): enables you to select your start and search
pages, in addition to user agent. You can also clear cache and
history as needed.
•
Connection (below): lets you set the parameters for online
access.
•
Security: provides intranet, internet, trusted and restricted sites
access, including ActiveX controls and plug-ins.
•
Privacy: offers a way to accept, block or prompt for first- and
third-party cookies.
•
Advanced: gives accessibility, browsing, multimedia, TV features and security options.
•
Popups: lets you block popups, set exceptions and enable advanced event options.
Janam Technologies LLC
4-6
XM60 User Manual
Connection
Security
Privacy
Advanced
Popups
4. After you finish making your selections in each screen, click OK to save settings.
.
Janam Technologies LLC
4-7
XM60 User Manual
Janam Technologies LLC
4-8
XM60 User Manual
5
Enter Data
You can enter data into your Janam XM60 handheld computer by using the stylus or touch screen with the
onscreen keyboard or by scanning barcodes.
•
•
Using the stylus or touch screen with the onscreen keyboard
Scanning a barcode
Use the stylus or touch screen with the onscreen
keyboard
You can open the onscreen keyboard when you need to enter text or
numbers.
To access the onscreen keyboard:
1. From the desktop or any open application, tap on
the keyboard icon in the command bar.
2. Tap keyboard to select and a check will appear to the left, and the
keyboard icon in the command bar will change.
3. The keyboard appears on the desktop or application
(shown at right), and the keyboard icon changes.
To close the onscreen keyboard:
1. Select the new keyboard icon, and tap hide input panel.
Janam Technologies LLC
5-1
XM60 User Manual
To change input panels:
1.
2.
3.
The standard alpha keyboard is the default.
For numeric, tap on 123 keyboard in the lower left corner of the main keyboard.
For international, tap on áü key, directly to the right of 123.
Alpha
Numeric
International
Import data
If you have data stored in computer applications such as spreadsheets and databases, or if you want to
import data from another device, you can transfer the data to your Janam XM60 handheld computer
without having to key it in manually. See chapter 6 for more details on how to transfer files and
applications.
Use the barcode scanner
You can also get data by scanning barcodes into the handheld computer. See chapter 3 for more details.
Janam Technologies LLC
5-2
XM60 User Manual
6
Exchange and update Data Using ActiveSync
ActiveSync technology lets you synchronize – exchange and update – data between one or more Janamconnected handheld computers and your PC using either a USB or serial cable. To synchronize data, you
must connect your Janam XM60 and PC directly, place your handheld computer in the cradle attached to
your computer, use a modem or use a network.
Create a user profile
You can create a user profile to load data into a Janam XM60 without associating that data with a user
name. If you didn’t set up a user profile in chapter 4, follow the instructions below.
To create a user profile:
1. Tap MS Windows icon > settings > control panel.
2. Choose owner.
3. Enter identification, notes and network ID information.
4. Tap OK to save changes.
Identification
Notes
Network ID
Set up/delete a partnership
There are two types of partnerships that you can create with
your Janam XM60. You can automatically synchronize the files
on your handheld device with your PC when you start your
device. Or you can establish a guest partnership and manually
copy the files you want to synchronize.
To
1.
2.
3.
set up a partnership to automatically sync files:
Connect your Janam XM60 to your PC.
On your PC, select start > programs > ActiveSync.
Click yes > next.
Janam Technologies LLC
6-1
XM60 User Manual
4.
5.
Select yes in the select number of partnerships screen.
Click next.
6.
Select the files you want to sync between your mobile
device and your computer.
•
Note: when you select files, an additional screen
appears (shown below) with further information. Read
carefully before proceeding, because your files may be
converted.
7.
Click the settings button in the select synchronization settings screen
(#6 above), and the screen at right will appear.
Add the files you want to sync with the files on your mobile device.
Click OK > next to continue the setup.
8.
9.
10. Your partnership setup is complete, and you may need to
accept the partnership on your Janam XM60.
Janam Technologies LLC
6-2
XM60 User Manual
11. The ActiveSync manager screen appears on your desktop. As the
automatic synchronization progresses, the status bar will fill and the
sync will be displayed in the status section.
To
1.
2.
3.
delete a partnership:
Go to file > delete partnership in the ActiveSync manager.
Click yes when confirmation screen appears.
You will need to re-establish the partnership when you connect
your Janam XM60 to your PC, or you will need to connect as a
guest.
To
1.
2.
3.
4.
set up a guest partnership:
Connect your Janam XM60 to your PC.
On your PC, select start > programs > ActiveSync.
Click no > next.
You will be connected to your mobile device, and the guest
connection will appear, as shown.
5. You may also need to accept the partnership on your
Janam XM60.
6.
Select explore to manually copy the files on your handheld to your
desktop computer.
7.
Windows Explorer will appear with the folders and files on
your mobile device.
Select the file or file(s) you want to move or copy.
Choose copy files and select destination folder on your PC.
8.
9.
Janam Technologies LLC
6-3
XM60 User Manual
Partnership settings
To change partnership connection settings:
1. Click the ActiveSync icon in your Windows system tray
(bottom right corner of taskbar).
2. Choose file > connection settings from the ActiveSync
manager menu.
3. Make changes > OK.
Janam Technologies LLC
6-4
XM60 User Manual
7
802.11 Wireless Configuration
The following section details the basic 802.11 wireless configuration for your Janam XM60.
Wireless local area network access
To add or edit a WLAN:
1. Tap the MS Windows icon in the command bar > settings >
network and dial-up connections icon.
2.
Tap and hold BGW200WL1.
3.
Tap enable.
Janam Technologies LLC
7-1
XM60 User Manual
4.
Tap twice on add new.
5.
Enter ESSID, authentication and encryption.
6.
After wireless is configured, double tap the network
icon to edit or add another WLAN.
Janam Technologies LLC
7-2
XM60 User Manual
8
Bluetooth Manager
There are several ways to set up your computer for wireless access, and the following section details the
general instructions needed to set up Bluetooth on your Janam XM60. Please note that complex or custom
installations may require additional expertise from Janam’s technical and support team.
Start Bluetooth manager
To start Bluetooth manager:
1. Tap MS Windows icon in the command bar > settings > control panel.
2. Tap twice on Bluetooth device properties icon.
3.
Go to tools > turn on Bluetooth.
4.
5.
Start Bluetooth from the taskbar.
Click the taskbar’s Bluetooth icon, and choose turn on Bluetooth.
Janam Technologies LLC
8-1
XM60 User Manual
Scan Device Wizard
To
1.
2.
3.
4.
5.
use Scan Device Wizard:
Tap the scan device icon to start the wizard.
Tap next.
Wait until searching is finished.
Choose the device you want to add > next.
Tap finish.
Bond Wizard
To
1.
2.
3.
4.
5.
use Bond Wizard:
Tap the Bond Wizard icon.
Press next.
Press yes to authenticate.
Insert a PIN for pairing and enter the same number on the pairing device.
Tap finish to exit.
Janam Technologies LLC
8-2
XM60 User Manual
Send files
Please note that your target device needs to support OBEX file transfer option.
To send files:
1. In the Bluetooth Device Manager, choose send from the file menu.
2. Tap search to start searching the device.
3.
When you see your target device, select it.
4.
5.
6.
Choose the file you want to send.
Your target device will ask you to accept the file. Transfer will start after you accept it.
Wait until transfer is finished.
Janam Technologies LLC
8-3
XM60 User Manual
File browser
Please note that your target device needs to support OBEX file transfer option.
To
1.
2.
3.
use the file browser:
Choose the device you want to connect to.
Input PIN number.
If connection is successful, you can view the remote and local files.
Bluetooth ActiveSync
To
1.
2.
3.
setup your PC to accept Bluetooth ActiveSync:
Go to MS Windows icon > settings > control panel.
Select Bluetooth devices > COM ports.
Add a COM port if needed.
4.
At the ActiveSync option, allow connections to the BT COM port
(e.g., COM10).
Janam Technologies LLC
8-4
XM60 User Manual
5.
6.
7.
Choose Bluetooth ActiveSync on your XM60 device.
Pick the device that can accept Bluetooth ActiveSync.
•
You will see the serial port provided by the PC (make sure that your PC is not currently synching
with another device.
Tap OK and ActiveSync should start.
To
1.
2.
3.
set up Bluetooth LAN service:
Go to file > Bluetooth LAN access.
Press search to search for your target connect device
Make sure your target device supports Bluetooth LAN access service, because Windows XP does not
support such services by default.
4. Choose your target device and press OK. Authentication may be required.
5. Enter the same PIN number at your target device.
Janam Technologies LLC
8-5
XM60 User Manual
To
1.
2.
3.
4.
use Bluetooth COM service (create a BT virtual COM port):
Choose COM service from file menu in the Bluetooth device manager.
Pick the device for creating the virtual COM port.
Select the COM number to map to.
A success message appears, if your target device accepted the Bluetooth connection.
To
1.
2.
3.
check what service the scanned BT device supports:
Choose the target device in the Bluetooth device manager.
Click on property icon.
The two tabs – general and services – will show what service the other device supports.
Settings
To change the Bluetooth settings:
1. Go to device > my Bluetooth device in the
Bluetooth device manager.
2. Change the name and other settings.
Janam Technologies LLC
8-6
XM60 User Manual
To check Bluetooth chip setting:
1. Go to tools > about.
2. The next screen will show the chip setting.
Janam Technologies LLC
8-7
XM60 User Manual
Janam Technologies LLC
8-8
XM60 User Manual
9
Beam Information
You can beam any file or application between Janam connected handheld devices. Beaming distance to
other connected devices may be different.
Turn beaming on/off
To turn beaming on or off:
1. Go to MS Windows icon > settings > control panel.
2. Double tap Irda icon.
3.
Click on or off > OK.
Janam Technologies LLC
9-1
XM60 User Manual
Beam information
To beam a file or application:
1. Navigate to Windows Explorer from the MS Windows icon in the
command bar.
2. Select Windows Explorer.
3. Highlight or select the file you want to send.
4.
From the top menu, select file > send to > beam files.
5.
Aim the sending device IRDA window at the receiving XM60 IRDA
window, about 6 inches apart.
•
You will have to acknowledge and accept the receipt of the file on the
receiving device.
Janam Technologies LLC
9-2
XM60 User Manual
10
Regulatory and Maintenance
Regulatory and safety approvals
The CE Mark on the product indicates that the system has been tested to and conforms with the
provisions noted within the 89/336/EEC Electromagnetic Compatibility Directive.
For further information, please contact:
Janam Technologies
100 Crossways Park West, Suite 105
Woodbury, NY 11797
Janam Technologies shall not be liable for use of our product with equipment (i.e., power supplies,
personal computers, etc.) that is not CE marked and does not comply with the Low Voltage Directive.
FCC and Canadian Compliance
XM Series mobile computers meet or exceed all applicable standards and have been manufactured to the
highest level of quality. To see the specific labels associated with RF terminals configurations, visit
www.janam.com.
Warning: Changes or modifications to this unit not expressly approved by the party responsible for
compliance could void the user authority to operate the equipment.
XM Series Terminal
Regulatory and Safety Approvals
Parameter
Specification
U.S.A.
FCC Part 15 Subpart B
Canada
ICES-003 Issue 4
European Community
EN55022:1998+A1: 2000+A2:2003
EN55024:1998+A1: 2000+A2:2003
Australia
AS/NZS CISPR 22:2004
This device complies with Part 15 of the FCC Rules. Operation is subject to the following two conditions:
(1) this device may not cause harmful interference, and (2) this device must accept any interference
received, including interference that may cause undesired operation.
However, there is no guarantee that interference will not occur in a particular installation. If this
equipment does cause harmful interference to radio or television reception, which can be determined by
turning the equipment off and on, the user is encouraged to try to correct the interference by one or more
of the following measures:
•
•
•
•
Reorient or relocate the receiving antenna.
Increase the separation between the equipment and receiver.
Connect the equipment into an outlet on a circuit different from that to which the receiver is
connected.
Consult the dealer or an experienced radio/TV technician for help.
Janam Technologies LLC
10-1
XM60 User Manual
If necessary, the user should consult the dealer or an experienced radio/television technician for additional
suggestions. The user may find the following booklet helpful: “Something about Interference.” This is
available at FCC local regional offices. Our company is not responsible for any radio or television
interference caused by unauthorized modifications of this equipment or the substitution or attachment of
connective cables and equipment other than those specified by our company. The correction is the
responsibility of the user. Use only shielded data cables with this system.
This device and its antenna must not be co-located or operating in conjunction with any other antenna or
transmitter. To maintain compliance with the FCC RF exposure guidelines for body-worn operation, do not
use accessories that contain metallic components other than specified by the manufacturer.
This Class B digital apparatus complies with the Canadian ICES-003.
Cet appareil numerique de la Class B est conforme a la norm NMB-003 du Canada.
Operation is subject to the following two conditions: (1) this device may not cause interference, and (2)
this device must accept any interference, including interference that may cause undesired operation of the
device.
L’utilisation de ce dispositif est autorisée seulement aux deux conditions suivantes : (1) il ne doit pas
produire de brouillage, et (2) l’utilisateur du dispositif doit être prêt à accepter tout brouillage
radioélectrique reçu, même si ce brouillage est susceptible de compromettre le fonctionnement du
dispositif.
To prevent radio interference to the licensed service, this device is intended to be operated indoors and
away from windows to provide maximum shielding. Equipment (or its transmit antenna) that is installed
outdoors is subject to licensing.
Battery Warning
CAUTION!
RISK OF EXPLOSION IF BATTERY IS REPLACED BY AN INCORRECT TYPE.
ALWAYS DISPOSE OF USED BATTERIES ACCORDING TO THE INSTRUCTIONS.
Use only Janam approved batteries such as the BA-XP-1 and recharge batteries using only Janamapproved chargers. Use only easily accessible wall outlets that are reached with the length of the supplied
power cables.
The standard charger provides an easy and convenient way to charge the device. You can purchase the
charger through an authorized dealer. Visit Janam’s website www.janam.com for information.
The socket-outlet shall be installed near the equipment and shall be easily accessible.
General information
1. Before using the standard charger, read all instructions and warnings.
2. Please retain these instructions for future reference.
Warning
1. No user serviceable parts inside. Do not open the charger. The charger is not serviceable.
2. If found any damage or cracking on the enclosure of the charger, do not use the charger. This
charger shall be disposed of.
3. Do not short-circuit the output terminals of the charger.
4. The charger is for indoor use only. Do not expose the charger to moisture or place the charger at
location which could subject to water spillage.
5. The standard charger is designed for use with this barcode scanner only. Do not use this charger
for other purpose.
Janam Technologies LLC
10-2
XM60 User Manual
Operating instructions
1. Insert the output plug of the standard charger to the barcode scanner before plugging the charger
into the AC power socket outlet.
2. After use, always unplug the standard charger from the socket outlet.
3. Ensure that your local power supply system complies with the technical data of the standard
charger.
Janam Technologies LLC
10-3
XM60 User Manual
Janam Technologies LLC
10-4