1
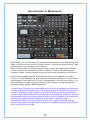
Modelonia Manual Version 2.0 November 2015 So f t w a r e by Lu i g i Fe l i c i Ma n u a l by Se a n Ah e r n an d Lu i g i Fe l i c i © NU S o f t i n g 20 0 5 20 1 5 . Al l ri g h t s re s e r v e d . This manual will show you how to use Modelonia and all of its features. To help you take full advantage of the sound design possibilities of Modelonia and have fun discovering this exciting software synthesizer. Are you an experienced Modelonia 1.7 user ? Then you may first jump to "What's new in Modelonia 2.0" . 1 Table of contents Introduction to Modelonia ......................................................4 Glossary............................................................................................6 Demo Restrictions:......................................................................7 Getting started with Modelonia ......................................... 7 Installation...............................................................................................7 System Requirements........................................................................8 Using Modelonia........................................................................... 9 Using Presets...................................................................................... 10 The Preset Name Prefix .......................................................................... 11 More About The Presets Management. .......................................... 12 The Sound Wizard..................................................................... 14 Tweaking presets....................................................................... 15 Plucked-to-Sustained: Gain Macro, XM Modif...................15 XM parameters.................................................................................... 15 Filters.......................................................................................................16 Envelope, Modulation, LFOs....................................................... 16 Modelonia Audio Effects............................................................... 16 EQ ...................................................................................................................... 16 FX .......................................................................................................................16 AP EQ .............................................................................................................. 16 A short tutorial: Where to start?.............................................. 17 FAQ 2.....................................................................................................18 The Sound Generation System In Detail........................19 Basic Structure ................................................................................. 20 Signal Path............................................................................................20 Blocks.............................................................................................. 21 Exciter Block : Pick Exciter, Noise Exciter and Lips Exciter..................................................................................................... 21 Resonator Block : String Resonator and Horn Resonator.............................................................................................. 27 2 Modulation Block ............................................................................. 32 Modulators ..................................................................................................... 32 Modulation Targets....................................................................................34 Globals, Setup Options and more .......................................... 35 The "EQ" ..........................................................................................................38 The "FX" ..................................................................................................... 39 The "AP EQ" ................................................................................................ 39 Other Globals (The Tuning table)........................................... 41 The Look Of Modelonia ......................................................... 42 Changing skins...................................................................................42 FAQ 3........................................................................................................42 Appendices................................................................................... 43 Appendix A MIDI CCs (Control Change, Aftertouch and Velocity)................................................................................ 43 Appendix B Preset Management......................................46 Create Your Own Templates For the Sound Wizard....... 46 Appendix C Known issues, reminders and more tips: .............................................................................................................47 Appendix D What's new in Modelonia 2.0 ................. 48 Sound Engine Update and Upgrade........................................ 48 Utilities Update and Upgrade......................................................49 About NUSofting........................................................................ 50 Software End User License Agreement (EULA) for NUSofting products..................................................................50 Acknowledgments and Credits...........................................52 3 Introduction to Modelonia Modelonia is a novel physical modeling synthesizer from NUSofting that uses a hybrid of two distinct model 'types' : a plucked-string model, and a blown-bore (ie trumpet-type) model. Both models may be used simultaneously, and the signal path allows cross-modulation between the two models for more interesting and complex tones , going beyond stringed and wind instrument simulation. Modelonia's sophisticated synthesizer engine is capable of a wide variety of very expressive and natural-sounding emulations* of acoustic instruments, from guitars to flutes, saxophones , violins and cellos. It is also capable of more original sounds, from ethnic-sounding hybrids, through totally unique abstract tones. *Emulations: Please note that Modelonia is a multi-purpose synthesizer. It uses a physical modeling sound engine designed to produce original sounds. Therefore, the realism of the emulation varies from preset to preset. While Modelonia's flutes and harps sound quite realistic, sounds like saxophones or acoustic guitars will not be as realistic as those you can get from specialized software dedicated to emulate such instruments. Still, you can expect lively and organic sounds that go beyond the usual cold and static nature of samples and are more lifelike than synthesized sounds . 4 FAQ 1 FAQ 1 Which sounds may I expect from Modelonia and what different types of instruments are physically modeled? Modelonia features two basic models: plucked string and blown bore (named "Horn"). The two models are open to manipulation and they can interact in various ways, emulating to some degree sounds like guitar, dulcimer, marimba, steel drum, brass, flute, harmonica, accordion, bagpipe and bowed strings like cello. Modelonia excels in "ensemble" sounds, like small orchestras with a rich "organic" feeling , and "lead" sounds, like flutes and other wind instruments to be played as monophonic synth voices. But thanks to new features of Modelonia 2.0 also punchy basses and more aggressive sounds are possible. Are un-natural and hybrid sounds possible with Modelonia? Yes, thanks to the interaction of the string and horn models you can create unheard instruments which still deliver an acoustic feel and the liveliness of a real instrument, like hybrid "sax harmonicas" or "plucked flutes" as well as many other interesting and expressive strange sounds. Evolving drones and "scary" soundscapes are possible too. What kind of music does Modelonia suit? Modelonia has been successfully used in many genres, like video game sound tracks, new age , pop songs, world music and also in various kinds of ambient and experimental genres. The ability to create evocative sounds, haunting solo lines and more hybrid unconventional sounds ask s your creativity to put Modelonia to use with no limits of genre. Modelonia uses a hybrid physical modeling technology to calculate and output sound in real-time, no samples or wavetables are used. Modelonia includes a 'Sound Wizard' which provides you with a set of generic starting-points for your own presets. Modelonia supports extended MIDI-learn mapping , multiple skins and cross-platform presets management . Read on to know more about all its features. 5 Glossary Simplified glossary of some terms and acronyms in the context of this manual. Module: one of the components of the Modelonia sound-generation engine. Block : a set of modules. Physical Modeling : in the context of this manual this is "Physical modeling synthesis", a method in which the waveform of the sound to be generated is computed in real -time by using a mathematical model, to simulate a musical instrument. Exciter : the module responsible for initiating the sound vibrations, it triggers the Resonator. Resonator : the module responsible for generating the sound vibrations once excited by a proper exciter. Coupling : the interaction of two vibratory systems, in Modelonia this is mainly the cross-modulation between the String and the Horn resonators, as regulated by the "XM" parameters. Cross-modulation : For Modelonia see Coupling. Cross-feedback : For Modelonia see Coupling. XM : Cross-modulation, in Modelonia this is the parameter to regulate resonators coupling. AU : Audio Unit, Apple audio plugin format. VST : Virtual Studio Technology, Steinberg audio plugin format, usually the standard Windows audio plugin. Cross-platform : compatible with both Apple Mac s and Windows PCs. DAW : Digital Audio Workstation, software application. Sequencer : software application. Plugins Host : software application. (Sequencer, Plugins Host, DAW are common terms for software which loads and runs audio plugins either in AU or VST format) GUI : Graphic User Interface, the panel showing the controls in the Modelonia plugin window, also called Editor . All technical specifications of the products specified in this manual may be subject to change without notice. The documents may not be changed, especially copyright notices may not be removed or changed. But you are free to copy and share the file of the manual as it is, with no changes. Modelonia is a Trademark of NUSofting company. Windows is a registered trademark of Microsoft Corporation in the United States and other countries. Mac OS and Audio Units are registered trademarks of Apple Computer, Inc. VST Instruments and Effects are trademarks of Steinberg Media Technologies GmbH. All product and company names are trademarks of their respective owners. Unauthorized copying, renting or lending of the software is strictly prohibited. Visit NUSofting on the World Wide Web at http://nusofting.com 6 Demo Restrictions: The free ly downloadable demo of Modelonia has these limitations: 1) Saving the state in the host (presets changes ) is disabled 2) A splash screen will remind you of the demo version. 3) At intervals of about 120 seconds a gentle noise plays through the audio. Getting started with Modelonia Installation Installing Modelonia is easy. For Windows you just need to copy the content of the Modelonia VST zip archive into your Vstplugins folder. For Mac a simple installer is provided to copy AU and VST plugins in the right folders. To uninstall you just need to delete the Mod elonia files and folders. . Warning: Version 2.0 completely replaces all files of previous versions! The format of the skin files and presets have changed in version 2.0.. This means all previous skins are now obsolete! But of course you can still load old presets you saved outside of the Modelonia installation by using your DAW's features for managing presets , (That is the host software will be responsible for loading the old preset files, read more in the next “Using Presets ” section). Note. Many VST hosts may allow you to have multiple Modelonia versions installed at the same time if you provide separate folders for each plugin. However, AU on Mac may allow only the 2.0 version,and so in that case you have to manually backup all old Modelonia files you want to keep . The AU installation could also, in some cases, require you to update the whole AU plugins cache of the DAW. For any questions don ’t hesitate to ask NUSofting , writing to [email protected] or posting on our kvraudio.com forum. 7 Technical Modelonia uses very few resources compared to similar synthesizers. The synthesis engine has been optimized from the start, even while it is 2X oversampled to reduce the aliasing. System Requirements The following minimum computer configuration is necessary to run Modelonia: Mac OS : • Mac OS X 10. 6 or later (10.5 could work too it ’s not fully supported) • Intel Core processor or later • 512 MB of RAM • 15 MB of free hard drive space • 1024 x 768 screen resolution • Built-in audio interface • AU or VST host software Windows : • Windows XP SP2 32-bit or later Windows 32-bit/64-bit • Intel Core or equivalent processor • 512 MB of RAM • 15 MB of free hard drive space • 1024 x 768 screen resolution • VST host software 8 Here is a reduced screenshot the new big skin: Using Modelonia Modelonia is a VST instrument plugin (VSTi) and an AU instrument, which should be usable in most sequencers with AU or VSTi support. Every sequencer works differently, so you should consult the manual on how to use AU or VSTi plugins in your projects. Generally, however, you will be inserting Modelonia into a track within your project, and creating MIDI patterns or sequences which trigger notes within Modelonia. Of course you can also play the Modelonia plugin live, using a MIDI Keyboard or other MIDI controller, like breath controllers , once Modelonia is loaded in a plugin host. Modelonia features an advanced MIDI matrix to assign Control Change, Aftertouch and Velocity to any of its 102 parameters, for real-time modulation. Please read the MIDI section in Appendices 9 Modelonia is very straightforward to use, and even if the principles of physical modeling are unfamiliar to you, its architecture is actually fairly simple even compared to basic subtractive synthesizers. All the controls are visible, and they are logically grouped according to the various 'blocks ' which make up the structure of the sound-generation engine. Please note that for many presets the modules named "String" and "Horn" on the graphic interface won't always sound like plucked strings or horns . Since the resonators can be used interactively to model different sound generators , you can simply think of them as resonator 1 and resonator 2, abstractly. The same goes for the "exciter" modules named "Pick", "Noise" and "Lips", you can call them exciter 1, exciter 2 and exciter 3. "Pick" is an impulse generator, "Noise" generates filtered noise, "Lips" generates a continuous tone which is feedback modulated by the "Horn" resonator. What you will hear in the output of Modelonia is the sound produced by one or both resonators (String and Horn) depending on what is used in the chosen preset . The red arrows represent the coupling Using Presets You can select a preset using the Presets Menu . Just click on the preset name display on the Modelonia GUI to open it. That's the best choice, since you can choose the category of presets by the submenus. You can also browse the presets using the "next " and "previous" buttons , marked [>>>] and [<<<] respectively. Alternatively you can also select a preset using the AU or VST plugin menu provided as standard facilities by your DAW software . 10 The Preset Name Prefix We use a 3-characters prefix in the preset name to organize the presets in categories . These are the prefixes used so far and their meaning: AMP : sound making use of AP EQ Overdrive as amp emulations for aggressive or “dirty ” tones BAS : sound intended for bassline or other bass parts BLN : sound which comes close to simulat ing a blown instrument, like a flute BOW : sound which comes close to simulat ing a bowed instrument, like a cello ENS : sound designed to be used as ensemble, mostly for playing chords FXS : sound designed to be used as effects or noise, it can be untuned HBR : sound designed to play like a hybrid instrument, e.g, a mix of trumpet and flute, but also others that don ’t fit elsewhere. HRN : sound which comes close to simulat ing brass instruments LED : sound designed to be used as lead voice, usually played in mono mode KBD : sound designed to be close to a keyboard sound, like organs KEY : sound designed to be close to a percussive keyboard sound like a piano PAD : sound designed to be used as sustained background, mostly for playing chords , and with a "synth feeling" PLK : sound which comes close to simulat ing a plucked instrument, like a guitar or harp PRC : sound which comes close to simulat ing pitched percussions, mallets and similar TUN : sound designed to be used for the unique tuning they have The Presets Menu features submenus , one for each category. Preset names without a category prefix , match ing one of the list above, are sorted in the submenu labeled "OTHERS" Please note that the numbering of the presets in the menu reflects the order the preset files have alphabetically, not the order of the categories. A word of warning about auditioning the various presets. The instruments modeled by Modelonia usually cover a small range of notes like real instruments do. 11 For instance a real orchestra flute covers about three octaves, a classical harp can play about four to five octaves, much less for a small harp. Ethnic instruments rarely span more than two octaves. Trumpets and clarinets cover from three to four octaves. A large marimba can reach five octaves. As you see beside piano and organs all real instruments are very far from the ten octaves of the MIDI range (128 notes), and so are the Modelonia presets. Of course, since Modelonia is an unrestricted synthesizer, you can reach all MIDI notes, but do not expect good or useful sounds outside a reasonable range. For instance if you go too high with presets using cross-modulation you may hear piercing tones and aliasing, while with many presets if you go too low in the octaves the sound becomes weak or almost silent. Anyway there are interesting exceptions: playing very low tones with some Modelonia presets can produce different but still useful synthetic sounds, especially for drones or other cinematic effects. More About The Presets Management. Starting with version 2.0, Modelonia uses a new cross-platform preset format, a human readable XML file. This is a plain text file easy to read and edit in any text editor. You can load or save a single preset in the cross-platform XML format using the dialogue boxes activated by two interface buttons: the [load] button and the [save ] button , these will allow you to load or save the XML file. Note. When you load or save a XML file the currently loaded bank will be modified to reflect the change of presets. The current preset will be replaced with the one you load. But no preset file is lost. When you load a new instance of Modelonia all the preset files will be loaded, up to 512 maximum. Moreover Presets files can also be loaded or saved , individually or as full Bank, in standard VST or AU format, using your DAW features. Note that when you save a song project using Modelonia with your DAW software the currently loaded bank will be saved within the project and then reloaded * in Modelonia when you will open the project again in your DAW. (* n ot in the De mo ve r s i o n) When you load a new instance of the Modelonia plugin it will load the default bank made using all the preset files found in the Modelonia Presets folder. 12 The bank of presets which is loaded at startup of a new instance of Modelonia is made of a maximum 512 items (the first 512 preset files Modelonia alphabetically finds in the preset s folder) Note. The bank of presets does not have to be not fully filled.Currently at the release of 2.0 there are little less than 400 presets , spanning a wide range of styles. Hint: you can customize your own default bank . To learn more about presets management please read the Appendices 13 The Sound Wizard The Sound Wizard provides convenient 'starting templates' for specific common types of sound you might want to create with Modelonia. There are eleven , Basic Plucked, Basic Flute, Basic Pad, Basic Horn and others. You can select and load a template using the menu that opens when you click on the"Sound Wizard" button in the GUI. Note .The factory templates in the Sound Wizard do not affect the Tuning table so you will not loose any change made there when loading a Sound Wizard patch. The AP EQ is not affected too. Also, using a Sound Wizard template does not save or load a MIDI map. Hint for advanced users : learn how to create your own Templates for the Sound Wizard, in the Appendices 14 "Now Hands On! Don't be afraid to turn some knobs!" Tweaking presets The best way to become familiar with programming your own sounds on a synthesizer is to 'tweak' existing presets.So now, hands on! Don't be afraid to turn some knobs! With the Sound Wizard, Modelonia provides an easy route to get started creating and customizing several different families of sounds. There are several adjustments you can make to a given preset to quickly tailor the nature of a sound in Modelonia. The following hints are for any preset of course not just the Sound Wizard ones . But before reading on please note that the Modelonia parameters can be divided in three families: safe, almost safe and critical. Audio effects and modulations are safe, all gain and mix controls are almost safe, while pitch controls, filters, XMs and "R+B" are critical. That means that they can more or less destroy the "balance" obtained in the preset design.So, if you tweak the XMs, filters and pitch controls you will most likely need to recalibrate the other parameters to get a good sounding preset. Plucked-to-Sustained: Gain Macro, XM Modif These two sliders can be found just below the String and Horn Resonator sections . They affect several parameters at once to change the overall character of the sound. The top slider perform a crossfade between the volume gains of the two resonators, the bottom slider does a crossfade between the two XM parameters , changing the level of the cross-feedback configuration. These controls are meant as useful tools to quickly change the character of the sound. Experiment with them. Using these changes temporarily the settings of Gain and XM parameters and will not influence the saved preset, that is the position of the Gain Macro and XM Modif sliders will not be saved. Note that the macros can cover a wide range, so if the sound goes "wild" simply return the macro sliders in the middle. These two controls are NOT sound design parameters, they are here for you to experiment with or for sound mangling in live performance. Note that these two sliders , Gain Macro and XM Modif , are always linked to MIDI CC 45 and 46, via a fixed mapping. See also the MIDI sections in the Appendices XM parameters The two XM knobs set the amount of signal that is sent from one resonator to the other. These are powerful controls unique to the Modelonia architecture that allow to configure the physical modeling engine in an complex algorithm where the interaction of the resonators 15 shapes the sound dramatically. You almost never turn both XMs to high values otherwise the sound can be unpleasant. Filters Both resonators contain filter sections which restrict the specific range of frequencies the resonator acts on. These can be carefully changed to change the tone of the resonations, and thus affect the overall timbre. Resonators Filters are labeled LPF, LP, HP and also STIF and MODIF switches can be thought as filters as well. Note that the filters LPF, LP, HP can detune the preset, so they are not your first choice if you are just starting with Modelonia programming. Envelope, Modulation, LFOs These parameters are fairly common in all synthesizers, so you could be already familiar with them. The Envelope always modulate the amplitude of the sound, but you can also use it on the targets supported by the bottom row of modulation knobs. The LFOs are two modulators with targets controlled by the top two rows of the modulation knobs. The most common uses of LFOs are for vibrato and tremolo effects. Modelonia Audio Effects There are 3 effects modules: EQ This controls a fixed filter, which allows tailoring of the timbre by the simulation of resonant bodies etc. This is labeled EQ to remind you that it can boost low or high frequencies in the sound. Adjust the "Size" to your taste and set the "Filter" knob to the amount of filtering applied. Switch "A" for unmodulated, switch "B" for modulated "Size", that is a slow modulation of the "Size" value by its own LFO. FX This is a reverb with optional chorus. Switch "A" for clean reverb, switch "B" for added chorus. For chorus only effect turn the Mix knob to zero, hard left. AP EQ This is a two-band equalizer booster, with Low shelf and High shelf filters, and optional overd rive . The easiest way to use this equalizer is to adjust the "LH Bal" knob. You will hear that highs and lows change. You can also check the equalizer curve in the small display on the left . Switch "A" for clean channel, switch "B" for overdrive channel. If you 16 switch to “B” and raise the EQ gain , Modelonia can do dirty sounds! A short tutorial: Where to start? Start with the switches, choose a preset and turn the audio effects on and off, EQ, FX, AP EQ. Play some notes and listen how these parameters affect the sound. Then leave one of the three effects on and turn its knobs, and again learn how the timbre changes with different settings. Once you have mastered the audio effects turn your attention to another set of switches . Leave the audio effects off, adjust the gain knobs if it's necessary to boost or reduce the volume and try the MODIF switches. There is one set in the String Resonator ( SM, CP, DC, WI), and one set in the Horn Resonator (SMI: N, A, B and WI). Note that depending on the chosen preset both resonators can be used or just one of them, so try the switches with more than one preset. Experiment with those switches and note the sound changes. Use this manual, read the reference in the blocks section to learn what they do to the models. Now let's try some sliders. The easiest one s are the ADSR levels of the Envelope. Try changing the attack time using the A slider, and changing the release time using the R slider. Two other sliders to try are the two gain sliders in the Noise module, they regulate how much noise signal is sent to the resonators. Try using more noise or nothing by moving the sliders down to zero. Again try playing several presets, adjusting the Noise gains. Learning the about R+B sliders (resonance and brightness). These two sliders don't go linearly from min to max value , even though the parameter value display shows a range from 0.0 to 1.0, so their values can only be adjusted carefully by ear. You first choose a preset from the BLN or HRN family, turn the audio effects off, adjust the volume, then while playing one note try moving the R+B sliders up or down by little steps . you will hear how the resonance can disappear or increase in magnitu de and brightness depending on the exact position the sliders are. Then you can turn your attention to the resonators low pass and high pass filters (LPF, LP, HP).Read in the blocks section the details about how they also affect the instruments tuning and again experiment with them with several presets and the audio effects turned off. 17 FAQ 2 FAQ 2 Why there are so few on board effects compared to other VST synths? Modelonia is an instrument modeler, and all efforts have been put in the generation of the sound rather than in its processing. You should treat it like recording any real instrument, where you consider further equalization and more custom audio effects in addition to the raw instrument. What do I need to know to design my own sound with Modelonia? Basically a good musical ear and time to experiment with the several parameters. Also, reading the whole Modelonia User Manual, especially the Block reference sections, will help learn what the controls do. The ability to tune an instrument by ear (like most real instrument players do) is very useful while programming Modelonia since adjusting the various resonances at a consonant relative pitch usually leads to the best sounding patches. For that purpose you can turn on the "Diapason" switch, this generates a pure tuned tone for pitch reference along with the Modelonia sound . It is also important to know that for complex models, where all the synth features are used, the attack transient is mostly shaped in the "String" section of the synth and the sustained part is mostly shaped in the "Horn" section. This ends the "Tweaking presets " section of this manual, it should be enough to get you started with your creativity and have fun with the Modelonia synthesizer. "BTW did I say thanks for choosing it?" To get the most out of the real-time expressive possibilities of Modelonia you need to use MIDI Learn for controlling parameters. See Appendices 18 The Sound Generation System In Detail There are basically two parallel sound-generation models in Modelonia; a plucked-string model, and a blown-bore model. These models may be used singly, in parallel, or fed into each other. The full sound-generation structure is relatively simple to understand if you consider these two parallel models... The Pick Exciter, in conjunction with a definable amount of the output from the the Noise Exciter, initiates a 'reaction' within the String Resonator, and the Resonator continues that reaction generating the evolution of the volume and timbre of the plucked-string model. This results in a note which is effectively 'triggered', then fades away as the string resonations die out. The Lips Exciter, in conjunction with a different definable amount of the output from the Noise Exciter, initiates a reaction within the Horn Resonator, and the Resonator continues that reaction. However the Resonator also feeds back to the Lips Exciter, causing a bi-directional effect between the two components of the model. This results in a sound which is effectively 'held', until the notes is released; only then do the timbral changes die out. The output from both the String Resonator and the Horn Resonator are sent to the master section, but there is also the possibility to feed the output from each Resonator into the other. This cross-modulation between models can be used for some of the more experimental sounds Modelonia is capable of, as well as subtly enriching specific sounds. The only thing to be aware of is that a dual cross-modulation, where both resonators feed each other using high gain signal, can cause pitch instabilities. That means that the XM knobs position is very important and needs to be carefully set. 19 Basic Structure There are five basic 'blocks' of controls in Modelonia, and the basic structure of the synthesizer can be conveniently compared to that of the familiar subtractive synthesizer, although the underlying algorithms and controls are somewhat different. Exciter block : There are three separate exciter components, a 'Pick' exciter, a 'Lips' exciter and a 'Noise' exciter. These are used to trigger oscillation in the resonators. . Resonator block : this block modifies the tone and its evolution.. There are two separate resonator components, a 'String' resonator, and a 'Horn' resonator. These have some common and many different parameters to shape the sound. Modulation block : LFOs and an ADSR envelope as would be found in most synthesizers, and a ‘modulation matrix ’ to set the targets. Global Block : Global controls affecting the synthesizer as a whole, like master pitch, main volume, audio effects and others. Tuning Block :Tuning compensation of each note, in the highrange for each of the plucked-string and blown-bore models. One set of sliders for each resonator allow adjusting the fine pitch in cents for each note in the higher octaves. Signal Path The signal path is relatively simple: the initial harmonic content of a sound is generated in three parallel streams within the Exciter block. These streams are passed to the Resonators block, where their timbral evolution takes place. Finally, the output from the Resonators is processed through a 'master stage' of equalization, effects processing, and a gain stage, controlling its overall final 'sound'. That simplicity ends when the XM controls are used, then the interaction between the Resonators creates a more complex signal path. Moreover also the SA switch can change the properties of the Resonators. Keep reading to learn about that and the other parameters.. 20 T Blocks Exciter Block : Pick Exciter, Noise Exciter and Lips Exciter. Pick Exciter The Pick Exciter is 'unidirectional', i.e. it outputs sound, but is unaffected by any other sound-generation component. It does not continuously oscillate, but instead produces a brief sound 'impulse', which is then fed to the String Resonator. The parameters for the Pick Exciter determine the 'shape' of the impulse. The shape of the impulse models approximately the initial shape of the string when plucked or struck to start the vibrations. Plucking in the middle of the string. Hence we can identify the two main harmonic profiles by a triangular shape or a rectangular shape, a horizontally wide triangular shape of the impulse produce s the sound of a plucked string, pulled and released, whereas a horizontally narrow rectangular shape of the impulse produces the sound of a hammered string, like hit by a stick. Although the impulse of the Pick Exciter models are approximations physical events , you can clearly hear the sound differences while experimenting with the impuls e shape. 21 You can use the Basic Plucked or the Basic Nylon presets from the Sound Wizard menu as starting points. Since this exciter only models the shape of a simple impulse, it is usually combined with the Noise exciter to generate a richer harmonic spectrum in the String resonator. Controls Comments Gain Controls the initial 'strength' of the pick excitation, the amplitude of the impulse. Displacement (Onset) Controls the impulse position relative to the string length, as represented by the x axis. This emulates the plucking as being far or close to the string bridge. Displacement (Width) Controls the impulse width, a narrow impulse leads to a softer sound. This parameter also controls the gate applied to the Noise output that goes to the “String” resonator. The output to “Horn” is not gated. Displacement (Slope) Controls the impulse shape, triangular vs rectangular. See above the explanation about plucked or struck . Vel Amount of influence MIDI note-on velocity has over the Pick exciter impulse Also called velocity sensitivity Rand Adds a certain amount of randomness to the Pick exciter impulse shape, for realism. This can be a subtle variation and even at max value the randomness is not excessive. 22 Noise Exciter The Noise Exciter, like the Pick Exciter, is unidirectional. However it continuously generates sound, a filtered noise source which may be routed independently to both String and Horn Resonators. The parameters for the Noise Exciter determine the tone of the noise, and its destination. The noise signal is used to add complexity to the Resonators generated tones, obtaining a richer harmonic spectrum. Controls Comments FQ Centre-frequency of the filtered noise source Here is where you tune the noise tone BW Bandwidth of the filtered noise source Adjust s the br oadness of the noise Gain (to String) Amount of the output sent to the String Resonator Note that the Noise output that goes to the “String” resonator.is gated by the width of the Pick Exciter. Gain (To Horn) Amount of the output sent to the Horn Resonator Vel Amount of influence MIDI note-on velocity to the Noise exciter gain Sets the same sensitivity for the two outputs. Keytr The amount the centre frequency of the Noise Exciter tracks the MIDI note being played When Keytr is at max and the FQ slider is in the middle the tuning of the noise follows almost completely the pitch of the notes being played. Add Wave to Noise Values up 0.5 mix a tuned component with the noise. From 0.5 to 0.92 noise is reduced until only the tuned component is used. A tuned component in the Noise Exciter is useful to add warmth to flute and bowed string sounds. 23 There are 5 types of waveforms you can select using the Sub Osc multi switch: 1) Triangle 2) Parabolic, saturated sine wave 3) Ramp 4) Triangle plus noise 5) Parabolic plus noise New 2.0 feature, sub osc mode added to Noise module . Add Wave to Noise Values up 0.5 mix a tuned component with the noise. From 0.5 to 0.92 noise is reduced until only the tuned component is used. Over 0.92 or by clicking the Sub Osc switch below the "Add Wave to Noise" knob you activate the Sub Osc mode. When types 3 , 4 or 5 are selected you can use the Noise filter controls to shape the harmonics of the sub oscs, while types 1 and 2 make no use of the filters. The Sub Osc is very useful to fatten up the sound adding a strong fundamental tone to the generated timbre. This allows to create more broaden sounding instruments. Lips Exciter The Lips Exciter is 'bidirectional', ie it can output a sound source to the Horn Resonator, but it can also be part of a 'coupled' feedback with that Resonator. It continues to oscillate as long as the MIDI note is held. The parameters for the Lips Exciter determine the timbre , the tuning and the shape of the oscillation. Controls AM1 and AM2 Amplitude Modulation over the pitch of discrete components of the lips vibration, for vibrato, pitch changes, and subtle timbral variations . Comments You can turn off AM1 and AM2 controls with the switch on the right. 24 R+B React + Brightness : adjust the reaction of the Lips Exciter to the Horn resonator feedback changing the tone and volume. Note that this is very sensitive parameter and its influence on the sound is determined also by the other R+B parameter in the Horn resonator module. Their relative positions matter for the Resonator 2 ("Horn") timbre. Gain Gain of the Lips stage Reson (A) : Resonance attack stage, adjusts the time it takes the tone to build up . This overrides the "A" parameter in the ADSR envelope module. That means that to have a fast attack for the Lips exciter both "A" controls must be set to low values Reson (R) : Resonance release stage, adjusts the time it takes to fade out . This is overridden by the "R" parameter in the ADSR envelope module. PE Pitch Emitter - turns on a sine tone emitted by lips vibration, so with PE off the Lips Exciter acts only as part of the coupled feedback with the Horn Resonator. Note : If this is off, the Horn Resonator will need a different source of sound, e.g. the Noise Exciter, or the String Resonator, otherwise it will produce silence . New in 2.0 . The "PE" switch in "Lips" exciter has been extended to a knob control. Up to Modelonia 1.8 it turned on the "pressure emitter", now in 2.0 it adjusts the PE level in the right half turn (marked with a green curve), and it switches to an alternative algorithm when used in the left half (marked with a red curve). This new feature take s better advantage of the external exciters to the "Lips" module, i.e. the Noise module and the String module via "XM to Horn". Moreover if you use only the Noise Exciter, with PE off, then Lips "A" still affects the attack time resonance 25 Vel Amount of influence MIDI note-on velocity has over the Lips Exciter How much MIDI velocity controls the Lips Exciter gain. Keytr The amount that resonance gain of the Lips Exciter tracks the MIDI note being played Use this to balance the Lips Exciter gain over the whole keyboard. 26 Resonator Block : String Resonator and Horn Resonator. Note. XM controls are most important; XM is cross-modulation , but you may also call it coupling or cross-feedback . These controls allow you to send part of the signal of one resonator into the other. If you use both cross-modulations at the same time you set up a figure-8 shaped feedback configuration, and whilst this may affect pitch badly if overused, it can also lead to interesting results and richer sound. String Resonator Models a resonating string model. Note. The HP and LP filters and Pitch controls are very important when this Resonator is cross-fed with the Horn Resonator. Ver y high HP knob sett ings and ver y low LP knob sett ings will also slight ly affect the int onat ion of the inst rum ent, requiring compensat ion us ing the fine pit ch cont r ol or the Adjust slider s in the Tuning block Resonator Controls Comments Filter (LP ) Controls the frequency of a low-pass filter which affects the timbre and the sustain of the String Resonator. It may be understood also as the dampening effect due to the material of the string. For instance a nylon string will be emulated by a lower filter setting than a steel string. This filter is 100% updated only on note retrigger, therefore turning the knob during sustain partially affects the timbre. Full changes the timbre only occour when you play a new note. Filter (HP) Controls the frequency of an high-pass filter which affects the timbre of the String Resonator. This filter can emulate the thickness of the string, the more the filter the thinner the string. This HP filter is also very useful when the two resonators feed each other. It increases the stability of the sound by reducing fluctuating and rumbling low frequencies. Pitch (Fine) Controls the fine-tuning of the pitch of the String Resonator 27 Pitch (Semi) Controls the basic pitch of the String Resonator, in semitones. These pitch parameters are very important also when Stiffness (STIF) is used to get the instrument in tune, also important in case of XM with the Horn Resonator since the relative tunings create different harmonic profiles Modif (SM) Modifier - special modulation; causes a more 'buzzy' sound Modif (WI) Modifier - wave inversion; causes different harmonics to be generated With "WI" turned on the odd hamonics will be prevalent. Modif (CP) Modifier - change properties; models a different material for the string, giving a softer and shorter sound. One octave overtone is added. Good for percussions. Since this "CP" control dampen the vibrations, you may want to activate it also when high XM values are used, to reduce excessive low resonances. Modif (DC) Modifier - direct current; an offset added to the oscillation inside the string model, mostly useful when XM is active Use this to apply a bias to the signal, the effect of this bias will depend on the other settings. Stiffness This creates an harmonic dispersion, mainly used to emulate metallic inharmonicity. The Stiffness parameter is useful to emulate mallet instruments like xylophone. Note that it detunes the resonator so you have to balance the tuning using the pitch controls. Gain Controls the amplitude of the String Resonator Keytr Controls how the Feedback gain of the String Resonator tracks MIDI notes Simply put it adjusts the volume across the notes range, 28 Mixer (FX) Controls how much of the output of the String Resonator is sent to the FX processor stage Mixer (L-R) Controls the stereo positioning of the String Resonator block ouput XM to Horn Controls how much of the output of the String Resonator is sent to the Horn Resonator to cross-modulate it Here is where the resonators coupling happens. Horn Resonator Models a resonating bore model. A cylindrical tube is modeled but by coupling it with the String Resonators conical shapes can be emulated. Resonator Controls Comments Filter (LP F) Controls the frequency of a low-pass filter which affects the timbre of the Horn Resonator This filter is updated only on note retrigger, therefore turning the knob while on sustain does not change the timbre until you play a new note Pitch (Fine) Controls the fine-tuning of the pitch of the Horn Resonator Pitch (Semi) Controls the basic pitch of the Horn Resonator in semitones. Very important in case of "XM" with the String Resonator since the relative tuning create different harmonic profiles 29 Note Controls how the Pitch of the Horn Resonator tracks or doesn't track MIDI notes. This parameter lets you us the Horn Resonator as a resonating fixed object for input from the String XM. Here you have three settings: 1) MIDI: follows the pitch of the notes played 2) Fixed C4: the resonator is always tuned to C4 frequency 3) Fixed C6: the resonator is always tuned to C6 frequency R+B React + Brightness : adjust the reaction of the Horn Resonator, changing the tone and volume Note that this is very sensitive parameter and its influence on the sound is determined also by the other R+B parameter in the Lips Exciter module Modif (SM) Modifier - special modulation; causes a more 'buzzy' and loud sound. Two levels of saturation are available. Different types of waveshaper are selected with this switch. Modif (WI) Modifier - wave inversion; causes different harmonics to be generated With "WI" turned on the odd hamonics harmonics will be prevalent. This models a cylindrical air column closed at one end, which will produce resonant standing waves at a fundamental frequency and at odd harmonics. Closing one end of the cylinder introduces a constraint that prevents it from producing the even harmonics. Gain Controls the amplitude of the Horn Resonator Keytr Controls how the Gain of the Horn Resonator tracks MIDI notes Simply put it adjusts the volume across the note range, Mixer (FX) Controls how much of the output of the Horn Resonator is sent to the FX processor stage Mixer (L-R) Controls the stereo positioning of the Horn Resonator block output 30 XM to String Controls how much of the output of the Horn Resonator is sent to the String Resonator to cross-modulate it Here is where the resonators coupling happens. SA Changes the models algorithms, it turns on a set of DC filters that changes the behavior of both models Strings and Horn, for more sound design possibilities. Usually bowed instruments emulation benefit from this switch being on. As usual just experiment with it in any setting , just a click can make your sound very different. Better or worse as it can be. Things you must know about SA to avoid frustration! with "SA" on, the "Horn" resonator produces sound even with "PE" off, but "AM" doesn't affect the pitch. with "SA" on and "PE" off the "WI" switch doesn't change the sound of the "Horn" resonator. with "SA" on, the "String" "DC" is overridden. with "SA" on, the "String" gets detuned, like steeldrums. This is a useful thing for some sounds. 31 Modulation Block Modulators This is a set of three additional modulation sources, as well as a 'modulation matrix' allowing each of those sources independent control over six parameters each. LFO1 and LFO2 Controls Comments Shape Shape of the LFO waveform. The waveforms available are sine, triangle, square, ramp up and ramp down. Sync Tempo-sync disabled, or division setting. The rate of the LFO module can be synchronized to the clock of the host sequencer. To do so, simply click on the Sync menu and select one of the value. Rate Frequency, or tempo-sync multiplier. Adjusts the sync value selected on the "Sync" knob by the rate multiplier. 32 LFO Single Shot Mode When the LFO 1 or 2 are in Single Shot Mode they can be used as an extra envelope that uses the shape selected. See the pictures . There are five modes and for each mode you can change the shapes, making several useful combinations. For instance you can bend the pitch up or down in the attack stage. The "Rate" knob will still control the speed of the envelope. Note. The fifth mode is not an envelope mode but a mix between the waveforms of the two LFOs. This way you will have the same output from both LFOs, but the relative rates and shapes will allow many interesting modulations . 33 Four Stages Envelope Controls A Attack Time Linear D Decay Time Linear S Sustain Level R Release Time Linear Comments Setting an high value for the Release parameter will lead the playing voices to remain active for a longer time, which will increase the CPU usage if the max polyphony control "Voices" is set to an high value as well. Please note that since the Resonators, especially "String", can produce their own amplitude envelope you should set the ADSR to fit that for maximum playabilty. Note. For blown sounds and wind instruments, do not set the envelope "A" and "R" to. absolute zero, unless you like clicks in your sound. Modulation Targets Modulation level controls for 6 different simultaneous destinations for each of the two LFOs and the ADSR envelope. These targets are fixed, while assignable targets for real-time modulation can be created with the MID I mapping, see Appendices . Note.The two LFOs can modulate each other speed. 34 There are 18 destinations some them have a clearly audible effect other are more subtle. The depth of modulation goes clockwise, when the knobs are turned hard left you have zero effect. The Env modulation applies the ADSR amplitude profile to the target parameter Globals, Setup Options and more 1 Controls Sound Wizard Selects a Sound Wizard preset template The templates are simplified presets to show you a starting point for further sound design. Setup Option Menu This menu offers various options: Open the preset folder Open the skin folder Delete MIDI map for current preset Generate Random preset Deviate parameters by 23% Reset the modulations to zero Reset the Tuning table Preset Name Display Name of the currently selected preset Preset Functions Four buttons for: Previous preset in bank Next preset in bank Save preset as XML file Load preset as XML file To better understand the preset files management please read the rest of this manual. Diapason Switches a reference diapason tone on or off to tune the resonators by ear. A tuned pure tone will be generated along the Modelonia sound for pitch reference. This is just a utility not a sound design parameter, the Diapason setting is not saved with the presets. 35 Parameter Value Display Shows the value of the currently edited control. Could be Hz, dB or other meaningful scale for the parameter. MIDI Monitor Monitors incoming MIDI note info 2 Controls NUSofting Logo used to launch an utility in versions prior 2.0, currently it's not mouseable ? Displays the 'about' screen Info Displays the help image Skin Changes the selected skin 36 Not e that when the select ed skin changes also the GUI size some hos ts may require to close and reopen the plugin window to adjust the visible ar ea. 3 Controls Pitchbend Pitch bend amount in semitones. Pitch bend is difficult to implement in physical modeling for the same reasons that some of Modelonia's parameters are critical to the balance of the sound. This means that each preset can vary in how smoothly it behaves while using pitch bend. Voices Maximum polyphony, from 2 to 16 voices. Remeber that the more the voices the more CPU power is used. MONO Switch to one voice, mono legato mode. Please note that not every preset sounds correct with this feature turned on, it must be a sound that it actually make s sense to be played in mono legato mode. Also you should avoid pressing multiple keys while playing in Mono Legato to avoid clicks. Moreover the ADSR envelope may need to be adjusted for the best legato performance. 37 4 Controls 8A Shift tone one octave down Tuning Master pitch control, to adjust the fine pitch of Modelonia in the context with other instruments. Master Gain Overall volume control Audio Effects The "EQ" EQ "EQ " is a fixed resonator which can enhance middle, low or high frequencies in the spectrum of the sound. Controls Comments Size Adjusts the resonance points. The EQ spectrum profile is shifted using this parameter. Filter Adjusts the band of the filter; turn anticlockwise to decrease This regulate the effective power of the resonance. Setting the "Filter" knob hard left is the same as turning the "EQ" off. A B Changes between modulated and unmodulated EQ . Modulated means that is slowly and slightly changing in time the resonating frequencies. 38 The "FX" FX The FX is a reverb designed mostly for small room resonance plus a chorus effect. Note. Reverb is not applied to EQ output , both outputs are summed later in the signal path. Controls Comments Size Adjusts the size of the space Brite High frequenc y damping factor of the reverb decay Mix Dry/wet ratio A B Chorus on off Note that if Mix is set at zero only chorus fx is applied, so you can use chorus and avoid reverb. The "AP EQ" AP EQ This is a two-band equaliz er -booster, with low shelf and high shelf filters, and optional overdrive. Controls Comments LH Bal Tilts the equalizer curve, low vs high For quick and simple equalization you can use this control for balancing bass and treble , while all the other AP EQ controls are in or near the middle position. Hz Ls Sets the frequency of the Low shelf filter Range 50 , 2900 Hz 39 dB Ls Sets the gain of the Low shelf filter Range -12, +12 dB dB Mg Sets the gain of the whole equalizer curve Use this to adjust the overall output level of the AP EQ, particularly useful when the B channel with overdrive is active Hz Hs Sets the frequency of the High shelf filter Range 100, 6900 Hz dB Hs Sets the gain of the High shelf filter Range -12, +12 dB A B Switch A for clean channel, switch B for overdrive channel When B is on a soft saturation will distort the sound depending on the overall AP EQ gain, thus all dB controls will affect the overdrive Signal Path, image on the right. The picture shows the path of the effects in AP EQ, when you select A or B, since the AP EQ includes an overdrive and a limiter, and their order changes using the A B switch. 40 Other Globals (The Tuning table) Advanced Controls Tabbed view. By default, Modelonia 2.0 shows the new AP EQ knobs and macro sliders, while hiding the Tuning table sliders. You can just click the "Table" switch to show the tuning table sliders. Tuning : String and Horn Adjust The Tuning table enables you to perform a fine correction to each note pitch for a better sounding instrument. The Modelonia Tuning table is made of two sets of 36 sliders, one for the “String ” and one for the “Horn ” resonator, with each slider adjusting the pitch of each note in the range from A3 to G#6. This is the "critical range" of tuning, since complex sounds created in Modelonia can sound uneven in timbre or out of tune in that range due to the interactions of the modeling engines and possible limitation in computing very small number, as happens when high pitched tones are generated by the sound engine . The tones below A3 are usually automatically well tuned. The tones above G#6 are very high pitched notes which produce stable or unstable sounds, and depending on the preset they may be musically useful or not. What is the Tuning table for? One of the possible side-effects of the physical modeling system that Modelonia uses is that certain filter and cross-modulations settings may result in pitch inaccuracies in particular notes in the higher octaves. To compensate for this Modelonia allows fine-tuning of the pitch of each individual note from A3 to G#6, for both the String and Horn sections. In addition, the pitch controls can be used to help make the timbre even and consistent for every MIDI note. This can be important when using the Horn resonator, or for presets with cross-modulated signal; the nature of physical modeling is such that a slig ht difference in pitch may lead to a noticeable timbral difference. You may also use the Tuning table for limited microtuning purposes, but that is not its main goal. To identify the slider it will be highlighted in blue when the corresponding note is played 41 The Look Of Modelonia Changing skins Modelonia supports 'skins'; graphics sets which completely change the look of the GUI. The Skin button allows you to change the current skin rotating through the installed skins. Skins are installed simply by putting the new skin folder inside the plugin folder. FAQ 3 FAQ 3 How can I make a new skin for Modelonia? You should read and learn how the skin.xml file is written . You can find it in any skin folder at same place where the plugin DLL has been installed, for Windows, or inside the AU bundle on Mac. You are completely free to convert and change the appearance of the controls, size, type etc.., as long as you know how to create proper custom bitmaps. Tip for a quick new skin: make a copy of the "skin" folder with a new name, then you can simply edit the colours of the background.bmp file inside it for a new look. The skin feature in Modelonia is so powerful that can also be used to change the size of the GUI window. Of course that would need the complete production of new skin files, all image files and the skin.xml Note. Modelonia skins can use both PNG or BMP files. 42 Appendices Appendix A MIDI CCs (Control Change, Aftertouch and Velocity) Modelonia supports MIDI CC , aftertouch or velocity assignment for any parameter; all you need to do is right-click on a interface control, knob or slider, to bring up the MIDI mapping page and fill the fields: Field 1 : write here the CC number, or write "AT" or "Velo" , and press the Enter key. Field 2 and 3 : write here the start and end values, in the range of 0..127, and press the Enter key. Note that it is valid for you to enter a start value greater than the end value. Modelonia simply treats this as a reversed mapping. You must press the "Enter " key of you computer after each input to the fields. When you write AT ( lower case "at" or "a" work as well) instead of the CC number, Modelonia links both polyphonic key pressure and channel pressure to the parameter. (Aftertouch is the common name for both) As note, I implemented Polyphonic Key Pressure and Channel Pressure response the same like CC, that is not modulation per voice as Polyphonic Key Pressure is supposed to do in other synths, basically Modelonia will handle Polyphonic Key Pressure like the simpler Channel Pressure, so the modulation of the linked parameter will affect all voices being played. Hence there is no difference for Modelonia if you r MIDI keyboard send s Polyphonic Key Pressure or Channel Pressure messages. Modelonia responds to Polyphonic Key Pressure and Channel Pressure in the same way. That means that the per note (pressed key) value supported by Aftertouch in some keyboards is ignored. Modulation is always applied to all playing notes. Velocity of each note can be used a modulation source as well. And saved in the MID Map for parameters. When you write Velo (lower case "velo" of "v" work as well) instead of the CC number, Modelonia links note velocity to the parameter. Note that this way any note played will affect the parameter value. Multiple parameters can be linked to a single MIDI CC or AT/Velo . That obviously means that you can control many Modelonia parameters in different ranges at the same time, for instance using only the mod wheel or aftertouch controllers . This also allows very expressive setups for breath controllers. 43 Each preset stores its own full Midi map. View of the full MIDI map. To view the full MIDI map created by the assignments all you need to do is right-click on an interface control (knob, slider or switch) to bring up the MIDI mapping page and then click the "View All" button. This is handy since when you are going to assign a CC you can check with a single click which other parameters are linked and their range of modulation. How do I delete a MIDI link? To clear a linked parameter, right-click on it again, then enter -1 for the CC number. To clear all MIDI CC, AT, Velo assignments for the current preset use the Options menu. Note. The macro sliders have fixed assignments, that you can't currently edit: Gain macro linked to MIDI CC 45 by default, XM macro linked to MIDI CC 46 by default. All Sound Off and All Note Off MIDI messages are automatically recognized and turn Modelonia 's sound off. These messages use CC number 120 and 123 , so you should not use them for custom mapping . As stated by MIDI specifications: "Controller numbers 120-127 are reserved for Channel Mode Messages, which rather than controlling sound parameters, affect the channel's operating mode." MIDI Program Change is supported . MIDI program changes are supported in Modelonia. When Modelonia receives a MIDI program change it loads from the currently loaded bank the preset having the same number as that of the MIDI program change message. You can switch that way amon g the the first 128 presets listed numerically in the bank . For best Modelonia stability do not send to it many program changes and CC messages at the same time Note. When using MIDI Program Change to Modelonia while it ’s playing not all parameters can can jump to a new value silently, therefore depending on the preset selected a burst of noise may be produced, 44 but don't worry it will not blow up your monitors . *Remeber that you can customize the default bank, see the following Presets Management section. MIDI Implementation Chart Function or Control Transmitted Recognized MIDI channels no no Note numbers no yes Program change no yes Note-On Velocity no yes Note-Off Velocity no no Channel Aftertouch no yes Poly (Key) Aftertouch no yes Pitch Bend no yes Active Sensing no no All Sound Off no yes All Notes Off no yes Other CCs: ModWheel etc.. no yes 45 Remarks Appendix B Preset Management You can customize your own default bank by moving the preset files that you don't want to load in the default bank , into subfolders you create inside the Modelonia\Presets folder. You can still load individually any preset file in the subfolders using the the Load button and browsing for them, but they will not be loaded in the default bank each time you open a Modelonia instance . Things you must know if you open a Modelonia preset file in a text editor. Warning. When copy or editing in any way the content of the XML file of a preset you must not copy or change the bottom data in binary format, see picture below. That is the MIDI map of the preset. Always keep a backup of the factory files. Create Your Own Templates For the Sound Wizard Hint for advanced users: Factory Templates are fixed. However you can create your own Templates by copying the content of the XML file of the preset you like to add as template into the file used by the Sound Wizard. This file is called "sound wizard.xml" and it can be found in the folder Modelonia was installed in. It is an XML formatted file, but can be edited in any tex t editor, just like the single preset files . It contains is list of presets in one file; each preset is an item in the Sound Wizard menu. Note also that you don't need to have all parameters defined in a template of the "sound wizard.xml", just the ones that you want to change. However you should avoid making any alterations to this file without making a backup copy first. 46 Appendix C Known issues, reminders and more tips: 1) When sending MIDI program change to Modelonia while it’s playing not all parameters can jump to a new value silently. Therefore , depending on the preset selected a burst of noise may be produced. 2) Preset from Modelonia 1.8 and earlier can be loaded in 2.0, but a few parameters must be adjusted by hand due to the changes in the sound engine. 3) The sound of Modelonia slightly depends on the DAW host rate . The new bank has been designed at 44100 Hz, some of its may subtly change when played using other sample rate values . you can have a brighter sound at 48000 Hz , and darker at 32000 that to your advantage sample presets Usually Hz , use 4) Mono Legato mode can smoothly change pitch only if the current Preset allows that. Also avoid playing chords in Mono Legato to prevent click sounds. There can be a few issues with transients when using pitch bend with some presets. 5) AP EQ curve display is updated at slow rate, so if you move the knobs too quickly it may not follow the values. 47 Appendix D What's new in Modelonia 2.0 Sound Engine Update and Upgrade 1) New. Two macro sliders are now available for real-time sound morphing: respectively crossfading gains and cross-feedback levels between the two main Resonators. 2) New. Added a powerful equalizer in the output fx chain. This new "AP EQ " features two fully adjustable shelving filters and a "tilt" knob to quickly balance brightness to low boomines. Moreover it features a switch to choose between a clean or overdrive channel. Tabbed view. The bottom pane with the microtuning sliders is now hidden by default, while the new AP EQ knobs and macro sliders are shown. 3) New. The MIDI modulation matrix now includes the ability to use Aftertouch and Velocity as modulation sources for each parameter. Moreover the map is now saved per preset. The start and end range of modulation is also settable. Reverse mappings are is supported as well, with start greater than end value. 4) New. "Single Shot" mode extended to both LFOs . This allows the use of LFOs as envelope for modulation. Moreover a Mix mode has been added to mix the waveshapes of the two LFOs. 5) New. The SA switch changes the architecture of both Modelonia models, for more sound design possibilities. 6) New. The "PE" switch in "Lips" exciter has been extended to a knob control. Up to Modelonia 1.8 it turned on the "pressure emitter" in the Horn exciter, now in 2.0 it adjusts the PE in the right half turn (marked with a green curve), and it switches to an alternative algorithm with PE off when used in the left half (marked with a red curve). This new feature takes better advantage of the exciters external to the "Lips" module, i.e. the Noise module and the String module via "XM to Horn". 7) New. The harmonic waveshapers controlled by the "Modif" switches A and B, in the Horn module, have been updated with new algorithms. 8) New. The "change properties fx" (the "CP" switch in "String" module) now features a stronger harmonic enhancement. 9) New. The A/B switch in the FX module adds now a soft chorus to the reverb . Chorus can be used alone as well, setting the reverb mix to zero. 10) Vastly improved Mono Legato mode for enhanced realism in solo 48 playing of wind instruments and similar hybrid ones. 11) Updated "EQ" module, the new fixed resonator is capable of more pronounced spectrum changes. 12) The Noise exciter now features also a sub oscillator, for fatter tones and more harmonics . These modifications allow a great new range of sounds, making Modelonia more versatile. Utilities Update and Upgrade 1) New. The presets are now stored in a new cross-platform preset format, a human readable XML file, and they can be saved/loaded by the Modelonia panel buttons. Also 2 browse buttons "next" and "previous" are provided, as well as a utility for preset file s folder management. 2) New. Presets menu with submenus for categories allows an easier and swifter selection. The default bank holds up to 512 presets at once, visible also in DAW menus of VST or AU hosts 3) Almost 400 updated presets are currently available. Older preset s from Modelonia 1.8 and earlier can still be loaded in 2.0, but due to the changes in the sound engine explained in "Sound Engine Update and Upgrade " a few parameters may need to be adjusted by hand 4) New. Completely rewritten user manual in PDF format. This includes detailed descriptions of the parameters, the sound signal path and features hints and FAQ. A "must read" to enhance your experience in Modelonia programming. 5) The Sound Wizard provides some basic templates for you to start a fresh sound design. This has been updated too. 6) New. Options menu includes commands to generate random presets 7) Skin change button rotates through all the skins installed. Beautiful brand new larger skin included in 2.0. 8) NUSofting Data folder (was in My Documents for Windows) is no longer used . 49 About NUSofting NUSofting is dedicated to progressive audio software research. Our product range features software that captures, emulates and expands upon traditional musical instruments, as well as completely future-centric audio applications, creating a rich and varied sound palette which appeals to many different musicians, sound designers, and producers all over the world. NUSofting is a "one man company", a small company with limited resources (read money and time) but with a strong philosophy in software business. We don't use any copy protection code, serial number, on-line authorization or key file. The product is delivered as a copy of the fully functional version after purchase, while a demo version is freely downloadable and has few limitations like not being able to save presets. We fully trust our customers the loyalty and honesty to personally protect our product from unauthorized copying. Moreover we are happy to use all help we can get from the community of users, from simple comments to bug reports, sound design and betatesting. And in exchange to that we are committed to maintain prices that are lower than the competitors for similar quality products. We enjoy making audio software and we hope to spread the joy to our users. Software End User License Agreement (EULA) for NUSofting products. Disclaimer This software is provided ‘as is ’. NUSofting Team does not warrant in any way that the functions contained in the software will meet your requirements, or that the operation of the software will be uninterrupted or error-free, or that defects in the software will be corrected. It is illegal to make copies and/or spread/publish the full version of this program or its parts in any form without the written permission of NUSofting Team. The registered user is not allowed to lend the full version to other persons, and he/she is also responsible for keeping the full version out of reach of unregistered users. While efforts are made to ensure that the software and its documentation are free from defect, under no circumstances and under no legal theory, tort, contract, or otherwise, shall NUSofting Team, or its distributors or dealers be liable to you or any other person for any indirect, special, incidental, or consequential damages of any character including, without limitation, damages for loss of profit or goodwill, work stoppage, computer failure or 50 malfunction, damage to hearing, damage of speakers and headphones or any and all other health and commercial damages or losses occasioned by the use of the software. This NUSofting End-User License Agreement ("EULA") is a legal agreement between you (either an individual or a single entity) and NUSofting for the software accompanying this EULA, which includes computer software and electronic documentation ("SOFTWARE PRODUCT" or "SOFTWARE"). By exercising your rights to make and use copies of the SOFTWARE PRODUCT, you agree to be bound by the terms of this EULA. If you do not agree to the terms of this EULA, you may not use the SOFTWARE PRODUCT. SOFTWARE PRODUCT LICENCE The SOFTWARE PRODUCT is protected by copyright laws and international copyright treaties, as well as other intellectual property laws and treaties. DESCRIPTION OF OTHER RIGHTS AND LIMITATIONS Limitations on Reverse Engineering, Decompilation and Disassembly: You may not reverse engineer, decompile, or disassemble this SOFTWARE PRODUCT. Software Transfer: You may resell the the license of the NUSofting product after written agreement, therefore if you want to resell your license please contact NUSofting first. Software Copy: You are allowed to make copies of the software for private backup purpose only. Or for use in other computers you personally own. COPYRIGHT All title and copyrights in and to the SOFTWARE PRODUCT (including any images, text, and "Presets" incorporated into the SOFTWARE PRODUCT), the accompanying printed materials, and any copies of the SOFTWARE PRODUCT are owned by NUSofting or its suppliers. By using the software you accept all of above terms and conditions. copyright © 2015 NUSofting 51 Acknowledgments and Credits Synth design and DSP code © 2005-201 5 Luigi Felici, NUSofting . Additional DSP code and XML GUI System © 2005 Aldo Trianti . Additional code stabilization by Sagan Technology (www.sagantech.biz .) GUI design © 2005-20 15 Luigi Felici and Branislav Pakic . Code improvements Marco Spies (www.asseca.org). Mac OS X port and user manual review for Modelonia 2.0 by Bernie Maier. Presets by: Liqih, Tim Conrardy, Paul Walsh, Stephen Wey, Xenos and others. Many thanks to all involved in this project, for their help and assistance. especially to Aldo Trianti for the skin code and the initial voicing management. And to Branis for the gorgeous graphics. Thanks to all the betatesters and the Modelonia users who with their comments and praises push me to always improve this soft synth. Sincerely Luigi Felici 52


![ManyGuitar user manual [november 2005]](http://vs1.manualzilla.com/store/data/005861536_1-a0b937985b357a67600aa3c9a5e7e46a-150x150.png)