1
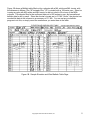
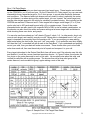
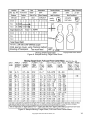
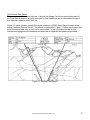
Storm Tactical Precision Rifle Data Book
User Manual
Copyright © 2007 – 2010 Storm Tactical, Inc.
Thank you for choosing the Storm Tactical Precision Rifle Data Book. This book was developed
by a team of shooters, including a former Marine Corps Captain, and former Police Officer from
a large metropolitan police department. The authors and many contributors have also instructed
as Range Master for various rifle courses, including Precision Rifle, at formal shooting schools.
The Data Book was developed with input from several USMC Scout Snipers, with combat
experience, two former Army Snipers with recent combat experience, a retired USMC PMI with
combat experience, a Vietnam veteran US Army Sniper, various active law enforcement
officers, and civilian competitive riflemen.
This User Manual gives basic information how to get started and get the most out of your Data
Book. The Storm Tactical Data Book provides data collection boxes for a variety of useful
targets. This Data Book was designed primarily for the military and law enforcement operator
who is entering or a graduate of a formal precision rifle school. However, the bench rest
precision shooter, tactical competition shooter, and hobbyist shooter alike will find these books
useful. Information pages with charts and graphics dealing with critical issues such as reading
wind, range estimation, and moving target engagement, are included.
Each precision rifle you own should have its own assigned Data Book. The Data Book should
be transferred with the rifle to the new owner if the rifle is sold. The Data Book also may
become a legal document if the law enforcement sniper is involved in a shooting, and must
defend his skill set with documentation, which the Data Book could provide. If you change
optics, you may keep the same Data Book, but record the date of the change and start fresh
target data sheets with your new optical sight.
Copyright © 2007-2010 Storm Tactical, Inc.
1
Note: The Storm Tactical Data Books are copyright and any copying, scanning, internet posting
of pages, or distribution of any kind without prior permission is strictly forbidden. This User
Manual is also copyright, but the purchaser of the Data Book may print the information
contained herein. The targets included on the CDROM are not copyright, and the purchaser of
the Data Book may freely print and copy the targets for himself and his unit. If you would like to
print extra User Manuals to hand out to students, please give a courtesy email to request
permission to copy the material for distribution.
Filling out your Data Book pages
Cover Page
Fill in the shooter’s name, rifle type, rifle serial number, and optical sight on the cover page.
Target Pages - Marginal Information
The Data Book pages where you record your shots will all have a similar ‘marginal information’
section, i.e., your Location, Date, Time, etc. If you have time, fill in this information now, as you
may forget the details later, and wish you had entered this information. Some of these boxes
include: Temperature, Humidity, Barometric Pressure, and (Density) Altitude. If you have
electronic meteorological devices that can capture this data, it will ensure you have the most
accurate environmental conditions possible for this day of logging your shots. At a very
minimum, you should establish the temperature and altitude of your shooting location(s). This
can be accomplished via electronic device, or pre-planning the weather conditions for your
particular area via internet, airport, or other weather service broadcast. After the fact, you can
also research and record the actual conditions for your location. Having these environmental
conditions written down will give you the most precise data for you to plot and calculate your
rifle’s external ballistics under given conditions.
Location: “Boulder City NV,” “Quantico Range 4,” etc
Date, Time, Temp, (Density) Altitude, Humidity, and Baro Pressure: Self explanatory. Add as
much detailed info as you can.
Distance: “400 yards,” etc.
Position: “Prone,” “Concrete bench rest,” “Car hood,” etc.
Rate of Fire: “Slow Fire,” “3rds in 1 minute,” etc.
Sling / Support: “Bipod with sand squeeze bag,” “soft bag,” etc.
Elev, Wind: Very important to put your elevation come-ups, and any added wind (MOA or MIL)
Call: Very important to record every call, for more information on how to do this, read on.
Light Conditions: Use an arrow to draw the direction of light. Simply hold up a pen on the little
clock graphic perpendicular to the page, and draw the arrow where you see the shadow. Also
record if shooting in lowlight or night conditions
Wind Conditions: Use an arrow and average wind speed for that shoot duration. Note any
changes.
Hold Box: Draw your reticle hold here. It will generally be center mass of the target, unless
using moving targets, or doing wind holds, etc.
Ammunition: Ammo type, and lot number, or hand load used.
Copyright © 2007-2010 Storm Tactical, Inc.
2
Remarks: Record any pertinent info. Example, target number 6 at rifle range 2. Record how
you are feeling. Do you have a headache, dehydrated, sweating in your glasses? Review of
this information days or months after the shoot can provide valuable information.
A Note About Density Altitude
Storm Tactical Data Books have Density Altitude (DA) listed in one of the marginal boxes.
Density Altitude is formally defined as, pressure altitude corrected for non-standard temperature
variations. Density altitude is the altitude in the International Standard Atmosphere at which the
air density would be equal to the actual air density at the place of observation, or, in other
words, the height when measured in terms of the density of the air rather than the distance from
the ground. DA is an important factor in aviation operations, as it affects flight performance. In
a nutshell, DA can be a useful factor when making ballistic calculations, as it incorporates
altitude, temperature, and humidity.
There are several methods for calculating Density Altitude, which can be quickly found on an
internet search. If you do not want to calculate DA, then you can simply cross out “Density,” and
put your Altitude above mean sea level in the box instead.
Target Pages - Target Box: Record your shots, preferably after each shot using a spotting
scope if possible, in the target box area. Make notes now, while the info is fresh in your mind.
Copyright © 2007-2010 Storm Tactical, Inc.
3
Ballistic Table Data Sheets
Record your verified ballistic data, elevation (come-ups), and windage, in the table. Use a
pencil for this table until the data has been verified in the field, in case changes need to be
made to the table. The table provides data boxes for come-ups and wind adjustments in MOA
and MILS. Circle the “YD” for yard distances or “M” if using range distance in Meters. The Data
Book provides several table pages for come-up information. This will be useful for a
summer/winter table, or tables for different locations, or different loads, all of which will have
different ballistic characteristics.
Assume a 10 MPH full value wind (or write the wind velocity of your choice) for the wind
columns. If you use a MIL reticle and MIL turrets, fill out the MILS columns (Figure 1B). If your
optical sight has MOA turrets (and a MIL reticle), fill out the MILS and MOA columns (Figure
1A), so you will know your MIL holds for elevation and wind. If your ballistic program does not
compute in MILS, just convert MOA to MILS. To do this, simply divide MOA by 3.438. For
example, if your MOA come-up at 525 yards is 11.0 MOA, then 11.25 / 3.438 = 3.2 MILS at 525
yds. If you have an MOA reticle and MOA turrets, you will not need to fill out the MILS columns.
Once you fill out the Ballistic Table, transfer the MIL hold data onto the Reticle MIL hold
diagrams, which are one of the last pages in the Data Book (Figure 14). Figure 1A below shows
a completed sample Ballistic Table in both MOA and MILS with 10 MPH full value wind, to 1000
yards. The shooter in Figure 1A has MOA turrets and MIL reticle on his optic, and has thus
completely filled out both the MOA and MIL columns.
Figure 1A. Sample Elevation and Wind Ballistic Table Page
Copyright © 2007-2010 Storm Tactical, Inc.
4
Figure 1B shows a Ballistic table filled out by a shooter with a MIL reticle and MIL turrets, with
the distances in Meters (The “M” instead of the “YD” is circled) with a 100 meter zero. Since he
is using an optic with MIL reticle and MIL turrets, he did not need to fill out any of the MOA
columns. This shooter filled in the confirmed data out to 800 meters in pen, and unconfirmed
ballistic data he left in pencil. Since the shooter’s turrets are in 0.1 MIL “clicks,” the shooter has
rounded his data in the columns to an accuracy of 0.1 MIL. You can set up your ballistic
program to do this, or simply round the numbers as you enter them in the table.
Figure 1B. Sample Elevation and Wind Ballistic Table Page
Copyright © 2007-2010 Storm Tactical, Inc.
5
Stationary Target Data Sheets
On all Target Data pages, there will be blocks of information that the shooter should completely
fill out. Location, (Density) Altitude, and Temperature are especially important blocks. Do not
forget to fill out the Distance you are shooting, and Elevation come-ups in the boxes. If you are
making wind changes, record it every time you make a change. Mark your “calls” in the small
target box areas, as well. Weeks or even years later, the shooter can review these pages and
recollect the range location, date, and temp for the data as needed. A completed sample
Stationary Target Data sheet (Torso Target) is included below (Figure 2).
Figure 2. Sample Stationary Target Data Sheet
Copyright © 2007-2010 Storm Tactical, Inc.
6
Dedicated Cold Bore Data Sheets
The ‘cold bore’ (CB) or ‘Clean Cold Bore’ (CCB) shot may have a different POI (point of impact)
than the typical rifle zero from a recently fired “dirty” barrel. These sheets are used to record
these cold bore (CB) and clean cold bore (CCB) shots, also known as ‘fouling’ shots. Printable
Clean Cold Bore targets are included on the CDROM for you to print and use. Use these
targets and data sheets to document Cold Bore and CCB shots. CCB shots may be slightly
high on the target for example, but some rifles will also impact right or left on a CCB shot. There
is also a school of thought that the CB/CCB is just shooter error, as the shooter is getting
warmed up on the first shot. Regardless of reason, if you ever have to make a critical shot with
a cold barrel, you will know how much to compensate for the precision shot. The cold bore
page in the Data Book represents a diamond (or other shapes in our custom books), to
accurately document your cold bore impacts. You can also use the circle or square printable
zero targets to record these shots. Just make of note of that in the Data Book. Save these
sheets and record only your cold bore and clean cold bore shots on them. The distance is
typically 100 yards (M), but the shooter may also wish to do a CB/CCB page at further distance
to verify the CB/CCB POI at those distances.
From this session at the range, the shooter in Figure 3 shot a string of CCB shots during a
barrel break in, where he fired a series of shots, then cleaned the barrel. From his recorded
data, on this day with these weather conditions, the shooter was shooting about 2 CM (¾”) high
from center point of aim, on a 1” diamond target at 100 meters. If this same CB/CCB shot
pattern persists, then this shooter may conclude he will shoot about 0.2 MIL (0.75 MOA) high on
his CCB shots with similar environmental conditions, ammunition, etc. Noteworthy in Figure 3,
the shooter circled “CCB” for each of these shots, because each one was a Clean Cold Bore
shot. If you are shooting a cold bore shot out of a dirty barrel, simply circle the “CB” (Cold Bore)
to signify this. You will want to put the wind speed next to the wind clock on these pages. Also,
write your Hold and Call for each shot.
Figure 3. Sample Cold Bore / Clean Cold Bore Data Sheet
Copyright © 2007-2010 Storm Tactical, Inc.
7
Zero / Group Data Sheets
Storm Tactical produces several target types and sizes for rifle zeroing and groups. The typical
target shapes are the Circle Target and Diamond Target. Diamonds are very easy and natural
for the human eye to center in a reticle. Storm Tactical also produces Square Target, and other
target shapes, depending on the shooter’s personal preference. There are printable targets on
the included CDROM that contain Diamond, Circle, and Square targets for the shooter to shoot
and record, such as: cold bore, zero, groups, calls, and dot drills.
Figure 4 shows a Data Book page where the shooter plotted a 3 shot group on a 10 CM (4”)
Diamond target at 400 meters. This shooter verified his Ballistic Table (Figure 1B) Data of 3.0
MILS Elevation at a distance of 400 meters. This shooter kept the actual target he shot and
placed it in a binder for future reference. He now has solid Data for these environmental
conditions with this rifle and ammunition, for a 400 meter shot.
Figure 4. Sample Zero Target Data Sheet
Copyright © 2007-2010 Storm Tactical, Inc.
8
Zero / Call Data Sheets
The sheets with the 5 targets per sheet represent two target types. These targets are included
on the CDROM for you to print and use. On the 5 Diamond or 5 Circle pages, you can use each
diamond/circle as a separate target for 3 to 5 shot groups, to record data at specific distances
and conditions. The diamond and circle shapes are very useful to shoot, especially the center
one (at distance), as when aiming at the center target, you can “quarter” the center target and
see the other targets spaced in the reticle for extremely consistent aiming. Also included on the
CDROM are assorted 5 Diamond and 5 Circle targets with a larger center target (2” to 4”) that
can be shot out to 400 yards and beyond with a 10x or greater scope. Some of the center
diamonds/circles are also sized to be a specific MOA or MIL in size at certain yards/meters, so
the shooter can also check his reticle and power settings at a known target size and distance
while shooting these zero shots, and groups.
You can also use these sheets as “call” sheets (Figure 5, shots 1-4). In other words, shoot only
once at each target, and carefully record your call. Being able to understand how to “call” your
target is important to accurately shoot the precision rifle. If you are positive you were aiming
dead center when the shot broke, then your “call” was center. If you pulled the next shot slightly
left, then that “call” is recorded left with a mark in the Data Book. If you understand and properly
record your calls, then your data will make more sense. These sheets allow you to shoot and
write down each call, then see the actual point of impact and compare it to your call.
Every target data sheet in the Sniper Data Book has call boxes, and if the shooter uses this info
and studies it, he will be a more consistent precision shooter. In Figure 5 below, the shooter did
four shots on the outer diamonds to work on his calls. He recorded notes about his calls, and
verified his calls/hits with a spotting scope. The shooter then did a three shot group at the
center diamond, and recorded his group, again making a note of his calls.
Figure 5. Sample Zero / Call Target Data Sheet
Copyright © 2007-2010 Storm Tactical, Inc.
9
Special Target Data Sheets
The Special Target Data Sheet (Figure 6) is used to draw any special or unusual target not
included in the Data Book. Fill out the blocks the same as any of the other target data sheets.
Draw the Special Target, and use the grid to scale the target, if desired. Record the target size,
and if to scale, the grid size on the sheet.
Figure 6. Sample Special Target Data Sheet
Copyright © 2007-2010 Storm Tactical, Inc.
10
Unknown Distance / Long Range Target Data Sheets
This sheet is unique compared to the other target sheets in the Data Book. The Long Range
Target Data sheet allows the shooter to record up to five targets at various distances in the field,
at different times and conditions, all on one page.
Treat each column as a separate engagement exercise. See Figure 7 below; the first column
has been completed.
Figure 7. Sample Long Range Target Data Sheet
Using the Long Range Target Data Sheet for Unknown Target Distance Exercises
Fill out the information blocks, same as the regular data sheets. There is extra space for
Remarks, such as changing conditions, location info, hand loaded ammunition, etc.
Target #. Select a number for this unknown distance target. In the example it is “A.” The target
size is given as 0.5 Meters (19.7”) tall. The size of the target must be known before any range
estimation can occur.
Est. Target Size in Mils: This is a critical skill that takes practice. Use the reticle to estimate the
target’s size, in Mils (or MOA is using a MOA reticle). If this step is not accurate, then your
estimated distance to target will be off!
Est. Distance: This is the Estimated distance you believe the target to be, using your reticle.
During this exercise you may want to confer with your spotter and determine the best estimated
range.
Copyright © 2007-2010 Storm Tactical, Inc.
11
Elevation: The Elevation placed on your turret in MOA or MILS based on the estimated distance
to target.
Windage: The Windage placed on your turret in MOA or MILS based upon the estimated wind
conditions.
Light Direction / Conditions: Using the clock method, hold your pencil up and draw the arrow
where the pencil casts a shadow on the clock. Record the conditions, such as sunny, cloudy,
rain, etc. Record if you are shooting in lowlight or night conditions, as well. In this box it is a
good idea to put the time of day (or night) as well.
Wind Direction / Velocity: Using the clock method, draw an arrow of wind direction, and write
the estimated velocity. You may want to confer with your spotter to estimate this critical
component accurately. There are three wind dials for use at extended distances, if you can
read the wind by using flags or other wind estimation methods at: muzzle, mid-range, and
target.
Call, Plot Shots: Call your shots one at a time, and record the Call with a mark on the Call
target, such as a dot, to show where the reticle was when the shot broke. Plot the shots on the
Plot Target with dots or other mark, to show the actual POI (point of impact). This will
graphically illustrate if the called shots and actual plotted shots differ, and if this difference is due
to range estimation and/or wind estimation errors. In the example in Figure 6, a three shot
group was recorded, with center calls, but the plotted impacts are shown to be low and right.
Actual Distance: From the Call and Plot silhouettes, determine the actual range to target. In
Figure 6, the estimated range was 625 meters. From the Ballistic Table (Figure 1B) the shooter
put 6.4 MILS elevation and 0.7 MILS wind on his turrets. The shots were approximately 30 CM
(12”) low and 15 CM (6”) right (or about 1.75 MOA or 0.5 MILS low and 1 MOA or 0.3 MILS
right). Therefore the estimated range was slightly too short, and the wind estimation was off.
The corrected actual range was estimated to be 650 meters. At this point the shooter/spotter
could also use a laser rangefinder or other measuring device to confirm their second estimation.
Assuming the actual range is 650 meters, the correct elevation and wind is placed on the
turrets, and follow up shots are taken. From the formulas in Figure 13, if the actual range to
target is 650 meters and the target size is 0.5 M, then the object size in the reticle would be
0.769 MIL which is very close to the original size estimation of 0.8 MILS. This formula shows
the difficulty in range estimation using the reticle at longer distances.
Corrected Elevation: The corrected elevation can now be put on the turret. In Figure 7, the
shooter decided to add an additional 0.5 MILS elevation on the turret.
Corrected Wind: Same as above, the corrected windage can now be put on the turret. In
Figure 7, the shooter added an additional 0.3 MILS windage to the turret This assumes the
wind didn’t change before re-engaging the target.
Position: Generally prone, but could be another supported position, over a vehicle hood, etc.
Using the Long Range Target Data Sheet for Long Range Targeting Exercises
Fill out the blocks same as above. Using the same sheets for Long Range Target Data, the
distance to target is generally given. If distance is given or measured by the shooter, correct
elevation (come-up) is placed on the turret. The skill set being honed during this exercise is
correct wind reading. This is where the shooter/spotter use the three wind dials and take the
time to estimate wind direction and velocity at three points, usually: muzzle, mid range, and at
the target. Reading the wind is an art that will not be learned during a four day or even an eight
week course. It is a skill that requires a lifetime of practice to master. The shooter must also
realize that the winds may be constantly changing, and by studying the wind dials at the three
distances, the shooter can gain an appreciation for shifting winds, and which winds will most
affect the projectile trajectory. It is beyond the scope of this User Manual to detail wind reading
Copyright © 2007-2010 Storm Tactical, Inc.
12
techniques, but the shooter will realize that shooting in a constant wind, even if strong, will
generally yield better results than shooting in gusting winds, shooting during a short wind lull, or
winds with quickly changing direction.
Moving Target Data Sheets
This data sheet can be used to record moving target leads, or simple static profile shots. The
sheet is organized to log moving targets, and that would be the preferred use of the sheet. The
standard data boxes are filled out like the regular static target sheets, including distance,
elevation, and wind. In addition, this sheet has boxes to record target speed and target lead.
Data is taken from the estimated values in the Moving Target Chart, Full Lead From Center
Mass Sheet, which is located near the end of the Data Book (Figure 9 below). That information
is a starting point for .308 caliber shooters. Other caliber shooters can determine their
estimated lead by obtaining the Time of Flight information from The Sample Wind Drift Data
pages from the Data Book, or from a computer ballistic program. The Flight Time number is
plugged into the formula at the bottom of Figure 9, to give a starting point for target leads. The
estimated lead is then practiced under controlled conditions at a known distance and known
moving target speed. The target speed can be calculated simply by measuring the amount of
feet covered by the target in a certain amount of seconds, yielding a feet per second (fps)
speed. Some match directors will put a GPS device on the moving target and experiment with
different target speeds for tactical rifle competitions. Once the estimated lead is calculated, the
shooter puts the information to use in the field.
In the example in Figure 8, the shooter gave a 2 Mil lead from center mass on a target moving
at 4 fps. After 5 shots, the shooter realized he was leading too much. The shooter went back to
Figure 9, and realized the estimated lead was 1.75 Mils for 175 grain .308. He was shooting
168 grain and was leading 2 Mils, so he went back to the formula to get a more precise lead
estimate.
From the Sample Wind Drift Data .308 page in the Data Book (Figure 15), the flight time for 168
gr .308 at a velocity of 2650 fps is 0.242 seconds to travel a distance of 200 yards. Multiply
0.242 by 4 fps yields 0.968 feet, or 11.6". Converting that to Mils yields 1.6 Mils (to the nearest
tenth). So our shooter realized his lead from center mass at 200 yards for a target moving at 4
fps should have been 1.6 Mils. Looking at the data he recorded in Figure 8, it appears that a 1.6
Mil hold would have solved his problem of leading too much. Now the shooter can confirm that
data by shooting a 1.6 MIL lead (assuming his Tracking is being done smoothly), and then
experiment at different distances, and different target speeds.
Note also in Figure 8 that the shooter put elevation and wind on the turrets prior to the moving
target engagement. Doing an elevation or wind "hold" at the same time as doing a moving
target lead "hold" is extremely difficult, so it is generally not attempted.
Copyright © 2007-2010 Storm Tactical, Inc.
13
Figure 8. Sample Moving Target Data Sheet
Figure 9. Sample Moving Target Chart, Full Lead From Center Mass
Copyright © 2007-2010 Storm Tactical, Inc.
14
Range Card Data Sheets
These sheets are for sniper’s field use. The correct employment of these sheets is critically
important for field operations, but it is beyond the scope of this instruction sheet to detail their
use. To fully understand how to use the sheets, there are several schools open to civilians,
which will teach field craft, including:
Storm Tactical (NV), Rifles Only (TX), McMillan School (AZ), Badlands Tactical (OK), Central
Virginia Tactical (VA), etc.
A basic overview of completing these sheets is provided, but it will by no means teach the
precision rifle shooter what he will need to know about completing range cards and field
sketches. Figure 10, below shows a sample Range Card.
Figure 10. Sample Sniper Range Card
Copyright © 2007-2010 Storm Tactical, Inc.
15
The Range Card is (generally) an aerial view of the sniper’s sectors as seen from the hide. The
card has 10 arcs, each representing 100 yards (M) distance from the sniper. Notice the sniper
symbol just above the copyright © symbol on the Range Card. The sniper looks out onto his
sector and records terrain features, buildings, potential targets, and target indicators. The
process of completing the Range Card is a critical skill to develop, as it forces the sniper team to
conduct both hasty and detailed searches over their sector. Topographic features may be
added to the Range Card, as needed. The Range Card may also be used in conjunction with a
topo map, aerial photos, and GPS waypoints of the area of operations (AO). In urban areas, a
standard street map may also be useful in conjunction with the Range Card. The Range Card
has space for the sniper’s name, as well as the method of range estimation for the features
documented on the Range Card.
Elevation and Windage tables for the ranges are filled out by the sniper for the current
conditions. In Figure 9, the sniper has placed his summer ballistic data from page 1 of the Data
Book onto the Range Card, as well as his 10 MPH windage information. If the wind is 5 MPH at
the time of engagement, the sniper team just halves the windage data from the Range Card
windage row. This allows an immediate response for engagement of an enemy force on the
Range Card, as the elevation and windage has already been determined for each range. There
are also three rows on the bottom of the Range Card for the sniper to insert significant features,
targets, or target indicators. For example, in Figure 9, the sniper has designated an enemy
encampment as “A” which may or may not be used again by enemy troops. Also, target “B” is a
parked column of enemy vehicles, which may be used by troops during the sniper’s stay in his
hide. Both “A” and “B” are important potential targets, which are valuable to ‘tag’ with distance,
compass azimuth readings, and mark on the sniper’s Range Card and accompanying maps for
possible artillery or an air strike if a large body of troops were to appear. Tunnel “C” is a target
indicator, and valuable feature to have written on the Range Card. This is a choke point where
troops have walked under the road through the tunnel along a well traveled dirt path. The
sniper has recorded that the tunnel is a 10 foot corrugated steel (storm drain) under the road,
with footprints at the entry/exit area.
Copyright © 2007-2010 Storm Tactical, Inc.
16
Field Sketch Data Sheets
These sheets are for sniper’s field use. Like with the Range Card, the correct employment of
the Field Sketch sheets is critically important for field operations, but it is beyond the scope of
this instruction sheet to detail their use.
Figure 11, below shows a sample field sketch made by a USMC Scout Sniper student at the
Camp Pendleton Division School. The sketch is unclassified. Figure 11 below shows sectors for
which the sniper team may or may not be responsible. In this mountainous area, terrain
features are highlighted and distances and azimuths to ridgelines and peaks are provided.
Figure 11. Sample Field Sketch
Copyright © 2007-2010 Storm Tactical, Inc.
17
Sniper Observation Log Data Sheets
The Sniper Observation Log is used to record entries for specific events. This can become a
legal document in court, so accurate log entries are important. A sample of the Sniper
Observation Log is shown below, Figure 12:
Figure 12. Sample Sniper Observation Log Data Sheet
Round Count Sheets
Use these sheets to record rounds fired after each mission or day at the range. Keep a running
tally and refer to it as needed, for cleaning, maintenance, armorer repairs, barrel changes, etc.
MOA / MILS Info Page
This sheet gives concept info of MILS and MOA, how they are defined and calculated, with their
respective arc at 100 yards (M).
Common Milling Reticles Info Page
This sheet explains the common milling reticles, including standard Mildot, Gen II Mildot™, and
Tactical Milling Reticle (TMR) for Leupold, (close to the NightForce MLR). The info boxes at the
bottom also show Mil Width Equivalents, and the distance various Mil lengths will measure at
100 yards (M) and beyond distance.
Copyright © 2007-2010 Storm Tactical, Inc.
18
Range Estimation Page
This page graphically shows range estimation (and its pitfalls) using the Mildot reticle on a
human target. It demonstrates the errors the shooter may encounter using a human target for
range estimation, if the exact target height is unknown. It also shows the common formulas to
determine the range in yards / meters.
Figure 13. Range Estimation Using The Mildot Reticle Sheet
In Figure 13, the target on the left is exactly 6 feet (2 yards) tall. He subtends 2.5 Mils in the
reticle.
Using the Range Estimation Formula, 2 (yds) X 1000 / 2.5 (Mils) = 800 yards distance to target.
Now look at the man in the center, who is 5’9” (1.9 yds) tall. Let’s say that target subtends 2.4
Mils. If the shooter ‘thinks’ this man is 6 feet (2 yds) tall, instead of 5’9” (only 3” difference in
height), the range estimation will be:
2 (yds) X 1000 / 2.4 = 833 yards
Assume your elevation adjustment for 833 yards is 24.75 MOA. The actual distance is 800
yards, which is 22.75 MOA of elevation for your rifle. Adding 24.75 MOA elevation results in 2
MOA too much elevation for the actual 800 yard target distance. Therefore, this incorrect range
estimation of a very small difference in height, results in a full two minutes of error at 800 yards,
which is over 16 inches. This could result in a miss of the target. Measuring sizes of known
Copyright © 2007-2010 Storm Tactical, Inc.
19
static objects has proven to be a more accurate way to range estimate. Many shooters will paint
a “barber pole” and use it for range estimation practice.
Wind and Elevation Hold Sheets
Transfer the data from the Ballistic Data Elevation and Wind Sheet (page 1 in your Data Book),
and graphically represent your elevation and wind holds, in pencil on the Reticle Elevation Hold
and Reticle Wind Hold sheets (located near the back of the Data Book). Sometimes a quick
hold and a ‘snap shot’ will be ‘close enough’ when time is of the essence, and there is no time to
make turret adjustments for elevation and or wind.
For example, in the Reticle Elevation Hold sample (Figure 14) below, a target at 500 yards can
be engaged by simply "holding" the third Mildot center mass on the target (assume no wind for
this example). This data should be put to practice and verified in the field. The sample in Figure
14 shows .308 168 gr match ammo (@ 2700 fps) with a 100 yard zero. These numbers
obviously change depending on rifle caliber, environmental conditions, and zero distance of the
rifle.
Figure 14. Sample Mildot Reticle Elevation Hold
Copyright © 2007-2010 Storm Tactical, Inc.
20
Wind Drift Information Page
Figure 15 shows sample information for common .308 match rifle rounds, assuming a 10MPH
full value wind. The tables show the Inches, MOA, and MILS of wind drift from 100 to 1000
yards, as well as the velocity and flight time at these distances.
Figure 15. Sample Wind Drift Data, .308
Wind Reading and Estimation Pages
These pages have basic information for estimating the wind, using the clock value system, and
reading mirage. Reading the wind is one of the most important skills a precision shooter can
learn and apply.
US and Metric Conversions Page
This page gives standard conversions from US to Metric and vice versa, as well as comparing
Yards vs. Meters at rifle range distances.
Notes Sheets
Use these sheets to write notes. You can write your cleaning procedure on the notes. The
specific cleaning procedure will be helpful to maintain consistent cleaning, or to help the shooter
experiment with different cleaning procedures to see if any one procedure improves accuracy.
For more information, please visit: www.stormtactical.com
Copyright © 2007-2010 Storm Tactical, Inc.
21