1
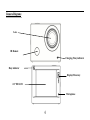
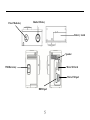
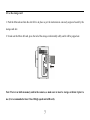
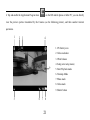
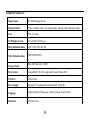
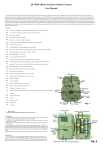
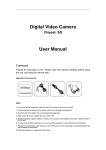
Wifi Sports Camera User Manual 1 Quick Guide: 1. Download and install the app “SYMAGIX 2” from Itunes® or Google Play 2. Press the Wi-Fi button on the side of the camera to initialize the signal, the LED will be red 3. Search for the wireless signal “QC8028” on your smartphone or tablet using the password “1234567890”. 4. You can now start using the camera once the wireless signal is connected and you have opened the app. Note: Class 10 Micro SD Cards are required for this camera 2 Care & Maintenance Limit the cameras exposure to direct sunlight; also do not point its lens into direct sunlight. This may damage the image sensor of the video camera. Take precautions to prevent water or sand particles from entering the video camera when it is used on the beach or near water, as this may damage the video camera. Keep the video camera free of dust and chemical materials. Place it in a cool, dry and well ventilated place. Avoid placing the video camera in high temperature conditions, moist or dusty places to avoid damage of the video camera. If dirt or stains are accumulated on the video camera or on its lens, use soft, clean and dry rag to wipe it away gently. If the video camera or its lens is covered with sand particles, blow them away gently. Do not use a cloth to wipe. Otherwise, it may scratch the surface of video camera or its lens. If you are required to clean the camera lens surface, firstly blow away the sand or dust accumulated on this surface, and then wipe the camera gently with a clean dry cloth. Do not use solvents to clean the video camera. Do not touch the lens surface with fingers. 3 Camera Diagram: Lens IR Remote Charging /Busy indicator Busy indicator Display/Menu key 2.0’’ HD LCD Microphone 4 Power/Mode key Shutter/OK key Battery Latch Speaker Wifi/Down key Micro SD Card Micro USB port HDMI port 5 Opearting: _______ 1. Charge the built-in lithium battery USB cable Connect the camera to the computer for charging, at this time, the charging indicator will be in red, and it will be off after charging. Generally, it takes 2-4 hours to charge the battery. 6 2. Use the storage card 1. Push the Microsd card into the slot till it is in place as per the instruction in concavely engraved words by the storage card slot. 2. To take out the Micro Sd card, press the tail of the storage card inwardly softly and it will be popped out. Note: There’s no built-in memory unit in the camera, so make sure to insert a storage card into it prior to use (it is recommended at least Class 10 high speed microSD card). 7 3. Power on/off 3.1 Power on: Press Power key for 3 seconds, the screen will be on and the camera will be started. 3.2 Power off: Hold on Power key for 3 seconds when the camera is in the idle state to turn it off. 3.3 Auto screen off: The screen will be turned off automatically when the time that the camera is in the idle state for automatic screen off to save power. After that, the lamp for screen off will be on. 3.4 Power off when the camera is lack of electricity. When electrical quantity of the battery is very low, an icon of will be displayed on the LCD screen, prompting you to charge it in time. When the icon turns red and flickers, the camera will be turned off automatically. 8 4. Shift among functional modes The camera has 4 modes, namely video recording mode, car-carrying mode, shooting mode and replay mode. After power is on, press Power key to shift among them. Video recording mode Car-carrying mode Shooting mode Replay mode Note: after the shutdown of the system will save the current setting pattern, the next open opportunity automatically entered into the model. 9 5. Indicator Busy indicator (red): When the camera is busy such as recording videos, shooting photos and turning off screen automatically, the work indicator will flicker. Charging indicator (blue): When it is on, the user is prompted that the camera is being charged and it will be off after charging is completed. 6. Video recording mode After power is on, the video camera will enter video recording mode directly and in preview mode, press Shutter key to start video recording; Press it again to stop shooting. If the memory card is full or electrical quantity is low, it will also stop shooting: 1. Icon of mode, indicating video recording mode; 2. Indicate quality of video; 3. Indicate size of video:FHD 1080P(60FPS) / FHD 1080P(30FPS)/HD 720P(120FPS) / HD 720P(60FPS) 4. Recording time, indicating recordable length of time; 5. Icon of battery, indicating current electrical quantity; Note: short press power key to realize the camera video process and save the image. 10 7. Car-carrying mode After power is on, press Power key to enter car-carrying mode 1. Icon of mode, indicating car-carrying mode; 2. Indicate quality of video; 3. Indicate size of video: FHD 1080P(60FPS) / FHD 1080P(30FPS)/HD 720P(120FPS) / HD 720P(60FPS 4. Recording time, indicating recordable length of time. 5. Icon of battery, indicating current electrical quantity Prompt: 1.In car-carrying mode, a passage of video is kept every three minutes in recording. After the storage card is full, the earliest passage will be deleted, and video will be recorded in a circulating way. 2. Boot after choosing to car-carrying mode, normal shutdown again after boot, connect the car charger will automatically enter the vehicle model and start the video. 11 8. Shooting mode After power is on, press Power key twice to enter shooting mode, and in preview state, press Shutter key to take a photo: 1. Icon of mode, indicating the current is shooting mode; 2. Size of video, and 5M/8M/10M/12M/16M is optional; 3. Counter, indicating number of photos to be taken; 4. Icon of electrical quantity of battery. 9. Replay mode 9.1 After power is on and entering Preview state, press Power key continuously to shift to Replay mode. Select the file to be replayed through the menu as follows: Select CAR to replay files in car-carrying video mode; Select VIDEO to replay files in general video mode; Select JPG to replay files in shooting mode; 12 9.2 Introduction to play screens 9.2.1 Screens of video files 1. Icon of replay mode; 2. Indicate serial number of current file/ total number of files; 3. Indicate parameter of recording time; 4. Operation buttons hint icon 5. Indicate recording time point. When a video file is being played, click Ok key to pause play, and click Menu key to stop playing. 13 9.2.2 Screen of photos 1. Indicate serial number of current file/ total number of files; 2. Operation buttons hint icon In replaying, Press WIFI key to select other file type, in a circulating way. 10. Menu operation There is a different menu in each working mode as shown in the following figures: Menu for video recording /car-carrying mode Menu for shooting mode Menu for setting mode 14 Menu for replay mode Operation: Press Menu key, the menu for this mode will be displayed on the LCD. At this time, press Power key to move the cursor leftward or rightward and select on the menu, and press WIFI key to move the cursor upward or downward and select on the menu in a circulating way. Press OK key to confirm and press Menu key to return or exit from menu mode. Application of remote controller 1. Definition of keys of remote controller Remote controller is as shown in the right figure: Signal transmission port Power on/off key Video recording key Shooting key 15 2. Use of remote controller: Using the remote controller, you can achieve functions of video recording, shooting and power off without operating on the camera. Just point the signal transmission port of the remote controller at RF signal receiving lamp of the camera, and press corresponding keys to achieve functions of video recording, shooting and power off. RF remote control lamp 16 Connect device to HDTV: Connect the video camera to an HDTV with a HD cable as shown in the following figure, display signals in the camera will be output into the HDTV automatically, and you can browse HD videos and photos that are recorded or taken in the HDTV. Diagram of connection Signal transmission 17 APP (for Android and iOS System) I. How to Obtain the APP Installation Program 1. For the Android System, you can search “SYMAGIX2” in the Play Store to obtain corresponding installation programs, and then you can install them according to the indicated steps or through scanning the two-dimensional code . 2. For the IOS System, you can search “SYMAGIX2” in the APP Store to obtain corresponding installation programs, and then you can install them according to the indicated steps or through scanning the two-dimensional code . 18 II. Camera WIFI and System Applications Android Applications 1. Please install the SYMAGIX2 application program (provided by the Supplier or the Internet) for the Android mobile phone or tablet PC, and then the Display Screen will show the Icon ; 2. Insert a Storage Card into the Camera and then power it on. Press the WIFI key to conduct WIFI connection, and the Screen of the Camera will show the WIFI signal Icon with the external screen revealing WIFI Connecting. 3. Enable the WIFI function of the Android mobile phone or tablet PC, and try to find the AP Name QC8028; please conduct connection between them till the system reveals a successful connection; Note:if you are conducting WIFI connection for the first time, please input the password: 1234567890. 4. Tap and enable the Application Program Icon on the Android mobile phone or tablet PC; you can directly view the preview picture transmitted by the Camera (see the following picture), and then conduct relevant operations. 19 4 1. Resolution 5 2. White Balance 1 2 3 3. Settings (Enter Settings Menu) 4. Wi-Fi Signal Icon 5. Camera’s Battery Status Icon 6. Enter the Playback Mode 7. Shutter Button 8.Video Mode 9. Photo Mode 6 7 8 9 10 10. Timelaps Mode IOS Applications 1. Please install the SYMAGIX2 application program (provided by the Supplier or the Internet) for the IOS mobile phone or tablet PC, and then the Display Screen will show the Icon ; 2. Insert a Storage Card into the Camera and then power it on. Press the WIFI key to conduct WIFI connection, and the Screen of the Camera will show the WIFI signal Icon with the external screen revealing WIFI Connecting. 3. Enable the WIFI function of the IOS mobile phone or tablet PC, and try to find the AP Name QC8028; please conduct connection between them till the system reveals a successful connection; if you are conducting WIFI connection for the first time, please input the password: 1234567890. 20 4. Tap and enable the Application Program Icon on the IOS mobile phone or tablet PC; you can directly view the preview picture transmitted by the Camera (see the following picture), and then conduct relevant operations. 1 2 3 4 1. DV battery icon 2. Video resolution 3. White balance 4. Setup (enter setup menu) 9 5. Enter Playback mode 6. Timelaps Mode 7. Photo mode 8. Video mode 9. Shutter button 5 6 7 8 21 Notes: 1. If you need to record videos or download pictures using your mobile phone or tablet PC, please insert one TF card for your camera; 2. When the Camera has been successfully connected with your mobile phone or tablet PC, the WIFI Indicator Light will be on. Application on PC The camera has a plug-and-play function. Connect the power-on device to the computer with the USB cable, and the mode can be automatically switched to the removable hard disk. Removable disk icon will appear in the "My Computer" window. The pictures you shot stored in the removable disk I: \ jpg folder (I is this equipment removable disk); video files your shot stored in I: \ video folder; vehicle-mounted files you shot saved in I: \ CAR folder. Note: If using a mobile hard disk function on Windows 2000 or later versions of Windows operating system, do not install the driver. 22 System Requirements System Requirements Operating System CPU Internal Memory MSDC Microsoft Window 2000,XP, Vista, 7,8 Mac OS X ver: 10.0.0 or above version Intel Pentium of more than 1GB Hz or other CPU with equivalent performance Larger than 1GB Sound Card and Display Card The sound card and video card shall support DirectX8 or higher version. CD Driver Speed of 4 times or faster Hard Disk Free space of more than 2GB Others One standard USB1.1 or USB2.0 port 23 Technical Parameters Image Sensor 8.0 Million Image Sensor Function Modes Video recording mode, car-carrying mode, shooting mode and replay mode Lens F2.8, f=2.5mm LCD Display Screen 2.0 inch HD LCD Screen Photo Definition Ratio 16M, 12M, 10M, 8M, 5M Video Definition Ratio FHD 1080P(60FPS) Storage Media MicroSD Card (up to 32GB) File Formats Videos(MOV); H.264 Compressed Format; Photos(JPG) USB Port USB 2.0 Port Power Supply External 3.8V rechargeable lithium battery 1200mAh. Language English, Spanish, Portuguese, German, Italian, French, Dutch Dimension 59x44x25.5mm 24