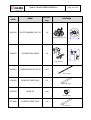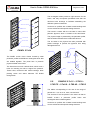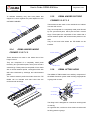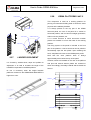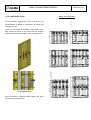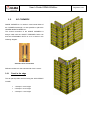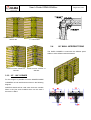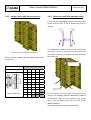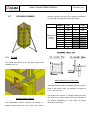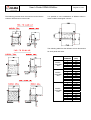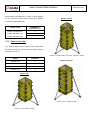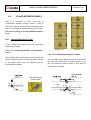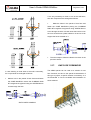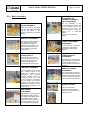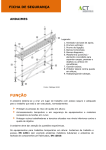
1
USER’S GUIDE
ORMA 80kN/m2
All rights reserved.
Neither all nor part of this document may be reproduced or transmitted in any way by
any electronic or mechanical procedure, including photocopy, magnetic recording or
any other form of information storage or retrieval system without the written
V00BFP
permission of ULMA Construcción.
Technical Area
User’s Guide ORMA 80kN/m2
Page 2 of 126
0. TABLE OF CONTENTS
0.
TABLE OF CONTENTS ........................................................................................................................................................2
1.
INTRODUCTION ...................................................................................................................................................................5
2.
SYSTEM COMPONENTS .....................................................................................................................................................8
2.1.
2.2.
2.3.
2.4.
2.5.
2.6.
2.7.
2.8.
2.9.
2.10.
2.11.
2.12.
2.13.
2.14.
2.15.
2.16.
2.17.
2.18.
2.19.
2.20.
2.21.
2.22.
2.23.
2.24.
2.25.
2.26.
2.27.
2.28.
2.29.
2.30.
2.31.
2.32.
2.33.
2.34.
2.35.
2.36.
2.37.
2.38.
2.39.
2.40.
2.41.
2.42.
2.43.
2.44.
2.45.
2.46.
PANEL 3.3X2.4 ....................................................................................................................................... 32
PANELS 3.3X1.2– 3.3X0.9 – 3.3X0.75 – 3.3X0.6 –3.3X0.45 – 3.3X0.3 ................................................. 33
UNIVERSAL PANEL 3.3X0.92 .............................................................................................................. 33
PANEL 2.7X2.4........................................................................................................................................ 34
PANELS 2.7X1.2 – 2.7X0.9 – 2.7X0.75 – 2.7X0.6 – 2.7X0.45 – 2.7X0.3 ................................................ 34
PANEL COLUMN 2.7X1.32, 2.7X0.92 AND 2.7X0.72 ........................................................................... 35
PANEL UNIVERSAL 2.7X0.92.............................................................................................................. 35
PANELS 1.2X1.2, 1.2X0.9, 1.2X0.75 1.2X0.6, 1.2X0.45 AND 1.2X0.3 .................................................. 36
PANEL COLUMN 1.2X1.32 – 1.2X0.92 – 1.2X0.72 .............................................................................. 36
UNIVERSAL PANEL 1.2X0.92.............................................................................................................. 36
PANEL COLUMN 0.6X1.32–0.6X0.92 – 0.6X0.72................................................................................ 37
ORMA INSIDE CORNER 3.3–2.7–1.2 ................................................................................................... 37
ORMA OUTSIDE CORNER 3.3-2.7- 1.2................................................................................................ 37
ORMA HINGED INSIDE CORNER 3.3-2.7-1.2 .................................................................................... 38
ORMA HINGED OUTSIDE CORNER 3.3-2.7-1.2 ................................................................................ 38
ORMA LIFTING HOOK ......................................................................................................................... 38
ORMA CLAMP ....................................................................................................................................... 39
ORMA FIXED CLAMP .......................................................................................................................... 39
HEAD 60.................................................................................................................................................. 39
PUSH-PULL PROP SHOE ...................................................................................................................... 40
PUSH-PULL PROPS ............................................................................................................................... 40
PUSH-PULL PROP 6-10 ......................................................................................................................... 40
PROP HEAD............................................................................................................................................ 41
ORMA WALKWAY BRACKET............................................................................................................ 41
ORMA-BRIO BRACKET ....................................................................................................................... 41
TYING PROFILE .................................................................................................................................... 42
LADDER SUPLEMENT ......................................................................................................................... 43
ORMA PLATFORM 2.4X1.2.................................................................................................................. 43
POST BRACKET .................................................................................................................................... 44
SAFETY HANDRAIL SV ....................................................................................................................... 44
SAFETY HANDRAIL POST .................................................................................................................. 44
ORMA CLIMBING BRACKET.............................................................................................................. 44
CONE DW15/M24................................................................................................................................... 45
CLIMBING RING NT 15 ........................................................................................................................ 45
LOST TIE 15/0.25.................................................................................................................................... 45
CONE-WALER CONNECTOR .............................................................................................................. 46
ORMA WALER....................................................................................................................................... 46
WALER HOOK ....................................................................................................................................... 46
TIE ROD .................................................................................................................................................. 47
ORMA BULKHEAD HOOK................................................................................................................... 47
PINS......................................................................................................................................................... 47
ECCENTRIC WASHER.......................................................................................................................... 48
TIE BOLT ................................................................................................................................................ 48
PANEL BOLT ......................................................................................................................................... 48
COMPENSATION TUBE 3.3-2.7-1.2..................................................................................................... 48
ORMA COMPENSATION PLATE 3.3-2.7-1.2 ...................................................................................... 49
User’s Guide ORMA 80kN/m2
2.47.
2.48.
2.49.
2.50.
2.51.
2.52.
2.53.
2.54.
2.55.
2.56.
2.57.
2.58.
2.59.
2.60.
2.61.
2.62.
2.63.
2.64.
2.65.
2.66.
2.67.
2.68.
2.69.
2.70.
3.
Page 3 of 126
TOP TIE BRACKET 65........................................................................................................................... 49
PLATE WASHER NUT 15...................................................................................................................... 49
HEXAGONAL NUT 15........................................................................................................................... 49
PLATE NUT D15 200X150..................................................................................................................... 50
WING NUT 20......................................................................................................................................... 50
BASE PLATE D20 .................................................................................................................................. 50
PLATE WASHER NUT 20...................................................................................................................... 50
FOUNDATION HEAD ........................................................................................................................... 50
FOUNDATION PLATE .......................................................................................................................... 51
SPACER TUBE 22/25 ............................................................................................................................. 51
CONE 22.................................................................................................................................................. 51
SPACER TUBE 32/36 ............................................................................................................................. 51
CONE 32.................................................................................................................................................. 51
SPACER TUBE 22/26 ............................................................................................................................. 51
WATER STOP CAP 26 ........................................................................................................................... 52
PLUG 20 .................................................................................................................................................. 52
PLUG 22 .................................................................................................................................................. 52
PLASTIC PLUG 26 ................................................................................................................................. 52
ORMA CHAMFER 3.3M ........................................................................................................................ 52
WATER STOP DW15 ............................................................................................................................. 53
WATER STOP ADAPTER DW15 .......................................................................................................... 53
WOODEN PROFILE 2.7 – WOODEN PROFILE 1.2 ............................................................................. 53
WOODEN BEVELED EDGE ................................................................................................................. 53
WOODEN FILLER ................................................................................................................................. 54
SOLUTIONS........................................................................................................................................................................55
3.1.
PANEL ASSEMBLIES-GANGS............................................................................................................. 57
3.1.1
Vertical joint.................................................................................................................................. 57
3.1.2
Horizontal joint ............................................................................................................................. 58
3.2.
90º CORNERS ......................................................................................................................................... 69
3.2.1
Panel in the edge........................................................................................................................... 69
3.2.2
Outside corner............................................................................................................................... 70
3.2.3
Universal Panel: ........................................................................................................................... 71
3.3.
HINGED CORNERS ............................................................................................................................... 73
3.3.1
65º - 180º CORNERS .................................................................................................................... 73
3.3.2
95º - 180º CORNER ...................................................................................................................... 75
3.4.
90º WALL INTERSECTIONS................................................................................................................. 75
3.5.
BULKHEADS ......................................................................................................................................... 76
3.5.1
With walers ................................................................................................................................... 76
3.5.2
With panel in the edge................................................................................................................... 77
3.5.3
With UNIVERSAL PANEL ............................................................................................................ 78
3.6.
PILASTERS............................................................................................................................................. 78
3.6.1
With walers ................................................................................................................................... 78
3.6.2
Inside corner with Universal panel ............................................................................................... 79
3.6.3
Universal panel with standart panel ............................................................................................. 79
3.7.
COLUMN FORMING ............................................................................................................................. 80
3.7.1
Tie bolt .......................................................................................................................................... 80
3.7.2
Panel in the edge........................................................................................................................... 82
3.8.
FILLER BETWEEN PANELS ................................................................................................................ 83
3.8.1
Job built filler 0<X<10 cm............................................................................................................ 83
3.8.2
Job built filler 10-30 cm ................................................................................................................ 84
3.9.
POLYGONAL WALLS........................................................................................................................... 86
3.10.
JOINING WALL FORMING STAGES................................................................................................... 86
3.10.1
Close to transversal wall .......................................................................................................... 87
3.10.2
Close to longitudinal wall ........................................................................................................ 87
3.11.
INCLINED WALLS ................................................................................................................................ 87
3.11.1
Inclination up to 10% ( 6º) ....................................................................................................... 87
User’s Guide ORMA 80kN/m2
Page 4 of 126
3.11.2
Inclination > 10% .................................................................................................................... 88
3.12.
FOUNDATIONS ..................................................................................................................................... 89
3.12.1
Open air foundations................................................................................................................ 89
3.12.2
Foundations in trenches ........................................................................................................... 90
3.13.
UPPER EXTRAFORMWORK................................................................................................................ 90
3.14.
STRIPPING AT CORNERS IN HOLLOWS........................................................................................... 90
3.15.
WATER STOP SOLUTION .................................................................................................................... 91
3.15.1
Water stop system 26 ................................................................................................................ 91
3.15.2
Water stop system DW15.......................................................................................................... 91
3.16.
CLIMBING.............................................................................................................................................. 92
3.16.1
Cone on tie rod ......................................................................................................................... 92
3.16.2
Cone on plywood ...................................................................................................................... 94
3.17.
ONE FACE FORMWORK ...................................................................................................................... 95
4.
SYSTEM FEATURES..........................................................................................................................................................96
4.1.
4.2.
4.3.
4.4.
4.4.1
4.4.2
5.
ASSEMBLY, USE AND DISASSEMBLY...........................................................................................................................104
5.1.
5.2.
5.3.
5.3.1
5.3.2
5.4.
5.4.1
5.4.2
5.4.3
5.5.
5.5.1
5.6.
5.6.1
5.7.
6.
CONCRETE PRESSURE ........................................................................................................................ 97
PANELS WORKING LOADS ................................................................................................................ 98
COMPONENTS WORKING LOADS .................................................................................................... 99
TYING SYSTEM................................................................................................................................... 102
Tie 15mm..................................................................................................................................... 102
Tie 20mm..................................................................................................................................... 102
PUSH-PULL PROPS ............................................................................................................................. 108
POST BRACKET .................................................................................................................................. 109
ORMA LIFTING HOOK ....................................................................................................................... 110
Basic assembly ............................................................................................................................ 110
Basic disassembly........................................................................................................................ 111
WALKWAY BRACKET....................................................................................................................... 111
Horizontal ribs ............................................................................................................................ 111
Vertical ribs................................................................................................................................. 112
Basic assembly ............................................................................................................................ 112
ORMA-BRIO BRACKET ..................................................................................................................... 113
Basic assembly ............................................................................................................................ 114
ORMA PLATFORM 2.4X1.2 ................................................................................................................ 116
Basic assembly ............................................................................................................................ 116
FOUNDATION ..................................................................................................................................... 118
CONDITIONS OF USE......................................................................................................................................................119
6.1.
GENERAL CONDITIONS OF USE...................................................................................................... 120
6.1.1
Framing....................................................................................................................................... 120
6.1.2
Release agent .............................................................................................................................. 121
6.1.3
Pouring........................................................................................................................................ 121
6.1.4
Stripping and curing ................................................................................................................... 122
6.1.5
Personal and collective protective equipment............................................................................. 122
7.
HANDLING AND MAINTENANCE CONDITIONS.............................................................................................................123
8.
LEGAL AND STANDARD REFERENCES ON THE PREVENTION OF OCCUPATIONAL AND ENVIRONMENTAL
HAZARDS ....................................................................................................................................................................................125
User’s Guide ORMA 80kN/m2
1. INTRODUCTION
Page 5 of 126
User’s Guide ORMA 80kN/m2
Page 6 of 126
The ORMA80kN/m2 product has been created as a vertical formwork system for
wall formworks, focused mainly on the residential building.
Basic properties:
•
GSV certification
¾ Maximum allowable concrete pressure: 80 kN/m2.
¾ Maximum deflection: 60 kN/m2 (line 7)
80 kN/m2 (line 6)
•
Three height ranges: panels of h=3.3m, h=2.7m and h=1.2m, completely
compatible.
•
All the panels have lateral metal bushings for solutions like bulkheads, 90º
corners and pilasters using the Universal panel
•
Panels of the range 3.3m and 2.7m can be assembled face to face
•
Big Panel 3.3x2.4 (7.92m2) with 3 tying points in heigh.
o hpouring concrete ≤ 3.3m, just 2 tying points in height needed.
o hpouring concrete > 3.3m, 3 tying points in height needed.
•
Panel 2.7x2.4 (6.48 m2) with just 2 ties in height.
•
Width of panels every 15cm.
•
Panel joint with Clamp.
•
Broad range of panels for columns, (maximun column 120cm x 120cm)
•
Robust system. A frame formed by closed steel profile reinforced with
rectangular tubes also which protects the phenolic edge of the plywood.
•
The form face phenolic plywood is fixed with rivets to the steel frame.
•
Safe assembly process.
User’s Guide ORMA 80kN/m2
2700
3300
Page 7 of 126
Panel 3.3x2.4→ 2 tying points in heigh h ≤ 3.3m
Panel 3.3x2.4 and Panel 2.7x2.4 face to face
2700
2700
3300
3900
1200
Panel 2.7x2.4→ 2 tying points in heigh
User’s Guide ORMA 80kN/m2
2. SYSTEM COMPONENTS
Page 8 of 126
User’s Guide ORMA 80kN/m2
NAME
1900179
ORMA LIFTING HOOK
WEIGHT
(Kg)
DIAGRAM
360
CODE
Page 9 of 126
10.6
188
ZINC COATED
ORMA CLAMP
5.5
174
1900170
ZINC COATED
ORMA FIXED CLAMP
2.9
144
1900894
ZINC COATED
User’s Guide ORMA 80kN/m2
CODE
NAME
WEIGHT
(Kg)
Page 10 of 126
DIAGRAM
450
1580
PANEL 3.3X2.4
560
1908247
500
1400
500
1908250
PANEL 3.3X1.2
3300
2400
208
1908253
PANEL 3.3X0.9
167
1908256
PANEL 3.3X0.75
148
1908259
PANEL 3.3X0.6
130
3300
1200
3300
RANGE 3.3m
User’s Guide ORMA 80kN/m2
WEIGHT
CODE
NAME
1908262
PANEL 3.3X0.45
107
1908265
PANEL 3.3X0.3
88
DIAGRAM
3.3X0.92
3300
185
600
UNIVERSAL PANEL
450
600
1908268
600
600
450
3300
(Kg)
Page 11 of 126
1908271
ORMA
INSIDE CORNER 3.3
3300
920
124
300
User’s Guide ORMA 80kN/m2
ORMA
OUTSIDE CORNER 3.3
DIAGRAM
(Kg)
61
3300
1908273
WEIGHT
PAINTED YELLOW
CODE
NAME
Page 12 of 126
145
CORNER 3.3
ORMA
1908357
HINGED OUTSIDE
CORNER 3.3
93
3300
HINGED INSIDE
3300
1908346
PAINTED YELLOW
ORMA
PAINTED YELLOW
120
User’s Guide ORMA 80kN/m2
CODE
NAME
WEIGHT
(Kg)
Page 13 of 126
DIAGRAM
1900002
PANEL 2.7X2.4
2700
RANGE 2.7m
363
1900005
PANEL 2.7X1.2
2700
2400
167
1900008
PANEL 2.7X0.9
134
1900487
PANEL 2.7X0.75
120
1900011
PANEL 2.7X0.6
105
2700
1200
User’s Guide ORMA 80kN/m2
1900020
PANEL 2.7X0.45
86
1900029
PANEL 2.7X0.3
69
19000089
ORMA
INSIDE CORNER 2.7
(Kg)
DIAGRAM
2700
CODE
2700
WEIGHT
NAME
Page 14 of 126
100
ORMA
OUTSIDE CORNER 2.7
51
2700
1900932
PAINTED YELLOW
30 0
120
User’s Guide ORMA 80kN/m2
CODE
NAME
WEIGHT
(Kg)
Page 15 of 126
DIAGRAM
1900096
HINGED INSIDE
2700
ORMA
118
CORNER 2.7
580
PAINTED YELLOW
1900110
HINGED OUTSIDE
2700
ORMA
77
CORNER 2.7
PAINTED YELLOW
2.7X1.32
700
213
700
PANEL COLUMN
300
1900341
2700
700
300
200
1320
User’s Guide ORMA 80kN/m2
WEIGHT
(Kg)
DIAGRAM
2.7X0.92
159
700
PANEL COLUMN
300
700
1900509
2700
700
300
CODE
NAME
Page 16 of 126
2.7X0.72
700
134
700
PANEL COLUMN
300
1900354
2700
700
300
920
720
User’s Guide ORMA 80kN/m2
(Kg)
DIAGRAM
2.7X0.92
600
UNIVERSAL PANEL
159
450
600
1908372
2700
600
450
CODE
WEIGHT
NAME
Page 17 of 126
920
PAINTED GREY
1900032
PANEL 1.2X1.2
1200
RANGE 1.2m
89
1900035
PANEL 1.2X0.9
70
1900490
PANEL 1.2X0.75
62
1900038
PANEL 1.2X0.6
54
1200
1200
User’s Guide ORMA 80kN/m2
PANEL 1.2X0.45
1900056
PANEL 1.2X0.3
1900156
ORMA
INSIDE CORNER 1.2
(Kg)
DIAGRAM
42.3
1200
1900047
WEIGHT
34.5
1200
CODE
NAME
Page 18 of 126
48.7
1900936
ORMA
OUTSIDE CORNER 1.2
1200
300
22.9
120
PAINTED YELLOW
User’s Guide ORMA 80kN/m2
CODE
NAME
WEIGHT
(Kg)
Page 19 of 126
DIAGRAM
1900164
HINGED INSIDE
1200
ORMA
55
CORNER 1.2
580
PAINTED YELLOW
1900194
HINGED OUTSIDE
1200
ORMA
34.8
CORNER 1.2
PAINTED YELLOW
1.2X1.32
100
600
PANEL COLUMN
300
1900344
1200
300
200
1320
User’s Guide ORMA 80kN/m2
(Kg)
DIAGRAM
600
PANEL COLUMN
74
1.2X0.92
300
1900515
1200
300
CODE
WEIGHT
NAME
Page 20 of 126
600
PANEL COLUMN
62
1.2X0.72
300
1900357
1200
300
920
1.2X0.92
300
UNIVERSAL PANEL
79
450
1908381
1200
450
720
920
PAINTED GREY
PANEL COLUMN
0.6X1.32
58
600
1900347
300 300
RANGE 0.6 m
1320
User’s Guide ORMA 80kN/m2
PANEL COLUMN
0.6X0.92
(Kg)
DIAGRAM
43.3
600
1900518
WEIGHT
300 300
CODE
NAME
Page 21 of 126
PANEL COLUMN
0.6X0.72
35
600
1900360
300 300
920
1900119
HEAD 60
187
24
720
4.5
24
211
PUSH-PULL PROP
SHOE
143
1900144
24
PAINTED BLACK
4.3
1
O2
243
PAINTED BLACK
User’s Guide ORMA 80kN/m2
Page 22 of 126
WEIGHT
CODE
NAME
1900134
PUSH-PULL PROP 1.1-1.7
7.8
1900123
PUSH-PULL PROP 2.4-3.5
24.2
1908168
PUSH-PULL PROP 3.6-4.8
43.3
1900147
PUSH-PULL PROP 5-6
51
1900207
PUSH-PULL PROP 6-10
99
DIAGRAM
(Kg)
PAINTED YELLOW
A
ZINC COATED
PROP HEAD
4.6
54
1902219
187
226
54
PAINTED BLACK
1861094
ORMA
1911
1014
14.8
WALKWAY BRACKET
PAINTED BLACK
User’s Guide ORMA 80kN/m2
CODE
NAME
WEIGHT
(Kg)
Page 23 of 126
DIAGRAM
972
BRACKET
27.1
1596
ORMA-BRIO
1224
1900908
GALVANIZED
TYING PROFILE
2.3
129
1900890
200
PAINTED YELLOW
1908363
LADDER SUPPLEMENT
12.2
1908171
ORMA PLATFORM
2.4x1.2
1269
GALVANIZED
163
1365
User’s Guide ORMA 80kN/m2
1900941
POST BRACKET
WEIGHT
(Kg)
DIAGRAM
3.5
375
CODE
NAME
Page 24 of 126
1860516
SAFETY HANDRAIL S-V
1240
PAINTED BLACK
3.9
PAINTED YELLOW
SAFETY HANDRAIL POST
3.4
1243
1902210
PAINTED YELLOW
ORMA CLIMBING
BRACKET
36.5
2250
1900386
1200
1325
PAINTED BLACK
User’s Guide ORMA 80kN/m2
1901080
CONE DW 15/M24
WEIGHT
(Kg)
DIAGRAM
1
O 70
CODE
NAME
Page 25 of 126
BICHROMATE
TREATED
0.8
BICHROMATE
TREATED
9053013
HEXAGONAL SCREW
M24x120 DIN931-10.9
O 40
CLIMBING RING 15
O 76
1901083
125
74
0.54
BLUED
1901245
LOST TIE ROD
15/0.25
CONE-WALER
CONNECTOR
0.7
250
M 24
1900738
1.9
500
ZINC COATED
25
ORMA WALER 0.9
10.9
1900445
ORMA WALER 1.55
18.6
100
1900193
PAINTED BLACK
105
1900448
WALER HOOK
1.4
316
ZINC COATED
User’s Guide ORMA 80kN/m2
WEIGHT
CODE
NAME
0230100
TIE ROD 15/1
1.7
0230120
TIE ROD 15/1.2
2
0230150
TIE ROD 15/1.5
2.2
0230200
TIE ROD 15/2
3.3
0230600
TIE ROD 15/6
10
0234100
TIE ROD 20/1
2.9
0234120
TIE ROD 20/1.2
3.4
0234150
TIE ROD 20/1.5
4.3
0234200
TIE ROD 20/2
5.2
0234600
TIE ROD 20/6
17.2
1900227
ORMA
BULKHEAD HOOK
(Kg)
Page 26 of 126
DIAGRAM
0.91
350
ZINC COATED
1861033
SHORT PIN 0.35
0.6
1861034
LONG PIN 0.55
0.8
ZINC COATED
0
ECCENTRIC WASHER
1.4
110
1861692
O2
150
1900265
TIE BOLT
O 30
ZINC COATED
0.6
300
ZINC COATED
1861122
PANEL BOLT
0.3
210
ZINC COATED
User’s Guide ORMA 80kN/m2
1908460
COMPENSATION
TUBE 3.3
WEIGHT
(Kg)
DIAGRAM
120
CODE
NAME
Page 27 of 126
25.3
3300
1900216
COMPENSATION
TUBE 2.7
120
PAINTED YELLOW
20.2
2700
1900217
COMPENSATION
TUBE 1.2
120
PAINTED YELLOW
9
1200
PAINTED YELLOW
1908483
COMPENSATION
3300
ORMA
49.2
PLATE 3.3
PAINTED YELLOW
360
ORMA
COMPENSATION
39.8
2700
1900423
PLATE 2.7
PAINTED YELLOW
360
1900428
COMPENSATION
1200
ORMA
18.8
PLATE 1.2
PAINTED YELLOW
360
User’s Guide ORMA 80kN/m2
CODE
NAME
WEIGHT
(Kg)
Page 28 of 126
DIAGRAM
140
1.8
170
TOP TIE BRACKET 65
66
1900929
1908158
HEXAGONAL NUT 15
PLATE NUT D15 200X150
1.2
BICHROMATE
TREATED
120
ZINC COATED
O 36
0.22
50
7238001
PLATE WASHER NUT 15
150
1900256
120
PAINTED BLACK
2.6
200
ZINC COATED
106
WING NUT 20
0.37
60
1905046
BICHROMATE
TREATED
O
BASE PLATE D20
2.2
120
1905047
26
ZINC COATED
120
User’s Guide ORMA 80kN/m2
CODE
NAME
1905160
PLATE WASHER NUT 20
WEIGHT
(Kg)
Page 29 of 126
DIAGRAM
1.2
130
BICHROMATE TREATED
173
FOUNDATION HEAD
3.4
210
1908229
ZINC COATED
1850453
FOUNDATION PLATE 25
16.6
ZINC COATED
7230455
SPACER TUBE 22/25
0.3
SPARE PART
7230264
CONE 22
0.006
SPARE PART
9371968
SPACER TUBE 32/36
0.4
SPARE PART
User’s Guide ORMA 80kN/m2
CODE
NAME
9371967
CONE 32
WEIGHT
(Kg)
Page 30 of 126
DIAGRAM
0.03
SPARE PART
7238047
SPACER TUBE 22/26
0.4
SPARE PART
7238049
WATER STOP CAP 26
0.009
SPARE PART
1861799
PLUG 20
0.003
SPARE PART
1900159
PLUG 22
0.003
SPARE PART
7238050
PLUG 26
0.004
0230004
WATER STOP DW15
O 65
SPARE PART
0.61
112
9371966
WATER STOP
ADAPTER DW15
0.1
SPARE PART
User’s Guide ORMA 80kN/m2
CODE
1908535
NAME
ORMA
CHAMFER 3.3M
WEIGHT
(Kg)
2.1
1908505
WOODEN PROFILE 3.3
11.4
1900439
WOODEN PROFILE 2.7
9.2
1900440
WOODEN PROFILE 1.2
4.2
1900494
WOODEN BEVELED
EDGE
9.1
1908506
WOODEN COMP.3.3X0.02
4.4
1908507
WOODEN COMP.3.3X0.03
6.6
1908508
WOODEN COMP.3.3X0.05
11
1900441
WOODEN COMP.2.7X0.02
4
1900442
WOODEN COMP.2.7X0.03
6.2
1908443
WOODEN COMP.2.7X0.05
8.3
Page 31 of 126
DIAGRAM
User’s Guide ORMA 80kN/m2
2.1.
Page 32 of 126
PANEL 3.3X2.4
The PANEL 3.3X2.4 is the base element of the ORMA
80kN/m2 system, since it covers the largest surfaces
(7.92m2).
These panels have a frame formed by steel perimeter
3300
profiles and different rectangular tubes that are welded
2700
together. The panel face is phenolic plywood riveted to
the frame.
The frame´s four corners are stiffned by a especial
casting elements (welded to the external profiles). This
casting element has a special shape that significantly
eases any fine adjustment needed (with a crowbar),
after the panels have been deposited by crane.
The rectangular tubes provide a rigid structure for the
frame, and they incorporate pre-drilled holes that are
reinforced with bushings to facilitate assembling the
different system accessories.
The vertical 3.3m profiles of the frame have 5 lateral
metal bushings for solutions like bulkheads, 90º corners
and pilasters.
The board in contact with the concrete is 18mm thick
phenolic plywood, which is riveted to the steel frame.
The plywood edge is protected by the perimeter profile,
and the hollow between them is filled with silicone.
The tie holes in the plywood are also protected with
The frame has two main vertical tubes, which have 4
of the 6 holes for inserting tie rods to support the
pressure. The rest 2 holes are on the superior
horizontal profile.
These holes, reinforced with metal bushings, allow
passing 15mm and 20mm diameter TIE RODS
through them.
Panels of the range 3.3m and 2.7m can be brought
face to face, because the holes for inserting tie rods
are on the same level.
plastic bushings to prevent the plywood from being
damaged with use.
User’s Guide ORMA 80kN/m2
Page 33 of 126
The holes for inserting tie rods to support the pressure
RIVETED PLYWOOD
TIE HOLE
are situated on the outside profile. These holes,
METALIC FRAME
C
ZOOMED VIEW E
D
reinforced with metal bushings, allow passing 15mm and
E
ZOOMED VIEW C
20mm diameter TIE RODS through them and panels of
TIE HOLE
B
the same width can be brought face to face with the
ZOOMED VIEW B
panels of the range 2.7 and 1.2.
PHENOLIC PLYWOOD
The board in contact with the concrete is 18mm thick
F
LATERAL BUSHING
phenolic plywood, which is riveted to the steel frame.
ZOOMED VIEW D
PLASTIC BUSHING
ZOOMED VIEW F
A
ZOOMED VIEW A
2.2.
1200
CASTING CORNERS
-
PANELS 3.3x1.2– 3.3X0.9 –
3300
3.3X2.4. Vertical 3.3m profiles with 5 lateral metal
2700
2700
The frame of the panels are similar to the PANEL
3300
3.3X0.75 – 3.3X0.6 –3.3X0.45 – 3.3X0.3
bushings, corners reinforced with special casting
elements and rectangular tubes which incorporate predrilled holes.
2.3.
UNIVERSAL PANEL 3.3x0.92
TIE HOLE
It has a steel frame formed by perimeter profile and ribs,
ZOOMED VIEW A
rectangular tubes, but it also has 5 “U” shaped
multipunched ribs with holes situated such that the
different column dimensions can be achieved using a
METALLIC FRAME
A
combination of these holes.
Combining this Universal panel with the other panels of
the range 3.3, solutions like bulkheads, pilasters and 90º
RECTANGULAR TUBE
corners can be done.
They can also be used as wall panels, and they have
CASTING CORNER
holes in the perimeter profile where the TIE RODS can
be inserted.
PANELS 1.2 – 0.90 – 0.75 – 0.60
PANELS 0.45 – 0.30
User’s Guide ORMA 80kN/m2
Page 34 of 126
The rectangular tubes provide a rigid structure for the
frame, and they incorporate pre-drilled holes that are
RECTANGULAR TUBE
reinforced with bushings to facilitate assembling the
different system accessories.
PHENOLIC PLYWOOD
Vertical 2.7m profiles with 4 lateral metal bushings and
corners reinforced with special casting elements.
TIE HOLE
The board in contact with the concrete is 18mm thick
METALLIC FRAME
phenolic plywood, which is riveted to the steel frame.
The plywood edge is protected by the perimeter profile,
"U" SHAPED TUBE
and the hollow between them is filled with silicone.
The tie holes in the plywood are also protected with
CASTING CORNER
plastic bushings to prevent the plywood from being
damaged with use.
HOLES FOR COLUMNS
RIVET PLYWOOD
2.4.
PANEL 2.7x2.4
METALLIC FRAME
B
The PANEL 2.7X2.4 has a frame formed by steel
DETAIL
ZOOMED
VIEW BB
perimeter profiles and different rectangular tubes that
A
are welded together. The panel face is phenolic
PHENOLIC PLYWOOD
plywood riveted to the frame.
The frame has two main vertical tubes, which have 4
C
holes for inserting tie rods to support the pressure.
TIE HOLE
These holes, reinforced with metal bushings, allow
passing 15mm and 20mm diameter TIE RODS
PLASTIC BUSHING
PLASTIC
ELEMENT
ZOOMED VIEW A
DETAIL A
through them.
2.5.
ZOOMED VIEW C
DETAIL C
PANELS 2.7x1.2 – 2.7X0.9 –
2.7X0.75 – 2.7x0.6 – 2.7X0.45 – 2.7X0.3
2700
The widths corresponding to the rest of the range of
panels are: 1.2, 0.90, 0.75, 0.60, 0.45 and 0.30.
The structure of all the panels is the same as that for
PANEL
2.7X2.4
a
perimeter
profile
frame
and
rectangular tubes welded together.
Vertical 2.7m profiles with 4 lateral metal bushings and
corners reinforced with special casting elements.
User’s Guide ORMA 80kN/m2
Page 35 of 126
In these panels’ widths, the TIE ROD holes are placed
on the perimeter profiles, and they also allow passing
TUBULAR RIB
15mm and 20mm diameter TIE RODS.
The board in contact with the concrete is 18mm thick
PHENOLIC PLYWOOD
phenolic plywood, and it is riveted to the steel frame.
TIE HOLE
METALLIC FRAME
TIE HOLE
"U" SHAPED RIB
ZOOMED
VIEW
DETAIL
A A
METALLIC FRAME
HOLES FOR COLUMNS
A
2.7.
PANEL UNIVERSAL 2.7X0.92
TUBULAR
RIB
RECTANGULAR
TUBE
It has a steel frame formed by perimeter profile and ribs,
rectangular tubes, but it also has 4 “U” shaped
multipunched ribs with holes situated such that the
PANELS 1.2 – 0.90 – 0.75 – 0.60
2.6.
PANELS 0.45 – 0.30
PANEL COLUMN 2.7X1.32,
2.7X0.92 and 2.7X0.72
different column dimensions can be achieved using a
combination of these holes.
Combining this Universal panel with the other panels of
the range 2.7, solutions like bulkheads, pilasters and 90º
corners can be done.
The panel column comes in three different widths,
0.72, 0.92 and 1.32; which can be combined to
achieve a broad range of column dimensions.
RECTANGULAR TUBE
TIE HOLE
As with all panels, it has a steel frame formed by
perimeter profile and ribs, rectangular tubes, but it also
PHENOLIC PLYWOOD
has 4 “U” shaped multipunched ribs with holes
situated such that the different column dimensions can
be achieved using a combination of these holes.
METALIC FRAME
They can also be used as wall panels, and they have
holes in the perimeter profile where the TIE RODS can
"U"-SHAPED TUBE
be inserted.
HOLES EVERY 50MM
HOLES EVERY 60MM
User’s Guide ORMA 80kN/m2
They can also be used as wall panels, and they have
holes in the perimeter profile where the TIE RODS can
be inserted.
2.9.
Page 36 of 126
PANEL COLUMN 1.2X1.32 –
1.2X0.92 – 1.2X0.72
It is grey painted not to mix with the panel column
In the 1.2m high panel column range, 1.32, 0.92 and
2.7x0.92
0.72m wide panels are available, and they can be used
in combination with all other panel height ranges.
2.8.
PANELS 1.2X1.2, 1.2X0.9,
1.2X0.75 1.2X0.6, 1.2X0.45 and 1.2X0.3
As with all panels, it has a steel frame formed by
perimeter profile and ribs, rectangular tubes, but it also
has 2 “U” shaped multipunched ribs with holes situated
The range of 1.2m high panels is formed by a variety
such that the different column dimensions can be
of panel widths including 1.2, 0.9, 0.75, 0.6, 0.45 and
achieved using a combination of these holes.
0.3m widths, which are compatible with the 2.7m high
They can also be used as wall panels, and they have
panels.
holes in the perimeter profile where the TIE RODS can
The panel structure is the same as that of the PANEL
be inserted.
2.7X2.4: a metallic perimeter profile frame and
rectangular tubes welded together.
In these panels, the TIE ROD holes are placed on the
TUBULAR RIB
RECTANGULAR
TUBE
perimeter profiles, and they also accept 15mm and
20mm diameter TIE RODS.
PHENOLIC PLYWOOD
Each panel has two holes in heigth, one of which is on
TIE HOLE
top of the panel.
U-SHAPED
TUBE RIB
"U" SHAPED
The board in contact with the concrete is 18mm thick
HOLES FOR COLUMNS
phenolic plywood, and it is riveted to the steel frame.
METALLIC FRAME
2.10.
TIE HOLES
UNIVERSAL PANEL 1.2X0.92
It is used for the same solutions as the 2.7m Universal
panel. They have 2 “U” shaped multipunched ribs with
holes.
It is grey painted not to mix with the panel column
1.2x0.92
TUBULAR
RIB
RECTANGULAR
TUBE
METALLIC FRAME
PANELS 1.2 – 0.90 – 0.75 – 0.60
PANELS 0.45 – 0.30
User’s Guide ORMA 80kN/m2
2.12.
RECTANGULAR TUBE
Page 37 of 126
ORMA INSIDE CORNER 3.3–
2.7–1.2
"U"-SHAPED TUBE
These elements are used on the inside face of 90º wall
PHENOLIC PLYWOOD
corners. They are 30cmx30cm side panels formed by a
TIE HOLES
steel frame with phenolic plywood riveted to it.
They have two vertical profiles with holes for TIE RODS.
Several rectangular tubes with their reinforced holes are
HOLES EVERY 50MM
welded one to another along the vertical profile of the
HOLES EVERY 60MM
2.11.
PANEL COLUMN 0.6X1.32–
0.6X0.92 – 0.6X0.72
frame to enclose the structure, and there are 2 plates
welded on the top and the bottom of the frame.
The board in contact with the concrete is 18 mm thick
phenolic plywood, and it is riveted to the steel frame.
In the 0.6m high panel column range 1.32, 0.92 and
END CAP
0.72m wide panels are also available, and it can also
be used in combination with all other panel height
METALIC FRAME
ranges. It is basically used to complement the other
panel heights in order to adjust the column height, and
it is used at the top of the formwork.
As with all panels, it has a steel frame formed by
perimeter profile and ribs, rectangular tubes, but it also
RECTANGULAR TUBE
PHENOLIC PLYWOOD
has 1 “U” shaped multipunched ribs with holes
situated such that the different column dimensions can
be achieved using a combination of these holes.
These panels do not have holes for TIE RODS since
they are only used in column construction.
2.13.
PHENOLIC PLYWOOD
ORMA OUTSIDE CORNER 3.3-
2.7- 1.2
These elements are used on the external face of 90º
corners, and they are generally used in combination with
the INSIDE CORNERS on the other face.
U-SHAPED
TUBERIB
"U" SHAPED
METALLIC FRAME
HOLES FOR COLUMNS
They are formed by a steel sheet bent at a 90º angle,
and they have several welded steel profiles that are
used to join the adjacent panels with CLAMPS.
User’s Guide ORMA 80kN/m2
To facilitate assembly, they also have plates that
support the corner against the panel adjacent to the
OUTSIDE CORNER.
2.15.
Page 38 of 126
ORMA HINGED OUTSIDE
CORNER 3.3-2.7-1.2
These elements are used on the outside face of obtuse
or acute wall corners.
TIED PROFILE
They are comprised of a completely metal panel formed
PLATE
by two symmetrical parts, which pivot around a central
90º CORNER
hinge. These parts are comprised of form sheet with a
vertical external profile and reinforcement plates on the
ends.
They do not have holes where the TIE RODS can be
inserted.
CENTRAL HINGE
2.14.
ORMA HINGED INSIDE
CORNER 3.3-2.7-1.2
VERTICAL PROFILE
These elements are used on the inside face of the
hinged corners.
They are comprised of a completely metal panel
formed by two symmetrical parts, which pivot around a
END PLATE
central hinge. These parts are comprised of form sheet
with a vertical external profile, rectangular tubes with
2.16.
ORMA LIFTING HOOK
drill holes reinforced by bushings and reinforcement
plates.
The ORMA LIFTING HOOK is an auxiliary component of
The vertical external profile has holes where the TIE
the ORMA formwork system used for lifting single panels
RODS can be inserted and side holes that are
or gangs with a crane.
reinforced with bushings.
TUBULAR RIB
RING
CENTRAL HINGE
HEXAGONAL SCREW
FIXED PART
VERTICAL PROFILE
MOVABLE PART
FORM SHEET
PLATE
ID PLATE PLATE
SHACKLE
NUT+ WASHER
The lifting hook is designed for a maximum working load
of 1500 kg.
As a general rule, a minimum of two hooks must be used
for lifting panels or gangs.
User’s Guide ORMA 80kN/m2
2.17.
ORMA CLAMP
2.18.
The ADJUSTABLE CLAMP is the main component
used to join and fix ORMA system elements.
It is used to join different panels together to form the
desired assemblies, always assuring concrete leak
tight joints. Panel´s joint can be made horizontally or
vertically.
Page 39 of 126
ORMA FIXED CLAMP
The FIXED CLAMP is an ORMA system joining element.
It does not have any stiffening capacity, so it almost
always assembled with WALERS in the horizontal joints.
It is used to join together different panels to form the
desired assemblies, always assuring concrete leak tight
joints.
The clamp is comprised of three different parts: fixed
body, movable body and wedge.
This joint can be made horizontally or vertically.
The clamp is comprised of three different parts: fixed
The movable body slides on the fixed body until the
desired opening is achieved. In this position, the
wedge is stroken with a hammer until the clamp joins
both external profiles together.
body, movable body and wedge.
The movable body slides on the fixed body and the
wedge is fixed in position with a hammer. The wedge
cannot be lost due to a safety rivet.
SAFE WORKING LOAD: 20 kN
This clamp can be only used to join panels without any
filler between them.
WORKING LOAD: 15 kN
MOVABLE PART
WEDGE
FIXED BODY
WEDGE
It can join wooden or steel fillers of up to 100mm,
placed between two adjacent panels.
2.19.
HEAD 60
This element is used as a connection between the panel
and the push-pull props in order to stabilize the gangs.
It can be assembled on any hole in the rectangular
tubes, vertically or horizontally.
The hook is inserted in any hole in the panel’s ribs, and
then the fixed plate nut is tightened over the head, thus
maximum compensation
between panels: 10cm
maximum compensation
in the extreme union of
the panel: 16cm
securing it to the panel.
User’s Guide ORMA 80kN/m2
Page 40 of 126
These pieces are formed by a tubular body with two
FIXED PLATE NUT
adjustable screws located at each end in order to control
the final length.
Depending on the formwork height, the appropriate
PUSH-PULL PROP or combination of push-pull props
WALER HOOK
will be used.
PIPE BRACE POSITION
CODE
NAME
This head includes safety pins and cotter pins to fix
the PUSH PULL PROP.
2.20.
1900134
PUSH-PULL PROP SHOE
1900123
The PUSH-PULL PROP SHOE is the component used
to anchor PUSH-PULL PROPS to the ground.
1908168
It has two plates with holes in which the PUSH-PULL
PROPS are secured using pins, and a base plate is
1900147
WEIGHT
(kg.)
Push-pull prop
1.1-1.7
7.8
Push-pull prop
2.4-3.5
24.2
Push-pull prop
3.6-4.8
43.3
Push-pull prop
5-6
51
welded to these two plates.
This piece must be fixed on the foundation using the
Ø21mm holes in the base plate in which necessary
anchors are inserted.
The push-pull props will be secured with pins to HEAD
60 on one side (this head will be fixed to the panel) and
to the PUSH-PULL PROP SHOE on the other.
PIPE BRACE POSITION
2.22.
PUSH-PULL PROP 6-10
The PUSH-PULL PROP 6-10 and the PUSH-PULL
PROPS have the same function, i.e., to stabilize the
ANCHORING HOLES
panels against wind and to plumb the high panel
assemblies. They work under tensile and compression
This element includes safety pins and cotter pins to fix
loads.
the PUSH PULL PROP.
As indicated by the name, lengths range from 6m to 10
m.
2.21.
PUSH-PULL PROPS
The PUSH-PULL PROP 6-10 is an adjustable prop
composed of outside and inside tube that incorporates a
PUSH-PULL PROPS are elements used in the
assembly process to stabilize the panels against wind
loads and to plumb the assembled gang or panels.
They work under tensile and compression loads.
base plate on its bottom to anchor it to the ground.
User’s Guide ORMA 80kN/m2
2.24.
Page 41 of 126
ORMA WALKWAY BRACKET
The WALKWAY BRACKET is used to build the walkway
3
OUTSIDE TUBE
platform where the concrete pouring or any other job will
be executed over the formwork.
It has fixing elements for securing plank based handrails
2
INSIDE TUBE
and toe boards. Planks are nailed to a plastic strip
located on the base, thus creating the work platform.
The bracket is installed by inserting the main pin in one
4
PLATE BASE
of the horizontal rib holes securing it with the cotter pin
and resting the movable stop on the lower rib, to provide
2.23.
PROP HEAD
stability. The bracket can be also assembled on the
vertical ribs through the lateral holes, securing it with the
The PROP HEAD is used to connect the panel and the
PANEL BOLT and HEXAGONAL NUT 15 or with
PUSH-PULL PROP 6-10 in the process of stabilizing
SHORT PIN 0.35 and two HEXAGONAL NUTS 15.
the panels.
This bracket includes a safety cotter pin, located in the
This head is fixed to the free end of the PUSH-PULL
main pin, to avoid safety problem durimg lifting the
PROP 6-10 using the pin and cotter pin.
formwork.
It can be inserted in any hole of the vertical or
HANDRAILS POSITION
horizontal ribs.
The hook is inserted in any hole of the panel’s
rectangular tubes and then the fixed plate nut is
tightened over the head, thus fixing the prop head to
TOE BOARD POSITION
the panel.
PLASTIC STRIP
HEAD STRUCTURE
FIXED PLATE NUT
WALER HOOK
MAIN PIN
LATERAL HOLE
MOVABLE ELEMENT
2.25.
ORMA-BRIO BRACKET
PIPE BRACE POSITION
This head also includes safety pins and cotter pins to
fix the PUSH PULL PROP.
The ORMA-BRIO BRACKET is used to build the
walkway platform where pouring or any other job will be
executed over the formwork.
The difference between this and the standard BRACKET
is that, in this case, the working area will be set up using
standard BRIO scaffolding platforms rather than planks.
User’s Guide ORMA 80kN/m2
Page 42 of 126
It includes several BRIO discs used to adapt the
These are the BRIO ledgers that can be used with the
horizontal ledgers between brackets, thus creating the
ORMA-BRIO BRACKET.
safety handrails.
CODE
NAME
WEIGHT
(kg)
2127522
Ledger 0.7
3.2
2127523
Ledger 1.02
4.4
2127524
Ledger 1.5
6
2127525
Ledger 2
7.6
2127526
Ledger 2.5
9.4
2127527
Ledger 3
11.6
BRIO DISCS
BRIO SOCKET
ORMA CLAMP
This bracket can be placed on top of the formwork; in
that case, it must be fixed using the TYING PROFILE,
or it can be placed in the horizontal panel joint, fixed
on the profiles by the clamp welded on the end of the
part.
The final position of the ORMA-BRIO BRACKET in the
panel comes determined by the clamp incorporated in
the bracket. This clamp, like any clamp, can be placed in
certain positions of the panels.
List of BRIO Platforms that can be used with the
ORMA-BRIO BRACKET
CODE
NAME
WEIG
HT
(kg)
2127718
Platform 0.7
6.6
2127717
Platform 1.02
9
2127716
Platform 1.5
12.4
2127715
Platform 2
17
2127714
Platform 2.5
20.2
2127713
Platform 3
22.2
2127868
2127712
WEIGHT
(kg)
2067035
Extending platform 1-1.5
12.5
2067048
Extending platform 1.5-2.35
17.3
2067043
Extending platform 2-2.5
20.5
2.26.
TYING PROFILE
when the bracket has to be placed on the top part of the
formwork.
It is a piece of BIRA profile, which together with the
18.6
panel frame profile forms an assembly used to secure
the ORMA BRIO BRACKET using the clamp welded on
Platform with
ladder 3
NAME
This is always used with the ORMA-BRIO BRACKET
Platform with
ladder 2
CODE
31
it. Additionally, it has two stops on the side of the form
face.
User’s Guide ORMA 80kN/m2
2.28.
TYING PROFILE
Page 43 of 126
ORMA PLATFORM 2.4X1.2
This component is used as a working platform for
pouring concrete when building walls. It serves the same
purpose as the walkway brackets.
STOPS POINTS
FIXING
It is always placed on the top part of the ORMA
formwork panel, as much if the panel is in vertical or
horizontal position, and it is ideal for straight geometries,
TYING PROFILE
ORMA BRIO BRACKET
A
without corners, pilasters, etc.
It is a metal structure to which 20cmx4cm wooden
planks are screwed in to form the base of the working
ORMA PANEL
platform.
The fixing system to the panel is included in the front
part of the platform. It has a hook that can be pulled to
automatically open the lock plates. Upon releasing the
hook, said plates will close on the ORMA panel profile.
Note
2.27.
LADDER SUPLEMENT
that
the
work
platform
base
is
always
approximately 30cm below the top of the panel.
Likewise, tubes are installed on the rear of the platform
It is formed by outside tubes, steps and profiles for
with pins and several 20x3cm planks are screwed to
adjustment. It is used to increase the length of the
these. Accordingly, the safety handrail and toe board are
LADDER incorporated in the BRIO platform.
formed
Its use is necessary when the height between
200
platforms mounted on the ORMA-BRIO BRACKETS is
HANDRAIL
LIFTING RING
318
200
260
higher than 2.4m.
1590
1218
2385
HINGE
User’s Guide ORMA 80kN/m2
2.30.
Page 44 of 126
SAFETY HANDRAIL SV
This is an element composed of a round vertical tube
that is assembled on the POST BRACKET using the pin
incorporated in the post. Several flanges are also welded
on the piece for attaching D42 tubes to create handrails
and a lower plate for the toe board, thus front side
30
protection is provided.
O 48
1165
FLANGE
LIFTING RING
LOWER PLATE
320
40
TUBE O42
STORAGE
LEG
PIN
This post includes safety pin and cotter pin to fix it to the
530
1200
2.29.
POST BRACKET.
POST BRACKET
2.31.
SAFETY HANDRAIL POST
The POST BRACKET is a support component on
This is an element composed of a round vertical tube
which the SAFETY HANDRAIL POST SV is inserted to
that is assembled on the POST BRACKET using the pin
provide protection (handrail) on the opposite side of
incorporated in the post. Several flanges are also welded
the WALKWAY BRACKET or PLATFORM 2.4x1.2.
on the piece for attaching planks to create handrails and
Thus, it is positioned in front of the work-pouring area.
a lower plate for the toe board, thus front side protection
TUBE
is provided.
FLANGE
FIXED PLATE NUT
LOWER PLATE
WALER HOOK
TUBE
It is composed of rectangular tubes where the
PIN
TUBE O42
SAFETY HANDRAIL POST SV is anchored, and it has
a WALER HOOK with a SAFETY FIXED PLATE NUT.
This bracket can be secured in the holes of the ribs,
This post also includes safety pin and cotter pin to fix it
inserting the hook and securing it with the FIXED
to the POST BRACKET.
PLATE NUT.
User’s Guide ORMA 80kN/m2
2.32.
ORMA CLIMBING BRACKET
2.33.
Page 45 of 126
CONE DW15/M24
This component is used to build walls that are not on
This element is used for climbing walls with the LOST
ground level. It is the element that supports the
TIE ROD, always joined to the CLIMBING RING NT15
formwork panels when it is necessary to build high
and the HEXAGONAL BOLT M24x120 DIN931-10.9.
walls in different phases.
It is a metal piece with two different internal threads: half
For climbing, it is possible to use cones, climbing rings
is metric thread M24 and the other half is the Dywidag
and screws that can be placed on the TIE ROD
type. Thus, it permits threading tie rods DW15mm.
positions or over the plywood.
This piece can be recovered from the wall after stipping
the formwork. For this purpose, it has a 36mm
hexagonal head used to extract the cone from the wall.
ROD
DYWIDAG THREAD O15
PIPE BRACES POSITION
METRIC THREAD M24
PUNCHING PLATE
HEXAGONAL HEAD
2.34.
CLIMBING RING NT 15
LOWER SUPPORT
It has a punched plate in the front part that permits
The CLIMBING BRACKET is supported on this element,
placing the CLIMBING BRACKET at the required
which is installed over the CONE DW15/M24 connected
height. The bracket also includes rods to assemble
to the same by a HEXAGONAL BOLT M24X120
safety handrails with planks, and it has components
DIN931-10.9.
where PUSH-PULL PROPS can be placed to stabilize
the formwork.
This element includes safety pins and cotter pins to fix
the PUSH PULL PROP to the bracket
2.35.
LOST TIE 15/0.25
This piece is composed of a tie rod with a plate welded
on its end. It is used for climbing with the cone system
when said system is only set up on one side of the wall.
In this case the piece is always lost in the concrete, and
it cannot be recovered.
User’s Guide ORMA 80kN/m2
2.37.
THREADED ROD
Page 46 of 126
ORMA WALER
WELDED PLATE
This component is available in two different lengths: 0.9
and 1.55 m, and its main function is to increase gang
stiffness.
It is comprised of two “U” profiles separated by
rectangular shims.
Depending on the height and the dimensions of the
LOST TIE
panels to be lifted, the appropriate waler is used. Both
elements are always fixed to the panel with two WALER
CONE DW15/M24
HOOKS.
CLIMBING RING15
WALERS will also be used for bulkheads and for
aligning panels around fillers.
HEXAGONAL SCREW M24X120
DIN931-10.9
MAX. ADMISSIBLE MOMENT: 5,5 kNm
CLIMBING ELEMENTS SET
2.36.
0,90
CONE-WALER CONNECTOR
This is a rod with metric threads M24 on one side and
1,55
Dywidag threads on the other side. It includes a
FIXED PLATE NUT that slides on the DW threads
HOLES TO FIXE WOOD ON BULKHEADS
HOLES TO FIX WOOD ON BULKHEADS
side. It also has a flat bar on the other end that is
used as a stop for the FIXED PLATE NUT.
2.38.
WALER HOOK
It is used to secure the climbing elements (cones,
rods) on the panels by threading it through the holes
provided for the TIE RODS.
This is used to secure the WALERS to the panels. Two
WALER HOOKS are used to tie each WALER.
It comprises a hook that is positioned over the holes in
METRIC THREAD M24
the ribs. The FIXED PLATE NUT incorporated in the
component is used to tighten it over the WALER.
DYWIDAG THREAD
FIXED PLATE NUT 15
BAR
FIXED PLATE NUT
HOOK
User’s Guide ORMA 80kN/m2
2.39.
TIE ROD
2.40.
Page 47 of 126
ORMA BULKHEAD HOOK
This component, in conjunction with plate nuts, is used
The bulkhead hook can be used along with the WALERS
to support panel joints (one opposite the other), due to
and PLATE WASHER NUT 15 when building bulkheads.
concrete pressures while pouring.
It can be hooked over the panel lateral profile with the
They are inserted through the panel’s tie holes, and
possibility of placing it in any position.
SPACER TUBES are used to sleeve the tie rods. The
final tightening is made using corresponding nuts.
There are TIE RODS of Ø 15mm and Ø20mm.
HOOK
TIE ROD 15mm
SAFE WORKING LOAD: 90 kN
DYWIDAG THREADED ROD
TIE ROD 20mm
SAFE WORKING LOAD: 160 kN
SAFE WORKING LOAD: 15 KN
Tie rods are available in the following lengths in order
to cover different wall thicknesses.
2.41.
CODE
NAME
WEIGH
T (kg.)
0230100
TIE ROD 15/1
1.7
0230120
TIE ROD 15/1.2
2
0230150
TIE ROD 15/1.5
2.2
These are Ø15mm steel DW threaded rods that are
used as auxiliary joint elements with the HEXAGONAL
NUT 15 or PLATE WASHER NUT 15.
CODE
0230200
TIE ROD 15/2
PINS
NAME
WEIGH
T (kg.)
3.3
SHORT
0230600
TIE ROD 15/6
10
0234100
TIE ROD 20/1
2.9
0234120
TIE ROD 20/1.2
3.4
0234150
TIE ROD 20/1.5
4.3
0234200
TIE ROD 20/2
5.2
0234600
TIE ROD 20/6
17.2
1861033
THREADED
0.6
ROD 0.35
LONG
1861034
THREADED
ROD 0.55
0.8
User’s Guide ORMA 80kN/m2
2.42.
ECCENTRIC WASHER
2.44.
Page 48 of 126
PANEL BOLT
The eccentric washer is a 150X110X12mm plate with
This element with the HEXAGONAL NUT 15 is used to
two Ø20mm holes: one centered and the other not.
fix the WALKWAY BRACKET, inserting the bolt through
It is always used with the HEXAGONAL NUT15 in
holes in the ribs when the panel is in a horizontal
place of the PLATE WASHER NUT 15 in conjunction
position (ribs in vertical).
with the TIE RODS.
It is formed by a tie rod with a head on one end.
This element is used when the panels are in horizontal
position in contact with the ground so is not possible to
HEAD
place the PLATE WASHER NUT 15; The ECCENTRIC
DYWIDAG THREADED ROD O15
WASHER and the HEXAGONAL NUT is placed in the
bottom row of ties.
CENTERED HOLE
2.45.
COMPENSATION TUBE 3.3-2.7-
1.2
ECCENTRIC HOLE
These are 120x50 rectangular tubes with wide front
holes on the same level as the panels. They basically
2.43.
TIE BOLT
have two functions:
•
This element is used to make 90º connections
between the PANELS COLUMN for forming columns.
They can be used as 5cm filler between panels
in place of using wooden filler.
•
They are used in inclined walls, when it is not
It also can be used in conjunction with WALERS to
possible to pass the TIE RODS through the
make bulkheads or 90º corners and bulkheads with
panels (>6º). The tubes are placed between the
the UNIVERSAL PANELS.
panels and the TIE RODS pass through them
It is a threaded bolt with a round head, and it has a flat
instead through the panels.
area with a large diameter to reduce slack and
The COMPENSATION TUBES can be joined laterally to
minimize the looseness inside the hole where the
the panels with SHORT THREADED ROD 0.35 and
piece will be placed.
HEXAGONAL NUT 15.
PLATE WASHER NUT 15 is always used as tying
component.
SLOTED TIE HOLES
HEAD
SHAPED TIE HOLES
DYWIDAG THREADED ROD O15
FLAT AREA
User’s Guide ORMA 80kN/m2
2.46.
ORMA COMPENSATION
2.48.
Page 49 of 126
PLATE WASHER NUT 15
PLATE 3.3-2.7-1.2
This element is formed by a 120x100mm “bell shaped”
These are metal sheets that are used to provide filler
plate and wing nut, which allows the use of any Ø 15mm
between panels. They cover a 6-30cm wide range.
dywidag TIE RODS or PINS.
They are comprised of a form plate that has a tube
This element’s shape makes it easy to use for straight or
welded in the center with holes for the TIE RODS. The
inclined walls, permitting an incline of up to 15º. It is
plate includes a horizontal tube with a wedge in the
capable to support the concrete pressures transmited by
middle, which is used to bring it into the same plane as
ORMA PANELS.
the adjacent panels, and it has handles to facilitate the
SAFE WORKING LOAD
PLATE WASHER NUT 15: 90 kN
movement of the piece.
TUBE
STOPPER TUBE
WEDGE
WING NUT
HANDLE
TIE ROD HOLE
FORM SHEET
BELL SHAPED PLATE
2.47.
TOP TIE BRACKET 65
2.49.
HEXAGONAL NUT 15
This element is always placed on the top of the
formwork and fixed to the panel profile. It can be used
This 30mm (from one face to the opposite face)
to pass the TIE RODS above the formwork.
fastening element is 50mm long, and it accepts any
It is used for foundation solutions and in those cases
15mm TIE ROD or PIN.
when it is desirable to avoid the tie hole for the top tie
SAFE WORKING LOAD
HEXAGONAL NUT 15: 90 kN
in the wall.
TIE ROD HOLES
50
PANEL POSITION
O 36
User’s Guide ORMA 80kN/m2
2.50.
PLATE NUT D15 200X150
This is a tying element used together with the Ø 15mm
2.53.
Page 50 of 126
PLATE WASHER NUT 20
This element consists of a Ø 130mm “bell shaped” plate
and a wing nut, and it can be used with any Ø 20mm TIE
TIE RODS.
It is used instead of the PLATE WASHER NUT 15 in
those cases where the tie rods pass through 50-100
ROD.
This element’s shape makes it easy to use for straight or
inclined walls, permitting an incline of up to 15º. It is
mm wide filler.
SAFE WORKING LOAD PLATE NUT
200X150X10: 90 kN
capable to support the concrete pressures transmited by
ORMA PANELS.
SAFE WORKING LOAD
PLATE WASHER NUT 20: 160kN
WING NUT
WING NUT
BELL SHAPED PLATE
2.51.
WING NUT 20
This fastening element can be used with any Ø 20mm
BELL SHAPED PLATE
TIE ROD.
It is always used in combination with BASE PLATE
D20.
2.54.
SAFE WORKING LOAD
WING NUT 20: 160 kN
FOUNDATION HEAD
This piece is used to solve foundations and its function
together with the FOUNDATION PLATE is to replace the
106
lower tie rod.
60
It is comprised of a wedge and a hook that pivots on a
bolt. This hook pulled by the wedge is used to fasten to
the FOUNDATION PLATE.
It is always inserted in the panel’s ribs holes and joined
2.52.
BASE PLATE D20
using the pin included with the piece.
BOLT
BASE PLATE D20 and WING NUT 20 form the Ø
20mm TIE RODS tying elements.
O 26
WEDGE
BOLT
PIVOT HOOK
User’s Guide ORMA 80kN/m2
2.55.
Page 51 of 126
FOUNDATION PLATE
It is always used with the FOUNDATION HEAD and is
the element that susbtitutes the tie rod in the base of
the formwork.
It is a 2mm thick plate with holes of Ø22mm every
50mm, in order to achieve all satndard wall thickneses
The plate’s working load is 12kN.
The FOUNDATION PLATE is lost in the concrete and
cannot be recovered or reused.
2.58.
SPACER TUBE 32/36
This element is a plastic tube used to sleeve TIE RODS
20, so ties can be easily recovered after stripping the
panels.
It is used to fix the thickness of the wall cutting it
according to this distance and it always remains in the
concrete
2.56.
SPACER TUBE 22/25
This element is a plastic tube used to sleeve TIE
RODS 15, so ties can be easily recovered after
stripping the panels.
It is used to fix the thickness of the wall cutting it
according to this distance and it always remains in the
concrete
2.59.
CONE 32
This element is a plastic cone. It is placed in both sides
of the SPACER TUBE 32/36 and it will cover the panel
tie hole. Together with the spacer tube, these two
elements will form a wall spreader.
It can be easily extracted and reused.
2.57.
CONE 22
This element is a plastic cone. It is placed in both
sides of the SPACER TUBE 22/25 and it will cover the
panel tie hole. Together with the spacer tube, these
two elements will form a wall spreader.
It can be easily extracted and reused.
2.60.
SPACER TUBE 22/26
This element is a plastic tube used to sleeve TIE RODS
15. It is used together with WATER STOP CAP 26 to
solve “water stop” conditions in wall forming, for deposit
or tank solutions.
User’s Guide ORMA 80kN/m2
2.61.
WATER STOP CAP 26
This plastic piece is manufactured with a series of
cylindrical rings to prevent liquids from leaking through
the wall. The element works together with PLASTIC
PLUG 26 and SPACER TUBE 22/26 to assure the
2.64.
Page 52 of 126
PLASTIC PLUG 26
This plastic element is used to plug the WATER STOP
CAP 26 to solve the water stop condition in wall forming.
It is placed after the formwork has been stripped.
concrete leak tight seal of the holes left by the TIE
RODS used for securing the formwork.
2.65.
RINGS
ORMA CHAMFER 3.3M
This is a plastic element used to do chamfers to the
column corners. It is not necessary to use any additional
2.62.
PLUG 20
These are used to plug the holes not used for inserting
TIE BOLTS in the PANELS “U” shaped tubes.
After stripping the panels, this plastic element is used
to plug the holes in END CONES 22.
2.63.
PLUG 22
After stripping the panels and removing END CONES
22, this plastic element is used to plug the holes in the
SPACER TUBES 22/25.
element to tie the ORMA CHAMFER to the panel.
User’s Guide ORMA 80kN/m2
2.66.
WATER STOP DW15
Page 53 of 126
They are used to make customized wooden filler, placing
two wooden profiles on the extremes of the filler and
This metal piece is placed in the center of the wall and
nailing a 21 mm thick piece of wood over them. They are
connected on both sides with TIE RODS. Its function is
clamped to the ORMA panels on the side, over the
to provide a barrier to prevent the penetration of
inclined face of the wooden profiles.
liquids to the inside of the wall.
INCLINED FACEFACE
BATTERED
100
CONNECTION TIE ROD
65
CONNECTION TIE ROD
2.69.
WOODEN BEVELED EDGE
This is a 3m long piece of wood with an inclined face.
2.67.
WATER STOP ADAPTER
DW15
It is used to provide filler in areas where it is difficult to
dismantle panels: elevator shafts, water tanks, etc.
Two WOODEN BEVELED EDGES greased and joined
This plastic piece is always used together with the
face to face on their inclined faces should be used to
WATER STOP DW15, and it facilitates its connection
make a miter joint, which facilitates posterior stripping.
with the standard SPACER TUBE 22 / 25. Together
The filler will measure 100mm and it is placed on all the
they protect the formwork TIE RODS.
faces that are buttressed between corners.
It is 3m long to assure that it will extend beyond the
CONNECTION WITH SPACER TUBE
formwork (h=2.7). Said process begins by striking the
zone that extends beyond the panels.
40
121
CONNECTION WITH WATER STOP
2.68.
WOODEN PROFILE 2.7 –
WOODEN PROFILE 1.2
These are 2.7m and 1.2m long by 10cm wide wooden
profiles. Similar to the frame’s metal profile, they have
an inclined face.
60
User’s Guide ORMA 80kN/m2
2.70.
WOODEN FILLER
These are 20, 30 and 50mm strips of wood used to
provide filler from 20 to 100mm at a height of 2.70m.
They can be used individually or grouped until the
121
necessary thickness is achieved.
20
30
50
Page 54 of 126
User’s Guide ORMA 80kN/m2
3. SOLUTIONS
Page 55 of 126
User’s Guide ORMA 80kN/m2
Page 56 of 126
Gang solutions and solutions for different working cases are presented in the
following sections:
•
Panel assemblies-gangs
•
90º corners
•
Hinged corners
•
90º Intersections
•
Bulkheads
•
Column forming
•
Fillers
•
Polygonal walls
•
Adjoining wall forming
•
Inclined walls
•
Foundations
•
Upper extra formwork
•
Stripping in hollows
•
Water Stop
•
Climbing
•
One face formwork
User’s Guide ORMA 80kN/m2
3.1.
PANEL ASSEMBLIES-GANGS
•
Page 57 of 126
As a general rule, any joint adjacent to an outside
corner should be reinforced with one more Clamp
Forming gangs with CLAMPS saves time during
assembly because it is possible to set up by simply
¾
Panel height 3.3: 4 Clamps in each joint
positioning the panels and tying them with the strike of a
¾
Panel height 2.7: 3 Clamps in each joint
hammer.
¾
Panel height 1.2: 3 Clamps in each joint
Another important quality of this type of connection is
that it allows the panels to be at different elevations
because the CLAMPS can be placed anywhere along
the panels' perimeter profiles.
2.7 height Panel: 5 adjustable clamps in external joints in 90º corners,
3 adjustable clamps in the adjacent joint.
•
3.1.1
Vertical joint
The vertical joints can be made with both clamp models.
The external joints in 90º corners with OUSTIDE
CORNER:
¾
panel side.
¾
3.1.1.1 Adjustable clamp
OUTSIDE CORNER 2.7: 5 Clamps per each
panel side.
¾
The vertical joints between panels are connected with
OUTSIDE CORNER 3.3: 7 Clamps per each
OUTSIDE CORNER 1.2: 2 Clamps per each
panel side.
two ADJUSTABLE CLAMPS in height:
*Panel height 3.3 : 3 Clamps in each joint
*Panel height 2.7 : 2 Clamps in each joint
*Panel height 1.2 : 2 Clamps in each joint
Exceptions to this rule follow:
•
The external joints in 90º corners between panels:
*h = 3.3m: 7 Clamps
*h = 2.7m: 5 Clamps
*h = 1.2 m: 3 Clamps
2.7 height Panel: 5 adjustable clamps per each side
User’s Guide ORMA 80kN/m2
•
The joints with wooden filler between panels will
•
have.
Page 58 of 126
The external joints in 90º corners with OUTSIDE
CORNER:
•
¾
Panel height 3.3: 4 Clamps.
¾
Panel height 2.7m: 3 Clamps.
¾
Panel height 1.2m: 3 Clamps.
OUTSIDE CORNER 3.3: 6 Clamps per each
panel side.
•
OUTSIDE CORNER 2.7: 5 Clamps per each
panel side.
•
OUTSIDE CORNER 1.2: 2 Clamps per each
panel side.
•
As a general rule, any joint adjacent to an outside
corner should be reinforced with one more Clamp.
Panel height 2.7m
•
Panel height 3.3m
When possible, it is recommended to place always
the Adjustable Clamp on the panels' rectangular
tubes to achieve stronger joints.
2.7 height Panel: 5 fixed clamps per each side of the OUTSIDE
CORNER, 3 fixed clamps in the adjacent joint and 2 fixed clamps in
3.1.1.2 Fixed clamp
As a general rule, the vertical joints between panels are
connected with two FIXED CLAMPS in height:
the rest of vertical joints, except with the panel 2.7x2.4
•
The external joints in 90º corners between panels
cannot be made with that clamp.
*Panel height 3.3 : 3 Clamps in each joint
*Panel height 2.7 : 2 Clamps in each joint
3.1.2
Horizontal joint
*Panel height 1.2 : 2 Clamps in each joint
The horizontal joint is joined between panels when they
are joined in height.
Exceptions to this rule follow:
•
4 clamps are placed in every vertical joint formed
with a panel 3.3x2.4 and 3 with a panel 2.7x2.4.
User’s Guide ORMA 80kN/m2
Page 59 of 126
Range 3.3m and 1.2m
3.1.2.1 Adjustable clamp
x= 450-600-750-900
For this solution, depending on the panels sizes, only
ADJUSTABLE CLAMPS or combination of clamps and
WALERS is used.
There are two types of WALERS: 0.90m and 1.55m.
Some examples of different panel heights and gang
elevations are provided here:
2400
1200
2400
2400
4800
1200
2400
Detail: WALER fixing
h= 4050-4200-4350-4500
2400
x= 450-600-750-900
2400
3600
3900
1200
300
2400
2700
HOOKS inserted in the tie holes in the rectangular tube.
h= 2850-3000-3150-3300
300
Both walers are fixed to the panel with two WALER
2400
3300
6600
2400
7200
3300
2400
2400
2400
3300
4500
6000
5700
2400
2400
1200
1200
900
2400
2400
2400
3300
4500
2400
h=5250-5400-5550
5100
1200
300
x= 450-600-750
User’s Guide ORMA 80kN/m2
1200
Page 60 of 126
1200
920
600
920
900
450
900
750
300
750
2400
2398
4800
1200
2400
x= 450-600-750-900
2400
2400
3900
3600
1200
1200
1200
300
450
2400
3300
4500
600
h= 4050-4200-4350-4500
3300
6600
3300
2700
2400
300
6600
h= 2850-3000-3150-3300
2400
3300
x= 450-600-750-900
3300
User’s Guide ORMA 80kN/m2
Page 61 of 126
range 2.7 and 1.2m
300
2700
3900
1200
2400
2400
2700
3000
2400
2400
2700
h= 3150-3300-3450-3600
6000
5700
1200
900
x= 450-600-750-900
300
2400
2400
2400
2400
2400
7200
2400
h= 5250-5400-5550
5100
300
2400
x= 450-600-750
User’s Guide ORMA 80kN/m2
Page 62 of 126
User’s Guide ORMA 80kN/m2
5400
2700
2700
3900
1200
Page 63 of 126
920
900
750
1200
2700
1200
1200
900
750
2700
2700
3900
920
450
300
2700
2700
5400
600
2700
5400
600
2400
450
300
User’s Guide ORMA 80kN/m2
3150
2400
2400
3600
x= 600 - 750 - 900
2400
2400
3300
2700
900
1200
5100
1200
3000
1200
600
750
Page 64 of 126
x= 300 - 450
3.1.2.2 Fixed clamp
This element is placed on the profiles of the panels to
assembled
together
with
WALERS.
Following are some examples of different panel heights
2400
and gang elevations.
1200
be
2400
will
1200
always
h= 3900 - 4050
almost
h= 4200 - 4350 - 4500
join them. It does not have any stiffening capacity, thus it
450
2400
h= 5100 - 5250
2400
2400
4800
2400
2850
2400
300
2700
2400
x= 300 - 450
Range 3.3m and 1.2m
3300
3300
4500
4500
1200
1200
2400
2400
1200
920
600
450
2400
7200
2400
h= 5400 - 5550 - 5700 - 6000
2400
x= 600 - 750 - 900 - 1200
User’s Guide ORMA 80kN/m2
1200
900
750
300
Page 65 of 126
900
750
920
2400
2400
2400
X=300-450
2850
2400
2700
2400
450
300
H=3900 - 4050
1200
2400
1200
H=4200 -4350 -4500
2400
Range 2.7 and 1.2m
H=5100 -5250
4800
750
600
2400
2400
2400
3150
3000
2400
X=600-750-900
X=300-450
3300
6600
2400
2400
3600
3300
3300
1200
900
User’s Guide ORMA 80kN/m2
Page 66 of 126
2700
2700
2700
3450
3300
3900
750
600
1200
3150
2700
3000
2700
2700
3900
450
300
1200
2400
2400
2700
2400
7200
2400
H= 5400 -5550 -5700 -6000
3600
2400
900
X=600 -750 -900 -1200
User’s Guide ORMA 80kN/m2
1200
Page 67 of 126
-
900
750
User’s Guide ORMA 80kN/m2
2700
5400
2700
Page 68 of 126
1200
450
750
300
2700
2700
5400
5100
1200
2700
1200
600
900
NOTE - For the configuration of Panel gangs higher than
the ones shown in this document, consult with the
Technical Department.
User’s Guide ORMA 80kN/m2
3.2.
90º CORNERS
INSIDE CORNER 2.7 is used on most internal sides of
90º CORNERS although it is also possible to place the
HINGED INSIDE CORNER 2.7.
The vertical connection of the INSIDE CORNERS is
always made with the SHORT THREADED ROD 0.35
and two HEXAGONAL NUTS 15 as it is shown in the
following diagram.
Vertical Corner connection
Different solutions for the external side of 90º corners:
3.2.1
Panel in the edge
The 90º panel profiles are fixed using the ADJUSTABLE
CLAMP.
•
7 clamps in 3.3m height
•
5 clamps in 2.7m height
•
3 clamps in 1.2m height.
Page 69 of 126
User’s Guide ORMA 80kN/m2
3.2.2
Outside corner
This component can be joined to the panels using two
types
of
Clamps,
the
ADJUSTABLE CLAMPS:
FIXED
CLAMPS
and
Page 70 of 126
•
6 Clamps in 3.3m height.
•
5 Clamps in 2.7m height
•
2 Clamps in 1.2m height
User’s Guide ORMA 80kN/m2
Page 71 of 126
between UNIVERSAL PANEL and STANDARD panels.
Using the different holes of the “U” shaped tubes of the
UNIVERSAL PANELS facilitates a broad range of wall
thicknesses.
For tying the panels, TIE BOLTS and PLATE WASHER
NUTS are used.
UNIVERSAL PANEL 3.3x0.92m
UNIVERSAL PANEL 2.7x0.92m
UNIVERSAL PANEL:
U shaped tube
The letters A, B, C, D has a separation of 60 mm
between them, whereas the numbers 1, 2, 3 … have a
separation of 50 mm between them.
3.2.3 Universal Panel:
In this case, one UNIVERSAL PANEL is used at least.
Side of 90º corners can be solved by the combination
User’s Guide ORMA 80kN/m2
Page 72 of 126
RANGE 3.3m-1.2m
Panels 3.3x0.92 and 1.2x0.92 are asymmetric, they
TIE BOLT
must always place in the same vertical position and this
makes them to occupy a determined situation in every
corner solution. Look at the drawings below.
3300
Always
SIEMPRE
ARRIBA
above
1200
-Thicknesses of walls using holes letter:
920
920
Thicknesses of walls using holes number:
NUMBER X (mm)
UNIVERSAL
PANEL
3.3x0.92
1.2x0.92
1
450
2
400
3
350
4
300
5
250
6
200
7
150
8
100
9
50
UNIVERSAL
PANEL
3.3x0.92
1.2x0.92
LETTER
X (mm)
A
420
B
360
C
300
D
240
TIE BOLT
User’s Guide ORMA 80kN/m2
Page 73 of 126
Range 2.7m:
UNIVERSAL
PANEL 2.7x0.92
These panels are symmetrical, therefore for the
solutions of corner, can be placed like in the SOLUTION
1 or 2, (panel 3.3x0.92 and 1.2x0.92 are asymmetric, so
only the solution 1 is valid).
3.3.
LETTER
A
B
C
D
X (mm)
420
360
300
240
HINGED CORNERS
The solution for hinged corners is achieved by
combining the HINGED INSIDE CORNER and HINGED
OUTSIDE CORNER.
3.3.1 65º - 180º CORNERS
For these cases both types of corners are used in
combination. The HINGED INSIDE CORNER is used on
SOLUCION11
SOLUTION
SOLUCION 2
SOLUTION
2
the inside angle and the HINGED OUTSIDE CORNER
placed on the outside.
FILLING
NUMBER X (mm)
1
450
2
400
3
350
4
300
UNIVERSAL
5
250
PANEL 2.7x0.92
6
200
7
150
8
FILLING
100
HIN
SOLUCION 1
1
SOLUTION
SOLUCION 2 2
SOLUTION
User’s Guide ORMA 80kN/m2
Page 74 of 126
HINGED OUTSIDE CORNER 3.3.
HINGED OUTSIDE CORNER 2.7.
With filler
With filler
The following rules should be taken into account for
these solutions:
•
In the exterior side of corner, it should be used:
o
•
used on the external corner taking into account that
6 Clamps for heights of 3.3m. Whenever
for angles bigger than 130º, the ADJUSTABLE
there is significant filler between joints,
CLAMPS cannot be placed at the same level on
they should be reinforced with 3 WALERS
both sides. They should be placed in different levels
per side.
o
5 Clamps for heights of 2.7m. Whenever
there is significant filler between joints,
to avoid collision between them
•
larger angles. In both cases it is recommended to
per side.
3 Clamps for heights of 1.2m.
The FIXED CLAMP is used for inside corners
between 65º-75º. Both Clamps can be used for
they should be reinforced with 2 WALERS
o
Both clamps, FIXED and ADJUSTABLE, can be
place them on different levels.
•
For the inside corner, place 3 Clamps for heights of
2.7m and 2 Clamps for 1.2m (each side).
Likewise, whenever there are significant fillers
between panels they should be reinforced with:
3 WALERS and 4 CLAMPS on each side for a
height of 3.3m. and 2 WALERS and 3 CLAMPS on
each side for a height of 2.7m.
HINGED OUTSIDE CORNER 2.7.
Without filler
User’s Guide ORMA 80kN/m2
HINGED OUTSIDE CORNER 3.3.
Page 75 of 126
HINGED OUTSIDE CORNER
2.7. Without filler
Without filler
3.4.
90º WALL INTERSECTIONS
The FIXED CORNER is used with the different panel
widths to solve different wall thicknesses.
HINGED OUTSIDE CORNER 3.3.
HINGED OUTSIDE CORNER 2.7.
With filler
With filler
3.3.2 95º - 180º CORNER
For this range it is possible to use the HINGED INSIDE
CORNERS on both wall faces as shown in the following
diagram.
WALERS should still be used when there are wooden
fillers in the joint, and CLAMPS alone can be used if
there are no fillers.
User’s Guide ORMA 80kN/m2
3.5.
Page 76 of 126
PANEL TYPE
NUMBER OF
WALERS
PANEL HEIGHT 3.3
5
PANEL HEIGHT 2.7
4
PANEL HEIGHT 2.4
3
PANEL HEIGHT 1.2
2
BULKHEADS
Bulkhead solutions can be provided in many different
ways:
Bulkheads with walers 2.7m
3.5.1
Bulkheads with walers 3.3m
With walers
3.5.1.2 With Tie bolt
Bulkhead solutions using WALERS depends on the
fixing element utilized.
3.5.1.1 With bulkhead hook
The WALERS are fastened to the panels by inserting the
TIE BOLT through the panels' lateral holes securing
them with PLATE WASHER NUT 15.
The WALERS are fastened to the panels with the
If 0.3m wide PANELS are used, they are tied with the
BULKHEAD HOOK placed on the frame profile and the
BULKHEAD BOLT and BULKHEAD NUT 15, due to lack
PLATE WASHER NUT 15.
of space in the assembly.
TIE RODS are neccesary in the panel adjacent to the
bulkhead.
User’s Guide ORMA 80kN/m2
Page 77 of 126
3.5.2 With panel in the edge
In these cases the panel width must coincide with the
thickness of the wall, placing the panels in the corner
and tying them with the ADJUSTABLE CLAMP.
•
7 clamps in 3.3m height
•
5 clamps in 2.7 m height
•
3 clamps in 1.2 m height
Bulkhead with 5 tie
rods in height 3,3m
Bulkhead with 4 tie
rods in height 2,7m
3.5.1.3 With SHORT PIN and HEXAG. NUT 15
This
type
of
bulkhead
with
SHORT
PIN
and
HEXAGONAL NUT 15 is used when the wall is finished
or closed with panels of width 0.3m.
NOTE: This solution is limited to wall thickness of 45cm.
User’s Guide ORMA 80kN/m2
Page 78 of 126
3.5.3 With UNIVERSAL PANEL
3.6.
PILASTERS
The UNIVERSAL PANEL is tied to the standard panels
with the TIE BOLTS and the PLATE WASHER NUT 15
Pilaster solutions:
3.6.1
With walers
For this kind of solution, SHORT PIN and HEXAGONAL
NUT 15 are used.
Bulkhead with
universal 2,7x0,92m
Bulkhead with
universal 3,3x0,92m
The thicknesses of wall can change between 7 and
55cm. These are all the possible combinations:
THICKNESSES OF WALL
A
B
C
D
1
550
490
430
370
2
500
440
380
320
3
450
390
330
270
4
400
340
280
220
5
350
290
230
170
6
300
240
180
120
7
250
190
130
70
UNIVERSAL PANEL
8
200
140
80
0.92
9
150
90
10
100
Pilaster with inside corner 2.7
User’s Guide ORMA 80kN/m2
3.6.2 Inside corner with Universal panel
Page 79 of 126
3.6.3 Universal panel with standart panel
For this solution, UNIVERSAL PANELS are placed face
to face and the holes of the U shaped tube have to
coincide.
The UNIVERSAL PANELS 3.3x0.92 and 1.2x0.92 are
asymmetric, so one of the panels has the holes of the
Inside corner with Universal panel 3.3x0.92
TIE RODS on the top (A), whereas the other panel has
For this solution, SHORT PIN and HEXAGONAL NUT
them below (B).
15 are used.
HOLES OF THE TIE
ROD ON THE TOP
thicknesses of wall
UNIV. PANEL 0.92
A
B
C
D
1
550
490
430
370
2
500
440
380
320
3
450
390
330
270
4
400
340
280
220
5
350
290
230
170
6
300
240
180
120
7
250
190
130
70
8
200
140
80
9
150
90
10
100
B
HOLES OF THE TIE
ROD BELOW
A
For this solution the holes of the TIE RODS are not
used, so it is possible to place the UNIVERSAL PANELS
3.3x0.92 and 1.2x0.92 in the position of the picture
above. The TIE RODS pass from the holes of the
INSIDE CORNER.
The universal panels 2.7x0.92, is symmetrical.
User’s Guide ORMA 80kN/m2
3.7.
COLUMN FORMING
Page 80 of 126
through which the TIE BOLTS are inserted. Depending
on hole used, the panel dimensions will change.
HOLE
COLUMN
COLUMN
LETTER
NUMBER
(mm)
(mm)
UNIVERSAL
PANEL
3.3x0.92
1
750
A
720
2
700
B
660
3
650
C
600
4
600
D
540
5
550
6
500
7
450
8
400
9
350
10
300
3.7.1 Tie bolt
The panels are fastened by the TIE BOLT and PLATE
WASHER NUT 15.
Panel column 2.7m, 1.2m y 0.6m:
There are different PANEL COLUMNS according to their
width: 0.72m-0.92m-1.32m, all available in heights of
2.7m, 1.2m and 0.6m.
The panels have several “U” shaped multipunched ribs
Universal panel 3.3x0.92:
with holes every 50mm through which the TIE BOLTS
are inserted. Depending on hole used, the panel
The UNIVERSAL PANEL 3.3x0.92 has several “U”
shaped multipunched ribs with holes every 50mm
dimensions will change.
User’s Guide ORMA 80kN/m2
Page 81 of 126
The following pictures show the maximum and minimum
It is possible to use combinations of different holes in
columns dimensions for each model.
order to obtain rectangular columns.
The following table lists the different column dimensions
for each panel and holes.
PANELCOLUMN
720
PANELCOLUMN
920
PANELCOLUMN
1320
HOLE
NUMBER
COLUMN
(mm)
1
2
3
4
5
6
1
2
3
4
5
6
7
8
1
2
3
4
5
6
7
8
9
10
11
12
550
500
450
400
350
300
750
700
650
600
550
500
450
400
1150
1100
1050
1000
950
900
850
800
750
700
650
600
User’s Guide ORMA 80kN/m2
Page 82 of 126
Each PANEL-COLUMN has a range of three heights:
2.70m, 1.20m and 0.60m. Each of them has a different
Panel 2.7+0.6m:
number of multiphubded ribs.
PANEL TYPE
NUMBER OF
multiphubded ribs
PANEL-COLUMN 2.7m
4
PANEL-COLUMN 1.2m
2
PANEL-COLUMN 0.6m
1
3.7.2 Panel in the edge
This solution allows solving columns up to 1200x1200,
but always taking into account that the column height is
not higher than 3.3 m.
Column 3.3m with panels 2.7m+0.6m: 7 clamps in height
PANEL
NUMBER OF CLAMPS
IN HEIGHT
HEIGHT 3.3m
7
HEIGHT 2.7m
5
HEIGHT 1.2m
3
HEIGHT 0.6m
2
Panels 3.3x0.92m:
Panel 2.7m:
Column 3.3m: 7 clamps in height
Column 2.7m: 5 clamps in height
User’s Guide ORMA 80kN/m2
3.8.
Often
it
Page 83 of 126
FILLER BETWEEN PANELS
is
necessary
to
insert
wood
filler
or
compensation elements between panels in order to
achieve the required wall dimensions. Depending on the
filler size to be inserted, different solutions can be used.
The limit of opening of the ADJUSTABLE CLAMP is
10 cm
3.8.1 Job built filler 0<X<10 cm
For any wooden filler smaller than 10cm, the following
solutions are possible:
3.8.1.1 Tie rod through the filler + Plate washer
Range 2.7m
Range 3.3m
nut 15
3.8.1.2 Tie rod through the panel + Waler
The TIE RODS will be inserted through the wooden filler
and the PLATE NUT D15 is placed as support element
The TIE RODS will be placed through the panel holes
on the ORMA panels. They are fastened using the
and using the WALER 0.90 as support element on its
ADJUSTABLE CLAMPS.
ribs. The fastening between panels is done with the
ADJUSTABLE CLAMPS.
Max. filler between
panels: 10cm
User’s Guide ORMA 80kN/m2
Range 2.7m
Range 3.3m
Page 84 of 126
Range 2.7m
Range 3.3m
3.8.2 Job built filler 10-30 cm
3.8.1.3 Plate nut D15 200X150 (filler <7 cm)
3.8.2.1 Wooden filler
The TIE RODS will be placed through the panel holes
and the PLATE NUT D15 200X150 is placed as support
element on the ORMA panels. They are fastened using
the ADJUSTABLE CLAMPS. The fillers must be smaller
than7 cm.
Any filler 10-30cm requirements can be solved using
wooden filler adapted to the required dimensions.
A “wooden panel” can be made with 21mm thick
plywood, cut to the required dimensions and reinforced
laterally with WOODEN PROFILE. These wooden
reinforcements
are
joined
to
the
panels
with
ADJUSTABLE CLAMPS; the TIE RODS can pass right
through the middle of the filler and through the WALER.
User’s Guide ORMA 80kN/m2
Page 85 of 126
In this case the TIE RODS will be inserted through the
COMPENSATION PLATES holes, fixing them on the
WALERS 0.90 that will be fastened to the panels with
the WALER HOOKS.
WOOD FILLER
COMPENSATION
FILLER PLATE
PLATE
OVERLAP
60
FILLER
Compensatón
PANEL
Range 2,7m
Range 3,3m
3.8.2.2 COMPENSATION PLATE
Fillers between 6 and 30cm can be solved by placing the
COMPENSATION PLATES in both sides of the wall;
they are always used with the panels in vertical position.
The proper filler dimension is achieved by cutting back
the panels on both sides as much as necessary over the
form plate. Thus, the minimum filler measurement is
given by the center tube of the COMPENSATION
PLATE when the panels are flush against it.
PANEL
User’s Guide ORMA 80kN/m2
3.9.
Page 86 of 126
POLYGONAL WALLS
Polygonal walls of the following minimum radius can be
made with the ORMA panels.
PANEL
WALL MINIMUM
WIDTH (m)
RADIUS (m)
2.7
25.8
2.4
22.9
1.2
11.45
0.9
8.6
0.75
7.15
It is necessary to place wooden filler between panels for
0.6
5.73
this type of walls. It is recommended that the TIE RODS
0.45
4.3
be passed through the wooden filler in order to fix both
0.3
2.85
panels after placing the PLATE WASHER NUT 15.
If the wooden filler width is over 50 mm, the PLATE NUT
D15 250x150 should be used.
These values are obtained taking into account that the
maximum angle the ADJUSTABLE CLAMP can fasten
between panels is 6º.
3.10.
JOINING WALL FORMING
STAGES
User’s Guide ORMA 80kN/m2
Page 87 of 126
Different solutions for different wall cases are shown
In these cases the general assembly is the same as the
below:
one used for straight walls, but it is necessary to take
into account some considerations due to the inclination.
All the values presented in this section are referred for
3.10.1 Close to transversal wall
using panels with TIE RODS 15 and using them in their
2.7m and 3.3m high vertical position.
For these inclined walls, when pouring, there are vertical
forces on formwork panels, which can lift the panels.
Thus, before pouring it is necessary to adequately
anchor the formwork panels to the ground to resist such
forces.
3.11.1 Inclination up to 10% ( 6º)
COLUMN
PANEL
Range 2.7m:
In these conditions, the ORMA standard panels allow us
to reach a 10% inclination; this is approximately a 6º
incline with respect to the vertical axis.
This limit of 6º is due to the angle of the conical bushing
3.10.2 Close to longitudinal wall
placed inside the panel’s holes to facilitate inserting the
TIE RODS.
Different solutions are shown below:
CONICAL
BUSHING
MAX. WOOD FILLER 16CM
COLUMN PANEL
3.11.
INCLINED WALLS
User’s Guide ORMA 80kN/m2
Page 88 of 126
Range 3.3m
For walls which height is equal or less than 3.30m and
just 2 TIE RODS in height are used, the limitation of the
angle is 6º:
The PLATE WASHER NUT 15 in no case is an
impediment or problem for this type of solutions.
3.11.2 Inclination > 10%
The COMPENSATION TUBES should be used for walls
where the inclination is greater than 10% (6º).
The COMPENSATION TUBES are placed on the joint of
two
consecutive
panels
fastening
them
with
ADJUSTABLE CLAMPS.
The TIE RODS 15 should be inserted through the
COMPENSATION TUBES instead of passing through
the panels.
The COMPENSATION TUBES must be placed on both
sides, even if the wall is not inclined on one of the sides.
For walls which height is bigger than 3.3m, the limitation
The use of PANEL 3.3X2.4 and 2.7X2.4 is not allowed
of the angle is 3º. The inclination suffers an important
for this solution because the four TIE RODS would be
limitation because the top hole is used and it is not
replaced in that case with only the two ties that are
conical.
inserted through the tubes at the joint. Thus, they would
be overload.
User’s Guide ORMA 80kN/m2
Page 89 of 126
FILLER
TUBE
FILLER
TUBE
3.12.
FILLER
TUBE
FOUNDATIONS
Different situations encountered when placing formwork
for foundations are presented below:
TOP TIE BRACKET 65
HEXAGONAL NUT 15 +
ECCENTRIC WASHER
3.12.1 Open air foundations
3.12.1.2
When laying open air footers it is very common to use
In this case, it is possible to use PLATE WASHER
horizontally placed panels, using TIE RODS as shown in
NUT15 to fasten the lower TIE RODS supported over
the following cases.
the profile and the wood.
3.12.1.1
Panel placed on wood sills
Panel placed on the ground
With panels in direct contact with the ground, it is
necessary to fix the panel using the lower TIE RODS
and HEXAGONAL NUT15 which always should be used
with ECCENTRIC WASHER to avoid chrusing into the
panel profile.
Upper TIE RODS are fixed by placing the TOP TIE
BRACKET 65 over the profile, thus permitting the rod to
pass above the concrete level.
WOOD SILL +PLATE WASHER NUT 15
User’s Guide ORMA 80kN/m2
3.12.2 Foundations in trenches
3.14.
Page 90 of 126
STRIPPING AT CORNERS IN
HOLLOWS
When forming foundations in trenches, the formwork is
propped against the trench walls using wooden braces.
To simplify stripping the panels between fixed corners,
TIE RODS are not used.
for example building containers or elevator shafts, it is
In these cases it is also possible to place the
necessary to place wood filler on those faces. Stripping
FOUNDATION HEAD and FOUNDATION PLATE on the
should begin at this point.
lower part of the panels to support the concrete pressure
Two WOODEN BEVELED EDGE joined face to face
exerted on the base of the formwork.
forming 100mm filler are used in this case.
3.13.
UPPER EXTRAFORMWORK
It is good to grease the WOODEN BEVELED EDGES
beforehand, so that later they can be extracted easily.
WALERS 0.90, fixed to the upper part of the panels, are
used as a base support, and they facilitate certain
wooden formwork extensions.
These formwork extensions can provide up to 25 cm of
extra formwork on the top side of a wall.
The length of these elements is 3m to assure they
extend above the formwork (h=2.7). The stripping
process begins by striking those elements in the upper
area.
User’s Guide ORMA 80kN/m2
3.15.
Page 91 of 126
WATER STOP SOLUTION
3.15.2 Water stop system DW15
There are two basic systems to provide water stop
solutions for deposits, tanks…
This system will withstand a hydrostatic pressure equal
to 70m head of water.
3.15.1 Water stop system 26
The WATER STOP DW15 is installed in the middle of
the wall together with the WATER STOP ADAPTER
This system will withstand a hydrostatic pressure equal
DW15, which is used to connect, the TIE ROD on both
to 10m head of water.
sides along with standard spacer parts.
It is installed at each end of the SPACER TUBE (as
All These components, except the tie rod, will remain in
shown in the picture).
the concrete.
In structures where hydrostatic pressure is only exerted
on one face of the wall, the WATER STOP CAP 26 can
CODE
NAME
0230004
Water stop DW15
9371966
Water stop adapter DW15
7230455
Spacer tube 22/25
be installed just on that side and CONE 22 can be used
on the other.
CODE
NAME
7238049
Water stop cap 26
7238047
Spacer tube 22/26
Spacer Tube
22/25
7238050
Plug 26
Spacer Tube
22/25
User’s Guide ORMA 80kN/m2
3.16.
Page 92 of 126
CLIMBING
The CLIMBING BRACKET is the base component used
as support for the formwork when is necessary to climb
on both sides.
The climbing formwork slides vertically so the formwork
has no support on the ground. Because of this, it is
necessary to build a supporting platform for the
formwork at the required height. Said platform is built
using the CLIMBING BRACKETS for support.
This ORMA CLIMBING BRACKET is only used to cover
primary climbing needs on low walls 12-15m.
When climbing on both sides with high safety level
requirements or high heights, other climbing brackets
It is recommended to use panels 2.7m range for this type
must be used.
of climbings. If panels 3.3m range are used, for concrete
In this section we will just explain the climbing solution
levels between 2.7 to 3.3 m, the distance between the
using the cone embedded in the concrete as a fixing
cone and the top surface of the wall (distance X, see
element.
picture below), turns out to be excessive.
The CLIMBING BRACKETS are independent from the
panel gangs.
It is recommended to place a CLIMBING BRACKET
approximately every 2.4m, which comes out the same
for each large panel.
3.16.1 Cone on tie rod
This method is only valid when climbing on both sides of
the wall, since it is necessary to place the climbing
components over the position of some of the formwork
TIE RODS. This is usually on the panel’s upper tie hole
The climbing process comprises the following phases:
•
Place the cones and the tie rods on the panel.
and therefore, the anchoring system works as tying
The cones are tied by inserting the TIE RODS
element.
through the holes of the panels using CONEWALER CONECTOR.
The length of the tie rod connecting the cones
depends on the wall thickness and its value will be
L = Thickness – 160mm. It will remain in the wall at
the end of the process.
User’s Guide ORMA 80kN/m2
•
Page 93 of 126
The CLIMBING BRACKETS are braced in pairs
using TUBES D48, FIXED COUPLERS 48 AND
SWIVEL COUPLERS 48/48.
•
Once the formwork
has been stripped, the
CLIMBING RING NT15 is inserted in the cones of
the wall and fastened with HEXAGONAL SCREW
M24X120
•
The CLIMBING BRACKETS are then placed on the
CLIMBING RINGS 15NT.
•
The following components are used to make
platforms and wooden handrails:
- Platform planks: minimum of 20x5cm.
- Handrail planks: minimum of 15x3cm.
•
The first face of the panels is lifted and put in place,
securing them with the corresponding PUSH-PULL
PROPS.
User’s Guide ORMA 80kN/m2
•
Page 94 of 126
The other side of the panels is put in place and
connected to the TIE RODS before the pouring.
3.16.2 Cone on plywood
With this method the anchoring elements are placed in
the desired position on the panel’s plywood, and
therefore it can be used for climbing on one or both
sides of the wall.
It is problematic to make the holes in the plywood but the
advantage is that the position of the CLIMBING
BRACKETS on the wall can be better controlled, thus
improving the accessibility to the elements and also the
•
The stripping process starts by removing the panels.
The CLIMBING RING NT15 is placed on the cones
before lifting the groups of brackets.
safety.
User’s Guide ORMA 80kN/m2
Page 95 of 126
If it is only necessary to climb on one of the wall faces,
then the components are arranged as follows:
•
Make the holes in the panels of that face and
fasten the CONE M24/DW15 placing the CLIMBING
RING NT15 against the plywood using SCREW M24 to
screw through the hole. In these cases the lost tie rod on
the cone should have a plate welded on its end so it can
support the forces exerted on it.
•
The other steps to follow are identical to those in the
previous section.
3.17.
In case climbing on both sides of the wall is necessary,
the components are arranged as follows:
•
Make a hole in the panels of both faces and fasten
the CONE M24/DW15 secure the CLIMBING RING
NT15 against the plywood using the SCREW M24 to
screw through the hole.
BOTH SIDES CLIMBING
ONE FACE FORMWORK
The ORMA panels can be used as a solution for one
face formwork, but due to the special characteristics of
this type of project, a specific solution is necessary. It is
recommended to use the available documentation for
these solutions.
User’s Guide ORMA 80kN/m2
4. SYSTEM FEATURES
Page 96 of 126
User’s Guide ORMA 80kN/m2
4.1.
Page 97 of 126
CONCRETE PRESSURE
The calculation of the concrete pressure on formwork panels is based on the
German Standard DIN 18218. The pressure diagram is provided below.
User’s Guide ORMA 80kN/m2
4.2.
Page 98 of 126
PANELS WORKING LOADS
PANELS WORKING LOADS-RANGES 2.7 y 1.2- (GSV)(1)
Max. concrete pressure
2
(kN/m ) / DIN 18202
Panel
m2
2.7x2.4
6.48
Type of load
Max. hydrostatic l
Max. constant
Max. hydrostatic l
2.7x1.2
Max. hydrostatic l
Group
Group
Group
Group
Group
Group
5
6
7
5
6
7
67,5
67,5
67,5
85
85
85
0.62
74
74
60
120
120
97
0.62
67,5
67,5
67,5
85
85
85
0.62
74
74
55
120
120
89
0.62
67,5
67,5
67,5
80
80
80
67,5
67,5
67,5
74
74
74
0.82
2.43
Max. constant
Max. hydrostatic l
1.2x1.2
Ties per m2
/ DIN 18202
3.24
Max. constant
2.7x0.9
Max. tie load (kN)
(2)
97
97
97
0.82
1.38
1.44
Max. constant
54
54
54
1.38
PANELS WORKING LOADS-RANGE 3.3- (GSV)(1)
Max. concrete pressure
2
(kN/m ) / DIN 18202
m2
Panel
3.3x2.4
Type of load
7.92
Max. hydrostatic
7.92
Max. constant
3.96
Max. hydrostatic
3.96
Max. constant
Max. tie load (kN)
(2)
Ties per m2
/ DIN 18202
Grupo
Grupo
Grupo
Grupo
Grupo
Grupo
5
6
7
5
6
7
82.5
82.5
82.5
80
80
65
82.5
82.5
82.5
80
80
60
0.5
(2x2 tie rods)
3.3x2.4
147
147
119
0.75
(3x2 tie rods)
3.3x1.2
0.5
(2x2 tie rods)
3.3x1.2
147
147
111
(3x2 tie rods)
1) GSV: This is an organization that includes the main formwork manufacturers and it is in charge of
certifying and checking up on the different products of the association members.
(2) DIN 18202 (Flatness tolerances): The different quality levels of wall surfaces are defined in the
following chart.
0.75
User’s Guide ORMA 80kN/m2
Page 99 of 126
D
L
D:
4.3.
COMPONENTS WORKING LOADS
The following charts show us the working loads of each component:
User’s Guide ORMA 80kN/m2
Code
Name
1900894
Fixed Clamp
15 kN
1900170
Adjustable Clamp
20 kN
Tie Rod 15
90 kN
Tie Rod 20
Picture
Page 100 of 126
* Do not weld or heat the tie rods
Working Load
160 kN
1900227
Bulkhead Hook
15kN
7238001
Hexagonal Nut 15
90 kN
1900256
Plate Washer Nut 15
90 kN
1905160
Plate Washer Nut 20
160 kN
1905046
Wing Nut 20
160 kN
0230004
Water Stop DW15
90kN
1861094
Walkway Bracket
150 kg/m2
1900179
ORMA Lifting hook
CE certificate
15 kN
1900908
ORMA-BRIO Bracket
1908171
ORMA Platform 2.4X1.2
150 kg/m2
150 kg/m2
User’s Guide ORMA 80kN/m2
Page 101 of 126
ORMA PUSH-PULL PROP WORKING LOADS
(TENSILE AND COMPRESSION)
PUSH-PULL PROP 1.1-1.7
PUSH-PULL PROP 2.4-3.5
L (m)
WORKING LOAD (kN)
L (m)
WORKING LOAD (kN)
1.1
35.8
2.4
47.0
1.3
29.4
2.8
31.4
1.5
19.6
3.2
19.1
1.7
10.8
3.5
13.4
PUSH-PULL PROP 3.6-4.8
PUSH-PULL PROP 5-6
L (m)
WORKING LOAD (kN)
L (m)
WORKING LOAD (kN)
3.6
32.3
5
16.3
4
26.5
5.25
14.2
4.4
21.6
5.5
12.7
4.8
16.2
5.75
11.8
6
10.8
The load values for the PUSH-PULL PROP 6-10 follow:
WORKING LOADS ( TENSILE AND COMPRESSION) PUSH-PULL PROP 6-10
Length
(m)
6
6.5
7
7.5
8
8.5
9
9.5
10
Load
(kN)
33.3
33.3
28.5
23.5
19.6
16.6
13.7
11.8
9.8
User’s Guide ORMA 80kN/m2
4.4.
Page 102 of 126
TYING SYSTEM
CODE
The tying systems differ depending on the type
of rod that will be used as support for the
NAME
1861692
Eccentric
washer
7238001
Hexagonal
nut 15
CODE
panels; the ORMA80kN/m2 formwork allows
the use of:
4.4.1 Tie 15mm
Its base element is the 15mm TIE ROD, and it
is composed of the following:
CODE
7230455
NAME
Spacer tube
22/25
Once the panels have been stripped, the holes
left by the TIE RODS can be plugged as
follows:
¾
the END CONE 22.
¾
7230264
Place the PLUG 20 (Cod: 1861799) on
End Cone 22
Remove the END CONE 22 and place
the PLUG 22 (Cod: 1900159) on the
SPACER TUBE 22/25 that remains in
According
to length
the wall.
Tie rod 15
4.4.2
1900256
Plate washer
nut 15
Tie 20mm
Its base element is the 20mm TIE ROD, and it
is composed of:
The tying component PLATE WASHER NUT
CODE
NAME
9371968
Spacer tube 32/36
9371967
End Cone 32
According
to length
Tie rod 20
1900256
Plate washer nut 20
15 can always be replaced by the combination
of the ECCENTRIC WASHER + HEXAGONAL
NUT 15.
User’s Guide ORMA 80kN/m2
In this system it will also be possible to replace
the
PLATE
WASHER
NUT
20
by
the
combination of BASE PLATE D20 + WING
NUT 20.
CODE
NAME
1905047
Base plate
D20
1905046
Wing nut 20
Selection of the type of TIE ROD:
TIE ROD 20→Concrete pressure ≤ 80kN/m2
TIE ROD 15→ Concrete pressure ≤ 60kN/m2
NOTE: In those cases that the pressure of
concrete is higher than 60kN/m2 and TIE ROD
15 is wanted to be used consult to the
Technical Area
Page 103 of 126
User’s Guide ORMA 80kN/m2
5. ASSEMBLY, USE AND DISASSEMBLY
Page 104 of 126
User’s Guide ORMA 80kN/m2
Page 105 of 126
This section describes the steps in an ORMA gang assembly in detail, describing the different
system elements that are used.
STEP
DESCRIPTION
Once the preassembly area is cleaned, place the bottom plank to support
1
the formwork. Use a crane to put the panels on the sills using a certified
lifting hook. Then, fix the panels using ORMA adjustable clamps.
2
3
Assemble the heads, push-pull props and the push-pull prop shoes on the
panels. (Section 5.1.).
Assemble post brackets on the panels. Once they are placed, assemble the
boards on the top and bottom handrails using wooden planks (Section 5.2.).
Fasten the certified lifting hooks on the gang (section 5.3.). Lift the gang and
4
move it to the final formwork position. Anchor the push-pull prop shoes to the
ground using Hilti HAS M20x125 anchors.
SKETCH
User’s Guide ORMA 80kN/m2
In the preassembly area repeat step 1 with new panels. Place the
5
walkway brackets or working platforms according to the assembly
drawing. Three different bracket types or working platforms can be
(section 5.4.)
BRACKET
ORMA
PLATFORM
2.4X1.2 (section
5.6.)
used.
ORMA-BRIO
BRACKET
(section 5.5.)
WALKWAY
Page 106 of 126
Lift the gang and place it in front of the other panel. Insert the tie rods and
6
plate washer nuts to join the gangs. Remove the lifting hooks.
These operations require the use of appropriate auxiliary equipment.
7
Using appropriate auxiliary equipment, access to the working platform, install
corner handrails and begin pouring the concrete.
Once the concrete has cured completely, the formwork can be stripped.
Access the working platform and secure the panels with lifting hooks.
8
Remove all the plate washer nuts and tie rods from the panels to be
dismantled. Remove the panels and put them on the ground, strike the
clamps and remove brackets. After pouring, all the elements should be
cleaned.
User’s Guide ORMA 80kN/m2
Page 107 of 126
ORMA 3.3m panel assembly is the same of ORMA 2.7m but It is necessary take into account that the
panel 3.3m high should be placed with holes A (see drawing) in the top as soon as the panel is lifted.
Hole A
Orificio A
Detail
Detalle
hole A A
orificio
Detail
Detalle
hole A
orificio
A
For further information about assembling,disassembling or handling different ORMA formwork
elements, read and follow the technical instructions provided below:
-
ITM 1: TECHNICAL INSTRUCTIONS OF ASSEMBLY “EO01-00”: ASSEMBLING ORMA
WALL FORMWORK H< 5M
-
ITM 2: TECHNICAL INSTRUCTIONS OF ASSEMBLY “EO01-00”: DISMANTLING ORMA
WALL FORMWORK H< 5M
-
ITM 3: TECHNICAL INSTRUCTIONS OF ASSEMBLY “EO03-00”: ASSEMBLING ORMA
COLUMN FORMWORK H< 3.5 M
-
ITM 4: TECHNICAL INSTRUCTIONS OF ASSEMBLY “EO04-00”: DISMANTLING ORMA
COLUMN FORMWORK H< 3.5 M
-
ITM 7: TECHNICAL INSTRUCTIONS OF ASSEMBLY “EO7-00”: ASSEMBLING ORMA
CLIMBING SYSTEMS WITH CONES
-
ITM 9: TECHNICAL INSTRUCTIONS OF ASSEMBLY “EO09-00”: ASSEMBLING ORMA
WALL FORMWORK WITH POURING PLATFORM
-
ITM 13: TECHNICAL INSTRUCTIONS OF ASSEMBLY “EO13-00”: ASSEMBLING ORMA
COLUMN FORMWORK H>3.5M
-
ITM 14: TECHNICAL INSTRUCTIONS
OF ASSEMBLY “EO14-00”: DISMANTLING
ORMA COLUMN FORMWORK H>3.5M
-
ITM 15: TECHNICAL INSTRUCTIONS
OF ASSEMBLY “EO15-00”: ASSEMBLING
ORMA WALL FORMWORK WITH THE ORMA-BRIO BRACKET
-
ITM 16: TECHNICAL INSTRUCTIONS OF ASSEMBLY “EO16-00”: DISMANTLING
ORMA WALL FORMWORK WITH THE ORMA-BRIO BRACKET
-
ITM 21: TECHNICAL INSTRUCTIONS OF ASSEMBLY “EO21-00”: ORMA WALL
FORMWORK H>5M WITH WALKWAY BRACKETS ON ALL LEVELS
-
ITM 22: TECHNICAL INSTRUCTIONS ON ASSEMBLY “EO21-00”: DISMANTLING
ORMA WALL FORMWORK H>5M WITH WALKWAY BRACKETS ON ALL LEVELS
User’s Guide ORMA 80kN/m2
5.1.
PUSH-PULL PROPS
Page 108 of 126
PUSH-PULL PROPS are attached to the panels
using HEAD60, which is bolted through the holes
The PUSH-PULL PROPS are used for the correct
in the horizontal and vertical ribs.
vertical positioning of panels or gangs.
They also support temporary loads, as wind loads,
during the assembly process.
Horizontal rib
Vertical rib
Detail view: Tie
PUSH PULL PROPS are fixed to the head and the
The PUSH-PULL PROPS are anchored to the
shoe using pins and cotter pins included in the
ground with the PUSH-PULL PROP SHOES. They
head such as in the shoe.
are fastened to the ground using appropriate fixing
elements.
The PUSH-PULL PROP 6-10 is equipped with a
plate for this purpose.
It is recommended to use Hilti HSA M20X125
anchors (Ftensile = 23.8kN), (Fshear = 29.6 kN),
The manufacturer’s assembly installation instructions
should be followed at all times.Contractor has to
follow manufacturer’s installation instructions.
There are four different types of PUSH-PULL
PROPS. Depending on the formwork height, the
appropriate
push-pull
props
are
used
in
combination.
The number of components to place horizontally
depends on the formwork height, but a maximum
distance of 4.5m between them should never be
exceeded.
User’s Guide ORMA 80kN/m2
Page 109 of 126
The handrails are made of TUBES D42 and the
toe board plank is at least 3x15cm.
024
These posts incluye safety pins and cotter pins to
fix these them to the POST BRACKET
60
°±
5
º
0
35
º
x.
ma
60
°±
5
BRACKETS is 2m.
0
48
x.
ma
n.
mi
036
n.
mi
The maximum distance between two POST
min. 110
max. 170
min. 110
max. 170
1900134 Push-pull prop 1.1-1.7
1900123 Push-pull prop 2.4-3.5
1900134 Push-pull prop 1.1-1.7
1900123 Push-pull prop 3.6-4.8
x.
ma
0
60
x.
ma
060
050
n.
mi
n.
mi
60
°±
5
60
°±
5
º
º
00
10
1:1
min. 240 - ma
x.
350
1900123 Push-pull prop 2.4-3.5
1900147 Push-pull prop 5-6
5.2.
1900207 Push-pull
prop 6-10
POST BRACKET
This element is always placed in a vertical rib holes,
inserting the hook and fastening it with the FIXED
PLATE NUT.
This bracket is used as support element where the
SAFETY HANDRAIL POST SV is installed as a
protection (handrail) on the opposite side of the
WALKWAY BRACKETS or PLATFORM 2.4x1.2.
Therefore, it is located in front of the pouring area.
The TUBES D42 is listed in the following chart:
CODE
NAME
WEIGHT
(kg.)
2033700
TUBE 42/1.55
3
2033800
TUBE 42/2.1
3.4
2034000
TUBE 42/3.1
6.4
2033600
TUBE 42/4.1
8.4
2053000
TUBE 42/5
12.2
2023800
TUBE 42/4070
WITH SOCKET
8.4
User’s Guide ORMA 80kN/m2
Page 110 of 126
5.3.1 Basic assembly
SAFETY HANDRAIL S-V
The basic installation can be divided into three
POST BRACKET
phases:
5.3.1.1 The hook Opening
Hold the fixed part of the Hook with one hand and
H > 2 MTS.
WALKWAY BRACKET
turn the mobile part with the other hand.
-
5.3.
ORMA LIFTING HOOK
5.3.1.2 The hook placement
Place the hook on the panel border profile, so that
This element is an auxiliary component for lifting one
the Hook claw seats in the profile channel.
panel or gangs using a crane. Each hook is
designed to lift a maximum load of 1500Kg, and the
maximum recommendable angle between slings is
60º.
As a general rule, a minimum of two Hooks should
be used when lifting panels or gangs. For gangs of
5.3.1.3 The hook Fastening
0.90m wide or less, a single hook could be used.
Release the Hook assuring that it is correctly
The
seated in both sides of the panel.
LIFTING
HOOK
incorporates
the
“EC”
certification in accordance with the European
directive 98/37/CE on machinery and the “GS” mark
from the Construction Committee of the “Office for
Testing and Certifications” in Germany.
It is recommended to place the Hook on a rib in
order to avoid lateral movements when lifting.
Position the sling over the hook, taking into
account that this should form a maximum of a 30º
angle with the vertical.
User’s Guide ORMA 80kN/m2
5.4.
Page 111 of 126
WALKWAY BRACKET
The ORMA WALKWAY BRACKET, placed on the
top part of the panels, is used to provide support
for the walkway from which concrete is poured or
other works can be done.
This working platform should be assembled on the
ground and the whole assembly lifted into place.
As
general
rule,
two
brackets
should
be
assembled on each large panel. For smaller
5.3.2 Basic disassembly
panels, a maximum distance of 2.1m is admitted,
always assuring that the platforms are properly
5.3.2.1 The hook Opening
Hold the fixed part of the Hook with one hand and
turn the mobile part with the other hand.
anchored.
The following elements must be used:
•
Handrail planks: minimum of 15x3cm.
•
Platform planks: minimum of 20x5cm.
WALKWAY BRACKET load capacity: 150 Kg/m2
The BRACKETS can be assembled on the panels’
vertical or horizontal ribs.
5.3.2.2 The hook Releasing
The Hook is disengaged from the external Orma
5.4.1 Horizontal ribs
panel profile.
The WALKWAY BRACKET is assembled by
inserting its pin in one of the ribs’ holes and the
adjustable element is supported on the lower rib to
provide stability.
The main pin of the bracket includes a safety
cotter pin to fix it to the panel avoiding problems
ULMA has specific documentation about the use,
assembly and disassembly for the LIFTING HOOK.
This documentation includes documents such as a
USER'S MANUAL, and it is recommended to follow
the instructions provided therein.
during lifting and movement of the panels.
User’s Guide ORMA 80kN/m2
Page 112 of 126
Adjustable
STOP
5.4.3 Basic assembly
Place wooden planks until covering the working
surface, assuring that the 2 supports are correctly
secured, thus guaranteeing the boards cannot
move.
Assemble upper and intermediate wood handrails
and toe boards on the safety handrail posts of the
Detail view: pin inserted in the rib and lower
adjustable stop supported on lower rib.
walkway bracket. For this handrail, the brackets
provide L shaped post, where the wooden planks
are placed. The wooden toe board should be
supported on the bottom part of working platform.
It is recommended to use planks which are in
good condition, thus do not have any knots,
5.4.2 Vertical ribs
The WALKWAY BRACKET is laterally bolted in one
of the holes of the vertical rib by inserting the PANEL
BOLT through the hole in the bracket and fastening
with the HEXAGONAL NUT15 on the other side.
User’s Guide ORMA 80kN/m2
5.5.
ORMA-BRIO BRACKET
•
Page 113 of 126
The WALKWAY BRACKET includes a head to
place the PUSH-PULL PROPS.
This bracket is installed on Orma formwork panels
•
components of the BRIO scaffolding system.
and providing working platforms on different levels
utilizing standard BRIO scaffolding elements such as
The ledgers, posts and toe boards are
•
It is recommendable to do a layout study for
platforms, ledgers, etc.
jobsites to take into account the position of the
This bracket incorporates an ORMA clamp (to fix it to
brackets in the ORMA gangs.
any position on the outside profiles of the ORMA
panels) and some BRIO collars (to permit adapting
the horizontal ledgers between walkway brackets
creating the safety handrails).
The horizontal tube of the bracket is used as support
for steel platforms and ladders.
The most important characteristics of the product
follow:
•
Versatility in the walkway bracket position, which
allows placing it in any position of the horizontal
joint between panels.
•
Access between walkway brackets on different
levels is achieved with the TELESCOPIC
INTERMEDIATE ASSEMBLY BETWEEN PANELS
FASTENING DIRECTLY TO THE JOINT PROFILES
LADDER.
•
The platforms are secured while lifting the gang.
•
Bracket load capacity: 150 Kg/m2, on platforms
with a maximum distance of 3m between
brackets.
•
Different Types of platforms:
* 320 mm wide steel platforms
* 640 mm wide combi platforms
* 640 mm wide platforms with ladder
•
The walkway will be composed of:
* Three 320 mm platforms
* One 640 mm platform with ladder and one
320 mm platform (640 mm platform will be on
the side closest to the panel).
•
The platforms provide access to assemble the
tie rods, the clamps and to the lifting hooks.
UPPER ASSEMBLY
TYING PROFILE + PANEL PROFILE
User’s Guide ORMA 80kN/m2
5.5.1 Basic assembly
PANEL ASSEMBLY
First, the Orma Panel gangs
will be assembled with their
clamps and walers on the
ground supported by wooden
planks.
Page 114 of 126
PLACEMENT OF
LATERAL HANDRAILS
AND TOE BOARDS
For the placement of the
lateral handrail the inside part
of the bracket has to be
increased with a 0.5 or 1m
post to be able to place the
upper 1.02 m horizontal
ledger.
Then, the toe boards are
placed.
BRACKET PLACEMENT
The bracket will be placed on
the upper part of the panel
depending on the layout
defined on the drawing. They
will be securely fixed to the
tying profile on the panel’s
upper profile.
TYING PROFILE
The tying profile is seated
perfectly on the panel’s upper
profile. The flat bars of the
tying profile will remain in
contact with the panel board.
LEDGERS PLACEMENT
The 2nd bracket will be placed
at a distance equal to the
length of the ledger to be
assembled.
The
distance
between brackets should be
exactly 3m, 2.5m, 2m, 1.5m,
1.02m or 0.07m in accordance
with the lengths of the BRIO
platforms. In the cases when a
platform with ladder is used,
distances will be limited to 3m,
2.5m and 2m.
PLATFORMS
PLACEMENT
The platforms will be placed on
the brackets, always placing
the platform with ladder as far
as possible from the panel.
After that, tubes are placed to
hold the platforms so they do
not fall while lifting the gangs.
LADDER SUPLEMENT
PLACEMENT
If it is necessary, connect the
supplement to the ladder
incorporated to the BRIO
platform
LOWER MODULE
PLACEMENT
Place the lower module in the
intermediate joint between the
panels following the same
process as that used from the
beginning.
PUSH-PULL PROPS
PLACEMENT
The corresponding push-pull
props will be placed in the U to
stabilize the bracket. The other
corner of the push-pull props
will be anchored in the ground.
MODULE LIFTING
Once the assembly is
complete, the gang will be
lifted to its final position, with
the lifting hooks.
User’s Guide ORMA 80kN/m2
Page 115 of 126
Real jobsite application
Note: The disassembly process is the same as the
assembly process executed in reverse order.
User’s Guide ORMA 80kN/m2
5.6.
Page 116 of 126
ORMA PLATFORM 2.4x1.2
This ORMA PLATFORM 2.4X1.2 is used as a
working platform for wall forming.
This ORMA PLATFORM and the WALKWAY
BRACKET have the same function.
It is always placed on the upper part of the ORMA
panel whether it is in the vertical or horizontal
position, and it is ideal for straight geometries that do
not have pilasters, corners, etc.
Handrail in position
2
The load capacity of the platform is 150 Kg/m .
This ORMA platform for pouring concrete also
offers the option of positioning the handrail at a
5.6.1
Basic assembly
14º angle with respect to the vertical.
The ORMA PLATFORM 2.4X1.2 is stored and
supplied to the customer with the back handrail
folded.
To unfold the handrail, simply release the upper pins
on the rear tubes, lift the handrail into position and
insert the pins.
Inclined handrail 14º
This incline is achieved by releasing the lower
bolts of the back tubes, turning it and inserting the
bolts in the bolt hole that corresponds to that
angle.
Folded platform
Upper pin
Inserting the pins
Lower bolt
Lower bolt at 14º
User’s Guide ORMA 80kN/m2
Page 117 of 126
Once the handrail has been unfolded, the platform is
If it is necessary to place accessories on the top
lifted by 4 slings: two on the front side and the other
part of the panel, heads for push-pull props, etc,
two on the back handrail tubes.
there is a trap door that turns on a hinge leaving
space for it.
Closed trap door
Opened trap door
Lifting platform
Then, fasten the ORMA PLATFORM on the top part
of the panel. Once the platform is lifted into place
and pressure is released from the slings, the safety
hooks will fall by gravity, thus assuring that the
platform cannot be released unintentionally.
Real application on jobsite
Platform placed on the
top of the panel
Pressure released from swing,
platform locked into profile by gravity
User’s Guide ORMA 80kN/m2
5.7.
FOUNDATION
•
Page 118 of 126
Fasten the hook in one of the foundation plate
holes, and anchor the system by striking the
wedge with a hammer.
Foundation system assembly should be as follows:
•
Cut strips of FOUNDATION PLATE based on
thickness of the wall. Place these strips under
the panels and always in line with one of the
There are some rules that should be followed
when distributing the PLATES and FOUNDATION
HEADS:
vertical panel’s ribs. The plate only covers wall
thicknesses that are multiples of 50 mm.
•
For wall heights that are less than or equal to
0.9m, the foundation system should be placed
every 1.2m.
•
For wall heights that are greater than 0.9 m
and less than or equal to 1.2m, the foundation
system should be placed every 0.6m.
•
For walls higher than 1.2m, a calculation
should be made to solve the distance between
foundation heads taking into account that the
working load for the foundation plate is of 12
kN.
•
Fix the FOUNDATION HEAD on the panels with
a rounded pin, on both sides of the wall.
User’s Guide ORMA 80kN/m2
6. CONDITIONS OF USE
Page 119 of 126
User’s Guide ORMA 80kN/m2
6.1.
GENERAL CONDITIONS
•
Under no circumstances shall people loiter
beneath or in the path of elevated loads.
OF USE
•
Page 120 of 126
Follow the instructions for the project in
6.1.1 Framing
execution at all times.
•
•
•
Follow
the
general
manufacturer’s
•
ground, frames will be placed on planks or
Formwork shall be assembled and stripped
similar materials and distributed to avoid
by
any
qualified
personnal,
who
are
•
facilitating
organization,
cleanliness and posterior distribution of the
competent person.
panels to their assembly positions.
If the working area is close to high voltage
•
All
gang
positioning
and
assembly
power lines, power should be shut off while
processes will be performed following safe
working is in progress. If this is not
work procedures.
•
Proper leveling and bracing shall be
measures recommended in the current
applied based on terrain and/or climate
applicable standard.
conditions.
Do not work with formwork when wind
•
New gang shall not be mounted in the
speeds are in excess of 60 km/h, or when
working area until the previous gang has
there is ice or snow.
been properly secured.
The crane used must be strong enough for
The auxiliary lifting elements should be
•
No component should be left partially
assembled.
•
The working platforms should never be
appropriate for the loads to be lifted. They
overloaded. Only elements required for
should be checked before each use and
fluid work flow should be stacked on them.
discarded if found to be faulty.
•
damage,
supervised, overseen and managed by a
the handling and assembly of the gangs.
•
For stacking formwork panels on the
instructions at all times.
possible, take the necessary protective
•
•
•
Climbing through the formwork panels is
If the ORMA lifting hook is used, it should
prohibited except in exceptional cases that
be used following the instructions provided
have been duly studied, and proper safety
by the manufacturer.
equipment must be used.
If,
due
to
conditions
of
the
work
•
Check that all the clamps are correctly
environment, the crane operator does not
wedged to assure that no grout is lost
have the capacity to view the whole
through the joints.
trajectory over which the load is moved,
•
Make sure that all the plate washer nuts
the transport operations will be guided by a
are properly tightened, the push-pull props
signalman, who will communicate with the
are properly placed and tightened and the
crane operator using predefined signals.
push-pull
prop
shoes
anchored to the ground.
are
correctly
User’s Guide ORMA 80kN/m2
•
Respect
pressures
the
of
maximum
the
•
The release agent plays an important role
in assuring the quality of the concrete
and cleaned before pouring concrete.
surface. It serves the purpose of assuring
Release agent should be applied to a cloth
there are no surface holes and that color is
or brush and used to clean the panels after
uniform.
•
It should be applied uniformly on the wall
can damage the phenolic film of the
in thin coats. Usage and correct use
plywood.
guidelines should be taken into account at
It is important to know whenever the
all times.
plywood's phenolic film suffers damage
•
The panel surfaces should be cleaned
due to the chemical and abrasive action of
carefully
the concrete, and it is recommended to
agent.
pay special attention to the seal over the
•
•
The formwork surfaces should be checked
each use. Do not use wire brushes that
•
can be used.
system
(according to product instructions).
•
thus increasing number of times a panel
hydrostatic
formwork
Page 121 of 126
•
before
applying
the
release
It is recommended to clean the metal
holes and deteriorated areas.
frame, and apply the release agent to the
Any plywood border that is cut should be
frame every 4 or 5 pourings.
sealed as soon as possible, because if
water penetrates the plywood it will swell
6.1.3 Pouring
and made the plywood thicken.
•
•
It is not recommended to use nails or
•
It is recommended to pour the concrete
screws.
from the lowest possible height; never
Panels should always be stored after their
higher than 2m if it is not poured through a
last use at the construction site. Before
conduit, pipe or other pouring accessory, It
stacking the panels, they must be cleaned.
is good to pour as close as possible to the
Then, they should be stacked by placing a
base, without pouring directly against the
wooden piece between one panel and the
formwork at a single point.
next. They should be kept of the ground by
•
The concrete is poured in layers or levels
stacking them on supports that are leveled,
of uniform thickness: 30 to 45 cm per
and they should be stored under a roof
layer.
since prolonged exposure to sunlight and
•
rain may damage them.
The condition of the formwork will be
overseen while pouring concrete. Pouring
will be stopped if any incident is detected.
6.1.2 Release agent
•
Do not permit concrete to splash on the
high sides of the panels to assure that
•
stains are not caused by the same.
Release agent should be used to keep
concrete from sticking to the formwork,
•
If concrete is poured from a bucket, special
care should be taken to avoid hitting the
User’s Guide ORMA 80kN/m2
formwork with the bucket and to avoid
•
exceeding the crane’s load limit.
•
•
The
should
be
should be used for the consistency and
of view of surface quality, this is justified
workability of the concrete. This should be
since the surface quality is directly linked
appropriate for the vibrator used.
to and influenced by the time over which
vibrators
are
better
the
for
surface
is
isolated
from
the
surrounding environment.
•
During the stripping process, check that
the panels, should only be used when
there are no people near and verify that
holes cannot be accessed or for parts that
there is no lose material that can fall from
are molded in workshops offsite.
the platforms.
The needle vibrator should penetrate the
•
concrete by 10 to 15cm.
Vertical elements should be dismantled
from top to bottom.
The needle vibrator should never come in
•
Once the gang is stripped, it will be
contact with the formwork surface to
supported on the frames where it will then
assure
be cleaned and totally disassembled if no
the
expected
loads
are
not
exceeded.
•
interval
from the construction area. From the point
internal
compacting
external vibrators, which vibrate through
•
time
respected while stripping other elements
compacting the concrete on site, and the
•
same
system
The
appropriate
The
Page 122 of 126
more concrete is going to be poured.
The vibrator should penetrate the concrete
•
Before using any material, it should be
quickly, and be held still, vertical and
checked to confirm that all components are
slightly inclined for 10 to 30 seconds or
in proper working conditions.
until the concrete flows back to the
surface.
•
6.1.5 Personal and collective
Remove the vibrator slowly and carefully.
6.1.4 Stripping and curing
protective equipment
•
Regulatory safety equipment should be
used when working, or work platforms with
•
Before starting the stripping process, the
their corresponding safety handrails should
concrete
be used (collective safety equipment).
must
have
the
minimum
resistance to avoid losing concrete next to
Personal protective equipment to be used
the surface since this would affect the
should include at least: helmet, safety
surface resistance and durability of the
footwear, gloves and a tool belt.
concrete.
•
•
•
Other
personal
protective
equipment
The time before beginning the stripping
should be used depending on the site
process should be increased when there
guidelines,
are low temperatures or strong winds that
assessments.
could result in quickly drying the surface.
drawn
up
based
on
risk
User’s Guide ORMA 80kN/m2
Page 123 of 126
7. HANDLING AND MAINTENANCE CONDITIONS
User’s Guide ORMA 80kN/m2
Page 124 of 126
Proper storage of components is a fundamental necessity for their preservation.
Optimal storage conditions include:
•
Place the pieces of the same type and dimensions on or in elements that have
been exclusively designed for them (baskets, pallets, boxes, etc.).
•
In order to avoid part deformation, do not strap the metal strips too tightly.
•
Apply the metal strips sufficiently tight to assure the parts cannot move.
•
Use protectors to guard the components from the excessive pressure exerted
by the metal strips.
•
Do not permit parts to hit against one another while the material is being
moved.
User’s Guide ORMA 80kN/m2
Page 125 of 126
8. LEGAL AND STANDARD REFERENCES ON THE
PREVENTION OF OCCUPATIONAL AND ENVIRONMENTAL
HAZARDS
User’s Guide ORMA 80kN/m2
Page 126 of 126
89/391/EEC Directive Health and Safety in the Workplace
89/654/EEC Health and Safety in the Workplace
92/57/EEC Health and Safety at Construction Sites
92/58/EEC Health and Safety Signposting in the Workplace
89/655/EEC, 95/63/EC, 2001/45/EC Using Work Equipment
89/656/EEC Personal Protective Equipment (PPE)
90/269/EEC Manually Handling Loads
2002/44/EC Risks Derived from Physical Agents (Vibrations)
2003/10/EC Risks Derived from Physical Agents (Noise)
UNE-EN 13374: Temporary border protection systems, product specifications, test
methods