1
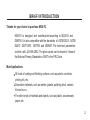
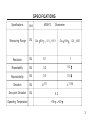
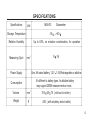
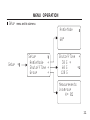
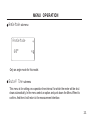
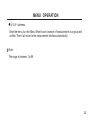
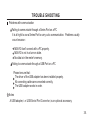
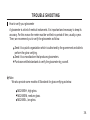
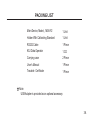
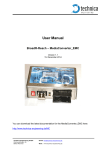
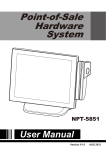
MG6-F2
USER's MANUAL
Please read this manual seriously before using !
Made in China
Add.: Middle of Binnan Street, Dongbin Industrial Zone, Donghai Bincheng,
Quanzhou, Fujian 362000,
China
Tel.: +86-595 22391040
Website:www.ksj.cn
E-mail: [email protected]
Fax: +86-595 22391048
www.glossmeter.cn
[email protected]
CONTENTS
Brief Introduction
Specifications
Main Functions
Construction
Measurement
Warning And Notice
Menu Operation
Using Software
Trouble shooting
Warranty
Packing List
...........................
...........................
...........................
...........................
...........................
...........................
...........................
...........................
...........................
...........................
...........................
2
3
5
7
11
16
17
25
33
37
38
1.
BRIEF INTRODUCTION
Thanks for your choice to purchase MG6-F2.
MG6-F2 is designed and manufactured according to ISO2813 and
GB9754. It is also compatible with the standards of ASTM D523, ASTM
D2457, GB/T13891, GB7706, and GB8807. The technical parameters
conform with JJG 696-2002. The gloss values can be traced to those of
the National Primary Standards in SIMT in the P.R.China.
Main Applications:
All kinds of coating and finishing surfaces, such as paints, varnishes,
printing ink, etc.
Decorative materials, such as marble, granite, polishing brick, ceramic
tile and so on.
The other kinds of materials and objects, such as plastic, woodenware,
paper, etc.
2.
SPECIFICATIONS
Specifications
Unit
Measuring Range
GU
Resolution
GU
0.1
1
Repeatability
GU
0.2
0.2
Reproducibility
GU
0.5
0.5
Deviation
GU
1.5
Zero-point Deviation
GU
Operating Temperature
Glossmeter
MG6-F2
Gs
60
0.0
119.9
Gs
60
120
1000
1.5%
0.2
+10
+40
3.
SPECIFICATIONS
Specifications
Unit
MG6-F2
Storage Temperature
-10
+60
Up to 85%, no moisture condensation, for operation
Relative Humidity
Measuring Spot
Glossmeter
9
mm 2
Power Supply
16
One AA-sized battery, 1.2V 1.5V,Rechargeable or alkaline.
It's different to battery types. An alkaline battery
may support 20000 measurements or more.
Consumption
Volume
mm 3
Weight
g
155
48
75 ( without a holder)
400 ( with a battery and a holder)
4.
MAIN FUNCTIONS
MG6-F2 has the main functions as below:
One key to get a measurement. The result will be automatically stored into memory.
Self-diagnosis and self-calibration.This function help to find some faults, and so you can
deal with them in time.
Friendly display interface. In measurement mode, current values, averages and other
information are synchronously shown on the Display Window. The clear characters and
simple menus make operation more easily.
Presettable measurement number in a group. According a requirement you can choose
a proper number between 1 to 99 for a group. A correct choice will make measurement
and data processing easier.
Large memory for measurement data. More than30000 measurements or 999 groups
can be allowed to stored in MG6-F2.
Inquiry for data in memory. By menu operation you can browse the data in memory.
5.
MAIN FUNCTIONS
6.
CONSTRUCTION
Whole set of MG6-F2
Ô
Display Window
Front Shell
Holder
Menu Wheel
Rear Shell
Bat. Chamber Cover
7.
CONSTRUCTION
Main Device
Measuring Button
Rear Shell
Mark For Location
Incidence Direction
RS232 Port
Front Shell
Label
Measurement Aperture
8.
CONSTRUCTION
Holder With Calibrating Standard
Calibrating Standard
Gloss Value Label
Holder
9.
CONSTRUCTION
Battery in Position
Battery Chamber Cover
Rear Shell
Battery With Positive Pole Up!
AA or LR6, Alkaline or Rechargeable.
Front Shell
10.
MEASUREMENT
Turn on the meter
Lay the main unit into the holder, then push down the Menu Wheel to turn on the meter.
The infos of model and series number will be shown in the Display Window, meanwhile
the meter performs self-diagnose and self-calibrating. After passing this procedure the
display should turn to measuring mode, the meter would be ready for operation. Or else
it shows as below:
Please
1.CleanSTD.
2.SetHolder.
3.Recalibrate.
The messages prompt you to confirm that:
1) The calibrating Standard (STD) is clean;
2) The main device is set into the holder properly;
3) Recalibrating is required when environment temperature change is great. In this case
the meter needs some time to establish a balance of temperature before calibrating.
Notes
If the main unit don't lay into the holder, it is possible to turn on the meter by pushing
down the Menu wheel. But it will skip the self-diagnose and self-calibrating.
Battery installing can also turn on the meter directly.
11.
MEASUREMENT
Measuring and measurement interface
Remove the holder and lay the Measurement Aperture just against the position that you
want to measure.Then push the Measuring Button. Within 2 seconds a measurement will
be completed. Meanwhile the result will be shown in the Display Window as below
and stored into the memory automatically.
008/03/05
X
60 "
91.9
!
91.8
Notes
008/03/05 express that the current measuement is the third of five measurements in
the eighth group.
Angle mode is shown in the first column, the values of A current measurement in the
second and the averages in the third.
12.
MEASUREMENT
Deleting measurements
To delete a current measurement please push down operation button for more than 2
seconds.
Note
Only the measurements in a current group can be deleted one by one.
Turn off the meter
The meter will shut off automatically according to the preset time. See page 25..
Note
After turning off the meter will be in a sleeping state which consume little power. Even so
it is strongly recommended to remove the battery when no use for a long time interval.
13.
MEASUREMENT
Notice
The holder removed from the main device should be kept in a safe and clean place
to prevent from damage or pollution.
While measuring please keep environment light f rom directly irradiating into the
Measurement Aperture. If necessary, especially under strong light, shade it with a
piece of light-tight cloth.
A big temperature difference between environment and the meter would badly affect
measuring. In this case please wait for a period of time till the temperature get to a
balance and then calibrate the meter again.
If measurement operation last a long time, for example an hour or more, it's necessary
to recalibrate the meter.
Pay attention to keep Calibrating Standard and Measurement Aperture clean. Any dirt,
such as fingermarks, dust, steam and filth, should be cleaned gently with lens paper
or a piece of soft cloth dipped in absolute ethanol.
14.
MEASUREMENT
If memory is full of data, a prompt would be shown as below in Display Window. In this
case measuring operation will be in order, but the results can't be stored into memory
any more. It is better to upload the data in memory to PC and clear the memory.
FULL
When a battery runs out, the following message will be shown. Please replace the old
battery with a new one.
Low Battery
15.
WARNING AND NOTICE
The whole set of the meter should be kept in dry and non-corrosive environment under
the temperature between -10 to +60 .
Although the exterior parts of the meter are made of good quality plastic, they may not
resist some chemicals, especially some strong solvents, such as acetone and so on.
If the meter is not in use, please lay it into the holder.
When moisture condensation occurs, you may be unable to make a correct measurement.
To avoid damage of the meter due to leak of corrosive liquid, we strongly recommend you
use a high quality battery.
After turning off the meter will be in a sleeping state which consume little power. Even so
it is strongly recommended to remove the battery when no use for a long time interval.
When the battery run out, "Low Battery" will appear on the Display Window, replace the
old battery with a new one at once.
For environment dispose the wasted batteries properly.
The meter should not be taken down at will in order to avoid permanent damage.
16.
MENU OPERATION
Menu interface
On the measurement Interface, push the Menu Wheel to enter the menu interface as
below.
{
#
#
#
Measurement
Data
Calibration
Setup
Option selecting
Turn up or down the Menu Wheel to select the options. Push down the Menu Wheel for
entering your option selected. The following describes what the symbols mean.
}
Return to the prior menu
{
# Enter the next submenu
*|
Select to return
Select to enter
Hint: Anytime press the Measuring Button to terminate menu operation and return to the
measurement interface.
17.
MENU OPERATION
Measurement Option
Select this option and push down the Menu Wheel to return to measurement interface.
Data menu and its submenu
Inquiry
Group No. 001
Data
*|
Data
Inquiry
Delete All
{
#
#
Delete All
OK
NO
18.
MENU OPERATION
Inquiry submenu
In data menu select inquiry option and push down the Menu Wheel to enter the inquiry
submenu. Turn up and down to set the group number that you want to inquire and
then push down the Menu Wheel to enter the inquiry interface. Here you can browse
all the measurements in this group by turning the Menu Wheel.
N=01/05
60"
49.4
!
51.7
Notes:
1) N=01/05 represents the first measurement in a current group that has been preset
to involve five measurements. ! represents the averages of this group.
2) Turn up and down the Menu Wheel to browse data. Push down the Menu Wheel to
return to the previous interface, and press the Measuring Button to exit and back to
the measurement interface.
19.
MENU OPERATION
Delete All submenu
Enter the submenu and turn the Menu Wheel to select OK to clear all data in memory.
Or else select NO to exit.
Calibration Menu and its submenu
Calibration *|
{
Calibration
Modify Values #
Calibrate
Modify Values
}
6 0 " = 96.0
*_
20.
MENU OPERATION
Modify Values submenu
Enter the submenu, turn the Menu Wheel to select a value and push down the Menu
Wheel to confirm, then turn the Menu Wheel to modify the value, push down the Menu
Wheel to confirm again. It is the same operation for other values.
Calibrate option
In Calibration menu, turn the Menu Wheel to select Calibrate option and push
down the Menu Wheel to confirm. The calibrating will be carry out automatically, and
meanwhile the result will be shown in the Display Window. Finally it will return to the
measurement interface.
Notes
1) Before calibrating be sure that the Calibrating Standard is clean!
2) You can also calibrate the meter with Checking Standard that is available for purchase.
21.
MENU OPERATION
Setup menu and its submenu
Angle Mode
{
60"
Setup
*|
Setup
Angle Mode
Shutoff Time
Group
{
#
#
#
Shutoff Time
30 S *
60 S
120 S
}
*_
Measurements
in a group
N = 05
_
22.
MENU OPERATION
Angle Mode submenu
Angle Mode
60"
}
*_
Only an angle mode for this model.
Shutoff Time submenu
This menu is for setting a no-operation time interval for which the meter will be shut
down automatically. In the menu select an option and push down the Menu Wheel to
confirm. And then it will return to the measurement interface.
23.
MENU OPERATION
Group submenu
Enter the menu, turn the Menu Wheel to set a number of measurements in a group and
confirm. Then it will return to the measurement interface automatically.
Note
The range is between 1 to 99.
24.
USING SOFTWARE
Brief introduction
KSJ Data Operator is a simple software for data processing. Using it, we can perform a
communication between MG6-F2 and a PC, and upload the data of measurements.
Then we can process the data uploaded and export them to an Excel file or as a printout.
We can also operate on a PC to set the measuring conditions for MG6-F2 and clear its
memory.
Software installation and uninstall
To use KSJ Data Operator, you need the following:
an IBM compatible PC with a CD-ROM.
Microsoft Windows XP or later versions.
The software is on the CD that comes with MG6-F2. The procedure of intallation and
uninstall is same as a normal software, and it is unnecessary to be described here.
25.
USING SOFTWARE
How to connect between MG6-F2 and a PC
There are two connecting cables for MG6-F2 to connect with a PC. One is a RS232
Cable (9 pins), and the other is a USB Adapter ( optional extra).
Using a COM port
Simply connect one terminal to MG6-F2 and the other to a COM port on a PC.
Using a USB port
Just connect the USB Adapter to MG6-F2 and a USB port on a PC.
Note
It is necessary to install a driver for a USB Adapter. Please find the driverin the CD
which comes with MG6-F2.
26.
USING SOFTWARE
Software interface
Interface of Current Data (default)
Title Bar
Menu Bar
Tool Bar
Upload Area
Data Area
Function Area
27.
USING SOFTWARE
Interface of Historical Data
Title Bar
Menu Bar
Tool Bar
Query Area
Data Area
Function Area
28.
USING SOFTWARE
Menu commands
Data Operation
Current Data
Connect MG6-F2 and a PC, turn on MG6-F2, run KSJ Data Operator, set the
upload date, then click Upload button to upload data.
Notes
The data is uploaded one by one group with sounds and flash indicating..
Uploading troubles can usually be settled according to the hints of a pop-up window.
Historical Data
Turn to the interface of Historical Data, set a time interval for data inquiring, then
click the Query button to get a result.
29.
USING SOFTWARE
Meter Setup
This group of commands is used to set the measuring conditions of MG6-F2 in a
communication state.
Angle Mode
There are six options to be select including single angle, double angle and treble
angle.
Group Presetting
To preset a number of measurements in a group, you can choose from 1 to 99.
Verified Values
This is for modifying the verified values of the Calibrating Standard in the Holder.
Note
It is very important to keep the verified values correct for a calibrating standard. Therefor
don't modify those values at will.
30.
USING SOFTWARE
Shutoff Time
This command is for setting a no-operation time interval for which the meter will be
shut down automatically. There are three options to be selected.
Clear Memory
This is for cllearing all the data stored in the memory of MG6-F2 permanently.
And so It is better to reconsider before clearing.
Help
Contents
The contents of help
About KSJ Data Operator
About the copyright and version of KSJ Data Operator and other informations.
31.
USING SOFTWARE
Tool bar
Current Data
Historical Data
: Equivalent to the corresponding menu command.
: Equivalent to the corresponding menu command.
Print
: Equivalent to the function button of print.
Print
: Equivalent to the corresponding menu command.
Function Button
Delet Button
To delete selected data shown in the Data Area permanently.
Delet All Button
To delete all data shown in the Data Area permanently.
Excel Button
To export data to an Excel document.
Print Button
To make a printout.
32.
TROUBLE SHOOTING
Errors in self-diagnose and self- calibration
When the meter is turned on with the Holder, the
warning message (on right hand side) may come
out. It says something would be wrong.
Please
1.CleanSTD.
2.SetHolder.
3.Recalibrate.
Please check and settle the troubles in turn:
1. Clean STD. Clean the Calibrating Standard.
Observe the surface of the Calibrating Standard against light. If any dirt, such as dust
fingermarks, steam and filth, is found, it should be cleaned gently with lens paper or
a piece of soft cloth dipped in absolute ethanol. Some abrasion and damage on the
surface will change its verified values. If so, please contact the manufacturer to deal
with.
2. Set Holder. Set the main unit into the Holder.
Only when the main unit lay in the Holder properly, the meter can pass the procedure
of self-diagnose and self- calibration
33.
TROUBLE SHOOTING
3. Recalibrate. Recalibate the meter.
A big temperature difference between environment and the meter would badly affect
measuring, and the warning message will be shown. In this case please wait for a
period of time till the temperature get to a balance and then calibrate the meter.
Moisture condensation
When the meter is taken from a cold location to a hot environment, moisture condensation occurs easily. If so don't use the meter any more and wait for the moisture to
evaporate. See above item also.
Corrosion caused by a bad battery
A bad or over-discharged battery will produce corrosive liquid to damage the electric
poles and elements. When it happens, please remove the battery in time and clean the
poles with a cotton bud dipped in absolute ethanol. If the meter don't work well, please
contact us for repair.
34.
TROUBLE SHOOTING
Problems with communication
Failing to communicate through a Series Port on a PC
It is all right to use a Series Port to carry out a communication. Problems usually
occur because :
MG6-F2 don't connect with a PC properly.
MG6-F2 is not in a turn-on state.
No data is in the meter's memory.
Failing to communicate through a USB Port on a PC
Please be sure that:
The driver of the USB adapter has been installed properly.
All connecting cables are connected correctly.
The USB adapter works in order.
Notes
A USB adapter, i.e. USB Serial Port Convertor, is an optional accessory.
35.
TROUBLE SHOOTING
How to verify your glossmeter
A glossmeter is a kind of metrical instruments. It is important and necessary to keep its
accuracy. For this reason the meter must be verified in a period of time, usually a year.
Then, we recommend you to verify the glossmeter as follow:
Send it to a public organization which is authorised by the government and able to
perform the gloss verifying.
Send it to a manufacturer that produces glossmeters.
Purchase certified standards to verify the glossmeter by yourself.
Note:
We also provide some models of Standards for gloss verifying as below:
MG268S-H, high gloss.
MG268S-M, medium gloss.
MG268S-L, low gloss.
36.
WARRANTY
Limited Warranty And Technical Support
The limited warranty period is one year commencing on the date of purchase. If your
meter needs service, carry it to the local reseller or contact us at http://www.ksj.cn
for repair.
We provide spare parts anytime for distributors and customers.
The inquiries on the gloss measurement may be directed to [email protected]
We also provide glossmeter customizing for a special application.
Notes
The meter should not be taken down at will in order to avoid precision destroying
and maintaining difficulty.
If the breakdown is caused by taking-down or inappropriate use, we reserve the
rights not to guarantee it free in repair.
37.
PACKING LIST
Main Device, Model
MG6-F2
1 Unit
Holder With Calibrating Standard
1 Unit
RS232 Cable
1 Piece
KSJ Data Operator
1 CD
Carrying case
2 Piece
User's Manual
1 Piece
Tracable Certificate
1 Piece
Note:
USB Adapter is provided as an optional accessory.
38.