1
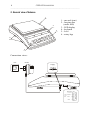
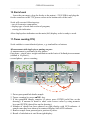
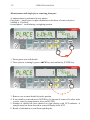
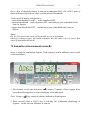
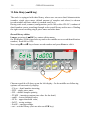
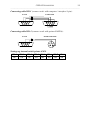
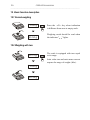
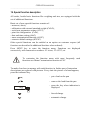
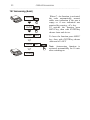
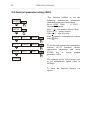
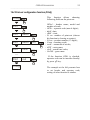
USER MANUAL
BLM Series
File: 2011-10-04-BLM-136 BL010 GB
2
OPERATION MANUAL
__________________________________________________________________________________________________________________
Index:
1. General description ..................................................................................................... 3
2. Completeness ............................................................................................................. 3
3. Security rules............................................................................................................... 4
4. Technical data ............................................................................................................. 5
5. General view of balance .............................................................................................. 6
6. Keys and indicators ..................................................................................................... 7
7. Preparation of work place............................................................................................ 9
8. Preparation to work ..................................................................................................... 9
9. General rules............................................................................................................. 10
10. Start of work .............................................................................................................. 11
11. Pieces counting (PCS) .............................................................................................. 11
12. Summation of measurements series (Σ.) .................................................................. 15
13. Data library ( ↔LIB key ) .......................................................................................... 16
14. Connecting a computer or a printer ........................................................................... 18
15. Basic function description.......................................................................................... 20
15.1 Normal weighing ...................................................................................................... 20
15.2 Weighing with tare.................................................................................................... 20
16. Special function description....................................................................................... 21
16.1 Autozeroing (Autot) .................................................................................................. 22
16.2 Calibration with external weight (CALIb)................................................................... 23
16.3 Serial port parameters setting (rS232) ..................................................................... 24
16.4 Print-out configuration function (PrInt))..................................................................... 25
16.5 Date and time setting function (dAtE) - option .......................................................... 26
16.7 Customization function menu (ACtIV i dEFAULt) ..................................................... 27
17. Maintenance and repairs of small defects ................................................................. 28
Declaration of Conformity........................................................................................... 29
OPERATION MANUAL
3
__________________________________________________________________________________________________________________
1. General description
BLM series scales are destined for identical pieces counting and can be used in
store houses control of production and in similar tasks.
Counting pieces function is based on calculation individual mass of detail from
sample weight or keyboard inscribed. Scale avails a “learn algorithm” during
calculation and this algorithm is correcting inaccuracy conversion.
Scale owns summing register. This register allows to addition or subtraction of
next result and observation current state of this register.
Scales grant claims of regulations abort safeties in European Union, sign
inform about that on brand table CE.
This type of scale not requires legalization.
PKWiU classification: : 33.20.31.
2. Completeness
Standard set consist of:
1. Scale
2. Carrying pan
3. Fish-plate pan
4. Feeder
5. User manual
6. Guarantee card
4
OPERATION MANUAL
__________________________________________________________________________________________________________________
3. Security rules
To avoid electrical shock or damage of the scale or
connected peripheral devices, it is necessary to follow
the security rules below.
•
All repairs and necessary regulations can be made by authorised
personnel only.
•
To avoid fire risk use a feeder of an appropriate type (supplied with the
scale). Pay attention that supply voltage is compatible with specified
technical data.
•
Do not use the scale when its cover is opened.
•
Do not use the scale in explosive conditions.
•
Do not use the scale in high humidity.
•
If the scale seems not to operate properly, unplug it from the mains and
do not use until checked by authorised service.
According to legal regulations it if forbidden to
dispose
wasted
electronic
equipment
in
waste
containers.
•
Please return wasted scale to the point of purchase or other company
specialised in recycling of wasted electronic components.
5
OPERATION MANUAL
__________________________________________________________________________________________________________________
4. Technical data
Scale type
Maximum loading (Max)
Reading unit (d)
Minimal sample weight
Pan dimension
Working temperature
Weighting time
Scale base dimension
Scale weight
Power supply
BLM1.5
BLM3
1.5kg
0,1g
0,1g
3kg
0,1g
0,1g
BLM6
BLM15
BLM30
6kg
15kg
0,2g
1g
0,2g
1g
250x180mm
-10°C ÷ +40°C
<3s
255x310x107mm
2,6kg
~230V 50Hz 6VA / =12V 1,2A
30kg
1g
1g
6
OPERATION MANUAL
__________________________________________________________________________________________________________________
5. General view of balance
1
2
3
4
1 – pan welt (pan)
2 – carrying pan
(under welt)
3 – LED display
4 – keyboard
5 – level
6 – rotary legs
6
5
Connections views:
~230V
Zasilacz
Feeder
Supply
Zasilanie
RS232C
RxD (odbiór)
TxD (nadawanie)
1
2
3
4
masa
5
6
7
8
9
OPERATION MANUAL
7
__________________________________________________________________________________________________________________
6. Keys and indicators
Keys function description:
→T←
→0←
I/
LIB
MENU
UNITS
DATA
HR
←B/G
↔LIB
→PCS+
→PCS-
→SPW
Σ+
Σ-
- tare (subtract package weight from weighed mass) / approve
options in menu,
- zero (option),
-
switch-on / switch-off (standby),
special key,
database,
print out,
special function menu,
change of mass units on main display,
change data on displays DATA
temporary increased indication resolution,
gross weight indication switch,
get to record base,
- start counting procedure with added sample
(long hold key: turn-on/turn-off function, MIN/OK./MAX
selection),
- start counting procedure with subtractive sample
(long hold key: turn-on/turn-off function, MIN/OK./MAX
selection),
- set a sample detail mass by numeric keys and ENTER,
- added current indication to summing register,
- subtracted current indication from summing register
8
OPERATION MANUAL
__________________________________________________________________________________________________________________
Main display indicators:
- result stabilisation indicator,
indicator
indicator →0←
indicator NET
indicator kg/g
indicators:
lb,oz,ozt,ct
-
zero indicator,
net weight indicator (indication with subtracted tare),
change of unit displayed,
units of masses current indications,
DATA display indicators:
indicator B/G
- gross mass (key B/G),
indicator T
- actual tare,
indicator PT
- stored tare,
indicator APW
- sample mass,
- contents of summing register,
indicator Σ
COUNT display indicators:
- not working,
indicator ∇
indicator MIN
- indication under minimum threshold,
indicator OK
- indication between minimum and maximum thresholds,
indicator MAX
- indication above maximum threshold,
- signalize indication of summing register contents.
indicator Σ
OPERATION MANUAL
9
__________________________________________________________________________________________________________________
7. Preparation of work place
Works place of scale should be chosen carefully. This place should be assured
a proper temperature and essential area for attendance. Weight should stand on
stable table.
Violent movements of air, dust, vibrations, violent changes of temperature or
humidity above 90% are inadmissible. Scale should be disallow from strong
electromagnetically or magnetically fields.
8. Preparation to work
1
2
5
6
1. Take the scale, pan and
feeder out of the package.
It is recommended to keep
the original scale package
in order to transport the
balance safely in future.
2. Place the scale on a
stable ground not affected
by mechanical vibrations
and airflows.
3. Put a carrying pan 2 in
wholes.
4. Put the fish plate pan
1.
5. Level the scale with the
rotating rear legs 6 so that
the air bubble in the
water-level 5 at the back
of the scale is in the
middle.
If scale has been moved from places with low temperature to places with
upper temperature (for example in winter), please weight on time 4 hours
purpose of acclimatization.
10
OPERATION MANUAL
__________________________________________________________________________________________________________________
9. General rules
1. It is advised to check scale indication accuracy before and after series of
measurement using any load with known weight. To check the scale with legal
verification uses a calibration weight with valid calibration certificate. In case
permissible error is exceeded it is advised to contact the nearest service to
calibrate the scale.
2. Weighed sample should be placed in the centre of the pan.
3. The scale is equipped with a tare equal to its range. To tare the scale press
→T← key (left or right). Storing a tare value does not extend measuring range,
but only subtracts it from a load placed on a pan. To make weight control
easier and to avoid range overdrawing, the scale is equipped with a load
indicator (graduated in percentages).
4. Weighing result should be read when the indicator " " lights, which
signalizes stabilization of a result.
5. When the scale is not used but it is necessary to be ready to work
immediately, it can be switched off by pressing I/ key. The scale reading
system is then switched off to "standby" mode. To switch the scale on press
I/ key. The scale is immediately ready to operate maximum accuracy (after
self tests).
6. Before each measurement make sure that zero indicator is displayed. If zero
indicator does not displayed or “----“ communicate appears, press →0← key
and wait until zero indication and zero indicator appears
7. The mechanism of scale is a precision devices and susceptible on congestions,
impacts and mechanical shakes.
Do not overload the scale more then 20% of maximum load (Max).
Do not press a pan by hand.
Scale should be protected during the transport.
OPERATION MANUAL
11
__________________________________________________________________________________________________________________
10. Start of work
Leave the pan empty, plug the feeder to the mains (~230V/50Hz) and plug the
feeder connector to the 12V power socket at the bottom side of the scale.
Scale will execute following step:
- test of electronic components,
- display type of scale and version of program,
- zeroing the indication.
After displayed an indication on the main (left) display scale is ready to work.
11. Pieces counting (PCS)
Scale enables to count identical pieces, e.g. turnbuckles or buttons
Measurement with single pieces putting on pan:
A measurement is performed in two phases:
- first phase - single piece weight calculation on the basis of defined pieces amount
(default is 10 pieces.),
- second phase – pieces counting
1. Put on pan quantified details sample.
2. Turn a counting by press →PCS+ key.
3. If the quantified sample consists 10 pieces press ENTER (solid line on the
drawing). If amount of detail is other write correct value by using numeric
keys and ENTER (dotted line on the drawing).
4. Number of details has been showed on right display with PCS indicator. A
sample mass has been showed in centered display with APW indicator.
5. Remove ample form pan and put o portion of pieces.
6. Result of calculation is read from right display.
12
OPERATION MANUAL
__________________________________________________________________________________________________________________
Measurement with single pieces removing from pan:
A measurement is performed in two phases:
- first phase - single piece weight calculation on the basic of removed pieces
(default is 10 pieces),
- second phase – recalculating a weighting portion.
1. Put on pan a box with details.
2. Turn a pieces counting by press →PCS-key and confirm by ENTER key.
3. Remove one or more details from the portion.
4. If one detail is removed press ENTER key. If amount of removed is other write
correct value by using numeric keys and ENTER.
5. Number of details has been showed on right display with PCS indicator. A
sample mass has been showed in centered display with APW.
6. Result of calculation is read from right display.
OPERATION MANUAL
13
__________________________________________________________________________________________________________________
Change/write a sample mass by numeric keys:
During a pieces counting (indicator PCS) user can change actual sample mass.
Write a sample mass when a counting process is turn-off initiate a counting
process.
1. Press a →SPW key.
2. Write sample mass by using a numeric keys and ENTER.
3. Number of details has been showed on right display with PCS indicator. A
sample mass has been showed in centered display with APW.
4. Result of calculation is read from right display.
Note:
1. It is advised that single piece weight is not less than one reading unit and
sample weight used in first phase is bigger than 100 reading units.
2. Err-PCS communicate signalizes that a sample was not put on the pan or
single piece weight is less than one reading unit (it is possible to count pieces but
measuring error is bigger).
14
OPERATION MANUAL
__________________________________________________________________________________________________________________
MIN/OK./MAX selection, turn-on/turn-off counting detail
Hold a →PCS+( →PCS-) key causes display following options:
- OFF – disable a counting details
- on – enable a counting details
- thr – setting a threshold selection MIN/OK./MAX
3sek.
OPERATION MANUAL
15
__________________________________________________________________________________________________________________
Set a value of threshold causes a turn-on an indicators MIN, OK i MAX, state of
these indicators depends on value on indicator and thresholds.
If the result of details calculation is:
- lower than threshold undEr – scale signalizes MIN,
- between thresholds - scale signalizes OK, and during a pass a threshold scale
turn-on buzzer,
- bigger than threshold OVEr – and during a pass a threshold scale turn-on
buzzer.
Note:
On the first start scale value of thresholds are set to maximum.
During a setting a upper threshold remember that his value can’t be lower that
value of minimum threshold.
12. Summation of measurements series (Σ.)
Scale is equip In summation register. That registers enable addition a next result
of measurements.
1. Put element on the pan and press →Σ+ button. Contents of this register have
been showed temporary in centered display with indicatorΣ.
Note: Using a →Σ- key causes a subtract indication from register.
2. Press several times a DATA key to belongs for continuous displaying of
register – in this case an indicator is turn-on.
16
OPERATION MANUAL
__________________________________________________________________________________________________________________
13. Data library ( ↔LIB key )
The scale is equipped with data library where user can save detail characteristics
(number, single piece mass, default amount of samples and others) in chosen
record number and later when it is needed recall to it.
During scale work, scanner (configuration: prefix 04h, sufixx CR+LF) readout of
detail number causes searching through scale record library and in case of finding
the right record recalling single piece mass and other data.
Record library edition
Longer pressing of ↔LIB key enters edition menu.
On left display a Edit sign shows up and on the middle one a record identification
number ( from 000 to 999).
Next using Σ+ and Σ- keys choose record number and press Enter to edit it.
Chosen record id will show up on the left display. On the middle one following
options will successively display:
- PA no – detail number inserting,
- SPW – single piece mass,
- SPL – default sample quantity,
- PTARE – inserting constant tare value for the detail,
- undEr – lower threshold value,
- OVEr – upper threshold value,
- SAVE – saving settings,
- ErASE – erasing settings,
- out – exit the library (user can also use CLR key).
OPERATION MANUAL
17
__________________________________________________________________________________________________________________
To speed up options displaying user can press Σ+ and Σ- button.
We choose option by pressing ENTER key (options that have inserted values
display together with a green diode in lower left corner of middle screen).
After choosing the proper option user can insert numeral value using keyboard
and confirm it with ENTER key.
Entering record library
Shortly press ↔LIB key to enter record library in order to readout inscribed
earlier record. User can differ saved records (green diode lights on middle screen)
from empty ones.
We choose record using Σ+ and Σ- keys and confirm our choice by pressing
ENTER. It is also possible to inscribe directly the record number. In order to do
that press and then insert numeral value using keyboard. Confirm pressing
ENTER key.
Selection of empty record is signalized by „EMPtY” message. Currently used
record is marked by additional „in USE” message. If user wants to cancel
choosing of records press CLR key.
18
OPERATION MANUAL
__________________________________________________________________________________________________________________
14. Connecting a computer or a printer
The scale is equipped with RS232C which can be used to connect external
devices such as a computer or a printer
When cooperating with a computer data
is send after initiate signal from a
computer or after a press
button.
When cooperating with the scale, a
computer should be equipped with a
program which enables processing data
from the scale
The Axis company offers programs to cooperating with scales. These programs
are available on site www.axis.pl :
- Test RS232C- program to tests serial connections (full version),
- ProCell – program enabling cooperation with Microsoft Excel or different
Windows applications (demo version).
Information for programmers (transmission protocol describe)
Signal description:
Computer→Scale: initialising signal S I CR LF (53h 49h 0Dh 0Ah),
Scale→Computer: weighing result according to the diagram below
(16Bytes, transmission parameters: 8bits, 1stop, no parity, 4800bps),
Byte description:
Byte 1
-sign „-” or space
" 2
- space
- digit or space
" 3÷4
" 5÷9
- digit, decimal dot or space
" 10
- digit
" 11
- space
" 12
- k, l, c, p or space
" 13
- g, b, t, c or %
" 14
- space
" 15
- CR
" 16
- LF
OPERATION MANUAL
19
__________________________________________________________________________________________________________________
Connecting cable WK-1 (connect scale with computer / interface 9-pin):
SCALE
COMPUTER
Connecting cable WD-1 (connect scale with printer KAFKA):
SCALE
KAFKA PRINTER
Settings og internal switch printer AXIS:
SW-1
on
SW-2
off
SW-3 SW-4 SW-5 SW-6 SW-7 SW-8
on
off
off
on
off
off
20
OPERATION MANUAL
__________________________________________________________________________________________________________________
15. Basic function description
15.1 Normal weighing
0.00 g
T
Press the →T← key when indication
is different from zero at empty scale.
Weighing result should be read when
the indicator " " lights.
43.04 g
15.2 Weighing with tare
23.13 g
T
The scale is equipped with tare equal
to its range.
Joint value tare and netto mass can not
surpass the range of weight (Max).
0.00 g
63.24 g
OPERATION MANUAL
21
__________________________________________________________________________________________________________________
16. Special function description
All scales, beside basic functions like weighing and tare, are equipped with the
set of additional functions.
Basic set of user special functions consists of:
- autozero (Autot),
- calibration with external standard weight (CALIb),
- serial port parameters setting (rS232),
- print out configuration (PrInt),
- date and time setting (dAtE),
- menu customization function (ACtIV),
- return to default settings (dEFAU).
Other special functions can be enabled as an option on customer request (all
functions are described in additional brochure when ordered).
Press MENU key to enter the function menu. Functions are displayed
successively with consecutive numbers: F1-Autot, F2-rS232, etc.
To customise the function menu with most frequently used
functions use Menu Customisation function ACtIV.
To make clear how to manage with each function, in further part of instruction
descriptions are replaced with pictures. Every time the picture of a hand appears,
press the indicated key.
- put a load on the pan
- remove the load from the pan
12g
T
- press the key when indication is
displayed
- forced change
- automatic change
22
OPERATION MANUAL
__________________________________________________________________________________________________________________
16.1 Autozeroing (Autot)
When F..-Aut function is activated,
the scale automatically ensures
stable zero indication if the pan is
empty or if zero indication was
acquired by pressing →T← key.
To activate the function press
MENU key, then with ENTER key
choose Autot and Aut on.
0.01g
Autot
Autot
0FF
Autot
on
0.00g
To leave the function press MENU
key, then with ENTER key choose
Autot and AUt OFF
Note: Autozeroing function is
activated automatically for 10 min.
after switching-on
OPERATION MANUAL
23
__________________________________________________________________________________________________________________
16.2 Calibration with external weight (CALIb)
Calibration with external weight standard in verified balances should be
performed in case balance indications exceed permissible error. To calibrate the
balance a service centre should use calibration weight as stated in Technical Data
table (or of better accuracy).
Operations sequence:
Cause a user function by press
MENU key.
0.00g
Press ENTER key during the CALIb
is displayed.
CALIb
-CAL-
0FF
-CAL-
on
...
-CAL-
They will be displayed following
options:
-CAL OFF
–
out
without
calibration,
-CAL on – calibration with external
weight,
out –leave option
Press ENTER key during the CAL
on is displayed.
0.00g
m
Wait until zeroing is finished.
LOAD
When LOAD communicate put a
calibration weight on the pan.
m
0.00g
Wait until calibration process is
finished and zero indicated.
24
OPERATION MANUAL
__________________________________________________________________________________________________________________
16.3 Serial port parameters setting (rS232)
0.00g
rS232
bAud
rS232
Prt-1
Prt-1
bAud 9600
rS232
Prt-1
0.00g
out
The function enables to set the
following transmission parameters
(standard parameters underlined):
- bAud (4800, 9600, ..., 115200) –
transmission speed,
- bitS (7, 8) – the number bits in a byte,
- PArIt (0, 1) – parity control,
- Odd (0, 1) – type of parity,
- Send – continous transmission without
using
key.
To set desired transmission parameters
activate rS-232 function, choose
appropriate parameter and press
ENTER key to accept needed
parameter value.
The example at the left presents how
to set transmission speed value to
9600bps.
To leave the function chooses out
option.
OPERATION MANUAL
25
__________________________________________________________________________________________________________________
16.4 Print-out configuration function (PrInt))
This function allows choosing
following fields on the print-out:
0.00g
PrInt
PrInt
HEAd
PrInt
HEAd
PrInt
OPEr
...
PrInt
0.00g
-
out
on
-
HEAd – header: name, model and
number of scale,
OPEr – operator code (max 6 digits),
dAtE –date,
tIME – time,
Pr no– number of print-out (choose
his function is clearing a counter),
PA no – product number (13 digits),
Count –counting result,
totAL – ammount of results,
APW – netto mass,
tArE – actuall tare value,
GrOSS – gross mass.
If the function OPEr is checked,
operator code can be inscribe directlty
by press key.
The example at the left presents how
to set header and operator code,
setting of other function is similar.
26
OPERATION MANUAL
__________________________________________________________________________________________________________________
16.5 Date and time setting function (dAtE) - option
0.00g
This function allows setting actual
date, time and setting a PIN code to
protect by non authorized changes.
dAtE
This function is installed on the
special order.
dAtE
Press ENTER key during the dAtE
is displayed.
SEt
HH-M 00-00
-
dAtE
HH-M 12-00
-
dAtE
dd-M 28-03
dAtE
...
dAtE
YYYY 2009
...
dAtE
0.00g
on
They will be displayed following
options:
OFF – turn-off date on the printout,
on – turn-on date on the print-out,
SEt – setting time and date,
PIn – access code (4 digits),
out – leave the function.
OPERATION MANUAL
27
__________________________________________________________________________________________________________________
16.7 Customization function menu (ACtIV i dEFAULt)
This function enables to select special
functions that will be displayed after
pressing MENU key. Easy access to
the most useful functions will shorten
operation time and make work more
comfortable.
User can return to factory setting
using special function dEFAULt.
Operation sequence shown on the
picture, presents how to add RS232C
parameters setting function to the
Function Menu.
To remove a function from the
Function Menu choose rS oFF in the
last operation.
28
OPERATION MANUAL
__________________________________________________________________________________________________________________
17. Maintenance and repairs of small defects
1. The scale should be kept clean.
2. Take care that no dirt gets between the platform and the scale base. If found
any, remove the pan (lift it up), remove dirt and then replace the pan.
3. In case of improper operation caused by short-lasting power supply decay,
unplug the scale from the mains and then plug it again after few seconds.
4. It is forbidden to make any repairs by unauthorised persons.
5. To repair the scale, please contact our nearest service. List of authorized
services is show on site: www.axis.pl.
6. Damages scales should be sent to repair only in original package. Scale should
be protected against pressure.
Error communicates:
Communicate
C-1 ... 6
Possible cause
self test failed
(over 1 min.)
balance
Remedy
if displayed more than 1 minute,
contact an authorised service
protection rod
remove protection rod and cap
pan missing
put the pan on
mechanical damage
contact an authorized service
overloading
remove the load from the pan
mechanical damage
contact an authorized service
doesn’t work
L
H
the scale was switched on with remove the load from the pan
loaded pan
unstable ground
vibrations
indicator does air flows
not appear
------
place the balance on a stable
ground not affected by
mechanical vibrations and
airflows
balance damage
contact an authorized service
taring is progress
contact an authorized service
29
OPERATION MANUAL
__________________________________________________________________________________________________________________
Declaration of Conformity
We:
AXIS Spółka z o.o. 80-125 Gdańsk, ul.Kartuska 375B
confirm with all responsibility that scales:
BLM1.5, BLM3, BLM6, BLM15, BLM30
marked with CE mark comply with the following:
1. EN 55022:2000 standard Limits and methods of measurement of
radio disturbance characteristics of information technology equipment
and IEC 61000-4-3 Electromagnetic compatibility (EMC) - Part 4-3:
Testing and measurement techniques - Radiated, radio-frequency,
electromagnetic field immunity test, harmonised with the Council
Directive 89/336/EEC).
Additional information:
- Conformity evaluation for the Council Directive 73/23/EEC and 89/336/EEC were carried
out by Laboratorium Badawcze Oddziału Instytutu Elektrotechniki in Gdańsk, accredited by
PCA,
Gdańsk, 23.03.2009 r.
Per pro Director of AXIS Sp. z o.o.:
Production Manager
Jan Kończak
_________________
Podpis
30
OPERATION MANUAL
__________________________________________________________________________________________________________________
Notes