1
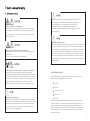
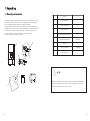
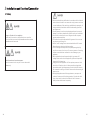
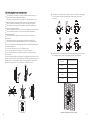
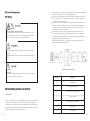
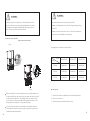
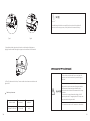
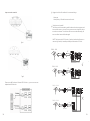
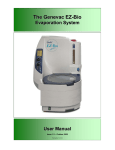
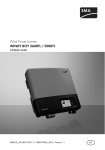
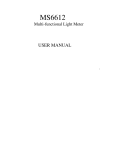
Growatt 4000MTLP-US Growatt 5000MTLP-US Growatt 6000MTLP-US Shenzhen Growatt New Energy Technology CO.,LTD 1st East & 3rd Floor, Jiayu Industrial Zone, Xibianling, Shangwu Village, Shiyan, Baoan District, Shenzhen,P.R.China T F E W + 86 755 2747 1942 + 86 755 2747 2131 [email protected] www.growatt.com GR - UM - 039 - 00 Installation & Operation Manual Contents 1 Notes on this manual 1.1 Validity 1.2 Target Group 1.3 Additional information 1.4 Storage of the manuals 1.5 Symbols Used 1.6 Markings on this product 2 Safety and conformity 2.1 Safety Instructions 3 Product Description 3.1. Inverter Overview 3.2. Information of Label 3.3. Dimensions and Weight 3.4. Transportation 3.5. Storage of Inverter 3.6. The advantage of the unit 4 Unpacking 4.1 Unpacking and inspection 5 Installation and Electrical Connection 5.1. Safety 11 Trouble shooting 11.1. Warnings(W) 11.2. Errors(E) 5.2. Selecting the installation location 5.3. Mounting the Inverter with bracket 5.4. Fixed the inverter on the wall 5.5. Check Inverter Installation Status 5.6. Electrical Connection 12 Operation Modes 12.1. Normal Mode 12.2. Fault Mode 5.7. Commissioning Checking 12.3. Shutdown Mode 6 LCD display 6.1. Display and messages 6.2. Setting the LCD display 13 Protection 13.1. Altitude protect 7 13.2. Temperature protect Communications 13.3. Arc detection protect and Operation 7.1. Monitoring Products 7.2. Monitoring System 7.3. Inverter communication setup 14 Growatt Warranty 8 9 Start-Up and shut down the inverter 15 Technical Data Maintenance and Cleaning 15.1. Specification 15.2. Efficiency curve 15.3. Torque 15.4. Optional accessories 10 Decommissioning 10.1 Dismantling the Inverter 16 Download address 10.2 Packing the Inverter 10.3 Storing the Inverter 10.4 Disposing of the Inverter 17 Contact Notes on this manual Manual Introduce and Copyright Copyright © 2010 Growatt New Energy Technology CO.,LTD all rights reserved. No part of this document may be reproduced, stored in a retrieval system, or transmitted, in any form or by any means, electronic, mechanical, photographic, magnetic or otherwise, without the prior written permission of Growatt New Energy Technology CO.,LTD . Growatt New Energy Technology CO.,LTD makes no representations, express or implied, with respect to this documentation or any of the equipment and/or software it may describe, including (with no limitation) any implied warranties of utility, merchantability, or fitness for any particular purpose. All such warranties are expressly disclaimed. Neither Growatt New Energy Technology CO.,LTD nor its distributors or dealers shall be liable for any indirect, incidental, or consequential damages under any circumstances. (The exclusion of implied warranties may not apply in all cases under some statutes, and thus the above exclusion may not apply.) Specifications are subject to change without notice. Every attempt has been made to make this document complete, accurate and up-to-date. Readers are cautioned, however, that Growatt reserves the right to make changes without notice and shall not be responsible for any damages, including indirect, incidental or consequential damages, caused by reliance on the material presented, including, but not limited to, omissions, typographical errors, arithmetical errors or listing errors in the content material. All trademarks are recognized even if these are not marked separately. Missing designations do not mean that a product or brand is not a registered trademark. 1 1.1 Validity This manual describes the assembly, installation, commissioning and maintenance of the following Growatt Inverters: Growatt 4000MTLP-US Growatt 5000MTLP-US Growatt 6000MTLP-US This manual does not cover any details concerning equipment connected to the Growatt inverter ( e.g. PV modules). Information concerning the connected equipment is available from the Growatt of the equipment. 1.2. Target group CAUTION This manual is for qualified personnel. Qualified personnel have received training and have demonstrated skills and knowledge in the construction and operation of this device. Qualified personnel are trained to deal with the dangers and hazards involved in installing electric devices. 1.3. Additional informatio Find further information on special topics in the download area at WWW.growatt.com 1.4. Storage of the manuals Growatt New Energy Technology CO.,LTD Building B,jiayu industrial Zone,#28 Guanghui Road,Longteng Community,Shiyan, Banan District Shenzhen P.R.China The manual and other documents must be stored in a convenient place and be available at all times. We assume no liability for any damage caused by failure to observe these instructions. 1 1.5. Symbols Usedt 1.6. Markings on this product The following types of safety instructions and general information appear in this document as described below: Symbol Description Warning regarding dangerous voltage The product works with high voltage. All work on the product must only be performed as described in its documentation. Read the manual! Beware of hot surface The product can become hot during operation. Do not touch the product during operation. Danger indicates a hazardous situation which, if not avoided, will result in death or serious injury. WARNING indicates a hazardous situation which, if not avoided, could result in death or serious injury. CAUTION indicates a hazardous situation which, if not avoided, could result in minor moderate injury. Failure to observe a warning indicated in this manual may lead to damage to property Observe the operating instructions Read the product’s documentation before working on it. Follow all safety precautions and instructions as described in the documentation. FCC certificate Intertek ETL semko mark, it apply to the Growatt MTLP-US series certify that the inverter meet the safety standard Ul1741. Point of connection for grounding protection. Direct Current (DC) Alternating Current (AC) 2 3 2 Safet and conformity 2.1. Safety Instructions Danger to life due to lethal voltages! Lethal voltages are present within the unit and on the power supply lines. Therefore, only authorized electricians may install and open the unit. Even when the unit is disconnected, high contact voltages may still be present within the unit. Danger of burn injuries due to hot enclosure parts! During operation, the four sides of the enclosure lid and the heat sink may become hot. Only touch the front enclosure lid during operation. Possible damage to health as a result of the effects of radiation! In special cases, there may still be interference for the specified application area despite maintaining standardized emission limit values (e.g. when sensitive equipment is located at the setup location or when the setup location is near radio or television receivers).In this case, the operator is obliged to take proper action to rectify the situation. Do not stay closer than 20 cm to the inverter for any length of time. The inverter may only be operated with a permanent connection to the public power grid. The inverter is not intended for mobile use. Any other or additional use is not considered the intended use. The manufacturer/supplier is not liable for damage caused by such unintended use. Damage caused by such unintended use is at the sole risk of the operator Capacitive Discharge Currents PV modules with large capacities relative to earth, such as thin-film PV modules with cells on a metallic substrate, may only be used if their coupling capacity does not exceed 470nF. During feed-in operation, a leakage current flows from the cells to earth, the size of which depends on the manner in which the PV modules are installed (e.g. foil on metal roof) and on the weather (rain, snow). This "normal" leakage current may not exceed 50mA due to the fact that the inverter would otherwise automatically disconnect from the electricity grid as a protective measure. ·Certified countries With the appropriate settings, the unit will comply with the requirements specified in the following standards and directives UL 1741 IEEE 1547 CSA C22.2 No.107.1-1 FCC Part15 Grounding the PV generator Comply with the local requirements for grounding the PV modules and the PV generator. Growatt recommends connecting the generator frame and other electrically conductive surfaces in a manner which ensures continuous conduction with ground these in order to have optimal protection of the system and personnel. 4 UL1699B Growatt can preset special grid parameters for other countries installation locations according to customer requests after evaluation by Growatt. You can make later modifications yourself by changing software parameters with respective communication products (e.g. contact Growatt). To change the gridrelevant parameters, you need a personal access code, if you need it , please contact with Growatt. 5 ·DC and AC Switch Separate the GROWATT MTLP-US Inverter securely from the grid and the PV generators using DC and AC Switch. DC and AC Switch shall be able to disconnect all unground conductors after installation. ·Qualification of Skilled Workers 1)Knowledge of how an inverter works and is operated 2)Instruction in how to deal with the dangers and risks associated with installing and using electrical devices and plants 3)Training in the installation and commissioning of electrical devices and plants ·Grounding the PV modules 4)Knowledge of all applicable standards and guidelines 5)Knowledge and observance of this manual and all safety instructions The GROWATT MTLP-US series product is a transformer-less inverter. That is why it has no galvanic separation. Do not ground the DC circuits of the PV modules connected to the GROWATT MTLP-US Inverter. Only ground the mounting frame of the PV modules. If you connect grounded PV modules to the GROWATT MTLP-US Inverter, the error message "PV ISO Low". ·Appropriated Usage The Growatt Inverter converts DC Current from PV generator into AC current. The inverter is suitable for mounting indoors and outdoors. You can use the AC current generated as follows: House grid: Public grid: Energy flows into the house grid. The consumers connected, for example, household devices or lighting, consume the energy. The energy left over is fed into the public grid. When the Growatt is not generating any energy, e.g., at night, the consumers which are connected are supplied by the public grid. The Growatt does not have its own energy meter. When energy is fed into the public grid, the energy meter spins backwards. Energy is fed directly into the public grid. The Growatt is connected to a separate energy meter. The energy produced is compensated at a rate depending on the electric power company. Persons with limited physical or mental abilities may only work with the inverter following proper instruction and under constant supervision. Children are forbidden to play with the inverter. Must keep the inverter away from children. 6 7 3 Product Description 3.1. Inverter Overview: 3.2. Information of Label 3.1.1 Type1 Inverter model You can consult the inverter by the type label. It is on the left side of the enclosure. The type of product (Type/Model) Device-specific characteristics Specifications of the inverter Serial number 3.1.2 Type2 Inverter model 8 9 3.4. Transportation 3.3. Dimensions and weight Type 1 Model Height (H) Width (W) Depth (D) Weight 4000 MTLP-US 685 mm 26.97inch 400 mm 15.75 inch 215mm 8.46inch 31Kg 68.3b 5000 MTLP-US 685 mm 26.97inch 400 mm 15.75 inch 215mm 8.46inch 31Kg 68.3b 6000 MTLP-US 685 mm 26.97inch 400 mm 15.75 inch 215mm 8.46inch 31.5Kg 69.4b The inverter is thoroughly tested and inspected strictly before delivery. Our inverters leave our factory in proper electrical and mechanical condition. Special packaging ensures safe and careful transportation. However, transport damage may still occur. The shipping company is responsible in such cases. Thoroughly inspect the inverter upon delivery. Immediately notify the responsible shipping company if you discover any damage to the packaging which indicates that the inverter may have been damaged or if you discover any visible damage to the inverter. We will be glad to assist you, if required. When transporting the inverter, the original or equivalent packaging should to be used, and the maximum layers for original carton is four, as this ensures safe transport. 3.5. Storage of Inverter Type 2 10 Model Height (H) Width (W) Depth (D) Weight 4000 MTLP-US 735 mm 28.94inch 400 mm 15.75 inch 215mm 8.46inch 31.5Kg 69.4b 5000 MTLP-US 735 mm 28.94inch 400 mm 15.75 inch 215mm 8.46inch 31.5Kg 69.4b 6000 MTLP-US 735 mm 28.94inch 400 mm 15.75 inch 215mm 8.46inch 32Kg 70.5b If you want to storage the inverter in your warehouse, you should choose an appropriate location to store the inverter. The storage temperature should be always between -25℃and +60℃. And the storage relative humidity should be always between 0 and 100%(without condensation). If there are a batch of inverters need to be stored, the max layers for original carton is six. After long term storage, local installer or service department of Growatt should perform a comprehensive test before installation. 3.6. The advantage of the unit DSP controller Multi MPP controller Sound control Easy installation Integrated wire box Integrated DC switch CEC efficiency of 97.0% Maximum efficiency of 97.5% Wide input voltage range from 100-600V Adapt to multi gird model(208Vac/240Vac/277Vac) Multi communication pattern optional Reactive power regulate function optional(Default PF>0.99) Integrated smart meter optional 11 4 Unpacking 4.1. Unpacking and inspection Thoroughly inspect the packaging upon received. If any damage to the carton is visible, or if you find that the inverter unit is damaged after unpacking, please notify the shipping company and Inverter supplier immediately. Meanwhile please check the delivery for completeness and for visible external damages of the inverter. If there are anything damaged or missing, please contact your dealer. Don’t dispose its original package. If you want to transport the inverter, it is better to store the inverter into the original package. Complete delivery should contain as follows: E D A B A inverter 1 B Mounting frame 1 C Safety-lock screws 2 D Mounting screws 3 E Mounting frame screws sleeve 3 F Monitor software(disk) 1(Optional) G Manual 1 H Wi-fi or shinelan 1(Optional) I Rs485 connectors 3 C F I H G 12 Though the packaging box of Growatt is durable, please treat the packing box gently and avoid dispose the packing box. In this package, they are inverter, cystosepiment and carton from inside to outside. 13 5 Installation and Electrical Connection 5.1. Safety Danger to life due to fire or explosion Despite careful construction, electrical devices can cause fires. Do not install the inverter on easily flammable materials and where flammable materials are stored. Risk of burns due to hot enclosure parts Mount the inverter in such a way that it cannot be touched inadvertently. 14 1. All electrical installations shall be done in accordance with the local and national electrical codes. Do not remove the casing. Inverter contains no user serviceable parts. Refer servicing to qualified service personnel. all wiring and electrical installation should be conducted by a qualified service personnel . 2. Carefully remove the unit from its packaging and inspect for external damage. If you find any imperfections, please contact your local dealer. 3. .Be sure that the inverters connect to the ground in order to protect property and personal safety. 4. The inverter must only be operated with PV generator. Do not connect any other source of energy to it. 5. Both AC and DC voltage sources are terminated inside the PV Inverter. Please disconnect these circuits before servicing. 6. This unit is designed to feed power to the public power grid (utility) only. Do not connect this unit to an AC source or generator. Connecting Inverter to external devices could result in serious damage to your equipment. 7. When a photovoltaic panel is exposed to light, it generates a DC voltage. When connected to this equipment, a photovoltaic panel will charge the DC link capacitors. 8. Energy stored in this equipment’s DC link capacitors presents a risk of electric shock. Even after the unit is disconnected from the grid and photovoltaic panels, high voltages may still exist inside the PV-Inverter. Do not remove the casing until at least 5 minutes after disconnecting all power sources. 9. Although designed to meet all safety requirements, some parts and surfaces of Inverter are still hot during operation. To reduce the risk of injury, do not touch the heat sink at the back of the PV-Inverter or nearby surfaces while Inverter is operating. 15 5.2. Selecting the installation location This is guidance for installer to choose a suitable installation location, to avoid potential damages to device and operators. Raintight or wet location hubs that comply with the requirements in the Standard for Conduit, Tubing, and Cable Fittings, UL 514B, are to be used. The unit shall be mounted at least 914 mm (3 feet) above the ground. The installation location must be suitable for the inverter's weight and dimensions for a long period time. Select the installation location so that the status display can be easily viewed. Do not install the inverter on structures constructed of flammable or thermolabile materials. The humidity of the installation location should be 0~100% without condensation. The installation location must be freely and safely to get at all times. Vertically installation or tilted backwards by max. 15°. and make sure the connection of inverter must be downwards. Never install horizontal and avoids forward and sideways tilt. Be sure that the inverter is out of the children’s reach. Don’t put any things on the inverter. Do not cover the inverter. Don’t install the inverter near television antenna or any other antennas, antenna cables. Inverter requires adequate cooling space. Providing better ventilation for the inverter to ensure the heat escape adequately. The ambient temperature should be below 40°C to ensure optimum operation. Please make sure the inverter is installed at the right place,The inverter can’t install close to trunk。 16 The inverter can’t install to direct sunlight,drench,firn location. We suggest that the inverters should be installed at the location with some cover or protection。 Observe the minimum clearances to walls, other inverters or objects as shown in the diagram below in order to guarantee sufficient heat dissipation. Direction Min. clearance (cm) above 30 below 50 sides 30 front 30 Ambient dimensions of one inverter 17 M i n.3 0 c m M in. 3 0 cm Min.50cm Min.50cm Mi n . 30c m M in. 3 0 cm Min . 30c m Min.50cm M i n . 3 0 cm M in.3 0 cm Using the mounting frame as a template, drill holes as illustrated in image. Ambient dimensions of a series inverters There must be sufficient clearance between the individual inverters to ensure that the cooling air of the adjacent inverter is not taken in. If necessary, increase the clearance spaces and make sure there is enough fresh air supply to ensure sufficient cooling of the inverters. 5.3. Mounting the Inverter with bracket Fix the mounting frame as the figure shows. Do not make the screws to be flush to the wall. Instead, leave 2 to 4mm exposed. In order to avoid electrical shock or other injury, inspect existing electronic or plumbing installations before drilling holes. The dimension of bracket as follow: 18 19 5.4. Fixed the inverter on the wall Falling equipment can cause serious or even fatal injury, never mount the inverter on the bracket unless you are sure that the mounting frame is really firmly mounted on the wall after carefully checking. Rise up the inverter a little higher than the bracket. Considered the weight of them. During the process please maintain the balance of the inverter. Hang the inverter on the bracket through the match hooks on bracket. Type1 model second protective Ground After confirming the inverter is fixed reliably, fasten four M6 safety-lock sokets head cap screws on the left and right side firmly to prevent the inverter from being lifted off the bracket. Type2 model second protective Ground 5.5. Check Inverter Installation Status Check the upper straps of inverter and ensure it fits on to the bracket. Connecting the Second Protective Conductor If the installation requires, the earth terminal can be used to connect a second protective conductor or as equipotential bonding. This prevents touch current if the original protective conductor fails. 20 Check the secure mounting of the inverter by trying to raise it from the bottom. The inverter should remain firmly attached. Choose a strong mounting wall to prevent vibrations while inverter is operating. 21 5.6. Electrical Connection 5.6.1 Safety Danger to life due to lethal voltages! High voltages which may cause electric shocks are present in the conductive parts of the inverter. Prior to performing any work on the inverter, disconnect the inverter on the AC and DC sides This unit or system is provided with fixed trip limits and shall not be aggregated above 30 kW on a single Point of Common Connection. PV Panel: Provide DC power to inverter. IF MTL series PV inverter With Arc fault current detection function, recommend consumer connect the Tracker A and Tracker B to differ PV panel string. Converts DC (Direct Current) power from PV panel to AC (Alternating Current) power. Because Inverter is grid-connected, it controls the current amplitude according to the PV Panel power supply. Inverter always tries to convert the maximum power from your PV panel. Connection system: This “interface” between Utility and PV-Inverter may consist of electrical breaker, fuse and connecting terminals. To comply with local safety standards and codes, the connection system should be designed and implemented by a qualified technician. Utility: Referred to as “grid” in this manual, is the way your electric power company provides power to your place. Danger of damage to electronic components due to electrostatic discharge. Take appropriate ESD precautions when replacing and installing the inverter. Principle of PV plant system Grounding Before connecting the power cables, you much connect both ground wire of DC and AC side in wire box first. 5.6.2 System Diagram with Inverter Electrical Position Description A PV modules B rapid shutdown system C DC load circuit fuse or breaker D Growatt Inverter E AC load circuit fuse or breaker F Energy meter G Utility grid Intended Use The unit converts the DC current generated by the photovoltaic (PV) modules to grid-compliant alternating current and feed-in into the electricity grid. Growatt inverters are built according to all required safety rules. Nevertheless, improper use may cause lethal hazards for the operator or third parties, or may result in damage to the units and other property. 22 23 Single inverter System Installation PV array Inverter Breaker Fuse Energy Meter L1 PV array Inverter Breaker Fuse Energy Meter L1 L2 L1 N L2 AC L2 L1 AC N DC PE N DC L1 PE PV array Inverter Breaker Fuse L1 Energy Meter L2 AC For 240 split phase L2 N PV array Inverter Breaker Fuse DC Energy Meter L1 PE L2 L2 Inverter PV array Breaker Fuse L1 N DC L3 L1 AC L2 Energy Meter L3 AC L2 PE N DC For 208/240V delta 3-phase PV array Inverter Breaker PE Fuse Energy Meter L1 L1 L2 N AC For 208/240V delta 3-phase N DC PE wire box For Y 277V 3-phase Multi inverters System Installation PV array Inverter Breaker Fuse Energy Meter L1 L1 L2 N AC N DC PE PV array Inverter Breaker Fuse Energy Meter L1 L2 L2 N AC N DC N PE Inverter PV array Breaker L1 Energy Meter L3 L2 N AC Fuse Type1 N DC PE For Y 277V 3-phase 24 In the wire box, the right side is AC output wire connection terminal, and the middle is PV input wire connection terminal and communication port, the left side is DC switch. 25 5.6.3 Connecting to the grid (AC utility) Grid standard Before wiring the inverter, the installer needs to determine the grid configuration that the inverter will be connected to. The inverter is default set for utility interconnection with 3Phase-Δ Grid type 240Vac from factory. However, you can choose the Net MODEL through the LCD to set the inverter to be fitted the commonly used utility configuration types shown in the figure 5.6.3. Based on the local grid standards, it is possible to select different connection types. The available configurations are shown in the following table: Type2 In the wire box, the middle place is AC output and PV input wire connection terminal, the left side is DC switch, the right side is communication port. L1 L1 L3 NET MODEL L2 L2 240Vac Split-phase wiring to terminal pin L1 N GRID STANDA RD Use only solid or stranded wire but not fine stranded wire. • Use cables with high ambient temperatures. • Use cables with a large cross-section . L1 L1 L2 N NET MODEL:1 (Option) L3 208Vac 3phase-Δ PE L1 L2 – 240Vac 3phase-Δ PE NET MODEL:2 (Option) L1 L2 – NET MODEL:3 (Default) N L3 L2 L2 277Vac 3phase-Y PE L1 N – PE NET MODEL:4 (Option) figure 5.6.3 26 Code Name Detail A Conductor cross-section See the Conductor cross section in the flowing chart B Stripping insulation C bushing 10mm or 12mm If several inverter are installed in a three-phase AC grid. it is recommended to distribute the inverters between the phases in order to reduce the power unbalances between the phases. Always refer to the local standards. KST E4010 or E6012 27 Si plusieurs inverter sont installés sur un réseau électrique à courant alternatif à trois phases. Il est recommandé de distribuer les onduleurs entre les phases pour réduire les déséquilibres de puissance entre les phases. Toujours vous référer aux normes locales. The separate disconnection unit spec require as follow: Voltage: the voltage much not less than the AC grid voltage which you connection. Current: the current much not less than 1.2 times of the inverter max output current which defined in the inverter spec. Connection of the AC cable Output connection terminal Type1 We suggest the AC separate unit spec as follow: Model 4000 MTLP-US 5000 MTLP-US 6000 MTLP-US @208Vac 30A/400Vac 35A/400Vac 40A/400Vac @240Vac 30A/400Vac 35A/400Vac 40A/400Vac @277Vac 25A/400Vac 30A/400Vac 35A/400Vac Grid type Type2 Make sure the grid (AC utility) configuration types .If you grid standard is not the factory default type, don’t worried, you just need to wire the local AC grid according with the figure5.6.3, after wiring both DC input and AC output, you can use the LCD to choose the NET model to make the inverter suit the local grid type in the chapter 6.2 “Setting the LCD display”. You must install a AC separate circuit-breaker or other load disconnection unit between the inverter and utility, in order to ensure that the inverter can be safely disconnected under load. 28 Wiring Step : 1. Open the AC separate unit between the inverter and utility and the DC switch on the inverter. 2. Open the wire box cover and the knock-out hole. 29 The cables length should not exceed 50 m, the resister of the cable will consume inverter output power , finally reduce the inverter efficiency . Type1 Type2 3. Installation rubber pipe into the knock-out hole and pull the pipe nut slightly, feed the cables through the pipe into the wire box till the terminal. 5.6.4 Connect to PV Panel (DC input) 4 . The AC side terminal is clear, Connect cables into relevant terminals as the figure 5.6.3 Cable requirements Product Model Area(mm²) Risk of electric shock and fire, use only with PV modules, and with a maximum system voltage of 600Vdc. Electric shock hazard , the DC conductors of this photovoltaic system are normally ungrounded but will become intermittently grounded without indication when the inverter measures the PV array isolation. Because of the transformer less design, the DC positive pole and DC negative pole of PV arrays are not permitted to be grounded. AWG No. Do not disconnect the DC connectors under load! GROWATT MTLP-US 30 3.30~6.63 9~12 31 Input connection terminal Suggestions for the PV modules of the connected strings: ·Same type ·Same quantity of PV modules connected in series Wiring inverter in parallel The inverter can be connected in parallel in order to obtain more power, each inverter shall connect to its own PV array, cannot connect a single PV array to more than one inverter. That will cause the inverter to work abnormally, the worst condition inverter will be damaged. Type1 NOTE: The inverter with AFCI function, if tracker A and tracker B connect to same string PV model, it mand be possibility misinformation AFCI fault. Public Grid AC Breaker + - + - √ PublicGrid Grid Public AC AC Breaker Breaker Type2 There are two MPP trackers of Growatt MTLP-US series , so you can connect two independent MPP channels. + + - + - + + - + - Public Grid Public Grid AC AC Breaker Breaker + - + - × Public Grid AC Breaker 32 + - + - 33 Under any condition! Make sure the maximum open circuit voltage (Voc) of each PV string is less than 600Vdc. ·Do not connect strings with an open circuit voltage greater than the Max. input voltage of the inverter. If the strings voltage exceeds the Max. input voltage of the inverter, it can be destroyed due to overvoltage. All warranty claims become void. ·Check the design of the PV plant. The Max. open circuit voltage, which can occur at solar panels ambient temperature of -10℃,must not exceed the Max. input voltage of the inverter. Wiring step: 1.Open the independent DC separate unit ,the DC switch on the GROWATT MTLP-US inverter and the AC separate unit. 2.Open the left hand side knock-out hole. Before connecting PV panels to DC terminals, please make sure the polarity is correct. Incorrect polarity connection could permanently damage the unit. Check short-circuit current of the PV string. The total short-circuit current of the PV string should be less than the inverter’s maximum DC current. Connect the positive and negative terminals from the PV panel to positive (+) terminals and negative (-) terminals on the PV-Inverter. Each DC terminal on Inverter can withstand 18Adc. 3. installation rubber pipe into the knock-out hole and pull the pipe nut slightly, feed the cables through the pipe into the wire box till the terminal. For instance, if the positive pole of a string is connected at MPP tracker A and the string's negative pole at MPP tracker B, this is called a mixed connection, the inverter no longer fulfils the requirements of the EMC Directive. Only connect strings at one input zone and never mix the input zones A and B! High voltages exist when the PV panel is exposed to the sun. To reduce risk of electric shock, avoid touching live components and treat connection terminals carefully 34 35 4. Connect the PV cables to the terminal correct. 5. Checking the wiring of PV positive and cathode connect is right then turn on DC switch. NOTE: When DC switch turn off, PV wiring mistake (polarity reverse) the wire Box board LED light brighten. Cable requirements: Product Model Area(mm²) AWG No. 6K MTLP-US 3.30~5.26 10~12 5K MTLP-US 3.30~5.26 10~12 4K MTLP-US 3.30~5.26 10~12 5.7. Commissioning Checking For type1 Cover the wire box. Close the DC separate unit and the DC switch on the inverter. When the PV panels are connected and PV voltage is greater than 100 Vdc but the AC grid is not yet connected, the message on the LCD display produce the following messages in order: “PV Inverter”-> “Waiting” -> “No AC connection”. The display repeats “No AC connection” and the LED will be red. Setting grid model choice. See the chapter 6.2 “Setting the LCD display”. Close the AC separate unit between inverter and grid. The normal operating sequence begins. Under normal operating conditions the LCD displays “Power: xxxx.xW xxxx.xVar ”. That is the power fed to the grid. The LED turns green. This completes the check. For type2 36 37 6 LCD display Glossary AC Abbreviation for "Alternating Current". 6.1. Display and messages 6.1.1 LCD display Starting-up display sequence, Once the PV power is sufficient, Inverter displays information as shown in the flow chart as follow: DC Module: xxxxxx Abbreviation for "Direct Current". Ser No: xxxxxxxxxx Energy FW Version: x.x.x Energy is measured in Wh (watt hours), kWh (kilowatt hours) or MWh (megawatt hours). The energy is the power calculated over time. If, for example, your inverter operates at a constant power of 4,000 W for half an hour and then at a constant power of 1,000 W for another half an hour, it has fed 2,500Wh of energy into the power distribution grid within that hour. Connect in: xxxS Connect : OK Power: xxxx.xW xxxx.xVar Power Power is measured in W (watts), kW (kilowatts) or MW (megawatts). Power is an instantaneous value. It displays the power your inverter is currently feeding into the power distribution grid. Power rate Power rate is the radio of current power feeding into the power distribution grid and the maximum power of the inverter that can feed into the power distribution grid. Power Factor Power factor is the ratio of true power or watts to apparent power or volt amps. They are identical only when current and voltage are in phase than the power factor is 1.0. The power in an ac circuit is very seldom equal to the direct product of the volts and amperes. In order to find the power of a single phase ac circuit the product of volts and amperes must be multiplied by the power factor. 6.1.2 LCD display The LCD display’s backlight automatically turns off after 30 seconds to save the power. The display on the inverter can be control by Knock on the front of it. Symbol Description Explanation Tap symbol Indicates display operation Inverter status symbol Indicates inverter operation status PV Abbreviation for photovoltaic. 38 The first line will show some status of the inverter, there are 4 status listed in below table. 39 The First Line Of LCD STATE Wait State The Second Line Of LCD DISPLAY CONTENT REMARK Standby PV voltage low Waiting Initial waiting Connect in xx S System checking Reconnect in xx S System checking Connect OK Connect to Grid Inverter State Power: xxxx.x W xxxx.xVA Fault State Program State Error: xxx Programming Inverter watt at working Update Software The Second Line Of LCD 40 Display time/S 2635.1W Setting Display time/S 10.3Var Remark 4 Setting 2521.7W 11.3Var 2014/12/05 11:20 4 Time system 2324.5W 16.7Var AC Error Record 4 2635.1W 10.3Var Input 123: xxx 4 Set input page 2635.1W 10.3Var Language:English 4 Set language 2635.1W 10.3Var COM Address: xxx 4 Set Communications Address 2635.1W 10.3Var Net model: x 4 The last 5dated failure report System Fault The Second line can change by knock on . Cycle display Cycle display Remark 2279.5W 12.4Var Model:PVIA00F163 2 The inverter model 1872.0W 25.4Var FW Version:IA1.0 2 The software version 2270.0W 14.3Var SerNo:xxxxxxxxxx 2 The Serial Number 4240.1W Etoday: 75.4Var 12.7KWh 4 The energy today 1270.0W 75.4Var Eall: 102.1KWh 4 The energy all 743.7W 20.3Var Ppv: 421/ 389 W 4 PV input watt 427.3W 15.7Var PV:387/389 B:389 4 The PV and Bus Voltage 3724.3W 10.1Var AC:217V F:60.1Hz 4 Grid information 3143.7W 20.3Var L1:119V L2:120V 4 The grid system Set Net Model 6.2. Setting the LCD display The inverter can support three kinds of knock: single knock, double knock and Thrice knock. Each kind of knock has different function. Refer to specified definition in Table below: Knock type Definition Single knock Key Down Double knock Key SET Thrice knock Key Enter or ESC 41 Communications Before light the background, the types of knock functions are the same: just light the background. NOTE:That the background light will automatically off if there is no knock detected in 10 seconds. Sound control can define the display language, communication address and utility model choice. 7 7.1. Monitoring Products 7.1.1 Shine Net Shine NET is a PC software that communicate with inverter to analyze the inverter working state. It is convenient for you to know the inverter’s real-time working state and the history work information. Enter to set When the LCD is dark, Knock and double knock make it becomes bright. Knock to make it display next information or change the set situation. Double knock make the display stand for 30 second, enter to setting state. Display show as follows: 2635.1W Setting 10.3Var Double knock 2635.1W 10.3Var Input 123: 000 Double knock 2635.1W 10.3Var Input 123: 000 knock 2635.1W 10.3Var Input 123: 120 knock 2635.1W 10.3Var Input 123: 100 Double knock 2635.1W 10.3Var Input 123: 100 Double knock 2635.1W 10.3Var Input 123: 120 knock 2635.1W 10.3Var Input 123: 123 Setting language Thrice knock Enter to setting state 2635.1W 10.3Var Set Language On the set situation page → knock to “Set language”→double knock to enter “language:English”→ knock to select the language you need and thrice knock enter or wait until the display become dark. Setting communication address On the set situation page → knock to “COM Address: xx” → double knock to change the Address model → knock to set address, thrice knock enter or wait until the display become dark. Features: Monitor and record current data and of inverters . Record historical data. Monitor and record event information of inverter Connect computer and inverter via RS232 or RS485 port Remote access available for local area network. Setting grid model choice This function is disable when the inverter work in the normal state, you much turn off the AC separate unit, and the inverter LCD will display a error “NO AC Connection” , LED turn red ,then this model choice function is enable. On the set situation page →knock to “Net Model: x” →double knock to enter “Net Model: x”→knock to select the grid model .need to wait for 10S till the LCD background light gone out then the Inverter restart. Check the “NET Model” in LCD display again. Information Users are able to monitor the inverter after the setting of software. Detailed information about setting and functions refer to the ShineNET Manual. You can download the ShineNet YN2.0 from: ftp://113.106.58.169, the user name is ftpguest and Password is ftpguest. ShineNet may be upgraded for better function or user experience, please refer to the actual software version. Turn on the AC separate unit, inverter begin to work. 42 43 7.1.2 Shine Vision 7.1.4 Wi-Fi module Shine Vision, which consists of a power monitor and a number of transmitters, can achieve 1 to 6 monitoring modes. The transmitters transmit the power data collected from a photovoltaic inverter to the monitor and display the data onto the monitor screen, as along as data of generated energy, the gross generated energy and the generation income obtained from the above-mentioned data through some simple calculations. We can also see AC voltage, two-way PV voltage, indoor temperature, date and time, as well as CO2 emissions. Wi-Fi module is a wireless device used to monitor inverter. It transmit the data collected from the inverter to the server via router. User could get access to the inverter data by inquiring the server. WiFi module 7.1.5 Shinelan module Shine Vision Shinelan module include wi-fi and Ethernet function, user can choose wireless communication or Cable communication. 7.1.3 Shine Webbox Shine WebBox is specially designed for solar power plant remote monitoring. While supporting both wired and wireless communication, Shine WebBox can simultaneously monitor, record and analyze inverter operating parameters real time with a maximum quantity of 50. Monitored data can be sent to ShineServer. Shinelan module 7.1.6 Shine Server Shine Server is a remote data server, it is based on B/S structure. It can receive monitoring data from Shine Webbox or Shine Pano, and publish monitored data to LAN or WAN. User can easily access data browse interface via an Internet Explorer. Shine WebBox 44 45 7.2. Monitoring System Through RS232 or RS485 interface-data logger +PC monitor single inverter The inverter provides Multi communication mode optional: Cable communication mode There are three kinds of cable communication mode: RS232, RS485 and Ethernet. RS232 as the Type1 inverter model standard, RS485 as the Type1 and Type2 inverter model standard, Ethernet as the Type1 and Type2 inverter model optional function. Wireless communication mode There are three kinds of Wireless communication mode: Wi-Fi, Zigbee and GPRS . Wireless communication as the user matching function. Through RS485 interface-Data logger monitor Multi inverter 7.2.1. RS232 and RS485 monitoring system RS232 and RS485 interface to communicate with remote PC or logger. User can monitor the inverter’s state via the following types of communication systems. Through RS232 interface +PC monitor single inverter Through RS485 interface-Data logger+ PC monitor Multi inverter Through RS485 interface- RS485-232 converter +PC monitor single inverter Through RS485 interface-RS485-232 converter+ PC monitor Multi inverter 46 47 7.2.2. RS485 and Ethernet monitoring system Through RS485 interface +Ethernet monitor single inverter Through RS485 interface +Ethernet monitor Multi inverter For exterior wireless module inverter type 7.3. Inverter communication setup User different communication mode monitor inverter system, must setup inverter and insure inverter monitor stabilization. 7.3.1. RS485 cable connection 7.2.3. Wireless communication monitoring system Wireless communication mode limit as follows 1. Installation rubber pipe into the knock-out hole and pull the pipe nut slightly, feed the RS485 cables through the pipe into the wire box. 2. Rs485 communication wiring request and machining. For Integrated wireless module inverter type 48 Code Name Detail A Conductor cross-section 0.2~0.5mm² B Stripping insulation 5~8mm 49 3. Take out the RS485 connection terminal from accessory packing bag. As to the connection between inverters, please refer to the following figure. Information As to the connection between inverter and data logger, please refer to the following figure. 4. Connect the cable to the RS485 terminal (‘1’ to ‘T/R-’, ‘3’ to ‘T/R+’, and ‘2’ to the shielding net) Information 5. Plug RS485 terminals into the inverter Information RS485 BUS balance jumper: In RS485 communication circuit, when the T/R+ and T/Rlines reach a certain length, the line itself has impedance, in order to balance the impedance of the RS485 bus line, you’d better get the jumper to the state “ON” in RS485 BUS balance jumper of the remote inverter that the last one connects to the RS485 bus line while others keep “OFF” state. Type1 inverter 50 51 As to the connection between inverters, please refer to the following figure. 7.3.2. Ethernet cable connection 1. Installation rubber pipe into the knock-out hole and pull the pipe nut slightly, feed the Ethernet cables through the pipe into the wire box. 2. Ethernet communication wiring request and machining. Information 3. Using CAT5 cable for monitoring connections, connect RJ45 plug to the end of the cable as shown in the flowing table and plug into RJ45 jack. As to the connection between inverter and data logger, please refer to the following figure. Information Information Signal name Description 1 TX+ Transmit Data 2 TX- Transmit Data 3 RX+ Receive Data 6 RX- Receive Data 4,5,7,8 N/U NA RS485 BUS balance jumper: In RS485 communication circuit, when the T/R+ and T/Rlines reach a certain length, the line itself has impedance, in order to balance the impedance of the RS485 bus line, you’d better get the jumper to the state “ON” in RS485 BUS balance jumper of the remote inverter that the last one connects to the RS485 bus line while others keep “OFF” state. Type2 inverter 52 PIN Type1 inverter 53 Start-Up and shut down the inverter 8 8.1. Start-Up the inverter 1. Connect the AC circuit breaker 2. Turn on the DC switch, and the inverter will start automatically when the input voltage is higher than 150V. 8.2. Shut down the Inverter Type2 inverter 1. Disconnect the AC circuit breaker and prevent it from being reactivated. 2. Turn off the dc switch. 3. Check the inverter operating status. 4. Waiting until LED, LCD display have gone out, the inverter is shut down. 7.3.3. exterior wireless module user setup Type1 inverter model user exterior wireless module,setup port as follows 54 55 9 Decommissioning Maintenance and Cleaning 9.1. Checking Heat Dissipation 10.1. Dismantling the Inverter If the inverter regularly reduces its output power due to high temperature, please improve the heat dissipation condition. Maybe you need to clean the heat sink. 1. Disconnect the inverter as described in chapter 10. 2. Remove all connection cables from the inverter. 3. Screw off all projecting cable glands. 4. Lift the inverter off the bracket and unscrew the bracket screws. 10 9.2. Cleaning the Inverter If the inverter is dirty, shut down the inverter, then clean the enclosure lid, the display, and the LEDs using only a wet cloth. Do not use any cleaning agents (e.g. solvents or abrasives). Danger of burn injuries due to hot enclosure parts! Wait 20 minutes before disassembling until the housing has cooled down. 10.2. Packing the Inverter 9.3. Checking the DC switch If possible, always pack the inverter in its original carton and secure it with tension belts. If it is no longer available, you can also use an equivalent carton. The box must be capable of being closed completely and made to support both the weight and the size of the inverter. Checking externally visible damage and discoloration of the DC disconnect and the cables at regular intervals. If there is any visible damage to the DC disconnect, or visible discoloration or damage to the cables, contact the installer. 10.3. Storing the Inverter Store the inverter in a dry place where ambient temperatures are always between 25°C and +60°C. Once a year, turn the rotary switch of the DC switch from the On position to the Off position 5 times in succession. This cleans the contacts of the rotary switch and prolongs the electrical endurance of the DC Disconnect. 10.4. Disposing of the Inverter Do not dispose of faulty inverters or accessories together with household waste. Please accordance with the disposal regulations for electronic waste which apply at the installation site at that time. Ensure that the old unit and, where applicable, any accessories are disposed of in a proper manner. 56 57 11 Trouble shooting Sometimes, the PV inverter does not work normally, we recommend the following solutions for common troubleshooting. The following table can help the technician to understand the problem and take action. 11.1 Warnings(W) Warnings(W) identify the current status of the GROWATT MTLP-US inverter. Warnings do not relate to a fault. When a (W) with a number after it appears in the display, it indicates a Warning Code and is usually cleared through an orderly shutdown/re-set or a self corrective action performed by the inverter. See the (W) codes in the following table. Error message Description Suggestion No AC Connection No utility grid connected or utility grid power failure. 1. Check AC wiring and switch state, especially the ground wire. 2. Clear malfunction, Restart inverter. AC V Outrange Utility grid voltage is out of permissible range. 1. Shunt down the inverter, check grid type and voltage. 2. Insure NET model and voltage is right, Restart inverter. AC F Outrange Utility grid frequency out of permissible range. 1. Check grid frequency range. 2. Restart inverter Over Temperature Temperature outrange 1. Check the inverter operation state 2. Play down ambient temperature, Restart inverter. PV Isolation Low Insulation problem 1. Check if panel enclosure ground properly. 2. Check if inverter ground properly. 3. Check if the DC breaker gets wet. 4. Clear malfunction, Restart inverter. 5. Clear the PV array firn and desiccate. Output High DCI Output current DC offset too high Restart inverter. Residual I High Leakage current too high Restart inverter. PV Voltage High The DC input voltage is exceeding the maximum value. Disconnect the DC switch immediately. If the error message is displayed despite the above checking suggestions passed, contact dealer or Growatt. Information 58 PV isolation detection The ISO function a protection mechanism. The inverter measures the resistances between both the positive pole and negative pole of PV panel and earth. Either of the measured value is lower than the limit, the PV inverter will not connect to grid, the output relay will stay open, and show ‘PV isolation low’. The limited value is determined by the standards. The simplified principle of the isolation resistance measurement is described as below: Note: In the rain and snow weather or humid environment (humidity >90%),PV panel array equivalent resistance less than the dry environment , the inverter may appear ISO error. UL1741 require show as: GFCI function GFCI is short for Ground-Fault Circuit Interrupter which is used for preventing from being electric shock. The inverter is equipped with integrated RCD (Residual Current Protective Device) and RCM (Residual Current Operated Monitor). The current sensor will detect the volume of the leakage current and compare it with the pre-set value. If the leakage current is above the permitted range, the RCD will disconnect the inverter from the AC load. 59 Operation Modes 11.2 Errors(E) 12 12.1 Normal Mode In this mode, the inverter works normally and LED turns green. Errors(E) codes identify a possible equipment failure, fault or incorrect inverter setting or configuration. Any and all attempts to correct or clear a fault must be performed by qualified personnel. Typically, the(E) code can be cleared once the cause or fault is removed. Some of the(E) codes, Error as indicated in the table below, may indicate a fatal error and require you to contact the supplier to replace a new one. Error code 60 Description 1. Whenever the DC voltage is higher than 150Vdc, inverter converts power to grid as generated by the PV panels; 2. Whenever the DC voltage is lower than 150Vdc, the inverter will work in waiting state and attempt to connect the grid. In waiting state the inverter consumes just enough power generated by the PV panel to monitor the internal system status; Suggestion 1. Restart inverter 2. If error message still exists, contact Growatt 1. Restart inverter 2. If error message still exists, contact Growatt 1. Restart inverter. 2. If error message appears frequently or error message still exists after replacement, check utility grid. if you require help, contact Growatt 3. If error message still exists, contact Growatt Error: 100 2.5V reference voltage fault Error: 101 Communication fault Slave processor can’t receive data from Master processor. Error: 102 Consistent fault. Data received by Master and Slave processor are different. The reason can be utility grid voltage or frequency change frequently. Error: 112 AFCI fault. System PV circuitry exist arc. 1.Check the system circuitry remove fault, restart inverter. 2.If error message still exists, contact Growatt. Error: 114 AFCI Device Danage Contact Growatt. Error: 116 EEPROM fault Contact Growatt. Error: 117 Relay fault Contact Growatt. Error: 118 Init model fault Contact Growatt. Error: 119 GFCI Device Damage Contact Growatt. Error: 120 HCT fault Contact Growatt. Error: 121 Communication fault. Master processor can't receive data from Slave processor. 1.Restart the inverter 2.If error message still exists, contact Growatt.. Error: 122 Bus voltage fault Contact Growatt. The inverter starts up automatically when the DC power from the PV panel is sufficient. 12.2 Fault Mode The internal intelligent controller can continuously monitor and adjust the system status. If inverter finds any unexpected conditions such as system fault and inverter fault, the fault information will be displayed on the LCD. In fault mode the LED turns red. Detailed fault information refers to 11. Trouble shooting. 12.3 Shutdown Mode Inverters automatically stop running during periods of little or no sunlight. In shutdown mode the inverters take no power from the grid and panel, and the LCD and LED turns off. If the PV string DC voltage is too low, the inverter will also turn to Shutdown Mode. 61 13 Protection 13.3 Arc detection protect and Operation 13.1 Altitude protect The inverter uses natural convection cooling mode, if the installation site altitude of more than 2000m, the inverter may happen de-rating protection. Altitude and output Power curves reference as follows: High(m) 0m 2000m 1.1 3000m 4000m 1.05 5000m 1 6000m Pout(%) 1 1 0.925926 0.869565 0.826446 0.793651 Pout(%) 0.95 0.9 Arc-Fault Circuit Interrupter (AFCI) In accordance with the National Electrical Code®, Article 690.11, the inverter has a system for the recognition of electric arc detection and interruption. An electric arc with a power of 300 W or greater must be interrupted by the AFCI within the time specified by UL 1699B. A tripped AFCI can only be reset manually. You can deactivate the automatic arc fault detection and interruption (AFCI) via a communication product in "Installer" mode if you do not require this function. The 2011 edition of the National Electrical Code®, Section 690.11 stipulates that newly installed PV systems attached to a building must be fitted with a means of detecting and disconnecting serial electric arcs (AFCI) on the PV side. Pout(%) 0.85 Fault message 0.8 0.75 0.7 0m 2000m 3000m 4000m 5000m 6000m 13.2 Temperature protect The inverter will monitor the temperature of the heat-sink. Once the temperature exceeds 75°C (167°F) ,the system will reduce the output power until the temperature drops under the critical value. The inverter will shut down the power output to the grid if the temperature reaches 85°C (185°F). If this occasion happens often, it is necessary to check whether the inverter is mounted at an appropriate place with good ventilation and not directly exposure to the sunshine. High temperature output Power de-rating curves reference as follows: power Error NO. Eerror description Error 112 AFCI fault. System PV circuitry exist arc Error 114 AFCI device damage. Danger information Then "Error 112" Message is displayed and red LED is permanently lit and the buzzer alarms. An electric arc occurred in the PV system. The AFCI has tripped and the inverter is in permanent shutdown. The product has large electrical potential differences between its conductors. Arc flashes can occur through air when high-voltage current flows. Do not work on the product during operation. 100% Danger of fire from electric arc 50% •Only test the AFCI for false tripping in the order described below. • Do not deactivate the AFCI permanently. temperature -25 62 0 40 60 63 Operation step ☑ When the inverter error 112, please according to the following steps. c) Perform troubleshooting in the PV system : Check all PV strings for the correct open-circuit voltage. a) Turn the DC Disconnect to position "0". The PV inverter starts and performs another AFCI self-test. d) After the fault is rectified, restart the PV inverter : e) Turn the AC Disconnect to position "1". b) Turn the PV system AC Disconnect to position "0". Turn the DC Disconnect to position "1". ☑ Wait for the display to go out. c) Perform troubleshooting in the PV system : Check all PV strings for the correct open-circuit voltage. d) After the fault is rectified, restart the PV inverter : e) Turn the AC Disconnect to position "1". ☑ The PV inverter starts and performs another AFCI self-test. f) If the AFCI self-test is successful: The PV inverter switches into the "nominal" mode and the green LED is permanently lit. g) If the AFCI self-test fails: The following message appears on the display : "Error 114." Please restart the system, repeat step 1 to step 4. h) If the AFCI self-test continues to fail: Turn the DC Disconnect to position "0" and switch off the AC disconnect switch to the inverter. Turn the DC Disconnect to position "1". Contact If the AFCI self-test fails permanently, Please shutdown mode and contact the Service Line. dealer information you can refer to the warranty card. 64 65 14 Growatt Warranty Model Specifications Technical Data 15.1 Specification 5000 MTLP-US 6000MTLP-US Input data Please refer to the warranty card. 15 4000 MTLP-US Max. recommend PV power 4800W 6000W 7200W Max. DC power 4300W 5300W 6300W Max. DC voltage 600±15V 600±15V 600±15V Start voltage 150±15V 150±15V 150±15V DC nominal voltage 360±15V 360±15V 360±15V PV voltage range 100-600±15V 100-600±15V 100-600±15V MPP operating voltage range 120-500±15V 120-500±15V 120-500±15V Rated MPPT voltage range 180-480±15V 180-480±15V 100-600±15V 2/2 2/2 2/2 24A/18A 30A/18A 36A/18A Number of independent MPP trackers/strings per MPP tracker Max. input current /per MPP tracker Grid Output data Nominal AC output power (@ cosφ =1) 4000W 5000W 6000W Max. output current 16.7A 21A 25A AC nominal voltage; range 66 Default:240V single phase, optional:208 or 277 single phase , optional: 240Vsplit phase 183-228@208V 211-264V@240V 244-305@277V 67 Model Specifications 4000 MTLP-US 5000 MTLP-US 6000MTLP-US Model Specifications Grid Output data 5000 MTLP-US 6000MTLP-US Efficiency (Grid) V<0.45Un; ≤0.16S±0.08S 0.45Un<V<0.6Un; ≤11S±0.2S 0.6Un<V<0.88Un;≤21S±0.2S 1.1Un<V<1.2Un; ≤13S±0.2S V>1.2Un; ≤0.16S±0.08S abnormal voltage Clearing time adjust range 4000 MTLP-US AC grid frequency; range 60Hz; 59.5-60.5Hz abnormal frequency Clearing time adjust range 1# Under:56~60Hz/≤10S±0.08S 2# Under:56-60Hz/≤300S±0.8S 1# Over:60~64Hz/≤10S±0.08S 2# Over:60~64Hz/≤300S±8S Phase shift (cosφ ) Default: >0.99, opt Reactive power adjust / range:0.85~+0.85 THDI <3% AC connection Single phase CEC efficiency 96.5% 97% 97% MPPT efficiency 99.50% 99.50% 99.50% Protection devices DC reverse polarity protection yes DC switch rating for each MPPT yes Output over current protection yes Output overvoltage protection-varistor yes Ground fault monitoring for Split phase yes Grid monitoring yes Integrated all - pole sensitive leakage current monitoring unit yes AFCI compliant to UL 1699B yes Off-line Output (opt) Max. output power 1800VA Max. output current 15A AC nominal voltage 120V+/-10% AC grid frequency 60Hz+/-0.5 Phase shift 0.9+/-0.1 THDV <5% General Data Dimensions (W / H / D) in mm Efficiency (Grid) Max. efficiency 68 97.2% 97.5% 97.5% Type1 660*400*215 660*400*215 660*400*215 Type2 735*400*215 735*400*215 735*400*215 Type1 31Kg 31Kg 31.5Kg Type2 31.5Kg 31.5Kg 32Kg Weight 69 Model Specifications 4000 MTP-US 5000 MTLP-US 6000MTLP-US 15.2 Efficiency curve Protection devices Operating temperature range -25..+60℃/(-13...+ 140℉) with de-rating above 45℃(113℉) Noise emission (typical) ≤ 25 dB(A) Altitude Up to 2000m(6560ft) without power de-rating Relative humidity 100% Consumption: standby/ night <5W / < 0.5 W Topology Transformer-less Cooling concept Natural Enclosure Type 3R GROWATT 4000 MTLP-US @240Vac Features DC connection: Smart meter for Type2 Screw terminal opt opt AC connection: Screw terminal display LCD opt GROWATT 5000 MTLP-US @240Vac Interfaces: 70 Type1:RS485/RS232/RF/ WIFI /Ethernet yes/yes/opt/opt/opt Type2:RS485/WIFI/Zigbee /Ethernet/GPRS yes/opt/opt/opt/opt Warranty: 10 years / 15 years yes /opt Certificates and approvals UL1741,UL1998 ,IEEE 1547, CSA C22.2 No.107.11,FCC Part15(Class A&B),UL1699B GROWATT 6000 MTLP-US@240Vac 71 Download address 16 Download address 17 15.3 Torque www.ginverter.com/Download.aspx Shell and RS232 screws 12kg.cm DC/AC terminal 12kg.cm M6 soket head cap screws for securing the enclosure at the bracket 20kg.cm Additional ground screws 20kg.cm 15.4 Optional accessories In the following table you will find the optional accessories or optional integrated function module for your product. If required, you can order these from SHENZHEN GROWATT NEW ENERGY TECHNOLOGY CO.,LTD or your dealer. Type1 inverter optional accessories and function Name Brief description WI-FI Wireless monitor device WebBox Data logger Vision Wireless monitor device Ethernet Integrated function Shinelan Monitor device Type2 inverter optional accessories and function 72 Name Brief description WebBox Data logger Ethernet Integrated function Zigbee Integrated Wireless communication module GPRS Integrated Wireless communication module Meter Integrated function If you have technical problems about our products, contact the Growatt Service line. We need the following information in order to provide you with the necessary assistance: Inverter type Serial number of the inverter Event number or display message of the inverter Type and number of PV modules connected Optional equipment Manufacturer: GROWATT NEW ENERGY TECHNOLOGY CO.,LTD Address: No. 28 Guangming Road, Longteng Community,Shiyan, Baoan District, Shenzhen, P.R. China Serviceline T: + 86 755 2747 1942 F: + 86 755 2747 2131 E: [email protected] 73