1
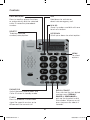
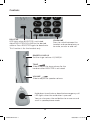
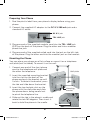
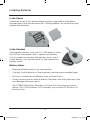
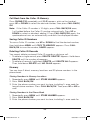
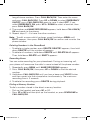
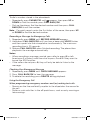
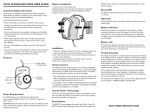
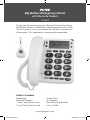
Big Button Emergency Phone
with Remote Pedant
PT3802
Thank you for purchasing your Remote Dialing/Answering
Big Button Phone. Combining a speakerphone and a Caller
ID unit in one system, your phone can display available call
information. This telephone is hearing aid compatible.
What’s Included
Telephone
Remote Pendant
7 feet Long Phone Cord
7 inch Short Phone Cord
Coiled Cord
AC Adapter
Wall Mounting Bracket
User’s Guide
www.leiproducts.com
PT3802-OM-EN.indd 1
04/08/2008 11:53:15 AM
Contents
Important Safety Instructions ............................................................................. 3
Controls..................................................................................................................... 4
Preparing Your Phone ........................................................................................... 6
Mounting the Phone .............................................................................................. 6
Installing Batteries ................................................................................................. 7
In the Phone ......................................................................................................................7
In the Pendant ..................................................................................................................7
Battery Notes ....................................................................................................................7
Setting Your Phone ................................................................................................ 8
Setting the Remote Pendant ......................................................................................8
Making calls ............................................................................................................. 9
Caller ID .................................................................................................................... 9
Call Back from the Caller ID Memory .....................................................................10
Saving Caller ID Numbers ...........................................................................................10
Deleting Caller ID Records .........................................................................................10
Memory .................................................................................................................... 10
Storing Numbers in Memory Locations ................................................................10
Storing Numbers in the Phone Book .....................................................................10
Deleting Numbers in the PhoneBook .................................................................... 11
Recording Name ............................................................................................................. 11
Dialing a Memory Number.......................................................................................... 11
Recording a Message for Emergency Calls .........................................................12
Checking Your Emergency Message ......................................................................12
Using the Emergency Call ..........................................................................................12
Cautions ................................................................................................................... 13
Industry Canada Statement (CS03) ................................................................. 14
Industry Canada Statement (RSS 210) ............................................................ 15
Limited One-year Warranty ................................................................................ 16
2
PT3802-OM-EN.indd 2
04/08/2008 11:53:15 AM
Important Safety Instructions
When using your telephone equipment, basic safety precautions should
always be followed to reduce the risk of fire, electric shock and injury to
persons, including the following:
1. Do not use this product near water, for example, near a bath tub,
wash bowl, kitchen sink or laundry tub, in a wet basement or near a
swimming pool.
2. Avoid using a telephone (other than a cordless type) during an
electrical storm. There may be a remote risk of electric shock from
lightening.
3. Do not use the telephone to report a gas leak in the vicinity of the leak.
4. Use only the power cord and batteries indicated in this manual. Do
not dispose of batteries in a fire. They may explode. Check with local
codes for possible special disposal instructions.
Save these instructions!
3
PT3802-OM-EN.indd 3
04/08/2008 11:53:15 AM
Controls
SOS
Hold down to activate or
deactivate emergency call.
CALL BACK/OK
Press to confirm phone functions
or automatically dial the selected
caller ID record or phonebook
number.
MI & M2
Store 2 numbers and dial with one
touch of a button.
DELETE
To delete selected
number/name/option.
UP/DOWN
Scroll up or down to select option.
MENU
To select
options.
PHONE/CID
Switch between phone book and
Caller ID when in standby mode.
REDIAL/PAUSE
Press to view the last dialed
number, press REDIAL/
PAUSE or SPKPHONE or
pick up the handset to dial
the number. When on a call,
press to pause for about 4
seconds.
FLASH
Press to produce a switchhook
signal for special services or to
disconnect the current call.
4
PT3802-OM-EN.indd 4
04/08/2008 11:53:16 AM
Controls
BOOSTER
LED lights when BOOSTER is activated.
Adjust BOOSTER/VOLUME for the desired
volume. Press BOOSTER again to deactivate.
This function is for the handset only.
SPKPHONE
Press to switch between the
handset and speakerphone, or
to make, answer or end call.
RINGER LO MID HI
Set the ringer volume: LO/MID/HI.
TONE
Slide to adjust the tone volume for the
handset when BOOSTER is activated.
VOLUME
Slide to adjust the speaker volume.
Hold down to activate or deactivate emergency call.
LED lights when the red button is pressed.
You can also press the red button to answer or end
a call in speakerphone mode.
5
PT3802-OM-EN.indd 5
04/08/2008 11:53:16 AM
Preparing Your Phone
1. Peel the plastic label from your phone’s display before using your
phone.
2. Connect the supplied AC adapter to the DC 9 V 200 mA jack and a
standard AC outlet.
DC 9 V jack
TEL LINE jack
3. Plug one end of the supplied modular cord into the TEL. LlNE jack
(RJ11) on the back of the phone. Plug the other end into a modular
phone line jack.
4. Plug one end of the supplied coiled cord into the jack on the left side
of the phone. Plug the other end into the modular jack on the handset.
Mounting the Phone
You can place your phone on a flat surface or mount it on a telephone
wall plate (not included). To mount it on the wall:
1. Connect one end of the short phone
cord to the telephone wall plate and
the other the telephone.
Wall plate
2. Insert the supplied mounting bracket
into the slots on the back of the
phone and push the bracket up until
it clicks. To detach the bracket, press
the tab and slide down the bracket.
3. Insert the two keyhole slots on the
phone with the wall plate and slide
the phone down, being careful not
to pinch the telephone line.
Tab
Mounting
bracket
4. Slide out the tab in the phone’s cradle and
rotate the tab 180 degrees. Then insert it
back to hold the phone in the cradle.
Tab
6
PT3802-OM-EN.indd 6
04/08/2008 11:53:16 AM
Installing Batteries
In the Phone
(Optional) Insert 4 AA alkaline batteries (not supplied) in the battery
compartment with correct polarities. When appears or the display dims,
replace the batteries.
In the Pendant
Your pendant comes with one 12 V A23 battery, when
the LED on the pendant dims, replace the battery.
Use a screwdriver to open the battery cover, insert
a new battery with correct polarity, and replace the
battery cover.
Battery Notes
• Replace batteries quickly to save records.
• Use only fresh batteries of the required size and recommended type.
• Do not mix batteries of different sizes or chemistries.
• Always remove old or weak batteries. Batteries can leak chemicals that
can damage electronic parts.
• The PT3802 Big Button Emergency Phone will work during a power
failure. The 4 AA batteries (not included) will provide 30~40 hours of
back up time.
7
PT3802-OM-EN.indd 7
04/08/2008 11:53:17 AM
Setting Your Phone
After your phone is powered on, system information appears in the
display.
1. Press MENU. LCD CONTRAST appears in the display. Press CALL
BACK/OK to display the current level, then press UP/DOWN to select
one of five settings. Press CALL BACK/OK to confirm and go to time
and date setting. TIME/DATE appears.
2. Press CALL BACK/OK to display the time, then press UP/DOWN
to set the time, month and date. Press CALL BACK/OK to confirm.
LANGUAGE appears.
3. Press CALL BACK/OK to display the current language, then press
UP/DOWN to select the desired language. Press CALL BACK/OK to
confirm and go to voice setting. VOICE appears.
4. Press CALL BACK/OK to display the language, then press UP/DOWN
to select the desired language or VOICE OFF. Press CALL BACK/OK
to confirm.
5. Repeatedly press MENU until FLASH appears, press CALL BACK/OK
to display the current setting, then press UP/DOWN to select flash
time. Press CALL BACK/OK to confirm and go to tone/pulse setting.
6. TONE/PULSE appears, press CALL BACK/OK to display the current
setting, then press UP/DOWN to select tone or pulse 40/60 setting.
Press CALL BACK/OK to confirm.
Notes:
• If you do not press a button within 20 seconds, the phone returns to
the standby mode, or press PHONE/CID to return to standby mode.
• The default setting for voice is English, if you select other languages,
the phone will announce the phone number, digits and phone/CID
only.
Setting the Remote Pendant
The phone comes with one remote pendant for emergency, you can pair
up to 5 pendants to your phone, FULL appears if you pair the 6th pendant.
To pair the pendant to your phone:
1. Repeatedly press MENU until REMOTE PENDANT appears, press CALL
BACK/OK, press UP/DOWN to pair (PAIRING appears) or cancel
pairing (DELETE? appears) your pendant.
8
PT3802-OM-EN.indd 8
04/08/2008 11:53:17 AM
2. To pair your pendant to your phone, select PAIRING, press CALL
BACK/OK on the phone, PAIRING... appears, press the red button on
the pendant. If the pendant is successfully paired, PAIRED appears, if
not, PAIRING FAILURE would appear.
3. To cancel, select DELETE? and press CALL BACK/OK to confirm.
Making calls
Press SPKPHONE to switch between the handset and speakerphone for
convenient hands-free use. To end a call, press SPKPHONE again.
When on a call, press SPKPHONE to make or answer calls.
Caller ID
Your phone stores up to 64 Caller IDs. If you subscribe to Caller ID
service, your phone displays the following call information:
• Caller’s phone number - Your phone displays up to 14 digits. If the
number is longer, the display shows only the last 14 digits.
• Time and date of the call.
• Caller’s name (if you have this service).
If the Caller...
Display Shows
New number not previously displayed
NEW
Call more than once
REPEAT
Blocked number or name
PRIVATE
No information sent (International or PBX call)
UNAVAILABLE
Calling from long distance
LONG DISTANCE
Invalid or uncompleted Caller ID
LINE ERROR
Your phone stores the caller information. To see Caller ID records,
repeatedly press UP or DOWN.
Note: The Caller ID’s time and date can update the time on you phone.
9
PT3802-OM-EN.indd 9
04/08/2008 11:53:17 AM
Call Back from the Caller ID Memory
Press PHONE/CID repeatedly until CLIP appears, pick up the handset,
press UP or DOWN to select the desired number, then press CALL BACK/
OK.
Note: If the Caller ID number is 10 digits, press CALL BACK/OK once,
1 will added before the Caller ID number automatically. Press UP or
DOWN to select or deselect adding 1. Press CALL BACK/OK again, the
speakerphone turns on automatically and dials the displayed number.
Saving Caller ID Numbers
To save a Caller ID number, use UP or DOWN to find the desired number,
then hold down MENU until COPY TO MEMORY appears. Press CALL
BACK/OK to save the number, SAVED appears.
Deleting Caller ID Records
You cannot delete unviewed Caller ID records or during a call.
• To delete a single record, press DELETE. DELETE? appears. Hold down
DELETE until the number disappears.
• To delete all records, hold down DELETE until DELETE ALL? appears.
Then, hold down DELETE until NO CALLS appears.
Memory
You can store 2 direct memory locations and 30 phone numbers in the
phone book.
Storing Numbers in Memory Locations
1. Repeatedly press MENU until STORE NUMBER appears.
2. Press CALL BACK/OK.
3. Enter the phone number you want to store, including 1+ area code for
long distance numbers. Press CALL BACK/OK. Then press M1 or M2 to
save.
Storing Numbers in the Phone Book
1. Repeatedly press MENU until STORE NUMBER appears.
2. Press CALL BACK/OK.
3. Enter the phone number you want to store, including 1+ area code for
10
PT3802-OM-EN.indd 10
04/08/2008 11:53:17 AM
long distance numbers. Press CALL BACK/OK. Then enter the name
and press CALL BACK/OK. Press UP or DOWN to select EMERGENCY
ON/OFF, press CALL BACK/OK again to save if select OFF. If you
select EMERGENCY ON, press UP or DOWN to select a location, then
press CALL BACK/OK.
4. The number and NAME RECORDING appears, hold down CALL BACK/
OK and speak to the phone.
5. Repeat steps 3 ~ 4 to save the other numbers.
Note: To edit a name which has been saved, hold down MENU until
EDIT? appears, then press CALL BACK/OK to confirm and re-enter the
phone number.
Deleting Numbers in the PhoneBook
• To delete a single number, press DELETE, DELETE? appears, then hold
down DELETE until the number disappears.
• To delete all numbers, hold down DELETE until DELETE ALL? appears.
Then, hold down DELETE until EMPTY appears.
Recording Name
You can make recording for your phonebook. During an incoming call,
your phone will announce the caller’s name instead of the phone number.
1. Repeatedly press MENU until NAME RECORDING appears.
2. Press CALL BACK/OK, then press UP or DOWN to find the desired
number.
3. Hold down CALL BACK/OK until you hear a beep and VOICE flashes
and then speak into the microphone simultaneously. The maximum
recording time is 3 seconds.
4. To delete the recording, press DELETE during playback.
Dialing a Memory Number
To dial a number stored in the direct memory location.
• Pick up the handset and press M1 or M2.
• Press M1 or M2 and then pick up the handset, or press SPKPHONE or
CALL BACK/OK.
11
PT3802-OM-EN.indd 11
04/08/2008 11:53:17 AM
To dial a number stored in the phonebook:
• Repeatedly press PHONE/CID until
appears, then press UP or
DOWN to find the number, press CALL BACK/OK.
• Pick up the phone, find the desired number and then press CALL
BACK/OK to call the number.
Note: For quick search, enter the first letter of the name, then press UP
or DOWN to find the desired number.
Recording a Message for Emergency Calls
1. Repeatedly press MENU until RECORD MESSAGE appears.
2. Hold down CALL BACK/OK until you hear a beep and VOICE flashes
and then speak into the microphone simultaneously. The maximum
recording time is 20 seconds.
3. Release CALL BACK/OK when finished recording. The phone then
playbacks the message automatically.
Notes:
• When recording a message, remind your caller to press 0 to talk
(maximum 3 minutes), and then also to press 1 and 2 if they want to
cancel the SOS function.
• If the callers do not press 0, they will only be able to listen to the
message.
Checking Your Emergency Message
1. Repeatedly press MENU until CHECK MESSAGE appears.
2. Press CALL BACK/OK to hear the message.
3. To delete the recording, press DELETE during playback.
Using the Emergency Call
When programming emergency numbers and (or) making test calls:
• Remain on the line and briefly explain to the dispatcher the reason for
the call.
• Perform such activities in the off-peak hours, such as early morning or
late evenings.
12
PT3802-OM-EN.indd 12
04/08/2008 11:53:18 AM
CAUTIONS
• To ensure proper operation, this equipment must be installed
according to the enclosed installation instructions. To verify that the
equipment is operating properly and can successfully report an alarm,
this equipment must be tested immediately after installation, and
periodically thereafter, according to the enclosed test instructions.
• This equipment cannot report an alarm when other equipment
(telephone, answering system, computer modem, etc.) is connected to
the same phone line is in use.
1. Pair your pendant to your phone. (See Setting the Remote Pendant)
2. Save phone numbers with EMERGENCY ON. (See Storing Numbers in
the PhoneBook).
3. Hold down the red pendant button or SOS. The phone beeps for about
15 seconds then dials the first emergency number automatically. The
phone will announce your recording.
Notes:
• If there is no response from the 1st emergency call, or if the 1st caller
does not press 1 and 2, the phone will dial the next number.
• If you do not record a message, the phone will announce the default
emergency message when you press SOS or the pendant.
• If the emergency calls receive no response, the phone automatically
redials the numbers 10 minutes later.
• The maximum operating range of the pendant is about 100 feet.
• The PT3802 Big Button Emergency Phone will work during a power
failure. The 4 AA batteries (not included) will provide 30~40 hours of
back up time.
13
PT3802-OM-EN.indd 13
04/08/2008 11:53:18 AM
Industry Canada Statement
INDUSTRY CANADA CS03 STATEMENT
This product meets the applicable Industry Canada technical
specifications. This is confirmed by the registration number. The
abbreviation, IC before the registration number signifies that registration
was performed based on a Declaration of Conformity indicating that
Industry Canada technical specifications were met. It does not imply that
Industry Canada approved the equipment.
Before installing this equipment, users should ensure that it is permissible
to be connected to the facilities of the local telecommunications
company. The equipment must also be installed using an acceptable
method of connections. The customer should be aware that compliance
with the above conditions may not prevent degradation of service in
some situations. Repairs to certified equipment should be made by an
authorized Canadian maintenance facility designated by the supplier. Any
repairs or alterations made by the user of this equipment, or equipment
malfunctions, may give the telecommunications company cause to
request the user to disconnect the equipment.
WARNING! Users should not attempt to make such connections
themselves but should contact the appropriate electric inspection
authority, or an electrician, as appropriate.
CAUTION: The Ringer Equivalence Number (REN) assigned to each
terminal device provides an indication of the maximum number of
terminals allowed to be connected to a telephone interface. The
termination on an interface may consist of any combination of devices
subject only to the requirement that the sum of the Ringer Equivalence
Numbers of all the devices does not exceed 5. An alternative indication
of the REN is the Load Number (LN); this number should be divided by
20 to approximate the equivalent REN. The REN Number of this unit is
indicated on the bottom of your telephone.
14
PT3802-OM-EN.indd 14
04/08/2008 11:53:18 AM
Industry Canada Statement
INDUSTRY CANADA RSS 210 NOTICE: CLASS B LIMITS
WITH INTERFERENCE STATEMENT
This equipment complies with the limits of a Class B digital device as
specified in Industry Canada Regulations. These limits provide reasonable
protection against radio and TV interference in residential areas. However,
this device might cause radio or TV interference even when it is operating
properly.
Operation is subject to the following two conditions: (1) This device may
not cause interference, and (2) this device must accept any interference
including interference that may cause undesired operation of the device.
To eliminate the interference, you can try one or more of the following:
• Reorient or relocate the receiving antenna.
• Move your device away from the receiver.
• Connect your device to an outlet that is on a different electrical circuit
from the receiver.
This digital apparatus does not exceed the Class B limits for radio noise
emissions from digital apparatus.
15
PT3802-OM-EN.indd 15
04/08/2008 11:53:18 AM
Warranty
LEI ELECTRONICS INC. LIMITED WARRANTY
LEI Electronics Inc warrants that this product will be free from defects in
materials and workmanship for a period of one (1) year from the date of
purchase. Within this period, simply take the product and your proof of
purchase to place of purchase and the product will be repaired without
charge for parts and labour. LEI Electronics Inc reserves the right to
charge for transportation. Any product which has been subject to misuse
or accidental damage is excluded from this warranty.
While this warranty does not confer any legal rights other than those set
out above, you may have additional statutory rights which will vary under
the laws of the various countries, states, province and other governmental
entities in which LEI Electronics Inc operates. This warranty is subject to
all statutory rights you may have in the country of purchase.
For product support please contact
www.leiproducts.com or 1-800-449-3315.
Custom Manufactured in China for
LEI Electronics Inc,
Barrie, Ontario, Canada L4N 8Y1
Limited Warranty/Garantie Limitée
U.S.A & Canada
LEI Electronics Inc. All Rights Reserved.
16
PT3802-OM-EN.indd 16
04/08/2008 11:53:18 AM