1
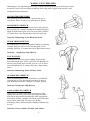
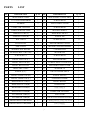
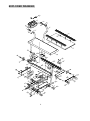
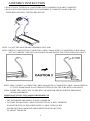
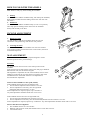
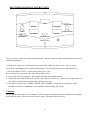
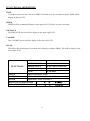
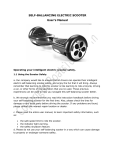
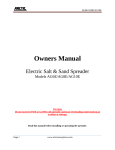
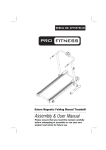
FOLDABLE MOTORIZED TREADMILL
CAUTION︰
User’s weight limitation 220lbs (100kg).
WARNING︰
Please consult your physician before starting any exercising. Porper usage of this
product in essential. Please make sure you have read carefully and understood your
manual before exercising.
IMPORTANT SAFETY PRECAUTIONS:
1. This product in suitable for home use only. It is not for commercial or club use.
2. Please read all instructions and manual carefully before workout.
3. Always check every bolts and nuts have been fastened properly and tightly before
workout.
4. For safety reason, please keep your small children away from this product while
you are exercising. Unless with adults around, never let your children work on this
equipment along.
5. Please make 5 minutes warm-up before workout or training program. And give
Yourself 5 minutes to get back the normal breath before stop the workout.
6. Keep your breath speed normally while workout and increasing gradually the speed
of your breath according to your program. Don’t hold your breath while workout.
7. Ultimately, you’ll be able to exercise continuously for 30 minutes. But for
beginners, it’s suggested to start slowly from few , minutes of workout for twice a
week. Gradually increasing your speed and time to 4 or 5 times per week..
8. Resting for a day or two between workouts. It prepares your body for more
strenuous exercise by heating up and stretching out your muscles , increasing your
blood circulation and pulse rate and delivering more oxygen to your muscles.
9. Please remove all the jewelry such as ring, necklace, bracelet or brooch before
workout.
10. Always wear proper clothing and athletic shoes while exercising. Do not wear
loose or flowing clothing that could be caught while workout.
1
WARM - UP GUIDELINES
Warming up is an important part of every workout. Warming up prepares the body for more
strenuous exercise by increasing circulation, delivering more oxygen to the muscles, and
raising the body temperature.
SUGGESTED STRETCHES
The following stretches provide a good warm-up, or
cool-down. Move slowly as you stretch-never bounce.
HAM STRING STRETCH
Sit with one leg extended. Bring the sole of the opposite
Foot toward you, resting it against the extended leg inner
thigh. Stretch toward your toe as far as possible, hold for
15 counts, then relax. Repeat three times for both legs.
Stretches: Hamstrings, lower Back and Groin
INNER THIGH STRETCH
Sit with the soles of your feet together and knees pointing
outward. Pull your feet as colse into the groin area as
possible. Hold for 15 counts, then relax. Repeat three times.
Stretches:
Quadriceps, Hip Muscles
TOE TOUCHES
Standing with your knees bent slightly, slowly bend
forword from the hips. Allow your back and shoulders to
relax as you stretch down toward your toes. Go as far as
you can and hold for 15 counts, then relax. Repeat three
times.
Stretches: Hamstrings, Back of Knees, Back
QUADRICEPS STRETCH
With one hand against a wall for balance, reach behind
you and pull up your foot. Bring your heel as close to
your buttocks as possible. Hold for 15 counts. Repeat.
Stretches: Quadriceps, Hip Muscles
CALF/ACHILLES STRETCH
With one leg in front of the other and arms out, lean
against the wall. Keep your back leg straight and back
foot flat on the ground; then bend the front leg and lean
forward by moving your hips toward the wall. Hold, then
repeat on the other side. To cause even further
stretching of the Achilles tendons, slightly bend back leg
as well.
Stretches: Calves, Achilles Tendons, and Ankles
2
PARTS
LIST
NO.
DESCRIPTION
Q'TY
NO.
DESCRIPTION
Q'TY
1
MONITOR BC-85040
1
29
ADJUSTABLE TUBE(LARG)
1
2
ㄇ STYLE HANDLEBAR
1
30
SCREW M8*20
2
3
RUBBER
4
31
ADJUSTABLE LEVER
1
4
COMPUTER LINE 600L
1
32
SCREW M8*40
4
5
COMPUTER LINE 1200L
1
33
MOVING WHEEL
2
6
UPRIGHT TUBE (L)
1
34
REAR ROLLER SET
1
7
UPRIGHT TUBE (R)
1
35
SCREW M8
4
8
BOLT M6*8
10
36
SCREW #8*1/2"
14
9
SAFETY KEY
1
37
MOYOR FRONG COVER
1
10
SIDE PANEL
2
38
MOTOR CONTROL BOARD
1
11
WOOD PLATE 480×900
1
39
CONTROLLER
1
12
RUNNING BELT 340×2185
1
40
MOTOR 1HP
1
13
SCREW M6*75
4
41
SCREW M8*45
4
14
FRONT END CAP (L)
1
42
MOTOR FRAME
1
15
FRONT END CAP (R)
1
43
TUBE PLASTIC COVER 30X
2
16
FRONT ROLLER SET
1
44
MOTOR BOTTOM COVER
1
17
DRIVE BELT 584J7
1
45
WASHER 3/8
2
18
SCREW #10*1"
8
46
AIR CYLINDER 45KGS
1
19
FRONT-UPPER CAP (R)
1
47
SCREW M10X65
2
20
FRONT-UPPER CAP (L)
1
48
STANDING FRAME
1
21
REAR END UP CAP(L)
1
49
FRONG WHEEL
2
22
REAR END UP CAP(R)
1
50
FRAME PAD
2
23
REAR END COVER(L)
1
51
SAFETY KEY
1
24
REAR END COVER(R)
1
52
COMPUTER LINE 600L
1
25
ALUMINUM TUBE(L)
1
53
ELEVATOR
2
26
ALUMINUM TUBE(R)
1
54
AN ACTIVITY POLE OF FOOT
1
27
ADJUSTABLE TUBE SHEET
1
55
A HORIZONTAL POLE OF FOOT
1
28
ADJUSTABLE TUBE(SMAL)
1
56
FOOT WHEEL
2
3
EXPLODED DRAWING
4
ASSEMBLY INSTRUCTION
˙DO NOT FULLY TIGHTEN ALL FASTENERS UNTIL ASSEMBLY IS NEARLY COMPLETE.
˙DO NOT PLUG IN POWER SUPPLY UNTIL ASSEMBLY IS COMPLETE MAKE SURE ALL
FASTENERS ARE WELL TIGHTEN BEFORE USE
STEP1. LOCATE THE MAIN FRAME ASSEMBLY ON FLOOR.
STEP2. FIRSTLY,CONNECTTING#5 COMPUTER CABLE 1200mm WITH #52 COMPUTER CABLE 600mm.
PUT #6#7 UPRIGHT TUBE INTO #48 STADING FRAME.FASTEN THE TUBE WITH#8 M6*8 BOLT.
STEP3.THEN CONNECT #4 COMPUTER CABLE 600mmWITH #5 COMPUTER CABLE 1200mm.INSERT#2
“ㄇ”STYLE HANDLEBAR TO #6#7UPRIGHT TUBE.FASTEN THE TUBE WITH #8 M6*8BOLT.
STEP4. INSERT THE SAFETY KEY TO THE HOLE OF MONITOR.THE MOTORIZED TREADMILL
IS NOW ASSEMBLED.
INSERT SAFETY KEY INTO MONITOR BEFORE USE
STEP5. TIGHTEN ALL FASTENERS.
˙THE MOTORIZED TREADMILL IS NOW ASSEMBLED.
˙TO START THE MACHINE. CHECK THE SAFETY KEY IS WELL INSERTED
IN MONITOR.PLUG IN THE POWER SUPPLY CABLE, TURN ON THE
POWER SWITCH ON MONITOR. PRESS SPEED UP/DOWN BUTTON
TO ADJUST THE SPEED
5
HOW TO FOLD THE TREADMILL
Note: Remove safety key before folding the treadmill.
1. Fold up
Use both hands to hold the treadmill firmly, then fold up the treadmill,
Keep raising treadmill until the folding release rack well click into
The frame.
2. Fold down
Use both hands to hold the treadmill firmly (in rear cover position),
Then step upon the folding release rack.Lower the treadmill
Slowly and carefully to the floor.
INCLINE ADJUSTMENT
1. Raising elevation
Use both hands to hold end of treadmill. Raise the rear end
Of machine until gradient leg click into the next position.
2. Lowering elevation
Use both hands to hold end of treadmill. First raise the machine
To it’s highest incline position then lower to max incline, then raise
To the desired position.
MAT ALIGNMENT
The treadmill mat must be correctly adjusted aligned to ensure
Smooth operation and to prevent damage.
Procedure
The treadmill mat must run close to the central position of the
treadmill.
If the gap between the mat and the side foot rail (mat gap) is different
Between each side, the mat must be aligned.
Mat alignment is adjusted at the end of the treadmill, however if the
Difference in the mat gap is greater at the front (motor end) of the
Treadmill then the front roller will have to be adjusted first.
See Front Roller Adjustment
Switch on the treadmill at a slow speed (4-6km).
If the treadmill mat has moved to the left hand side;
1. turn the left mat adjustment bolt-clockwise 1/2 a turn.
2. If more adjustment is necessary, turn the right hand
Adjustment belt anti clockwise 1/2 a turn.
If more adjustment is required, repeat, steps 1 and then 2
Any final adjustments should be made with 1/4 of a turn.
If the treadmill mat has moved to the right hand side;
1. turn the right mat adjustment bolt-clockwise 1/2 a turn.
2. If more adjustment is necessary, turn the left-hand adjustment belt anti clockwise 1/2 a turn.
If more adjustment is required, repeat steps 1 and then 2. Any final adjustments should be made with 1/4 of a turn.
Factors that effect mat alignment.
1. The treadmill must be on a level surface.
2. Walking with an uneven stride, Mat should return to centre after exercise.
3. Correct mat tension.
6
FRONT ROLLER ADJUSTMENT
Adjusting the front roller can have 2 effects.
1.
Drive belt tension,
2.
Mat alignment
Drive belt tension procedure
The drive belt tension must be adjusted first. With light to moderate force applied with the thumb and forefinger, the drive
belt should be able to be twisted 45°.
If this is done easily then the tension must be decreased.
Now the front roller can be aligned.
Procedure
Make sure the treadmill is switched off and unplugged.
To increase drive belt tension, turn the roller alignment bolt(at the drive belt end) clockwise.
To decrease drive belt tension, turn then roller alignment bolt anti clockwise.
Mat alignment procedure
If the treadmill mat has moved away from the drive belt side;
1.
turn the adjacent mat adjustment bolt clockwise 1/2 a turn.
If more adjustment is required, repeat step 1.
Any final adjustments should be made be made 1/4 of a turn.
Mat tension
Correct mat tension must be maintained to ensure
smooth operation and to avoid premature wear.
Procedure
Make sure the treadmill is switched off.
Increase mat tension:
Turn both mat alignments bolts clockwise 1 turn.
Decrease mat tension:
Turn both mat alignments bolts anticlockwise 1 turn.
Place each hand centrally on each side of the treadmill mat, using your fingers loft the mat in the air using light pressure.
The mat should lift approximately 3 cm from the deck. If it is more then you must increase mat tension. Of it is less, you
must decrease mat tension.
Another procedure is to reduce the belt tension until you can feel the mat slipping when you walk run (do not labour the
treadmill or stomp your feet when testing for this, exercise as you would normally). Now increase the tension one full turn
at a time until this slipping feeling disappears.
This procedure will not work correctly of you have just lubricated the mat and deck.
7
MONITOR OPERATION INSTRUCTION
TIME
UP
SPEED
SPEED UP
DISTANCE
DOWN
SPEED DOWN
CALORIES
START/STOP
PULSE
MODE/RESET
SAFETY KEY
For your safety , please step on the both side panel , and place both of hands on the hand bar before you
push the start button .
A. Plug in the safety key , and then press the start button .(Push one time to start , twice to stop .)
B. Press the speed button to accelerate and decelerate .Or press the button on the right handle bar .
C. Press the button “STOP” or pull out the safety key to stop .
D. Press Reset for 2 seconds , the value will go back to zero .
E. If you didn’t use for 4 minutes , the monitor will shut down automatically .
F. If the pulse was not detected in 16 seconds , the window will show “p” , this is for save the power . If
you want to start the heart rate function , please press reset .
G. You can set up the value of TIME , SPEED , and COLORIE . It will start to count down . This
treadmill will stop as countdown is over and the buzzer warning “BI’ sound .
Caution:
Please clip the safety key on your clothes ; it will be plug out and shut down the treadmill if you cannot
keep with the speed . When you need to start it again , just plug in the safety key .
8
FUNCTIONS & OPERATIONS
TIME
If you have not preset any value, then TIME will count up in one-second increment. TIME will be
display in the top LCD.
SPEED
SPEED will be permanently display on the upper left LCD while you are exercising.
DINTANCE
The DISTANCE traveled will be display in the upper right LCD.
CALORIE
The CALORIE traveled will be display in the lower left LCD.
PLUSE
This allows the monitoring of your heart rate in beats per minute (BPM). This will be display in the
lower right LCD.
FUNCTIONS
TIME
00:00~99:59
CURRENT SPEED
0~99.9 MILE/H OR KM/H
TRIP DISTANCE
0.0~99.9 MILES OR KMS
CALORIE
0.0~99.9 Kcal
PULSE
40~240 BPM
DISPLAY
LIQUID CRYSTAL TYPE
CONTROLLER
4 BIT, 1 CHIP MICROPROCESSOR
SENSOR
MAGNETIC, NON-CONTACT
0℃~40℃ (32℉~104℉)
OPERATING TEMPERATURE
STORAGE TEMPERWATURE
10℃~60℃
9
(14℉~140℉)
TREADMILL LUBRICATION INSTUCTIONS
For treadmills lubricated with silicon
1.
using a clean towel, slide it between the running mat and the bed of the treadmill, at the motor end, so that one end of
the towel hangs over each side of the machine,
2.
stand on the treadmill with one foot holding each end of the towel. Run the machine at about 1.6 km/h for 20 seconds,
this effectively cleans the underside of the running mat.
3.
while still standing on the towel, stop the treadmill. Grasp each end of the towel and gradually pull it back towards the
rear of the machine using a zig-zag pattern, When you reach the rear roller, pull the towel out to one side of the
treadmill. This action cleans the bed of the treadmill.
4.
take the container of lubricant and fill the syringe with 3ml of the silicon supplied, Attach the plastic tube to the end of
the syringe, apply half of the lubricant (1.5ml)to the treadmill bed at point about one-third of the way in from the left
side of the running mat and about 7.5cm(3”)back from the motor cover, Repeat this procedure under the right side of
the treadmill mat.
5.
Walk on the treadmill for two minutes at about 5 km/h, to spread the lubricant.
6.
Only of required, adjust the running mat tension as per directions in the owner ’s manual. Do not over-tighten as this
will decrease the life of the mat and place undue stress upon the roller bearings.
7.
If the mat appears to be slipping and is not corrected with minor tension adjustment, please check the tension of the
main drive belt(connection motor to front roller).Refer to the owner’s manual for instructions.
8.
If you are uncertain of any procedure or lack the correct tools, please contact your distributor. We recommend that any
work involving the removal of the motor cover be carried out by a technician,
SILICONE SPRAY WARNING
KEEP OUT OF REACH OF CHILDREN!
If swallowed or sprayed directly on face, seek medical advice.
NOTE: this product may cause damage or loss if used otherwise than strictly in accordance with the directions for its use.
This product is sold only subject to these conditions and upon the basis that it is used solely at the purchaser’s own
risk and the manufacturers and distributors hereby exclude themselves from all liability in relation to this product
howsoever arising.
TREADMILL CARE INSTRUCTIONS
1. Clean and lubricate the bed of the treadmill every 20 hours of use or monthly, which ever comes first (see
treadmill lubrication instructions). Daily cleaning to the sides of the running mat will prevent much of the dirt from
getting underneath the mat.
2. Ensure that fluids are not spilt on the treadmill console or running mat.
10