Transcript
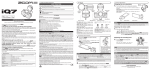
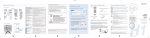
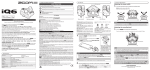
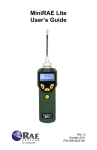
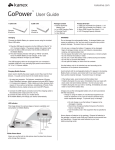
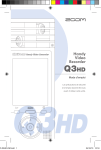
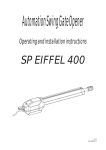
Usage and Safety Precautions
Part Names
SAFETY PRECAUTIONS
M-S stereo mic
In this manual, symbols are used to highlight warnings and cautions that you must read to prevent accidents.
The meanings of these symbols are as follows:
Warning
Caution
R
R
Something that could cause serious injury or death.
Audio position
Something that could cause injury or damage to the equipment.
L
L
Video position
NOTE
Other symbols
• Hold the
to the connected device tightly to prevent disconnection when using its switches or changing
its mic orientation. Use of excessive force could cause disconnection and even damage the connector.
Required (mandatory) actions
Prohibited actions
Warning
Warning
OPERATION MANUAL
© 2013 ZOOM CORPORATION
Copying or reproduction of this document in whole or in part without permission is prohibited.
Thank you very much for purchasing the ZOOM
has the following features.
The
.
• High quality mic that connects with iPhones, iPods and iPads
This stereo mic can be connected to an iPhone (5 or later), iPod touch (5th generation),
iPad (4th generation), iPad Air or iPad mini, and used for high-quality recording with apps
that support microphone input.
Note: In this manual, we refer to all of these devices as “the connected device” or “the iOS device.”
Usage Precautions
The mid-side (M-S) stereo mic design has a directional mid mic that covers the front
and a bidirectional side mic that covers the sides. By adjusting the level of the side mic
signal you can change the stereo width of the sound as you like.
• Two modes: audio and video
Use the audio position when pointing the connected device like a mic toward the sound
you are recording. Use the video position when recording with the connected device’s
camera.
• High-performance app for use with the mic
Download the free application from the App Store and use it with the
example, set the recording format, edit audio files and apply various effects.
to, for
• Audio monitoring without latency (only when using the ZOOM
app)
Using latency-free direct monitoring, the audio input through the
can be output
directly from the stereo mini jack without passing through the connected iOS device.
• Hardware controls for adjusting recording
Use the
dial and switches to adjust the recording gain and stereo width.
• Port for powering the iPhone/iPod
Use the USB connector to power an iPhone/iPod even while you are using the
.
Note: Powering an iPad/iPad Air/iPad mini is not supported.
Specifications
Microphone
Precautions
Product handling
Do not drop, bump or apply excessive force to the unit.
Be careful not to allow foreign objects or liquids to enter the unit.
Operating environment
Do not use in extremely high or low temperatures.
Do not use near heaters, stoves and other heat sources.
Do not use in very high humidity or near splashing water.
Do not use in places with excessive vibrations.
Do not use in places with excessive dust or sand.
Precaution when using the connectors
Before moving the device, always disconnect all the connectors.
• Stereo width control using mid-side mics
Type
Mid-side (M-S) stereo mic (90°/120°/M-S)
Maximum input sound pressure 120dBspl
Input gain
+0 - +40dB
Audio quality
44.1kHz/16bit, 48kHz/16bit
Power
Powered by the connected device
An iPhone/iPod can be powered by connecting a genuine Apple power
.
adapter to the USB connector on the
Connector
Lightning connector
USB Mini-B connector (only for recharging the iPhone/iPod)
Stereo mini jack (combined headphone/line level output)
Dimensions
58.6 (W) x 62.45 (D) x 38.5 (H) mm
Weight
30.5g
iPhone 5, iPhone 5s, iPhone 5c, iPhone 6, iPhone 6 Plus, iPod touch (5th generation),
Compatible devices
iPad (4th generation), iPad Air, iPad Air 2, iPad mini, iPad mini 2, iPad mini 3
Supported operating systems iOS 6.0 or newer
Adjusting the stereo width
Warning
Alterations
Never open the case or attempt to modify the product.
Interference with other electrical equipment
In consideration of safety, the
has been designed to minimize the emission of electromagnetic radiation from the device and to minimize external electromagnetic interference. However, equipment that is
very susceptible to interference or that emits powerful electromagnetic waves could result in interference
and the other device farther apart.
if placed nearby. If this occurs, place the
With any type of electronic device that uses digital control, including the
, electromagnetic interference
could cause malfunction, corrupt or destroy data and result in other unexpected trouble. Always use caution.
Cleaning Use a soft cloth to clean the panels of the unit if they become dirty. If necessary, use a damp cloth
that has been wrung out well. Never use abrasive cleansers, wax or solvents, including alcohol, benzene and
paint thinner.
Malfunction If a malfunction or something unexpected occurs, disconnect the
and connection cables
as soon as possible. Contact the store where you bought the unit or ZOOM service with the following information: product model, serial number and specific symptoms of failure or malfunction, along with your name,
address and telephone number.
Copyrights
• iPad, iPhone, iPod and iPod touch are trademarks of Apple Inc., registered in the U.S. and other countries. iPad
Air, iPad mini, and Lightning are trademarks of Apple Inc.
• All other trademarks, product names and company names mentioned in this documentation are the property
of their respective owners.
Note: All trademarks and registered trademarks mentioned in this manual are for identification purposes only
and are not intended to infringe on the copyrights of their respective owners.
• Recording for any purpose other than personal use from copyrighted sources, including CDs, records, tapes,
live performances, video works and broadcasts, without permission of the copyright holder is prohibited by law.
Zoom Corporation will not assume any responsibility related to infringements of copyrights.
”Made for iPod”, ”Made for iPhone”, and ”Made for iPad” mean that an electronic accessory has been designed
to connect specifically to iPod, iPhone, or iPad, respectively and has been certified by the developer to meet
Apple performance standards. Apple is not responsible for the operation of this device or its compliance with
safety and regulatory standards. Please note that the use of this accessory with iPod, iPhone, or iPad may affect
wireless performance.
USB charging
connector
Stereo mini jack
M-S stereo mic: This is a mid-side stereo
microphone. Turn to change its orientation. (See
”Changing the mic orientation.”)
USB Mini-B charging connector:The connected
device can be powered by connecting the power
adapter that was included with it here. Data
transmission is not supported.
Stereo mini jack: Connect headphones to
monitor recording and playback. This can also be
used as a line output jack.
Stereo width switch: Set the left-right spread
of the stereo mic. (See “Adjusting the stereo
width.”)
Voltage Directive 2006/95/EC and ErP Directive 2009/125/EC and RoHS Directive 2011/65/EU
Power LED
1.
Connect the
AUTO GAIN/LIMITER switch: Set automatic
recording level adjustment. (See “Adjusting the
recording level.”)
MIC GAIN knob: Use to adjust the recording
level manually. (See “Adjusting the recording
level.”)
Power LED: This lights when connected to the
iOS device. When the input level is too high, it
flashes rapidly.
Lightning connector: Connect to the Lightning
connector of the iOS device.
to the device with the lighting connector.
Adjusting the recording level
1.
Move the AUTO GAIN/LIMITER switch.
AUTO GAIN: The recording level will be automatically adjusted. With this setting,
the MIC GAIN knob cannot be used to adjust the level.
AUTO GAIN has three settings that can be used according to the input level. Use
the
app to choose the setting.
Concert: Use for band performances, concerts and other loud sound sources.
Solo: Use for solo performances and other quiet sound sources.
Meeting: Use for meetings and other non-musical sound sources.
The setting made using the
app is saved in the
applied when using the
with other applications.
and will be
OFF: Use this setting to adjust the recording level manually with the MIC GAIN knob.
2. If you set the switch to OFF or LIMIT in step 1, use the MIC
NOTE
• The lightning connector does not have a front or back, but if you connect the
to the device upside down
compared to the illustration above, the left and right stereo channels will be reversed.
* The left and right stereo settings can be reversed in
app. This setting
is stored in the
itself.
2. Connect headphones, for example, to the stereo mini jack on the
.
Use the
app to adjust the volume of the headphones or other device
connected to the
stereo mini jack.
The volume level set using the
app is saved in the
and will be
applied when using the
with other applications.
Using the Microphone
Changing the mic orientation
Turn the M-S stereo mic to change its orientation.
Turn the mic so that the center red dot faces what will be recorded.
Audio position: Use this position when pointing the connected device
toward the sound source.
Video position: Use this position when recording video with the
built-in camera.
90°: Record with a stereo width of 90°.
120°: Record with a stereo width of 120°.
M-S: Record without setting the stereo width using the
. Adjust the stereo
app. When used with apps
width after recording using the
other than
, this setting will function as though set to 120º.
LIMIT: Use this setting to adjust the recording level manually with the MIC GAIN knob. If the
input level is too high, the limiter will automatically lower the level to prevent distortion.
* If the input volume level is too high, the limiter might not be able to completely prevent distortion. If
this occurs, adjust the MIC GAIN knob or move the
further from the sound source.
The connected device powers the
, and the
power LED lights dimly.
When you start
or another
app that uses the
, the power LED will light
and the
will become usable.
1.
Move the stereo width switch.
MIC GAIN knob
Connecting with the Device
FCC regulation warning (for U.S.A.)
This equipment has been tested and found to comply with the limits for a Class B digital device, pursuant to part
15 of the FCC Rules. These limits are designed to provide reasonable protection against harmful interference
in a residential installation. This equipment generates, uses and can radiate radio frequency energy and, if not
installed and used in accordance with the instructions, may cause harmful interference to radio communications. However,
there is no guarantee that interference will not occur in a particular installation. If this equipment does cause harmful interference to radio or television reception, which can be determined by turn-ing the equipment off and on, the user is encouraged
to try to correct the interference by one or more of the following measures:
• Reorient or relocate the receiving antenna.
• Increase the separation between the equipment and the receiver.
• Connect the equipment to an outlet on a circuit different from that to which the receiver is connected.
• Consult the dealer or an experienced radio/TV technician for help.
Declaration of Conformity This product compiles with the requirements of EMC Directive 2004/108/EC and Low
Lightning connector
1.
AUTO GAIN/LIMITER
setting switch
Stereo width
setting switch
R
L
GAIN knob to adjust the recording level.
HINT
• If the input level is too high and distortion occurs (-0.25 dB for higher), the power LED will
flash rapidly. If this occurs, use the MIC GAIN knob to reduce the recording level.
• For recording and playback procedures, see the instructions for the app that you are using.
NOTE
• No sound is output from the connected device speakers when the
is connected. If you want to
listen to audio using the speakers, disconnect the
from the device when you are done recording.
• Connect the
and the iOS device completely. Incomplete connection could cause
malfunction or damage.
• When you are not using the
, disconnect it from the iOS device and put it away. If you
use the iOS device while the
is still connected, damage could occur if excessive force
is applied to the connector.
• If the connected device sends or receives data wirelessly while recording with the
,
noise could occur in the recording. Using the phone function of the iPhone will also cause
recording to stop. When using the
, put the connected device into Airplane Mode.
ZOOM CORPORATION
Red mark
at mic center
Recording level
Low
High
4-4-3 Surugadai, Kanda, Chiyoda-ku, Tokyo 101-0062 Japan
http://www.zoom.co.jp