1
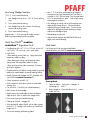
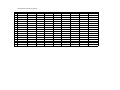
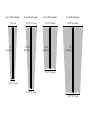
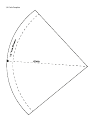
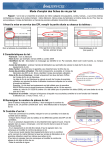
Fan Quilt
PFAFF® Accessories
Supplies
• PFAFF® creative sensation™ sewing and
embroidery machine
• PPFAFF® Bi-Level topstitch foot with IDT,
#820676-096
• creative™ Deluxe Hoop 360 x 200 mm
You can find this and many other accessories in the
PFAFF® on-line Accessory catalogue or on our website,
www.pfaff.com. All are available for purchase at your
nearest PFAFF® dealer.
• creative™ Elite Hoop 260 x 200 mm
• creative™ Master Hoop 240 x 150 mm
Silk Dupioni fabric 42" (110 cm wide) in the following
colors and yardage:
• 3 yds (2.7m) Black (sashing, corners and binding)
Cutting Instructions
• 1-1/8 yd (100 cm) Orange/Rust (color 1)
Please label each cut fabric piece with color number
and block row.
• 3/8 yd (40 cm) Lilac (color 2)
From Black silk dupioni
• 3/8 yd (40 cm) Coral (color 3)
Cut from length of fabric:
• 3/8 yd (40 cm) Pink (color 4)
• 12 strips: 1-1/2" x 55" (3.5 x140 cm) sashings
• 3/8 yd (40 cm) Light Mauve (color 5)
• 1 square – 45" x 45" (115 x 115 cm) for binding cut
on bias. From the square cut bias strips 3" (7.5 cm)
wide and enough strips to measure 220" (550 cm)
• 3/8 yd (40 cm) Pale Yellow (color 6)
• 1/2 yd (50 cm) Fuschia (color 7)
From remainder of Black silk dupioni cut:
• 1/2 yd (50 cm) Lime Green (color 8)
• 1/2 yd (50 cm) Purple (color 9)
• 1 quarter circle for bottom corner of fan – see
pattern piece.
• 3/8 yd (40 cm) Blue (color 10)
• 36 – 1-1/2" x 1-1/2" (3.5 x 3.5 cm) squares
• 3/8 yd (40 cm) Orange (color 11)
• 36 - 1-3/4" x 1-3/4" (4 x 4 cm) squares
• 3/8 yd (40 cm) Rust (color 12)
• 36 – 2" x 2" (5 x 5 cm) squares
• 1/2 yd (5 cm) Burgundy (color 13)
• 18 – 2-1/4" x 2-1/4" (5.7 x 5.7 cm) squares
• 3-3/4 yds (340 cm) backing fabric
From Orange/Rust silk dupioni (color 1)
• 2 yd (180 cm) batting
Cut:
• 1/4 yd (20 cm) lightweight fusible interfacing for Quilt Label
• 1 piece 20" x 28" (51 x 71 cm) for row 1 blocks
with embroidery
• Assorted rayon and metallic threads for embroideries
• 1 piece 18" x 30" (46 x 76 cm) for row 3 blocks
with embroidery
• Black sewing thread
• Embroidery bobbin thread
• Ruler, Rotary cuter and cutting mat
• Marking pen/pencil
• Post it notes for labeling each block
• 1-1/2 yd (1-1/2 m) 20" wide heavy weight
stabilizer for templates or template plastic/cardstock
• Pins
• 1 piece 18" x 13-1/2" (46 x 34 cm) for row 4
block with embroidery
From Lilac silk dupioni (color 2)
Cut:
• 1 piece 13-1/2" x 20" (34 x 51 cm) for row 1
blocks with embroidery
• 2 pieces 6-3/4" x 18" (17 x 46 cm) for row 2
blocks without embroidery
creative sensation™ Quilt
2
From Coral silk dupioni (color 3)
Cut:
• 1 piece 13.5" x 20” (34 x 51 cm) for row 1 blocks
with embroidery
• 1 piece 13.5" x 20” (34 x 51 cm) for row 2 block
with embroidery
From Pink silk dupioni (color 4)
Cut:
• 2 pieces 13.5" x 20" (34 x 51 cm) for row 2 blocks
with embroidery
From Light Mauve silk dupioni (color 5)
Cut:
• 1 piece 13.5" x 20" (34 x 51 cm) for row 2 block
with embroidery
• 1 piece 6-3/4" x 18" (17 x 46 cm) for row 2 block
without embroidery
From Pale Yellow silk dupioni (color 6)
Cut:
• 2 pieces 13.5" x 20" (34 x 51 cm) for row 2
blocks with embroidery
• 1 piece 13.5" x 18" (34 x 46 cm) for row 4 block
without embroidery
• 4 pieces 2-1/2" x 9" (6.5 x 23 cm) for Quilt label
borders
From Orange silk dupioni (color 11)
Cut:
• 1 piece 13.5" x 18" (34 x 46 cm) for row 4 block
with embroidery
From Rust silk dupioni (color 12)
Cut:
• 1 piece 13.5" x 18" (34 x 46 cm) for row 4 block
with embroidery
From Burgundy silk dupioni (color 13)
Cut:
• 1 piece 13.5" x 18" (34 x 46 cm) for row 4 block
with embroidery
• 2 pieces 12" x 18" (30 x 46 cm) for row 4 blocks
without embroidery
Backing Fabric:
From Fuschia silk dupioni (color 7)
• Cut 1 piece 45" x 67" (115 x 170 cm)
Cut:
• Cut 1 pieces 22" x 67" (56 x170 cm)
• 1 piece 18" x 20" (46 x 51 cm) for row 3 block
with embroidery
• 1 piece 18" x 14" (46 x 36 cm) for row 4 block
with embroidery
From Lime Green silk dupioni (color 8)
Cut:
• 1 piece 18" x 20" (46 x 51 cm) for row 3 block
with embroidery
• 1 piece 7-1/2 x 4-3/4" (19 x 12 cm) for Quilt label
From Purple silk dupioni (color 9)
Cut:
• 1 piece 18" x 42" (46 x 110 cm) for row 3 blocks
with embroidery
From Blue silk dupioni (color 10)
Cut:
• 1 piece 13.5" x 18" (34 x 46 cm) for row 4 block
with embroidery
Create Row Block Templates
See illustrations on last page for measurements.
On heavyweight stabilizer (cardstock or template
plastic) create the templates for each quilt row. Templates include ½" seam allowances.
Creating Stitch Creator Embroideries
Use the Stitch Creator Technique section – Create
a New Stitch to create the stitches we will use for
embellishing Row 1 blocks.
Row 1 Embroidered Blocks
Use stitch #1, stitch #5 and stitch #7 from the Create
a new stitch technique exercise to create 3 embroidery
files which we will use to embroidery Row 1 blocks.
creative sensation™ Quilt
3
Stitch #1 embroidery design
• Open sequencing in Embroidery mode
• Toggle to Embroidery Edit on your PFAFF® creative
sensation™.
• Set Hoop to the 360 x 200 creative™ Deluxe
hoop
• Long touch on Duplicate
• Go to Selection Menu – Stitch Menu – Personal
Menu –Menu 1 - Stitch #1
• Open sequencing in Embroidery mode
• Set number of copies to 45 – Confirm with check
mark – OK
• Long touch on Duplicate
• Touch OK to close sequencing in embroidery screen.
• Touch Save to Personal Designs icon
• Set number of copies to 67 – Confirm with check
mark – OK
• Touch OK to close sequencing in embroidery screen.
• Touch Save to Personal Designs icon
• Select Rename
• Long touch on delete icon to remove auto generated
name.
• Type in Stitch 5
• Select Rename
• Touch Ok
• Touch Ok to save design
• Long Touch on Delete icon to clear screen.
• Long touch on delete icon to remove auto generated
name.
• Touch Ok to Delete all designs.
• Type in Stitch 1
Stitch #7 embroidery design
• Touch Ok
• Embroidery Edit – 360 x 200mm creative™
Deluxe hoop selected.
• Touch Ok to save design
• Long Touch on Delete icon to clear screen
• Touch Ok to Delete all designs
• Go to Selection Menu – Stitch Menu – Personal
Menu –Menu 1 - Stitch #7.
• Open sequencing in Embroidery mode
Stitch #5 embroidery design
• Make sure you are still in Embroidery Edit window
with 360x200 creative™ Deluxe hoop selected.
• Long touch on Duplicate
• Go to Selection Menu – Stitch Menu – Personal
Menu –Menu 1 - Stitch #5
creative sensation™ Quilt
4
• Set number of copies to 45 – Confirm with check
mark – OK
Label stitch 1.vp3 embroidered block as Row 1,
Wedge section B. • Touch OK to close sequencing in embroidery screen.
Label stitch 7.vp3 embroidered block as Row 1,
Wedge section G.
• Touch Save to Personal Designs icon
Row 1 Non Embroidered blocks
• Select Rename
Trace and cut out 3 more Row 1 block templates on
remaining fabric. Label as Row 1- Wedge Section A, Row 1-Wedge Section H, Row 1-Wedge Section I.
• Long touch on delete icon to remove auto generated
name.
Row 1 – Lilac (color 2) embroidered blocks
• Type in Stitch 7
• Embroidery Edit screen
• Touch Ok
• Go to Selection Menu – Files and Folders – Personal
Designs – Stitch 5.vp3 design
• Touch Ok to save design
• Long Touch on Delete icon to clear screen.
Row 1 - Orange/Rust (color 1) embroidered
blocks
• Embroidery Edit screen
• Selection Menu – Files and Folders – Personal
Designs – Stitch 1.vp3 design.
• Move the stitches to the left side of the hoop.to coordinates -60.0/0.0
• Go to Selection Menu – Files and Folders – Personal
Designs - Stitch 7.vp3 design
• Move the stitches to the right side of the hoop to
coordinates 60.0/0.0
Hoop stabilizer and 20" x 28" (51 x 76 cm) Color
1 – Orange/Rust fabric in the 360 x 200 creative™
Deluxe hoop with majority of fabric to the left of the
hoop. Attach hoop and toggle to Embroidery Stitch-out screen.
Thread your PFAFF® creative™ sensation with
contrasting rayon embroidery thread in machine and
bobbin thread in bobbin.
Embroider stitch 1.vp3 and stitch7.vp3 design. Clear screen when embroidery is finished. Remove
fabric and stabilizer from hoop and carefully remove
stabilizer from behind stitches. Center Row 1 block template over each row of stitches
and trace around template. Cut out the 2 blocks.
• Move the stitches to the left side of the hoop.to coordinates -60.0/0.0
• Go to Selection Menu – Files and Folders – Personal
Designs – Stitch 1.vp3 design.
• Move the stitches to the right side of the hoop.to coordinates 60.0/0.0
Hoop stabilizer and 13.5" x 20" (34 x 51cm) Lilac
color 2 fabric in the 360 x 200 creative™ Deluxe
hoop.
Attach hoop and Toggle to Embroidery Stitch-out
screen.
Thread machine with contrasting 40 wt rayon thread
and bobbin thread in bobbin.
Embroider stitch5.vp3 and stitch1.vp3 designs. Clear screen when embroidery is finished. Remove
fabric and stabilizer from hoop and carefully remove
stabilizer from behind stitches.
Center Row 1 block template over each row of stitches
and trace around template. Cut out the 2 blocks.
Label Stitch 5.vp3 embroidered block as Row 1,
Wedge section D
Label Stitch 1.vp3 embroidered block as Row 1,
Wedge section E.
Row 1 – Coral (color 3) embroidered blocks
• Embroidery Edit screen
• Go to Selection Menu – Files and Folders– Personal
Designs – Stitch 7.vp3 design.
creative sensation™ Quilt
5
• Move the stitches to the left side of the hoop to
coordinates -60.0/0.0
• Touch Duplicate 1 time
• Move duplicated row to right side of hoop to coordinates 60.0/0.0
Hoop stabilizer and 13,5" x 20" (34 x 51cm) Coral
(color 3) in your 360 x 200 creative™ Deluxe hoop.
Attach hoop and toggle to Embroidery Stitch-out
screen.
Thread machine with contrasting 40 rayon thread on
top and bobbin thread in bobbin.
Embroider the two stitch7.vp3 designs. Clear screen
when finished. Remove fabric and stabilizer from hoop
and carefully remove stabilizer from behind stitches.
Center Row 1 block template over each row of stitches
and trace around template. Cut outblocks.
Label Stitch 7.vp3 embroidered block as Row 1,
Wedge section C
Label Stitch 7.vp3 embroidered block as Row 1,
Wedge section F.
Row 2 Embroidered Blocks
• Select Personal Designs Folder
• Select rename – type in combined shaping
• Touch OK
• Touch OK to save file.
Center the following silk fabrics and stabilizer in the
360 x 200 creative™ Deluxe Hoop and embroider
the combined shaping design:
Color 3 - Coral silk dupioni
• One 13.5" x 20" (34cm x 51cm) piece
• Center Row 2 block template over embroidery, trace
and cut out.
• Label as Row 2 – Wedge section D
Color 4 – Pink silk dupioni
• Two 13.5" x 20" (34 x 51cm) pieces
• Center Row 2 block template over embroidery, trace
and cut out the 2 blocks.
• Label as Row 2 – Wedge section C and Row 2 –
Wedge Section F
Toggle to Embroidery Edit screen.
• Hoop selection – 360 x 200 creative™ Deluxe
hoop
• Selection Menu – Files and Folders – Built in designsMachine Designs.
• Select List View
• Scroll down to cs_013.vp3
• Touch cs_013.vp3, cs_014.vp3 and long touch on
cs_015.vp3 to load all 3 designs at one time.
• Tap twice on the screen to de-select all designs.
• Use arrows to tab through to the first design
• Move to top of hoop to co-ordinates 0.0/106.0 (use
wheel to fine tune position if necessary)
• Use down arrow to tab through to second design
• Touch the center of the fine tuning wheel to center
the design in the hoop
• Use down arrow to tab through to third design
• Move to bottom of hoop to co-ordinates 0.0/-91.0
creative sensation™ Quilt
6
Color 5 – Light Mauve silk dupioni
block template and cut out the Row 3 blocks.
• One 13.5" x 20" (34 x 51cm) piece
Please see Owner’s Manual for complete instructions
on using precise positioning feature of your PFAFF®
creative sensation™.
• Center Row 2 block template over embroidery, trace
and cut out.
• Label as Row 2 – Wedge section G
Color 6 – Pale yellow silk dupioni
• Two 13.5" x 20 pieces (34 x 51cm)
• Center Row 2 block template over embroidery, trace
and cut out the 2 blocks.
• Label as Row 2 – Wedge Section B and Row 2 –
Wedge Section E
Embroider design on the following pieces of fabric:
Color 1 – Orange/Rust silk dupioni
• 18" x 30" (46 x 76 cm) piece – embroider 4
repeats across width of fabric using precise
positioning to line up embroidery after re-hooping. • Trace 3 of the Row 3 block templates on
embroidered section of fabric.
Row 2 Non Embroidered Blocks
• Cut out and label as Row 3 – Wedge section A, Row
3 – Wedge section B, Row 3 – Wedge Section C.
Trace and cut out Row 2 block template on the
following non-embroidered colors.
Color 7 – Fuschia silk dupioni
Color 2 – Lilac silk dupioni
• Two pieces 6-3/4" x 18" (17 x 46 cm)
• Label as Row 2 – Wedge section A and Row 2 –
Wedge section I
• 18" x 20" (46 x 51cm) piece – embroider 2 repeats
across width of fabric using precise positioning to
line up embroidery after re-hooping.
• Trace 1 of the Row 3 block template on embroidered
fabric. • Cut out and label as Row 3 – Wedge section D
Color 5 – Light Mauve silk dupioni
• One piece 6-3/4" x 18" (17 x 46cm)
• Label as Row 2 – Wedge Section H
Row 3 Embroidered Blocks
Toggle to Embroidery Edit screen.
Hoop selection – 260 x 200 creative™ Elite hoop
Selection Menu
Open Files and Folders. Select Tab for Built-in designs
and long touch on the folder for Quilt Designs. Scroll
down and select Q_40.vp3, the last design on the
page. Long Touch to load the design in embroidery
edit.
Thread machine with metallic embroidery thread on
top and bobbin thread in bobbin.
Use Precise Positioning to create an allover
embroidered piece of fabric and then trace the Row 3
creative sensation™ Quilt
7
Color 8 – Lime Green silk dupioni
Color 10 – Blue silk dupioni
• 18" x 20" (46 x 51cm) piece – embroider 2 repeats
across width of fabric using precise positioning to
line up embroidery after re-hooping.
• 18" x 13.5" (46 x 34 cm)
• Trace 1 of the Row 3 block template on embroidered
fabric. • Cut out and label as Row 3 – Wedge section E.
Color 9 – Purple silk dupioni
• 18" x 42" (46 x 110 cm) piece – embroider
6 repeats across width of fabric using precise
positioning to line up embroidery after re-hooping.
• Trace 4 of the Row 3 block template on the
embroidered section of fabric. • Cut out and label as: Row 3 –Wedge Section F,
Row 3 – Wedge Section G, Row 3– Wedge Section
H and Row 3 – Wedge Section I.
Row 4 Embroidery Files
Toggle to Embroidery Edit screen
• Hoop selection – 260 x 200 creative™ Elite hoop
• Selection Menu – Designs Menu – Built In Machine
Designs – Design 1 Column 1
Thread machine with rayon embroidery thread on top
and bobbin thread in bobbin.
• Center Row 4 block template over embroideries,
trace and cut out.
• Label Row 4 – Wedge Section B
Color 11 – Orange silk dupioni
• 18" x 13.5" (46 x 34 cm)
• Center Row 4 block template over embroideries,
trace and cut out. • Label Row 4 – Wedge Section C
Color 12 – Rust silk dupioni
• 18" x 13.5" (46 x 34 cm)
• Center Row 4 block template over embroideries,
trace and cut out.
• Label Row 4 – Wedge section E
Color 13 – Burgundy silk dupioni
• 18" x 13.5" (46 x 34 cm)
• Center Row 4 block template over embroideries,
trace and cut out. • Label Row 4 – Wedge section G
Embroider Design centered in the 260 x 200
creative™ Elite Hoop on the silk fabric and stabilizer
in the following colors:
Color 1 – Orange/Rust silk dupioni
• 18" x 13.5" (46 x 34 cm)
• Center Row 4 block template over embroideries,
trace and cut out.
• Label Row 4 – Wedge section F
Color 7 – Fuschia silk dupioni
• 18" x 13.5" (46 x 34 cm)
• Center Row 4 block template over embroideries,
trace and cut out.
• Label Row 4 – Wedge Section D
creative sensation™ Quilt
8
Row 4 Non Embroidered Blocks
• Press towards corners.
Cut Row 4 block templates from the following non
embroidered colors:
• Pin 1-3/4" x 1-3/4" (4.5 x 4.5 cm) squares right
sides together to the top corners of all Row 2 blocks
and the bottom corners of all Row 3 blocks.
Color 10 – Blue
• 18" x 13-1/2" (46 x 34 cm) piece without
embroidery–
• Label Row 4 – Wedge Section A
Color 13 – Burgundy
• two 12" x 18" ( 30 x 46 cm) pieces without
embroidery
• Label Row 4 – Wedge Section H and Row 4 –
Wedge Section I.
Quilt Construction
Add corners to each block
Using chalk and small ruler draw diagonal line on
wrong side of each of the black silk square blocks. After stitching trim only the black corner of triangle
between corner and block fabric. • Stitch on diagonal lines. Trim only the black corner
of triangle between corner and block fabric.
• Press towards corners.
• Pin 2" x 2" (5 x 5 cm) squares right sides together to
the top corners of all Row 3 blocks and the bottom
corners of all Row 4 blocks.
• Stitch on diagonal lines. Trim only the black corner
of triangle between corner and block fabric.
• Press towards corners.
• Pin 2-1/4" x 2-1/4" (5.7 x 5.7 cm) squares right
sides together to the top corners of all Row 4 blocks.
• Stitch on diagonal lines. Trim only the inside black
corner of the sewn triangle (between corner and
block fabric).
• Press towards corners.
Due to the large number of colors in the quilt and
different techniques/embroideries used for each row
please use the attached chart for assistance in piecing
the blocks together.
Add sashings
Due to the delicate nature of silk fabric use 1/2"
(1.3 cm) SEAM ALLOWANCE ON ALL SEAMS. Mark top and bottom center on each block
Join Row 1 to Row 2 wedge blocks using attached
chart A and quilt picture as guide.
1. Strip piece the tops of each Row 1 block to one
1-1/2" x 55" (3.5 x 140 cm) sashing strip. Leave 2" (5 cm) between blocks. Cut sashing
halfway between each block
2. Press seam toward sashing. 3. Match center of bottom Row 2 block to center of
row 1 block . Pin to sashing and sew.
• Pin 1-1/2" x 1-1/2" (3.5 x 3.5 cm) squares right
sides together to the top corners of all Row 1 blocks
and the bottom corners of all Row 2 blocks. • Stitch on diagonal lines. Trim only the black corner
of triangle between corner and block fabric.
4. Press seam toward sashing.
5. Trim sashing and true wedge shape.
Join Row 2 to Row 3 wedge blocks. – repeat steps 1-5
Join Row 3 to Row 4 wedge blocks – repeats steps 1-5 creative sensation™ Quilt
9
Join Long Wedge Sections
(1/2" (1.3 cm) seam allowance)
1. Join Wedge Section A to 1-1/2" (3.5 cm) sashing
strip.
2. Press seam toward sashing.
3. Join Wedge Section B to Section A matching
corner and sashing seams
4. Press seam toward sashing. Repeat steps 1 – 4 for joining all wedge sections
following chart and quilt picture as guide.
• Join 3” (7.5 cm) bias cut binding strips together
mitering corners (see illustration) until you have a
strip that is 220” (550cm) long. Trim mitered seams
to ¼” (6 mm) and press open. Fold in half wrong
sides together and press.
• Sew binding to wrong side of quilt matching raw
edges and mitering corners.. Be careful not to
stretch binding on straight sides. On the curved
edge of the quilt gently stretch binding to shape
around curved edge of quilt. • Fold binding to right side.
• Attach Bi-level topstitch foot #820676-096 and
edge stitch around binding. Quilt Your PFAFF® creative
sensation™ Signature Quilt
Quilt Label
• Sew Backing 44" x 67" (112 x 170 cm) strip to 22"
x 67" (56 x 170 cm) strip – press seam open
Finish your quilt with a custom made label
embroidered on your PFAFF® creative sensation™.
• Layer Quilt:
- Place backing wrong sides up. Spray baste with
temporary adhesive spray.
- Place batting on wrong side of backing fabric. Spray baste with temporary adhesive spray.
- Place quilt top wrong sides to batting. Pin baste
quilt layers together.
• Thread machine with black sewing thread in top and
bobbin (or match bobbin thread to backing fabric)
• Attach 1A foot and engage the IDT. (included with
your PFAFF® creative sensation™)
• Select Serpentine stitch #2.3.5
• Stitch serpentine stitch down center of each black
sashing strip.
• Cut out lower 1/4 circle (use included pattern). • Mark center of curved edge
Sewing Mode
1. Selection Menu – stitch menu – category 4 –
subcategory 2 – stitch 7
2. Adjust length to 13mm and density to .1. Leave
width at 9 mm
• Match center of curved edge to center of bottom
edge of quilt. Stitch in place with straight stitch.
• Press away from quilt towards batting.
• Change to 0A foot – engage IDT.
• Stitch around all edges of quilt with a triple zigzag
stitch #1.1.9. Change stitch width to 4.5 and stitch
length to 6.0.
• Trim excess batting and backing fabric.
creative sensation™ Quilt
10
3. Select Save Options icon
19. Touch and drag on screen to length of 200mm. Use
the arrows on the wheel to fine tune if necessary.
20. Touch OK to go back to Embroidery Edit screen.
21. Touch and drag on screen to move to the left of
the hoop Co-ordinates -66.0/0.0
4. Select Save to Personal Files
22. Select Duplicate
23. Select Touch Function - Rotate – touch the center of
the wheel to rotate 90 deg.
24. Select Shaping
5. Select rename
and long touch on the delete icon.
6. Type in 4-2-7 for the name.
7. Touch OK
8. Touch OK to save.
Create Label Frame design
9. Toggle to Embroidery Edit screen.
25. Touch the minus of “Duplicate Last” tool 6 times
until you see 11 designs on the line.
26. Touch and drag the line until it is 130 mm long
– use the arrows on the wheel to fine tune if
necessary. 27. Touch OK to go back to Embroidery Edit screen.
28. Touch and drag the design to the left of your
screen match the top corner to the corner of the
first design. Co-ordinates 1.0/100.0
10. Select Hoop – 240 x 150 creative™ Master hoop
11. Selection Menu – Files and Folders – Personal
Files – Select the saved stitch 4-2-7.
12. Select Shaping icon
13. Select Straight Line
14. Select Enter number of designs
29. Use the Zoom to Box tool to zoom in close to the
corner.
15. Type in “17”
16. Touch OK
17. Select Touch function Rotate icon – Touch center of
wheel to rotate 90 deg.
18. Select Touch function Scale Icon
creative sensation™ Quilt
11
30. When you are satisfied that your corners are lined
up use Zoom to Hoop to go back to full screen.
42. From the 64 colors shown select a bright fuschia. Touch OK to close the Thread color Edit screen.
43. Select Save to Personal Designs
44. Select Rename – long touch on delete icon to
delete automated name. 31. Long touch on Multi Select to select both lines.
45. Type in Label Frame. Touch OK. Touch OK to save.
Create Label
1. Label Frame design should still be on screen.
32. Move to co ordinates -3.0/0.0
2. More Options
33. Select Touch Function - Rotate icon– touch center
of wheel to rotate 90 deg.
34. Select Touch Function – move icon and move
duplicated sides to 1.6/-4.4 co-ordinates. 35. Use Zoom to Box tool to check that all corners are
matching.
36. Select Touch Function – move icon – touch center
of wheel to center design in hoop – co-ordinates
0.0/0.0
grid icon
3. Selection Menu – Personal designs – select stitch
4-2-7
4. Select Shaping
37. Long touch on Multi Select to select all the designs.
38. Select Group Icon
Letter Tab
5. Select Letter “C” (or letter of your choice)
39. Select Thread Color Edit
6. Select Enter number of designs – type in 17
40. Long touch on Multi Select Color icon to select all
stitches
7. Select Touch Function – Rotate icon – touch center
of wheel 3 times to rotate 270 deg. 8. Select Touch Function – Scale icon
9. Touch the center of the fine tune wheel to unlock
the proportional scaling.
41. Select Quick Color Change icon
creative sensation™ Quilt
12
10. Touch and drag to Scale to size 126.5/68.5
18. Touch OK
19. Selection Menu – Alphabets – Pouty 20 (or font
of your choice – we used Times New Roman for
PFAFF)
20. Type in your name (you may need to choose a
smaller font if your name is long).
21. Touch OK – Remember you can edit your font
style/size through sequencing in embroidery
11. Touch OK to go back to Embroidery Edit screen.
12. Touch and drag on screen to move the C to the
bottom of the frame – co-ordinates 0.0/-51.
13. Select Thread Color Edit
14. Scroll down until you come to the black color for
the “C” design,
15. Select the first black in the design – 5.1
22. Select Touch Function – Rotate icon – touch center
of wheel 3 times to rotate name 270 deg.
23. Select Touch Function – Move icon.
24. Move to upper 1/3 of label frame
25. Selection Menu – Alphabets – Pouty 20 (or font of
your choice)
26. Type in the year – 2011
27. Touch OK
28. Select Touch Function Rotate – touch center of
wheel 3 times to rotate year.
29. Select Touch Function Move icon.
30. Center year below name.
16. Select Touch Select Equal colors to select just the
black colors.
17. Select Quick Change Color Icon - Choose the
same color as the frame.
31. Selection Menu – Files and Folders – Personal
Designs – stitch 4-2-7.
32. Open Sequencing in Embroidery
creative sensation™ Quilt
13
33. Duplicate 2 times
40. Mirroring side to side
34. Touch OK to go back to Embroidery Edit screen
41. Touch and drag to left side of 3 diamond design. Use diagram and grid for assistance in placing
design.
35. Touch and drag on screen to move design
centered above your name.
42. Touch Thread Color Edit
36. Selection Menu –Stitch Menu – Category 4 – Sub
Category 5 – stitch 15
37. Touch and drag design to just below last diamond
of the 3 diamond design. Use grid to assist in
placing of stitch designs. Zoom to box to zoom in
close to 3 diamond design.
43. Scroll down until you get to design color #8:1.
44. Select Quick Color Change icon
45. Select new color for 3 diamond design – coral/
bright pink
46. Select color 9.1
47. Select equal colors icon to choose both stitch designs
38. If you lose the selection box around the stitch
design touch the design again to select or use the
arrows to navigate through the designs.
48. Select Quick Color Change icon and change to a
lighter pink
49. Touch OK to close Thread Color Edit screen
50. Use the zoom tools as needed to arrange the
39. Duplicate 1 time
creative sensation™ Quilt
14
designs.
51. Use the up/down arrows to tab through designs
until you get to design 8/10
58. Touch duplicate to duplicate just the three marked
(chosen) designs.
59. Mirroring side to side
52. The coral 3 diamond design is the only one
selected with a green box around it.
60. Touch and drag the group to below the year.
53. Touch Multi Select Icon – notice the selection box
becomes dotted
61. Use the Touch function Move wheel to fine tune
placement opposite top grouping
54. Use the down arrow to go to design 9 – notice it has
a black selection box around it. It has been marked
(chosen) but not yet selected. Notice the 3 diamond
design now has a solid green box around it.
62. Long touch on Multi Select icon to select all
55. To select the marked (chosen) design touch select/
deselect icon (the Multi-select tool must also be
selected to use select/deselect) The marked design
now has a dotted selection box.
65. Selection Menu – Stitch Menu – Stitch #2.4.20
63. Touch Function Move Icon – touch center of the
wheel to center the group in the hoop.
64. Select Sequencing icon
66. Duplicate 2 times.
67. Touch OK to go back to Embroidery Edit screen.
68. Select Touch Function Rotate – touch center of
wheel to rotate 90 deg.
56. Use down arrow to select design 10/10
57. Touch select/deselect to select the design.
69. Select Touch Function Move – move to coordinates 0.0/84.0
70. Select Thread Color Edit
71. Scroll down until you come to the last design
entered.
creative sensation™ Quilt
15
72. Select Quick Color Change and change to same
color as the year.
73. Touch OK to close Thread Color Edit
74. Touch Duplicate
75. Touch and drag to co-ordinates 0.0/-27.0 (or just
below name)
76. Save to Personal File – Rename – long touch on
delete icon – type in quilt label
77. Touch OK
Please see User’s manual for complete instructions
on using Precise Positioning on your PFAFF®
creative sensation™.
18. When you are happy with placement of design
Touch OK to go back to Embroidery Stitch out
screen.
19. Select Color Sort icon
20. Select More Options icon and select Color
Merge.
78. Touch OK to save the file
1. Iron interfacing to wrong side of color 8 Lime
Green 7-1/2" x 4-3/4" (19 x 12 cm) silk fabric
and color 10 Blue 2-1/2" x 9" (6.5 x 23cm)
border strips.
2. Thread machine with regular sewing thread top
and bobbin.
3. Attach 1/4" piecing foot and engage IDT
21. Embroider your label design.
Measure 1-1/4" (3 cm) from outside edge of border
and mark. Press each corner in at a 45 deg angle to
the edge. (see illustration). Press each long edge in
on marked line. ©2011 KSIN. All rights reserved. PFAFF, creative, creative sensation, idt and inspira are trademarks of KSIN Luxembourg II, S.ar.l.
Stitch out label
Use your favorite method to attach your label to your
PFAFF® creative sensation™ fan quilt.
4. Sew a 2-1/2" x 9" (6.5 x 23 cm) border strip to
top and bottom of label fabric.
5. Press towards border
6. Sew a 2-1/2" x 9" (6.5 x 23 cm) border strip to
both sides of label.
7. Press towards border
8. Mark center of quilt label both horizontally and
vertically.
9. Hoop tear away stabilizer in 240 x 150
creative™ Master Hoop.
10. The Label center design should still be on screen
11. Attach hoop to embroidery arm
12. Toggle to Embroidery Stitch out mode
13. Thread machine with 40wt Rayon thread on top
and bobbin thread in bobbin.
14. Position label in hoop lining up center markings
on hoop and needle in center of label.
15. Long touch on Baste icon – select Baste around
hoop. Uncheck Baste around design if selected.
16. Select Precise Positioning icon
17. Check each corner and center position of design. creative sensation™ Quilt
16
Arrangement of blocks for piecing.
Wedge A
Wedge B
ROW
1 Color 1 Color 1 Orange/Rust
Orange/Rust
no embroidery embroidered
stitch #1
Wedge C
Wedge D
Wedge E
Wedge F
Wedge G
Wedge H
Wedge I
Color 3 Coral
embroidered
stitch #7
Color 2 Lilac
embroidered
Stitch #5
Color2
Lilac
embroidered
stitch #1
Color 3
Coral
embroidered
Stitch #7
Color 1
Color 1
Color 1
Orange/Rust Orange/Rust
Orange/Rust
embroidered no embroidery no embroidery
stitch #5
2 Color 2 Color 6
Color 4
Color 3
Color 6
Color 4
Color 5
Color 5
Color 2
Lilac
Pale Yellow Pink
Coral
Pale Yellow Pink
Light Mauve Light Mauve
Lilac
no embroidery embroidered embroidered embroidered embroidered embroidered embroidered no embroidery no embroidery
3 Color 1
Orange/Rust
embroidered
Color 1
Color 1
Color 7
Color 8
Color 9
Color 9
Color 9
Orange/Rust Orange/Rust Fuschia
Lime Green Purple
Purple
Purple
embroidered embroidered embroidered embroidered embroidered embroidered embroidered
Color 9
Purple
embroidered
4 Color 10
Color 10
Color 11
Color 7
Color 12 Color 1
Color 13
Color 13
Color 13
Blue
Blue
Orange
Fuschia
Rust
Orange/Rust Burgundy
Burgundy
Burgundy
no embroideryy embroidere
embroidered
d embroidered
embroidered embroidered
embroidered embroidered
embroidered embroidered
embroidered embroidered
embroidered no no eembroidery no embroidery
no embroidery
no embroider
Row 1 Block Template
Row 2 Block Template
Row 3 Block Template
Row 4 Block Template
3" (7.6 cm)
5-1/2" (13.3 cm)
7-1/4" (18.4 cm)
9-3/4" (24.8 cm)
12"
(30.5 cm)
15-1/4"
(38.7 cm)
9-1/4"
(23.5 cm)
14"
(35.6 cm)
5-3/4" (14.6 cm)
1-1/4" (3.2 cm)
3-1/4" (8.3 cm)
7-1/2" (19.1 cm)
1/4 Circle Template