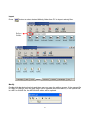
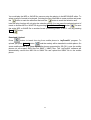
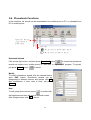
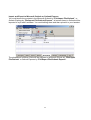
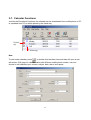
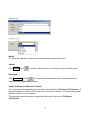
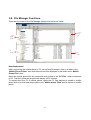
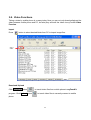
1
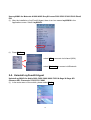
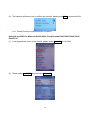
Wenjoy Technology Incorporation
We Enjoy What We Enjoy In Our Life
Wenjoy myFoneKit
User Manual
Infrared (IrDA) Adapter
Address: 4F-1, No. 153, Chung-Sun Rd., Hsinchu City, Taiwan
Phone: +886-3-5250234
Fax: +886-3-5258296
http://www.myfonekit.com.tw , http://www.wenjoy.net
EMAIL: [email protected]
1
Contents
CHAPTER 1 PRODUCT PROFILE....................................................................................................4 CHAPTER 2 SETUP .............................................................................................................................8 2-1. SYSTEM REQUIREMENT .............................................................................................................8 2-2. SOFTWARE INSTALL ...................................................................................................................8 2-3. SETUP MYFONEKIT AGENT (ONLY FOR SYMBIAN SMART PHONES)...........................................12 Setup myS60Kit for Nokia 3600 /3650 /3660 /6600 /7650 /N-Gage/ N-Gage QD
/Siemens SX1 /Panasonic X700 /X701 /X800 ......................................................................12 Setup myUIQKit for Motorola A1000 /A925 /SonyEricsson P800 /P802 /P900 /P910i
/BenQ P30 ....................................................................................................................................14 2-4. USE MYFONEKIT AGENT TO CONNECT WITH PC .....................................................................16 Use myS60Kit for Nokia 3600 /3650 /3660 /6600 /7650 /N-Gage/ N-Gage QD
/Siemens SX1 /Panasonic X700 /X701 /X800 ......................................................................16 Use myUIQKit for Motorola A1000 /A925 /SonyEricsson P800 /P802 /P900 /P910i
/BenQ P30 ....................................................................................................................................18 2-5. UNINSTALL MYFONEKIT AGENT .............................................................................................18 Uninstall myS60Kit for Nokia 3600 /3650 /3660 /6600 /7650 /N-Gage/ N-Gage QD
/Siemens SX1 /Panasonic X700 /X701 /X800 ......................................................................18 Uninstall myUIQKit for Motorola A1000 /A925 /SonyEricsson P800 /P802 /P900
/P910i /BenQ P30 .......................................................................................................................20 CHAPTER 3 FUNCTION’S GUIDE .................................................................................................22 3-1. START UP .................................................................................................................................22 3-2. MESSAGING FUNCTIONS .........................................................................................................24 Download/Upload ......................................................................................................................24 New ...............................................................................................................................................25 Modify SMS .................................................................................................................................26 3-3. MMS FUNCTIONS ...................................................................................................................27 Compose MMS messages.......................................................................................................27 Save file .......................................................................................................................................28 3-4. PICTURES FUNCTIONS .............................................................................................................29 Import ...........................................................................................................................................29 Modify a picture .........................................................................................................................29 Perform an Animation ..............................................................................................................32 Download /Upload .....................................................................................................................38 3-5. MELODY FUNCTIONS ..............................................................................................................39 New ...............................................................................................................................................39 Import ...........................................................................................................................................41 Modify ...........................................................................................................................................41 3-6. PHONEBOOK FUNCTIONS .........................................................................................................43 Download /Upload .....................................................................................................................43 2
Modify ...........................................................................................................................................43 New ...............................................................................................................................................43 Import and Export to Microsoft Outlook or Outlook Express .......................................44 3-7. CALENDAR FUNCTIONS ...........................................................................................................45 New ...............................................................................................................................................45 Modify ...........................................................................................................................................46 Upload ..........................................................................................................................................46 Download.....................................................................................................................................46 Import and Export to Microsoft Outlook .............................................................................46 3-8. FILE MANAGER FUNCTIONS ....................................................................................................47 Download/upload ......................................................................................................................47 3-9. VIDEO FUNCTIONS ..................................................................................................................48 Import ...........................................................................................................................................48 Download /Upload .....................................................................................................................48 Modify ...........................................................................................................................................49 View ...............................................................................................................................................50 3-10. JAVA GAME FUNCTIONS ......................................................................................................51 Download/Upload ......................................................................................................................51 3-11. CDTOMP3 FUNCTIONS .......................................................................................................51 Start Up ........................................................................................................................................51 Rip CD ..........................................................................................................................................53 Upload ..........................................................................................................................................54 Settings ........................................................................................................................................55 3-12. WEB PICTURE MASTER FUNCTIONS ....................................................................................57 Start Up ........................................................................................................................................57 Capture images ..........................................................................................................................58 Disable/ Enable ..........................................................................................................................58 Settings ........................................................................................................................................59 Capture Screen ..........................................................................................................................59 3
Chapter 1 Product Profile
1
Unique Features:
‧ Supports FIR (Fast Infra-Red, up to 4Mbps), MIR (Medium Infra-Red, up to 1.15Mbps) and
SIR (Serial Infra-Red, up to 115.2 Kbps). When working with color mobile phones (like
Nokia 7210, 6610…etc), myFoneKit – Infrared Adapter provides 10 times faster than
other solutions with only SIR support.
‧ Dynamically switch mobile phone models, users could easily transfer the data in one mobile
phone to the new one.
Basic Features
‧ Transfer data between mobile phone and PC by download and upload. Backup data in PC.
‧ myFoneKit software is based on Unicode technology, contents in all languages are fully
supported. User interface has been localized to English, French, German, Italian,
Spanish… and more. The user-interface language could be switched at run-time.
Messaging Functions
‧ Download SMS/EMS from the mobile phone and SIM card memory to PC for backup,
modifying, replying and forwarding.
‧ Composing SMS/EMS easily by powerful editing tool on PC: it is just a click to insert the
EMS logos or ringtones. Sending the composed SMS/EMS directly on PC.
‧ Long messages will be automatically arranged to several concatenated messages.
‧ Sending SMS to multiple recipients. The recipients could be selected from download
phonebook.
‧ Storing the composed SMS on mobile phone and send it later.
MMS Functions
‧ Downloading received MMS to PC for backup, modifying and replying…etc.
4
‧ Composing MMS on PC with pictures and melodies easily. Playback feature enables you to
preview the result.
‧ Storing the MMS on mobile phone and send it to friends for sharing.
Pictures Functions
‧ Downloading the pictures taken by integrated camera of your handset.
‧ Read and Write more than 40 image formats (including JPEG, GIF, TIFF, PNG, BMP,
PhotoShop (PSD), PCD, PSP…). You could easily convert your pictures to formats
supported by the mobile phone and upload it as wallpaper.
‧ More than 40 effects could be applied to pictures. Including basic image processing, color
manipulation, 3D/artistic effect filters (such as Impressionist, Oilify…etc). Easily to adjust
the effect parameters by previewing the result image on the screen.
‧ Undo/Redo are supported on the effects applied to pictures.
Melody Functions
‧ Polyphonic MIDI staff composing tool enables you to compose a new MIDI or editing
existing MIDI/RMI files. Adding notes and tracks, playback features are fully supported.
‧ Saving selected tracks or a period of MIDI to another MIDI file.
‧ Playback of sound files (MP3 or WAV) and saving a period of sound to MP3 or WAV.
‧ Converting WAV files to MP3 files.
Phonebook Functions
‧ Downloading phonebook on mobile phone and SIM card memory for backup, modifying,
adding, deleting…etc.
‧ Complete address book fields are supported including e-mail, postal address…etc. Easily to
adjust the storage of the phonebook items between mobile phone and SIM card memory.
‧ Dynamically switching handset models, all phonebook contents are preserved. This feature
enables users to switch mobile phones easily.
Calendar Functions
‧ Uploading the selected calendar events in Microsoft Outlook to your mobile phone and get
notified even out of office.
5
‧ Downloading all calendar events in mobile phone to computer for backup or modifying.
File manager Functions
‧ Simultaneous view the files on mobile phone and PC. Easily copy/transfer files between
mobile phone and PC by just drag-n-drop.
‧ File manager functions including Copy, Rename, Delete and more…etc.
‧ Managing files on both mobile phone memory and extension memory card.
‧ Double click on file manager to open related program to editing the file.
Java game Functions
‧ Backup your Java Games to PC.
‧ Uploading Java games to mobile phone.
Video Functions
‧ Downloading the videos taken by integrated camera of your handset.
‧ Playback of 3GP video files with adjustable viewer size.
‧ Saving selected period of video to another 3GP or AVI file.
CDtoMP3 Functions
‧ Rip the audio CD tracks and saves them to MP3 or WAV formats.
‧ Download titles from the Internet (CDDB).
‧ Customize CD track names.
‧ Uploading the ripped melody to mobile phone.
Web picture master Functions
‧ The fastest and easiest way to capture the images or animations from websites.
‧ Easily to capture any portion of the screen.
6
Hardware Specifications
‧ USB 1.1 and 2.0 compliance.
‧ IrDA 1.0 and 1.1 compatible
‧ Thumb size, light weight and easy to carry
‧ With USB extension cable for easy angle adjustment
‧ Supports FIR, MIR and SIR.
7
Chapter 2 Setup
2
2-1. System requirement
‧ OS: Windows 2000, XP, 2003
‧ RAM: 128 MB
‧ CPU: Pentium II 350 or higher
‧ Disk space: 100 MB
‧ Free USB 1.1 port
2-2. Software install
(1). When myFoneKit CD is placed into PC, the setup menu should launch automatically.
Press Install myFoneKit to start installation. If the setup menu does not launch
automatically, use Windows Explorer to navigate to the appropriate CD-ROM drive and
run "Autorun".
8
(2). Please select a setup language and click Next. Then it will prepare to setup.
Select
language
(3). Click Next to install.
9
(4). Enter “user name” and “company name”, and then click Next.
(5). You can choose the destination folder in your system, if you do not want to change the
destination folder please click Next. On the “Destination Folder” screen, click the
Change button to browse to a new destination folder for the myFoneKit software.
Otherwise, click the Next button to accept the default folder.
10
(6). The system is ready to install the myFoneKit software. If you need to review or change
any settings, click the Back button. Click the Cancel button to exit the Wizard. Otherwise,
click the "Install " button to begin the installation.
(7). When the installation is completed, please click Finish to end installation.
11
2-3. Setup myFoneKit Agent (only for symbian smart phones)
If your mobile phone is a Symbian-OS smart phone, you must install the myFoneKit agent to
your phone and execute it for connecting with myFoneKit on PC. Please check the following
section on how to install the myFoneKit agent to your smart phone and section 2-4 on how to
execute the myFoneKit agent on the smart phone.
Setup myS60Kit for Nokia 3600 /3650 /3660 /6600 /7650 /N-Gage/ N-Gage QD /Siemens
SX1 /Panasonic X700 /X701 /X800
(1). Please make sure the mobile has enabled Infrared before the installation of “myFoneKit”
Agent (myS60Kit). Select the “Connectivity“ in the main menu of mobile and open it.
Then select the Infrared and press the Options button to activate the Infrared.
(2). After activating the Infrared, please aim the infrared port of handsets to myFoneKit
Infrared adapter (as shown below, taking Nokia 7650 for example). After installation
“myFoneKit Infrared” in PC, there is a sub-directory named “SIS“(e.g. C:\Program
Files\myFoneKit Infrared \SIS).
(3). If the handset and PC is connected via Infrared successfully, the Windows desktop will
generate an icon like this
Infrared icon
. Besides, the Windows system tray will also show an
.
12
(4). Double click the Wireless link icon
in desktop or the icon
in system tray, the
transmission dialog will be opened. Please browse to the sub-directory “SIS” of the
myFoneKit Infrared installed directory and select the file “myS60Kit.SIS”. Then press
“Send button to send this file to mobile phone.
(5). After the file is sent, you handset will prompt a new message received. Press Show to
open the new message. Then will show a security warning, please press Yes to
continue.
(6). The handset will prompt you to install myS60Kit, please press Yes. The install option will
be shown as following, please select Install and press OK to install “myS60Kit”.
13
(7). After the installation of myFoneKit Agent, the “myS60Kit” icon
will be shown on
the main menu of the mobile.
Setup myUIQKit for Motorola A1000 /A925 /SonyEricsson P800 /P802 /P900 /P910i
/BenQ P30
(1). Please make sure the mobile has enabled the infrared transmission before the
installation of myFoneKit Agent (myUIQKit). Select the “Control Panel“ in the main
menu of the mobile and open it. In the Control panel mode, please select the
Connections page. In the Infrared page, please click the radio button labeled “PC
connect” and “On” box.
(2). After activated the Infrared, please aim the infrared port of handsets to Infrared adapter
(as shown below, using SonyEricsson P800 for example). After the setup of myFoneKit
in PC, there is a sub-directory named “SIS” (e.g. C:\PPMOBILE\SIS).
14
(3). If the handset and PC is connected via Infrared successfully, the Windows desktop will
. By the way, the Windows system tray will also show an
generate an icon like this
Infrared icon
.
(4). Double click the Wireless link icon
in desktop or the icon
in system tray,
and then the transmission dialog will be opened. Please browse to the sub-directory
“SIS” of the myFoneKit installed directory and select the file “mYUIQKIT.SIS”. Then
press the Send button to send this file to your handset.
(5). After the file is sent to your handset, you handset will prompt a new message is received.
Please press View to continue.
15
(6). Please click Yes at Security information dialogue box to continue installing. And then
click Install to install “myUIQKit”.
(7). Then select a preferred language and press Continue. After the installation, the
“myUIQKit” icon will be shown on the Applications menu of the mobile.
2-4. Use myFoneKit Agent to connect with PC
Use myS60Kit for Nokia 3600 /3650 /3660 /6600 /7650 /N-Gage/ N-Gage QD /Siemens
SX1 /Panasonic X700 /X701 /X800
(1). After the installation of myFoneKit Agent, there is an icon named myS60Kit in the main
menu of the mobile. Select “myS60Kit“ and press Options. In the option menu please
select the Open.
16
(2). In the myS60Kit page, please press Options to open the connection menu.
If you want to connect via Bluetooth, please select Bluetooth and press Select.
If you want to connect via Infrared (IrDA), please select Infrared and press Select.
Note: Nokia 7610 /N-Gage / N-Gage QD only support connecting via Bluetooth.
via Bluetooth
via Infrared
17
Use myUIQKit for Motorola A1000 /A925 /SonyEricsson P800 /P802 /P900 /P910i /BenQ
P30
(1). After the installation of myFoneKit Agent, there is an icon named myUIQKit in the
Applications menu. Select “myS60Kit“.
(2). Press Options.
select IrDA to connect via Infrared (IrDA).
select Bluetooth to connect via Bluetooth.
2-5. Uninstall myFoneKit Agent
Uninstall myS60Kit for Nokia 3600 /3650 /3660 /6600 /7650 /N-Gage/ N-Gage QD
/Siemens SX1 /Panasonic X700 /X701 /X800
(1). In the main menu of the mobile, please select Tools.
18
(2). In the Tools menu, please select App. manager in the List View or «Manager» in Grid
View.
(3). Then please select the myS60Kit file. Press the Options button to open the options
menu.
(4). In the menu, select Remove and press the Select button.
19
(5). The handset will prompt you to confirm the uninstall, please press Yes to remove this file.
Note: Please Exit from myS60Kit before uninstall it.
Uninstall myUIQKit for Motorola A1000 /A925 /SonyEricsson P800 /P802 /P900 /P910i
/BenQ P30
(1). In the Applications menu of the mobile, please select Uninstall in List View.
(2). Please select myUIQKit item and click Uninstall.
20
(3). Please click Yes button to uninstall myUIQKit.
(4). Please click Done button to finish
21
Chapter 3 Function’s Guide
3
Wenjoy myFoneKit products include both software and hardware as a total
solution for mobile phone management. Besides basic features on SMS/EMS,
phonebook and calendar, myFoneKit's multimedia features on MMS, MP3,
WAVE, MIDI/SMAF, JPEG, GIF, and Java... enable the whole enjoyment of
mobile phones. The modem dial-up and charger functions make myFoneKit the
best travel companion.
3-1. Start up
1. Connect myFoneKit IrDA adapter and your handset with PC. Execute “Start /Programs
/myFoneKit Infrared /myFoneKit Infrared” program or click the “myFoneKit Infrared
“ icon
on Windows Desktop.
22
2. Click on File / Select handset model to select the model as the mobile phone. And then
click the OK button.
3. To change the operation language, just click on File / Select Language and then click the
OK button.
23
3-2. Messaging Functions
By myFoneKit, it is easier to compose the SMS/EMS by powerful editing tool on PC, and
send SMS/EMS messages via mobile phone connected with PC. Just input the message on
PC and send to more than one person at the same time.
Download/Upload
When myFoneKit handset is connected with PC, press Download button
to transit
the SMS/EMS massage records from mobile phone to “myFoneKit” program. To send
messages, select the message you desire and just press Send button
. Then the
message will be sent directly by PC via the mobile phone.
Note: When sending or reading EMS, the receiver’s mobile phone should support EMS
function (i.e. Ericsson T68/T68i, Siemens 6688/6618, Motorola 388, etc.), otherwise the
content cannot be read.
24
New
To add a new SMS/EMS record, press button New
or double click at the blank area and
then will open a new edit screen. Directly type in recipient's name or click Receiver to open
phonebook list. Select desired number and double click to add to the right side of receiver
column, and then click OK.
After filling out the SMS massage and selecting the folder, click Save to mobile to save the
data in mobile phone or Save to save data in PC or Send to send this message to the
recipient directly by PC or Cancel to cancel the edit.
25
Modify SMS
Double click the desired massage to open the editing screen to edit receiver's phone number
or the message content or the folder. Finishing edit, click Save in mobile or Save to record in
PC, or click Send to send the massage directly by PC.
Note: An SMS can be 160 English or 70 Chinese characters (varies with phone model). For a
message exceeding the length limit, it will be divided and sent by more than one SMS.
26
3-3. MMS Functions
MMS functions make the massages more amusing and colorful. It is very easy to compose
multimedia messages with pictures and sound just by dragging and dropping with mouse.
New: Create a new MMS message.
Delete: Delete the MMS message.
Modify: Edit the MMS message.
Upload: Update the MMS message from PC to mobile phone.
Download: Backup the MMS message from mobile phone to PC.
Compose MMS messages
In MMS Dialog screen, there are three main areas, multimedia list, slide list and time line list.
User can import pictures and sounds individually from PC to the multimedia list, then
drag-n-drop to the new slide on the slide list and input text. Finally edit playing time by clicking
on the time line of picture, sound and text directly.
27
Save file
Save the MMS message and exit the MMS editor window. You should specify the name for
this composed MMS message before you save it.
28
3-4. Pictures Functions
The functions allow creating your own style picture and animation, Easily convert the pictures
to formats supported by the mobile phone. By “GifMaker”, you can combine any pictures and
perform an animation you like.
Import
Press
button to select desired folder from PC to import image files.
Select
folder
Modify a picture
Double click the desired picture which is “jpg”, “bmp” or “png” format to open the edit screen.
29
(1). Click Image to edit the image.
(2). Click Color to edit the color.
(3). Click Effects to add some effects.
30
(4). When select a function, the image processing dialog shows the original and result
images. You can select
“Zoom to Normal” to view the image in its normal size or
“Zoom to Fit Window” to fit the images to the view box. In normal view, if the
image is larger than the view, you could adjust the view portion by dragging the image in
the view. When adjusting the slider bars of effect parameters, the result image will be
automatically updated for quick review.
31
Perform an Animation
In the “Picture Function”, double click a “gif” file or click the New button
to execute the
“GifMaker” program. In the “GifMaker” program, you can not only modify a gif, but also
create a new one.
Select “File/ New…” to create new file.
32
Click Add Image… button to add images.
Select the images you desired and then click Open.
33
If there are any images you don’t want, please select it and click Remove button, or click
Next button to add all images.
Set the delay time and the canvas size. The default size is the maximum for all selected
images.
Note: If you set the “Width” and “Height” values smaller than the original size, the images will
be cut.
34
Select “File/ Insert Images…” to insert other images into the frames.
If you want to resize the canvas, please select “Edit/ Resize Canvas…”.
35
Click “Type” button
in the tool bar and then you can add some words on the canvas. If
you want to change the type of the words, please select “Font…”.
Tool
bar
If you want to deal with the frames, you can select “Frame” or move mouse right on the frame
and left click. Besides, you can move a frame backward or forward just by dragging and
dropping with mouse.
36
When select “Frame/ Frame Ser (Current Frame)…”, you can set the delay time and
disposal method only for the current frame. If select “Frame/ Frame Ser (All Frame)…”, all
frame will be set.
None: Do nothing.
LEAVE: Leave the target bitmap as is.
Restore background: Restore the background.
Restore previous: Restore the previous image.
Select “File/ Preview”, then you can preview the animation.
37
Download /Upload
Press
button to transit the pictures from mobile phone to “myFoneKit” program. To
upload, just press Upload button
to transit the pictures from “myFoneKit” program to
mobile phone.
38
3-5. Melody Functions
In the functions user can edit own rings and upload to the mobile phone, or import melody
files from PC and convert to rings. myFoneKit provide smart and convenient tools to
personalize own-style melody.
New
Click New button
to open a edit screen. User can compose a new melody here.
Notes
Play tag
Track name (track instrument)
: Save
: Save As
: Save selected Tracks and Range
: Select Range
: Tempo Adjustment (Beats/Minute)
: Play
: Pause
: Stop
: Select Track
: Delete Note
User can add the notes by choosing a “note button” and click at a track. To delete the notes
please select the
button, and then click on the note. Then it will be deleted.
39
Pressing
button or clicking the mouse right button at a track can open the “Track
Editing Functions”.
Click on the Track Properties, to open the track properties editing screen. You can name the
track and select at the “Track Instrument” in the screen.
40
Import
Press
button to select desired Melody folder from PC to import melody files.
Select
folder
Modify
Double click the desired melody and then user can open the editing screen. If the opened file
is a MIDI or RMI file, then the midi editor will be opened (as shown above). If the opened file
is a MP3 or WAVE file, the MP3/WAVE editor will be opened.
41
You could play the MP3 or WAVE file, pause or stop the playing in the MP3/WAVE editor. To
select a range of sound to be played, just drag the time-line slider to some position and press
button to mark the selection start and the
button to mark the selection end.
the
Later the play function will only play the selection period. You can save the selected period of
. Or save
music to another MP3 or WAVE file by pressing Save Selected Range button
the entire MP3 or WAVE file to another format (converting WAVE to MP3…etc) by pressing
Save
button.
Download / Upload
Press
button to transit the ring from mobile phone to “myFoneKit” program. To
upload, just press Upload button
, and the melody will be transited to mobile phone. On
some mobile phones (e.g. Samsung mobile phones supported by SS-C01), even the mobile
phones do not support MIDI files but SMAF (*.MMF) files. The “myFoneKit” software will
automatically convert the MIDI file to SMAF file and upload the SMAF file to the mobile
phone.
42
3-6. Phonebook Functions
In the functions, the record can be downloaded from mobile phone to PC, or uploaded from
PC to mobile phone.
Upload tag: Records
ticked upload to
mobile phone.
Save tag:
=Record saved in mobile phone memory.
=Record saved in SIM card memory.
Download /Upload
Click mouse right button, and then press Download button
to transit the phonebook
records no matter in the “mobile phone” or “SIM card” to “myFoneKit” program. To upload,
just press Upload button
to transit.
Modify
To modify phonebook, double click the desired data to
open “Edit” screen. Phonebook records can be
categorized to different memory and groups, click OK
after modification, if don’t want to save, just press
Cancel.
New
To add a new phone record, press
or double click
the blank area and then will open a new edit screen.
After filling the data, click OK to save it.
43
Import and Export to Microsoft Outlook or Outlook Express
You could import the contacts in the Microsoft Outlook by “File/Import File/Outlook”, or
Outlook Express by “File/Import File/Outlook Express”, all contact items in Outlook will be
imported to myFoneKit software. You could editing them and then upload it to your handset.
The phonebook contents could also be exported to Microsoft Outlook by “File/Export
File/Outlook” or Outlook Express by “File/Export File/Outlook Express”.
44
3-7. Calendar Functions
Just like the Phonebook functions, the calendar can be downloaded from mobile phone to PC,
or uploaded from PC to mobile phone by the same way.
Upload
tag
Alarm tag
New
To add a new calendar, press
or double click the blank area and then will open a new
edit screen. Edit page for calendar varies with different mobile phone models, user can
choose to edit calendar type, content, subject, date, alarm, and repeat.
45
Calendar type
Calendar repeat
Modify
To modify the calendar, double click the desired data to open edit screen.
Upload
Click Upload button
to transmit calendar data to currently connect to mobile phone.
Download
Click Download button
to transit and backup mobile phone calendar data from
mobile phone to myFoneKit program.
Import and Export to Microsoft Outlook
You could import the appointments in the Microsoft Outlook by “File/Import File/Outlook”, all
the appointments in Outlook will be imported to myFoneKit software. You could editing them
and then upload it to your handset.
The calendar events could also be exported to Microsoft Outlook by “File/Export
File/Outlook”.
46
3-8. File Manager Functions
There are four areas of the File Manager window and shown as below:
Mobile
Phone
Files
Mobile
Phone
Folders
PC
Folders
PC
Files
Download/upload
When connecting the mobile phone to PC via myFoneKit handset, click on a folder in the
“Mobile Phone Folder“ area. And there are the files displayed in the folder in the “Mobile
Phone Files” area.
Select the mobile phone files by mouse and drag-n-drop to the “PC Files” area to download
to PC. The files’ download progress will display on PC monitor.
To upload files from PC to mobile phone, select the PC files desired to upload to mobile
phone also by mouse and drag-n-drop to the ”Mobile phone Files” area to upload to mobile
phone.
47
3-9. Video Functions
Taking a video by mobile phone is so easy today. Now you can not only download/upload the
video between mobile phone and PC, but also play and edit the video via myFoneKit Video
Function.
Import
Press
button to select desired folder from PC to import image files.
Select
folder
Download /Upload
Click Download button
program. Click Upload button
to transit video files from mobile phone to myFoneKit
to transit video files to currently connect to mobile
phone.
48
Modify
Double click the desired video or clicking the mouse right button at the file and select Open.
Then you can open the editing screen.
Tool bar
Measure bar
You could play the 3GP file, pause or stop the playing in the video editor. To select a range of
button to
video to be played, just drag the time-line slider to some position and press the
mark the selection start and the
button to mark the selection end. Later the play
function will only play the selection period. You can save the selected period of video to
another 3GP or AVI file by pressing Save Selected Range button
3GP or AVI file to another file by pressing Save As button
49
.
. Or save the entire
View
In the video editor, select “View” and you can change the screen size. When you play a video
at “Full Screen”, pressing Esc button can return to the original size.
50
3-10. Java Game Functions
Download/Upload
Press Download button
to transit the software from mobile phone to “myFoneKit”
program. To upload, just press Upload button
.
3-11. CDtoMP3 Functions
Is it difficult to rip the Audio CD tracks into MP3 formats? Not any more. “myFoneKit”
CDtoMP3” functions not only rip the Audio CD tracks into MP3 /WAV formats but also upload
them to your mobile phone. Want to listen the favorite music by your mobile phone any time
and anywhere, “myFoneKit CDtoMP3” make it come true.
Start Up
Insert the Audio CD first. Under myFoneKit Infrared program, you can click on “Tool
/CDtoMP3” to start up the CDtoMP3 program.
51
If you are not under myFoneKit Infrared program, you also can execute “Start /Programs
/myFoneKit Infrared /CDtoMP3” to start up the CDtoMP3 program.
You can see the “CDtoMP3“ program window as below. If the tracks are empty, please press
“Refresh CD” button
.
52
If the track name can’t show complete, please select the language according to the Audio CD.
Rip CD
Select the desired tracks and then press “Rip CD” button
Select tag
= The tag means that the track has been ripped
53
.
In the ripping process.
Upload
When the rip finished, the window will show the output file as below. Now you can select the
files you desired and then press “Upload” button
phone.
54
to transit the files to your mobile
Settings
If you need to check or change the default settings of “CD Data” or “Output files”, please
click File and select Settings....
You can change the default settings and select the “CD ROM” if you have another CD drive.
55
Besides, you can change the “Output folder”, “Full output folder”, and the output files
or
button.
“Type” by press
56
3-12. Web Picture Master Functions
Web Picture Master is the fastest and easiest way to take screen captures. With only one
click, you can easily get images or GIF animations from websites. Besides, Web Picture
Master can also capture any portion of the screen image. Are there any images you desired?
Actions speak louder than words.
Start Up
In myFoneKit software, you can click on “Tool /Web Picture Master” to start up the Web
Picture Master program. When it is running you can see the icon
Window toolbar.
57
in the right corner of
Capture images
When it is running, on any websites you open in Internet Explorer, there will be a small tag
shown on every image. If you would like to get an image on the website, just click on the
tag
. You can get that image by “Get file” or “Capture Screen” by selecting the popup
menu
.
Note: Get file = Get the original image file from the website. It is useful to capture an
animation.
Capture Screen = Get that image by screen capture. It is useful when sometimes “Get
file” function does not work well for some specific picture.
Disable/ Enable
You can temporary disable showing tags on Internet Explorer. Just click on the Web Picture
Master icon
and select Disable. To enable it again, please select Enable.
58
Settings
If there are too many small images and the tags are everywhere on some specific websites,
you can select Settings to setup the minimal size of web picture. The tags will not be
displayed on the images smaller than your setting.
Capture Screen
You can also capture any portion of screen. Click on the Web
Picture Master icon
and select Capture Screen to start
the screen capture.
On screen capture, the mouse cursor will become cross
. Just use mouse to select the
range that you want to capture. If you don’t want to capture any image, you can easily exit the
screen capture mode by a right click.
59
All images that you captured will be stored in the directory of “Picture” page in myFoneKit
software. Select an image and right click to open it. If it’s a “GIF” animation, you can see the
animation by right click on the picture and select “Open/ Internet Explorer”. In myFoneKit
software, you can easily upload the captured images to your mobile phone.
60