Transcript
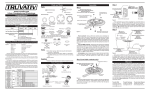
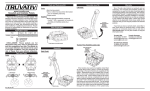
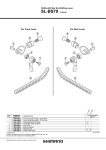
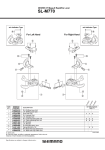
Parts Preparation Your new Truvativ chain comes well lubricated and ready to ride out of the box. To get the best performance from your drive-train it is best to replace all sprockets and chainrings when replacing a chain. This may or may not be practical depending on the condition of your bicycle. However, you should be sure to clean your drive-train of all dirt and grime when installing your new chain. www.truvativ.com Chain Congratulations! Thank you for purchasing a Truvativ chain. The following instructions should be read thoroughly before installation. Improper installation of your Truvativ chain may cause an unexpected failure of the parts that could cause you to lose control of your bicycle resulting in serious injury or death. We recommend having your parts installed by a qualified bicycle technician. Truvativ assumes no responsibility for malfunction or injury due to faulty installation or maintenance. Assembly CHAIN LENGTH Shorten the chain length specified by your derailleur manufacturer or follow these general guidelines: (1) Place chain over the largest rear sprocket and the largest front chainwheel and add 2 links. + 2 Links See Figure 1. Figure 1 Application Chart Part Road XC AM DH CONNECTING YOUR CHAIN Team 10 XR MODELS Team 9, XR 9, XR 8 Key: XC = Crosscountry AM = All-Mountain DH = Downhill Compatibility Team 10 10 speed Team 9, XR 9 9 speed XR 8 8 speed Parts and Tools Chain Quick Link (Team Models only) Tools (required): Chain Tool (Park Tool CT-3, CT-5, or equivalent) Supplies: None Rev 1 June 24, 2004 XR model chains come ready to be assembled with one pin unpushed. Once the chain is at the desired length, bring the chain together (Figure 2) and simply connect the chain by pushing in the unpushed pin using a chain tool. Push the pin in so that there is equal amount of pin protruding on each side of the outer plate as shown in Figure 3. The strength of the chain will be maximized with proper pin installation. Figure 7 INCORRECT ASSEMBLY Figure 4 Figure 4 shows examples of incorrect installation of pin where the pin is not equally protruding on each side of chain plate. Finally, if a stiff link is created upon installation of the pin, be sure to remove the stiffness so the link moves free and smooth like the other links. This should be done with a chain tool or by a qualified bicycle technician. TEAM MODELS Truvativ Team Models are connected using the Truvativ QuickLink. Once the chain is at the desired length simply bring the two ends together and insert both halves of the QuickLink together as shown in Figure 5. Figure 2 Equal amount of pin protruding on each side of chain plate CORRECT ASSEMBLY Figure 3 WARNING: Once your new chain is installed, be sure your drive-train is functioning properly before using your bicycle. Maintenance & Care Get the maximum life out of your chain by servicing the chain and drive-train with regular cleaning and proper lubrication. Chain wear is mostly attributed to contaminants (dirt, grime, etc) that cause the individual chain pieces to wear down from abrasion. Regular cleaning and lubrication flush out these contaminants and thus reduce the amount of abrasion from environmental contamination. Poor maintenance of your chain will accelerate wear of the chain as well as the sprockets, chainrings, and derailleur pulleys of your bicycle. Always clean dirt from chain before applying lubrication and remove excess lube after application. Warranty Drive train compatibility Part Parts: (2) For rear suspension bicycles follow the directions in (1) above and be sure the rear suspension is positioned in the longest possible chain length. QuickLink locked into place correctly Figure 5 Once the QuickLinks are together, pull the chain apart (Figure 6) to fully lock the QuickLink together (Figure 7). Figure 6 Our chains are warranted against manufacturing defects and workmanship. Chains are a wear and tear part of your bicycle If your chain is defective upon initial assembly, a warranty claim may be valid. All other instances are likely not covered under warranty. If you feel you do have a warranty claim, would like to learn more about our warranty policy, or have further questions or comments please visit our web site at www.truvativ.com. You may also contact us using the information below: Truvativ USA Truvativ Germany Tel [1] (805) 787-0917 Tel [49] 23 02 399-280 [email protected] [email protected] [email protected] Truvativ Asia (Taiwan) Tel [886] (42) 496 5899 [email protected]