1
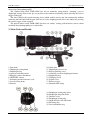
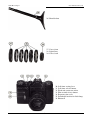
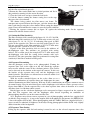
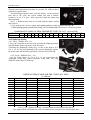
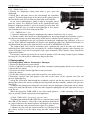
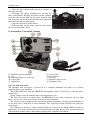
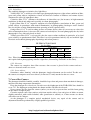
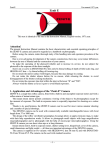
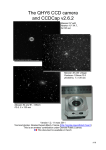
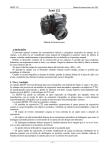
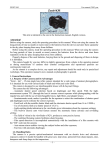
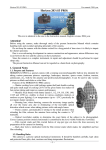
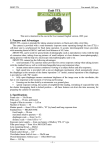
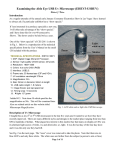
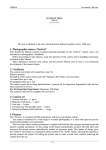
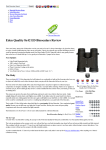
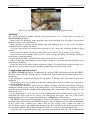
Zenit PhotoSniper
User manual, 1992 year
Zenit PhotoSniper
This text is identical to the one in the Instruction manual, English version.
Attention!
The present Instruction Manual contains brief characteristics and essential rules of using the
PHOTOSNIPER photogun.
Before using the photogun, make thorough study of the handling rules according to the present
Manual to master correct procedures.
Minor differences between the Description and your photogun may be due to ever-advancing
development of the camera and design.
To ensure long period and trouble/free operation of the camera the following should be kept
in mind:
Do not touch the surfaces of the optics with hands as it is likely to cause damage of the coating.
Do not turn the release button, if not necessary, while releasing the shutter to avoid the cutting out
of the shutter setting mechanism.
Do not rotate the shutter speed dial in the interval between “B” and “500”.
While cocking the camera shutter, always turn the setting lever up to the mechanical limit to avoid
blank frames on the film.
Check the work of the shutter before loading the camera. To do this turn the shutter cocking lever
with one or more movements up to the mechanical limit. Then press the release button.
1. Application and Advantages
The PHOTOSNIPER photogun in a combination of a special TAIR-3-PhS long focus lens and ZENITES reflex camera. The lens with the camera is mounted on a gun stock with a grip fitted with a release
mechanism.
The photogun is designed for taking close-up picture of animals, birds and plants under natural
conditions.
The photogun can be successfully used for sports photograph as well as for taking close-up pictures
of distant architectural details.
The ZENIT-ES camera has many attractive features including an instant return mirror, providing
continuous watching of the subject to be photographed (except for the moment of exposure), built-in
exposure meter (particularly valuable when photographing on a colour film), shutter setting lever and
hinged back cover.
In the photograph of 13×18 cm size (5 times magnification of the negative picture size) one can
distinguish the details that can be clearly seen through the field glass. The size of the details
distinguishable in the picture equals approximately to 1/10000 of the taking distance.
The ZENIT-ES type camera of the photogun is fitted with a built-in uncoupled exposure meter and
an instant return mirror. Unlike the ZENIT-E camera, it has an additional release button at the bottom
of the camera body (coupling the camera with the grip trigger), more remote exit pupil of
the viewfinder eyepiece (for comfortable shooting) and 42×1 mm thread that makes possible to use
lenses from the Praktica, Asahi, Pentax, Pentacon, Edixa, etc. cameras as interchangeable ones.
Using the reflex viewfinder (ground glass focusing) and extension rings, one can do reproduction
–1–
Zenit PhotoSniper
User manual, 1992 year
works, take pictures with large magnification (macrophotography) and photograph with the aid of a
microscope (microphotography).
The standard long focus TAIR-3-PhS lens has an automatic spring-loaded (“jumping”) pre-set
diaphragm closing down to the pre-set position at the moment of shooting (when pressing the release
trigger of the grip).
The lens is fitted with a quick focusing device which enables to focus the lens continuously without
removing the left hand from the gun stock and to set the diaphragm and release the shutter by pressing
the release trigger, when required.
The optical surface of the TAIR-3-PhS lens have an “amber” coating, which ensures correct colour
rendition when photographing on a colour film.
2. Main Units and Details
1. Sun shade
2. Diaphragm setting knob
3. Diaphragm ring
4. Aperture indicating mark
5. Ring for camera attachment
6. ZENIT-ES camera
7. Indicating mark of distance scale
8. Lens focusing drum
9. Bracket
10. Guide pins
11. Diaphragm release lever
12. Release pushing screw
13. Adjusting screw for diaphragm advance
14. Supporting ring
15. Clamping screw
16. Tripod screw
17. Release trigger
18. Shoulder butt clamp
19. Diaphragm setting ring index
20. Diaphragm ring with index
21. Distance scale
22. Diaphragm setting ring
23. Deph of field scale with index
24. Focusing ring
25. Lens attachment ring
–2–
Zenit PhotoSniper
User manual, 1992 year
26. Shoulder butt
27. Cover, front
28. Light filters
29. Cover, back
30. Self-timer setting lever
31. Self-timer release button
32. Flash unit connector socket
33. Film rewind release button
34. Exposure time scale
35. Detachable bracket for flash lamp
36. Photocell
–3–
Zenit PhotoSniper
User manual, 1992 year
37. Cassette chamber
38. Cassette spool guide
39. Viewfinder eyepiece
40. Eye hood
41. Take-up spool
42. Camera swing back
43. Film pressure plate
44. Lock latch
45. Take-up spool spring
46. Sprocket
47. Film channel slides
48. Shutter release button
49. Film gate
50. Guide of calculator diaphragm scale
51. Exposure time scale of calculator
52. Film speed scale
53. Film speed scale index
54. Diaphragm scale of calculator
55. Film rewind knob
56. Exposure time scale
57. Indicating mark of exposure time scale
58. Shutter release button
59. Exposure counter dial
60. Guide of exposure counter dial
61. Index of exposure counter dial
62. Shutter setting lever
63. Synchronization setting lever
64. Synchronization lever index
65. Exposure meter needle
66. Calculator pointer
–4–
Zenit PhotoSniper
User manual, 1992 year
3. Specifications
Frame size, mm . . . . . . . . . . . . . . . . . . . . . . . .
Width of perforated film, mm . . . . . . . . . . . . .
Number of frames . . . . . . . . . . . . . . . . . . . . . .
Shutter speed . . . . . . . . . . . . . . . . . . . . . . . . . .
Viewfinder field of view, mm . . . . . . . . . . . .
Eyepiece magnification . . . . . . . . . . . . . . . . .
24×36
35
36
from 1/30 to 1/500 sec (automatic), “B” (by hand)
and long exposure time
20×28
4,5x
LENSES
Focal length, mm . . . . . . . . . . . . . . . . . . . . . .
Relative aperture . . . . . . . . . . . . . . . . . . . . . . .
Mechanical back focal distance (the axial
distance between the film plane and the plane
of the seating scoulder), mm . . . . . . . . . . . . . .
Seating thread of the lens . . . . . . . . . . . . . . . .
Minimum taking distance, m . . . . . . . . . . . . .
Diaphragm scale . . . . . . . . . . . . . . . . . . . . . . .
Sun shade seating shoulder . . . . . . . . . . . . . . .
Light filter mounting thread . . . . . . . . . . . . . .
Tripod socket thread of the TAIR-3-PhS lens
and the ZENIT-ES camera . . . . . . . . . . . . . . .
TAIR-3-PhS
300
f/4,5
HELIOS-44-2
58
f/2
45,5
42×1
3
4,5 to 22
72×0,75
72×0,75
45,5
42×1
0,5
2 to 16
ø55 mm
49×0,75
3/8ʺ
OVERALL DIMENSIONS
Of the photogun ready to use, mm . . . . . . . . .
Of the photogun case, mm . . . . . . . . . . . . . . .
140×235×560
170×210×360
WEIGHT
Of the photogun ready to use, kg . . . . . . . . . .
Of the photogun colpete set in the case, kg . .
2,9
5,5
4. Preparation for Photographing
4.1. Preparation of the Photogun for Photographing
1. Open the case.
2. Release the tripod screw of the gun stock and remove the stock
from the case.
3. Holding the lens body with the left hand, screw out the
clamping screw which fastens the lens with the camera to the
bracket of the case; then remove the lens from the case.
4. Carefully join the stock to the lens. To do this put two guide
pins of the stock into sockets of the lens bracket and the release
button bush – into the hole of the supporting ring.
5. Tightly fasten the stock to the lens with the tripod screw.
6. Slightly tighten the clamping screw.
7. Put the shoulder butt in the socket of the stock and fasten it
with a clamp.
4.2. Loading the Camera
The camera is loaded at usual lighting in the following order:
1. Cut straight the end of the film. Open the back cover of
the camera.
2. Insert the cut end of the film under the take-up spool spring, and see that a sprocket tooth engage
a sprocket hole. See that the film is placed correctly between the film channel slides.
–5–
Zenit PhotoSniper
User manual, 1992 year
3. Place the cassette into the cassette chamber. Before doing this,
pull the film rewind knob upwards.
4. Return the film rewind knob into its initial position and fix in
this position by turning it in the arrow direction.
5. Close the back cover and press down the lock latch.
6. Cock the shutter, turning the shutter setting lever to the stop;
then press the release button.
The shutter being cocked, the film moves one frame. To
transport non-exposed film to the film gate, cock the shutter three
times each time pressing the release button. When setting the shutter see to it that the film rewind knob
rotate. If not, check whether the camera is correctly loaded with film.
7. Turning the exposure counter dial set figure “0” against the indicating mark. Set the exposure
counter dial with the shutter cocked.
4.3. Setting the Film Sensitivity
The film sensitivity dial is marked with figures 16, 32, 65, 130, 250,
500 indicating film sensitivity in ГОСТ-ASA units on one side and
with figures 13, 16, 19, 22, 25, 25 indicating film speed in DIN
grades on the opposite side. There are two dots under figure 32: the
left one corresponds to the film sensitivity of 25 ГОСТ-ASA units
and the right one – to that of 32 ГОСТ-ASA units.
Figures of the film sensitivity dial are seen in the windows of
the diaphragm scale. The windows are provided with setting
indexes. To set a film speed (for example 65 ГОСТ-ASA units) turn
the diaphragm scale until the setting index matches with scale
division 65. The same procedure should be performed in setting film
sensitivity if the film is marked in DIN grades.
4.4. Exposure Determining
Aim the photogun at the object to be photographed. Turning the
exposure time scale to the right or to the left, match the exposure
meter needle with the centre of the calculator pointer. (The needles
can be observed in the window at the top of the camera). In this case
the hatches of the exposure time scale and the diaphragm scale
should coincide. The hatches are allowed not to coincide within ½ of
interval between the hatches.
With the needles matched figures on the scales allow to set a
number of combinations of exposure times and diaphragms for some
definite illumination and film sensitivity. With any of these combinations the negative obtained will be
of normal density. Keep in mind that figures on the diaphragm scale indicate relative aperture values;
figures from 500 to 2 on the exposure time scale show exposure time values in fractions of a second
and those from 1 to 30 show whole seconds.
Black figures on the calculator diaphragm scale correspond to figures engraved on the exposure
time dial. The exposure time and the diaphragm value chosen depending on conditions of
photographing should be set on the camera and the lens.
Note. Exposure meter shows correct exposure in case of photographing with the lens, angular field
of which is large enough, i.e. is near to the angular field of the photocell (for instance, the HELIOS-442 lens with angular field of 40°). When photographing with the TAIR-3-PhS lens (angular field of 8°)
correct results are obtained if brightness of the object being photographed within 40–50° only slightly
differs from that of the background.
4.5. Exposure Time Setting
Lifting up the exposure time dial and turning it round its axis set the selected exposure time value
–6–
Zenit PhotoSniper
User manual, 1992 year
against the index mark in the middle of the dial. Figures on the
exposure time dial indicate fractions of a second; “B” indicates handcontrolled exposure time.
To obtain long exposure tome cock the shutter, set the exposure
time dial at “B”, press the release button and turn it counterclockwise as far as it goes. After exposure return the button into
initial position.
Notes: 1. Exposure time may be set both with the shutter cocked
and released.
2. It is good practice to use a tripod when photographing at long exposure time and “B”.
3. When photographing without flash lamps, the synchronization lever may be set in any position.
COMPARATIVE TABLE OF FILM SENSIBILITY UNITS OF ГОСТ, ASA and DIN
ГОСТ-ASA 16 20 25 32 40 50 65 80 100 130 160 200 250 320 400 500
DIN
13 14 15 16 17 18 19 20 21 22 23 24 25 26 27 28
4.6. Diaphragm Setting
4.6.1. Of the “TAIR-3-PhS” lens
1. Lay your left palm on the lens body and turn the diaphragm knob
with the thumb to the stop in the arrow direction.
2. Turning the diaphragm setting ring, set one of the figures (4.5;
5.6; 8; 11; 16; 22) corresponding to the selected diaphragm against
the index mark. Each of these positions is fixed with a click stop.
4.6.2. Of the “HELIOS-44-2” lens
Set one of the figures (2; 2.8; 4; 5.6; 11, 16) engraved on the
diaphragm setting ring against the index mark (dot). The ring
should be turned up to a click stop.
f/
D (m)
3
3.5
4
5
6
8
10
15
20
40
80
∞
DEPTH-OF-FIELD TABLE FOR THE “TAIR-3-PhS” LENS
(f = 300 mm)
4.5
5.6
8
11
16
from – to
from – to
from – to
from – to
from – to
2.99 – 3.01
3.48 – 3.52
3.97 – 4.03
4.95 – 5.05
5.93 – 6.07
7.87 – 8.14
9.79 – 10.22
14.50 – 15.53
19.11 – 20.98
36.48 – 44.30
66.84 – 99.60
400 – ∞
2.98 – 3.02
3.48 – 3.52
3.97 – 4.04
4.94 – 5.06
5.91 – 6.09
7.84 – 8.17
9.74 – 10.28
14.39 – 15.67
18.90 – 21.24
35.71 – 45.49
64.26 – 105.97
322 – ∞
2.98 – 3.02
3.47 – 3.54
3.95 – 4.05
4.92 – 5.08
5.88 – 6.13
7.77 – 8.25
9.63 – 10.40
14.14 – 15.98
18.47 – 21.82
34.14 – 48.35
59.29 – 123.19
225 – ∞
2.97 – 3.03
3.45 – 3.55
3.93 – 4.07
4.89 – 5.12
5.83 – 6.18
7.69 – 8.34
9.50 – 10.56
13.85 – 16.38
17.96 – 22.59
32.37 – 52.47
54.07 – 154.66
164 – ∞
2.96 – 3.05
3.43 – 3.57
3.91 – 4.10
4.84 – 5.17
5.76 – 6.26
7.55 – 8.51
9.29 – 10.85
13.38 – 17.10
17.16 – 24.02
29.81 – 61.18
47.16 – 269.92
113 – ∞
22
from – to
2.94 – 3.07
3.41 – 3.60
3.87 – 4.14
4.78 – 5.24
5.68 – 6.37
7.40 – 8.72
9.05 – 11.20
12.86 – 18.05
16.30 – 25.99
27.22 – 76.49
40.92 – ∞
82 – ∞
Notes: 1. D – distance in metres – distance from the film plane to the object.
2. In depth of field calculation the circle of confusion was accepted to be equal to 0,05 mm.
–7–
Zenit PhotoSniper
User manual, 1992 year
4.7. FOCUSING THE LENS FOR IMAGE SHARPNESS
4.7.1. “TAIR-3-PhS” lens
1. Turning the diaphragm setting knob until it goes, open the
diaphragm.
2. Acting like a rifle-man, observe the aim through the viewfinder
eyepiece. To obtain sharp image of the object on the ground glass of
the viewfinder rotate the lens focusing drum with your left hand.
If you want to photograph a group of objects unequally spaced
from the camera, use should be made of the depth-of-field table.
Required diaphragm should be selected according to this table. For
example: with the lens set at 40 m and diaphragm of f/11 objects
spaced within 32 to 52 will be sharp on the film.
4.7.2. “HELIOS-44-2” lens
1. Open the diaphragm turning the diaphragm ring counter-clockwise as far as it goes.
2. Aim the camera at the object to be photographed and, observing through the viewfinder eyepiece,
turn the lens focusing ring until sharp image of the object is obtained on the ground glass screen.
3. Close the diaphragm to the pre-set position by turning the diaphragm ring clockwise as far as it
will go. With different combination of distance and diaphragm values the depth-of-field limits are
determined with the help of the depth-of-field scale made on the HELIOS-44-2 lens.
The depth-of-field scale consists of number pairs symmetrically spaced on both sides from the
indicating mark. Each number pair corresponds to a definite diaphragm opening. After focusing two
values on distance scale can be read against such a pair of numbers. These distance values indicate the
depth-of-field limits.
For instance, with the lens focused at 4 m and an aperture of f/11 the image of objects placed within
the range of 2.5 to 10 m will be sufficiently sharp on the film.
5. Photographing
5.1. Photographing with the “Photosniper” Photogun
1. Prepare the photogun for picture taking.
2. Select a light filter according to the type of film, conditions of photography and the scene, and screw
it into the the lens mount.
3. Screw the sun shade into the light filter or the lens mount.
4. Load the camera.
5. Set the film sensitivity value on the film sensitivity scale of the camera.
6. Determine exposure time and aperture value and set the values on the exposure time dial and
the lens diaphragm ring.
7. Acting like a rifle-man, look through the viewfinder eyepiece and aim the camera at the object to be
photographed. Focus the lens by rotating the focusing drum and then smoothly, without jerks press the
gun trigger.
To prepare the photogun for taking the next picture turn the diaphragm setting knob and the shutter
setting lever with your left hand. At the same time support the photogun with your right hand to keep it
ready for use.
When the long-focus TAIR-3-PhS is used with small apertures, a slight vignetting of the image
edges is possible, which is practically of no importance.
A. With “TAIR-3-PhS” lens at long exposure times
To photograph with the TAIR-3-PhS lens at exposure times longer
then 1/60 sec (for instance, 1/30 or 10 sec) the photogun should be set
on a tripod; otherwise the obtained picture may happen to be unsharp.
To work with the camera mounted on a tripod act as follows:
1. Remove the lens with the camera from the case. Having loaded
the camera, mount it on the tripod using threaded socket of the
bracket.
–8–
Zenit PhotoSniper
User manual, 1992 year
2. Open the diaphragm by moving the knob in the arrow direction as far as it will go.
3. Set the required aperture.
4. Set the exposure time on the camera dial.
5. Aim the photogun at the object to be photographed.
6. Focus the lens.
7. Holding the lens body carefully press the diaphragm release lever from below.
8. Cock th shutter.
9. Press the release button at the top of the camera.
B. With “HELIOS-44-2” lens
1. Open the case and, holding the lens body with your left hand, loosen the clamping screw and
remove the lens with the camera out of the case.
2. Carefully unscrew the TAIR-3-PhS lens out of the camera and immediately cover the thread with
a back cover having taken it from a ring in the case.
3. Place the lens in the case and fasten it with the clamping screw.
4. Having removed a hermetic cap, unscrew the HELIOS-44-2 lens out of the seating socket on the
inner side of the case cover and mount it on the ZENIT-ES camera.
5. Load the camera with film.
6. Set the film sensitivity.
7. Using the exposure meter, determine exposure time and diaphragm and set these values on the
camera and the lens.
8. Open the diaphragm by turning the diaphragm setting ring counter-clockwise as far as it will go.
9. Looking through the viewfinder eyepiece aim the camera at the object to be photographed.
Turning the focusing ring, focus the lens.
10. Close the diaphragm to the pre-set value by turning the diaphragm ring clockwise as far as it
will go.
11. Keeping the object being photographed in the viewfinder frame, smoothly, without jerks, press
the release button.
C. With flash bulbs
For photographing in poor illumination use should be made of flash bulbs or electronic flash. For
this aim the ZENIT-ES is fitted with a special device which synchronizes the bulb flash moment with
the shutter operating time. To switch on a single action flash bulb the synchronization setting lever
should be set at “MF”. When operating with an electronic flash kit, set the synchronization setting
lever at index “X”. Only exposure time of 1/30 (i.e. when the shutter is completely open) may be used
in the ZENIT-ES camera if photographing with either flash bulbs or electronic flash.
Photographing with flash bulbs at “B” exposure time is not advisable since a considerable amount
of stray light (after flash) gets into the camera resulting in a blurred image on the film.
D. With self-timer
To photograph with self-timer, do the following procedure:
mount the photogun on a tripod or fix it in any other way; cock the
shutter; wind the self-timer mechanism by turning the self-timer
setting lever downwards as far as it will go; set the exposure time;
choose the frame; focus the lens by a definite place of the frame;
close the diaphragm to the stop and, having pressed the self-timer
release button, take your place before the camera.
The shutter operates in no less then 9–20 sec after pressing the
button.
5.2. Camera Unloading
When the exposure counter dial shows figure 36 it means that the exposed film should be rewound into
the cassette.
–9–
Zenit PhotoSniper
User manual, 1992 year
The procedure is the following:
1. Press the film rewind knob and turn it contrary to
the arrow direction.
2. Disengage the shutter mechanism by pressing the
film rewind button. Keeping the button in this position,
rotate the film rewind knob in the arrow direction until
you feel by the applied force that the film end is pulled out
from under the take-up spool spring.
3. Open the back cover of the camera.
4. Pull the film rewind knob upwards and remove
the cassette out of the camera.
6. Accessories; Care of the Camera
67. Shoulder strap for photogun
68. Cap
69. Interchangeable lens (with cap)
70. Cover, front
71. Light filters
72. Cover, back
73. Screw-drivers
74. Cassettes
75. Shoulder sraps for case
76. Clamping screw
6.1. Case with Accessories
The photogun with accessories is packed un in a stamped aluminium case where it is securely
protected in any route conditions.
The TAIR-3-PhS lens with the ZENIT-ES photographic camera is fastened to a bracket with a
tripod screw.
Spring clamps secure the shoulder butt at the bottom of the case.
The inner side of the case cover carries: the HELIOS-44-2 lens under a hermetic cap; five light
filters; two cassettes; two screw-drivers; two covers (front and back).
The case has sturdy locking catches, preventing accidental opening, a carrying grip and shoulder or
on the back (like a knapsack) in route conditions. The straps have buckles intended for varing the
straps length.
The complete set includes a rubber sunshade which is screwed on the TAIR-3-PhS lens (like the
light filters). It is used to protect the lens from undesirable side-light. Besides that, it protects the lens
and light filters against damage when photographing under complicated conditions.
– 10 –
Zenit PhotoSniper
User manual, 1992 year
6.2. Accessories
6.2.1. Light filters
The complete photogun set includes five light filters:
Yellow filter Y-2x is widely used in landscape photography;improves right colour condition of blue,
green and yellow objects; emphasizes clouds and increases contrast of shadows and remote objects;
eliminates the effect of atmospheric haze.
Colourless filter UV-1x eliminates the influence of ultraviolet rays (for instance, in high-mountain
conditions) in black-and-white and especially in colour photography.
Light yellow filter Y-1.4x improves rendition of visual brightness correlations of blue, green and
yellow objects in portraiture with natural illumination, in photographing landscapes under clouded
blue sky and the evening illumination when operating at brief exposure times.
Orange filter O-2.8x is used in taking pictures of remote objects when it is necessary to reduce the
effect of atmospheric haze; it increases the contrast of such objects. In usual photography the sky in the
photograph is very dark and clouds are bold.
Yellow-green filter YG-2x is of especial value for correct colour rendition (in particular, of red and
green colours) on panchromatic films. The filter is used in portraiture both by day and artificial light,
in artistic and technical photography of paintings and colour pictures.
FILTER FACTOR TABLE
(by day light)
Light filters
Films
UV-1x Y-1.4x
Y-2x
O-2.8x YG-2x
Filter factor
Isopanchromatic
1
1.5
1.5-2
2.5
1.5
Panchromatic
1
1.5
1.5-2
2.5
4
Note. Filter factor is the ratio of the exposure time used when photographing with a light filter to the
one required when photographing without a light filter (illuminating conditions are the same).
6.2.2. Cassettes
The camera set comprises three film cassettes. One cassette is placed in the camera and two
others are fastened on the case cover.
6.2.3. Screw-drivers
Sometimes, when “hunting” with the photogun, simple adjustment can be needed. To this end
the camera set comprises two screw-drivers (4 mm and 1.7 mm) attached to the case cover.
7. Care of the Camera
The photogun should be handled carefully, should be kept clean and protect from mechanical damages,
moisture and sharp temperature fluctuations.
Keep the photogun in a closed case. In such cases the diaphragm of the TAIR-3-PhS lens should be
set at “22”, the diaphragm setting knob, the shutter and the self-timer be released.
Never remove the lens from the camera (unless you need it) to prevent dust and dirt from getting
on the surface of optical parts.
Clean the optical coated lens surfaces only from outside with a clean soft piece of fabric or cotton,
slightly moistened with rectified alcohol, ether (petroleum or sulfuric) or, if these means are absent,
with toilet eau-de-Cologne.
As the photogun is a complex optical mechanical device, any repair of the camera and its
adjustment should be performed by a highly qualified specialist.
http://eugigufo.net/en/download/photovideo/
– 11 –