1
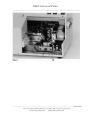
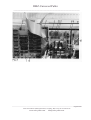
DMZ-Universal Puller
________________________________________________
___________________________________________________________________________________________
August 2005
800.998.MATE | www.autom8.com | 812 Page St, Berkeley, CA 94710 USA
tel 510.845.6283 | fax 510.280.3795 | e-mail [email protected]
DMZ-Universal Puller
________________________________________________
USER'S MANUAL
PRECAUTIONS
DANGER! For continued protection against fire hazard:
In no way, do not cover the instrument, even if it is switched off!!
DANGER! Disconnect the power cord before attempting any maintenance!
Dangerous voltages inside the instrument. Refer servicing to qualified personnel!
DANGER! Fingers can be jammed and burned or eyes injured by glass splinters when
the heater appears or retracts!
Warning! This equipment is not intended for use in human application or human experimentation!
Warning! The filament is very hot (1000 °C).
Warning! Replace only with the same rating of fuse!
DANGER!! FIRE HAZARD! Even when not in use, do not cover!
___________________________________________________________________________________________
August 2005
Zeitz-Instruments GmbH, Muenchen, Germany, Hot-Line+49 0172 8125656
www.zeitz-puller.com
[email protected]
DMZ-Universal Puller
________________________________________________
Table of contents
1
Features of the puller
4
2
2.1
3
3.1
3.2
3.21
First steps
First steps: detailed description
The puller controls
The right-hand side of the control panel
The left-hand side of the control panel
The function keys
7
8
11
11
11
12
4
4.1
4.2
4.3
Descriptions of the programs
Single-pull programs
Multi-pull programs
Polishing patch electrodes
14
14
15
15
5
5.1
5.2
5.3
Using the puller
Examples of programs
Effect of changes in program parameters
Understanding the pulling procedure
Diagram 1
Diagram 2
Diagram 3
Fig. 1, Fig. 2, Fig 3
17
17
17
17
19
20
21
22
6
Tables
Table 1 a:
b:
23
24
Summary of programs P00 - P09
Summary of programs P10 - P19
Detailed description, Program P10
Detailed description, Program P11
Detailed description, Program P12
Detailed description, Program P13
7
7.1
7.2
7.3
25
26
27
28
Table 2:
Effect of changes in puller parameters
Explanations and comments to Table 2
Maintenance
Cleaning the pulling rod
Lubricating the threaded spindle of the heaterpositioning motor
Replacing the heating filament
29
30
33
33
33
35
___________________________________________________________________________________________
August 2005
Zeitz-Instruments GmbH, Muenchen, Germany, Hot-Line+49 0172 8125656
www.zeitz-puller.com
[email protected]
DMZ-Universal Puller
________________________________________________
8
8.1
8.2
9
Troubleshooting
The glass breaks in the glass holders
Rattling motor noise
Figures
Fig. 1:
Fig. 2:
Fig. 3:
Fig. 4:
Fig. 5:
37
37
39
Overview of the puller and its controls
The puller's mechanical components
The puller's circuitry
Close-up view of the glass holders
The heater's mechanical components
10
Frequently Asked Questions
11
Circuit Diagrams
45
45
46
46
47
___________________________________________________________________________________________
August 2005
Zeitz-Instruments GmbH, Muenchen, Germany, Hot-Line+49 0172 8125656
www.zeitz-puller.com
[email protected]
DMZ-Universal Puller
________________________________________________
1
Features of the puller
The puller has the following fully microprocessor-controlled variables:
1.
2.
3.
4.
5.
Distance of pull (longitudinal)
Force of pull (time-controlled program)
Force of pull (distance-controlled program)
Time- or distance-controlled heat application
Power of the heat actually radiated by the filament, regulated by an optical (ultrared)
sensor
The puller features:
80 programs.
♦
Permanent storage of
♦
One- or two-stage pulling programs, in which all variables can be set independently for
each stage, with the option of repeating the first stage.
♦
Full automation. There is no risk of breaking even thin-walled capillary glass in the glass
holders because the clamping of the glass in the holders is carried out by two
micromotors which result in precisely defined clamping forces.
♦
Choice of capillary glass outer diameter of 1 - 2 mm.
♦
Symmetrical pipette tips in multi-pull programs (one, two or three preliminary pulls, up
to nine preliminary pulls from the Ser.N° up beginning with 25 ..). This is achieved by
readjustment (centring) of the position of the glass tubing relative to the heating filament
after each stage of the pull.
♦
Automatic (programmable) control of the duration of heating. This is achieved by
automatic positioning (advance or withdrawal) of the "U"-shaped heating filament
relative to the glass, thus avoiding the need for air-jet cooling.
♦
Compensation for variations in the wall thickness of the glass tubing. This is achieved
by the (programmable) inclusion in the pulling programs of a phase in which the
stiffness of the tubing is sensed during pulling.
♦
Free choice and absolute reproducibility of tip diameter (down to 0.1 µm), taper and
electrode resistance (up to 100 MΩ).
___________________________________________________________________________________________
August 2005
Zeitz-Instruments GmbH, Muenchen, Germany, Hot-Line+49 0172 8125656
www.zeitz-puller.com
[email protected]
DMZ-Universal Puller
________________________________________________
♦
Especially suitable for pulling patch electrodes of precisely defined tip o.d. (usually 1 80 µm). The puller will also heat polish the electrode tips after pulling.
♦
Canthal® heating filaments. This material is extremely durable, but the heating filaments
can nevertheless be changed easily.
♦
Electrode tip sizes and shapes are relatively (compared with other pullers) independent
of the precise shape and position of the heating filament. Repeated, time-consuming
readjustment of the heating filament is thus not necessary.
♦
The excellent reproducibility of electrode tip characteristics (even over months) means
that electrodes can be made as required, immediately before use. Prefabrication of large
numbers of electrodes well in advance of an experimental series is no longer required.
___________________________________________________________________________________________
August 2005
Zeitz-Instruments GmbH, Muenchen, Germany, Hot-Line+49 0172 8125656
www.zeitz-puller.com
[email protected]
DMZ-Universal Puller
________________________________________________
WARNING: This equipment is not intended for use in human application or human
experimentation!
The documentation accompanying the puller consists of two parts:
1. First steps. Brief instructions for setting the puller in operation and making
your first pipettes. These instructions are followed by more detailed descriptions,
which also refer to the second part of the documentation (the user's manual).
2. The User's Manual, containing a complete and detailed description of the
puller, its components and functions.
___________________________________________________________________________________________
August 2005
Zeitz-Instruments GmbH, Muenchen, Germany, Hot-Line+49 0172 8125656
www.zeitz-puller.com
[email protected]
DMZ-Universal Puller
________________________________________________
2
FIRST STEPS
This section of the documentation tells you how to produce your first pipettes
within minutes of unpacking the puller.
NB.: In the puller documentation, the various controls on the puller are always written
in bold, in exactly the same way that they appear on the puller, e.g. MAINS. The
table and figures to which reference is made below are in the User's Manual.
Make your first pipette:
1. Ensure the power cord is connected and switch on the puller by pressing MAINS.
2. Insert a glass blank GC 150 TF (not GC 150 F!) into the two open glass holders,
taken from the box supplied.
3. Select a program (program 10): press P(A), then enter 10 on the numeric keypad.
4. Press START.
5. After the pipettes have been pulled, the glass holders still hold the pipettes. Press
START again. The puller heat-polishes the right-hand pipette. When this is
concluded, remove the right-hand pipette from the reopened glass holder.
Press START yet again. The puller heat-polishes the left-hand pipette. When this
is concluded, remove the left-hand pipette from the reopened glass holder.
___________________________________________________________________________________________
August 2005
Zeitz-Instruments GmbH, Muenchen, Germany, Hot-Line+49 0172 8125656
www.zeitz-puller.com
[email protected]
DMZ-Universal Puller
________________________________________________
2.1
First steps: detailed description
1. Ensure the power cord is connected. Switch on the puller by pressing MAINS.
The pulling rod moves to the right to the "ready" position.
2. Select a program from Table 1 (User's Manual). Here program no. 10 (P10) has
been used. Table 1 shows the settings of all puller parameters for the 20 standard
programs for various electrodes and glass types. These programs are already installed
by the manufacturer, but may be modified at will. Check the width of the heating
filament in the puller. Please note that the programs P00 - P13 use a 3-mm-wide
heating filament, the programs P14 - P19 a 4.5-mm-wide filament. This, too, may be
varied as desired. The 3-mm filament is installed by the manufacturer and spare filaments of both sizes are supplied in the spare-parts box (for changing the filament see
section 6.3 in the User's Manual, "Replacing the heating filament").
The 4.5-mm heating filament is recommended for pulling glass with an o.d. of 2 mm
or aluminosilicate or common soda glass.
3. Open the Perspex lid, insert a glass pipette blank (type GC150 T or GC150TF,
taken from the box supplied) into the open glass holders so that it rests on the two
bearing surfaces (see Fig. 4, 1).
NB: Should the glass holders be closed when attempting to insert a blank (as would be the
case if the puller had been started without a glass blank in place) press READY, then
BREAK and, after some seconds, READY again (these are the large, illuminated switches
at the right-hand side of the control panel). The glass holders should now be completely
open. If not, repeat the procedure.
4. Press P(A) (Fig. 1, 9) and enter the corresponding number of the program (here 1 0)
on the numeric keypad (Fig. 1, 11). In the display 10 should appear, confirming that
program no. 10 is now activated.
N.B.: Before proceeding further, deactivate the tip polishing process which would normally
follow pulling. Press P(B) and then AD; a three-digit number (xyz) will appear in the
display. Press 0 (zero) on the numeric keypad and "enter" by pressing E (the enter key). The
display should now show 0yz. If you make a mistake, clear the display (press C) press the
correct numbers (0 y z) and enter (press E) See also point 5 below.
Caution! The heater appears!
Close the Perspex lid and press START (illuminated switch on the right). The glass holders
close automatically and heating begins. The pipette blank will be elongated a little by the
heat and the preliminary pull, after which it is centred. The pulling and centering is repeated
___________________________________________________________________________________________
August 2005
Zeitz-Instruments GmbH, Muenchen, Germany, Hot-Line+49 0172 8125656
www.zeitz-puller.com
[email protected]
DMZ-Universal Puller
________________________________________________
before the final pull which separates the two pipettes. Both glass holders now open and the
finished pipettes can be removed (see description of programs). This is an example of a
program with a total of three pulls, the first two of which were concerned with the
preliminary centering and elongation (two preliminary pull program, see Table 1, note 2).
5. Polishing. The puller may be used to polish patch electrodes after pulling. To activate
the polishing process, it is necessary to alter one of the parameters stored in the puller
before starting the pulling. This is done simply as follows: Press P(B) and AD. The number
0yz should appear in the display (see point 4 above). Change this by pressing 2 and then E
(= enter) on the numeric keypad. The display should now show 2yz. If you make a mistake
clear the display and enter the correct number (C 2 y z E) via the numeric keypad. Entering
the value 2 has changed 0yz into 2yz. This indicates a polishing duration of 2 s at a heating
current of yz0 (see Table 1, note 4). Two ranges (low and normal) of heating strength for
the polishing process are available (see Table 1, note 3 and section 2.2, the description of
the controls on the left-hand side of the control panel, in the User's Manual).
To pull and polish electrodes choose the same type of glass blank as before (GC150 T
or GC150 TF). Press READY, insert the glass blank into the glass holders, close the
Perspex lid and press START. In this case the glass holders now do not open after pulling.
Press START again. The right-hand holder moves automatically a little to the right so
that when the heating filament subsequently moves into outside position it encloses the tip
in the middle of its curved surface. The heater now moves to the outer position and heatpolishes the right-hand pipette. When this is concluded the right-hand glass holder will open
automatically, allowing the polished pipette to be removed.
Press START yet again. The left-hand pipette moves into the polishing position and is
heat polished, after which the holder opens and the pipette can be removed.
The polishing parameters can be altered before pulling by using the keys P(A), t(H)
and s(H) (see Table 1, notes 5 and 6 and description of program 10). Values between 001
and 090 are recommended. The values actually set can be displayed by pressing P(A) and
then t(H) or s(H) and changed when the puller is in the "ready" condition. The polishing
parameters cannot be changed after starting the pulling/polishing process. Once started, the
polishing process can be aborted only by switching off the puller. To deactivate the
polishing process in a program press, before starting the pulling program, P(A) and AD (the
display should show 2yz, see above) and then 0 and E on the numeric keypad (the display
should now show 0yz). If you make a mistake press C (clear), 0 y z E (enter) on the
numeric keypad (see also point 4 above).
___________________________________________________________________________________________
August 2005
Zeitz-Instruments GmbH, Muenchen, Germany, Hot-Line+49 0172 8125656
www.zeitz-puller.com
[email protected]
DMZ-Universal Puller
________________________________________________
N.B.: Pulling glass with a 2-mm o.d. (e.g. GC 200). Occasionally, and particularly after
pulling thinner glass, the glass holders may not open wide enough to accept 2-mm o.d.
blanks. If this should occur, press READY then BREAK, and after a delay of some
seconds, READY again. The glass holders should now open completely. Use the same
procedure if the glass holders are closed when you wish to insert a blank (as would be the
case if a pulling program had been started without glass in the holders).
N.B.: Should the heating filament be positioned in front of the glass holders (and thus
prevent normal insertion of a glass blank) DO NOT, under any circumstances, attempt to
insert a glass blank into the holders by pushing it through from the right (and thus through
the filament). Instead, switch off the puller (MAINS), wait 20 s then switch on again. The
heater will assume its rest position, after which you can insert the glass blank normally. If
this has happened, do not forget to reselect your program, because switching off and on
resets the selected program to P00.
6. Suggestions for variations to program. (Example is program P10). Smaller tip
diameters may be achieved by increasing the heating current for the final pull. Press P(B)
then H. The display shows, say, 105. Increase this value to e.g. 115 by pressing 1 1 and E
on the numeric keypad; the display should now show 115. If you make a mistake clear the
display and enter the correct number (C 1 1 5 E). A further means of achieving smaller tips
is to decrease the pulling delay. Press P(B) then t(F1). The display shows, say, 120.
Decrease this value to e.g. 110 by pressing 1 1 E on the numeric keypad. If you make a
mistake clear the display and enter the correct number (C 1 1 0 E).
WARNING: This equipment is not intended for use in human application or human
experimentation!
___________________________________________________________________________________________
August 2005
Zeitz-Instruments GmbH, Muenchen, Germany, Hot-Line+49 0172 8125656
www.zeitz-puller.com
[email protected]
DMZ-Universal Puller
________________________________________________
3
The puller's controls
The two groups of controls are located on the sloping top panel of the instrument. This
panel is hinged (Fig.1, 1 and 2) to allow service access. On the right hand side is the group
of illuminated switches and indicators controlling individual pulls, on the left are keys
defining the variables and a numeric keypad. These are used to select (and alter if
necessary) the 80 stored programs and the time sequence of the pulls.
3.1 The right-hand side of the control panel
The puller is switched on and off using the MAINS switch (3). The lower keys bring the
puller into a state of readiness (READY, 4), start a pull (START, 5) or, in case of trouble,
interrupt the pull sequence (BREAK, 6). The latter lights up when the program detects a
disturbance in the pulling sequence which stops the program. The stages of the pulling sequence are indicated by the real time counter (7, 100-ms units from the start of the pull) and
the lamps (8) which light up at various critical points within the sequence: "F(TH)" is lit as
long as the heater is on and a small sensing or preliminary or sensing pull is operating. It is
extinguished when a (programmable) threshold extension is reached. At this point "(TH)"
lights up. "F1" is lit when the first phase of the main pull begins, "F2" lights up when the
second phase of the main pull begins.
3.2 The left-hand side of the control panel
Pressing the keys P(A) or P(B) (9) causes the number (e.g. P14) of the last-used program to
appear in the display (10). To change the program selected simply type the appropriate
number (e.g. 0 9) on the numerical keypad (11), it will appear in the display (10).
Note: The programs P00, P09, P10, P11, P12, and P13 have been tested in each
individual puller and the values of the parameters stored in the memory adjusted
to achieve the specified tip characteristics (see table). The numeric values may
thus deviate slightly from the values both in the table and in any numeric
examples given in the manual.
The keys P(A) and P(B) (9) further define the effects of pressing the function keys (12, see
also section 3, Description of programs). Depressing a function key (12) causes the value
set for this variable in the current program to appear in the display (10). If the value of this
variable is to be changed, simply type the new numerals (from left to right) on the numeric
keypad (11) and press E (enter). The new value will appear in the display (10). For
example, to change the value 214 to 014 press 0 and E. If a mistake is made, clear the
display (C) and enter the whole new number (the entire sequence would then be C 0 1 4 E).
3.21
The function keys
___________________________________________________________________________________________
August 2005
Zeitz-Instruments GmbH, Muenchen, Germany, Hot-Line+49 0172 8125656
www.zeitz-puller.com
[email protected]
DMZ-Universal Puller
________________________________________________
•
Note 1: In the following, "H" always refers to the heating power, "F" to the force
applied to the pulling rod, "s" to the distance moved by the rod and "t" to a
time interval.
•
Note 2: The DMZ Universal Puller employs three types of pull:
a low force pull (termed sensing), which is used to compensate for variations
in glass dimensions
a series (up to three) of relatively low force pulls (termed preliminary) used to
produce specified elongations of the glass
a final or main pull (F1 and F2), which may have two phases and which finally
separates the two pipettes.
1.
2.
3.
Heat, H: The value can be set between 000 and 999. The actual power of the radiated heat
is measured by an ultrared photosensor, and is proportional to the value set.
Force Preliminary Pull, F(TH): The voltage applied to the force coil during a preliminary or
sensing pull is proportional to the value set here (020 -100). When P(A) is chosen, F(TH)
is a weak preliminary pull - point 2 above - and when P(B) is lit, F(TH) is the sensing
pull - point 1 above.
Distance Threshold s(TH): The value set here (001-080, unit 0.12 mm) is the distance
moved by the pulling rod before the preliminary or sensing pull is terminated.
Delay Heatstop, t(H): The value set here (000 - 999, unit 0.5 ms) is the delay between the
end of the sensing pull and switching off the heating (and retracting the heating filament).
This function is valid only if s(TH) = 000.
This key also determines the position (distance) of the right-hand electrode when polishing
(see Table 1, note 5). [The value is displayed, and can be altered only when P(A) is
activated. Values are 000 - 080].
Distance Heatstop, s(H): The value set here (000 - 127, unit 0.12 mm) is the position (of the
pulling rod) at which the heating is terminated and the filament retracted, after the pulling
rod has reached the position [s(TH)] at which the sensing pull is terminated. This function is
available only if t(H) = 000.
This key also determines the position of the left-hand electrode when polishing (see Table
1, note 6). [The value is displayed and can be altered only when P(A) is activated, at 000 080].
Delay Pull 1, t(F1): The value set here (000 - 999, unit 0.5 ms) is the delay between the end
of the sensing pull and the start of phase 1 of the main pull.
___________________________________________________________________________________________
August 2005
Zeitz-Instruments GmbH, Muenchen, Germany, Hot-Line+49 0172 8125656
www.zeitz-puller.com
[email protected]
DMZ-Universal Puller
________________________________________________
Force Pull 1, F1: The voltage applied to the force coil during phase 1 of the main pull is
proportional to the value set here (000 - 999).
Distance Pull 2, s(F2): The value set here (000 - 127, unit 0.12 mm) is the distance between
the position of the pulling rod at the start of phase 1 of the main pull ( i.e., the position at
the end of the sensing pull) to the position of the pulling rod at the start of phase 2 of the
main pull.
Force Pull 2, F2: The voltage applied to the force coil during phase 2 of the main pull is
proportional to the value set here (000 - 999).
Adjust, AD:
1. When P(A) is pressed:
Value X0X: (X = any value except 0); no preliminary pull (this only when
P(A) is pressed, see Table 1, note 2).
Value 0X0: normal heating range (during main pull and polishing, see Table
1, notes 1 and 3).
Value XYZ: X = 1: low heating range at final pull with more precise control of
heating strength (see examples Table 1).
Y = 1: one preliminary pull.
Y = 2: two preliminary pulls.
Y = 3: three preliminary pulls (see also Table 1, note 2).
Y = 4 ... 9 four to nine preliminary pulls.
Z = 1:
low heating range during polishing, with more
precise control of heating strength (see Table 1,
note 3).
2. When P(B) is pressed:
Value 000: no polishing. See Table 1 note 4).
Value XYZ: the duration of heat application during polishing is proportional to
X; the heating power to YZ (see Table 1, note 4).
___________________________________________________________________________________________
August 2005
Zeitz-Instruments GmbH, Muenchen, Germany, Hot-Line+49 0172 8125656
www.zeitz-puller.com
[email protected]
DMZ-Universal Puller
________________________________________________
4
Description of programs
4.1 Single-pull programs
To obtain single-pull programs press only the program key P(A) (Fig. 1, 9) and enter the
number of the programm (P00 - P79) on the numeric keypad (11). Do not press P(B). AD
must have the value 000. The various functions (12) now apply to a single pull.
Single-pull programs proceed with the following sequence:
On switching the puller on (MAINS, Fig.1, 3) the pulling rod with the left-hand glass
holder (Fig.1, 16) moves into the "ready" position and the READY switch lights up.
A glass pipette blank (1 - 2 mm o.d.) is inserted manually into the open glass holders (Fig.
1, 16 and 17), so that it rests on the two bearing surfaces (Fig. 4, 1) in the glass holders.
On pressing START the glass holders close automatically and clamp the glass. The timer
(Fig.1, 7) is activated. The heating current is switched on (power H) and the filament moved
into position. The force coil exerts a small sensing pull with force F(TH) (a typical value
for F(TH) would be 020). When heated sufficiently the glass under the filament becomes
plastic and the traction on the pulling rod causes the glass to elongate. The pulling rod thus
moves back. The distance moved is measured and the sensing pull switched off when the set
distance threshold [s(TH)] is reached. This sensing pull routine serves to compensate for
small differences in pipette dimensions.
At the conclusion of this sensing pull, the main pull (phase 1) is initiated after a delay
[t(F1)], with a force F1 . This results in further elongation and, on reaching the distance
s(F2) the pulling force changes to F2. Within this pulling sequence heat application is
terminated in either of two ways:
(a) if Delay Heatstop t(H) has been selected (Distance Heatstop s(H) must be 000) the
heating continues for the time t(H) or,
(b) if Distance Heatstop s(H) has been selected (Delay Heatstop t(H) must be 000), heating
continues until the distance s(H) is reached.
After reaching t(H) or s(H) the heat is switched off and the heater retracted. The pull
sequence pulls the pipettes apart, the sequence stops, the glass holders open and the pipettes
may be removed.
___________________________________________________________________________________________
August 2005
Zeitz-Instruments GmbH, Muenchen, Germany, Hot-Line+49 0172 8125656
www.zeitz-puller.com
[email protected]
DMZ-Universal Puller
________________________________________________
4.2
Multi-pull programs
These programs include up to nine (9) preliminary pulls and produce steeply tapering
electrodes or patch-clamp electrodes. Press either P(A) or P(B) and enter the program
number (P00 - P79) on the numeric keypad. In these programs the variables for the
preliminary and main pulls are selected by first activating P(A) or P(B).
After pressing P(A), the functions H, F(TH) and s(TH) define the characteristics of the first
pulling stages (one, two, three, or more preliminary pulls). There are two ranges of heating
strength available for the main pull, a normal and a low range. The key AD in combination
with P(A) selects the range. The low range allows the control of heating strength to be more
precise and is particularly suited to the production of patch electrodes with large tip
diameters (see section 2.2 and Table 1, note 1). The key AD also determines whether the
first stage of the pulling sequence employs one, two, three, or more preliminary pulls (see
description of the function keys above and Table 1, note 2). The remaining functions are
normally disregarded (except for t(H) and s(H), see section 3.3, Polishing patch electrodes).
After pressing P(B), the functions keys define the variables for the main pull. AD defines
whether or not electrode tips are polished (see section 2.2, function AD, section 3.3
Polishing patch electrodes and Table 1, note 4).
The first phase of a multi-pull program is initiated and proceeds as in the single-pull
programs (section 3.1), except one, two, three or more preliminary pulls are employed. The
combination of the values set for the variables is such that a constriction is produced in the
glass blank, but the two halves are not pulled apart. At the end of the first preliminary pull
the glass is moved to the right, so that the constriction is aligned with the heating filament.
This can be repeated a second or a third time (up to nine times). The final pulling phase (the
main pull) then commences automatically and proceeds exactly as in the single-pull
program.
4.3 Polishing patch electrodes
Pressing AD after P(B) allows selection of a fully automatic polishing routine after
completion of the final pull. With this program activated, the glass holders do not open after
the final pull. After pressing START, the right-hand holder moves to the right and the
heater is switched on for the selected time at the selected power (see section 2.2, function
key AD and Table 1 note 4). After the heater is switched off the glass holder opens,
allowing the finished electrode to be removed. Pressing START again repeats the process
for the left-hand electrode. The distances moved by the glass holders to the polishing
positions are set using the keys t(H) (right-hand electrode) and s(H) (left-hand electrode)
when P(A) is activated. Values between 001 and 080 are suggested (see Table 1, note 4).
___________________________________________________________________________________________
August 2005
Zeitz-Instruments GmbH, Muenchen, Germany, Hot-Line+49 0172 8125656
www.zeitz-puller.com
[email protected]
DMZ-Universal Puller
________________________________________________
5
Using the puller
5.1 Examples of programs
Table 1 summarises programs which have been most widely used. Typical uses of the
electrodes/pipettes are also given for orientation (see also First steps). Despite the utmost
care taken in the construction small variations between individual pullers are unavoidable
thus requiring minor adjustments to the values given, in particular Heat (strength), the
Heatstop variables and Delay Pull 1. Descriptions of programs P10 - P13 with
commentaries for orientation are found on pages 19 - 22.
5.2 Effects of changes in parameters
Table 2 on page 23 summarises qualitatively the effects of changing individual parameters
on the shape of the electrode/pipette.
5.3 Understanding the pulling procedure
The following is a step-by-step description of a pull, using program P12 (values as in Table
1b on page 18, and Diagram 1and 2 on pages 14 and 15.
When START is pressed, the glass holders close, the heater advances, is switched on and
heats the glass (heating strength H = 600, Diagram 1A and Figure 1). The preliminary pull
(low force, (F(TH) = 040, diagram 1B t0, Fig. 1) starts to extend the softened glass until a
certain distance threshold (s(TH) = 030 diagram 1C,
t1 -t2, Fig. 1) is reached. At this time (t2) the heater (Diagram 1A) and the force F(TH) are
switched off and the glass tubing is moved to the right to bring the constriction in the glass
to the position of the heater (Diagram 1, t2 - t3).
This preliminary pull can be repeated once or twice more (i.e., a maximum of three times
altogether). For the second (and third, if chosen) preliminary pull the program uses the same
variables, i.e., heat 600, 040 for the force and 030 for the elongation distance threshold.
After concluding the preliminary pull(s), the program continues with the final pull (P(B),
Diagram 1, t5 and Fig. 2). After the pipette has been repositioned to the right, the heater is
advanced and heats the glass again (heat strength H = 650 Table 1, row P(B) program P12
and Fig. 2). A small force (the sensing pull) is applied (F(TH) = 020) such that when the
glass has softened it elongates until the distance threshold
s(TH) = 015 is reached (Diagram 1C, t6) In this phase of the pull the stiffness of the glass is
sensed. Reaching this point results in the force F(TH) being switched off, thus terminating
___________________________________________________________________________________________
August 2005
Zeitz-Instruments GmbH, Muenchen, Germany, Hot-Line+49 0172 8125656
www.zeitz-puller.com
[email protected]
DMZ-Universal Puller
________________________________________________
the elongation. The two programmed delays (t(H) = 100 and t(F1) = 130 now become operative. After delay t(H) the heat is switched off (Diagram 1, t7) and the glass cools a little.
After delay t(F1) the first main pulling force F1 = 400 is switched on (Diagram 1, t8),
which elongates the glass to a further relative distance threshold s(F2) = 005 at which point
the second main pull F2 = 700 is switched on (Diagram 1 t9) and finally pulls the pipettes
apart.
The final pull is also shown magnified (diagram 2) on page 15.
___________________________________________________________________________________________
August 2005
Zeitz-Instruments GmbH, Muenchen, Germany, Hot-Line+49 0172 8125656
www.zeitz-puller.com
[email protected]
DMZ-Universal Puller
________________________________________________
___________________________________________________________________________________________
August 2005
Zeitz-Instruments GmbH, Muenchen, Germany, Hot-Line+49 0172 8125656
www.zeitz-puller.com
[email protected]
DMZ-Universal Puller
________________________________________________
___________________________________________________________________________________________
August 2005
Zeitz-Instruments GmbH, Muenchen, Germany, Hot-Line+49 0172 8125656
www.zeitz-puller.com
[email protected]
DMZ-Universal Puller
________________________________________________
Diagram 3 Distance Heatstop
___________________________________________________________________________________________
August 2005
Zeitz-Instruments GmbH, Muenchen, Germany, Hot-Line+49 0172 8125656
www.zeitz-puller.com
[email protected]
DMZ-Universal Puller
________________________________________________
Fig1, Fig2, Fig 3
___________________________________________________________________________________________
August 2005
Zeitz-Instruments GmbH, Muenchen, Germany, Hot-Line+49 0172 8125656
www.zeitz-puller.com
[email protected]
DMZ-Universal Puller
________________________________________________
Heater Filament
Intracellular
Glark
Glass:
Injection
GC150F
GC150F
Glass:
GC120F
Harvard Apparatus
thickw. & Filament
P00
GC150F
thickwall
P01
P02
P(A)
H
450
270-370
5OO
F(TH)
020
O16
O4O
s(TH)
t(H)
s(H)
025
O3O *7
OOO *7
O10
OOO *8
O26 *8
O15
32O *7
OOO *7
t(F1)
F1
230
3OO
OOO
160
42O
4OO
s(F2)
F2
AD
030
6OO
OOO *9
O70
700
OOO *9
OO2
5OO
OOO *9
Allowed only when P(A)
is lit !
short
100 MOhm
very short
P03
P(A)
H
F(TH)
s(TH)
Harvard
Apparatus
GC150TF
thinwall
3.0mm
Patch
Harvard
Apparatus
GC150TF
thinwall
Patch
Harvard
Apparatus
GC150 TF
Patch.
Harvard
Apparatus
GC150F
Patch
Harvard Apparatus
thinwall
thickwall
thickwall
GC150F
P04
P05
P06
P07
P08
P09
500
O3O
400
O3O
400
O2O
4OO
O2O
400
O2O
500
O2O
500
O2O
O22
O22
O47
O4O
O47
O21
O21
052
040
121 *2
O52 *5
O40 *6
121 *1;2
t(H)
s(H)
AD
12O *1;2
12O *1;2
O1O *2
O1O *2
OOO
OOO
111 *1;2;3
P(B)
H
82O
72O
O7O
16O
7OO
620
520
F(TH)
s(TH)
t(H)
s(H)
t(F1)
F1
s(F2)
F2
AD
O35
O12
O3O *7
OOO *7
O5O
17O
OO3
185
OOO
O35
O12
O3O *7
OOO *7
O5O
17O
OO3
185
OOO
O3O
OO7
OOO *8
OO3 *8
OOO
O85
O12
12O
OOO
O3O
O1O
O3O *7
OOO *7
12O
O8O
OO2
11O
OOO
O3O
O12
O3O *7
OOO *7
O9O
17O
OO2
185
OOO
O2O
008
030*7
OOO *7
100
070
OO4
080
330
O16
008
030 *7
000 *7
100
070
OO4
080
330 *4
1.5 µm
2.0 µm
0.8 µm, slim
1.0 µm
O.8 µm, long
0.8 µm
2.0 µm
Note1: 1xx=LOW RANGE OF HEAT (final pull); 0xx=NORMAL RANGE.
Note2: 000=NO PRIMARY-PULL (SINGLE PULL); x1x=ONE-PRIMARY-PULL;
x2x=TWO-PRIMARY-PULL; x3x=THREE-PRIMARY-PULL.
Note3: xx1=LOW RANGE OF HEATING (POLISHING); xx0=NORMAL RANGE.
Note4: 0xx=POLISH OFF; 511=polish. 5 s, heat: 110.
Note5: POLISH-DISTANCE RIGHT ELECTRODE.
Note6: POLISH-DISTANCE LEFT ELECTRODE.
Note7: DELAY HEATSTOP used.
Note8: DISTANCE HEATSTOP used.
Note9: Must be OOO.
Table 1a
___________________________________________________________________________________________
August 2005
Zeitz-Instruments GmbH, Muenchen, Germany, Hot-Line+49 0172 8125656
www.zeitz-puller.com
[email protected]
DMZ-Universal Puller
________________________________________________
Heater Filament 3.0mm
Intracell.
Macro-Patch
Patch
Patch
Intraperf.
Harvard
Apparatus
GC150TF
thinwall
or GC150F
thickwall
P10
Harvard
Apparatus
GC150F
thickwall
Assistent
Haematokrit
No.564
Harvard
Apparatus
SM150F
Alusilicate
Harvard
Apparatus
GC150F
thickwall
Harvard
Apparatus
GC200
OD=2mm
Harvard
Apparatus
GC150TF
thinwall
Harvard
Apparatus
GC150F
thickwall
Harvard
Apparatus
SM150F
Alusilicate
P11
P12
P13
P14
P15
P16
P17
P18
P19
P(A)
H
F(TH)
400
O16
400
O3O
500
O4O
350
O16
8OO
1OO
5OO
1OO
67O
O6O
46O
O2O
45O
1OO
8OO
1OO
s(TH)
t(H)
s(H)
AD
O17
O50 *5
O40 *6
121 *1;2;3
O15
O40
O24
O24
O28
O22
O35
O35
O2O *2
O1O *2
O21
O12 *5
O60 *6
121 *1;2;3
121 *1;2;3
121*1;2;3
12O *1;2
12O *1;2
O1O *2
O1O *2
P(B)
H
F(TH)
s(TH)
t(H)
s(H)
t(F1)
F1
s(F2)
F2
AD
520
O18
O15
O3O *7
OOO *7
100
040
OO2
200
245 *4
2O7
O16
O08
O4O *7
OOO *7
200
220
OO4
230
OOO
450
O2O
O12
1OO *7
OOO *7
230
4OO
OO3
7OO
OOO
O32
O8O
O45
OO6 *7
OOO *7
O5O
O2O
O55
O3O
470 *4
75O
O4O
O17
OOO *8
OO3 *8
OOO
O38
OO4
O4O
OOO
24O
O4O
O17
OOO *8
OO3 *8
OOO
O38
OO4
O4O
OOO
22O
O4O
O13
OOO *8
OO3 *8
OOO
O48
OO4
O5O
OOO
72O
O35
O12
O3O *7
OOO *7
O6O
17O
OO3
185
OOO
2OO
O2O
O1O
O8O *7
OOO *7
16O
18O
O25
65O
OOO
7OO
O2O
O1O
O8O *7
OOO *7
15O
18O
O25
65O
OOO
2.0 µm
0.8 µm
20-40
MOhm
28 µm
3 µm
1 µm
1.5 µm
long
short
short
Glass:
*Notes
1...8
are described
below
Heater Filament 4.5mm
Patch
* Note1: 1xx=LOW RANGE OF HEAT (final pull); 0xx=NORMAL RANGE.
* Note2: 000=NO PRIMARY-PULL (SINGLE PULL); x1x=ONE-PRIMARY-PULL;
x2x=TWO-PRIMARY-PULL; x3x=THREE-PRIMARY-PULL.
* Note3: xx1=LOW RANGE OF HEATING (POLISHING); xx0=NORMAL RANGE.
* Note4: 0xx=POLISH OFF; 245=polish. 2=2s, 45=heat: 450.
Inject.
Intracell.
* Note5: POLISH-DISTANCE RIGHT ELECTRODE.
* Note6: POLISH-DISTANCE LEFT ELECTRODE.
* Note7: DELAY HEATSTOP used.
* Note8: DISTANCE HEATSTOP used.
Table 1b
___________________________________________________________________________________________
August 2005
Zeitz-Instruments GmbH, Muenchen, Germany, Hot-Line+49 0172 8125656
www.zeitz-puller.com
[email protected]
DMZ-Universal Puller
________________________________________________
6.1 Detailed description program P09 (see also Table 1)
P(A)
H
F(TH)
s(TH)
500
010
021
t(H)
s(H)
AD
052
040
121
Heat for glass softening
Preliminary pull, force for glass elongation
Distance threshold for elongation (H and F(TH) terminated when
reached)
Position of right-hand electrode for polishing
Position of left-hand electrode for polishing
Low heat range for main pull (Table 1 note 1), two preliminary pulls
(Table 1, note 2) i.e. a three-stage pull, low heat range at polishing
(see table 1b note 3).
P(B)
H
F(TH)
s(TH)
t(H)
s(H)
520
016
008
030
000
t(F1)
F1
s(F2)
100
070
004
F2
AD
080
330
Heat strength for main pull (see AD above)
Sensing pull, force for sensing glass stiffness
Distance threshold for elongation (F(TH) terminates)
Delay before heat is terminated; starts at s(TH)
Distance threshold for termination of heat. Mutually exclusive with
t(H) (Table 1, notes 7 and 8)
Delay before starting main pull F1; starts at s(TH)
Force, first phase of main pull
Distance threshold for start of second force phase, main pull F2.
Distance measured from s(TH)
Force for second phase of main pull
Polishing program activated, 2=2 s duration, heat strength 45=450.
To deactivate polishing set AD = 045 here.
To achieve smaller tip diameters decrease P(B) t(F1), and increase P(B) F1 and F2.
___________________________________________________________________________________________
August 2005
Zeitz-Instruments GmbH, Muenchen, Germany, Hot-Line+49 0172 8125656
www.zeitz-puller.com
[email protected]
DMZ-Universal Puller
________________________________________________
6.1 Detailed description program P10 (see also Table 1)
P(A)
H
F(TH)
s(TH)
400
016
019
t(H)
s(H)
AD
050
040
121
Heat for glass softening
Preliminary pull, force for glass elongation
Distance threshold for elongation (H and F(TH) terminated when
reached)
Position of right-hand electrode for polishing
Position of left-hand electrode for polishing
Low heat range for main pull (Table 1 note 1), two preliminary pulls
(Table 1, note 2) i.e. a three-stage pull, low heat range at polishing
(see table 1b note 3).
P(B)
H
F(TH)
s(TH)
t(H)
s(H)
520
018
015
030
000
t(F1)
F1
s(F2)
100
040
002
F2
AD
200
245
Heat strength for main pull (see AD above)
Sensing pull, force for sensing glass stiffness
Distance threshold for elongation (F(TH) terminates)
Delay before heat is terminated; starts at s(TH)
Distance threshold for termination of heat. Mutually exclusive with
t(H) (Table 1, notes 7 and 8)
Delay before starting main pull F1; starts at s(TH)
Force, first phase of main pull
Distance threshold for start of second force phase, main pull F2.
Distance measured from s(TH)
Force for second phase of main pull
Polishing program activated, 2=2 s duration, heat strength 45=450.
To deactivate polishing set AD = 045 here.
To achieve smaller tip diameters decrease P(B) t(F1), or, less preferable, increase P(B) H.
___________________________________________________________________________________________
August 2005
Zeitz-Instruments GmbH, Muenchen, Germany, Hot-Line+49 0172 8125656
www.zeitz-puller.com
[email protected]
DMZ-Universal Puller
________________________________________________
6.2 Detailed description program P11 (see also Table 1)
P(A)
H
F(TH)
s(TH)
400
030
015
AD
020
Heat for glass softening
Preliminary pull, force for glass elongation
Distance threshold for elongation (H and F(TH) terminated when
reached)
Normal heat range for main pull (Table 1 note 1), two preliminary
pulls (Table 1, note 2) i.e. a three-stage pull
P(B)
H
F(TH)
s(TH)
t(H)
s(H)
207
020
010
040
000
t(F1)
F1
s(F2)
130
170
004
F2
AD
180
000
Heat strength for main pull (see AD above)
Sensing pull, force for sensing glass stiffness
Distance threshold for elongation (F(TH) terminates)
Delay before heat is terminated; starts when s(TH) is reached
Distance threshold for termination of heat. Mutually exclusive with
t(H) (Table 1, notes 7 and 8)
Delay before starting main pull F1; starts at s(TH)
Force, first phase of main pull
Distance threshold for start of second force phase, main pull F2.
Distance is measured from s(TH)
Force for second phase of main pull
Polishing program deactivated
To achieve larger tip diameters decrease P(B) H or decrease P(B) t(F1) or decrease P(B)
F2.
___________________________________________________________________________________________
August 2005
Zeitz-Instruments GmbH, Muenchen, Germany, Hot-Line+49 0172 8125656
www.zeitz-puller.com
[email protected]
DMZ-Universal Puller
________________________________________________
5
Detailed description program P12 (see also Table 1)
P(A)
H
F(TH)
s(TH)
500
040
040
AD
010
Heat for glass softening
Preliminary pull, force for glass elongation
Distance threshold for elongation (H and F(TH) terminated when
reached)
Normal heat range for main pull (Table 1 note 1), one preliminary
pull (Table 1, note 2) i.e. a two-stage pull
P(B)
H
F(TH)
s(TH)
t(H)
s(H)
650
020
012
100
000
t(F1)
F1
s(F2)
260
400
003
F2
AD
700
000
Heat strength for main pull (see AD above)
Sensing pull, force for sensing glass stiffness
Distance threshold for elongation (F(TH) terminates)
Delay before heat is terminated; starts when s(TH) is reached
Distance threshold for termination of heat. Mutually exclusive with
t(H) (Table 1, notes 7 and 8)
Delay before starting main pull F1; starts at s(TH)
Force, first phase of main pull
Distance threshold for start of second force phase, main pull F2.
Distance is measured from s(TH)
Force for second phase of main pull
Polishing program deactivated
To achieve electrodes with lower tip resistance decrease P(B) H or increase P(B) t(F1) or
decrease P(B) F2.
___________________________________________________________________________________________
August 2005
Zeitz-Instruments GmbH, Muenchen, Germany, Hot-Line+49 0172 8125656
www.zeitz-puller.com
[email protected]
DMZ-Universal Puller
________________________________________________
5
Detailed description program P13 (see also Table 1)
P(A)
H
F(TH)
s(TH)
350
016
021
t(H)
s(H)
AD
012
060
121
Heat for glass softening
Preliminary pull, force for glass elongation
Distance threshold for elongation (H and F(TH) terminated when
reached)
Position of right-hand electrode for polishing
Position of left-hand electrode for polishing
Low heat range for main pull (Table 1 note 1), two preliminary pulls
(Table 1, note 2) i.e. a two-stage pull, low heat range for polishing
P(B)
H
F(TH)
s(TH)
t(H)
s(H)
032
080
045
006
000
t(F1)
F1
s(F2)
F2
AD
050
020
055
030
470
Heat strength for main pull (Table 1, note 1)
Force for main pull
Distance threshold for terminating main pull
Delay before heat is terminated; starts at s(TH)
Distance threshold for termination of heat. Mutually exclusive with
t(H) (Table 1, notes 7 and 8)
Not used
Not used
Not used
Polishing program activated, 4=4 s duration, heat 50=500. To
deactivate polishing, set AD = 050 (Table 1, note 4)
The high value of P(B) s(TH) (045) ensures that the pipettes are already separated, so F1
and F2 have no influence.
To achieve smaller tip diameters increase P(B) H or decrease P(B) F(TH).
___________________________________________________________________________________________
August 2005
Zeitz-Instruments GmbH, Muenchen, Germany, Hot-Line+49 0172 8125656
www.zeitz-puller.com
[email protected]
DMZ-Universal Puller
________________________________________________
6.5 Table 2:
Effect of changes in puller parameters
Tip diameter ! means a larger electrode tip opening and a lower resistance.
Taper ! means a steeper tapering of the electrode, i.e. a shorter and
sturdier electrode.
Electrode tip form will change as indicated by the arrows:
For multi-pull-programs: when P(B) is lit and for single-pull-programs: when P(A) is lit!
Opening
Taper
!
"
"
F(TH)
!
!
!
s(TH)
!
"
"
t(H)
!
"
"
H
|
| alternative (and mutually exclusive:
| one parameter must be 000 ! )
s(H)
!
"
"
t(F1)
!
!
!
F1
!
"
!
s(F2)
!
!
!
F2
!
"
!
|
___________________________________________________________________________________________
August 2005
Zeitz-Instruments GmbH, Muenchen, Germany, Hot-Line+49 0172 8125656
www.zeitz-puller.com
[email protected]
DMZ-Universal Puller
________________________________________________
6.6
Explanations and comments to Table 2
The following explanations are intended as an aid to achieving more rapidly the desired
results with the DMZ Universal Puller. It must be understood that the various parameters can
influence each other mutually, so that in making tests, it is advisable to alter only one parameter
at a time. To understand better the processes involved in pulling and the explanations
given below, the reader should also consult the diagrams on pages 14 and 15.
1.
Increasing the heating H raises the temperature of the glass during the sensing pull
F(TH), the delay periods and the main pulls F1 and F2. The result is a smaller tip diameter and a
less steep taper. Excessive heat results in extremely long tips. Conversely, reducing the heat
prolongs the pulling process resulting in very short tips. In the extreme case, the glass may even
tear apart or the pulling process be terminated.
2.
The sensing pull F(TH) begins immediately on switching on the heating. This is a very
weak pull which only begins to move the pulling rod after the glass has reached its melting
point. Increasing the sensing pull (max.: 100) results in the pulling rod reaching its threshold
s(TH), at which the main pull begins, sooner. This is equivalent to reducing the duration of
heating for the duration of the sensing pull so that the glass at the melting site has less time to
become fluid than with a lower sensing pull (min.: 020) and is thus more viscous, resulting in
greater tip diameters.
3.
The distance s(TH) is the threshold which terminates the sensing pull F(TH). Increasing
(↑
↑) this threshold (max. 127) means that the pulling rod takes longer to reach this point, thus
increasing the duration of the sensing pull. The glass thus not only remains longer in the position
where it is melting, thus becoming more fluid (see 2. above), it also thins out, and the tip
diameters decrease. An high value for s(TH) may result in the glass separating before s(TH) is
even reached. In this case all subsequent parameters have no further influence on the tip form.
An example of this special case is found in Program P13 (Table 1).
4.
At the instant at which the pulling rod reaches s(TH) and the sensing pull f(TH)
terminates, two variable delays begin: delay heatstop t(H) and the pull delay t(F1). The
prerequisite for these is that t(H) has been selected (see manual). During delay t(H), the heating
continues at the same intensity.
A).
When delay heatstop expires, the heating is switched off and the heating unit
retracts . The longer the time selected for t(H), the longer heating continues and the smaller the
tip diameter. For t(H) to be effective, the distance heatstop s(H) must be set to zero (000)
(see 7 below).
B).
The heatstop distance s(H) can be used as a (mutually exclusive) alternative to
delay heatstop (see 4a above). This possibility is described in greater detail below (see 7 below).
C).
The pull delay t(F1) begins at the same time as the delay heatstop (see 4, 4a
above). In general, the value for t(F1) should be greater than that for t(H), so that the pull F1
starts after the heating phase has terminated and the glass is beginning to cool. (See diagrams on
___________________________________________________________________________________________
August 2005
Zeitz-Instruments GmbH, Muenchen, Germany, Hot-Line+49 0172 8125656
www.zeitz-puller.com
[email protected]
DMZ-Universal Puller
________________________________________________
pages 14 and 15). Increasing t(F1) results in the glass being cooler when the pull F1 starts and
tip diameter is larger. Varying t(F1) allows precise control of glass temperature from the end of
the heating phase into the cooling phase, without changing the global heat setting and is thus the
preferable means of varying electrode tip diameter.
5.
Raising (↑
↑) the force of the main pulls F1 and F2 increases the speed with which the
glass is pulled apart in the cooling phase. The reduced cooling time results in smaller tip
diameters.
6.
The threshold distance s(F2), upon reaching which the second main pull F2 is initiated,
has the following effect: F1 extends the glass until, on reaching s(F2), the second pull F2 starts.
If F1 is relatively small compared with F2 the higher the value for s(F2) the cooler the glass
when F2 starts: increasing s(F2) increases tip diameters (providing, of course, that the glass has
not already separated before reaching s(F2), in which case F2 has no relevance).
7.
The heatstop distance s(H) is a (mutually exclusive) alternative to delay heatstop t(H)
(see 4 above). To use this, s(H) can be given values of 001 - 127; delay heatstop t(H) must be
set to zero (000). Under these circumstances, heating continues during F1 and F2 until a
certain extension (the threshold s(H)) of the glass is reached, upon which the heating is turned
off and retracted. Increasing s(H) thus prolongs heating during the main pulls F1 and F2
resulting in long tips with small diameters.
Behavior of tip diameters during heater application:
___________________________________________________________________________________________
August 2005
Zeitz-Instruments GmbH, Muenchen, Germany, Hot-Line+49 0172 8125656
www.zeitz-puller.com
[email protected]
DMZ-Universal Puller
________________________________________________
7
Maintenance
Certain moving parts in the puller require cleaning and/or lubrication at regular intervals
(not greater than 6 months).
7.1 Cleaning the pulling rod
N.B. It is not necessary to clean the pulling rod for this model!
7.2 Lubricating the threaded spindle of the heater-positioning motor
Remove the small cover of the right-hand glass holder (Fig. 4, 2) by loosening the black
knurled screw. Remove the four screws holding the right-hand cover panel (Fig. 1, 14)
and lift the cover at the corner (Fig. 1, 15). Take care not to disturb the pulling rod (Fig.
1, 16)!
N.B. DANGER! Fingers can be jammed or eyes injured by glass splinters
when the heater appears!
Lubricate the threaded spindle (Fig. 5, 1) with "Molykote" paste (in spare-parts box). To
spread the paste turn the spindle using a screw-driver inserted into the slit (Fig. 5, 2).
Leave the heater at about the middle of its excursion.
Replace the cover panel and the four screws and the cover of the right-hand glass
holder. Tighten the black knurled screw. On switching on the puller (MAINS) the
heater moves back to its rest position.
___________________________________________________________________________________________
August 2005
Zeitz-Instruments GmbH, Muenchen, Germany, Hot-Line+49 0172 8125656
www.zeitz-puller.com
[email protected]
DMZ-Universal Puller
________________________________________________
7.3 Replacing the heating filament
The heating filament has, under normal conditions, a very long lifetime unless bent
or otherwise mechanically damaged. However, to ensure reproducibility, the filament
should be examined visually regularly (every week). If spot-like protrusions on the
surface are noticed, or if the filament is bent, the filament should be exchanged. In this
case only the filaments supplied by the manufacturer should be used. Handle the
filaments carefully and do not bend them, they fit exactly!
!!When excessive heat is needed, change the filament!!
To replace the heating filament:
Switch off the puller (MAINS).
DANGER! Before changing the filament disconnect the mains plug!
Remove the four screws holding the lower part of the right-hand cover panel (to which
the Perspex lid is attached, Fig. 1, 14). Grasp the panel at the right-hand corner and
remove it by pulling it up and towards yourself.
Give the spindle (Fig. 5, 1) a few turns using a screw driver inserted in the slit (2) until
the heating filament holder is in its most advanced position. Do not screw the spindle
(1) out completely! Loosen the small black grub screw of the upper filament holder
using the hexagonal key from the spare-parts box. Loosen the knurled screw of the
lower filament holder.
DANGER ! HOT !! You can burn your fingers!
Pull the filament out of the slots.
Danger! Fingers can be jammed or eyes injured from glass splinters when the
heater appears! Fingers can be burned when handling the filament!
Insert the new filament as far as it will go into the slots. Partially (gently) tighten the
screws . Adjust the horizontal and vertical position of the filament approximately by
moving the upper and/or lower parts of the filament (the fine adjustment is described
immediately following). Under no circumstances should the filament be adjusted by
bending.
Tighten the screws and screw the metal cover back in place. Leave the heater in its
advanced position (do not screw the spindle (1) completely out of its hole!)
___________________________________________________________________________________________
August 2005
Zeitz-Instruments GmbH, Muenchen, Germany, Hot-Line+49 0172 8125656
www.zeitz-puller.com
[email protected]
DMZ-Universal Puller
________________________________________________
Important: This cover prevents eye damage by flying glass splinters if a glass
blank breaks. It must be screwed firmly in place before switching the power
on. The puller may otherwise be seriously damaged if the heater unit is
obstructed by the metal cover when moving back into position.
Fine adjustment of the position of the heating filament: after closing the cover as
described above, switch on the puller (MAINS). The heating unit will immediately
return to its rest position. Insert a glass blank into the glass holders and press START.
Immediately before the puller has moved the heating unit to its advanced position,
switch the puller off (MAINS). Now remove the metal cover again
Give the spindle (Fig. 5, 1) a few turns using a screw driver inserted in the slit (2) until
the loop of the heating filament has reached the glass.
Carefully adjust the position of the filament as above. The glass tube should be centred
precisely in the loop of the heating filament.
Do not bend the heating filament!
Tighten the grub screws on the upper heating filament holder and tighten the
knurled screw on the lower holder. For good contact fix the filament carefully!
Tighten the knurled knob by hand. Finally, insert the hexagonal key as a lever into
the round holes of the knob and turn the knob by 30-40 degrees!
Do not overtighten the screw! Otherwise the wall of the clamp can be bent.
If the filament has been correctly inserted into its slots, the distance between the rear
wall of the glass tubing and the filament will be correctly adjusted. Now screw the
metal cover pane back in place and switch on the puller (MAINS). The heating unit will
return to its resting position. On pressing BREAK (Fig. 1, 6) the glass holders will open
and the glass blank can be removed.
___________________________________________________________________________________________
August 2005
Zeitz-Instruments GmbH, Muenchen, Germany, Hot-Line+49 0172 8125656
www.zeitz-puller.com
[email protected]
DMZ-Universal Puller
________________________________________________
8
Trouble shooting
8.1 The glass breaks in the glass holders
Cause 1:
If glass has broken previously, glass fragments may remain in the holders
and cause subsequent blanks to break.
Remedy:
Remove all fragments from the glass holders with a brush
Cause 2:
The rubber pressure pad(s) is(are) damaged.
Remedy:
Replace the rubber pressure pads as follows.
1. Disconnect the puller from the mains.
2. Remove the cover panel (Fig. 1, 18, three screws).
3. Remove the screws 5 and 7 (Fig. 4) from the left- or the right-hand
glass holder.
4. Remove plate 8 whilst holding the glass holder firmly.
5. Pull the glass holder by hand out of the apparatus.
6. Remove the bronze block from the glass holder by turning the spindle
clockwise for several turns. Use the screw driver included in the
spare-parts box.
7. Pull the old white rubber pressure pad off the bronze block, clean the
surface of the block (knife, acetone, etc.)
8. Glue on a new pressure pad ("Superglue"). Ensure no glue enters the
holes bored in the bronze block. If this happens the holes must be
cleaned. The middle threaded hole can be cleaned by screwing a 3mm metric screw into the hole.
9. Using scissors, cut off excess rubber flush with the sides of the bronze
block.
10. Replace the bronze block in the glass holder in same way it was
removed: set it on the spindle and guide pegs with the new rubber to
the front and turn the spindle counterclockwise until the block returns
to its original position.
11. Replace the glass holder in its mounting (approach from behind),
replace the front plate with its two screws.
12. Ensure that the red/black cable supplying the glass clamp motor is
free.This is particularly important for the left-hand (moving) glass
holder, since the connecting cable may hinder the free movement of
the pulling rod. Check by moving the pulling rod through its complete
___________________________________________________________________________________________
August 2005
Zeitz-Instruments GmbH, Muenchen, Germany, Hot-Line+49 0172 8125656
www.zeitz-puller.com
[email protected]
DMZ-Universal Puller
________________________________________________
excursion from left to right and observing the movement of the
connecting cable.
13. Replace the cover (Fig. 1, 18).
14. Test the puller. If the axes of the glass holders are not exactly
concentric, the glass blank will move away from its axis during
pulling resultion in non-symmetric tips. If this happens, adjust the
plate by loosening the screws (5 and 7) slightly and tilting the plate
slightly upwards or downwards. Contact the manufacturer if satisfactory results cannot be obtained
___________________________________________________________________________________________
August 2005
Zeitz-Instruments GmbH, Muenchen, Germany, Hot-Line+49 0172 8125656
www.zeitz-puller.com
[email protected]
DMZ-Universal Puller
________________________________________________
8.2
Rattling motor noise
When checking the puller according to the following instructions, always
observe the caution notes. These notes begin with the word DANGER!
When the puller is turned on (MAINS, see Remedy A) or when the pull
sequence is started (START, see Remedy B), a rattling motor noise may be heard.
This indicates that the bronze block (Fig. 5, 5) of the heater advance has become
completely detached from the spindle (Fig. 5, 1). The spindle has an external
thread and the bronze block an internal thread and under normal conditions the
spindle is screwed into the bronze block. The length of the spindle and its thread
are so designed that in the case of an error the heater advance cannot jam
mechanically, in either its advanced or retracted position. Complete detachment of
the bronze block from the spindle thread is normally prevented by two reflected
light sensors (6) and a small mirror which is glued to the guide track (7) which
moves with the heater (The mounted mirror cannot be seen, it is situated between
the black aluminium part (8) of the sensor and the track (7)). The travel of the
heater advance is the distance between these two sensors (see scetch Fig. 1 on the
end of this chapter). The error case occurs when the mirror is beyond either of the
reflected light barriers (see sketch Fig. 2 on the end of this chapter).
Error location and remedy
Remedy A. Heater in the retracted position.
The bronze block must be screwed back onto the spindle (Fig. 5, 1):
Step 1. Switch off the puller (MAINS) and pull out the mains plug. Open the
lower right cover panel (Fig. 1, 14) .
If the heater is in its rear position, turn the spindle (Fig. 5,1) clockwise using a
screwdriver in the slit (2). At the same time, and using a second screwdriver, push
the bronze block forwards (i.e. towards you) so that its thread engages in the first
turn of the spindle's thread. (If the heater is in its forward or working position, see
Remedy B)
Continue to turn the spindle clockwise until the heater is at approximately the
middle of its travel. For safety reasons the cover panel (Fig. 1, 15) must be
replaced before switching the puller on. Use the screws which were removed
___________________________________________________________________________________________
August 2005
Zeitz-Instruments GmbH, Muenchen, Germany, Hot-Line+49 0172 8125656
www.zeitz-puller.com
[email protected]
DMZ-Universal Puller
________________________________________________
above. Failure to close the cover properly may result in the advancing heater
colliding with the cover panel and causing serious damage to the instrument.
Switch the puller on by pressing the MAINS key. If there is no further cause of
error, the heater should automatically return to its rest position inside the
instrument.
If a rattling motor noise is immediately heard again, there are three possible
causes :
Possibility 1. The motor end-stage is defective (Fig. 3, 10; located on the heat
sink).
Possibility 2. There is an error in the sensors (Fig. 5, 6)
Possibility 3. There is an error in the circuitry handling the sensor signal on the
control circuit board (Fig. 3, 11).
To exclude the first possibility, identify the red and blue leads (Fig. 3, 12) and
detach the plugs. The motor should stop immediately (see next section)
To exclude the second possibility, detach the plug (Fig. 5, 9) leading to the
sensors whilst the rattling noise continues (the cover panel must be removed again
to do this).
DANGER!
Take care! Fingers can be seriously injured if jammed
between the aluminium block (Fig. 5, 10) and the bronze
block (5) as the heater reverses. Keep hands and fingers
away from here!
Briefly earth (i.e. connect with any bare metal part of the instrument chassis)
pin 6 of the detached plug (see picture below). To do this insert a suitable pin in
the appropriate hole of the plug. Earthing this pin normally causes the motor to
stop immediately, providing the heater had been moving towards its rest position
(i.e. at the rear of its travel).
___________________________________________________________________________________________
August 2005
Zeitz-Instruments GmbH, Muenchen, Germany, Hot-Line+49 0172 8125656
www.zeitz-puller.com
[email protected]
DMZ-Universal Puller
________________________________________________
Should the motor not stop immediately, the third possibility must be suspected.
In this case contact the manufacturer or the distributor.
If the sensor is defective (second possibility) it can be exchanged for a new one.
Remedy B. Heater in the advanced position.
If a rattling noise is heard when the heater is in its working (outer) position, the
bronze block (Fig. 5, 5) has advanced off the front end of the spindle thread.(1)
i.e. the sensor has not recognised the working position of the heater. To find and
remedy the error, the threads of the bronze block and the spindle must first be
reengaged.
For safety, switch the puller off (MAINS) and remove the mains plug. Open the
lower right cover panel (Fig. 1, 14) .
DANGER!
Take care! Fingers can be seriously injured if jammed
between the aluminium block (Fig. 5, 10) and the bronze
block (5) as the heater reverses. Keep hands and fingers
away from here!
Turn the spindle (Fig. 5, 1) counterclockwise using a screwdriver in the slit (2)
and, at the same time push the bronze block (5) towards the rear until the threads
of the spindle and bronze block engage. Continue to turn the spindle (1) until the
heater is at approximately the middle of its travel.
For safety reasons the cover panel (Fig. 1, 15) must be replaced before switching
the puller on. Use the screws which were removed at step 1 above. Failure to
close the cover properly may result in the advancing heater colliding with the
cover panel and causing serious damage to the instrument.
___________________________________________________________________________________________
August 2005
Zeitz-Instruments GmbH, Muenchen, Germany, Hot-Line+49 0172 8125656
www.zeitz-puller.com
[email protected]
DMZ-Universal Puller
________________________________________________
Now switch the instrument on (MAINS). The heater moves automatically to its
rest position inside the instrument. If the detachment of the bronze block from the
spindle was just coincidental no error is present and the instrument should now
again function normally.
If a rattling motor noise is again heard when a pull sequence is commenced
with the START key, there are three possible causes :
Possibility 1. The motor end-stage is defective (Fig. 3, 10; located on the heat
sink).
Possibility 2. There is an error in the sensors (Fig. 5, 6).
Possibility 3. There is an error in the circuitry handling the sensor signal on the
control circuit board (Fig. 3, 11).
To exclude the first possibility, identify the red and blue leads (Fig. 3, 12) and
detach the plugs. The motor should stop immediately.
To exclude the second possibility, detach the plug (Fig. 5, 9) leading to the
sensors whilst the rattling noise continues (the cover panel must be removed again
to do this).
DANGER!
Take care! Fingers can be seriously injured if jammed
between the aluminium block (Fig. 5, 10) and the bronze
block (5) as the heater reverses. Keep hands and fingers
away from here!
Briefly earth (i.e. connect with any bare metal part of the instrument chassis)
pin 1 of the detached plug (see picture below). To do this insert a suitable pin in
the appropriate hole of the plug. Earthing this pin normally causes the motor to
stop immediately, providing the heater had been moving towards its working
position (i.e. at the forward end of its travel).
___________________________________________________________________________________________
August 2005
Zeitz-Instruments GmbH, Muenchen, Germany, Hot-Line+49 0172 8125656
www.zeitz-puller.com
[email protected]
DMZ-Universal Puller
________________________________________________
Should the motor not stop immediately, the third possibility must be suspected.
In this case contact the manufacturer or the distributor.
If the sensor is defective (second possibility) it can be exchanged for a new one.
___________________________________________________________________________________________
August 2005
Zeitz-Instruments GmbH, Muenchen, Germany, Hot-Line+49 0172 8125656
www.zeitz-puller.com
[email protected]
DMZ-Universal Puller
________________________________________________
___________________________________________________________________________________________
August 2005
Zeitz-Instruments GmbH, Muenchen, Germany, Hot-Line+49 0172 8125656
www.zeitz-puller.com
[email protected]
DMZ-Universal Puller
________________________________________________
___________________________________________________________________________________________
August 2005
Zeitz-Instruments GmbH, Muenchen, Germany, Hot-Line+49 0172 8125656
www.zeitz-puller.com
[email protected]
DMZ-Universal Puller
________________________________________________
___________________________________________________________________________________________
August 2005
Zeitz-Instruments GmbH, Muenchen, Germany, Hot-Line+49 0172 8125656
www.zeitz-puller.com
[email protected]
DMZ-Universal Puller
________________________________________________
___________________________________________________________________________________________
August 2005
Zeitz-Instruments GmbH, Muenchen, Germany, Hot-Line+49 0172 8125656
www.zeitz-puller.com
[email protected]
DMZ-Universal Puller
________________________________________________
___________________________________________________________________________________________
August 2005
Zeitz-Instruments GmbH, Muenchen, Germany, Hot-Line+49 0172 8125656
www.zeitz-puller.com
[email protected]
DMZ-Universal Puller
________________________________________________
___________________________________________________________________________________________
August 2005
Zeitz-Instruments GmbH, Muenchen, Germany, Hot-Line+49 0172 8125656
www.zeitz-puller.com
[email protected]