1
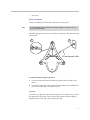
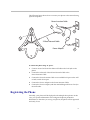
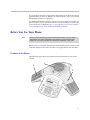
User Guide for the
Polycom® SoundStation® IP 5000
Phone for 8x8 Virtual Office
SIP 3.2.3 | March, 2011 | 1725-15645-001 Rev. C
Trademark Information
POLYCOM®, the Polycom “Triangles” logo and the names and marks associated with Polycom’s products are
trademarks and/or service marks of Polycom, Inc. and are registered and/or common law marks in the United States
and various other countries. All other trademarks are property of their respective owners. No portion hereof may be
reproduced or transmitted in any form or by any means, for any purpose other than the recipient’s personal use, without
the express written permission of Polycom.
Patent Information
The accompanying product is protected by one or more U.S. and foreign patents and/or pending patent applications
held by Polycom, Inc.
Disclaimer
Some countries, states, or provinces do not allow the exclusion or limitation of implied warranties or the limitation of
incidental or consequential damages for certain products supplied to consumers, or the limitation of liability for personal
injury, so the above limitations and exclusions may be limited in their application to you. When the implied warranties
are not allowed to be excluded in their entirety, they will be limited to the duration of the applicable written warranty. This
warranty gives you specific legal rights which may vary depending on local law.
Copyright Notice
Portions of the software contained in this product are:
Copyright © 1998, 1999, 2000 Thai Open Source Software Center Ltd. and Clark Cooper
Copyright © 1998 by the Massachusetts Institute of Technology
Copyright © 1998-2003 The OpenSSL Project
Copyright © 1995-1998 Eric Young ([email protected]). All rights reserved
Copyright © 1995-2002 Jean-Loup Gailly and Mark Adler
Copyright © 1996-2004, Daniel Stenberg, <[email protected]>
Permission is hereby granted, free of charge, to any person obtaining a copy of this software and associated
documentation files (the “Software”), to deal in the Software without restriction, including without limitation the rights to
use, copy, modify, merge, publish, distribute, sublicense, and/or sell copies of the Software, and to permit persons to
whom the Software is furnished to do so, subject to the following conditions:
The above copyright notice and this permission notice shall be included in all copies or substantial portions of the
Software.
THE SOFTWARE IS PROVIDED “AS IS”, WITHOUT WARRANTY OF ANY KIND, EXPRESS OR IMPLIED,
INCLUDING BUT NOT LIMITED TO THE WARRANTIES OF MERCHANTABILITY, FITNESS FOR A PARTICULAR
PURPOSE AND NONINFRINGEMENT. IN NO EVENT SHALL THE AUTHORS OR COPYRIGHT HOLDERS BE
LIABLE FOR ANY CLAIM, DAMAGES OR OTHER LIABILITY, WHETHER IN AN ACTION OF CONTRACT, TORT OR
OTHERWISE, ARISING FROM, OUT OF OR IN CONNECTION WITH THE SOFTWARE OR THE USE OR OTHER
DEALINGS IN THE SOFTWARE.
© 2009 Polycom, Inc. All rights reserved.
Polycom, Inc.
4750 Willow Road
Pleasanton, CA 94588-2708
USA
No part of this document may be reproduced or transmitted in any form or by any means, electronic or mechanical, for
any purpose, without the express written permission of Polycom, Inc. Under the law, reproducing includes translating
into another language or format.
As between the parties, Polycom, Inc., retains title to and ownership of all proprietary rights with respect to the software
contained within its products. The software is protected by United States copyright laws and international treaty
provision. Therefore, you must treat the software like any other copyrighted material (e.g., a book or sound recording).
Every effort has been made to ensure that the information in this manual is accurate. Polycom, Inc., is not responsible
for printing or clerical errors. Information in this document is subject to change without notice.
ii
About This Guide
Thank you for choosing the Polycom® SoundStation® IP 5000 conference
phone. This phone provides multi-person audio conferencing capabilities for
small conference rooms and executive offices within a Session Initiation
Protocol (SIP) internet telephony system.
This guide provides everything you need to quickly use your new phone.
Verify with your system administrator that the network is prepared for
configuring the phone. Also, read the Parts List and the Safety and
Compliance section in this guide before you set up and use the phone.
This guide includes regulatory compliance information that your system
administrator should review. You can also view this guide at
http://www.8x8.com/Support.aspx.
iii
Contents
About This Guide. . . . . . . . . . . . . . . . . . . . . . . . . . . . . . . . . . . . . . iii
1 Getting Started with Your Phone . . . . . . . . . . . . . . . . . . . . . . . 1–1
Parts List . . . . . . . . . . . . . . . . . . . . . . . . . . . . . . . . . . . . . . . . . . . . . . . . . . . . . . 1–2
Installing the Phone . . . . . . . . . . . . . . . . . . . . . . . . . . . . . . . . . . . . . . . . . . . . . 1–2
Connecting Network and Power Sources . . . . . . . . . . . . . . . . . . . . . . . 1–2
Power over Ethernet . . . . . . . . . . . . . . . . . . . . . . . . . . . . . . . . . . . . . 1–3
AC Power . . . . . . . . . . . . . . . . . . . . . . . . . . . . . . . . . . . . . . . . . . . . . . 1–3
Registering the Phone . . . . . . . . . . . . . . . . . . . . . . . . . . . . . . . . . . . . . . . . . . . 1–4
Before You Use Your Phone . . . . . . . . . . . . . . . . . . . . . . . . . . . . . . . . . . . . . . 1–5
Features of the Phone . . . . . . . . . . . . . . . . . . . . . . . . . . . . . . . . . . . . . . . . 1–5
Understanding Line and Call Icons . . . . . . . . . . . . . . . . . . . . . . . . . . . . 1–7
Navigating Menus and Entering Data . . . . . . . . . . . . . . . . . . . . . . . . . 1–8
2 Customizing Your Phone . . . . . . . . . . . . . . . . . . . . . . . . . . . . . . 2–1
Configuring Basic Settings . . . . . . . . . . . . . . . . . . . . . . . . . . . . . . . . . . . . . . . 2–1
Updating Preferences . . . . . . . . . . . . . . . . . . . . . . . . . . . . . . . . . . . . . . . . 2–2
Updating the Language . . . . . . . . . . . . . . . . . . . . . . . . . . . . . . . . . . 2–2
Updating the Time and Date Display . . . . . . . . . . . . . . . . . . . . . . 2–2
Updating the Display Contrast . . . . . . . . . . . . . . . . . . . . . . . . . . . . . . . . 2–5
Updating the Backlight Intensity . . . . . . . . . . . . . . . . . . . . . . . . . . . . . . 2–5
Updating the Ring Tone . . . . . . . . . . . . . . . . . . . . . . . . . . . . . . . . . . . . . 2–7
Selecting a Ring Tone . . . . . . . . . . . . . . . . . . . . . . . . . . . . . . . . . . . . 2–7
Setting Distinctive Ring Tones for Contacts . . . . . . . . . . . . . . . . . 2–8
Adjusting the Speaker and Ringer Volume . . . . . . . . . . . . . . . . . . . . . . . . . 2–8
Using Call Lists . . . . . . . . . . . . . . . . . . . . . . . . . . . . . . . . . . . . . . . . . . . . . . . . 2–9
Viewing Call Lists . . . . . . . . . . . . . . . . . . . . . . . . . . . . . . . . . . . . . . . . . . . 2–9
Managing Call Lists . . . . . . . . . . . . . . . . . . . . . . . . . . . . . . . . . . . . . . . . . 2–9
Managing Contacts . . . . . . . . . . . . . . . . . . . . . . . . . . . . . . . . . . . . . . . . . . . . 2–11
Viewing Your Local Contact Directory . . . . . . . . . . . . . . . . . . . . . . . . 2–11
Accessing Your Corporate Directory . . . . . . . . . . . . . . . . . . . . . . . . . . 2–11
Enabling Your Phone to Save Corporate Directory Search Results .
2–12
iv
Adding Contacts to Your Local Contact Directory . . . . . . . . . . . . . .
Adding Contacts Manually . . . . . . . . . . . . . . . . . . . . . . . . . . . . . .
Adding Contacts from Call Lists . . . . . . . . . . . . . . . . . . . . . . . . . .
Adding Contacts to Your Contact Directory from a Corporate
Directory . . . . . . . . . . . . . . . . . . . . . . . . . . . . . . . . . . . . . . . . . . . . . .
2–12
2–13
2–15
2–15
Searching for Contacts . . . . . . . . . . . . . . . . . . . . . . . . . . . . . . . . . . . . . . 2–16
Searching for Contacts in Your Local Contact Directory . . . . . 2–16
Searching for Contacts in Your Corporate Directory . . . . . . . . . 2–17
Updating Contacts in Your Local Contact Directory . . . . . . . . . . . . 2–18
Deleting Contacts from Your Local Contact Directory . . . . . . . . . . . 2–18
Placing Calls to Contacts . . . . . . . . . . . . . . . . . . . . . . . . . . . . . . . . . . . . 2–19
Managing Incoming Calls . . . . . . . . . . . . . . . . . . . . . . . . . . . . . . . . . . . . . . 2–19
Distinguishing Calls . . . . . . . . . . . . . . . . . . . . . . . . . . . . . . . . . . . . . . . . 2–20
Rejecting Calls . . . . . . . . . . . . . . . . . . . . . . . . . . . . . . . . . . . . . . . . . . . . . 2–20
Diverting Calls . . . . . . . . . . . . . . . . . . . . . . . . . . . . . . . . . . . . . . . . . . . . 2–21
3 Using the Features of Your Phone . . . . . . . . . . . . . . . . . . . . . . 3–1
Placing Calls . . . . . . . . . . . . . . . . . . . . . . . . . . . . . . . . . . . . . . . . . . . . . . . . . . . 3–2
Placing Calls Using Speed Dials . . . . . . . . . . . . . . . . . . . . . . . . . . . . . . . 3–3
Answering Calls . . . . . . . . . . . . . . . . . . . . . . . . . . . . . . . . . . . . . . . . . . . . . . . . 3–3
Ending Active Calls . . . . . . . . . . . . . . . . . . . . . . . . . . . . . . . . . . . . . . . . . . . . . 3–4
Muting the Microphone . . . . . . . . . . . . . . . . . . . . . . . . . . . . . . . . . . . . . . . . . 3–4
Redialing Numbers . . . . . . . . . . . . . . . . . . . . . . . . . . . . . . . . . . . . . . . . . . . . . 3–4
Holding and Resuming Calls . . . . . . . . . . . . . . . . . . . . . . . . . . . . . . . . . . . . . 3–5
Hosting Local Conference Calls . . . . . . . . . . . . . . . . . . . . . . . . . . . . . . . . . . 3–6
Setting Up Conferences . . . . . . . . . . . . . . . . . . . . . . . . . . . . . . . . . . . . . . 3–6
Setting Up a Conference Using the Conference Soft Key . . . . . . 3–6
Setting Up a Conference with an Active Call and a Call on Hold . .
3–7
Holding and Resuming Conferences . . . . . . . . . . . . . . . . . . . . . . . . . . . 3–7
Splitting Conferences . . . . . . . . . . . . . . . . . . . . . . . . . . . . . . . . . . . . . . . . 3–8
Ending Conferences . . . . . . . . . . . . . . . . . . . . . . . . . . . . . . . . . . . . . . . . . 3–8
Using Conference Bridges . . . . . . . . . . . . . . . . . . . . . . . . . . . . . . . . . . . . . . . 3–9
To call into a conference bridge: . . . . . . . . . . . . . . . . . . . . . . . . . . . 3–9
Conference Menu Options . . . . . . . . . . . . . . . . . . . . . . . . . . . . . . . . 3–9
Transferring Calls . . . . . . . . . . . . . . . . . . . . . . . . . . . . . . . . . . . . . . . . . . . . . 3–10
Performing a Consultative Transfer . . . . . . . . . . . . . . . . . . . . . . . . . . 3–10
Performing a Blind Transfer . . . . . . . . . . . . . . . . . . . . . . . . . . . . . . . . . 3–11
v
Forwarding Calls . . . . . . . . . . . . . . . . . . . . . . . . . . . . . . . . . . . . . . . . . . . . . . 3–11
Online Call Forwarding . . . . . . . . . . . . . . . . . . . . . . . . . . . . . . . . . . . . . 3–11
Phone-based Call Forwarding . . . . . . . . . . . . . . . . . . . . . . . . . . . . . . . 3–12
Forwarding Calls Statically . . . . . . . . . . . . . . . . . . . . . . . . . . . . . . . . . . 3–12
Forwarding Calls Dynamically . . . . . . . . . . . . . . . . . . . . . . . . . . . . . . 3–13
Using Do Not Disturb . . . . . . . . . . . . . . . . . . . . . . . . . . . . . . . . . . . . . . . . . . 3–14
Returning the Last Call . . . . . . . . . . . . . . . . . . . . . . . . . . . . . . . . . . . . . . . . . 3–14
Using the Auto Attendant . . . . . . . . . . . . . . . . . . . . . . . . . . . . . . . . . . . . . . 3–14
Using the Corporate Directory . . . . . . . . . . . . . . . . . . . . . . . . . . . . . . . . . . 3–15
Managing Speed Dial Entries . . . . . . . . . . . . . . . . . . . . . . . . . . . . . . . . . . . . 3–15
Using Voice Mail . . . . . . . . . . . . . . . . . . . . . . . . . . . . . . . . . . . . . . . . . . . . . . 3–16
Call Recording . . . . . . . . . . . . . . . . . . . . . . . . . . . . . . . . . . . . . . . . . . . . . . . . 3–17
4 Troubleshooting Your Phone . . . . . . . . . . . . . . . . . . . . . . . . . . . 4–1
Installation Configuration . . . . . . . . . . . . . . . . . . . . . . . . . . . . . . . . . . . . . . . 4–1
Power and Startup . . . . . . . . . . . . . . . . . . . . . . . . . . . . . . . . . . . . . . . . . . . . . . 4–2
Controls . . . . . . . . . . . . . . . . . . . . . . . . . . . . . . . . . . . . . . . . . . . . . . . . . . . . . . . 4–2
Access to Screens and Systems . . . . . . . . . . . . . . . . . . . . . . . . . . . . . . . . . . . 4–3
Calling . . . . . . . . . . . . . . . . . . . . . . . . . . . . . . . . . . . . . . . . . . . . . . . . . . . . . . . . 4–3
Displays . . . . . . . . . . . . . . . . . . . . . . . . . . . . . . . . . . . . . . . . . . . . . . . . . . . . . . . 4–4
Audio . . . . . . . . . . . . . . . . . . . . . . . . . . . . . . . . . . . . . . . . . . . . . . . . . . . . . . . . . 4–5
Testing Phone Hardware . . . . . . . . . . . . . . . . . . . . . . . . . . . . . . . . . . . . . . . . 4–5
vi
1
Getting Started with Your Phone
This chapter provides basic installation instructions and information for
obtaining the best performance from your SoundStation IP 5000 conference
phone.
The phone is a next-generation phone with a modern industrial design, and
the latest advancements in Polycom voice technology.
Some of the key features of the phone include:
•
Excellent wideband audio performance
•
A console microphone with a range of up to seven feet
•
International language support
•
Corporate Directory support
This chapter includes the following topics:
•
Parts List on page 1-2
•
Installing the Phone on page 1-2
•
Registering the Phone on page 1-4
•
Features of the Phone on page 1-5
•
Understanding Line and Call Icons on page 1-7
•
Navigating Menus and Entering Data on page 1-8
To read about how to change the settings on your phone, see Chapter 2,
Customizing Your Phone. To read about the phone’s features, see Chapter 3,
Using the Features of Your Phone.
If you require additional information or assistance with your new phone, see
your system administrator.
1-1
Parts List
The following items are included in your basic SoundStation IP 5000 package:
•
SoundStation IP 5000 Conference Phone
•
25-foot Network Cable
•
Quick Start Guide
•
AC Power Kit with:
— Power Adapter
— Regional Power Cord
•
Power Insertion Cable
Make sure your phone package contains each item. If any item is missing, see
your system administrator.
SoundStation IP 5000 Conference Phone
25-foot Network Cable
Quick Start Guide
Installing the Phone
This section describes how to install your phone. It includes the following
topics:
•
Connecting Network and Power Sources on page 1-2.
Connecting Network and Power Sources
There are two ways to connect your phone to the network and a power source.
Your system administrator can tell you which of the following methods best
suits your teleconferencing needs:
•
Power over Ethernet (PoE)
1-2
•
AC Power
Power over Ethernet
Power over Ethernet is the default connection for your phone.
Note
AC power adapters are not included in the PoE package. If you require one, see
your system administrator.
The following figure shows how to connect your phone to the network using
a PoE source.
1
2
25-foot Network Cable
To connect the phone using a PoE source:
1.
Connect one end of the 25-foot Network Cable to the LAN jack on the
phone.
2.
Connect the other end of the 25-foot Network Cable to an available LAN
port on the wall or hub/switch device port.
AC Power
To connect your phone to the network using AC power, make sure you have
the optional AC Power Kit. The AC Power Kit contains a Power Adapter,
Regional Power Cord, and a Power Insertion Cable.
1-3
The following figure shows how to connect your phone to the network using
optional AC power.
Power Insertion Cable
2
3
4
1
25-foot Network Cable
Power Adapter
5
To connect the phone using AC power:
1.
Connect one end of the 25-foot Network Cable to the LAN jack on the
phone.
2.
Connect the other end of the 25-foot Network Cable to the
Power Insertion Cable.
3.
Connect the Power Insertion Cable to an available LAN port on the wall
or hub/switch device port.
4.
Connect the Power Adapter to the Power Insertion Cable.
5.
Connect the Power Adapter (with the attached Regional Power Cord) to
the wall outlet.
Registering the Phone
Generally, your phone will be deployed with multiple other phones. In this
case, your system administrator will configure the phone parameters
beforehand, so that after you set up your phone, the phone will be registered
and ready to use.
1-4
If your phone is not part of a large phone deployment, your phone may not be
registered after you set it up. Before you use your phone, you or your system
administrator will have to register it.
For detailed information on how to register your phone after you install it, see
Quick Tip 44011: Register Standalone SoundPoint IP, SoundStation IP, and Polycom
VVX 1500 Phones, available at http://www.polycom.com/usa/en/support/
voice/soundpoint_ip/VoIP_Technical_Bulletins_pub.html
Before You Use Your Phone
Since you can customize your phone in many different ways, and your system
administrator can enable and disable certain features, the user interface that
displays on your phone may differ from the figures that appear in this guide.
Note
Before you use your phone, familiarize yourself with the phone’s features, the
icons that display on the screen, and how to navigate menus and enter data.
Features of the Phone
The following figure shows the primary hardware features of your phone
console.
1
2
3
1-5
Feature
Description
1
Speaker
Allows for ringer and hands-free audio output.
2
Microphones
Provide 360o coverage by three internal
microphones.
3
LED Indicators
Indicate phone and call status through three bi-color
LEDs. The LEDs illuminate to indicate the following
normal operational states:
•
Solid red—A muted call
•
Flashing red—A call is on hold
•
Solid green—A dial-tone is available, dialing is
in-progress, or a call is in-progress
•
Flashing green—An incoming call
The following figure shows the primary key buttons, controls, and indicators
on your phone console:
1-6
Understanding Line and Call Icons
Icon
Line or Call State
Description
Active call using
Polycom® HD Voice™
technology
A call is in progress using Polycom HD Voice.
The active call icons merge into one icon on
the phone screen. The following figure shows
what displays on the screen during an active
call:
Active call not using
Polycom HD Voice
A call is in progress that does not use
Polycom HD Voice.
Conference
A conference is in progress. See Hosting Local
Conference Calls on page 3-6.
Dialing
The phone is dialing a number.
Do Not Disturb
You have enabled the Do Not Disturb feature
on your phone. Your phone will not ring. See
Using Do Not Disturb on page 3-14.
Forwarding
You have enabled the forwarding feature on
your phone. See Forwarding Calls on page
3-11.
Hold
A call or conference is on hold. See Holding
and Resuming Calls on page 3-5 and Holding
and Resuming Conferences on page 3-7.
Registered line
The phone can place and receive calls.
Registered shared line
The phone, which shares a directory number
with another phone, can place and receive
calls.
1-7
Icon
Line or Call State
Description
Ringing
The phone is ringing.
Unregistered Line
The phone is unable to place and receive calls.
Voice mail message
You have a new voice mail message. See
Using Voice Mail on page 3-16.
Navigating Menus and Entering Data
To navigate menus and enter data, follow these tips:
Note
After 20 seconds of inactivity, the menu system automatically exits to the idle
screen unless an edit session is in progress.
If you want to...
Then do this...
Enter the main menu
Press
.
Exit the main menu and return
to the idle screen
Press
.
Return to the previous menu
Press
or the Back soft key.
Scroll through lists
Press
or
Scroll through lists that display
on more than one page
Press
to page up.
Press
to page down.
Select a menu item
.
Do one of the following:
•
Scroll to the menu item, and then press
or
.
or
•
Press the dial pad key that corresponds to
the item in the numbered menu list.
For example, to select the second item in a
menu, press 2.
Enter text
Press the dial pad keys one or more times.
For example, to enter ‘A,’ press 2. To enter ‘C,’
press 222.
1-8
If you want to...
Then do this...
Enter numbers, uppercase
characters, or lowercase
characters
Press the 1/A/a soft key one or more times to
select numerical, uppercase, or lowercase
mode, and then press the dial pad keys one or
more times.
Enter special characters
Do the following:
•
Press the * and # keys one or more times.
•
Press the 1/A/a soft key to select uppercase
or lowercase mode, and then press the 1 or
0 keys one or more times.
Enter text in a specific
language
Press the Encoding soft key.
Enter a space
Press the 0 key three times quickly.
Delete text you entered
Press the << soft key.
View additional soft keys
Press the More soft key.
Enable or disable fields
Toggle
Enable or disable menu items
Press
When in text entry mode, the language the text
will display in appears at the top of the screen.
.
.
1-9
2
Customizing Your Phone
You can customize your SoundStation IP 5000 conference phone by adjusting
certain settings, including language, volume, time and date, display contrast,
backlight intensity, and ring type. You can also add contacts to the phone’s
local Contact Directory.
This chapter shows you how to customize your phone. It includes the
following topics:
•
Configuring Basic Settings on page 2-1
•
Adjusting the Speaker and Ringer Volume on page 2-8
•
Using Call Lists on page 2-9
•
Managing Contacts on page 2-11
•
Managing Incoming Calls on page 2-19
Some customizations, including shared lines and viewing a
Corporate Directory, must be set up by your system administrator.
To learn about your phone’s features, see Chapter 3, Using the Features of
Your Phone.
For more information or assistance with your new phone, see your system
administrator.
Configuring Basic Settings
To configure basic phone settings, press
, and then select
Settings > Basic to view the basic phone settings you can customize.
This section includes the following topics:
•
Updating Preferences
•
Updating the Display Contrast
•
Updating the Backlight Intensity
2-1
•
Updating the Ring Tone
Updating Preferences
The Preferences menu allows you to customize the language that displays on
your phone and to specify how the time and date display on the idle screen.
You can also enable your phone to save Corporate Directory search results, if
Corporate Directory is set up on your phone (see Searching for Contacts in
Your Corporate Directory on page 2-17).
Updating the Language
The phone supports many languages. English (Internal) is the default
language that displays.
To change the language:
1.
Press
, and then select Settings > Basic > Preferences > Language.
The Language screen displays.
2.
Scroll to the language you want, and then press the Select soft key.
The text on the screen changes to the language that you selected.
3.
Press
to return to the idle screen.
Updating the Time and Date Display
The time and date appear on the idle screen of your phone. If the phone cannot
obtain a time and date, the display will flash. If this happens, or if the time or
date is incorrect, see your system administrator.
You can select from various formats for the time and date display, including
whether the time or date displays first (clock order). You can also turn the time
and date display off, so the time and date does not display on the idle screen.
Select and set options that are right for you.
2-2
The following figure shows the default format for the date and time display on
the phone screen.
To update the time and date display:
1.
Press
, and then select Settings > Basic > Preferences >
Time and Date.
The Time and Date screen displays.
2.
Do one of the following:
— To change the date format, press the Select soft key.
or
— To change the time format, scroll to Clock Time, and then press the
Select soft key.
The Clock Date screen or the Clock Time screen displays.
or
3.
Scroll to the date or time format you want, and then press the Select soft
key.
2-3
4.
Press
to return to the idle screen.
To change the order of the time and date display:
1.
Press
, and then select Settings > Basic > Preferences >
Time and Date > Clock Order.
The Clock Order screen displays.
2.
Scroll to the clock order you want, and then press the Select soft key. The
default setting is date before time.
3.
Press
to return to the idle screen.
To enable or disable the time and date display:
1.
Press
, and then select Settings > Basic > Preferences >
Time and Date.
The Time and Date screen displays.
2.
Do one of the following:
— To disable the time and date display, scroll to Disable.
or
— To enable the time and date display, you do not have to highlight an
item. Enable is already highlighted. Go to step 3.
2-4
3.
Press the Select soft key.
4.
Press
to return to the idle screen.
Updating the Display Contrast
You can set how light or dark the screen appears.
To adjust the contrast on the phone screen:
1.
Press
, and then select Settings > Basic > Contrast.
The Contrast screen displays.
2.
Press the Up or Down soft keys to increase or decrease the display
contrast.
3.
Press the Ok soft key.
4.
Press
to return to the idle screen.
Updating the Backlight Intensity
Backlight intensity on the phone has three components:
•
Backlight On
•
Backlight Idle
•
Maximum Intensity
You can modify the Backlight On intensity and the Backlight Idle intensity
separately. You can select high, medium, low, and off levels for both.
When you modify the Maximum Intensity, you modify the entire backlight
intensity scale. For example, if you decrease the Maximum Intensity, the low,
medium, and high levels for both Backlight On and Backlight Idle intensities
decrease.
The Backlight On intensity applies to the following events:
•
Any key press
•
Incoming calls
•
Ending a call, holding a call, resuming a call by the other party
•
A voice message received
2-5
If you do not press any keys on the phone, after 20 seconds of the backlight
turning on, the backlight dims (or changes) to medium in the following cases:
•
A call is in progress
•
A call is on hold
•
There is an incoming call (ringing)
•
There is an outgoing call (ringing back)
•
Any menu shows on the display
In all other cases, the Backlight Idle intensity applies.
To change the backlight intensity:
1.
Press
, and then select Settings > Basic > Backlight Intensity.
The Backlight Intensity screen displays.
2.
Select Backlight On Intensity.
The Backlight On Intensity screen displays.
3.
Scroll to the intensity you want, and then press the Select soft key. The
default Backlight On Intensity is High.
4.
If you selected a new intensity, press the Save soft key. If you did not
select a new intensity, press the Back soft key.
2-6
5.
Select Backlight Idle Intensity.
The Backlight Idle Intensity screen displays.
6.
Scroll to the intensity you want, and then press the Select soft key. The
default Backlight Idle Intensity is Low.
7.
If you selected a new intensity, press the Save soft key. If you did not
select a new intensity, press the Back soft key.
8.
Select Maximum Intensity.
The Maximum Intensity screen displays.
9.
Press the Up or Down soft keys to increase or decrease the maximum
intensity the screen can display.
10. If you selected a new intensity, press the Ok soft key. If you did not select
a new intensity, press the Cancel soft key.
11. Press
to return to the idle screen.
Updating the Ring Tone
You can select from many different ring tones to distinguish your phone from
your neighbor’s. You can also set distinctive ring tones for contacts in your
local directory so you can identify callers when your phone rings.
Selecting a Ring Tone
You can choose a unique ring tone for your phone to identify it when it rings.
To select a different ring tone:
1.
Press
, and then select Settings > Basic > Ring Type.
The Ring Type screen displays.
2.
Scroll to the ring type you want. To hear the ring type before you select it,
press the Play soft key. The default ring type is Low Trill.
3.
To select the ring type, press the Select soft key.
4.
Press
to return to the idle screen.
2-7
Setting Distinctive Ring Tones for Contacts
Note
Your company’s settings may override this feature. For more information, contact
your system administrator.
You can set a distinctive ring tone for each contact in your Contact Directory
so you can distinguish callers.
To set a distinctive ring tone for a local contact:
1.
Press
, and then select Features > Contact Directory.
The Directory screen displays.
2.
Scroll to the contact for whom you want to assign a distinctive ring tone.
3.
Press the Edit soft key.
The Edit Contact screen displays.
4.
From the Edit Contact screen, scroll to Ring Type, and then enter a
number corresponding to one of the ring types available.
If a ring type is already assigned to the contact, but you want to change it,
press the << soft key to delete the existing ring type. Then, enter a number
corresponding to one of the ring types available.
Note
To exit this screen and determine the number associated with a ring type, press the
Menu key twice, and then select Settings > Basic > Ring Type. Each ring type
has a number associated with it.
5.
Press the Save soft key.
6.
Press
to return to the idle screen.
Adjusting the Speaker and Ringer Volume
To adjust the speaker volume:
>> During a call, press
to adjust the volume up or down.
To adjust the ringer volume:
>> When the phone is in the idle state, press
to adjust the ringer
volume up or down.
2-8
Using Call Lists
Your phone maintains lists of missed, received and placed calls. Each list can
hold up to 100 entries.
If you miss a call, the idle screen will display a message indicating the number
of missed calls you have. To view information about the missed call, view your
Missed Calls list (see Viewing Call Lists on page 2-9). After you view the
Missed Calls list, the message on the idle screen is removed.
The following figure shows what the idle screen looks like when you miss a
call.
Viewing Call Lists
You can access any call list from the Call Lists menu, or you can quickly access
missed calls from the idle screen.
To view a call list:
>> Do one of the following:
— Press
, and then select Features > Call Lists > Missed Calls,
Received Calls, or Placed Calls.
or
— To quickly view the placed calls list, press
from the idle screen.
— To quickly view the missed calls list, press
from the idle screen.
— To quickly view the received calls list, press
from the idle screen.
Managing Call Lists
You can clear all the records in a call list, or just one record. You can also
choose a record in a list and return the call, store the call details in your local
Contact Directory, or view detailed information about the particular call.
2-9
To manage a call list:
1.
Press
, and then select Features > Call Lists.
The Call Lists screen displays.
2.
Do one of the following:
— To clear the records in a call list, select Clear, and then scroll to either
Missed Calls, Received Calls or Placed Calls. Then, press Select.
The following figure shows the message that displays when you clear
a Missed Calls list.
Note
To manually clear all calls in all call lists, you can restart the phone by pressing
then selecting Settings > Basic > Restart Phone.
,
or
— To view and manage a call list, scroll to either Missed Calls, Received
Calls, or Placed Calls, and then press Select. The call list information
displays.
To manage your call list (press the More soft key to view all these
options):
— To return the call, press the Dial soft key.
— To edit the phone number (if necessary) before you dial the
number or store the call details in your Contact Directory, press
the Edit soft key.
— To remove the call from the list, press the Clear soft key.
— To store the contact in your Contact Directory, press the
Save soft key.
2 - 10
— To view information about the call, such as the phone number, the
time and duration of the call, and the name of the caller, press the
Info soft key.
3.
Press
to return to the idle screen.
Managing Contacts
You can store a large number of contacts in your phone’s local
Contact Directory. Contact your system administrator for the exact number.
You can dial and search for contacts in this directory. You may be able to add,
edit, and delete contacts. Contact your system administrator to see if you have
read-only access to your local Contact Directory, or if you can update it.
If your system administrator sets up Corporate Directory on your phone, you
may also have read access to portions of your Corporate Directory. Your
system administrator determines which contacts you can see. You can search
for contacts in the Corporate Directory, and add contacts from the Corporate
Directory to your local Contact Directory. For more information, see Searching
for Contacts in Your Corporate Directory on page 2-17 and Adding Contacts
to Your Contact Directory from a Corporate Directory on page 2-15.
Note
You cannot update the contacts in your Corporate Directory. You can only search
for and dial contacts, and add contacts from your Corporate Directory to your local
Contact Directory.
Viewing Your Local Contact Directory
To view your local Contact Directory:
>> Press
, and then select Features > Contact Directory.
The Directory screen displays, listing all the contacts in your directory. Scroll
to view all your contacts. You can use the # key to Page Down, and the * key
to Page Up.
Accessing Your Corporate Directory
When you access Corporate Directory, a search screen displays so you can
search for a specific contact. You can perform a quick search or an advanced
search.
2 - 11
Note
Each time you access Corporate Directory, the search screen displays, unless you
enable your phone to remember the last search you performed or the last person
you selected. To enable this feature, see Enabling Your Phone to Save Corporate
Directory Search Results on page 2-12.
To access your Corporate Directory:
1.
Press
, and then select Features > Corporate Directory.
The Corporate Directory search screen displays.
Note
If you have enabled your phone to save the results of your last search (or
remember the last contact you selected), your previous search results (or the
contact), will display instead of a blank search screen. To enable this feature, see
Enabling Your Phone to Save Corporate Directory Search Results on page 2-12.
2.
Search for the contact. (See Searching for Contacts in Your Corporate
Directory on page 2-17.)
Enabling Your Phone to Save Corporate Directory Search Results
You can enable your phone to save Corporate Directory search results, and to
remember the last person you viewed in the directory. Whenever you
re-display Corporate Directory, the results of your last search, or the last
person you selected, will display. If you don’t enable your phone to save
search results, each time you access Corporate Directory, a blank search screen
will display.
To enable your phone to save Corporate Directory search results:
1.
Press
, and then select Settings > Basic > Preferences >
Corporate Directory > View Persistency.
2.
Scroll to Enabled, and then press
3.
Press the Back soft key.
4.
Press
.
to return to the idle screen.
Adding Contacts to Your Local Contact Directory
You can add contacts to your local Contact Directory in the following ways:
•
Manually (if you have permission to update your local Contact Directory)
•
From a call list
2 - 12
•
Note
From a Corporate Directory (if this is set up on your phone)
You cannot update a Corporate Directory from your phone.
Adding Contacts Manually
You can update your local Contact Directory manually, instead of importing
contact information from a call list or a Corporate Directory.
To add a contact manually:
1.
Press
, and then select Features > Contact Directory.
The Directory screen displays.
2.
To add a contact to your phone’s database, press the Add soft key.
The Add To Directory screen displays.
3.
Note
Enter the contact information. To move between fields, use the Next and
Prev soft keys. Enter the following information:
Your phone may not display all the following fields. For more information, see your
system administrator.
— (Optional.) Enter the First Name and Last Name of the contact. (To
enter the contact’s name, see Navigating Menus and Entering Data on
page 1-8.)
You can enter a maximum of 32 characters.
— (Required.) Enter the Contact phone number.
You can enter a maximum of 32 characters. The phone number must
be unique, and must not already exist in the directory. If you save an
entry with a non-unique phone number, the entry will not be saved.
— (Optional.) Update the Speed Dial Index number.
The speed dial index number is automatically assigned to the next
available index value, up to a maximum value of 99. You can assign
any unused speed dial index number from 1 to 99.
If you assign a speed dial index number that is already taken, the
message “Speed dial index already exists” displays. If you enter an
invalid speed dial index number (for example, 0 or 00), the message
“Speed dial index is invalid” displays.
For more information on speed dial index numbers, see Managing
Speed Dial Entries on page 3-15.
2 - 13
— (Optional.) Enter a Label for the contact. You can enter a maximum of
32 symbols, letters, or numbers.
If you specify a label, the label will be the first item that displays for
the contact in the Contact Directory and on the Speed Dial Info screen
(before the contact’s first and last names, if specified). For example, in
the following figures, Ann Brown has been assigned the label “Sales.”
— (Optional.) Set the Ring Type.
For information on setting the ring type, see Updating the Ring Tone
on page 2-7.
— (Optional.) Assign a Divert Contact.
The Divert Contact identifies the third party to which you want this
contact’s calls sent. You can enter a maximum of 32 characters.
— (Optional.) Change the Auto Reject and Auto Divert settings.
If you set the Auto Reject field to enabled, each time the contact calls,
the call will be directed to your voice mail system (if a voice mail
system is set up). If you set the Auto Divert field to enabled, each time
the contact calls, the call will be directed to a third party you specify
in the Divert Contact field.
To toggle between the Enabled and Disabled settings for the Auto
Reject and Auto Divert fields, press
.
Note
If you do not have a voice mail system set up, enabling the Auto Reject field will
have no effect. Each time the contact calls, your phone will ring (unless you choose
to divert the contact’s calls, or enable call forwarding or Do Not Disturb on your
phone).
4.
Press the Save soft key.
5.
Press
to return to the idle screen.
2 - 14
Adding Contacts from Call Lists
You can save call information from a call list to your local Contact Directory.
To add a contact to the local Contact Directory from a call list:
1.
Do one of the following:
— To select a call list, press
, and then select Features > Call Lists >
Missed Calls, Received Calls, or Placed Calls.
or
— To quickly view the placed calls list, press
from the idle screen.
— To quickly view the missed calls list, press
from the idle screen.
— To quickly view the received calls list, press
2.
from the idle screen.
Scroll to the contact’s call.
To scroll through a list of contacts, use the * key to Page Up and the # key
to Page Down.
3.
To save the contact to your Contact Directory, press the Save soft key.
If the contact already exists in your Contact Directory, “Contact already
exists” displays.
4.
Note
Press
to return to the idle screen.
You may want to go to the Contact Directory to see if the contact was saved
correctly and to add any missing contact information. To view your Contact
Directory, see Managing Contacts on page 2-11. To update missing contact
information, see Adding Contacts Manually (step 3) on page 2-13.
Adding Contacts to Your Contact Directory from a Corporate Directory
You can save any contact listed in your Corporate Directory (if it is set up on
your phone) to your local Contact Directory.
To add a contact to your Contact Directory from a Corporate Directory:
1.
Press
, and then select Features > Corporate Directory.
The Corporate Directory search screen displays.
Note
If you have enabled your phone to save the results of your last search (or
remember the last contact you selected), your previous search results (or the
contact), will display instead of a blank search screen. To enable this feature, see
Enabling Your Phone to Save Corporate Directory Search Results on page 2-12.
2 - 15
2.
Search for the contact, or scroll to the contact’s entry.
For information on how to search for a contact, see Searching for Contacts
in Your Corporate Directory on page 2-17.
3.
Press the View soft key.
The Contact screen displays.
4.
To save the contact to the local Contact Directory, press the Save soft key.
“Saved” displays on the screen. Only the first name, last name, and phone
number are saved.
If the contact already exists in your local Contact Directory,
“Contact already exists” displays.
5.
Note
Press
to return to the idle screen.
You may want to go to the Contact Directory to see if the contact was saved
correctly and to add additional contact information. To view your Contact Directory,
see Managing Contacts on page 2-11. To update contact information, see Adding
Contacts Manually (step 3) on page 2-13.
Searching for Contacts
You can search for contacts in your local Contact Directory, or in a
Corporate Directory (if this is set up on your phone).
Searching for Contacts in Your Local Contact Directory
Search for a contact by scrolling through the directory, or entering specific
search criteria.
To search for a contact in the local Contact Directory:
1.
Press
, and then select Features > Contact Directory.
The Directory screen displays.
2.
Press the Search soft key. Then, enter the first few characters of the
contact’s first or last name, and then press the Search soft key again.
The Directory Search screen displays a list of successful matches.
3.
Scroll to the contact you are searching for.
You can dial, edit, or delete the contact.
4.
Press
to return to the idle screen.
2 - 16
Searching for Contacts in Your Corporate Directory
Search for a contact by entering specific search criteria.
Note
You can enable your phone to save Corporate Directory search results, and to
remember the last person you viewed in the directory. Whenever you re-display
Corporate Directory, the last search you performed will display, or the last person
you selected will display. To enable this feature, see Enabling Your Phone to Save
Corporate Directory Search Results on page 2-12.
To search for a contact in the Corporate Directory:
1.
Press
, and then select Features > Corporate Directory.
The Corporate Directory search screen displays.
Note
If you have enabled your phone to save the results of your last search (or
remember the last contact you selected), your previous search results (or the
contact), will display instead of a blank search screen. To enable this feature, see
Enabling Your Phone to Save Corporate Directory Search Results on page 2-12.
2.
Perform a quick search or an advanced search.
A quick search allows you to search using the contact’s last name (if the
directory is alphabetized by last name) or first name (if the directory is
alphabetized by first name). An advanced search uses any combination of
the contact’s first and last names, phone numbers, address, and title.
Do one of the following:
— To perform a quick search, next to “Search (Filtered),” enter the first
few characters of the contact’s first or last name (depending on how
the directory is organized), and then press the Submit soft key. The
screen displays a list of contacts, starting with any successful matches.
or
— To perform an advanced search, press the AdvFind soft key.
The Advanced Find screen displays.
Enter your search criteria, and then press the Submit soft key. The
screen displays any successful matches.
Note
If you want to erase all your search criteria and enter new criteria before you submit
your search, press the Clear soft key.
3.
Press
to return to the idle screen.
2 - 17
Updating Contacts in Your Local Contact Directory
You can update contact information for contacts in your local Contact
Directory. You cannot update information for contacts in your Corporate
Directory.
To update a contact in your local Contact Directory:
1.
Press
, and then select Features > Contact Directory.
The Directory screen displays.
2.
Scroll to the contact whose information you want to update, or search for
the contact (see Searching for Contacts in Your Local Contact Directory
on page 2-16).
To scroll through a list of contacts, use the * key to Page Up and the # key
to Page Down.
3.
Press the Edit soft key.
The Edit Contact screen displays.
4.
Update the contact information. Use the
and
buttons to scroll
between fields.
For information on the fields you can update, see Adding Contacts
Manually (step 3) on page 2-13.
5.
Press the Save soft key.
6.
Press
to return to the idle screen.
Deleting Contacts from Your Local Contact Directory
You can delete contacts from your local Contact Directory, but not from your
Corporate Directory.
To delete a contact from the local Contact Directory:
1.
Press
, and then select Features > Contact Directory.
The Directory screen displays.
2.
Scroll to the contact you want to delete. Or, search for the contact (see
Searching for Contacts in Your Local Contact Directory on page 2-16).
To scroll through a list of contacts, use the * key to Page Up and the # key
to Page Down.
3.
Press the Delete soft key.
The contact is deleted from the directory.
2 - 18
4.
Press
to return to the idle screen.
Placing Calls to Contacts
You can place calls to contacts from your local Contact Directory or from your
Corporate Directory (if this is set up on your phone).
To place a call to a contact in the local Contact Directory:
1.
Press
, and then select Features > Contact Directory.
The Directory screen displays.
2.
Scroll to the contact you want to call. Or, search for the contact (see
Searching for Contacts in Your Local Contact Directory on page 2-16).
To scroll through a list of contacts, use the * key to Page Up and the # key
to Page Down.
3.
Press the Dial soft key.
To place a call to a contact in the Corporate Directory:
1.
Press
, and then select Features > Corporate Directory.
The Corporate Directory search screen displays.
Note
If you have enabled your phone to save the results of your last search (or
remember the last contact you selected), your previous search results (or the
contact), will display instead of a blank search screen. To enable this feature, see
Enabling Your Phone to Save Corporate Directory Search Results on page 2-12.
2.
Scroll to the contact you want to call. Or, search for the contact (see
Searching for Contacts in Your Corporate Directory on page 2-17).
To scroll through a list of contacts, use the * key to Page Up and the # key
to Page Down.
3.
Press the Dial soft key.
Managing Incoming Calls
You can manage incoming calls from the contacts in your Contact Directory by
doing the following:
•
Setting up a distinctive ring tone for a contact.
2 - 19
•
Rejecting calls from a particular contact by sending the call to your
voice mail system. (If you do not have a voice mail system set up, the call
will still ring on your phone.)
•
Diverting calls from a particular contact to another party.
Distinguishing Calls
You can customize your phone so that you can distinguish callers by certain
ring tones. For information on setting a distinctive ring tone for a particular
contact, see Setting Distinctive Ring Tones for Contacts on page 2-8.
Rejecting Calls
You can customize your phone so that incoming calls from a particular party
are immediately sent to your voice mail system. (If you do not have a voice
mail system set up, the call will still ring on your phone.)
To send incoming calls from a particular contact directly to voice mail:
1.
Press
, and then select Features > Contact Directory.
The Directory screen displays.
2.
Scroll to the contact. Or, search for the contact (see Searching for Contacts
in Your Local Contact Directory on page 2-16).
To scroll through a list of contacts, use the * key to Page Up and the # key
to Page Down.
3.
Press the Edit soft key.
The Edit Contact screen displays.
4.
Scroll down to the Auto Reject field, and then change the Auto Reject
setting to Enabled. Use the
5.
Press the Save soft key.
6.
Press
button to select Enabled.
to return to the idle screen.
2 - 20
Diverting Calls
You can customize your phone so that incoming calls from a particular party
are transferred directly to a third party.
To divert incoming calls from a contact to a third party:
1.
Press
, and then select Features > Contact Directory.
The Directory screen displays.
2.
Scroll to the contact for whom you want to transfer calls. Or, search for
the contact (see Searching for Contacts on page 2-16).
To scroll through a list of contacts, use the * key to Page Up and the # key
to Page Down.
3.
Press the Edit soft key.
The Edit Contact screen displays.
4.
Scroll to the Divert Contact field, and then enter the number of the party
to whom you want to divert the call.
You can enter a maximum of 32 characters.
5.
Scroll to the Auto Divert field, and then change the Auto Divert setting to
Enabled. Use the
button to select Enabled.
6.
Press the Save soft key.
7.
Press
to return to the idle screen.
2 - 21
3
Using the Features of Your Phone
Your SoundStation IP 5000 conference phone is designed to be used like a
regular conference phone on a public switched telephone network (PSTN).
You can place calls, transfer a call to someone else, conduct a multi-party
conference call, or perform other basic and more advanced functions.
At any time, only one active call may be in progress on your phone. The active
call is the one that has audio associated with it. In addition to an active call,
your phone can handle up to seven other calls, including conference calls, on
hold. Your phone can handle a total of eight calls at one time.
This chapter provides introductory information and basic operating
instructions for the phone. It includes the following topics:
•
Placing Calls on page 3-2
•
Answering Calls on page 3-3
•
Ending Active Calls on page 3-4
•
Muting the Microphone on page 3-4
•
Redialing Numbers on page 3-4
•
Holding and Resuming Calls on page 3-5
•
Hosting Local Conference Calls on page 3-6
•
Using Conference Bridges on page 3-9
•
Transferring Calls on page 3-10
•
Forwarding Calls on page 3-11
•
Using Do Not Disturb on page 3-14
•
Returning the Last Call on page 3-14
•
Using the Auto Attendant on page 3-14
•
Using the Corporate Directory on page 3-15
•
Managing Speed Dial Entries on page 3-15
•
Using Voice Mail on page 3-16
3-1
Placing Calls
You can place a call off-hook (with a dial tone), or on-hook (without a dial
tone). If you place a call off-hook, you have the option of dialing a contact
using a URL or IP address, if this feature is enabled for your phone. You can
also place calls (on-hook and off-hook) using speed dial numbers (see Placing
Calls Using Speed Dials on page 3-3).
The phone displays the duration of active calls on the phone screen. The
following figure shows an active call to Jane Smith at directory number 1951
that has lasted for twelve seconds.
To place a call off-hook (to dial a phone number, IP address, or URL):
Note
Placing calls using an IP address or URL may not be enabled for your phone. For
more information, see your system administrator.
1.
To obtain a dial tone, press
2.
Do one of the following:
or the New Call soft key.
— To dial a phone number, enter the phone number of the party you
want to call.
— To dial an IP address or URL, press the URL soft key, and then enter
the IP address or URL of the party you want to call.
To enter the number and letters displayed on a key, press the key one
or more times quickly.
To enter “@”, press the # key. To enter “.”, press the * key.
Note
When you dial a URL, the maximum number of characters you can enter is 32.
3.
Press the Send soft key.
To place a call on-hook (to dial a phone number):
>> Enter the phone number of the party you want to call, and then press the
Dial soft key.
3-2
Instead of entering a phone number from memory, you can access call lists,
directories, and speed dial lists to display and dial the number for you.
Note
•
To access a call list, press the Menu key, and then select Features >
Call Lists > Missed Calls, Received Calls, or Placed Calls. Scroll to the call
you want to dial, and then press the Dial soft key. For more information, see
Using Call Lists on page 2-9.
•
To access your Contact Directory or Corporate Directory (if enabled for your
phone), press the Menu key, and then select Features > Contact Directory or
Corporate Directory. Scroll to or search for the contact you want to dial, and
then press the Dial soft key. For more information, see Managing Contacts on
page 2-11.
•
To place a call using a speed dial index number, press the Up scroll key, scroll
to the party you want to call, and then press the Dial soft key. For more
information on other ways to use speed dial, see Placing Calls Using Speed
Dials on page 3-3.
Placing Calls Using Speed Dials
Use a speed dial index number for quick dialing. Speed dial index numbers are
associated with entries in your Contact Directory. For information on
managing speed dial entries from your Contact Directory, see Managing
Speed Dial Entries on page 3-15.
To place a call using a speed dial index number:
1.
Press
.
The Speed Dial Info screen displays.
2.
Do one of the following:
— If you know the contact’s speed dial index number, enter the number.
or
— If you do not know the contact’s speed dial index number, scroll to the
contact, and then press the Dial soft key.
The call is placed.
Answering Calls
To answer a call:
>> Press
or the Answer soft key.
The three LEDs flash green when the phone rings.
3-3
Note
To ignore Incoming calls, press the Reject soft key (for private lines) or the
Silence soft key (for shared lines). To prevent your phone from ringing, enable the
Do Not Disturb feature (see Using Do Not Disturb on page 3-14).
You can forward incoming calls by pressing the Forward soft key (see
Forwarding Calls Dynamically on page 3-13).
If you set up your phone with a silent ring, press the Answer soft key to answer the
call.
To answer a call on a shared line:
1.
Answer the incoming call.
2.
Press the Hold soft key.
Anyone on another phone configured to use the same shared line can take the
call by selecting the call on their phone screen.
Ending Active Calls
To end a call:
>> Press
Note
or the End Call soft key.
You cannot end a call that is on hold until you resume the call. To end a call on hold,
press the Resume soft key, and then end the call.
Muting the Microphone
To mute the microphone:
>> During a call, press
.
The three console LEDs glow red to indicate that the other party (or parties)
cannot hear you. You can still hear all other parties while Mute is enabled.
To turn off the Mute feature, press
again.
Redialing Numbers
You can redial the last number you dialed, or search a list of placed calls to find
a previously-dialed number.
3-4
To redial the last number dialed:
>> Press
.
To redial a previously dialed number:
1.
Press
Calls.
or press
, and then select Features > Call Lists > Placed
The Placed Calls screen displays.
2.
Scroll to the number you want to redial, and then press the Dial soft key.
Holding and Resuming Calls
You can place up to eight calls on hold on your phone.
(For information on placing conference calls on hold, see Holding and
Resuming Conferences on page 3-7.)
To place a call on hold:
>> During a call, press the Hold soft key. The console LEDs flash red to
indicate that a call is on hold.
The following screen shows Jane Smith on hold. The Resume soft key now
displays on the screen.
To resume a call on hold:
>> While a call is on hold, press the Resume soft key.
Note
To end a call on hold, you must resume the call first.
3-5
Hosting Local Conference Calls
You can create a conference with up to two other parties using the phone’s
local conference feature. To quickly set up a conference, you can use the
Join soft key to create a conference between an active call and a call on hold.
After you set up a conference, you can hold the conference call, split the
conference call into individual calls on hold, or end the conference call (and
your connection to the conference call participants).
This section includes the following topics:
•
Setting Up Conferences on page 3-6
•
Holding and Resuming Conferences on page 3-7
•
Splitting Conferences on page 3-8
•
Ending Conferences on page 3-8
Setting Up Conferences
You can set up a conference in one of two ways:
•
Using the Confrnc soft key.
•
Using the Join soft key, if you have an active call and a call on hold.
Setting Up a Conference Using the Conference Soft Key
To set up a conference using the Conference soft key:
Note
1.
Call the first party. See Placing Calls on page 3-2.
2.
Press the Confrnc soft key. The active call is placed on hold.
If configured for single key-press conferences, the conference participant hears the
dial tone and ringback when the conference host places the call to the new party.
3.
Enter the number of the second party, and then press the Send soft key.
4.
When the second party answers, press the Confrnc soft key to join all
parties in the conference.
3-6
Note
If configured for single key-press conferences, you do not have to press the
Confrnc soft key again.
The Active:Conference screen displays.
Setting Up a Conference with an Active Call and a Call on Hold
If you are currently in an active call, and you have another call on hold, you
can create a conference call between the active call, the call on hold, and
yourself, by pressing the Join soft key.
To set up a conference call with an active call and a call on hold:
>> If you have an active call and a call on hold, scroll to either call, and then
press the Join soft key.
The Active:Conference screen displays.
A conference is created with the active call, the call on hold, and yourself.
Holding and Resuming Conferences
When you place a conference call on hold, you place all other conference
participants on hold.
To place a conference call on hold:
>> From the Active:Conference screen, press the Hold soft key.
3-7
The Hold:Conference screen displays. The other parties in the conference call
are put on hold.
From the Hold:Conference screen, you can do the following:
•
To resume the conference call, press the Resume soft key. The
Active:Conference screen will display again.
•
To place a call to a new party, press the New Call soft key. The conference
remains on hold, and the new call becomes the active call.
•
To end the conference call and split the conference into two separate calls
on hold, press the Split soft key.
Splitting Conferences
When a conference has been established, a Split soft key is available. When
you split a conference, you end the conference and put all parties on hold.
To split a conference:
>> From the Active:Conference screen, press the Split soft key.
The conference ends, and all calls are split into individual calls and put on
hold.
Ending Conferences
You can end a conference, and your connection to the other parties, by
pressing the End Call soft key. When you use the End Call soft key, the other
parties remain connected.
To end a conference:
>> From the Active:Conference screen, press the End Call soft key.
The two other parties remain connected.
3-8
Using Conference Bridges
A key business tool, the conference bridge allows users with an extension and
voicemail passwords to schedule and manage conference calls. Basic
functionality includes the ability to create and log into conference bridges.
There are also administrator modes that allow calling out and dropping
parties from the bridge.
Conference bridge supports up to 20 connected callers. An unlimited number
of conference bridges can be in session at the same time.
To call into a conference bridge:
Internal:
1.
Dial 556.
2.
Follow the Conference Bridge voice prompts.
External:
1.
Call direct DID to Conference Bridge (only if a DID is assigned to
Conference Bridge).
2.
Call in Auto Attendant and select Menu Option that is assigned to
Conference Bridge.* (e.g. Option 4 > Conference Bridge)
Conference Menu Options
Enter a Conference - (Option 1):
1.
Enter your extension then press # .
2.
Enter conference ID then press # .
3.
Please record first and last name then press # .
Create a Conference - (Option 2):
1.
Enter your extension then press # .
2.
Enter your password then press # . (Voicemail Password)
• Create a conference that expires in 2 weeks press 1
• Create a non expiring conference press 2
• Create a conference with a custom expiration date press 3
3-9
Delete Existing Conference - (Option 3):
1.
Enter your extension then press # .
2.
Enter your password then press # . (Voicemail Password)
3.
Enter the conference ID you want to delete then press # .
Transferring Calls
A call can be transferred in one of three ways:
•
Consultative transfer—You have the option of either talking to the party
to whom you are transferring the call, or you can choose not to talk to the
party, and complete the transfer when you hear the party’s ring-back
sound.
— Performing a Consultative Transfer on page 3-10.
•
Blind transfer—The call is automatically transferred after you dial the
number of the party to whom you want to transfer the call. You do not
have the option of talking to the party.
— Performing a Blind Transfer on page 3-11.
•
Attended transfer—The parties are automatically connected to each other
after you exit a conference.
— Set up a conference call and then end your participation. For more
information, see Setting Up Conferences on page 3-6 and Ending
Conferences on page 3-8.
Performing a Consultative Transfer
Perform a consultative transfer if you want to talk to the party to whom you
are transferring the call. Or, you can choose not to talk to the party. In this case,
you wait for the party’s ring-back sound, and then transfer the call.
To transfer a call:
1.
During a call, press the Trnsfer soft key. The active call is placed on hold.
2.
Place a call to the party to whom you want to transfer the call. See Placing
Calls on page 3-2.
3.
When you hear the ring-back sound, press the Trnsfer soft key. The
transfer is complete.
If you want to talk privately to the person to whom you are transferring
the call before the transfer is complete, wait until the person answers the
call, talk to the person, and then press the Trnsfer soft key.
To cancel the transfer before the call connects, press the Cancel soft key.
3 - 10
Performing a Blind Transfer
When you use a blind transfer, you transfer a call without speaking to the
party to whom you are transferring the call. The call is automatically
transferred as soon as you dial the party’s number.
To perform a blind transfer:
1.
During a call, press the Trnsfer soft key.
2.
Press the Blind soft key, and then place a call to the party to whom you
want to transfer the call. See Placing Calls on page 3-2.
(If you want to cancel the transfer before the call is placed, and return to
the original call, press the Cancel soft key.)
The call automatically transfers to the party you specified.
Forwarding Calls
The Polycom IP 5000 phone offers two methods of call forwarding:
• Online Call Forwarding
• Phone-based Call Forwarding
Note
8x8 recommends using online call forwarding instead of phone-based call
forwarding so that your call forwarding instructions are stored online instead of on
your phone. If you set your call forwarding rules on your phone, they will not be in
effect if your phone is disconnected from an Internet connection.
Online Call Forwarding
To enable online call forwarding:
1.
Log on to your Virtual Office Online dashboard at
http://virtualoffice.8x8.com
2.
Select the Settings button, and then select the My Rules tab.
3.
Update your Call Forwarding Rules and press Save.
You can return to Virtual Office Online at any time to update your Call
Forwarding Rules.
3 - 11
Phone-based Call Forwarding
You can set up your phone to forward incoming calls to another party (static
forwarding), or you can forward a call as your phone rings (dynamic
forwarding). Your phone will forward calls even if you enable the Do Not
Disturb Feature.
You can also reject calls from a particular contact (by sending the call to your
voice mail system), or divert calls from a particular contact to another party.
For more information, see Managing Incoming Calls on page 2-19.
To access forwarding options:
>> Do one of the following:
— Press
, and then select Features > Forward.
or
— From the idle screen, press the Forward soft key.
Forwarding Calls Statically
You can set up your phone to forward calls to another number.
To forward calls to another extension:
1.
From the idle screen, press the Forward soft key.
The Forwarding Type Select screen displays.
2.
Scroll to the forwarding type you want, and then press the Select soft
key. The options are:
— Always—To forward all incoming calls.
— No Answer—To forward all unanswered incoming calls.
— Busy—To forward calls that arrive when you are already in a call.
3.
Do one of the following:
— If you selected Always, the Call Forward Always screen displays.
Enter a number to forward all incoming calls to.
— If you selected No Answer, the Call Forward No Answer screen
displays.
Do the following (use
and
to move between fields):
a
In the Contact field, enter a number to forward all unanswered
incoming calls to.
b
In the Forward After Rings field, enter how many rings to wait
before forwarding the call (one ring is approximately six seconds).
Two rings is the recommended value.
3 - 12
— If you selected Busy, the Call Forward Busy screen displays.
Enter a number to forward all future incoming calls to when you are
already in another call.
4.
Press the Enable soft key.
If you selected the forwarding type Always, a moving arrow displays on the
idle screen next to the directory number.
To disable call forwarding:
1.
From the idle screen, press the Forward soft key.
The Forwarding Type Select screen displays, showing the forwarding type
that is enabled.
The following screen shows the forwarding type “Always” enabled.
2.
Scroll to the forwarding type you want to change, and then press the
Select soft key.
A screen displays showing the details of the forwarding type you want to
disable.
3.
To turn off call forwarding, press the Disable soft key.
Forwarding Calls Dynamically
You can manually forward a call to another number while your phone rings.
To forward an incoming call to another extension:
1.
While your phone rings, press the Forward soft key.
The Call Forwarding screen displays.
2.
Enter the number to forward the incoming call to.
Your phone displays the last number you forwarded calls to (either
statically or dynamically). If you previously set a forwarding number and
want to enter a new one, use the << soft key to delete the number.
3.
Press the Forward soft key.
The incoming call is forwarded to the other party. If call forwarding is
disabled, future calls will not be forwarded and forwarding remains disabled.
3 - 13
Using Do Not Disturb
To prevent your phone from ringing, activate the Do Not Disturb feature.
Calls you receive while Do Not Disturb is enabled will display in your
Missed Calls Call List (see Using Call Lists on page 2-9). If you have chosen to
forward your calls to another number, calls will be sent to that number if Do
Not Disturb is enabled.
To enable and disable Do Not Disturb:
1.
Press
, and then select Features.
The Features screen displays. If Do Not Disturb is not highlighted, scroll
to it.
2.
To toggle Do Not Disturb on or off, press the Select soft key.
When you enable Do Not Disturb, a flashing icon,
, displays at the
top left of the screen. When you disable Do Not Disturb, the registered line
icon,
3.
Press
, displays instead.
to return to the idle screen.
If you enabled Do Not Disturb, the idle screen displays a flashing icon,
next to the directory number.
,
Returning the Last Call
Last Call Return (LCR) enables you to automatically call back the last
incoming call without having to dial the number.
To call back the last incoming call:
•
Press the New Call soft key, then the LCR soft key.
•
You can also press
, then select Features > Last Call Return.
Using the Auto Attendant
To access the Auto Attendant:
1.
Dial 444.
2.
Follow Auto Attendant voice prompts.
3 - 14
Using the Corporate Directory
To use the Corporate Directory to make a call:
1.
Press
and select Applications, then select Apps Home, then
Corporate Directory Listing.
2.
Browse up and down the directory list and select the person you wish to
call (speed dial).
For long directories, you can search for a user in the directory and then select
their name to speed dial them.
To search an extensive Corporate Directory:
1.
Press
and select Applications, then select Apps Home, then
Corporate Directory Search.
2.
Input name, extension, or other data into the search field, then scroll
down and select Search.
3.
Select the matching entry to speed dial the user (or select Back to do a
new search).
Managing Speed Dial Entries
Use the speed dial feature for fast, automated dialing. To use speed dial, you
enter a speed dial index number instead of entering a complete phone number.
When you create a Contact Directory entry, the phone automatically assigns a
Speed Dial Index number to the entry. You can change the index number or
delete it.
Note
Only entries in your Contact Directory can be set up as speed dial entries. To create
a new Contact Directory entry with a speed dial index number, see Adding Contacts
to Your Local Contact Directory on page 2-12.
The following steps describe how to update a speed dial entry for a user. For
information on how to place a call using a speed dial number, see Placing Calls
Using Speed Dials on page 3-3.
To update a speed dial entry in your contact directory:
1.
Press
, and then select Features > Contact Directory.
The Directory screen displays.
2.
Scroll to the user’s entry, and then press the Edit soft key.
The Edit Contact screen displays.
3 - 15
3.
Use
and
to scroll to the Speed Dial Index field, and then update
the speed dial index number. Use the << soft key to delete an existing
entry.
You can assign any unused speed dial index number from 1 to 99. If you
assign a speed dial index number that is already taken, the message
“Speed dial index already exists” displays. If you enter an invalid speed
dial index number (for example, 0 or 00), the message “Speed dial index is
invalid” displays.
4.
Press the Save soft key.
5.
Press
to return to the idle screen.
Using Voice Mail
Note
Voice mail is an optional feature that your system administrator sets up. Your
system may not support it. For more information, contact your system administrator.
Screen options may vary with your application. Voice mail may be accessible with a
single key press. Contact your system administrator about this option.
Your voice mail is saved in a centralized location and may be accessed from
your phone. Your phone may indicate voice mail by the following:
•
An icon,
, on the phone screen
•
A stutter dial tone instead of a normal dial tone
To listen to voice mail messages:
1.
Press
, and then select Features > Messages > Message Center.
The Messages screen displays, indicating the number of urgent, new, and
old messages you have.
2.
To listen to your voice mail, press the Connect soft key, and then follow
the voice or visual prompts on the screen.
3.
Press
to return to the idle screen.
3 - 16
Call Recording
Call Recording On/Off
(Virtual Office Pro users only)
Call Recording On/Off is available to Virtual Office Pro users when the Call
Recording feature on your Virtual Office online dashboard settings is set to
Record Calls On Demand.
•
To turn on Call Recording during a call, press *0
•
To turn Call Recording off, press *0
To enable call recording:
1.
Log on to your Virtual Office Online dashboard at
http://virtualoffice.8x8.com
2.
Select the Settings button, and then select the My Services tab.
3.
Update your Call Recording settings and press Save.
You can return to Virtual Office Online at any time to update your Call
Recording settings.
3 - 17
4
Troubleshooting Your Phone
This chapter contains general troubleshooting information to help you solve
any problems you might encounter when you use the SoundStation IP 5000
conference phone. The tables in this chapter list possible trouble symptoms,
the likely causes of these problems, and recommended corrective actions to
take. Problems are grouped as follows:
•
Installation Configuration on page 4-1
•
Power and Startup on page 4-2
•
Controls on page 4-2
•
Access to Screens and Systems on page 4-3
•
Calling on page 4-3
•
Displays on page 4-4
•
Audio on page 4-5
To obtain more detailed troubleshooting information, you can access certain
menus on your phone that test your phone hardware. For more information,
see Testing Phone Hardware on page 4-5.
If you require more information or assistance, contact your system
administrator.
Installation Configuration
Symptom
Problem
Corrective Action
The display shows:
The phone installation
configuration is not supported.
Verify that you have installed the phone
and any components correctly:
“General configuration error
Unsupported configuration
Undo last configuration change.”
•
See Installing the Phone on page 1-2.
•
Check that no more than two
microphones are installed.
•
Contact your system administrator.
4-1
Power and Startup
Symptom
Problem
Corrective Action
The display shows “Network Link
is Down.”
The network cable is not properly
connected.
Verify that the network cable is properly
connected:
•
Check the cable termination at the
switch or hub (furthest end of the
cable from the phone).
•
Check that the switch or hub is
operational (flashing link/status
lights).
•
Check if the LAN port is active or
inactive. Press the Menu key, and
then select Status > Network >
Ethernet. From the Ethernet screen,
scroll to LAN port and verify that it is
Active.
Controls
Symptom
Problem
Corrective Action
The dial pad does not work.
The dial pad on the phone does
not respond.
Try the following:
•
Check for a response from other
feature keys or from the dial pad.
•
Place a call to the phone from a known
working telephone. Check for display
updates.
•
Check if the LAN port is active or
inactive. Press the Menu key, and
then select Status > Network >
Ethernet. From the Ethernet screen,
scroll to LAN port and verify that it is
Active.
•
Check the termination at the switch or
hub end of the network LAN cable.
Ensure that the switch/hub port is
operational (if it is not accessible,
contact your system administrator).
•
Before restarting your phone, contact
your system administrator. Your
system administrator may want to
troubleshoot the phone in more detail
before restarting the phone and losing
current status information.
4-2
Access to Screens and Systems
Symptom
Problem
Corrective Action
There is no response when you
press a feature key.
The phone is not in an active
state.
Try the following:
The display shows “Network Link
is Down.”
•
Press the keys more slowly.
•
Call the phone to confirm that inbound
call display and ringing is normal. If
successful, try to press feature keys
within the call to access the Directory
or Buddy Status screens, for example.
•
To confirm the line is actively
registered to the call server, press the
Menu key, and then select Status >
Lines > Line Information. From the
Line Information screen, verify that
your phone line is registered.
•
To attempt re-registration with the call
server, reboot the phone. For more
information, see your system
administrator.
The network cable is not properly
connected.
See Power and Startup on page 4-2.
Symptom
Problem
Corrective Action
There is no dial tone.
Power is not correctly applied to
the phone.
Verify that power is correctly applied to the
phone:
Calling
•
Check that the display is illuminated.
•
Ensure the network cable is inserted
properly on the underside of the
phone. (Try unplugging and
re-inserting the cable.)
4-3
Symptom
Problem
Corrective Action
There is no audible ring tone.
Ringer volume is low, or the
Ring Type is set to Silent Ring.
Verify ringer volume and Ring Type:
•
To adjust the ringer volume, press
either of the volume keys when the
phone is in the idle state.
•
Check that the Ring Type is not set to
Silent Ring. (See Updating the Ring
Tone on page 2-7.)
Outbound or inbound calling is
unsuccessful.
Place a call to the phone under
investigation. Check that the display
indicates incoming call information.
The phone is not registered to a
server.
Ask your system administrator to register
the phone to a server.
Symptom
Problem
Corrective Action
There is no display.
Power is not correctly applied to
the phone.
Verify that power is correctly applied to the
phone:
A “hollow” phone icon,
,
displays at the top of the screen.
Displays
The display is incorrect.
The display has bad contrast.
The display is flickering.
•
Check that the display is illuminated.
•
Ensure the network cable is inserted
properly on the underside of the
phone. (Try unplugging and
re-inserting the cable.)
•
If your phone uses Power over
Ethernet (PoE), have your system
administrator check that the switch is
supplying power to the phone.
The contrast needs adjustment.
Adjust the screen contrast. (See Updating
the Display Contrast on page 2-5.)
Certain types of older fluorescent
lighting cause the display to
appear to flicker.
Try the following:
•
Move the phone away from the lights.
•
Replace the lights.
4-4
Audio
Symptom
Problem
Corrective Action
The speaker has no audible
sound.
Speaker volume is low.
Adjust the speaker volume. During a call,
press the volume keys to adjust the
volume.
Testing Phone Hardware
Your system administrator may ask you to access a diagnostics menu on your
phone to test your phone hardware. From the diagnostics menu, you can test
your phone’s microphones, keypad mappings, and display. See your system
administrator for instructions on how to perform these tests.
To access the diagnostics menus:
>> Press
, and then select Status > Diagnostics > Test Hardware >
Audio Diagnostics, Keypad Diagnostics, or Display Diagnostics.
4-5