1
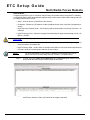
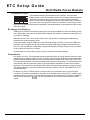
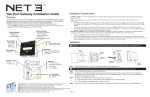
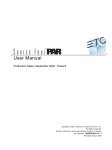
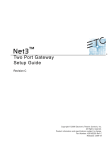
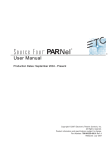
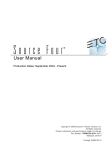
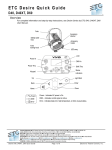
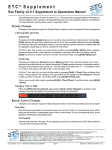
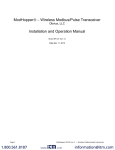
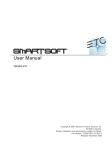
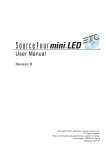
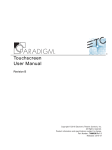
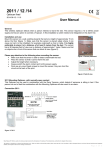
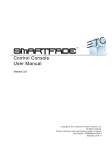
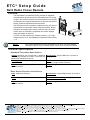
ETC® Setup Guide Net3 Radio Focus Remote O v e r v i ew sk Enter Chan The RFR and receiver unit feature a high frequency (HF) link for bi-directional communication with a connected console. During operation, the system status can be viewed on the LCD of the remote. Once a command is completed, the remote displays status information on the LCD. more mode The Net3 Radio Focus Remote (RFR) provides an advanced, wireless solution for remote control. Compatible with ETC Congo, Congo jr, Eos, and Ion consoles, this unit provides remote access to frequently used console features such as dimmer and channel checks, as well as update and record functions. Push For RFR, you will need Eos/Ion software version 1.4.4, Congo software version 5.1.0, and Gateway Configuration Editor version 1.1.0. Note: This guide illustrates basic setup procedures for the RFR. For more detailed instructions specific to your console, please refer to your console user manual. Te c h n i ca l Spe c i f i c a t i o n s Handheld Transmitter Specification Output- Default HF:1 (2.410 GHz) with 11 additional HF: channels available (2.410 GHz - 2.465 GHz). 99 Network IDs available per channel. Working range - 90m (300 ft) indoor, 200m (656 ft) in free field. Size - 160mm(4.5”) x 72mm (2.6”) x 20mm (.8”) excludes antenna. Connections - Integral USB mini-b connector for charging the unit. Power - 2x AA NiMH rechargeable battery. (Recharge using the USB connection.) Weight - 400g (14 oz.) includes antenna. Base Station Receiver Specification Data - USB type B. Ethernet. Power - USB or Power Over Ethernet. Size - 112mm(4.4”) x 71mm (2.7”) x 45mm (.7”) excludes antenna. Connections - Integral USB connector to console or RPU. Ethernet. Maximum USB cable length - 5m (16.5’) from power source using USB. Weight - 380g (13 oz.) includes antenna. Corporate Headquarters 3031 Pleasant View Road, P.O. Box 620979, Middleton, Wisconsin 53562-0979 USA Tel +608 831 4116 Fax +608 836 1736 London, UK Unit 26-28, Victoria Industrial Estate, Victoria Road, London W3 6UU, UK Tel +44 (0)20 8896 1000 Fax +44 (0)20 8896 2000 Rome, IT Via Ennio Quirino Visconti, 11, 00193 Rome, Italy Tel +39 (06) 32 111 683 Fax +39 (06) 32 656 990 Holzkirchen, DE Ohmstrasse 3, 83607 Holzkirchen, Germany Tel +49 (80 24) 47 00-0 Fax +49 (80 24) 47 00-3 00 Hong Kong Rm 1801, 18/F, Tower 1 Phase 1, Enterprise Square, 9 Sheung Yuet Road, Kowloon Bay, Kowloon, Hong Kong Tel +852 2799 1220 Fax +852 2799 9325 Service: (Americas) [email protected] (UK) [email protected] (DE) [email protected] (Asia) [email protected] Web: www.etcconnect.com Copyright © 2009 ETC. All Rights Reserved. Product information and specifications subject to change. 4250M2260 Rev C Released 2009-01 ETC intends this document to be provided in its entirety. Net3 Radio Focus Remote Setup Guide Page 1 of 7 Electronic Theatre Controls, Inc. ETC Setup Guide Net3 Radio Focus Remote Co nn ect i on an d S et up Connect Base Station Receiver The receiver includes a USB type B connector and an Ethernet connector (IEEE 802.3af) on the front of the unit for connection to the console (USB) or to a switch in your Net3 network. Push CAUTION: You may utilize either the Ethernet connection or the USB connection for data to the console, but not both. USB When the base station is connected directly to a console by USB type B, the RFR is powered by and controls only the console the base station is connected to. ETC supplies a 1.8m (6 ft.) USB cable for base station connection to a console or USB hub. The maximum distance between products is 5m (16 ft.). Direct USB Mode: To connect the Remote to a console directly, you need to use Direct USB mode. Step 1: Step 2: Step 3: With the remote power off, press and hold the [.] button. Continue pressing [.] and power up the remote. The remote will boot into the Console Selection List. In the Console Selection list, select {Direct USB} mode. The remote will prompt you to reboot. Reboot the remote. It will start up in Direct USB mode. Base USB Mode: To connect the remote to a base station connected to a console via USB, you need to use Base USB mode. Step 1: Step 2: Note: Step 3: With the remote power off, press and hold the [.] button. Continue pressing [.] and power up the remote. The remote will boot into the Console Selection List. In the Console Selection list, select {Base USB} mode. Base USB mode will not appear as an option unless the remote discovers a base station connected via USB to a console and set to the same frequency as the remote. The remote will prompt you to reboot. Reboot the remote. It will start up in Base USB mode. Ethernet For use with the Eos console, the base station may connect directly to the Ethernet port which is IEEE 802.3af. Both data and power are provided through this connection. For use with a Congo, Congo jr, Eos,or Ion, the base station can connect Ethernet through a powered Ethernet switch. If a powered Ethernet switch is not available, the base station can connect through a ethernet switch to the console and from a USB power source to the USB type B connection on the base station for power. Note: For single base station use, no configuration is needed if defaults are used. For multiple base stations, custom configurations, and connection issues, further configuration will be needed. Net 3 Radio Focus Remote Set up Guide Page 2 of 7 Elect ronic Theat re Cont rols, Inc. ETC Setup Guide Net3 Radio Focus Remote Ethernet Mode: Configuring the RFR for use on a network requires setup of the base station using the ETC Gateway Configuration Editor (GCE) and additional separate setup of the remote. Base station settings that can be configured from GCE include: • Name - How the device is identified on the network. • IP address - Whether the ID address is static (assigned by the user) or dynamic (assigned by a server). • High Frequency Channel (GHz) - The frequency that the base station is receiving. There are 1-12 channels. • High Frequency Power - Alters the strength of the transmission signal. Allowed range is from +10 dBm to +18 dBm. CAUTION: In Europe, only a value of +10 dBm is allowed. • Network ID - There are 1-99 IDs available. See “Change Frequency and ID Setting” on page 4 for more information on Network IDs. • High Frequency State - Used if there are multiple base stations. One base station should be set to master, while the remaining base stations are set to slave. Note: For more information on using the ETC Gateway Configuration Editor (GCE), please see the GCE Online Help and GCE version 1.1.0 Release Note. Step 1: In GCE, select the {Radio Focus Remotes} tab or {All Devices} tab. Make sure that show online devices is checked at the bottom of the screen. Step 2: Changes can be made by clicking on a field, such as HF Channel, which will open a drop down menu. Select the value you would like to assign to that field. Net 3 Radio Focus Remote Set up Guide Page 3 of 7 Elect ronic Theat re Cont rols, Inc. ETC Setup Guide Net3 Radio Focus Remote . Step 3: Other fields require that you type in the value you wish to assign, such as IP address and Network ID. Sp ec i a l Star t U p M o d e s From the RFR remote, there are several modes that can be accessed for configuration. Range Test Holding down [0] while the remote is booting up will take you to the range test screen. The remote will connect to the closest base station. In range test mode, any key press will generate signal strength feedback on the remote. To exit the range test, just power down the remote. Console Section Mode Holding down [.] while the remote is booting up will take you to the console selection list. This mode is used to select between Direct USB mode, Base USB mode, or available host consoles for networking. Note: Direct USB Booth Base USB mode will only be shown as an option when a base station connected via USB is detected. Base Station List Holding down [2] while the remote is booting up will take you to the base station list. This mode will show the signal strengths of all available bases in a list format. Feedback is shown from any base in master, slave, or USB modes. Change Frequency and ID Set ting An ID is a separate digital channel on a single high frequency (HF) setting. Changing an ID setting from the default “1” is useful when multiple systems are using the same frequency. This procedure is not required unless you are having difficulty at the default frequency and ID settings. Note: If you change the frequency and ID settings in the handheld remote you must also change the frequency and ID settings in the connected base station to match. Net 3 Radio Focus Remote Set up Guide Page 4 of 7 Elect ronic Theat re Cont rols, Inc. ETC Setup Guide Net3 Radio Focus Remote . Note: If multiple RFR units are to be used separately within a range of each other’s receiver units, change the frequency and/or ID settings to avoid conflicts. Reference “Recharge the Battery” on page 7. For optimal operation, set the base stations apart by at least 5m (16 ft.) to ensure the two units do not interfere with each other’s operation. To change the radio settings on the remote: Step 1: Step 2: Step 3: Step 4: Step 5: Step 6: CAUTION: Step 7: Step 8: Set HF Channel 1 (2.410 Ghz) With the remote power off, press and hold the [C] button. Available: ** Setup: HF EUR Continue pressing it and power up the unit. The display Prev Save Next window will show the HF Channel selection screen. Default Choose an HF Channel (1-12) by spinning either thumb wheel. • While setting the HF Channel, the RFR scans each available channel for traffic which may interfere with the RFR. This feature is used to determine what frequency to use in your venue. • In the “Available:” field the RFR will display ***,**,* or “used”. The asterisks indicate the quality of the signal at that channel. *** is best. “Used” indicates that other traffic is detected on that channel, but the RFR may still function properly. Press {Next} ([s2]). Choose a Network ID (1-99) by spinning either thumb wheel. Press {Next} ([s2]). Set the HF power level. This allows you to alter the strength of the transmission signal from the remote. Allowed range is from +10 dBm to +18 dBm. • A higher value indicates a stronger signal, but shortened battery life. A lower value indicates a weaker signal and an extended battery life. In Europe, only a value of +10 dBm is allowed. Press {Save} ([s3]). You must cycle the power to apply the new settings. To change the frequency and ID setting in your base station receiver with GCE: Step 1: Step 2: Step 3: Step 4: Step 5: Note: Select the {RFR} tab in GCE. Double click on the RFR that you wish to change or go to {Edit} in the toolbar and select {Edit Device Configuration}. Both methods will open up the Radio Focus Remote Configuration window. Select the {HF Properties} tab. Choose the appropriate HF Channel setting from the drop down box (must be from 1-12, matched with the remote). Type in the value you would like to assign as the Network ID (must be from 1-99, matched with the remote). Accept the changes by clicking the {Ok} button. To cancel changes click {Cancel}. Frequency and ID can also be configured from the Online Device screen in GCE. See “Ethernet Mode:” on page 3 for more information. Net 3 Radio Focus Remote Set up Guide Page 5 of 7 Elect ronic Theat re Cont rols, Inc. ETC Setup Guide Net3 Radio Focus Remote To change the frequency and ID setting in your base station receiver with an Eos or Ion console/ offline client: Step 1: In the browser menu, select {File}<{Exit Eos/Ion}. A dialog box opens asking you to confirm. Step 2: Confirm this command by clicking {Yes}. The Eos/Ion application will close and the Eos/ Ion Configuration Utility will display. Step 3: Click {Settings} button. A new settings dialog box will display. Step 4: Click the {RFR} button. A RFR dialog box will display. Step 5: Choose the appropriate High Frequency Channel setting from the drop down box (must be from 1-12, matched with the remote). Step 6: Choose the appropriate Network ID setting from the drop down box (must be from 1-99, matched with the remote). Step 7: Accept the changes by clicking the {Accept} button. To cancel changes click {Cancel}. The next time you start the Eos/Ion application, Eos/Ion will automatically send the new settings to any base station that is connected to the console. You must then reset the base station by unplugging and re-plugging it for the changes to take effect. To change the frequency and ID setting in your base station receiver with a Congo or Congo Jr console/offline client: Step 1: Step 2: Step 3: At the Congo Welcome Screen, select {System Settings}. In System Settings, select the {RFR} tab. Choose the appropriate Frequency setting from the drop down box (must be from 1-12, matched with the remote). Step 4: Choose the appropriate Group setting from the drop down box (must be from 1-99, matched with the remote ). Step 5: Accept the changes by clicking the {Ok} button. To cancel changes click {Cancel}. The next time you start the Congo application, Congo will automatically send the new settings to any base station that is connected to the console. You must then reset the base station by unplugging and re-plugging it for the changes to take effect. H a nd h el d R em o te O pe r a t io n The keypad illuminates while the keys are in use and remains illuminated while the unit is transmitting data. After a key is released, the keypad will dim the backlight and the LCD display until the next button press or transmission. s1 s2 @ s4 s5 s6 7 8 9 TH 4 5 6 - 1 2 3 + C 0 . s3 Chan Keypad Function more sk mode The RFR handheld unit features 24 backlit buttons and two push-button thumb wheels, one on either side for scrolling to desired targets and selecting them for interaction. The top side of the remote has an on/off power switch, a high frequency antenna, and a USB mini b port. The USB mini b connection may be used to supply power for the internal rechargeable NiMH battery cell. Enter Most of the buttons on the handheld remote are common use and function exactly as they are labeled. A select few of the buttons require additional explanation: • The top left button is labeled [More SK / Mode]. When this button is pressed and released, the soft keys will change to the next page of soft keys if there is more than one page available for use. Press and hold the [More SK / Mode] button to display different modes of interacting with the console. • The bottom right button is labeled [Enter / Chan]. When the RFR is connected for use with an Eos or Ion console, the [Enter / Chan] function is <Enter>, which terminates the command line. When the RFR is connected for use with a Congo or Congo jr console, the button’s function is <Channel>. Net 3 Radio Focus Remote Set up Guide Page 6 of 7 Elect ronic Theat re Cont rols, Inc. ETC Setup Guide Net3 Radio Focus Remote LCD General Layout The handheld remote LCD is divided into four sections. The top section displays status for the current target selected. The middle section displays the Command Line command line which scrolls to ensure the end of the entered command is S1 S2 S3 visible. The next section displays the console’s mode status and error status if S4 S5 S6 an error is active. The last section of the LCD shows the current function of the soft keys or the different modes that are available of interacting with the connected console when mode status is selected. Details of current target Recharge the Battery A battery level indicator is found in the upper right corner of the handheld LCD. When the battery is near to a complete drain, the indicator will flash. When charging, the indicator will depict increasing power to verify that it is charging. When the remote is not in use, set the switch to the “Off” position to guard against accidental key presses and to conserve battery power. Charge the battery using the USB mini b cable that shipped with your RFR. Connect the USB mini b connector to the handheld remote and the other end to the USB charger adapter supplied with your RFR. You may also attach the USB cable to a powered USB hub, personal computer, or your console. A full recharge may take up to 12 hours. Provided there is enough battery charge, you may use the remote while charging. Compliance FCC Notes (2.4 GHZ): This equipment has been tested and found to comply with the limits for a Class A digital device, pursuant to Part 15 of the FCC Rules. These limits are designed to provide reasonable protection against harmful interference when the equipment is operated in a commercial environment. This equipment generates, uses and can radiate radio frequency energy and, if not installed and used in accordance with the instruction manual, may cause harmful interference to radio communication. Operation of this equipment in a residential area is likely to cause harmful interference in which case the user will be required to correct the interference at his own expense. FCC ID: OUR-XBEEPRO. IC ID: 4214A-XBEEPRO. EU Notes (2.4 GHZ): The RFR system conforms to the CE requirements set up by the European Community. This can be recognized by this label on the outside of the product. The HF modules used are approved to ETS 300-220-1. The transmitter is approved according to R&TTE guideline 1999/5/EC and carries the declaration . The unit is approved for use in all European countries except Cyprus. Net 3 Radio Focus Remote Set up Guide Page 7 of 7 Elect ronic Theat re Cont rols, Inc.