1
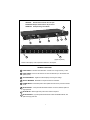
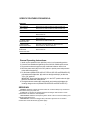
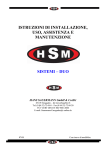
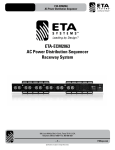
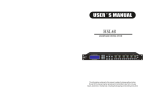
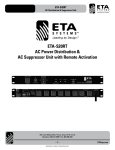
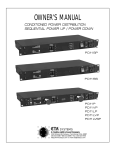
OWNER’S MANUAL
TM
©
SYSTEMS
A Creative Light & Sound Company
1532 Enterprise Parkway, Twinsburg, OH 44087 USA
330-425-3388 • 800-321-6699 • Fax: 330-425-9700
http://www.etasys.com E-mail [email protected]
SHOCK HAZARD – DO NOT ENTER
CHOC HASARD – N'ENTRENT
SCHOCKE HAZARD – TEST NICHT BETRETE
URTO HAZARD – DO NON ENTRANO
!
•
Read and understand all of the instructions before connecting unit to wall
supply.
Lisez les consignes ci-dessous avant de connecter l'appareil au secteur.
Gelesen und begreife das handbuch bevor anschliessend einheit bis wand
nachschub.
Legemmo e capiamo tutta istruzioni prima collegamento a muro fornirle.
•
Always disconnect power cord before opening unit.
Déconnectez toujours le cordon d'alimentation avant d'ouvrir le boîtier.
Entferne gewalt schnur bevor aufgehend einheit.
Allontanano potenza spago prima apertura unità.
•
Never expose the unit to rain or any liquid.
N'exposez jamais l'appareil à la pluie et ne l'utilisez pas à proximité de
liquides.
Test nicht aussetze das einheit bis regen oder etwas flüssig.
Do non esponete gli unità a pioggia o liquida.
Please read the following instructions carefully to prevent potential shock or fire hazards.
This manual should be retained for future use.
Lisez attentivement les consignes suivantes pour éviter tout risque d'électrocution ou d'incendie.
Conservez ce manuel pour une utilisation future.
Erfreue gelesen das folgend anleitung auf befehle bis vereiteln potentiell schocke oder feuer hazards.
Das handbuch darf bin beibehalten für futur gebrauch.
Accontentano legemmo gli seguendo istruzioni auf befehle a impediamo potenziale urto o fuoco
hazards. Questa manuale sarebbe ritenemmo per futura adoperano.
IMPORTANT
INPORTÁNT
WICHTIG
IMPORTANTE
1
The light switch on the front of unit is not the power disconnect device.
L'interrupteur d'eclairage en façade concerne uniquement l'allumage des lampes et non les
embases.
Das leicht einschalte das stirn von einheit ist nicht das gewalt knotrolle vorrichtung.
Gli leggera commutatore su gli fronte di unità è non gli potenza controlla dispositivo.
2
Never expose the unit to water or liquids.
Ne renversez jamais d'eau ni aucun liquide sur l'appareil.
Test nicht aussetze das einheit bis träne oder flüssigkeiten.
Do non esponete gli unità a acqua.
3
Connect unit only to a properly measured supply. Use only three wire cord.
Connectez l'appareil uniquement à une tension secteur adaptée. Utilisez uniquement un cordon
à trois fils.
Anschliesse einheit bis ein angebracht gemessen nachschub. Gebrauch nur drei draht schnur.
Annettere unità solo a un adequately misurata fornirle. Adoperano solo tre conductente spago
quale è fornii congli unità.
1
CAUTION: Risk of electrical shock. Do not open.
ATTENTION: Risque d'electrocution. Ne pas ouvrir.
VORSICHT: Hochspannung. Nicht öffnen.
1
5
2
3
2
4
6
8
7
(Typical 10 places)
NOTE: Total capacity of all receptacles combined is 10 amperes.
GENERAL FEATURES:
1 LIGHT SWITCH - Activates rack illumination. Choose HI or LO light intensity, or OFF.
2 LIGHT TUBES - Pull out to full extension of 79mm to illuminate up to 25 standard rack
spaces (0.9m)
3 VOLTAGE DISPLAY - Digital AC readout displays incoming line voltage.
4 CIRCUIT BREAKER - Resettable 10 ampere thermal circuit breaker.
5 POWER SWITCH - Illuminated power switch (DPDT line disconnect) controls all outlets
on unit.
6 IEC320 OUTLET – Front panel IEC320 female outlet is convenient, filtered, spike and
surge protected.
7 IEC320 INLET - IEC320 type male power inlet is rated 10 amperes.
8 IEC320 OUTLETS - (10) back panel IEC320 female outlets are EMI/RFI filtered, and
spike and surge protected.
2
SPECIFIC FEATURES FOR MODELS:
FEATURE
LIGHT SWITCH
EPD11LIEC-CE, EPD11LVIEC-CE, EPD11LOIEC-CE
LIGHT TUBES
EPD11LIEC-CE, EPD11LVIEC-CE, EPD11LOIEC-CE
VOLTAGE DISPLAY
EPD10VIEC-CE, EPD11LVIEC-CE
CIRCUIT BREAKER
EPD10IEC-CE, EPD10VIEC-CE, EPD11LIEC-CE,
EPD11LVIEC-CE
POWER SWITCH
EPD10IEC-CE, EPD10VIEC-CE, EPD11LIEC-CE,
EPD11LVIEC-CE
(1) FRONT PANEL
IEC320 OUTLET
EPD11LIEC-CE, EPD11LVIEC-CE
(1) BACK PANEL
IEC320 MALE INLET
EPD10IEC-CE, EPD10VIEC-CE, EPD11LIEC-CE,
EPD11LVIEC-CE, EPD11LOIEC-CE
(10) BACK PANEL
SWITCHED
IEC320 OUTLETS
EPD10IEC-CE, EPD10VIEC-CE, EPD11LIEC-CE,
EPD11LVIEC-CE
General Operating Instructions:
1. Install unit in a standard 19-inch (48.25cm) rack or in a free-standing position.
2. Connect Power Distribution/Lights Only unit to 230VAC 50/60Hz power source.
3. Plug sensitive electronic equipment into conditioned outlets on back of unit.
4. Move the power switch (#5) to the "ON" position to provide power and protection
to the electrical equipment.
5. For illumination (Models EPD11LIEC-CE, EPD11LVIEC-CE, and EPDLOIEC-CE),
pull out/extend the light tubes (#2) and move the light switch (#1) to either the
"HI" or "LO" positions.
IMPORTANT: Be sure the light switch (#1) is in the "OFF" position when the light
tubes are recessed back inside the unit.
6. The digital voltmeter readout (#3) automatically and continuously displays the
incoming voltage to the unit (Models EPD10VIEC-CE and EPD11LVIEC-CE).
SERVICING:
WARNING: Hazardous voltages are present within the unit. Never attempt any maintenance
without disconnecting the power cord.
ATTENTION: Les tensions de l'appareil présentent des dangers. Déconnectez le cordon
d'alimentation avant d'effectuer toute réparation.
VERWARNEND: Gefährlich stromspannung bist im einheit. Test nicht versuch erhaltung ohne
entfernend das gewalt schnur.
AMMONIMENTO: Pericolosa voltaggio siamo presentano negli unità. Do non tentativo
mantenimento senza allontanando gli potenza spago.
3
LAMP REPLACEMENT
REMPLACEMENT DE LA LAMPE
LAMPE ERSATZ
LAMPADA CAMBI
1. Disconnect the units power cord from the voltage source.
Déconnectez le cordon d'alimentation du secteur.
Loskomme das einheiten gewalt schnur vom stromspannung quelle.
Disinnestano gli units potenza spago dai voltaggio fonte.
2. Remove screws on cover, and remove cover.
Retirez les vis et ôtez le couvercie.
Entferne schraubt an abdeckung, und entferne abdeckung.
Allontanano vites su coperchio, e allontanano coperchio.
3. Remove the two (2) hex spacers and two (2) hex nuts from rear of light tube assembly.
Retirez les (2) deux entretoises et les (2) deux écrous à tête six-pans à l'arrière de chaque
assemblage de la lampe.
Entferne das (2) zwei trenner und das (2) zwei riegel halter vom hinter von jede leicht rohr.
Allontanano gli due (2) separatori e gli due (2) bolt raccoglitori dai posteriore di cadauna
leggera tubo assemblea.
4. Slide lamp socket out of the tube.
Retirez la lampe de la douille.
Hernehme lampe sockel aus das rohr.
Prendere lampada alloggiando fuori degli tubo.
5. Turn lamp counterclockwise and replace with same type and rating 230-,7W.
Tournez la lampe vers la gauche et remplacez-la par une lampe de même type et de même
calibre (230 V, 7 W).
Drehen lampe ans abfuhr und vertrete mit gleich typ und beurteilung 230-, 7W.
Giro lampada agli partii e rimetterci con stesso tipo e classifica 230-, 7W.
6. Insert lamp sockets into the back of the tube.
Insérez le culot de la lampe dans la douille.
Einfüge lampe sockel rücken im rohr.
Inseriamo lampada alloggiando ritorno negli tubo.
7. Replace the two (2) hexagonal spacers and the two (2) hex nuts at the rear of the light tube
assemblies, and attach the housing bracket to the tube.
Replacez les entretoises et les écrous à l'arrière de l'assemblage de la lampe et attachez le
support à la lampe.
Vertrete das zwei (2) trenner und das zwei (2) halter am hinter der leicht rohr, und anhefte das
sockel ans rohr.
Rimetterci gli due (2) separatori e gli due (2) nuts at gli posteriore degli leggera tubo assemblee,
e annettere gli alloggiando agli tubo.
8. Replace top cover and screws.
Revissez le couvercie.
Vertrete oberteil abdeckung und schraubt.
Rimetterci cima coperchio e raccoglitori.
9. Connect power cord to voltage source and test lamp.
Connectez le cordon d'alimentation au secteur et vérifiez le bon fonctionnement de la lampe.
Anschliesse gewalt schnur bis stromspannung nachschub und erprobe lampe.
Installano potenza spago a voltaggio fornirle e collaudo lampada.
4
EU DECLARATION OF CONFORMITY
Information Technology Equipment
Directives covered by
this Declaration:
89/336/EEC Electromagnetic Compatibility Directive
73/23/EEC Low Voltage Direction
Product:
ETA Systems - "EPD11LVIEC-CE Series" Power
Distribution Series, Serial Numbers CE20000+
(+ means "and up")
Standard which
Product Conforms to:
IEC950-1, -2, and referencing -3:1995,
or EN60950-3:1995 with all amendments through
Jan. 1997.
The technical documentation required to demonstrate that this product meets the
requirements of the "EMC", and "Low Voltage" Directives, has been compiled by the
signatory below and is available for inspection by the relevant authorities. The CE
Mark was first applied in 1998.
Authority:
Guy LeJeune
Eurocase Belgium N.V.
Daenenstraat 44
B-2600 Berchem-Antwerpen
Sign:
Date:
Phone: 011-32-3-230-9445
Fax: 011-32-3-218-9397
ATTENTION
The attention of the purchaser, installer, or user is drawn to the special
measures and limitations which must be observed when the product is
taken into service, in order to maintain compliance with the above
directives. Details of the special measures and requirements are
detailed in this product user manual.
5
©
TM
SYSTEMS
A Creative Light & Sound Company
1532 Enterprise Parkway, Twinsburg, OH 44087 USA
330-425-3388 • 800-321-6699 • Fax: 330-425-9700
http://www.etasys.com E-mail [email protected]
All designs and specifications are subject to change without notice.
Copyright © 1999 ETA Systems.
6/99 6MAN-026