1
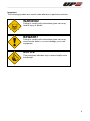
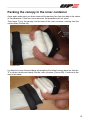
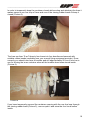
______________________________________________________________________________ PROFILE 2 Owner’s Manual and Service Booklet Serial number: __________________________ The data and statements contained within this manual may be changed without prior notice. No part of these documents may be copied or transmitted for any purpose in any manner or by any means, either electronic or mechanical, without explicit written permission from Ultralite Products International. © 1995-2012 UP International Version 1.0/August 2007 1 ______________________________________________________________________________ Table of contents WELCOME IN OUR TEAM 5 SAFETY INSTRUCTIONS 6 TECHNICAL DESCRIPTION 6 GENERAL ..................................................................................................................... 6 TECHNICAL DATA UP PROFILE 2 ................................................................................... 7 OVERVIEW DRAWING ..................................................................................................... 7 EQUIPMENT CONFIGURATION ......................................................................................... 8 Canopy, Lines and Bridle 8 The Inner Container 8 The Outer Container 8 NECESSARY DOCUMENTATION........................................................................................ 8 USAGE ........................................................................................................................ 8 USING THE RESERVE PARACHUTE ................................................................................... 8 CHECKING THE PARACHUTE SYSTEM ............................................................................... 9 PACKING THE RESERVE CANOPY 10 LAY OUT AND ARRANGE ............................................................................................... 10 FLAKING THE CANOPY ................................................................................................. 11 PACKING THE CANOPY IN THE INNER CONTAINER ............................................................ 15 CLOSING THE INNER CONTAINER .................................................................................. 17 CLOSING THE OUTER CONTAINER ................................................................................. 17 Harnesses with built-in reserve 17 Harnesses with no built-in reserve container 17 THE PACKING CARD ................................................................................................... 18 INSTALLING THE UP PROFILE 2 IN A HARNESS 19 MOUNTING THE UP PROFILE 2 OUTER CONTAINER ON YOUR HARNESS ............................. 19 INSTALLING THE UP PROFILE 2 IN A HARNESS WITH INTEGRATED RESERVE CONTAINER ...... 19 SAFETY RUPTURE THREAD ........................................................................................... 20 DEPLOYMENT ............................................................................................................. 20 COMPATIBILITY ........................................................................................................... 20 FURTHER TIPS ............................................................................................................ 21 Salt water 21 Insects 21 MAINTENANCE AND CLEANING22 TAKING CARE OF YOUR RESCUE SYSTEM ....................................................................... 22 CLEANING .................................................................................................................. 22 2 ______________________________________________________________________________ CHECKS AND REPAIRS 23 CARE AND MAINTENANCE ............................................................................................. 23 Working life limits 23 Airworthiness Check 23 Packing intervals 23 UP Craftsmanship 23 UP W ARRANTY .......................................................................................................... 23 National warranty conditions 24 International UP warranty 24 SENDING THE UP PROFILE 2 AND OTHER UP PRODUCTS ................................................ 24 UP HOMEPAGE 25 ATTACHMENTS ......................................................................................................... 29 Luftsportgeräte-Kennblatt UP Profile 2 20, 22, Bi ........................................................ 30 Service Booklet Rescue system and pilot data ...................................................................................... 34 Service verification stamps .......................................................................................... 36 Emergency parachute logbook .................................................................................... 38 Product registration card.............................................................................................. 39 3 ______________________________________________________________________________ Important The following symbols are used to draw attention to particular sections: WARNING! Failing to comply with instructions given here may lead to injury or death! BEWARE! Failing to comply with instructions given here may cause undue wear to, or even damage, your new equipment. NOTICE This pictogram indicates a tip or some helpful extra knowledge. 4 ______________________________________________________________________________ Welcome in our team Congratulations on the purchase of your new UP Profile 2 rescue system. Although we hope you’ll never need it, we assure you that with the UP Profile 2 you have chosen a rescue system that represents the maximum in safety, functionality and quality in our sport. In order to ensure that you get the maximum passive safety out of your reserve parachute we recommend that you take a little time to read this manual and thus become familiar with the functioning, the maintenance and the packing intervals. Please take a little time to complete and send the reply card (product registration) found in the back of this manual, or by doing the same Online via: www.up-paragliders.com > service > product registration Your completed product registration is also needed should any warranty issues arise. After a successful product registration we can keep you informed of all new products and developments at UP, as well as any technical information about the UP Profile 2. We would also be delighted to hear any feedback you have concerning the rescue system. It is only through your feedback that we can continue to develop world-class paragliding equipment that appeal to the majority of pilots. If you have any questions regarding your rescue system or auxiliary equipment please ask your local dealer or feel free to contact us here at UP directly. Your UP International Team 5 ___________________________________________________________________________ Safety instructions Paragliding is an extremely demanding sport requiring the highest levels of attention, judgment, maturity, and self-discipline. Due to the inherent risks in flying this or any paraglider, no warranty of any kind can be made against accidents, injury, equipment failure, and/or death. This rescue system is not covered by product liability insurance. Do not use it unless you are personally willing to assume all risks inherent in the sport of paragliding and all responsibility for any property damage, injury, or death, which may result from use of this paraglider rescue system. Please read this owner's manual thoroughly before your first flight with the UP Profile 2 so that you are fully acquainted with your new rescue system. This manual gives you information on the entire specific and general characteristics of the UP Profile 2. It is important to note the following points: At the time of delivery the UP Profile 2 conforms to German Hang Gliding Association (DHV) requirements (see certification information later in this manual) Any changes being made outside the permitted range of adjustment invalidate any and all claims under the warranty Using this rescue system is exclusively at the risk of the user; the manufacturer or distributor assumes no responsibility for accidents occurring while using it. The pilot assumes total responsibility for the use of the rescue system. Before each flight the pilot must perform a mandatory check of the condition of the rescue system. It is assumed that the pilot is in possession of the necessary qualifications and that provisions of any relevant laws are observed. When reselling the rescue system please make sure you also give this manual to the new owner. The manual is an integrated part of the paraglider and is required for the wing to keep its certification. Technical description General The UP Profile 2 is a modern rescue parachute for use with paragliders. It has been specially developed to show the lowest possible sink rates, the fastest opening time and the highest pendulum stability. Highlights of the UP Profile 2 Built-in pilot chute for faster opening times. The Profile Bi comes without this pilot chute Central line Easy to pack and minimal packing volume Special inner container for reliable and quick opening Long-lived, strong materials DHV approval 6 ___________________________________________________________________________ Technical Data UP Profile 2 Size 20 22 Bi Total weight [kg] 2,1 2,6 4,0 Sink Rate [m/s] 5,4 5,5 5,3 Canopy Surface Area [m ] Maximum Weight [kg] 27,0 100 30,0 120 53,0 200 Recommended Flying Weight [kg] 100 120 200 2 Overview drawing Canopy Lines Central Line Reserve bridle Connection loop 7 ___________________________________________________________________________ Equipment configuration Canopy, Lines and Bridle and must follow each canopy throughout its working life: The manual The packing-card Each canopy, according to its model size, has a different number of panels. In the Profile 2 series, there are two different types of material used in the construction of the canopy itself. The base material in the outer portion of the chute is made of nearly zero porosity fabric; the inner portion (the upper part of the chute) is made of a porous fabric. Both materials are of a ripstop nature. The main seams are reinforced with sewn in tape. The main lines are attached with sewn in „V“ tabs at the base of the skirt. The apex is a pulleddown design. The bridle is manufactured out of high strength webbing with a loop sewn into the end. Usage The Inner Container If you find yourself in an uncontrollable situation in the air pull hard on the deployment handle. This will open the outer reserve container and release the reserve parachute. Then throw the reserve package forcefully away from you. If your glider is spiralling/rotating it pays to throw the reserve against the rotation as this will speed up the inflating process. If you have had a collision and find yourself entangled with someone else’s glider try to make sure you don’t throw the canopy into the entanglement, as this will delay the opening. The air current, helped by the drogue chute, stretches the lines and peels away the inner container. This releases the actual canopy and lets it open. Once fully open most authorities suggest pulling in or B-lining the paraglider to avoid having the two The inner container is made from rip stop nylon just as the deployment handle with the locking pins and the drogue chute. The Outer Container The outer container is made from a very durable waterproof ballistic cloth. It has a bottom section, two sides, as well as upper and lower closing flaps. Necessary documentation The following papers are an integrated part of the UP Profile 2 reserve parachute, The UP Profile 2 series are manually deployed reserve parachutes for para- and hangglider pilots to use in emergencies. WARNING! Any other usage is dangerous and will invalidate all warranty claims. These free-flight emergency parachutes are NOT designed for jumping out of airplanes! Using the reserve parachute 8 ___________________________________________________________________________ canopies working against each other while descending in a wide V. We recommend that you practise this procedure under qualified instruction in a gym (such arrangements are offered by most schools and clubs around the world) and that you have your harness/parachute configuration tested by qualified professionals before flying. It is also a good idea to go through the entire deployment procedure before each flight to ensure that you are mentally prepared in the event that you suddenly need to use your UP Profile 2 reserve parachute. Checking the parachute system Before packing the UP Profile 2 it must be checked by a certified parachute rigger. In case the parachute has been deployed in earnest it must be sent to the manufacturer or to a manufacturerapproved checking facility for a complete check-up. Whenever re-packing an already packed parachute make sure that it remains deployable after installing it in the paragliding harness. This procedure is called the Compatibility Test and must be performed each time the parachute is installed in a harness. One of the things that must be verified is that the necessary deployment force should be between 5 and 12 kN – if lower a piece of thread in the form of a rupture joint solves the problem (see the “Rupture point” chapter). 9 ___________________________________________________________________________ Packing the Reserve Canopy Lay out and arrange The UP Profile 2, and indeed all parachutes, should be opened and aired for at least a day before re-packing. This eliminates any humidity present in the fabric. The packing operation is best done on a rigging table or at least on a clean flat surface. The parachute is stretched out on the packing surface. Insert a temporary line in the tabs at the vertex of the chute through the sewn-in tabs (Picture 1A). Attach the bridle to the other end of the table, stretching out the canopy tight between the temporary line and the bridle (Picture 1B). Picture 1A Picture 1B 10 ___________________________________________________________________________ In order to maintain an even pull on the entire parachute with lines we suggest you suspend a weight (your harness or a sand bag) off the bridle hanging over the edge of the table. The lines are to be inspected for damage and to ensure that they are straight. To accomplish this, take any two adjacent lines, for example, Pos. 1 and 20, and walk them down to the bridle, checking for any cross-tangles. If there are any tangles, continue this process, looping the bridle through the crossed line at the juncture of the lines and the bridle until all tangles have been removed. Flaking the Canopy The following example describes folding the Profile 2 20, which has 20 panels and lines. Folding of other canopies would follow a similar pattern; only the number of panels and lines would be different. One takes Line No 1 (of the main support lines) and counts half of the lines, (in this case of the Profile 2 20, 10 lines) and lays them together on one side. Now, with Lines 1-10 on the right, arrange Lines 11-20 on the left. The flaking of the panels now begins with panel/line No. 10. To this end, one after another, the panels from No. 10 to No. 1 are picked up and flaked-folded, holding the stacked lines between the thumb and fore-finger. Once the Lines Nos. 10-1 have been folded, move the bundle of lines so that they are now held between the fore finger and the middle finger. Now, Panel/Line Nos. 20-1 can also be flaked-folded between the thumb and forefinger, placing each successive line on top of the previously stacked lines. The canopy is now laid back down on the table in such a manner that the bundles of panels are divided, with the highest No. Panel (in this case No. 20) on the left. Now straighten the apex of the canopy to make all the panels even. The canopy is then weighted down as illustrated (Picture 2A). Picture 2A 11 ___________________________________________________________________________ If you are using a line-comb now is the time to “comb” the lines, working from the top down. The combing can also be done with your hands and ensures that there are no tangles or mistakenly placed panels/lines before you move on to the next step. Also make sure that you now have the panel with the stamp on it (in this case the no. 20) lying on top on the left. Now you move to the vertex of the parachute and sort the top of each panel. Then weigh down with a sand bag (Picture 2B). Picture 2B Next you place the line bundles on the left (corresponding to panel no. 20 to 11) left of the centre line, the line bundle on the right (panels 1 to 10) right of the centre line (Picture 2C and 2D). Picture 2C 12 ___________________________________________________________________________ Picture 2D Now fold the canopy in a large “S” so that the lines end up coming out of the middle of the “S” (Picture 3A and 3B). Picture 3A Picture 3B 13 ___________________________________________________________________________ Again weigh the canopy down with sand bags (see Picture 3C). Picture 3C WARNING! Now is the time to remove the packing line threaded through the packing loops at the vertex of the canopy (Picture 3D). Failing to do so will render the parachute dysfunctional! Failing to follow this procedure may render your emergency parachute unusable! Picture 3D 14 ___________________________________________________________________________ Packing the canopy in the inner container Once again make sure you have removed the packing line from the tabs at the vertex of the parachute. If this line is not removed, the parachute will not open! Then begin “Z-ing” the canopy into the back of the inner container, working from the vertex down (Picture 4A). Picture 4A It is helpful to have the sand bags still weighing the folded canopy down so that the “Z”s can be introduced cleanly into the inner container (Picture 4B). Continue all the way to the basis. Picture 4B 15 ___________________________________________________________________________ In order to temporarily keep the container closed while sorting and attaching the lines it makes sense to use one loop of lines and one of the closing rubber bands to keep it closed (Picture 5). Picture 5 The lines are then “S-ed” three to four times into four bundles and secured with suitable rubber bands (available from your normal flying equipment provider). Done correctly you should now have 4 bundles and still approximately 50 cm of free line to use for closing the inner container when all the bundles have been stored inside (Picture 6). Picture 6 If you have temporarily secured the container opening with the one line loop through the closing rubber band (Picture 5), now re-open it and store the four line bundles inside. 16 ___________________________________________________________________________ Closing the Inner Container The closing flap of the inner container is secured, first in the middle, by looping the excess 50cms of line though the closing rubber band. Then loop it through first the right, then the left side (Picture 7). Take care to keep the lines well sorted, with each line matching the others in the length of the loop passed through the rubber bands. Picture 7 Closing the outer container Harnesses with built-in reserve Almost all modern paraglider harnesses have a built-in container for the reserve parachute. We recommend always using this container for your UP Profile 2 parachute. When installing the UP Profile 2 in the harness, please follow the instructions delivered with your harness. This is also the place to look for information regarding the closing of the outer container. Further info to this topic in the “Installing the reserve in a harness” chapter. Harnesses with no built-in reserve container For harnesses with no built-in reserve container UP offers two different outer container solutions, the best one being the front-mounted container, and a universal container for mounting on either side of the harness. When using the universal container please note the following: 17 ___________________________________________________________________________ Excess reserve bridle is stored inside the outer container in neat S’s, and then the bridle is routed out of either the upper left or the upper right corner of the container, depending on how you intend to attach the container to your harness. The inner container is placed on top of the bridle S’s with the opening facing downwards, and the drogue chute neatly draped around it. Make sure the loop where the deployment handle is attached is in the middle, and facing upwards. Then close the two lateral flaps and the lower flap, and secure them with the pins. Close the last flap, securing it with the Velcro and your reserve is again ready to use. The Packing Card Each pack should contain a current inspection card recording the date, name, and signature of the packer/checker as well as the location of the approved inspection site. 18 ___________________________________________________________________________ Installing the UP Profile 2 in a harness The UP Profile 2 can be used in conjunction with most approved harnesses on the market, but UP cannot guarantee that it will function perfectly with every available harness. WARNING! Always make sure that you perform a compatibility test harness/reserve when you have installed your reserve in the harness. This is done by hanging the harness in a flying position, buckling up and then deploying the reserve. If there is ANY PROBLEM the harness/reserve combination may be dangerous to fly! Should you still have doubts or questions we suggest that you contact your UP dealer or UP directly. Mounting the UP Profile 2 outer container on your harness If you fly a harness without a built-in reserve container you can mount the UP Profile 2 in its outer container on the harness. First connect the UP Profile 2 bridle with the harness’ reserve bridle, using the special “handshake” knot. Then attach the outer container left or right, using the Velcro connectors on the back of the outer container. Make sure it is securely attached and that it does not obstruct any other part of your flying equipment, like speedbar or harness adjustments. Installing the UP Profile 2 in a harness with integrated reserve container When installing the UP Profile 2 in a harness please follow the user manual delivered with the harness. The following directions must however always be adhered to: Use only the original deployment handle delivered with the harness. Using other handles will compromise your safety If your inner container has an asymmetrically located attachment loop for the deployment handle make sure that you turn the inner container in such a way that the attachment loop is orientated towards the direction of the deployment pull. Failing to do so may render your parachute un-deployable Also make sure that the connection between handle and pin is shorter than between handle and inner container. If the opposite is the case you may find yourself pulling on the container when attempting to deploy, without releasing the pin Attach the deployment handle in such a way that the connection band is not fully stretched out – this could result in involuntary deployment because the pin could get pulled out After each repack the whole system must be tested and tried; see “Compatibility check” above! 19 ___________________________________________________________________________ If you are in any way insecure about the installing of your reserve parachute please leave it to trained professionals to do. Mounting a reserve parachute wrongly may severely compromise your safety in the event of a glider mishap. WARNING! The thread, locking pin and the proper installation of the inner container should be checked before each flight. Use only suitable thread – it must not be too strong! Safety rupture thread Deployment DHV (German Hang glider Federation) recommends a minimum deployment force of 5 daN (5 kg applied to the deployment handle in the correct direction) to avoid involuntary deployments. Due to the size and design of the UP Profile 2 integrated reserve container it is however possible that deploying the reserve will require less force than that. When pulling the deployment handle the first thing to give is the cotton thread. Then the locking pin is pulled out and the outer container opens. The deployment handle is attached to the inner container through the connection strap and allows the pilot to forcefully throw the reserve in the desired direction, away from the main canopy. When installing the reserve system make sure that the deployment sequence is as described here. Any other sequence means danger! Compatibility Should this be the case we recommend the use of a small piece of cotton thread between the locking pin and the closing loop on the reserve container (see illustration). This is a simple, cheap and efficient way to eliminate involuntary deployments, but always take care to test the system on the ground before flying with it. The installation of the integrated reserve container and the installation of a reserve parachute therein should be approved by the manufacturer of the harness or reserve parachute. This to ensure that the configuration works properly and that all installations have been carried out correctly. BEWARE! After each packing a test release should be done in order to guarantee the normal function of the emergency parachute. The deployment of the emergency parachute must be feasible from each possible flight position. 20 ___________________________________________________________________________ Be sure to fully deploy the inner container so that you can verify that it comes out all right. Further tips The changing of any aspect of the UP Profile 2 invalidates any and all warranty claims. Salt water Flying with the UP Profile 2 mounted in the harness in very humid/salty environments may accelerate the ageing process. If your flying environment is extraordinarily aggressive make sure you have your reserve repacked and checked more often than the normal check interval. Insects Also make sure that no insects are caught inside the parachute when packing it – many insects contain quite strong acids that could damage the fabric! 21 ___________________________________________________________________________ Maintenance and cleaning Taking care of your rescue system The UP Profile 2 was developed for long-lasting intensive use. Only the best and most long-lived materials have been used, materials that have proven their worth over years of use in the production of quality reserve parachutes. However the actual service time that you will get out of your new rescue system depends to a high degree on the way you treat it! Always beware that the condition of your rescue system is closely linked to your own personal safety. Check it frequently for signs of wear and have damaged components replaced immediately by UP authorised repair facilities. Take special care to check all structural stitching. Any damaged stitching must be repaired immediately by a UP authorised repair facility. Furthermore you are always welcome to send your harness to UP Europe for checks and repairs! To avoid unnecessary weakening of the UP Profile 2 rescue system we recommend the following precautions: Avoid fire and sharp objects near the rescue system Should the parachute get wet it must be opened, dried out and repacked. A wet, or even just a humid reserve parachute may not function properly. Should your parachute be exposed to excessive mechanical abrasion it must be returned to UP for checking. One example could be the harness with the reserve mounted being run over by a car. If in doubt always return your parachute to UP for professional checking. Avoid unnecessary UV exposure (sunlight). UV radiation affects the molecular structure of the materials used for the rescue system and will weaken it if exposed for longer periods Avoid exposure to salt water or acids. Should the parachute become exposed to salt water it must be rinsed with fresh water, dried and repacked If you find yourself hanging under your parachute from a tree, check it very carefully for wood resin. Resin may impede future opening of the parachute UP recommends repacking the parachute every 6 months Cleaning If you feel it necessary to clean your UP Profile 2 at any time then use lots of lukewarm water and a soft sponge. More stubborn stains can be cleaned with a weak soap solution, and rinsed thoroughly. BEWARE! Never use chemical cleaning agents, brushes or hard sponges on the material, as these destroy the coating and affect the strength of the cloth. 22 ___________________________________________________________________________ Checks and repairs Paragliding is a wonderful sport; flying as free as a bird in the air, enjoying the peace and tranquillity. But the air is an alien environment that commands respect and a responsible attitude from the pilot. At UP we don’t just put our knowledge and experience into the development of paragliders, but also into their maintenance, service and repairs to ensure that you can fly safely at all times. Our service team are all professional pilots with a wealth of experience examining and repairing paragliders. You can be sure that they will look after your equipment in a conscientious manner and the quality of work done will be second to none. Care and maintenance All care and maintenance must be carried out in accordance with UP recommendations. To ensure that this happens we strongly advise you to only let UP recognised service centres touch your wing – this is also a prerequisite for the UP Warranty to be valid. So there’s a lot speaking for letting UP, or a UP affiliate, look after your Profile 2! Thereafter another two years, with inspections once every year Airworthiness Check The UP Profile 2 must be checked for airworthiness at the following intervals: 2 years after purchase Every two years after that, or sooner if prescribed by the UP checking facility during the last check We will happily service the glider more often, if you feel that it is necessary. Packing intervals Please note that regular repacking of the UP Profile 2 is essential for it to function 100%! The UP Profile 2 must be repacked every 6 months. UP Craftsmanship Working life limits In order to ensure that your UP Profile 2 maintains its very high inherent performance and safety we highly recommend that you employ UP, or a UP affiliate, with any repairs or maintenance. Our service staff is trained and skilled, and knows the UP wings better than anyone. The UP Profile 2 has the following limits to its working life: UP Warranty Conditions and extent of the UP International Warranty can be found in the following pages. For further information please ask UP 10 years when the inspections follow a 2-year cycle 23 ___________________________________________________________________________ International directly, or you local representative. The UP importer in your country is always delighted to clear any questions with you. National warranty conditions In some countries the local laws stipulate different warranty rules than those outlined here. Please note that these local rules only apply in the country where you have purchased your wing. Information about local rules and conditions are available from your local dealer. covered by the warranty, and neither are faults caused by the exposure to solvents or salt water, or plain incorrect handling of the wing. For any warranty claim to be accepted the following conditions must be adhered to: The rescue system was used under normal circumstances and was maintained according to the instructions given by UP International. Note that these include instruction for the correct packing, storing and cleaning The rescue system was only used in accordance with its DHV certification Only original UP spares have been used, and only UP, or a UP affiliate service centre, has performed repairs or service jobs on the paraglider A complete, correct registration card has been filled in and sent to UP within 14 days of the purchase. Note that you may also register your rescue system via the UP homepage www.upparagliders.com>service>UP Product registration International UP warranty Warranty conditions: The international UP warranty covers material- and workmanship faults and is valid for 24 months from the delivery date. It can be extended for a further 12 months by letting UP do all service and maintenance, including the twoyears compulsory check. Outside of Germany and Austria UP-approved service centres may perform these checks. The UP warranty covers the cost of materials and workmanship on gliders accepted by UP to fall under the warranty. The UP warranty does not cover damage caused by accidents, or by changes made to the glider. Likewise, parts that are damaged due to normal wear and tear are exempt from warranty coverage. Fabric colour changes that do not influence the behaviour or safety of the wing are not UP reserves the right to refuse any claims not honouring one or several of these conditions. However, in some cases an “ex gratia” settlement may be offered. Sending the UP Profile 2 and other UP products The best way to send your paraglider, rescue parachute, harness etc. to our service team is in a stable box via post 24 ___________________________________________________________________________ or UPS. Enclose a note of what requires doing (2 Year Check, repair, repack etc.) and also your daytime contact details. We will return your equipment either by post or UPS. Please indicate preferred method of payment (either bank cheque or C o d)/ Should you require any further information about the services we offer, please contact us at the address and phone number below. We are also able to give you information about your nearest Authorised Service Centre, as well as other manufacturers who are authorised to check and repair UP gliders and equipment. UP International GmbH -Abteilung ServiceKreuzeckbahnstrasse 7 D-82467 Garmisch-Partenkirchen Email: [email protected] Service Fon: +49 (0) 88 21-73099-0 Fax: +49 (0) 88 21-73099-16 UP Homepage The UP Homepage gives you information about the latest news and products from UP. You will find any technical information and accessories for your UP Profile 2, as well as many useful things that are necessary for flying. Beside paragliders, harnesses and flying equipment you will also find the new “Skywear” collection with the latest flying garments and the “News” section, which will keep you updated with all activities around UP. www.up-paragliders.com 25 Attachments “Luftsportgeräte-Kennblatt“ UP Profile 2 20, 22, Bi ............................ 30 Service Booklet Rescue system and pilot data ............................................................ 34 Service verification stamps ................................................................ 36 Emergency parachute logbook .......................................................... 38 Product registration card .................................................................... 39 Deutscher Hängegleiterverband e.V. im DAeC DHV/OeAeC-Technikreferat LBA-anerkannte Prüfstelle für Hängegleiter und Gleitsegel Beauftragter der österreichischen Luftfahrtbehörde Herstellerangaben zum Luftsportgeräte-Kennblatt Gleitsegel-Rettungsgerät (GSR) I. Musterprüfung 1. Gerätemuster: UP Profile 2 20 2. Hersteller: UP International Sportartikel GmbH II. Merkmale und Betriebsgrenzen 1. Gerätegewicht (ohne Außencontainer, kg): 2,1 2. Max. zulässiges Gewicht (kg): 100 3. Empfohlenes Gewicht (kg): 100 4. Mittelleinen Schirm: ja 5. Sonstige Besonderheiten: III. Betriebsanweisung in der Fassung vom: Januar 2007 Packnachweisheft in der Fassung vom: Januar 2007 Ort, Datum, Stempel und Unterschrift des Herstellers: Kochel, den 19.01.2007 Bearbeitungsvermerk DHV: Kennblatt geprüft am: von: Deutscher Hängegleiterverband e.V. im DAeC DHV/OeAeC-Technikreferat LBA-anerkannte Prüfstelle für Hängegleiter und Gleitsegel Beauftragter der österreichischen Luftfahrtbehörde Herstellerangaben zum Luftsportgeräte-Kennblatt Gleitsegel-Rettungsgerät (GSR) I. Musterprüfung 1. Gerätemuster: UP Profile 2 22 2. Hersteller: UP International Sportartikel GmbH II. Merkmale und Betriebsgrenzen 1. Gerätegewicht (ohne Außencontainer, kg): 2,6 2. Max. zulässiges Gewicht (kg): 120 3. Empfohlenes Gewicht (kg): 120 4. Mittelleinen Schirm: ja 5. Sonstige Besonderheiten: III. Betriebsanweisung in der Fassung vom: Januar 2007 Packnachweisheft in der Fassung vom: Januar 2007 Ort, Datum, Stempel und Unterschrift des Herstellers: Kochel, den 19.01.2007 Bearbeitungsvermerk DHV: Kennblatt geprüft am: von: Deutscher Hängegleiterverband e.V. im DAeC DHV/OeAeC-Technikreferat LBA-anerkannte Prüfstelle für Hängegleiter und Gleitsegel Beauftragter der österreichischen Luftfahrtbehörde Herstellerangaben zum Luftsportgeräte-Kennblatt Gleitsegel-Rettungsgerät (GSR) I. Musterprüfung 1. Gerätemuster: UP Profile 2 Bi 2. Hersteller: UP International Sportartikel GmbH II. Merkmale und Betriebsgrenzen 1. Gerätegewicht (ohne Außencontainer, kg): 4,0 2. Max. zulässiges Gewicht (kg): 200 3. Empfohlenes Gewicht (kg): 200 4. Mittelleinen Schirm: ja 5. Sonstige Besonderheiten: III. Betriebsanweisung in der Fassung vom: Januar 2007 Packnachweisheft in der Fassung vom: Januar 2007 Ort, Datum, Stempel und Unterschrift des Herstellers: Kochel, den 19.01.2007 Bearbeitungsvermerk DHV: Kennblatt geprüft am: von: Service booklet ___________________________________________________________________________ Rescue system and pilot data Model: Profile 2 Size: 20 22 Bi Serial number: ___________________________________________ Colour: _________________________________________________ Date of purchase:_________________________________________ First flight date: __________________________________________ Dealer stamp and signature Pilot (1. owner) Name: _________________________________________________ Family name: ____________________________________________ Street: _________________________________________________ Town: __________________________________________________ Postal code: _____________________________________________ Country: ________________________________________________ Telephone: ______________________________________________ Fax: ___________________________________________________ Email: __________________________________________________ ___________________________________________________________________________ Pilot (2. owner) Name: _________________________________________________ Family name: ____________________________________________ Street: _________________________________________________ Town: __________________________________________________ Postal code: _____________________________________________ Country: ________________________________________________ Telephone: ______________________________________________ Fax: ___________________________________________________ Email: __________________________________________________ Pilot (3. owner) Name: _________________________________________________ Family name: ____________________________________________ Street: _________________________________________________ Town: __________________________________________________ Postal code: _____________________________________________ Country: ________________________________________________ Telephone: ______________________________________________ Fax: ___________________________________________________ Email: __________________________________________________ ___________________________________________________________________________ Please verify that your UP Service Centre has correctly filled in the form! 1st Service Performed date: _______________________________ Assignment Nr. Stamp Service jobs undetaken: 2nd Service Performed date: _______________________________ Assignment Nr. Stamp Service jobs undetaken: 3rd Service Performed date: _______________________________ Service jobs undetaken: Assignment Nr. Stamp ___________________________________________________________________________ Please verify that your UP Service Centre has correctly filled in the form! 4st Service Performed date: _______________________________ Assignment Nr. Stamp Service jobs undetaken: 5nd Service Performed date: _______________________________ Assignment Nr. Stamp Service jobs undetaken: 6nd Service Performed date: _______________________________ Service jobs undetaken: Assignment Nr. Stamp ___________________________________________________________________________ Emergency Parachute Logbook Nr. Date Activity Real-life Deployment? Notes Packers' signature Product registration card Model: Profile 2 Size: 20 22 Bi Serial number:____________________________________ Kaufdatum: ______________________________________ Date of purchase: _________________________________ Preflown by: _____________________________________ Owner Name: __________________________________________ Family name: ____________________________________ Address: ________________________________________ _______________________________________________ _______________________________________________ Telephone: ______________________________________ Fax: ____________________________________________ Email: __________________________________________ Dealer stamp and signature Cut out this card and mail it to UP within 14 days of purchase, or register your new UP Profile 2 via www.up-paragliders.com>Service>UP>Product Registration Ultralite Products International GmbH Kreuzeckbahnstrasse 7 82467 Garmisch-Partenkirchen GERMANY UP International GmbH Kreuzeckbahnstrasse 7 82467 Garmisch-Partenkirchen Tel. +49 (0) 88 21-73099 0 [email protected] Fax: +49 (0) 88 21 73099 16 www.up-paragliders.com Version 1.0 2007 Stand: 08/ 2012