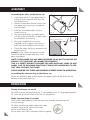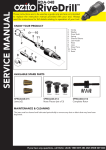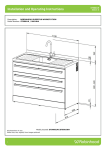
1
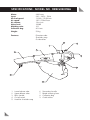
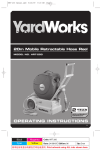
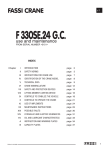
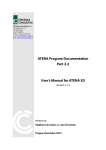
SPECIFICATIONS - MODEL NO. OZBLV2400WA
Motor:
Input:
No load speed:
Air speed:
Air volume:
Noise level:
Mulching ratio:
Collection bag:
Weight:
2400 watt
230 – 240V ~ 50Hz
13,000 / 15,000/min
160 / 270km/hour
12m3/min
100dB
10:1
40 Litres
5.3kg
Features:
Direction tube
Shoulder strap
Guide rollers
4
5
3
2
1
6
7
9
8
1.
2.
3.
4.
5.
2
Lower blower tube
Upper blower tube
Main handle
On/off switch
Hook for shoulder strap
6.
7.
8.
9.
Secondary handle
Mode selecting lever
Collection bag
Guide rollers
TABLE OF CONTENTS
SPECIFICATIONS…………….…………………………… Page 2
TABLE OF CONTENTS…………………………………... Page 3
INTRODUCTION…………………………………………. Page 4
SAFETY INSTRUCTIONS……………………………….... Page 4
GENERAL………………………………………………….. Page 5
ADDITIONAL SAFETY RULES FOR BLOWER VACS….. Page 7
ASSEMBLY………………………………………………… Page 8
OPERATION…………………………………………………Page 8
MAINTENANCE …………….…………………………… Page 10
DESCRIPTION OF SYMBOLS…………………………… Page 10
CONTENTS ………………………………………………. Page 11
WARRANTY………………………………………………. Page 12
3
INTRODUCTION
Congratulations on purchasing the Ozito Electric
Blower Vac. We aim to provide quality tools at an
affordable price. We hope you will enjoy using this tool
for many years.
The Blower Vac OZBLV2400WA has been designed for
blowing and vacuuming leaves, grass clippings and other
debris from courtyards, driveways, decks, car-parks,
footpaths etc. This product is intended for DIY use only.
SAFETY INSTRUCTIONS
Warning! When using mains-powered equipment, basic safety precautions,
including the following, should always be followed to reduce risk of fire,
electric shock, personal injury and material damage.
Read and understand the manual prior to operating this tool.
Save these instructions and other documents supplied with this tool for
future reference.
ELECTRICAL SAFETY
The electric motor has been designed for 230V and 240V only. Always check that
the power supply corresponds to the voltage on the rating plate.
Note: The supply of 230V and 240V on Ozito tools are interchangeable for
Australia and New Zealand.
This tool is double insulated in accordance with AS/NZS 3100: 2002;
therefore no earth wire is required.
If the supply cord is damaged, it must be replaced by an electrician or a power
tool repairer in order to avoid a hazard.
Note: Double insulation does not take the place of normal safety precautions when
operating this tool. The insulation system is for added protection against injury
resulting from a possible electrical insulation failure within the tool.
Using an Extension Lead
4
Always use an approved extension lead suitable for the power input of this tool.
Before use, inspect the extension lead for signs of damage, wear and ageing.
Replace the extension lead if damaged or defective. When using an extension lead
on a reel, always unwind the lead completely. Use of an extension lead not suitable
for the power input of the tool or which is damaged or defective may result in a risk
of fire and electric shock.
GENERAL
!
Warning! Read all instructions. Failure to follow all instructions listed below
may result in electric shock, fire and/or serious injury. The term “Power Tool”
in all of the warnings listed below refers to your mains operated (corded)
power tool or battery operated (cordless) power tool.
SAVE THESE INSTRUCTIONS
1) WORK AREA
a) Keep work area clean and well lit. Cluttered and dark areas invite accidents.
b) Do not operate power tools in explosive atmospheres, such as in the
presence of flammable liquids, gases, or dust. Power tools create sparks which
may ignite the dust or fumes.
c) Keep children and bystanders away while operating a power tool. Distractions
can cause you to lose control.
2) ELECTRICAL SAFETY
a) Power tool plugs must match the outlet. Never modify the plug in any way.
Do not use any adapter plugs with earthed (grounded) power tools.
Unmodified plugs and matching outlets will reduce risk of electric shock.
b) Avoid body contact with earthed or grounded surfaces such as pipes,
radiators, ranges and refrigerators. There is an increased risk of electric shock if
your body is earthed or grounded.
c) Do not expose power tools to rain or wet conditions. Water entering a power
tool will increase the risk of electric shock.
d) Do not abuse the cord. Never use the cord for carrying, pulling or
unplugging the power tool. Keep cord away from heat, oil, sharp edges or
moving parts. Damaged or entangled cords increase the risk of electric shock.
e) When operating a power tool outdoors, use an extension cord suitable for
outdoor use. Use of a cord suitable for outdoor use reduces the risk of
electric shock.
3) PERSONAL SAFETY
a) Stay alert, watch what you are doing and use common sense when operating a
power tool. Do not use a power tool while you are tired or under the influence
of drugs, alcohol or medication. A moment of inattention while operating power
tools may result in serious personal injury.
b) Use safety equipment. Always wear eye protection. Safety equipment such as
dust mask, non-skid safety shoes, hard hat, or hearing protection used for
appropriate conditions will reduce personal injuries.
c) Avoid accidental starting. Ensure the switch is in the off position before
plugging in. Carrying power tools with your finger on the switch or plugging in
power tools that have the switch on invites accidents.
d) Remove any adjusting key or wrench before turning the power tool on. A
wrench or a key left attached to a rotating part of the power tool may result in
personal injury.
5
GENERAL (cont.)
e) Do not overreach. Keep proper footing and balance at all times. This
enables better control of the power tool in unexpected situations.
f)
Dress properly. Do not wear loose clothing or jewellery. Keep your hair,
clothing and gloves away from moving parts. Loose clothes, jewellery or
long hair can be caught in moving parts.
g) If devices are provided for the connection of dust extraction and
collection facilities, ensure these are connected and properly used. Use of
these devices can reduce dust related hazards.
4) POWER TOOL USE AND CARE
a) Do not force the power tool. Use the correct power tool for your
application. The correct power tool will do the job better and safer at the rate
for which it was designed.
b) Do not use the power tool if the switch does not turn it on and off. Any
power tool that can not be controlled with the switch is dangerous and must
be repaired.
c) Disconnect the plug from the power source before making any
adjustments, changing accessories, or storing power tools. Such preventive
safety measures reduce the risk of starting the power tool accidentally.
d) Store idle power tools, unplugged & out of the reach of children and do not
allow persons unfamiliar with the power tool or these instructions to operate
the power tool. Power tools are dangerous in the hands of untrained users.
e) Maintain power tools. Check for misalignment or binding of moving parts,
breakage of parts and any other condition that may affect the power
tools operation. If damaged, have the power tool repaired before use.
Many accidents are caused by poorly maintained power tools.
f)
Keep cutting tools sharp and clean. Properly maintained cutting tools with
sharp cutting edges are less likely to bind and are easier to control.
g) Use the power tool, accessories and tool bits etc., in accordance with
these instructions and in the manner intended for the particular type of
power tool, taking into account the working conditions and the work to
be performed. Use of the power tool for operations different from intended
could result in a hazardous situation.
h) This appliance is not intended for use by persons (including children) with
reduced physical, sensory or mental capabilities, or lack of experience and
knowledge, unless they have been given supervision or instruction concerning
use of the appliance by a person responsible for their safety.
i)
Children should be supervised to ensure that they do not play with
the appliance.
5) SERVICE
a) Have your power tool serviced by a qualified repair person using only
identical replacement parts. This will ensure that the safety of the power tool
is maintained.
6
b) If the supply cord is damaged, it must be replaced by the manufacturer, its
service agent or similarly qualified persons in order to avoid a hazard.
ADDITIONAL SAFETY RULES FOR BLOWERS VACS
Always wear adequate protective clothing when operating the tool to avoid injuries to
face, eyes, hands, feet, head or hearing. Use safety glasses or a face shield, high boots
or sturdy shoes, long trousers, work gloves, a hard hat and ear defenders.
Do not start the tool when it is upside down or when it is not in the operating position.
Switch the motor off and remove the plug when the tool is not being used, left
unattended, being cleaned, being moved from one place to another or when the
extension cord is entangled or damaged.
Do not operate the tool near people, especially children or pets. Turn it off if they get
too close. Maintain a safe distance of at least 5m from other people when using the tool.
Never direct the blower direction nozzle towards bystanders or pets. Never blow
debris in the direction of bystanders or pets. The operator is responsible for accidents
or hazards occurring to other people or their property.
Do not handle the plug or the tool with wet hands and do not use the tool in the rain.
Use only outdoor rated extension leads that are so marked. Keep the extension cord
away from heat, oil and sharp edges.
Ensure that the extension lead is secured in a manner that prevents it form
disconnecting from the plug whilst in use.
Keep all the air intakes and the blower tube free of dust, lint, hair and other material
that may cause a reduction in air flow.
Keep a balanced and stable stance while using the tool. Do not switch on the tool in
enclosed or poorly ventilated spaces or in the presence of inflammable and/or
explosive substances such as liquids, gasses and powders.
Do not get distracted and always concentrate on what you are doing. Use common
sense. Never operate the tool when you are tired, sick or under the influence of
alcohol or other drugs.
Do not operate this appliance with long loose hair or loose fitting jewellery. Tie long
loose hair back and remove loose fitting jewellery.
Only operate the tool during broad daylight or with adequate artificial light.
When the tool is not in use, store it in a dry place and out of reach of children.
Only use the tool according to the instructions given in this manual.
Check regularly that the screws are tight.
Do not allow the blower vac to pick up any burning or smouldering materials like ashes,
cigarette butts etc.
Do not attempt to pick up breakable objects like glass, plastics, china etc.
Do not use in vacuum operation without the collection bag fitted.
Do not use the blower vac in either the vacuum or the blow position on gravel surfaces.
7
ASSEMBLY
Assembling the tubes to the blower vac
1. Insert lower tube (1) into upper tube (2)
and push them together until they are
connected firmly.
2. Loosen and remove the two screws from
the upper housing using a screwdriver
(not included).
3. Slide the assembled tubes into the
motor housing.
4. Secure the previously removed screws
into the lower screw holes on both sides
of the blower vac housing.
screw
Fig. A
Fig. B
upper screw hole
lower screw hole
5. Secure the additional two screws
supplied into the upper screw holes in
both sides of the blower vac housing.
6. Check the tubes are firmly secured to the
motor housing.
Caution: In the interest of safety the tubes
should not be dismantled after they have
been assembled.
NOTE: THE BLOWER VAC HAS BEEN DESIGNED SO AS NOT TO SWITCH ON
SHOULD THE TUBES NOT BE CONNECTED PROPERLY.
THIS IS A SAFETY DESIGN TO ENSURE THE USER DOES NOT COME TO ANY
HARM. DUE TO MULCHING FUNCTION IT WOULD BE HAZARDOUS TO USE
THIS TOOL WITHOUT THE TUBES.
PLEASE ENSURE THE TUBES ARE PROPERLY SECURED PRIOR TO OPERATION.
Assembling the collection bag to the blower vac
Attach the collection bag to the hook on the upper tube and the outlet on the
bottom of the motor housing.
OPERATION
Turning the blower vac on/off
To switch on, push the switch (4) to the “1” (low speed) or the “2” (high speed) position.
To switch off, push the switch (4) to the “0” off position.
Mode selection (blow or vacuum)
Next to the mode selection knob are icons that indicate the blowing and
vacuum settings.
To select the blowing mode; rotate the mode
selection knob so the arrow of the knob
points to the blowing icon.
Ensure when the knob is rotated it clicks into place.
8
OPERATION (cont.)
To select the vacuum mode; rotate the mode
selection knob so the arrow of the knob
points to the blowing icon.
Ensure when the knob is rotated it clicks into place.
Blowing mode
The blowing mode is ideal for blowing leaves, grass clippings and other debris from
courtyards, driveways, decks, car-parks, footpaths etc. It can also be used to clean
corners, fences, walls, wooden areas or beneath cars. Be careful where you direct the
jet of air as it could move heavy material and cause possible injury or property damage.
Vacuum mode
When using the vacuum mode ensure the collection bag is properly fitted.
Hold the blower vac several centimetres above the leaves you are going to vacuum.
Now switch the machine on. Hold the machine, tilting the Blower/Suction tube slightly,
and use a sweeping action to collect light debris with approximately 50mm distance
between the opening of Blower/Suction tube and the floor or ground to be cleaned
up. The leaves will be sucked up into the tube, chopped up and thrown into the
collection bag.
When the collection bag is full, the vacuum power will be greatly reduced. When this
happens, turn the switch to position “0” (off) and disconnect the plug from the power
supply. Disconnect from the power supply. Open the zip fastener inside the bag.
Spread out the opening and empty the bag of its contents. If you have collected only
leaves or vegetable matter, they will already have been shredded and will be ready for
composting. Zip up the bag and resume work.
Note: Before re-fitting the bag, first ensure the machine is disconnected from the
power supply then clean the inside of the exhaust opening, removing any shredded
deposits. Pay special attention to the cleaning of the supporting edges of the air flow
deviator on the inside of the tube.
Tips for using your blower vac
The following points may assist you in the operation of the blower vac.
•
Always try and vacuum dry leaves, cuttings or general garden debris.
•
Wet material is difficult to mulch and also can cause the blower vac to clog.
•
If the leaves etc. are damp, then use the blower vac in blow selection to pile the
leaves etc. into one area, vac and mulch the leaves when dry.
•
Avoid using the vac on areas where there are stones, or other hard objects. These
objects will damage the impellor of the blower vac.
•
It is also advisable not to allow the blower vac to pick up soil. Soil generally
contains moisture and when combined with other garden debris can clog the
blower vac.
•
The blower vac is not a garbage disposal unit. Do not attempt to mulch any
material than general garden debris.
•
For better performance and comfort, it is recommended the collection bag is
emptied when it becomes approximately half full. This reduces the weight and
also allows the vac operation to perform at its highest level.
9
MAINTENANCE
Place switch in “O” off position and unplug from the power supply before the
blower vac is serviced, cleaned or maintenance is performed.
Keep air intake clean and air vents free of debris to avoid overheating the motor.
Do not use cleaning agents to clean the plastic parts of the tool. A mild detergent
on a damp cloth is recommended. Water must never come into contact with
the tool.
If the blower vac vibrates abnormally, stop motor immediately. Abnormal vibration
usually indicates a mechanical problem continued operation could lead to injury
or damage.
No lubrication is necessary as the motor is equipped with lifetime-lubricated bearings.
Note: Ozito Industries will not be responsible for any damage or injuries caused
by repair of the tool by an unauthorised person or mishandling or mistreatment of
the tool. This tool is designed for DIY use - use in commercial or industrial
environments will void the warranty.
DESCRIPTION OF SYMBOLS
no
/min
~
m3
Double insulated
V
Voltage
Regulator compliance mark
Hz
Herts
No load speed
W
Wattage
Revolutions or
reciprocation per minute
Alternating current
Warning
dB
Decibel (noise) rating
Metres cubed
Disconnect from power supply
when performing maintenance
Wear Eye, Ear & Breathing
Safety Gear during use
Keep by standers away
Do not use in wet weather
Read operating instructions
before use
Disconnect and discontinue use should the power-cord
be damaged
Be aware of people around you and do not direct
towards them
10
CARING FOR THE ENVIRONMENT
Power tools that are no longer usable should not be
disposed of with household waste but in an environmentally
friendly way. Please recycle where facilities exist. Check with
your local council authority for recycling advice.
Recycling packaging reduces the need for landfill and raw
materials. Reuse of recycled material decreases pollution in the
environment. Please recycle packaging where facilities exist.
Check with your local council authority for recycling advice.
CONTENTS
1 x Blower Vac OZBLV2400WA
2 x Blower tubes
2 x Screws
1 x Shoulder strap
1 x Collection bag
1 x Operating instructions
OZITO INDUSTRIES PTY LTD
AUSTRALIA (Head Office)
1-23 Letcon Drive, Bangholme, Victoria, Australia 3175
Telephone:1800 069 486
Website: www.ozito.com.au
Email: [email protected]
WARRANTY
YOUR WARRANTY FORM SHOULD BE RETAINED BY YOU AT ALL TIMES. IN ORDER
TO MAKE A CLAIM UNDER THIS WARRANTY YOU MUST RETURN THE PRODUCT TO
YOUR NEAREST BUNNINGS WAREHOUSE WITH YOUR BUNNINGS REGISTER RECEIPT.
PRIOR TO RETURNING YOUR PRODUCT FOR WARRANTY PLEASE TELEPHONE OUR
CUSTOMER SERVICE HELPLINE:
`Australia 1800 069 486
New Zealand 0508 069 486
TO ENSURE A SPEEDY RESPONSE PLEASE HAVE THE MODEL NUMBER AND DATE OF
PURCHASE AVAILABLE. A CUSTOMER SERVICE REPRESENTATIVE WILL TAKE YOUR CALL
AND ANSWER ANY QUESTIONS YOU MAY HAVE RELATING TO THE WARRANTY POLICY
OR PROCEDURE.
The benefits provided under this warranty are in addition to other rights and remedies which
are available to you at law.
Our goods come with guarantees that cannot be excluded at law. You are entitled to a
replacement or refund for a major failure and for compensation for any other reasonably
foreseeable loss or damage. You are also entitled to have the goods repaired or replaced if
the goods fail to be of acceptable quality and the failure does not amount to a major failure.
Generally you will be responsible for all costs associated with a claim under this warranty,
however, where you have suffered any additional direct loss as a result of a defective product
you may be able to claim such expenses by contacting our customer service helpline above.
2 YEAR REPLACEMENT WARRANTY
Your product is guaranteed for a period of 24 months from the original date of purchase
and is intended for DIY (Do It Yourself) use only. If a product is defective it will be replaced in
accordance with the terms of this warranty. Warranty excludes consumable parts, for example:
blower tube, carbon brushes, collection bag, shoulder strap.
WARNING
The following actions will result in the warranty being void.
•
•
•
•
•
Professional, Industrial or high frequency use.
If the tool has been operated on a supply voltage other than that specified on the tool.
If the tool shows signs of damage or defects caused by or resulting from abuse, accidents
or alterations.
Failure to perform maintenance as set out within the instruction manual.
If the tool is disassembled or tampered with in any way.
OZITO
Australia/New Zealand (Head Office)
1-23 Letcon Drive, Bangholme, Victoria, Australia 3175
OW8