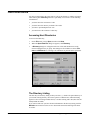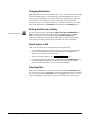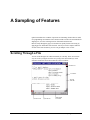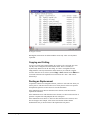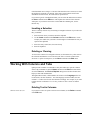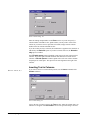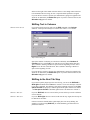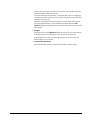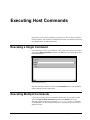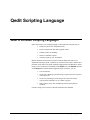
1
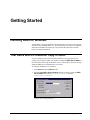
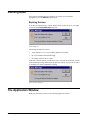
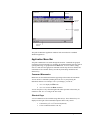
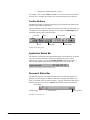
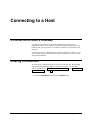
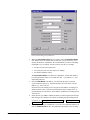
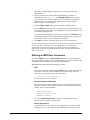
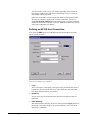
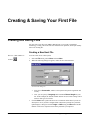
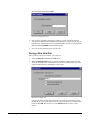
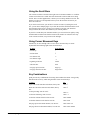
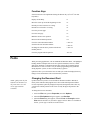
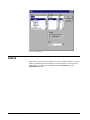
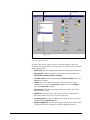
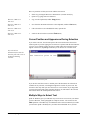
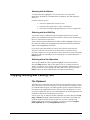
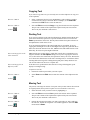
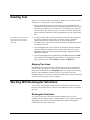
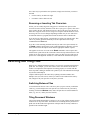
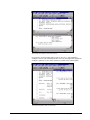
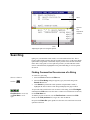
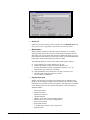
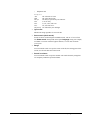
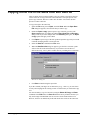
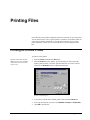
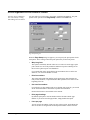
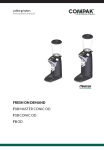
Qedit for Windows
By Robelle Solutions Technology Inc.
Copyright 1996-2001 Robelle Solutions Technology Inc.
Qedit is a trademark of Robelle Solutions Technology Inc. Windows is a trademark of Microsoft
Corporation. Other product and company names mentioned herein may be the trademarks of their
respective owners.
Updated Tuesday, July 17, 2001
Robelle Solutions Technology Inc.
Suite 201, 15399-102A Avenue
Surrey, BC, Canada V3R 7K1
Toll-free: 1.888.robelle
Tel: 604.582.1700
Fax: 604.582.1799
E-mail: [email protected]
Web: www.robelle.com
Contents
Welcome to Qedit for Windows
1
The Ultimate Editing Tool .........................................................................................................1
System Requirements .................................................................................................................2
Getting Started
3
Installing Qedit for Windows .....................................................................................................3
Trial Users with a Production Copy of Qedit .............................................................................3
Running Qedit ............................................................................................................................4
The Application Window ...........................................................................................................4
Connecting to a Host
7
A Connection is Qedit’s Roadway .............................................................................................7
Creating a Connection ................................................................................................................7
Creating & Saving Your First File
13
Creating and Saving Files.........................................................................................................13
Opening a File ..........................................................................................................................15
Host Directories .......................................................................................................................17
A Sampling of Features
19
Scrolling Through a File ..........................................................................................................19
Fonts.........................................................................................................................................21
Colors.......................................................................................................................................22
Ruler Bar ..................................................................................................................................25
Auto-Indent ..............................................................................................................................27
Selecting Text...........................................................................................................................27
Copying, Moving and Pasting Text..........................................................................................29
Deleting Text............................................................................................................................31
Working With Rectangular Selections .....................................................................................31
Working With Columns and Tabs............................................................................................33
Switching and Tiling Files........................................................................................................36
Multiple Views.........................................................................................................................38
Searching..................................................................................................................................39
Copying Files
43
Copying Files Across Platforms with Copy and Paste .............................................................43
Copying a Host File to the Same Host with Save As................................................................44
Printing Files
45
Printing on a Local Printer .......................................................................................................45
Print Options on a Local Printer...............................................................................................46
Executing Host Commands
49
Executing a Single Command ..................................................................................................49
Qedit for Windows Quick Start Guide
Welcome to Qedit for Windows • i
Executing Multiple Commands ............................................................................................... 49
Qedit Scripting Language
51
What is the Qedit Scripting Language? ................................................................................... 51
Index
ii • Welcome to Qedit for Windows
53
Qedit for Windows Quick Start Guide
Welcome to Qedit for Windows
Welcome to Qedit for Windows, the Microsoft Windows editor that edits local and
server files, both large and small. Use Qedit for Windows to edit files on your local
PC, network computers that are available from Microsoft Windows, and files on your
HP-UX or MPE servers. Throughout this manual, the terms HP 3000 and MPE will
be used interchangeably to identify an MPE host. Likewise, the terms UNIX, HP
9000 and HP-UX will be used to identify a UNIX host.
The Ultimate Editing Tool
Qedit for Windows is your ultimate editing tool. Now you can get the editing
functions you need in one easy-to-use package. Qedit’s efficient use of resources lets
you edit both local and host files with lightning speed, even over a network or the
Internet. You can seamlessly span multiple platforms concurrently, and use keystroke
shortcuts and toolbar buttons to quickly maneuver through your files. In the familiar
environment of Microsoft Windows, Qedit’s ultimate advantage is that by using it to
its full potential it helps you reach yours.
Multi-File Access—Simultaneously
Qedit for Windows allows you to have multiple MPE, HP-UX, and local files open at
the same time. You can work on all these platforms, seamlessly cutting and pasting
information between any number of files.
Speed, Speed, and More Speed
Do you work over a slow modem? Is your local area network clogged with Web
traffic? Don’t worry about Qedit for Windows—it makes minimal demands on your
network. Qedit does not download the entire file to your PC, only the portions you
are working on.
Fully Integrated with Windows
Qedit for Windows is a true Windows product that lets you copy and paste
information to and from other Windows applications. Open a host file, select a
portion of it, and paste it into Microsoft Word. Start Word, select some text, and
paste it into a Qedit for Windows host file.
Qedit for Windows Quick Start Guide
Welcome to Qedit for Windows • 1
Multiple Independent Views
How many times have you wished you could look at your variable declarations while
working on some new code in the middle of the program? How about working on a
file with very wide lines where you can never see the left and right margins together
on the screen? You can easily do that with Qedit’s split view feature.
Consistent Interface on All Platforms
The user interface of Qedit for Windows looks much like the standard Windows
editors such as Microsoft Notepad, Microsoft WordPad and Microsoft Word. This
makes the interface the same for all files you edit and reduces training costs.
As much as possible, a local file looks and acts like an MPE file, which looks and
acts like a UNIX file. There are, however, a couple of areas where the flavor of hostbased Qedit slips into Qedit for Windows.
System Requirements
Hardware and Software Requirements
Qedit for Windows runs on Windows 95, Windows 98 and Windows NT. Qedit for
Windows requires a minimum of 4 MB of memory and approximately 3 MB of disk
space.
In addition, you must have Qedit server software installed on your HP-UX or MPE
servers. This software communicates with the Qedit for Windows client that runs on
your local PC to provide fast service for all of your editing needs.
Network Requirements
To edit HP-UX or MPE server files, you must have a TCP/IP connection configured
in Microsoft Windows. Qedit requires a Winsock 1.1 compliant TCP/IP stack. If you
use a Web browser (e.g., Netscape Navigator or Microsoft Internet Explorer), you
already have TCP/IP installed and configured.
Qedit requires a true TCP/IP connection. Qedit does not support the SOCKS
standard proxy server. This is often used in corporate intranets to give people access
to the Internet without exposing their actual IP address.
If you want to use Qedit to access corporate servers from home or remote offices,
you might have to reconfigure your firewall software or router. The connection to the
HP-UX server occurs on port 7395 and to the Remote Process Management (RPM)
listener on HP 3000 on port 1542. If you use an Internet Service Provider (ISP), you
might be assigned a random IP address when you connect from home. You have to
make sure you can connect using all possible IP addresses.
2 • Welcome to Qedit for Windows
Qedit for Windows Quick Start Guide
Getting Started
Installing Qedit for Windows
You should have received installation instructions for the client and server programs
with the media (CD-ROM, DDS, etc.). The installation process has been streamlined
and requires minimum intervention on your part. Read the instructions carefully
before you start the installation.
Trial Users with a Production Copy of Qedit
If you are running a trial version of Qedit for Windows and you already have an
existing copy of Qedit for MPE, you will have to change the MPE Server Name to
the trial location of the Qedit for Windows server. You will have received a message
during the MPE server installation if this is necessary.
To configure the MPE server on the host,
1.
Select Server from the Options menu.
2.
When the Configure Server Settings dialog box appears, change the MPE
Server Name field from the Qedit.Pub.Robelle default to
Qedit.Pubtri.Robelle.
Configure Server Settings dialog box
Qedit for Windows Quick Start Guide
Getting Started • 3
Running Qedit
Once Qedit for Windows has been installed, you can start it by clicking the
appropriate icon in the Robelle program group.
Expiring Version
If you have an evaluation copy of Qedit and the version is about to expire, you might
see the following Expiry Message dialog box.
Expiry dialog box
The message describes the version:
•
16-bit (Windows 3.xx) or 32-bit edition (Windows 95 and NT)
•
the version number and build timestamp
•
the number of days before it expires
At the end of the trial period, you will not be able to use Qedit at all. Instead, you will
get the following message indicating the program has expired. You can call our office
if you think your version should not be expiring.
Expiry Message dialog box
The Application Window
When you start Qedit, you will see the following application window.
4 • Getting Started
Qedit for Windows Quick Start Guide
Application
Control icon
Application
Title bar
Application
Menu bar
Application
Tool bar
Application
Workspace
Application
Status bar
Qedit application window
The Qedit for Windows application windows looks and works like a standard
Windows application.
Application Menu Bar
All Qedit commands are accessible through the menu bar. Commands are grouped
according to their functionality. For example, all commands dealing with files such as
opening and saving, are grouped under the File menu. To access a menu, simply
click on it and select the appropriate command from the drop-down list. Menus and
commands are also available directly from the keyboard using mnemonics and
shortcut keys.
Command Mnemonics
Mnemonics are the underlined characters appearing on the menus and commands.
You can invoke a command by holding down the ALT key and pressing the
underlined character. For example, to save your changes, you can do:
1.
ALT+F to display the File menu
2.
ALT+S to execute the Save command
You can keep the ALT key down throughout the whole operation. This means you
could have done ALT+F+S and get the same result.
Shortcut Keys
A lot of commands are also available using shortcut keys. These shortcut keys are
displayed to the right of the command description. Shortcut keys can be
Qedit for Windows Quick Start Guide
•
a function key (F1 to F12 on most keyboards)
•
a letter combined with the CTRL key
Getting Started • 5
•
a function key combined with the CTRL key
For example, CTRL+S does a Save command, F11 saves the current cursor position
and CTRL+F11 exchanges the current cursor position with the last saved position.
Toolbar Buttons
The application toolbar contains the following groups of buttons. Their functions are
similar to many Windows applications.
The only unfamiliar items may be the three buttons for host files. The first allows you
to manage your host connections. The next two are similar to the New/Open local
file buttons, but they refer to files on the host.
Local files
Print
Save
Cut and paste
Search
Undo / Redo
Host files
Toolbar buttons and groups
Application Status Bar
The status bar at the bottom of the application displays various indicators. On the left
side of the status bar, informative messages are displayed as you use certain
functions. For example, if you use the Create local file button on the toolbar, a
short message appears on the status bar explaining what you are about to do.
Status bar while using the Create local file button
Document Status Bar
The document status bar, which appears at the bottom of a document window, is a
dynamic area with a number of indicators and values. It changes with almost every
action you perform on the document workspace. Typically, the status bar displays the
document type, the access mode, a Cancel button and the current cursor position.
Access mode
Document type
Cancel button
Cursor position
Document window status bar
6 • Getting Started
Qedit for Windows Quick Start Guide
Connecting to a Host
A Connection is Qedit’s Roadway
A connection is the roadway on which the client that runs on the PC uses to
communicate with the server. Think of it as Qedit for Windows logging in on your
behalf in order to access your files. A connection consists of a host computer and a
user login.
A connection has to be established between the client and the server before you can
access a file or directory. Qedit keeps the connection open until you close it or exit
from Qedit for Windows.
Creating a Connection
You must create a connection before you can access your host files. The following
steps describe the general procedures for creating a connection. For more hostspecific information, see “Defining an MPE Host Connection” and "Defining an HPUX Host Connection" on page 10.
To create a connection,
1.
Qedit for Windows Quick Start Guide
Select the Connections command of the Options menu.
Connecting to a Host • 7
Connection List dialog box for MPE hosts
2.
When the Connection List dialog box appears, enter a Connection Name.
Note that this is not the domain name of your host. It is just a name for you to
identify this host/user combination. We recommend that you choose something
meaningful to you or anybody else who works on your PC. For example,
•
the name of your system (SYLVIA)
•
the system plus your user name (SYLVIA - FRED)
•
the function (Purchase orders)
The Connection Name can contain any combination of letters and numbers,
but some punctuation marks are not valid: the colon “:”, parentheses “()”, and
nonprinting characters.
3.
Enter the Host Name or IP address. You will need the name of your host
system in Internet format (e.g., nickname.domain.com) or the host’s exact IP
address (e.g., 128.11.200.77).
NOTE: Do not enter leading zeros in any part of an IP address. A leading zero
indicates that the value is specified in octal notation. In the example above, if
you had entered 128.011.200.077, the IP address would have been interpreted as
128.9.200.63.
4.
Select the host type (MPE or UNIX) and define your host login and password(s).
Each host type has a different set of labels for defining the login and passwords.
For details, see “Defining an MPE Host Connection” and "Defining an HP-UX
Host Connection" below.
5.
8 • Connecting to a Host
The default character set is HP Roman 8. You can select a different character set
from the Character set list box. This should be required only if you are using
Qedit for Windows Quick Start Guide
HP’s Native Language Support subsystem and a 7-bit national characters
replacement set.
6.
All new connections are created with the Qedit default color scheme, as
indicated by the word (Default) in the Default Colors list box. You can
select a different color scheme off the list. Any file opened or created on that
connection will use the selected color scheme unless you have selected a
different scheme for individual files.
7.
Enter the Login or Hello string. (See host-specific information below.)
8.
When the Add button appears, enter your password. If your system requires one
or more passwords, enter each into the appropriate text box. Passwords are saved
in the connection template file.
If you prefer to be prompted for a password, you can choose the Prompt option.
The corresponding text box becomes unavailable, and Qedit will prompt you for
a password every time it tries to establish this connection.
9.
Click Add to create the connection and to save it in your connection list.
Now you can use this saved connection to access your host system and edit files. You
can create as many connections as you need. Remember, each connection is
associated with a specific user login, so you might need several connections to a
single host if you need to log in as different users. Your login will determine which
files you can access.
Defining an MPE Host Connection
To select the MPE option in the Connection List dialog box, your HP 3000 host
must run the MPE/iX operating system with the Qedit server software installed. Qedit
for Windows does not support Classic HP 3000s that run MPE V.
MPE connections must include the following information:
•
Hello
Enter your normal hello command into the Hello text box, but do not include the
word “hello.” Each new session on MPE has its own hello string, which can
contain up to four elements with the following syntax:
Session,User.Account,Group
Session and group names are optional.
•
Session and Group Passwords
Each element name can have a different password for login information, giving
each hello string up to four passwords: Session, User, Account and Group. For
example, these are valid commands:
RALPH.PURCH,ENTRY
ORDENTRY,CLERK.DISTRIB
MANAGER.PAYABLES
Note that the Session password is only used with third-party security
packages such as VESOFT’s Security/3000.
•
Use firewall protocol
In most situations, you do not have to do anything special to connect to an HP
3000 host. However, some companies have installed network security devices
Qedit for Windows Quick Start Guide
Connecting to a Host • 9
such as firewalls to restrict access even further. Depending on the installation,
these devices might prevent Qedit from communicating to the server using the
default MPE connection protocol.
Qedit offers an alternate connection sheme that should solve this problem while
satisfying the customer's security needs. For these connections, you have to
enable Use firewall protocol. Remember that this protocol requires additional
installation on the host. For details, refer to the "MPE Host Connections" section
of the Qedit for Window User Manual.
Defining an HP-UX Host Connection
If you select the UNIX option, your HP 9000 host must run the HP-UX operating
system, a flavor of UNIX.
Connection List dialog box for UNIX hosts
•
Login
This is a user name. It determines your home directory and which files you have
permission to browse and edit on the host system. Remember that both UNIX
user names and passwords are case sensitive.
•
Password
You can enter only one password because Qedit does not support multi-level
passwords.
•
Initial Directory
This defines the home directory for the user name specified in Login. Qedit uses
the user ID to log on but changes to the specified directory (cd) as soon as the
connection is established.
10 • Connecting to a Host
Qedit for Windows Quick Start Guide
Qedit performs a cd command relative to the root directory, not to the user’s
home directory. For example, if you want to automatically go to
/users/demo/public_html, you must enter either
/users/demo/public_html (explicit)
or
users/demo/public_html (implicit)
Qedit for Windows Quick Start Guide
Connecting to a Host • 11
Creating & Saving Your First File
Creating and Saving Files
You can create a new file on an MPE or HP-UX host or on your PC. In Windows
terminology, creating a file from scratch is called the New operation, while Open usually
refers to an existing file.
Creating a New Host File
Shortcut: CTRL+SHIFT+N
Toolbar:
To create a new file on a host system,
1.
Select the File menu, point to Host, and click New.
2.
When the following dialog box appears, define the file’s characteristics:
New Host File dialog box
3.
Qedit for Windows Quick Start Guide
•
First select a Connection, which is a host system and specific login name and
security.
•
Next, you can specify a Language and a maximum Record length for your
file. In this example, the defaults of Data and 256 are used. These settings can be
used for most types of text files.
Click the New button. Qedit will first create a connection to that host if you do not
already have one. If you have configured this connection to prompt for a password,
Qedit displays a dialog box with the Login or Hello string, the Host name and the
number of text boxes required to enter all the passwords you requested.
Creating & Saving Your First File • 13
Enter all the passwords and click OK.
Password prompting dialog box
4.
Once you have entered the passwords, you will see a series of progress messages.
After Qedit for Windows has established the connection, it creates a new file in your
login directory. Until this file is given a permanent name, you will see the connection
name followed by Untitled 1 in the window title bar.
5.
Now you can start entering text into your new file.
Saving a New Host File
Once you have created a new host file, you can save it,
1.
Select the Save As command of the File menu.
2.
When the Host Save As dialog box appears, enter the file name. Qedit saves this
file in the current directory. If you want to save the file in a different directory, enter
a path to another directory including the new file name.
Host Save As dialog box
If the new file name already exists, Qedit asks if you want to overwrite the existing
file with the new one. Check whether you are really in the directory you think you are
before clicking OK. The ESCAPE key or the Cancel button are always a safer
choice!
14 • Creating & Saving Your First File
Qedit for Windows Quick Start Guide
3.
Click Save to finish saving the file.
Once a file has been saved, you can close it by simply selecting the Close command in
the File menu.
Creating a New Local File
Shortcut: CTRL+N
Toolbar:
Creating a new local file on your PC is very similar to creating a new host file. Just
select the Local submenu on the New command in the File menu.
Qedit for Windows creates a new document window on your PC with these defaults: Data
as the Language and a maximum Record length of 8,172 characters.
The new window will be called Untitled1. To rename the file, use the Save As command
of the File menu after you have entered something in the file.
Opening a File
You can open an existing file by selecting its name from the list of most recently accessed
files or by using the Open command in the File menu. If you do not know the exact
name or location of a file, see “Host Directories” on page 17.
Opening MRU (Most Recently Used) Files
Qedit maintains a list of the 20 most recently used files (local and host). This list is
accessible via the Recent files command of the File menu. Local file names are fully
qualified including the letter of the drive. Host file names are also fully qualified
including the connection name on which they were opened.
To open a file in the list, select the Recent files command in the File menu. Qedit
presents the list of most recently used files as a submenu.
List of most recently accessed files
Opening a Host File
To open an existing file on a host server,
Qedit for Windows Quick Start Guide
Creating & Saving Your First File • 15
Shortcut: CTRL+SHIFT+O
1.
Select the File menu, point to Host, and then click Open.
Toolbar:
2.
When the Open Host File dialog box appears, it provides the following
options to either search for a file or to open it:
•
Connection
Select a connection from the Connection list.
Open Host File dialog box
•
File name
Enter the file name or choose a file from the field’s history list. Qedit does not
keep track of the connection associated with a file name in this history list.
If the file you want is not in your home directory on HP-UX or logon group on
MPE, you can type the path to the file in the File name text box.
•
Directory
If all this typing is too much trouble or you can’t remember the spelling of the
directory or file, there is another way to find a file. Just click the Directory
button. This will give you a list of files in the current directory and access to
other directories on the host.
If you find the file through the Directory dialog box, you can open it from
there. See the next section for a description of the Directory dialog box.
3.
Click the Open button to open the file on the host.
Qedit will use your existing connection if you have one. Otherwise, it will establish a
new connection.
16 • Creating & Saving Your First File
Qedit for Windows Quick Start Guide
Host Directories
You may not always know the exact name of a file or the directory in which it is located.
That’s when Qedit’s Directory function is quite handy. You can use it in the following
circumstances:
•
you don’t know the exact name of a file
•
you don’t know the directory in which a file resides
•
you want to open multiple files at once
•
you want browse the contents of a directory
Accessing Host Directories
To access a host directory,
1.
On the File menu, point to Open, and then click Host.
2.
When the Open Host File dialog box appears, click Directory.
3.
A Directory dialog box will appear with a list of files and subdirectories in the
current working directory or group. This dialog box also includes text boxes (File
name and Wildcard) for searching a file and buttons to perform further operations.
Directory dialog box
The Directory Listing
The first entry in a directory listing is always two dots (..), which is the parent directory of
your current working directory. Directories (parent or subdirectories) within the listing
appear in color. The listing includes all files, even those starting with a dot (these files are
usually hidden in UNIX).
If you want to make sure you have the latest information in the directory listing, click the
Refresh button. This forces the server to discard the current list and bring in the latest
set of files.
Qedit for Windows Quick Start Guide
Creating & Saving Your First File • 17
Changing Directories
Qedit displays directories (parent or subdirectory) in color. If you select a directory within
the current working directory, it becomes the new current working directory. You can
look for a file by continuing to move to other directories in which you have read access.
If you know the exact location of a directory, you don’t have to go through other
directories to get to it. Just use the absolute (e.g., /users/demo) or relative (e.g., ../demo)
syntax of the path name in the File name text box and select the Directory button.
Sorting the Directory Listing
Order Selection button:
You can sort the list on any of the headings (Name, File Type, Last Modified and
Size) by clicking on the column heading. By default, Qedit sorts files in ascending
order. You can reverse the sort order by clicking the Order Selection button
located on the right side of the heading line. When the arrow on this button points up,
the sort order is ascending; when the arrow points down, the order is descending.
Searching for a File
These are some of the ways you can search for files on host directories:
•
Scroll through the current directory. You can use your mouse or cursor movement
keys to move through the list of files and subdirectories. The highlighted file
indicates your current position within the list.
•
You can go to other directories. See “Changing Directories” above.
•
If you know part of the file name, enter a wildcard pattern in the Wildcard text box
to search through the current directory. Be sure to use the appropriate wildcard
characters for the connect host (e.g., * in UNIX and @ in MPE).
Selecting Files
Once you have found the files you need, they can be opened from the Directory dialog
box. You can select a file by highlighting it in the listing (it then appears in reverse video)
or by entering its name in the File name text box. To highlight a file, click on it once; to
remove the highlight, click on it again. You can select and open up to ten files at once
18 • Creating & Saving Your First File
Qedit for Windows Quick Start Guide
A Sampling of Features
Qedit for Windows has a number of practical text-formatting features that are useful
in a programming environment. These features include various tools and methods for
aligning text, as well as selecting fonts for documents and directories.
Browse slowly through any page of a document or quickly find an exact string by
applying precise and flexible search criteria. And if you need to compare different
sections of the same document, you can even get multiple views of a file.
Scrolling Through a File
You can scroll through a file either horizontally or vertically. There are two basic
ways to scroll: by using the scroll bar or by using cursor movement keys. Each
document window has both a horizontal and vertical scroll bar.
Scroll arrow
Scroll box
Vertical
scroll bar
Scroll arrow
Qedit for Windows Quick Start Guide
Scroll box
Horizontal
scroll bar
A Sampling of Features • 19
Using the Scroll Bars
The vertical scroll bar is located on the right side of a document window. A scroll bar
consists of scroll arrows at either end of the bar and the scroll box that moves along
the bar. Just as in other applications, it allows you to scroll up and down in a file. The
distance you move in a file depends on how you use the scroll bar or how far you
move the scroll box.
If you click a scroll arrow, you will move one line at a time. If you drag the scroll
box, you can move multiple pages. If you click the scroll bar itself between the scroll
box and either of the arrows, you move up or down by one page. The status bar
always indicates the relative line number of your current position.
If your file is wider than your document window, you can scroll left or right by using
the horizontal scroll bar located at the bottom of the window. It works the same way
as the vertical scroll bar, except it moves left and right.
Using Cursor Movement Keys
Another way to move through a file is to use cursor movement keys. Your PC
keyboard has the following eight cursor movement keys:
To move
Press this key
one line up
↑
one line down
↓
one character left
←
one character right
→
beginning of the line
Home
end of the line
End
one page up less one line
Page Up
one page down less one line
Page Down
Key Combinations
Qedit provides key combinations for moving faster within a document. You typically
hold down the CTRL key while using the basic cursor movement keys.
20 • A Sampling of Features
To Move:
Use:
Up in a file in the same line and column, line by line.
CTRL+↑
Down in a file in the same line and column, line by
line.
CTRL+↓
To the preceding “start of word.”
CTRL+←
To the next following “start of word.”
CTRL+→
To the first column of the first line in a file.
CTRL+HOME
To the last character in the last line of a file.
CTRL+END
One page up in a document window, less one line.
CTRL+PAGE UP
One page down in a document window, less one line
CTRL+PAGE DOWN
Qedit for Windows Quick Start Guide
Function Keys
Some functions are also implemented using the function keys (F1 to F12 on most
keyboards).
Display on-line Help.
F1
Move the cursor up toward the beginning of a file.
F2
Find the previous occurrence of a string.
F3
Find the next occurrence of a string.
F4
Go to the previous page.
F5
Go to the next page.
F6
Mark the current cursor position.
F11
Return to the last marked position.
F12
Close the current document window.
CTRL+F4
Switch to the next document window.
CTRL+F6
Exchange the current cursor position with the last
marked position.
CTRL+F11
Close the program and all open files.
ALT+F4
Fonts
Word processing applications, such as WordPad and Windows Write, can highlight a
heading and have multiple fonts in one file. Qedit for Windows, however, cannot
apply these attributes to a document because host systems do not usually support
them in their text files. To make it easy to transfer programming and system files
among disparate systems, we have sacrificed fancy typefaces.
Qedit does allow you to choose the font size and style in which it displays directory
listings. These font attributes can be customized by each user.
Changing the Document Font
NOTE: Qedit prints the font
defined in the document (or
the printer driver uses the
closest approximation
available).
Qedit uses the font you have set as a default for document windows. Because it
mostly works with data and program source files in which field position within a
record is important, Qedit only displays fixed-pitch (monospaced) fonts. This way
you know the column position on the screen is really the physical position in the
record.
To change the font in a document,
1.
Select the File menu, point to Properties, and click Options.
2.
When the File Options dialog box appears, click Set font.
3.
When the Font dialog box appears, select the Font, the Font style, and the
Size from the list boxes. If you want to apply a font size that is not available in
the list, you can type a custom size in the text box.
Qedit for Windows Quick Start Guide
A Sampling of Features • 21
Font selection dialog box
Colors
Qedit allows you to define color schemes to be used in document windows. It offers a
number of predefined schemes including one for Qedit defaults. You can select the
color scheme to be used as the overall default from the General page of the
Preferences dialog box.
22 • A Sampling of Features
Qedit for Windows Quick Start Guide
Selected
scheme
Colors in
selected scheme
Color scheme
list
Color Customization dialog box
To select a color scheme, simply click on it in the color scheme list. The colors
defined for it are displayed in the color boxes in the first column. Each color scheme
includes these elements:
•
Normal text: characters making up the actual text of the file and COBOL tags.
•
Background: workspace background. Characters in the foreground can be
Normal text, Invisible marker and Guides.
•
Invisible marker: markers displayed when the Show invisible option of the
View menu is enabled.
•
Guides: once set, guidelines are always visible in the document window.
Guidelines can be set when the Ruler bar is displayed or from the Guides
page of the Properties dialog box.
•
Pane border: panes appear when using the split-view feature. This color is
used to delimit the panes.
•
Splitter box: small box at top of the vertical scroll bar or on the left of the
horizontal scroll bar. The box is used to create split views.
•
Tag background: area where COBOL tags are displayed. The tag values are
displayed using the Normal text color.
•
Margin background: area off to the right when the text can not fill the width
of the document window. Nothing else should be displayed in that area.
Qedit for Windows Quick Start Guide
A Sampling of Features • 23
•
Caret: blinking insertion point (vertical or horizontal) when there is no text
selected
•
Attention highlight: brief visual signal to get the user's attention. For
example, the corresponding left parenthesis when typing a right parenthesis.
To select a new color, click on the corresponding color box. You will see another
dialog box with a color palette:
Color palette dialog box
Select the color that you want and click OK. The color palette shown above could be
different on your system, because color is based on your current display settings.
Default Colors Hierarchy
Default colors can be set at different levels.
1.
Global default: defined from the General page of the Preferences dialog
box
2.
Host type defaults: defined from the UNIX, MPE and Local pages of the
Preferences dialog box
3.
Connection default: defined from the Connection List dialog box
4.
File colors: defined from the Options page of the Properties dialog box
Colors defined at lower levels always override colors defined at previous levels. For
example, if you have defined host type defaults, these will be used even if a global
default has been set. Similarly, file colors are always used, no matter what has been
defined for the corresponding connection, host type or globally.
24 • A Sampling of Features
Qedit for Windows Quick Start Guide
Ruler Bar
Tab stop tool
Guide line tool
The ruler bar is a line at the top of a document window that is used to set tabs stops
and guide lines. Qedit for Windows can either show or hide the ruler bar. When it is
enabled, the ruler bar as well as the tab stop and guide line markers appear at the top
of the window.
The ruler bar has marks that indicate column positions. It also shows numbers at
regular intervals to make it easier to determine the cursor position. The rule bar
shows all the active tab stops and guide lines. For most files, the ruler starts in
column one (1).
Ruler with a text file
The ruler adjusts its column numbers according to the type of file you are editing. In
the following example, when Qedit opens a COBOL source file, which starts in
column seven (7), the first column on the ruler bar is number 7.
Ruler with a COBOL source file
Qedit for Windows Quick Start Guide
A Sampling of Features • 25
Displaying and Hiding the Ruler Bar
Before you can set tab stops or guide lines, you have to show the ruler bar. You can
do this by selecting Ruler from the View menu. To hide the ruler bar, simply repeat
this step.
Tab Stops on the Client
Tab stop marker
The tab stop marker appears in a button above the ruler. When tabs are set, they
appear on the ruler bar as small arrowheads pointing downward. By default, Qedit
sets tab stops at every four columns.
Default tab stops
Setting Tab Stops
Before you can set a tab stop, the ruler bar must be visible. To add new tab stops,
drag the marker to a position on the ruler. Click and hold the marker until the mouse
pointer becomes an arrowhead. Then drag the tab marker to a position on the ruler
bar. Tab stops apply to the whole file.
Moving or Clearing Tab Stops
Before you can move or clear a tab stop, the ruler bar must be visible. To move a tab
stop, drag the marker to the new position on the ruler bar. To remove a tab stop, drag
it off the ruler bar.
Guide Lines
Guide lines are vertical lines that provide a visual aid for aligning text. They do not
modify your text, but provide you with a constant reference point throughout a file.
Once you set a guide line in a document, it remains on your screen no matter where
you are.
26 • A Sampling of Features
Qedit for Windows Quick Start Guide
Setting Guide Lines
Guide marker
Before you can set a guide line, the ruler bar must be visible. To set a new guide line,
click and hold the Guide marker above the ruler bar until the mouse pointer changes
to a Guide pointer (a square pinhead). Then drag this new pointer to a position on
the ruler bar and release it. The new guide line appears as a thin blue vertical line
from the ruler bar all the way down to the document status bar. You can set as many
guide lines as you need.
Guide pointer
Guide lines in document window
Moving or Clearing Guide Lines
If you want to move an existing guide line, simply drag it to a new position on the
ruler bar. If you want to remove a guide line, drag it off the ruler bar.
Auto-Indent
Auto-indent is a great feature because it allows you to follow the same indentation
from the previous line when you press the RETURN or ENTER key. Instead of the
cursor going back to the beginning of the line, it goes to the column that matches the
indentation of the previous line. You can use spaces or tabs to increase the
indentation. If you use tabs, you can use SHIFT+TAB to decrease the indentation. To
enable auto-indent,
1.
Select the File menu, point to Properties, and click Options.
2.
When the File Options dialog box appears, select the Auto-indent check box.
Selecting Text
In the context of Qedit, the term “selecting” is synonymous with “highlighting.” If
text is highlighted, it appears on your screen in inverse video.
If you don’t highlight a string of text in your file, the only edit operations that are
available to you are to type, backspace or delete a single character. The key to more
powerful functions is text selection.
Qedit for Windows Quick Start Guide
A Sampling of Features • 27
Here is a partial list of what you can do with the selected text:
•
delete it by pressing the DELETE or BACKSPACE (in insert mode) key
•
replace it by typing some new characters
Shortcut: CTRL+C or
ALT+E,C
•
copy it to the Clipboard (Toolbar: Copy button)
Shortcut: CTRL+X or
ALT+E,T
•
cut it from the document and write it to the Clipboard (Toolbar: Cut button)
Shortcut: CTRL+D or
ALT+F,O
•
if the selected text is an embedded file name, open the file
Shortcut: CTRL+H or
ALT+E,F
•
search for the selected text (Toolbar: Find button)
Cursor Position and Appearance During Selection
If you select some text, the selection replaces the cursor and becomes the current
insertion point. If you start typing, the selected text is replaced with the first character
you type. If you continue typing, the new text either pushes the existing text to the
right or overwrites it, depending on whether you are in insert or overwrite mode.
Any selected text
automatically becomes the
insertion point. The cursor is
not displayed during
selection.
Selected text is the insertion point
If you use the scroll bar to move to another part of the document, the selected text
continues to stay selected, even though it might not be visible on your screen. The
selection is lost only when you move the cursor to a new location. If you forget that
you selected text and start typing in another location, you will return to the selected
text because that is the current position of the cursor.
Multiple Ways to Select Text
Qedit for Windows gives you numerous ways to select text. You can use your mouse
to select characters, words, paragraphs or complete sections. You can also use the
Find operation or the SHIFT key in combination with cursor movement keys to make
your selection. Qedit’s flexibility lets you choose the method that serves you best.
28 • A Sampling of Features
Qedit for Windows Quick Start Guide
Selecting with the Mouse
A common method to highlight text is to use the mouse. As in many other
applications, this method is a standard feature of Windows. Just click and drag to
select text.
For faster selection, you can
•
click twice (double-click) to select a word
•
click three times (triple-click) to select a complete line
•
click in the left margin (right-pointing arrow) to select a complete line
Selecting with the Shift Key
You can also select text without moving your hands from the keyboard: use the
SHIFT key in combination with cursor movement keys. When you use the SHIFT key,
the text is selected as the cursor moves.
Some of the most useful combinations are SHIFT+HOME to highlight to the start of
the current line, SHIFT+END to highlight to the end of the current line, and HOME,
SHIFT+END to highlight the current line.
If you use the cursor movement keys to move away from the selected text, the
selection is canceled. You can also use the ESCAPE key to cancel the current
selection. Using these keys is good practice because it prevents you from accidentally
deleting the selection, especially if you are not going to use a selected string after a
Find operation.
Selecting with a Find Operation
Just as in other Windows editors, Qedit also highlights text when it performs a
successful Find operation. This not only makes it easy to see where the text was
found, but it makes it easy to change or delete the selected text. Perhaps too easy! If
you type a character, or press the DELETE or BACKSPACE key after a successful
Find operation, you can accidentally delete or modify the selected text.
Copying, Moving and Pasting Text
The Clipboard
The Clipboard is a conceptual entity that can be used for temporary storage—a place
where you can save lines of text, a picture or some sound, then use it again later. Just
as in other Windows program, you cannot append to Qedit’s Clipboard. That means
the contents of the Clipboard are erased as soon you copy something new to it. You
can use the Clipboard to copy text to a Qedit document or to another application. The
Clipboard is closed when you shut down your system.
You can cut or copy to, and paste from the Clipboard. If you have already used Cut,
Copy or Paste in Notepad or Microsoft Word, you will not have any trouble with
the Qedit Clipboard. It works mostly the same way. If you are copying a large
number of lines from a host file to a local file, you may need to use the Copy to
local clipboard option of the Copy Special dialog box.
Qedit for Windows Quick Start Guide
A Sampling of Features • 29
Copying Text
If you want to copy some text, you can easily store it on the Clipboard. To copy text
to the Clipboard,
Shortcut: CTRL+A
1.
Select a contiguous block of text by highlighting it. This could be as small as
one character or as large as the entire file. For example, use the Select All
command of the Edit menu to select the entire file.
Shortcut: CTRL+C
2.
Select the Edit menu and click Copy to copy the selected text to the Clipboard.
The previous contents of the Clipboard are replaced with your new selection.
The text in your document is still selected.
Toolbar:
Pasting Text
If you cut/copy and paste in the same host document or another host document open
on the same connection, Qedit issues a special command to the server to have the
Paste operation done on the host. The only lines transferred to Qedit on the PC are
the updated lines visible on the screen.
If you are working with lines of the same length, there is no problem. If you are
copying lines that might exceed the record length of the target file, Qedit then has to
make some decisions. Because local files, MPE host files and UNIX host files work
differently, the result of a paste might be different.
Source and target files on the
same connection.
MPE host files and, to some degree, UNIX files typically have a maximum record
length as defined in the File options dialog box. If you are copying lines between
two (2) files on the same connection, the operation is done by the server. Because the
server knows the characteristics of the source and target files, it can fold lines before
inserting them in the target file. Folding means Qedit puts as many characters as it
can on a line and moves the rest to a separate line.
Source and target files on
different systems.
In all other cases, Qedit truncates lines that are too long. If this happens, Qedit
displays a warning message.
To paste text in a file,
Shortcut: CTRL+V
1.
Position the insertion point where you want to paste.
2.
Select Paste from the Edit menu to insert the contents of the Clipboard to the
file.
Toolbar:
Moving Text
The process of moving text consists of two parts. First you must remove the text from
its original position, then you have to paste it to a new location. To move text,
Shortcut: CTRL+X
1.
Select the block of text you want to move by highlighting it.
2.
Select the Edit menu and click Cut to put the selected text on the Clipboard.
The previous contents of the Clipboard are replaced with your new selection.
The text in your document is still selected.
3.
Position the insertion point where you want to insert the text. This could be in
the same file, another file in Qedit or even another application. Select the Edit
menu and click Paste.
Toolbar:
Shortcut: CTRL+V
Toolbar:
30 • A Sampling of Features
Qedit for Windows Quick Start Guide
Deleting Text
There are several ways to delete text in Qedit for Windows. If you select text before
deleting it, see “Selecting Text” for more information.
The BACKSPACE key does not
have any effect in overwrite
mode. The cursor just moves
to the left.
1.
The first and most obvious way to delete text is by pressing the DELETE key.
This deletes the single character that is immediately to right of the cursor, which
might be a space character or a TAB character. An interesting case is when you
go to the end of a line and press DELETE. You remove the NEWLINE character
between this line and the next, effectively appending the next line to the current
line.
2.
If you are in insert mode, you can press the BACKSPACE key. This key deletes
the character before the cursor position, effectively moving you back one
character and removing it at the same time. If you use the HOME and
BACKSPACE keys, you remove the NEWLINE character and append the current
line to the previous line.
3.
You can highlight some text (any sequence of contiguous characters including
NEWLINE characters) and then press the DELETE or BACKSPACE key. The
highlighted characters are deleted and the remaining line fragments to the left
and right are combined.
4.
You can also highlight some text and then press the Cut command of the Edit
menu. This deletes the highlighted text and writes it to the Clipboard. You can
get the deleted text back with the Paste command in the Edit menu.
Merging Two Lines
Remember that if you delete the end of a line and remove the NEWLINE character,
you will merge two lines into one. If the new line exceeds the file’s maximum line
length, which is determined by the Language option, you will get an error message
that says, “The resulting line would be too long.” If you need to remove the
NEWLINE character, you will have to break one or both lines into shorter lines before
you will be allowed to merge the pieces together.
Working With Rectangular Selections
You can select text in specific columns instead of complete lines. These selections
basically work the same. However, there are some differences specific to rectangular
selections.
Rectangular Selections
If you want to work on text in specific columns on multiple lines, you create
something called rectangular selection. Simply hold the CTRL key while clicking and
dragging the mouse. The selection is then limited to the leftmost and rightmost
columns in the selection as shown here:
Qedit for Windows Quick Start Guide
A Sampling of Features • 31
Rectangular selection
Rectangular selections can be defined with the mouse only. There is no keyboard
equivalent.
Copying and Cutting
To copy or cut text from certain columns, all you have to do is select the area. You
can only create rectangular selections with the mouse. There is currently no
keyboard-only function to do the same thing. To create a rectangular selection,
simply hold the CTRL key and click the mouse button as you would for a regular
selection. Once the text is selected, use the Copy or Cut command on the Edit menu
to send the selection to the clipboard. You can also use the CTRL-C and CTRL-X
shortcut keys.
Pasting as Replacement
To paste the content of a rectangular selection, you have to select the area where you
want to paste to. This area does not have to be exactly the size of the area copied to
the clipboard. Qedit tries to do its best to fit it in the destination.
If the destination area is narrower than the source selection, wide lines from the
clipboard are truncated.
If the destination area is wider than the source selection, text from each source line is
pasted on a separate line and Qedit pads the rest with spaces.
If the destination area is shorter i.e. has fewer lines than the source selection, extra
lines are dropped. For example, if the source selection had 10 lines and the
destination has only 6, the last 4 lines of the clipboard are not pasted.
32 • A Sampling of Features
Qedit for Windows Quick Start Guide
If the destination area is longer i.e. has more lines than the source selection, text from
the clipboard is repeated. For example, if the source selection had 5 lines but the
destination area has 10 lines, the source data is repeated twice.
If you want to get rid of the duplicated data, you can select the undesired text and use
the Clear command on the Edit menu. This replaces the contents of the selection
with spaces. If you want to remove the text and shift the remaining text, use the
DELETE key.
Inserting a Selection
There is currently no direct way of inserting a rectangular selection. If you wish to do
this, you should:
1.
Select the lines where you want to insert the clipboard
2.
Use the Insert command of the Column submenu on the Edit menu to create
an empty area. Make sure you make it wide enough to accommodate the text you
copied to the clipboard
3.
Select the newly created area, if it's not already
4.
Paste the clipboard
Deleting or Clearing
To remove the content of a rectangular selection, use the DELETE key. This removes
the selection and shifts the rest of each line to the left. To clear the content of the
selection i.e. replace it with spaces, use the Clear command on the Edit menu.
Working With Columns and Tabs
Qedit provides a number of commands to easily deal with text in specific columns.
Some of the commands are in the Column submenu of the Edit menu while others
are in the Text menu. The Find and Replace dialog boxes also have features that
helps you deal with columnar data.
Throughout these menus, column numbers are relative to the Language of the file.
For most files, the first column is 1. For some languages such as COBOL, the first
column is 7. Values in text boxes must entered accordingly. For example, if you want
to delete the first 2 columns of a COBX file, you have to enter 7 and 8 as column
values.
Deleting Text in Columns
Shortcut: ALT+E, O, D
If you want to remove or replace text between 2 columns, use the Delete command
of the Edit menu.
Qedit for Windows Quick Start Guide
A Sampling of Features • 33
Delete Columns dialog box
Enter the starting column number in the From text box. If you do not specify a
column number in the To text box, Qedit assumes you only want to work on one
column. If you want to remove more than one column, simply enter the column
number of the last column in the To text box.
If you do not have an active selection, the modification is applied to the whole file as
indicated by the Entire file option. If you have selected some text, the Selection
only option is enabled.
If the Fill with spaces option is disabled, Qedit removes the text in the specified
columns. Text to the right of the To column is then shifted left to fill the vacant
columns. If Fill with spaces is enabled, Qedit removes the text in these columns
and puts spaces in their place. This preserves the text alignment to the right of the
columns.
Inserting Text in Columns
Shortcut: ALT+E, O, I
If you want to insert at a certain column position, use the Insert command of the
Column submenu.
Insert Column dialog box
Type in the text you want to insert in the Text text box. Enter the column where you
want the text to appear in the At column text box. The specified string is inserted
34 • A Sampling of Features
Qedit for Windows Quick Start Guide
and text to the right of the column is shifted. If there is not enough room on the line
to accommodate the new string, an error is reported and the operation is stopped.
If you do not have an active selection, the modification is going to be applied to the
whole file as indicated by the Entire file option. If you have selected some text, the
Selection only option is enabled.
Shifting Text in Columns
Shortcut: ALT+E, O, S
If you want to shift text left or right, use the Shift command of the Column
submenu. A shift operation always occur at the start of lines i.e. in column 1.
Shift Columns dialog box
Specify the number of columns you want the text shifted by in the Number of
columns text box. Select Left if you want the text to be shifted in that direction.
This is similar to deleting a number of spaces from the beginning of a line. Select
Right to move the text in that direction. This is similar to inserting a number of
spaces at the beginning of a line.
If you do not have an active selection, the modification is going to be applied to the
whole file as indicated by the Entire file option. If you have selected some text, the
Selection only option is enabled.
Shifting to the Next Tab Stop
If you want to quickly align text to the next tab stop, you can use the Shift left or
Shift right commands on the Text menu. You have to set some tab stops in the file
to use these commands. The shifting is done at the beginning of the line. If the Use
spaces for tabs file property is enabled, Qedit inserts space characters in column
1. If Use spaces for tabs is disabled, Qedit inserts a tab character in column 1.
Shortcut: ALT+T, L
If you use Shift left, the text is moved to the previous tab stop. It can be a different
one for each line.
Shortcut: ALT+T, R
If you use Shift right, the text is moved to the next tab stop. Again, the tab stop can
be different for each line.
If the text can not be shifted further, Qedit simply does not do any shifting. For
example, if you keep using Shift left, you would ultimately get all the lines leftjustified in column 1.
Qedit for Windows Quick Start Guide
A Sampling of Features • 35
For a faster way to perform the same operation, simply select the lines you want to
shift and
•
Use the TAB key to shift to the right
•
Use SHIFT+TAB to shift to the left
Removing or Inserting Tab Characters
In files, you can visually align text using spaces or tab characters. Spaces on the
screen are stored in as many characters in the file. If you type in 5 spaces, there will 5
bytes stored in the file. Tab characters however, take up only one byte in the file no
matter how it appears on the screen. Using a mix of spaces and tab characters can be
deceiving. The size of a file changes depending on which one you use. Since these
are different characters, programs that read the file must be able to handle both.
If you need to use either formats, you might have to replace one with the other. This
can be very tedious. Qedit has the ability to do the replacement with a single
command from the Text menu.
If you have a file containing tab characters and you want to use spaces instead, use
the Detab command. Qedit preserves the visual alignment but, physically, removes
all the tab characters and replaces them with the appropriate number of spaces.
The opposite is also true. You can use the Entab command to convert spaces into
tab characters. Qedit looks at the text and the current tab stops. When it detects it can
replace one or more spaces by a single tab, it does it. In this case also, Qedit tries to
preserve the visual alignment. If need be, it will combine tab characters and spaces.
Switching and Tiling Files
With access to multiple document windows, you can easily switch between different
Qedit files. For example, you can have source code in one window and its data in
another. Or compare the shell script that is working properly on one host with the
same script that is failing on another host. Qedit lets you work and maneuver through
all your files uninterrupted.
Compare different parts of the same file by splitting a document window into
multiple views (see next section). And if you want to look at different files side by
side, simply tile all your open files or only those you need.
Switching Between Files
To switch between files use CTRL+TAB. Every time you press TAB as you hold the
CTRL key, you will switch to the next open file. Or, switch to the file you want by
choosing one from the Window menu, where all open files are listed in numbered
order (e.g., ALT+W,1 takes you to the first file).
Tiling Document Windows
Tile two documents horizontally by typing ALT+W, H. This will put currently opened
windows one on top of the other. You will now see something like the picture below.
Qedit uses the full width of the application workspace and fits as many windows as
possible in the available height.
36 • A Sampling of Features
Qedit for Windows Quick Start Guide
Horizontally tiled windows with two documents
If you prefer to see the windows side by side, use ALT+W, V. The application
workspace will now look something like this. It uses the full height of the application
workspace. Qedit tries to fit as many windows as possible in the width available.
Vertically tiled windows with two documents
Qedit for Windows Quick Start Guide
A Sampling of Features • 37
You can switch between documents quickly by just moving your mouse to another
document.
Multiple Views
Splitting a Document into Independent Views
The split box appears as a red
tab at the top of vertical
scroll bars and on the left of
horizontal scroll bars.
You can look at two different sections of the same file by using the split view feature
of Qedit. If you put your mouse on the split box, the pointer changes to a dark bar
with an arrow. When you drag the split bar in the direction indicated by the arrow,
you will see two dotted lines dividing your document into two parts:
Split box
Split bar
Split box
Splitting a window using the split bar
If Qedit cannot split a window at the location you select, the split bar becomes a
dotted line. You can split the screen only when the split bar becomes a solid line. Be
careful when you move a split bar because if it changes to a dotted line, it will be
removed (i.e., you will not have a split view anymore).
Split bars are displayed as
yellow lines between two
panes.
When you release the mouse button, if your window is big enough to split, Qedit will
split it into two windows that scroll independently. A split bar will delimit the two
panes. Each pane has its own set of scroll bars. If you have enough room, you can
split panes into more panes.
You can drag the split bar to adjust the size of each window. If you want to quickly
split a window or a pane in half, double-click on the split box.
Collapsing Multiple Views into One
Shortcut: double-click on the
split bar.
38 • A Sampling of Features
To collapse two views of a file into one, drag the yellow split bar to the edge of the
window and release it.
Qedit for Windows Quick Start Guide
Pane
Split bar
and
adjustment
indicator
Pane
Adjusting the pane size using the split bar
Searching
Qedit gives you immediate search results, even with enormous host files. This is
because Qedit actually performs host file searches on the server, not the client. When
Qedit finds a string match, it downloads only the portions of the file that contain the
match. That’s why Qedit is so fast. Qedit also provides you with numerous search
criteria: embedded words, highlighted words, pattern matching, as well as a partial
file search.
Finding Consecutive Occurrences of a String
To search for a text string,
Shortcut: CTRL+F
Toolbar:
Find Previous is on the left
and Find Next is on the
right.
1.
Select the Find command in the Edit menu.
2.
When the Find String dialog box appears, type your search string in the
Search for text box.
3.
Click Search to perform the search operation. If Qedit finds a match, it
highlights the first occurrence of the string and displays the page around it.
To repeat the same search for the next occurrence of the string, use the Find Again
command in the Edit menu or use the CRTL+G shortcut. To find the next occurrence,
use the Find Next tool.
To find the previous occurrence, use the Find Previous command of the Edit
menu, use the Find previous tool, or type the CTRL+R shortcut.
Except for the Entire file option, Qedit saves the terms of a search from one search
operation to the next.
Qedit for Windows Quick Start Guide
A Sampling of Features • 39
Find String dialog box
•
Search for
Qedit saves the last 15 strings you have searched for in the Search for list box.
If you want to use a string you have used earlier, select it from the list.
•
Match pattern
Matches patterns of characters instead of specific characters. For example,
@bob@green@ matches any occurrence of the string bob anywhere in a line,
followed by zero or more intervening characters and then the string green. The
pattern match control characters are the same as those used in the standard hostbased Qedit, not the General Expression match of UNIX.
The following characters can be used for other specific pattern searches:
@
#
?
~
&
^!
•
at sign matches zero or more characters of any type
number sign matches exactly one numeric character (0-9)
question mark matches exactly one alphabetic character (a-z, A-Z)
tilde matches zero or more space characters
ampersand matches the next character (use &@ to look for an @)
circumflex and exclamation point are reserved
use &^ and &! to match them
Regular expression
Regular expressions uses powerful syntax allowing precise definition of the
string you are searching for. Regular expressions have been around for a long
time and are now available on almost any platform. The following is a summary
of the metacharacters used. For complete information, refer to the Qedit for
Windows manual.
^
$
.
?
*
+
[
]
^
(
40 • A Sampling of Features
Start-of-line anchor
End-of-line anchor
Matches any character
Optional character
Matches zero or more of the preceding character
Matches one or more of the preceding character
Start a character class
End a character class
If 1st character in character class, negates class
Subpattern start
Qedit for Windows Quick Start Guide
)
Subpattern end
Examples:
^abc
abc at the start of a line
abc$
abc at the end of a line
abc.xyz
abc and xyz separated by one character
ab?c
ac or abc only
ab*c
ac, abc, abbc, and so on
ab+c
abc, abbc but not ac
abc[13579] abc followed by one odd digit
•
Ignore case
Matches the string regardless of case in the file.
•
Smart search (whole words)
Search for whole words and ignore embedded words, such as cell in excellent.
The Smart search also depends on the Qedit Language setting. For example,
in COBOL a word can contain a hyphen character, so word does not match
word-option.
•
Range
You can limit the search to a specific section of the file, the starting point of the
search, as well as the direction of the search.
•
Search in columns
You can limit the search to specific columns. The search finds only strings that
are completely within the specified columns.
Qedit for Windows Quick Start Guide
A Sampling of Features • 41
Copying Files
Copying files is easy with Qedit for Windows. You can copy files across platforms
with a simple copy-and-paste procedure. For files on the same platform, you can also
use the Save As command.
Copying Files Across Platforms with Copy and Paste
With a simple Copy and Paste operation, you can copy a local file or a host file to
another local file or host file.
1.
Open the file you want to copy from.
Shortcut: CTRL+A
2.
Select the text you want to copy. If you want to copy everything, you can use the
Select all command of the Edit menu.
Shortcut: CTRL+C
3.
Copy the selected text to the Clipboard using the Copy command of the Edit
menu.
4.
Create or open the target file you want to copy into.
5.
Paste the contents of the Clipboard by using the Paste command of the Edit
menu. As Qedit pastes, it displays the Paste progress dialog box if you are
copying across platforms.
Shortcut: CTRL+V
Paste progress dialog box
Qedit for Windows Quick Start Guide
Copying Files • 43
Copying a Host File to the Same Host with Save As
There are times when you want to modify a file, but you don’t want to lose the last
version of the file. To copy a host file to the same host is a two-part process: first
open a copy of the file, then save it with a new file name. You can also use this
process to rename a host file.
To copy a host file to the same host,
1.
Select the File menu, point to Open, and click Host. When the Open Host
File dialog box appears, select the file that you want to copy.
2.
Enable the Open a copy option to open a copy of the file you select. The
Open a copy option is available in both the Open Host File and Directory
dialog boxes. If you select multiple files in the Directory dialog box, the Open
a copy option will apply to all of them.
3.
Click Open to open a copy of the file. Qedit will open the copy and you can edit
it without modifying the last version of the file.
4.
Select the Save As command in the File menu.
5.
When the Host Save As dialog box appears, give the file a new name. Qedit
will save this file in the current directory. If you want to save the file in a
different directory, enter a path to another directory including the new file name.
Host Save As dialog box
6.
Click Save to finish saving the copied file.
If you have trained your fingers to use shortcut keys (e.g., CTRL+S), you won’t have
to worry about wiping out the existing version of a file because you work with a copy
of it.
You can also make a copy of a host file by using the Select All, Copy and Paste
commands of the Edit menu. The Save as method is more productive because you
only need a single command that uses less resources on the client and the server.
However, the Save As method only works with locals files or files on the same host.
44 • Copying Files
Qedit for Windows Quick Start Guide
Printing Files
Print a host file on any printer configured on the host connection or on a local printer.
You can choose from a variety of print options to customize your printout. Qedit can
access local and remote equipment, so you can print a hard copy of a file on the
printer attached to your PC or you can send the file to a printer configured on the
host.
Printing on a Local Printer
To print on a local printer,
Options in the Print on Host
dialog box are only available
with version 4.6.54 (or later)
of the server.
1.
Select the Print command in the File menu.
2.
When the Print dialog box appears, specify the pages you want to print. By
default, Qedit presumes you want to print the whole file. If you have selected
some text, the Selection option is enabled automatically.
Windows Print dialog box
3.
If you want to send the file to another printer, select it from the Name list.
4.
Select any other options you want to use (Number of copies or Properties).
5.
Click OK to print the file.
Qedit for Windows Quick Start Guide
Printing Files • 45
Print Options on a Local Printer
The Page Setup command is
also accessible by clicking
and holding the Print button.
You can send a local or host file to any printer available from Windows. The print
options can be specified in the Page Setup command of the File menu.
Page Setup dialog box
When the Page Setup dialog box appears, you can specify the print options for the
local printer. These settings control the print options only for the local printer.
•
Wrap long lines
This option is enabled by default. If lines are too wide to fit on the page, Qedit
puts as much as it can on the printed line and then wraps the remaining text on
the next line. Qedit wraps at word boundaries.
If you disable this option, Qedit fills the line and truncates the text at the next
character, even if it in the middle of a word.
•
Print line numbers
This option will include line numbers on the printed page. Note that these are
really records numbers, a sequential number that represents a line relative to the
beginning of the file.
•
Use host line numbers
If you asked to get line numbers and you are dealing with a host file, you can ask
for the actual line numbers and not the sequential record numbers.
NOTE: This function is not available at the moment.
•
Print page headings
By default, Qedit prints a one-line header with the file name and the page
number. If you do not want the page header, simply disable this option.
•
Lines per page
You can specify the number of lines per page in this text box. Qedit adjusts the
font size so there is enough room for the requested number of lines. The more
46 • Printing Files
Qedit for Windows Quick Start Guide
lines per page you request, the smaller your font size. Note that this setting also
affects the number of characters per line.
If you have numerous lines that wrap, you might be able to remove wrapping by
increasing the number of lines per page. This decreases the font size so that more
characters can fit on a line.
Qedit uses your document font as your print font (or the printer driver will use
the closest approximation). You can change the document font in the File
Options dialog box and print again. You can also reduce the size of the left and
right margins.
•
Margins
The four text boxes under Margins indicate the amount of space in the margins
of the page. Each text box represents a side: top, bottom, left and right.
In the example above, the top, left and right margins are set to 0.5 inch. The
bottom margin is set to 0.6 inch.
•
Inches and Centimeters
These buttons indicate the unit of measure used with the margin settings.
Qedit for Windows Quick Start Guide
Printing Files • 47
Executing Host Commands
Qedit allows you to execute commands on the host as if you were using a terminal or
terminal emulator. The command is transmitted to the host, executed there and results
are transmitted back to Qedit for Windows.
Executing a Single Command
If you only need to execute one command at a time, select the connection you wish to
access off the Host Command command of the File menu. This brings up the host
command dialog box.
Host Command dialog box
Enter the command you want to execute in the Command text box. The command
output is displayed in the result window.
Executing Multiple Commands
If you wish to execute a series of command, type them in a new document window
and use the Run as host command command on the Script menu. In the
following example, Qedit would execute the Showme, Build and Run commands
on the MPE host. The host command dialog box is automatically opened in order to
display the results.
Qedit for Windows Quick Start Guide
Executing Host Commands • 49
Run as host command on Script menu
Run as host command is also available on the shortcut menu (right-click).
Run file as host command on the shortcut menu
50 • Executing Host Commands
Qedit for Windows Quick Start Guide
Qedit Scripting Language
What is the Qedit Scripting Language?
Qedit comes with its own scripting language. It allows Robelle and Qedit users to
•
automate repetitive file manipulation tasks
•
perform complex file edits under program control
•
automate Qedit's file handling
•
add new commands to Qedit.
•
customize Qedit for your environment.
Robelle distributes useful scripts to perform common editing tasks that are not
implemented directly in Qedit. Customers can write their own scripts to address their
particular needs. Refer to the Qedit Scripting Language Reference Manual for details.
Scripts can be executed from commands on the Script menu. The Robelle submenu
of the Script menu contains Robelle-supplied scripts. From there, you can
•
sort selected lines
•
list all lines containing a particular string, regular expression or pattern
in the current file
•
list all lines containing a search string in the current file and any
referenced files ($Include, Use or COBOL Copylib)
•
easily compile source files on MPE hosts directly from Qedit for
Windows.
If needed, scripts can be written to add other submenus and commands.
Qedit for Windows Quick Start Guide
Qedit Scripting Language • 51
Index
Connection 2, 7
MPE 9
UNIX 10
using 16
Connection List dialog 8
Connection template 9
Control keys 20
Copylib 51
Cursor 38
D
#
$ (dollar sign) metacharacter 40
( (left parenthese) metacharacter 40
) (right parenthese) metacharacter 41
* (asterisk) metacharacter 40
. (dot) metacharacter 40
? (question mark) metacharacter 40
[ (left square bracket) metacharacter 40
] (right square bracket) metacharacter 40
^ (circumflex) character class negation 40
^ (circumflex) metacharacter 40
+ (plus sign) metacharacter 40
A
Auto-indent 27
Delete
column 33
Detab 36
Dialog
Connection List 8
Directory 16
Expiry message 4
host directory 17
New Host File 13
Open Host File 16
Directory
default HP-UX 10, 16
initial HP-UX 10
wildcard 18
Directory dialog 16
Document
font 21
E
Backspace key 31
Entab 36
Execute host commands 49
Expiring version 4
Expiry message dialog 4
C
F
Cancel button 6
Character set 8
Clipboard 29
COBOL 25
Cobol Copylib 51
Collapsing
views 38
Color
connection default 9
defaults hierarchy 24
schemes 22
Column
delete 33
insert 34
shift 35
Compile 51
File 44
creating 6, 13, 15
host 13, 15, 43, 44
local 6, 15, 43
Most recently used 16
Most Recently Used 15
MRU 16
opening 44
quick open 28
saving 14
switching 36
Find 28, 29
Find caseless 41
Find in columns 41
Find range 41
Find text 39
B
Qedit for Windows Quick Start Guide
Index • 53
Find words 41
Firewall 2
protocol 9
Font 21
print 47
Function keys 21
G
Group 9, 16
Guide line 25
deleting 27
moving 27
setting 27
H
Hardware and Software Requirements 2
Host command
multiple 49
single 49
Host Directory dialog 17
Host file
creating 13
local copy 43
opening 15, 44
Hostname 8
HP 9000 1, 10
I
Include files 51
Indent 27
Insert column 34
Insertion point 28
IP address 8
K
Keyboard 20
Keys
control 20
cursor movement 20
function 21
shortcut 5
L
Language 13
List occurrences 51
Local file 43
creating 6, 15
54 • Index
M
Menu
Edit 30, 31, 43
File 13, 15, 16, 44
Options 7
Window 36
Menu bar 5
Messages 6
Mnemonics 5
Most recent files 15
Mouse click
double 38
MPE 1, 2, 16
MPE connection 9
MPE server name 3
MRU 15
search string 40
N
Native Language Support 9
New Host File dialog 13
NLS 9
O
Open
host file 15
selection 28
Open Host File dialog 16
P
Page setup 46
Page size 46
Password 9
prompting 13
Port
MPE 2
UNIX 2
Print
line numbers 46
lines per page 46
local printer 45
margins 47
page headings 46
page setup 46
wrap lines 46
Q
Qedit Scripting Language 51
Qedit for Windows Quick Start Guide
R
Rectangle
copy 32
cut 32
deleting 33
inserting 33
pasting 32
Rectangular selection 31
Regular expression 40
Requirements
hardware 2
Software 2
RPM 2
Ruler 25
S
Save
file 14
Scripts 51
Scroll 20
bar 28
Search
caseless 41
Copylib 51
Include 51
Use 51
Search in columns 41
Search range 41
Search text 39
Search words 41
Security/3000 9
Select All text 30, 43, 44
Selecting
rectangle 31
Server name 3
Session 9
Shift column 35
Shift text 35
Shortcut keys 5
Sort lines 51
Split
views 38
Status bar
application 6
document 6
Switching file 36
Tab stop
deleting 26
moving 26
setting 26
TCP/IP 2
Text
copying 30
deleting 31
merging lines 31
moving 30
pasting 30
search 39
selecting 27
shift 35
Tile
horizontal 36
vertical 37
Toolbar 6
Trial server 3
U
UNIX 1, 10
UNIX connection 10
Use files 51
V
Views
collapsing 38
split 38
W
Wildcard search 18
Window
main 4
T
Tab
compress 36
expand 36
stop 26
Qedit for Windows Quick Start Guide
Index • 55