1
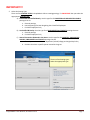
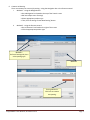
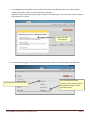
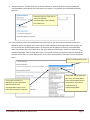
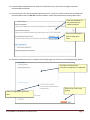
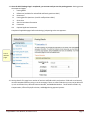
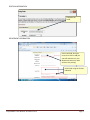
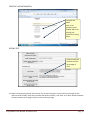
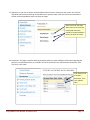
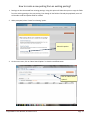
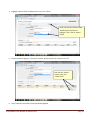
HowtoCreatePostings? UserGuide WRIGHT STATE UNIVERSITY November 2014 Authored by: Meltem Kokaly, Employment Manager, Human Resources 1. Go to PeopleAdmin website: https://jobs.wright.edu/hr I. Returning Users: Login with your username and password. II. First Time Users: Click ‘Request an account’ link located at the bottom right of the login box. You will be taken to the Account Request Form. Click ‘Request an account’. 2. Enter all required information on this form and click ‘Save’. Click ‘Save’ button. PeopleAdmin:UserManual,November2014 Page1 3. You will be returned to PeopleAdmin User Login Page with a message that your request was successfully submitted for approval. Once the User Account is approved, you will receive an e‐mail notifying that your account has been approved. 4. Change User Group: After successful login, if you are assigned more than one user type, click the User Group drop down menu located to the immediate right of your name. Select ‘Originator’ from the menu, then, click the refresh arrow “ “. You must be logged in as ‘Originator’ in order to create postings and have access to application materials. Your name will appear here. Select the appropriate user type and click ‘refresh’ arrow. PeopleAdmin:UserManual,November2014 Page2 IMPORTANT!!! 5. Select the Posting Type: There are four POSTING TYPES in PeopleAdmin. When creating postings, it’s IMPORTANT that you select the appropriate POSTING TYPE: A) Classified & Unclassified Hourly: Use this type for all CLASSIFIED and UNCLASSIFIED HOURLY postings that are a. External postings b. Internal postings for Non‐Bargaining Unit Classified Employees c. For WSU Employees Only B) Unclassified & Faculty: Use this type for all UNCLASSIFIED and FACULTY postings that are a. External postings b. For WSU Employees Only C) Internal Promotion & Named In the Grant: Use this type for all CLASSIFIED, UNCLASSIFIED HOURLY, UNCLASSIFIED and FACULTY postings that are a. Internal promotions within the department/school/college per Wright Way Policy b. Positions that have a specific person named in the grant There are four Posting types. Select the appropriate type. PeopleAdmin:UserManual,November2014 Page3 6. Create a Job Posting: There are two ways to create a job posting – using the Navigation bar or the Shortcut control. I. Method 1: Using the Navigation bar. Go to Navigation bar located at the top of the ‘Home’ screen Roll over object menu ‘Postings’ Select appropriate position type Then, click the orange ‘Create New Posting’ button II. Method 2: Using the Shortcut control Go to ‘Shortcuts’ box listed on the right of the screen Click the appropriate position type Method 1: Roll over Postings tab, then select posting type. Method 2 If using Method 1: Click here to create a new posting. PeopleAdmin:UserManual,November2014 Page4 7. A new dialogue box will appear on your screen that contains three different options to create a posting. ‘Create from Position Type’ is the most frequently used option. Note: You can also create a posting using the ‘Create from Posting’ option, only if you have created a same or similar position in the past. Select one of the three options. 8. On the New Posting page, fill in the necessary information. Fields with a red asterisk are required fields. For unclassified and faculty positions, select ‘Under review by School/Dept/College’ from the drop down menu. Type the position title in this field. PeopleAdmin:UserManual,November2014 Page5 9. ‘Accept references’: Check the box next to ‘Accept references’, ONLY if you wish to receive confidential recommendation letters directly from references. This option is only available for unclassified and faculty positions. Check this box only if you wish to receive confidential recommendation letters directly from references. 10. If you elected to receive recommendation letters directly from the references and checked the box, then additional options will appear. This is when you will need to decide at what stage of the search process you wish to receive the recommendation letters. If you prefer that all applicants have their recommendation letters submitted at the time of application, then go to ‘Reference Notification’ and select ‘Under Review by School/College/Dept’ from the drop down menu . If you prefer that only the applicants who are selected for interview submit their recommendation letters, then, select ‘Recommend for Interview’ from the drop down menu. Click on the drop down arrow. If you prefer that all applicants have their recommendation letters submitted at the time of application, then select ‘Under Review by School/College/Dept’. If you prefer that only the applicants who are selected for interview submit their recommendation letters, then, select ‘Recommend for Interview’. PeopleAdmin:UserManual,November2014 Page6 11. Recommendation Workflow section needs to be left blank as our system does not support automatic recommendation workflow. 12. The next section is the ‘Recommendation Document Type’. In order for references to be able to upload their recommendation letters as PDF files, ‘Recommendation’ needs to be selected from the drop down menu. Leave this field blank, as our system does not support automatic Select ‘Recommendation’ from the drop down menu. 13. Follow the below instructions to complete the ‘Settings’ page, then click on the ‘Create New Posting’ button. This field is used for special instructions to applicants, if applicable. Select the appropriate application form. Click here to create a new posting. PeopleAdmin:UserManual,November2014 Page7 14. Once the initial Settings Page is completed, you are now ready to start the posting process. Posting process encompasses 8 pages: I. Posting Detail II. References (available for unclassified and faculty positions ONLY) III. Documents IV. Posting Specific Questions (used for staff positions ONLY) V. Guest User VI. Search Committee Information VII. Comments VIII. Optional Applicant Documents Complete all applicable pages before submitting a job posting to the next approver. Title of different pages. 15. Posting Details: This page has a number of sections and fields within each section. Fields with a red asterisk must be completed before moving on to the next page. There are a few fields that you may not be able to fill in, such as Position Class, Affirmative Action Number, and NBAPOSN Number. These fields are filled in by Compensation, Office of Equity & Inclusion, and Budget during approval process. PeopleAdmin:UserManual,November2014 Page8 POSITION INFORMATION Complete the fields. DEPARTMENT INFORMATION Click in the field; find your name, then click to add you yourself and others in your department who may need access to the posting. Enter FOAP using the format indicated. PeopleAdmin:UserManual,November2014 Page9 STRATEGIC HIRE INFORMATION Complete the fields. Note: If the position is grant funded, skip to the Posting Text section by scrolling down. POSTING TEXT Enter the essential functions and the percentage of time. 16. When completing the ‘Posting Text’ section, the ‘Essential Functions’ must have the percentage of time and must total to 100%. Once all the sections and fields are filled in, click ‘Save’, then ‘Next’ button located at the top or bottom of the page in order to move to the next page. PeopleAdmin:UserManual,November2014 Page10 17. References: If you wish to accept recommendation letters from the references, then select ‘Yes’ from the drop down menu when answering ‘Accept References’ question. Next, enter the minimum and maximum number of recommendation letters you want to accept. Select ‘Yes’ from the drop down menu; then enter the minimum & maximum number of recommendation letters you want to accept. 18. Documents: This page is used for attaching ad copies and/or any other additional information regarding the position. To attach a document, click ‘Actions’ link at the end of the row, and follow the instructions. Then click ‘Save’; then ‘Next’. Click ‘Actions’ link to attach a document. Then, click ‘Upload New’. PeopleAdmin:UserManual,November2014 Page11 19. Posting Specific Questions: This page is used for adding questions that are related to the minimum and/or preferred qualifications. They assist users/reviewers in reviewing applications. Posting specific questions are to be used for staff positions ONLY. To add a question, click ‘Add a question’. Click ‘Add a question’. 20. Either select one of the questions from the question bank, or create a new one by clicking on ‘Add a new one’. Questions can have either predefined answers such as ‘Yes’ and ‘No’, or have ‘Open Ended’ answers which will allow the applicant to enter an answer. There is no character limit for open ended answer fields. New questions will have a ‘pending’ status until they are approved by Human Resources. Select question(s) from the list, then, click ‘Submit’. PeopleAdmin:UserManual,November2014 Page12 21. To create a new question, click ‘Add a new one’, then ‘Submit’. To create a new question, click ‘Add a new one’, then, click ‘Submit’. Assign the question a name. For example: Electrician or Assistant Director. The name will be used to find the question easily for future uses. Select a category from the drop down menu, then, enter the question. Select one of the ‘Possible Answers’. PeopleAdmin:UserManual,November2014 Page13 If preselected answers are used, enter ‘Yes’ in the first field. Then, ‘No’ in the second field. Click on ‘Submit’ to add the question to the posting. Check the box to make the question required for applicant to complete. Do not check if the question is to be optional for the applicant. Then, ‘Save’ and ’Next’. PeopleAdmin:UserManual,November2014 Page14 22. Guest User: On this page, you will create an account that will be used by the search committee members. Please note that Guest Users have ‘read only’ access to the system and are not able to make changes in applicant statuses. Once a position is filled, the Guest User name and password are deactivated by the system. Click here to create and activate Guest User Account. Enter committee members’ email addresses here. Then, click ‘Update Guest User Recipient List’. The system will send each member an email message with Guest User name and password. You may change the password by entering a new password and clicking ‘update password’. PeopleAdmin:UserManual,November2014 Page15 23. Search Committee Information: This page is used to enter the name, race and gender of the search committee members. Click on ‘Search Committee Information’ tab. Then, enter the information in the field. Click on ‘Save’, then, ‘Next’ to move to the next page. Enter the name, gender and race of the search committee members. Then, click ‘Save’ and ‘Next’. 24. Comments: This page is used for communication between the Originator and the approvers. Please note that comments entered in this section will be visible to all approvers. Enter comments, if any. PeopleAdmin:UserManual,November2014 Page16 25. Optional Applicant Documents: There are a number of documents listed on this page. For unclassified positions, cover letter and resume/CV are required. For faculty positions, cover letter, resume/CV and references are required documents. To make a document ‘required’, check ‘Required’. When completed, click ‘Save’, and then “Next” to move the posting to the ‘Summary’ page. Select the required and the optional documents. Click on ‘Save’. Then, ‘Next’. 26. The ‘Summary’ page will allow you to review all the information you entered in creating the job posting. Please note that a check mark in blue should appear next to the name of each page. If you see any section(s) with an orange “!” next to it, the system indicates that there are required field(s) that have not been completed. Click ‘Edit’ link located next to the title of the page to complete missing information. The “!” mark indicates that one or more required fields have not been completed. Click ‘Edit’ to complete the information. PeopleAdmin:UserManual,November2014 Page17 27. Next to Summary tab, there are two more tabs: a. History: Provides details on the approval steps, date/time stamps, and any comments and/or notes. b. Settings: Allows you to make any modifications to the posting setting page, such as type of application accepted, etc. 28. You can edit any of the pages by clicking the ‘Edit’ link next to the name of the page. An ‘Edit’ link is also located next to the title of the posting. 29. There are a number of items located on the right hand side of the screen: a. ‘Take Action on Posting’ button: There are different options indicating what you can do with this posting. This is the button that you need to click in order to move the posting to the next approver. (see the approval process on the last page) b. See How Posting Looks to Applicant: Shows which fields from the posting are visible to the applicants. c. Print Preview (Applicant View): Allows you to preview the applicant view of the posting. d. Print Preview: Allows you to preview the posting before printing. 30. As mentioned above (item 19.I), the ‘Take Action on Posting’ has a number of options to choose from. Originators have three options to pick from: Submit to Hiring Manager, Submit to Chair/Dept Head, and Submit to Business Manager. The order of the approvers at the Originator level depends on each hiring department/college/school’s departmental policies and practices. Once a position is submitted to the next approver, then the posting becomes ‘read only’ to the submitter. Roll over the ‘Take Action on Posting’ button and choose one of the options. Then, confirm. 31. Once a position goes through the approval process, and is approved by all parties, HR Employment posts and advertises the position. PeopleAdmin:UserManual,November2014 Page18 How to create a new posting from an existing posting? 1. Postings can also be created from existing postings. Using this option will allow the system to copy the fields from the existing posting to the new posting. Even though all the fields will already be populated, users will still be able to edit and update fields as needed. 2. When prompted, select ‘Create from Posting’ option. Select this option. 3. On the next screen, click on ‘More Search Options’ to view the workflow states. Click on ‘More search options’. PeopleAdmin:UserManual,November2014 Page19 4. Highlight ‘Position filled’ workflow state, then, click ‘Search’. Scroll until you find ‘Position filled’ workflow state, and click to highlight. Then, click on ‘Search’ button. 5. Once the position appears, roll over the ‘Actions’ button and click on ‘Create From’ link. Roll over the ‘Actions’ button, then, click ‘Create From’. 6. Then, follow the instructions from item #8 through #30. PeopleAdmin:UserManual,November2014 Page20 Position Approval Process ORIGINATOR HIRING MANAGER CHAIR/DEPT HEAD BUSINESS MANAGER PROVOST EXECUTIVE LEVEL HR EMPLOYMENT COMPENSATION EQUITY & INCLUSION HR EMPLOYMENT FOUNDATION RSP BUDGET POISITION IS POSTED AND ADS ARE PLACED, (if HR EMPLOYMENT applicable) PeopleAdmin:UserManual,November2014 Page21