1
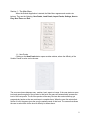
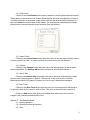
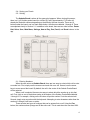
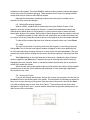
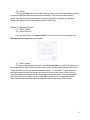
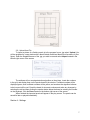
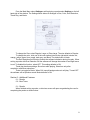
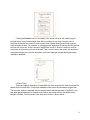
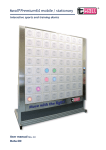
Allison Brumfield
Luke Bonde
Jessie Dahlquist
Sudoku Solver User Manual
The Sudoku Solver program is for anyone who enjoys solving (or attempting to solve) Sudoku
Puzzles. This software is applicable for the novice to expert user. This user manual covers in
detail every feature of this program.
Table of Contents
Section 1 - The Main Menu
1.1 - New Puzzle
1.2 - Load Puzzle
1.3 - Import Puzzle
1.4 - Settings
1.5 - How to Play
1.6 - Best Times
Section 2 - The Sudoku Board
2.1 - Entering Numbers
2.2 - Deleting/Re-entering Numbers
2.3 - Hints
2.4 - Saving your Puzzle
2.5 - Solving
Section 3 - The Import Puzzle Menu
3.1 - Enter by Hand
3.2 - Upload from File
Section 4 - The Settings Menu
Section 5 - Additional Features
5.1 - Results
5.2 - Best Times
*Note: Important sections are bolded
1
Section 1 - The Main Menu
When the Sudoku Application is started, the Main Menu appears and contains six
buttons. They are the following: New Puzzle, Load Puzzle, Import Puzzle, Settings, How to
Play, Best Times and Exit.
1.1 - New Puzzle
Clicking on the New Puzzle button opens another window, where the difficulty of the
Sudoku Puzzle to solve can be chosen.
The user can choose between easy, medium, hard, expert or insane. If the user starts on some
level and goes through all of the puzzles in that level, the game will automatically increase the
level of the next puzzle. The first few puzzles of the easy level are the easiest and they get
progressively harder as the user continues to complete them. When the user first selects their
choice of level, the game gives the user the easiest puzzle of that level. The screen that allows
the user to select their choice level of difficulty is shown above.
2
1.2 - Load Puzzle
Clicking on the Load Puzzle button opens a window of previous games that have saved.
These games can be saved on the Sudoku Board window, which will be explained in Section 2.
To load a previously saved puzzle, simply select a file from the list and either double click it or
click the Load button at the bottom of the window. The puzzle will be loaded onto the Sudoku
Board window, where the puzzle can be continued from the last save.
1.3 - Import Puzzle
Clicking on the Import Puzzle button takes the user to a new sub-menu with the options
to enter a puzzle “by hand”, or upload a picture of a puzzle from a file. See Section 3.
1.4 - Settings
Clicking on the Settings button takes the user to the settings menu, where the game
can be customized. The Settings Menu will be described in more detail in Section 4.
1.5 - How to Play
Clicking on the How to Play button takes the user to a window with instructions which
describe how to play the game of Sudoku. This menu is for the novice user, as it briefly
describes the basics of the game of Sudoku, but it will not go in detail about strategies.
1.6 - Best Times
Clicking on the Best Times button takes the user to a new screen which will display a
list puzzles solved by the user(s) in order of time. This menu is described later in section 5.
Finally, the Exit button at the bottom of the Main Menu allows the user to exit the
program. Any unsaved puzzle data will be lost.
Section 2 - The Sudoku Board
2.1 - Entering Numbers
2.2 - Deleting/Re-entering Numbers
2.3 - Hints
3
2.4 - Saving your Puzzle
2.5 - Solving
The Sudoku Board is where all the game play happens. When viewing this screen,
there is a 9 x 9 Sudoku puzzle board for a total of 81 cells. Approximately 17-26 cells will
already be filled with numbers depending on the difficulty the user chooses. There are 10
buttons under the board; one is a blank white button, the others are labeled 1 through 9. These
are explained shortly in Section 2.1. In addition to the board, there are ten other buttons: Pause,
Hint, Solve, Save, Main Menu, Settings, How to Play, Pen, Pencil, and Reset buttons. In the
upp
2.1 - Entering Numbers
When the user arrives at Sudoku Board, there are two ways to select which cell to enter
a number into. First, simply use the mouse cursor and click on a cell. Second, use the arrow
keys to move around the board. By default, the cell in the center of the Sudoku Puzzle Board
will be selected.
When a cell is selected, there are two ways to select which the number to go into that
cell. First, click on one of the buttons under at the bottom of the Sudoku Puzzle Board labeled
1 through 9. For example, clicking on the 5 button will put the number 5 into the selected cell.
Second, simply enter a number with the keyboard. Attempting to enter characters other than the
numbers 1 through 9 will have no action.
There are also two types of numbers that can be entered into a cell. Using the Pen
button, the numbers show up large and fill the entire cell. This is used when the user has 100%
4
confidence in the number. The button Pencil is used for marking scratch numbers that appear
1/9 the size of the full cell and a light gray. These numbers can be used for marking potential
values which may be useful for more difficult puzzles.
Note that the cells already containing numbers when the puzzle is started can be
selected, but they cannot be changed.
2.2 - Deleting/Re-entering Numbers
Without a doubt, mistakes will be made when solving the Sudoku Puzzles. If this
happens, select the cell (as described in Section 2.1) where the mistake has occurred, and
either press the delete button on the keyboard, or use the mouse cursor to select the blank
button at the bottom of the window. Doing either of these things will clear the number in that cell.
To rewrite the number in a cell, select the cell, and enter a new number as if there were
no number in that cell. Doing this will cause the old to be replaced by the new number selected.
To clear all the numbers that have been entered and start the time over, select Reset.
2.3 - Hints
The user has the option of receiving a hint from the program in case they get stuck by
clicking Hint. One of the next most logical numbers will appear on the screen appearing red
for a few seconds before returning to black so it’s clear to the user what was added. If the user
wanted, they could continue clicking the hint button until all the numbers in the puzzle are filled
in.
When Hint clicked, on the right hand side of the screen it explains the logic of the last
number supplied by the Hint button. It explains the logic of choosing the number visually by
highlighting the rows, columns, boxes, or individual numbers that force the box in question to
contain the number that it does.
When the user sees his/her results at the end of the puzzle, the number of hints needed
are shown next to the rest of their statistics and information. A user cannot get a highscore if
they needed to use a hint.
2.4 - Saving your Puzzle
If you are not finished with a puzzle, and you like to save your progress, you can click on
the Save button on the left-hand side of the screen. This will make a new window pop which will
have a line to enter the same of the puzzle. Enter the name of the puzzle, and click the Save.
If you did not actually want to save, then click “Cancel”. These puzzles can be access later
through the “Load Puzzle” menu. If puzzle with the same name as a puzzle already saved, the
older version will be overwritten.
5
2.5 - Solving
Clicking the Solve button located above the top right corner of the Sudoku Board will run
a computer algorithm and solve the puzzle automatically. If the puzzle had been partially
played, the users inputs will remain black (or the color specified in settings), any incorrect
answers will appear red, and the remaining solution will be grey.
Section 3 - Importing Puzzles
3.1 - Enter by Hand
3.2 - Upload from File
From the Main Menu, click Import Puzzle. A new sub-menu will open with options to
Enter by Hand and Upload as shown below.
3.1 - Enter by Hand
To enter an outside puzzle manually, select Enter by Hand. You will be navigated to a
new window with a blank Sudoku board as shown below. Directly underneath the board, there
will be 10 buttons for the nine possible numbers to enter, 1-9, and blank. To enter a number,
select the desired grid with the mouse, then either click the number button on the screen or
enter the number on the keyboard. The arrow keys may also be used to move the highlighted
cell. Enter all the given numbers on the board, with a minimum of 17 for a playable puzzle.
When finished select the Done button located in the bottom right corner of the screen.
6
3.2 - Upload from File
To import a picture of a Sudoku puzzle in to the program from a .jpg select Upload. You
will be navigated to a new window with a blank Sudoku board and blank input line above it (See
figure). Enter the filepath\filename of the .jpg you wish to use and select Import located in the
bottom right corner of the screen.
The software will run an edge detection algorithm on the picture, locate the numbers
in the grid, and display them on the puzzle board in the window. Confident numbers will be
displayed green, semi-confident numbers will be yellow, and numbers the algorithm believes
to be incorrect will be red. Check the board for incorrect numbers and make any changes by
selecting the cell and then clicking the number button below the board or entering the number
on the keyboard. Click the Done located in the bottom right corner of the screen.
When finished the imported puzzle will appear in the play screen. The puzzle can be
saved for later or played immediately.
Section 4 - Settings
7
From the Main Menu select Settingsor while playing a puzzle select Settings on the left
hand side of the window. The Settings Menu allows for changes in Size, Color, Error Detection,
Timed Play, and Music.
To change the Size, select Regular, Large, or Extra-Large. The size defaults to Regular.
To change the color, click one of the color options listed to the right which include: red,
orange, yellow, green, blue, purple, dark grey, and black. The default color is black.
The Error Detection on/off button controls the software’s behavior during free play. When
solving a puzzle with Error Detection ON the software will change the number of an illegal move
to red. To disable this function, select OFF. This setting defaults to ON.
Timed play has three settings: Show time while playing, Show time only after
completion, and Never show time.
There is a toggle for Music. When ON, tranquil background music will play. Turned OFF
the software will not produce sound. Music defaults to ON.
Section 5 - Additional Features
5.1 - Results
5.2 - Best Times
5.1 - Results
When finished solving a puzzle, a victorious screen will open congratulating the user for
completing the puzzle as shown below.
8
Clicking the Results button in the middle of the screen will open the results page as
pictured below. On the results page, there will be a display of how long it took the user to
complete the puzzle, the number of hints needed, and a graph showing how many numbers
were entered over time. For example, an average puzzle might take 10 minutes and 38 seconds
with the use of one hint. At first, the solver might find a bunch of “obvious” numbers, but then
slow down as the obvious cells are eliminated. Then, near the end of the puzzle, the number of
cells entered might pick up as the end nears. Hence we might get a graph that might roughly
resemble a parabola.
5.2 Best Times
There are separate best times for each difficulty. Each level has five slots to hold the five
fastest times for each level. If a hint was needed the time cannot be counted as a high score.
The best time section is separate from the results section which keeps track of statistics of the
last game played compared to the best times section which keep track of the fastest times
between all users. The first screen in the best times section is shown below.
9
The user can click on one of the levels of difficulty to see the rest of the fastest times specific for
each level. There is a separate high score screen for easy, medium, hard, expert, and insane
depicting the fastest five times for each. The easy high score screen is shown below.
10