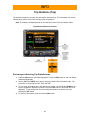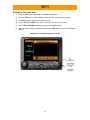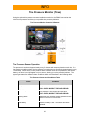
1
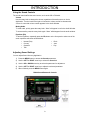
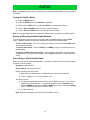
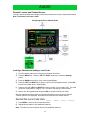
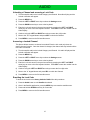
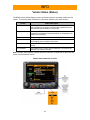
R5000
Operating Instructions
Read these instructions carefully before using this product and keep this manual for
future reference.
© 2006, 2007 Lectronix, Inc.
Part Number – 16715-A.2
ii
DISCLAIMER
THIS IS A DISCLAIMER OF LIABILITY AND DAMAGE RESPONSIBILITY AS
REGARDS TO LECTRONIX, INC. AND GARMIN RELATING TO YOUR USE
OF THE LECTRONIX R5000 SYSTEM. READ IT CAREFULLY. YOU
ASSUME TOTAL RESPONSIBILITY AND RISK FOR USING THIS SYSTEM.
Failure to properly focus on the operation of your motor vehicle can result in death,
serious injury and property damage. This R5000 device should never be used at a time or
in a manner that distracts you from properly focusing on operation of the motor vehicle in
which it is installed. Our concern is for your safety. We ask that you fully cooperate with
and share that concern.
Always operate the vehicle in a safe manner and in full compliance with speed limits, road
safety signs and all other laws and devices which regulate operation of a motor vehicle.
Be and remain aware of driving conditions at all times when using this system while
operating a motor vehicle.
Operation of this unit, including its camera, navigation, audio and other features can be
distracting to your operation of the motor vehicle. While the system is intended to provide
both entertainment and helpful vehicle and navigation information, it is not intended to,
nor should you allow it to distract you from properly focusing on operating the motor
vehicle in which it is installed. It is up to you to minimize or prevent such distraction.
Learn how to use this system before placing the vehicle in operation. Minimize the amount of
time spent viewing the screen of the unit while driving and use voice prompts whenever possible.
Do not attempt to adjust settings of the system or resolve any malfunction with it while driving.
Instead, pull off the road in a safe and legal manner and then adjust its settings or deal with any
malfunction. In the event of malfunction, disable the unit (turn power off or remove power from
the system).
In addition to its multiple other functions, your R5000 system may be equipped with the optional
Garmin GVN52 navigation unit. The navigation functions are provided by Garmin and are
displayed on the R5000 screen. The use of such navigation functions are the subject of a
separate Disclaimer from Garmin contained in the Garmin GVN52 Owner’s Manual made
available to you before use. Read that Garmin Disclaimer as it is also applicable to your use of
this system.
When navigating, carefully compare information displayed on the unit to all available navigation
sources, including information from street signs, visual sightings, and maps. Do not enter
destinations, change settings or access any functions requiring prolonged use of the controls of
the unit while operating your motor vehicle. For safety, pull off the road before making any
adjustments to the system or resolving any navigation discrepancies or questions.
iii
Table of Contents
Safety Information ......................................................................................................................... 1
Warnings .................................................................................................................................... 1
Cautions ..................................................................................................................................... 3
Notes on Use: Liquid Crystal Panel ........................................................................................... 3
Getting Started ............................................................................................................................... 4
Understanding Your R5000 ........................................................................................................ 4
Garmin GVN 52 Owner’s Manual ............................................................................................... 4
Satellite Radio User’s Guide ...................................................................................................... 5
Controls, Applications and Functions ......................................................................................... 5
Turning the R5000 On and Off ................................................................................................... 5
Standby Operation ..................................................................................................................... 5
Selecting Applications and Functions ........................................................................................ 6
The R5000 Display ..................................................................................................................... 7
Using the Sound Controls .......................................................................................................... 8
Adjusting Sound Settings ........................................................................................................... 8
Adjusting the Display .................................................................................................................. 9
FM, AM and WB Radio ................................................................................................................ 10
Selecting and Tuning the Radio ............................................................................................... 10
Seek and Scan ......................................................................................................................... 10
Saving and Recalling Radio Stations ....................................................................................... 10
Sirius Satellite Radio ................................................................................................................... 12
Tuning the Satellite Radio ........................................................................................................ 13
Saving and Recalling Satellite Radio Stations ......................................................................... 13
Subscribing to Sirius Satellite Radio ........................................................................................ 13
Parental Lockout and Channel Access .................................................................................... 14
Locking a Channel and setting a Lock Code............................................................................ 14
Unlocking a Channel and removing a Lock Code .................................................................... 15
Accessing a Locked Channel ................................................................................................... 15
Resetting the Lock Code .......................................................................................................... 15
Compact Disc (CD) ...................................................................................................................... 16
Playing CDs .............................................................................................................................. 16
CD Shuffle and Repeat Modes................................................................................................. 17
Playing MP3/WMA files on CD ................................................................................................. 17
USB Audio .................................................................................................................................... 18
Inserting the Memory Stick ....................................................................................................... 18
USB Shuffle and Repeat Modes .............................................................................................. 19
Playing MP3/WMA files on USB............................................................................................... 19
External Audio ............................................................................................................................. 20
Playing Files on Portable Audio Devices (MP3 Players).......................................................... 20
Camera (CAM) .............................................................................................................................. 21
Selecting Cameras ................................................................................................................... 21
Configuring the Camera Options .............................................................................................. 22
iv
Vehicle Status (Status) ................................................................................................................ 24
How to View Status Information in a Background Window ...................................................... 25
Alarms........................................................................................................................................... 26
Viewing Alarms ......................................................................................................................... 26
Disabling and Enabling Alarms ................................................................................................ 26
Vehicle Maintenance (Maint) ...................................................................................................... 27
Updating Vehicle Maintenance Information ............................................................................. 27
Trip Statistics (Trip) ..................................................................................................................... 28
Reviewing and Selecting Trip Statistic Items ........................................................................... 28
Operator’s Checklist (Check) ..................................................................................................... 29
Reviewing and Selecting Checklist Items ................................................................................ 29
Clock and Date ............................................................................................................................. 30
Viewing Clock and Date in the Active Window ......................................................................... 30
Setting the Clock and Date....................................................................................................... 31
Tire Pressure Monitor (Tires) ..................................................................................................... 32
Tire Pressure Sensor Operation............................................................................................... 32
Installing Tire Pressure Sensors .............................................................................................. 33
Removing Tire Pressure Sensors ............................................................................................ 34
Replacing Tire Pressure Sensors............................................................................................. 34
Tire Pressure Alarms ................................................................................................................ 34
Navigation (NAV) ......................................................................................................................... 35
Accessing the Navigation MAP ................................................................................................ 35
Configuring Navigation Options................................................................................................ 37
Maintenance ................................................................................................................................. 38
Troubleshooting .......................................................................................................................... 39
If You Suspect Something is Wrong ........................................................................................ 39
Common Problems ................................................................................................................... 39
Appendix A: One Year Limited Warranty .................................................................................. 41
Appendix B: Service and Technical Support............................................................................ 42
Contact Lectronix, Inc. .............................................................................................................. 42
Appendix C: Software Notice ..................................................................................................... 43
Software Notice ........................................................................................................................ 43
Open Source Software ............................................................................................................. 43
Appendix D: R5000 Technical Specifications........................................................................... 44
Technical Performance Specifications ..................................................................................... 45
Appendix E: Tire Pressure Monitoring Option ......................................................................... 47
Sensor Specifications ............................................................................................................... 47
v
IMPORTANT SAFETY INFORMATION
Safety Information
Read the operating instructions for the R5000 and all other components of the system carefully
before using the system. They contain instructions about how to use the system in a safe and
effective manner. FAILURE TO OBSERVE THE INSTRUCTIONS GIVEN IN THIS MANUAL
MAY CAUSE INJURY OR DAMAGE AND VOID THE WARRANTY.
This manual uses pictographs to show you how to use the product safely and to alert you to
potential dangers resulting from improper connections and operations. The meanings of the
pictographs are explained below. It is important that you fully understand the meanings of the
pictographs in order to use this manual and the system properly.
Warning
This pictograph intends to alert you to the presence of
important operation instruction and installation
instructions. Failure to heed the instructions may result
in severe injury or death.
Caution
This pictograph intends to alert you to the presence of
important operation instruction and installation instructions.
Failure to heed the instructions may result in injury or material
damage.
Warning
Observe the following warnings when using
this unit.
Warnings
•
The driver should neither watch the display nor operate the system while driving.
Watching the display or operating the system will distract the driver from looking ahead of
the vehicle and can cause accidents. Always stop the vehicle in a safe location and use
the parking brake before watching the display or operating the system.
•
Use the proper power supply.
This product is designed for operation with a negative grounded 12 V DC battery system.
Never operate this product with other battery systems, especially a 24 V DC battery
system.
•
Protect the deck mechanism.
Do not insert any foreign objects into the slot of this unit.
•
Do not disassemble or modify the unit.
Do not disassemble, modify the unit or attempt to repair the product yourself. If the
product needs repair, consult your dealer or contact technical support (see Appendix B).
•
Do not use the unit when it is out of order.
If the unit is out of order (no power, no sound) or in an abnormal state (has foreign
objects in it, is exposed to water, is smoking, or smells), turn it off immediately and
consult your dealer.
•
Refer installation to qualified personnel.
1
IMPORTANT SAFETY INFORMATION
Warning
Observe the following warnings when
installing.
•
Disconnect the lead from the negative (–) battery terminal before installation.
Wiring and installation with the negative (–) battery terminal connected may cause
electrical shock and injury due to a short circuit. Some vehicles equipped with the
electrical safety system have specific procedures of battery terminal disconnection.
FAILURE TO FOLLOW THIS PROCEDURE MAY LEAD TO THE UNINTENDED
ACTIVATION OF THE ELECTRICAL SAFETY SYSTEM RESULTING IN DAMAGE TO
THE VEHICLE AND PERSONAL INJURY OR DEATH.
•
Never use safety-related components for installation, grounding, and other such
functions.
Do not use safety-related vehicle components (fuel tank, brake, suspension, steering
wheel, pedals, airbag, etc.) for wiring or fixing the product or its accessories.
•
Do not install the product on the air bag cover or in a location where it interferes
with airbag operation.
•
Check for piping, gasoline tank, electric wiring, and other items before installing
the product.
If you need to open a hole in the vehicle chassis to attach or wire the product, first check
where the wire harness, gasoline tank, and electric wiring are located. Then open the
hole from outside if possible.
•
Never install the product in a location where it interferes with the driver’s field of
vision.
•
Never branch the power cord to supply other equipment with power.
•
After installation and wiring, you should check the normal operation of other
electrical equipment.
Using electrical equipment that is not operating normally may cause fire, electrical shock
or a traffic accident.
•
In the case of installation to an airbag-equipped vehicle, confirm warnings and
cautions of the vehicle manufacturer before installation.
•
Make sure the leads do not interfere with driving or getting in and out of the
vehicle.
•
Insulate all exposed wires to prevent short-circuiting.
2
IMPORTANT SAFETY INFORMATION
Cautions
Caution
FOLLOW THE LAWS AND REGULATIONS OF YOUR
STATE, PROVINCE OR COUNTRY FOR INSTALLATION.
Caution
THIS PRODUCT IS A CLASS I LASER PRODUCT.
USE OF CONTROLS OR ADJUSTMENTS OR
PERFORMANCE OF PROCEDURES OTHER THAN THOSE
SPECIFIED HEREIN MAY RESULT IN HAZARDOUS
RADIATION EXPOSURE.
DO NOT OPEN COVERS AND DO NOT REPAIR BY
YOURSELF. REFER SERVICING TO QUALIFIED
PERSONNEL.
Notes on Use: Liquid Crystal Panel
•
•
•
•
Do not cause impact to the liquid crystal panel.
When the temperature is very cold or very hot, the image may appear unclear or may
move slowly.
In order to protect the liquid crystal panel, keep it out of direct sunlight while the unit is not
in use.
Sudden changes in the temperature inside the vehicle such as those which occur
immediately after the vehicle’s air conditioner or heater has been turned on may cause
condensation (droplets of water) to form and, as a result, the panel may not work
properly. Do not use the unit while these symptoms are in evidence but leave the unit
standing for about an hour, and then resume or start use.
3
INTRODUCTION
Getting Started
Understanding Your R5000
The R5000 combines radio, CD/MP3 player, rear-view camera system, and advanced engine,
coach, and trip monitors into a single integrated system designed specifically for use in
Recreational Vehicles. The unit installs easily in the same dashboard space commonly used for
existing camera monitors, and replaces three separate systems (camera, radio, and vehicle
computer) with one. The R5000 also allows navigation, satellite radio and tire pressure
monitoring as options accessible from one common interface.
System Overview
• Integrated Audio Entertainment,
Camera, Vehicle Monitor, and Trip
Computer
• In-Dash Controller Unit with 7.0” Color
TFT LCD Display
• CD Reader for Regular and
Compressed Audio (MP3/WMA)
• Integrated 200W Amplifier for Four (4)
Audio Channels at 50W Each
• Clock
• Video Output (allows screen, any
camera, or navigation to be routed to
additional monitor)
Trip Computer
• Multiple Trip Odometers
• Speed and Distance Tracking
• Fuel Consumption
Camera Display
• Supports Three (3) Cameras
• Automatic Camera Select by Reverse
and Turn Indicators
• Supports Rear Camera Microphone
Expansion Options
• Navigation (Video, and Audio)*
• Sirius Satellite Radio * †
• Audio Input for MP3 Players or other
Portable Audio Devices
• USB Interface for Future Expansion
• Audio Line out (1 stereo)
• Video Output (NTSC)
• Tire Pressure Monitoring System*
Vehicle Monitor
• Monitor Coach and Engine Data from
Vehicle Busses
• Alarms for Fault and Out of Range
Conditions
• Operator Checklists for RV Arrival,
Departure, and Storage Tasks
• Maintenance Scheduling & Reminders
• Vehicle Bus connections for J1939
Advanced Digital Audio Subsystem
• Digital AM / FM / WB Tuner
• Satellite Radio Controller (External
Tuner Module)*
• CD Audio
• Compressed Audio (MP3) from CDs &
USB Memory Sticks
• DSP-based Digital Audio Processing
• 5-Band Parametric Equalizer
* Some features are optional and may not be installed with your R5000.
† A subscription is required to use this service.
Garmin GVN 52 Owner’s Manual
If your R5000 includes the optional Garmin GVN 52 navigation system, please refer to the
Garmin GVN 52 Owner’s Manual included with your vehicle for information regarding the
operation of this service.
4
INTRODUCTION
Satellite Radio User’s Guide
If your R5000 includes the optional Satellite Radio system, please refer to the User’s Manual
included with your vehicle for information regarding the operation of this service.
Controls, Applications and Functions
The front panel controls let you select the R5000’s Applications and Functions. Refer to the
following figure to understand how to use the front panels and controls.
R5000 Front Panel Buttons & Controls
Turning the R5000 On and Off
To turn the system on or off, press and hold the rotary dial for about two seconds after the ignition
is turned on in your vehicle. When the system turns on, a standard display screen will appear.
The R5000 will then automatically transition to the most recent Application and Function.
Standby Operation
The R5000 will be placed in a standby state for approximately 15 minutes when the vehicle’s
ignition key is turned off. When ignition is restored, the system will immediately return to the last
Application and Function. After 15 minutes the R5000 will be turned off.
5
INTRODUCTION
Selecting Applications and Functions
Each Application (i.e., Audio, Camera, Information or Navigation) includes a subgroup of
Functions which you select using the Application controls and four-way arrow keys on the front of
the R5000. The following table describes the Applications and lists their related Functions.
1) Select an Application by pressing an Application key.
2) To select a Function, continue to press the Application key until the desired Function is
highlighted. You can also use the UP and DOWN keys (from the Four Way Arrow group)
to select a Function.
3) Press the SEL key to select the Function or wait until the Function is automatically
selected.
R5000 Applications and Related Functions
Application Keys
Function
AUDIO
The R5000 offers a broad range of audio features, including
all standard radio bands, along with Weather Band and
Satellite Radio. You can play CDs and music files from your
USB memory sticks, or use the external function to connect
your iPod and MP3 player.
The five-band parameter equalizer and DSP-based digital
audio processor in combination with a 200W amplifier provide
quality sound for long miles on the road.
Radio FM
Radio AM
Radio WB
Satellite Radio (if installed)
CD
USB
External (Audio Line In)
CAM (Camera)
Use the side and rear cameras to avoid accidents and make
backing into campsites and driveways fast and easy. The
rear camera microphone lets you follow verbal directions
from someone guiding you.
Rear Camera
Left Camera
Right Camera
INFO (Information)
The INFO applications provide you with valuable status and
maintenance information about your recreational vehicle.
Refer to departure checklists to help you prepare for the next
leg of your trip. Update and use the oil change and fluid
records to keep up with maintenance. Prevent problems by
paying attention to the status alarms alerting you to potential
problems with your vehicle.
Status
Alarm
Maint (Maintenance)
Trip (Trip Computer
Check (Checklist)
Clock (Clock and Date)
Tires (Tire Pressure Sensor)
NAV (Navigation)
When configured with the Optional Garmin GVN 52
Navigation system, this selection displays the navigation
system information.
Optional Navigation System
6
INTRODUCTION
The R5000 Display
The R5000 display is divided into four windows as shown below. When you select a new
Application and Function, the information associated with the current Application and Function
may automatically move from the Active Window to the Background or Audio Windows.
Application Display Layout
7
INTRODUCTION
Using the Sound Controls
The sound controls affect the sound source, such as the CD or FM radio.
Volume
Use the rotary knob to change the volume, regardless of the audio source or Active
Application. Turn the knob to the right to increase the volume and left to decrease the
volume. A numerical volume number appears in the Audio Window.
Muting Audio
To mute audio, quickly press the rotary knob. “Mute” will appear in red in the Audio Window.
To unmute audio, press the rotary knob again. “Mute” will disappear from the audio window.
Equalizer (EQ)
To set the Equalizer, repeatedly press the EQ button on the front panel to select one of the
seven equalizer selections as listed below:
•
•
•
•
•
Normal (Flat)
Country
Classical
Talk
•
•
Rock
Jazz
Pop
Adjusting Sound Settings
You can adjust Sound from any Application.
1) Press the MENU button to access the Sound parameters.
2) Use the LEFT or RIGHT arrow key to select the Sound tab.
3) Use the UP or DOWN arrow key to select the parameter for adjustment.
4) Use the LEFT or RIGHT arrow key to adjust the selected parameter.
5) When finished, press the MENU button again.
R5000 Sound Buttons & Controls
8
INTRODUCTION
Adjusting the Display
You can adjust the Screen from any Application.
1) Press the MENU button to access the screen parameters.
2) Use the LEFT or RIGHT arrow key to select the Screen tab.
3) Use the UP or DOWN arrow key to select the parameter for adjustment.
4) Use the LEFT or RIGHT arrow key to adjust the selected parameter.
5) When finished, press the MENU button again.
6) The R5000 has the ability to output video to an external monitor. The Video Output
selection is used to select this output from the following options:
•
•
•
Auxiliary (default) – Garmin
output if option is installed
Main Display
Disabled
•
Rear Camera
•
Left Camera
Right Camera
•
R5000 Screen Buttons & Controls
9
AUDIO
FM, AM and WB Radio
The R5000 system’s FM, AM and WB (Weather Band) Radio Functions are selected via the
AUDIO button.
FM/AM/WB Radio Buttons & Controls
Selecting and Tuning the Radio
1) Press the AUDIO button.
2) Press the AUDIO button repeatedly to step through the radio bands.
3) When you reach the desired radio band, either press the SEL button to enable that band
or wait until the highlighted option is automatically selected.
4) Use the UP and DOWN keys to tune the radio.
5) Use the LEFT and RIGHT keys to seek or scan to the next station.
Seek and Scan
6) To Seek to the next station, press the LEFT or RIGHT arrow key.
7) To Scan stations, press and hold the LEFT or RIGHT arrow key for 2 seconds. The
radio will scan to the next available radio station and will pause for approximately 3
seconds before scanning to the next station. To stop scanning, press any arrow key.
Saving and Recalling Radio Stations
You can easily store (set) and recall your favorite radio and satellite stations using the SEL
button. Separate station preset lists are maintained for AM, FM and Satellite Radio.
10
AUDIO
To save a radio station - Tune to the radio station and press the SEL button. The preset list
will update.
To recall a radio station - Press the MINUS (-) or PLUS (+) keys to step through the list of
stored radio stations.
To remove a station from the preset list - Tune to that station and press the SEL button.
The preset list will update. When Empty is displayed, no radio stations are saved.
11
AUDIO
Sirius Satellite Radio
The R5000 system is compatible with an optional Sirius Satellite Radio. This section describes
the features and functions of the Satellite Radio system. Before using the optional Satellite radio,
you need to subscribe to the Sirius service either by phone or via the Internet (see Subscribing to
Sirius Satellite Radio).
SIRIUS Satellite Radio: The Best Radio On Radio
With everything from 100% commercial-free music to in-depth sports coverage, plus news, talk
and the hottest entertainment – you can always hear exactly what you want.
o
o
o
o
o
o
The only home of 100% commercial-free music. Whether you’re discovering new music,
or rediscovering songs you haven’t heard in years – you’ll hear it all on SIRIUS.
Live play-by-play and expert talk from the biggest leagues. NFL, every game, every
week, everywhere. Plus NFL Radio 24/7 news and opinions from top NFL pros, 40
games a week from NBA and College Sports from over 150 schools. Plus NASCAR
moving exclusively to SIRIUS in January 2007.
Entertainment, Comedy and Talk that can’t be found anywhere else. From 2 channels of
Howard Stern, Blue Collar Comedy with Jeff Foxworthy and Larry the Cable Guy to
Maxim and Playboy Radio.
Especially for Women. Martha Stewart and her team will inspire you 24/7 along with
Cosmo Radio, Deepak Chopra Wellness Radio and other exclusive talk show hosts.
World Class News, traffic and weather. Fox, CNN, NPR and BBC. Local traffic and
weather for the top 20 cities.
Family & Kids: G-rated fun for everyone with Radio Disney, Discovery Kids Channel,
Laugh Comedy and more.
Satellite Radio Buttons & Controls
12
AUDIO
Note: The Satellite selection will not be present if the optional Satellite Radio is not connected to
the R5000.
Tuning the Satellite Radio
1) Press the AUDIO button.
2) Press the AUDIO button until Satellite is highlighted.
3) Either press the SEL button or wait until Satellite is automatically selected.
4) Use the UP and DOWN buttons to select the Music Category.
5) Use the LEFT and RIGHT buttons to select the Music Channel.
Note: The signal strength indicator provides an indication of the strength of the satellite signal.
Saving and Recalling Satellite Radio Stations
You can easily store (set) and recall your favorite radio and satellite stations using the SEL
button. Separate station preset lists are maintained for AM, FM and Satellite Radio.
To save a radio station. Tune to the category and station of interest. Press the SEL button.
The preset list will update.
To recall a radio station. Press the PLUS (+) or MINUS (-) keys to step through the list of
stored stations.
To remove a station from the preset list. Tune to category and station of interest. Press
the SEL button. The preset list will update. When Empty is displayed, no radio stations are
saved.
Subscribing to Sirius Satellite Radio
Before you can use the optional Satellite radio, you need to subscribe to the Sirius service either
by phone or via the Internet.
By phone: 1-888-539-7474.
By the Internet: http://www.sirius.com
Before activating your service, first:
1) Make sure your SIRIUS tuner is installed with the antenna facing skyward.
2) Tune to “Category – ALL” and to “Channel 184”.
Also have on-hand:
1) The System Identification number (SID) from your SIRIUS receiver. This number is
located on the Sirius Receiver. It can also be obtained from the Settings screen.
Press the MENU key and use the LEFT or RIGHT arrow keys to select the Settings
screen. Refer to the SID text for the SID number.
2) A major credit card.
Note: Without a subscription, there will be limited Satellite service.
13
AUDIO
Parental Lockout and Channel Access
Locking a specific satellite radio category and channel will prevent tuning to that particular station.
Note: The default Lock Code is 0000.
Configuring the Sirius Satellite Radio
Locking a Channel and setting a Lock Code
1) Tune the satellite radio to the Category and Channel of interest.
2) Press the MENU key. Press the LEFT or RIGHT arrow key to select the Settings
screen.
3) Press the DOWN arrow key to move to the Keypad Display.
4) Press the LEFT and RIGHT arrow keys to move to the first keypad number. Press SEL
to enter the number into the Code Display.
5) Continue using the LEFT and RIGHT arrow keys to enter your four-digit code. This code
can be any combination of 4 digits. Hint: Choose a code that you will remember.
6) Move to the “S” keypad button and press SEL to set the Channel Lock Code.
After the channel has been locked, the channel will appear in the main screen with the
“Locked Channel” text displayed. No audio will be heard from the locked channel.
Record the Lock Code Here ____ ____ ____ _____
7) Press MENU to return to the Sirius audio screen.
8) Repeat this procedure to lock additional channels.
Note: The same lock code must be used to lock additional channels.
14
AUDIO
Unlocking a Channel and removing a Lock Code
1) Tune the satellite radio to the locked Category and Channel. No audio will play and the
Locked notification will appear.
2) Press the MENU key.
3) Press the LEFT or RIGHT arrow key to select the Settings screen.
4) Press the DOWN arrow key to move to the keyboard.
5) Enter the Lock code as set in the previous section by pressing the LEFT and RIGHT
arrow keys to move to the first keyboard number. Press SEL to enter the number into the
Code Display.
6) Continue using the LEFT and RIGHT arrow keys to enter the 4 digit code.
7) Move to the “UL” keypad button and press SEL to unlock the Channel.
8) Press MENU to return to the Sirius audio screen.
Accessing a Locked Channel
This feature allows access to a channel as needed. Enter the lock code only when the
specific channel is active. Once the channel is changed, the channel will stay locked until the
lock code is reentered.
1) Tune the satellite radio to the locked Category and Channel. No audio will play and the
Locked notification will appear.
2) Press the MENU key.
3) Press the LEFT or RIGHT arrow key to select the Settings screen.
4) Press the DOWN arrow key to move to the keyboard.
5) Enter the Lock code as set in the previous section by pressing the LEFT and RIGHT
arrow keys to move to the first keyboard number. Press SEL to enter the number into the
Code Display.
6) Continue using the LEFT and RIGHT arrow keys to enter the four-digit code.
7) Move to the “A” keypad button and press SEL to unlock the Channel.
8) Press MENU to return to the Sirius audio screen
Resetting the Lock Code
To reset the lock code to the factory default of 0000 follow this procedure.
1) Press the Audio button to until Satellite is selected.
2) Once in the Satellite application, press the MENU key to access the satellite menu.
3) Press and hold the DOWN arrow key for 5 seconds.
4) Press MENU to return to the Sirius audio screen
15
AUDIO
Compact Disc (CD)
The Compact Disk (CD) player is compatible with standard audio CDs as well as audio read/write
CDs that include MP3 or WMA files made on your computer. You can play the songs in normal
(sequential order) or shuffle mode.
CD Playback Buttons & Controls
Playing CDs
1) Insert the CD into the CD slot with the text on the CD facing up. When inserted, the
audio source automatically changes to CD, and begins playing the first track.
You can also select the CD by pressing the AUDIO button repeatedly until CD is
highlighted. Press SEL to select the CD or wait and CD will be selected automatically.
•
•
If there is no CD in the system, a reminder to insert a CD will be shown.
If there is a CD installed in the system it will start to play.
2) If the CD has music in more than one folder, use the UP and DOWN arrow key to change
folders.
3) Use the LEFT and RIGHT arrow keys to move to the next and previous track as well as
fast forward and rewind.
4) Press the SEL button to pause and resume CD playback.
Caution
Inserting foreign objects into the CD slot may cause injury or
damage.
Do not insert CDs with adhesive labels into the CD slot.
16
AUDIO
CD Shuffle and Repeat Modes
Shuffle mode plays CD tracks in a random sequence.
Repeat mode plays CD tracks from beginning to end of the CD repeatedly.
If both are selected, the system will repeatedly play the CD in shuffle mode.
1) Press the MENU button to view the options.
2) Move to the Settings tab with the LEFT or RIGHT arrow key.
3) Use the UP and DOWN arrow key to highlight either the Shuffle or Repeat selection.
4) Press the SEL button to check the desired selection.
5) Press the MENU button again to return to the CD display screen.
CD Player Shuffle and Repeat Buttons & Controls
Playing MP3/WMA files on CD
MP3 (MPEG Audio Layer-3) and WMA (Windows Media™ Audio) are digital audio compression
formats.
•
•
•
A maximum of 99 folders per CD is supported. Folders may be nested up to this limit.
Only a sampling frequency of 44.1 kHz is supported
UDF formatted CDs will play, but are not recommended.
17
AUDIO
USB Audio
The system will automatically detect and play MP3 and WMA encoded music from a USB stick
when it is inserted into the system (The system may take a few seconds to recognize the USB
stick). The song information associated with each music track will appear on the display screen if
it is encoded with the song.
USB Audio Buttons & Controls
Inserting the Memory Stick
Caution
Carefully insert the USB Memory stick in the vertical USB
port. Do not force the memory stick into the slot. If it does not
appear to fit, turn it 180 degrees and try again. Do not insert
foreign objects into the USB port.
1) Press AUDIO and USB to play from the USB stick if it is already installed in the system.
2) If the USB stick has music in more than one folder, use the UP and DOWN arrow key to
change folders.
3) Use the LEFT and RIGHT arrow keys to move to the next and previous track as well as
fast forward and rewind.
18
AUDIO
USB Shuffle and Repeat Modes
1) Shuffle mode plays tracks on a random sequence. “Repeat” plays tracks from beginning
to end repeatedly.
2) Press the MENU button to view the options.
3) Move to the Settings tab with the LEFT or RIGHT arrow key.
4) Use the UP and DOWN arrow keys to highlight either the Shuffle or Repeat selection.
5) Press the SEL button to check the desired selection.
6) Press the MENU button again to return to the USB display screen.
Playing MP3/WMA files on USB
MP3 (MPEG Audio Layer-3) and WMA (Windows Media™ Audio) are digital audio compression
formats.
•
•
•
WMA protected content is not supported.
The WMA lossless codec is not supported.
Only a sampling frequency of 44.1 kHz is supported.
19
AUDIO
External Audio
The R5000 will play the audio output from your portable audio devices such as an iPod or MP3
player.
External Audio Buttons & Controls
Playing Files on Portable Audio Devices (MP3 Players)
1) Connect your MP3 player to the R5000 by cabling the MP3 player to the R5000’s Audio
Line In jack. Carefully insert the audio connector into the Audio Line In port on the front
of the display.
Caution
Do not insert foreign objects into the Audio Line In jack.
2) When External is selected from the AUDIO menu, the R5000 will play the audio output
from the portable audio device.
20
CAM
Camera (CAM)
The R5000 supports up to three cameras. Mount the cameras on the vehicle so that there is a
left, right and a rear camera. The rear camera supports a microphone that can be automatically
activated when the RV is shifted into reverse.
Camera (CAM) Buttons & Controls
Selecting Cameras
1) To display a camera view on the main window, press the CAM button.
2) Press the CAM button to highlight the camera of interest (Left, Right or Rear). This will
define this camera view as the “preferred” camera view.
3) Press the SEL button to display the camera view or wait until the camera is automatically
selected.
4) When the preferred camera is viewed, use the LEFT, RIGHT or DOWN arrow keys to
provide a quick view of the other cameras. The camera view will display for
approximately five seconds after which the camera view will return to the preferred
camera view.
21
CAM
Configuring the Camera Options
When in the CAM view, pressing the MENU button provides a list of camera configuration
options.
Camera MENU Configuration Options, Buttons & Controls
Camera MENU Options Table
Menu Option
Description
Use Camera Audio
Turns on the rear camera microphone.
Once set, the microphone remains active and will override any
entertainment audio sources when the camera view is the active
application.
Auto Reverse Camera
Displays the rear camera view when the vehicle is placed in
reverse.
Note: If you have selected a preferred camera view other than rear
(i.e. left, right), then this auto reverse selection will override your
preferred selection and switch to the rear camera view.
Auto Reverse Microphone
Automatically turns on the microphone for the rear camera when
the vehicle is shifted into reverse. Audio from other sources such
as Radio, CD, or USB key will be muted when the vehicle is shifted
into reverse.
22
CAM
Menu Option
Description
Auto Turn Signal Camera
Automatically switches the display to the left or right camera when
the left or right turn signal is activated.
When the turn signal is deactivated, the camera view returns to the
previous application.
Note: If Auto Reverse is enabled, then Auto Reverse will take
priority over Auto Turn Signal Camera.
Default to Camera
When enabled the last camera viewed will be restored if there is no
activity in another application for approximately 10 seconds.
23
INFO
Vehicle Status (Status)
The R5000 Vehicle Status display provides information about the operating conditions of the
vehicle. The following table describes the information available in the status screens.
Screen
Status Description
Road
Traveling information such as road speed, fuel economy, fuel
level, average fuel economy, total fuel used, instantaneous fuel
rate and total vehicle distance is found here.
Engine
View engine RPM, oil temperature and pressure, coolant
temperature and pressure and transmission oil temperature and
pressure in this screen.
Electrical
Battery voltage and alternator status are available in this screen.
Environment
Interior and Exterior temperature as well as Barometric pressure
and Heading can be viewed in this screen.
Miscellaneous
Washer Fluid Level and Engine Load can be viewed in this
screen.
Tire Pressure
The pressure of the vehicle tires is displayed. This requires the
optional Tire Pressure Sensors.
Note: The type and availability of status and alarm information is dependant on the make and
model of the recreational vehicle.
Vehicle Status Buttons & Controls
24
INFO
How to View Status Information in a Background Window
You can view one of the fields from the status display in the Background window even when the
status display is not the main Application.
1) To select an item for display in the background window. Use the UP and DOWN
arrow keys to highlight the status item for display.
2) Press the SEL button to select the item. A check box will appear next to your selection.
Selecting a different parameter will remove the previous item from the display.
3) To remove an item from the background window. Move to the selected item and
press the SEL button again to uncheck the item.
Note: Selecting an item will override the information in the Background window unless there
is an Alarm condition.
25
INFO
Alarms
The R5000 continuously monitors system parameters and presents an alarm when the parameter
is outside of normal operating conditions. When there is an alarm, an indicator in a red box
appears in the background window, overriding anything that is displayed in that window. You
should take note of the alarm and check your vehicle to correct the alarm condition.
If there is an Alarm condition, pressing INFO will take you to the Alarm screen.
Alarm Indicator Buttons & Controls
Viewing Alarms
1) Select the INFO button and scroll to Alarm.
2) Press the SEL button or wait until the Alarm screen is automatically selected. A list of
alarms will appear.
Disabling and Enabling Alarms
1) When in the Alarm screen, use the UP and DOWN arrow keys to highlight the alarm of
interest.
2) Press the MINUS (-) key to disable the Alarm.
3) Press the PLUS (+) key to enable an Alarm.
Caution
A disabled Alarm will not appear in the Background window.
There will be no Alarm notification. The Alarm must be
manually enabled to display in the Background window.
26
INFO
Vehicle Maintenance (Maint)
The Vehicle Maintenance Information helps you track and monitor key vehicle maintenance
items. The maintenance item is shown on the left of the window. The Current column displays
the number of miles driven since the item received attention. The Sched. column displays the
manufacturer’s recommended scheduled maintenance interval.
Vehicle Maintenance Buttons & Controls
Updating Vehicle Maintenance Information
1) Press the INFO button until Maint is highlighted.
2) Press the SEL button or wait until Maint is automatically selected.
3) Use the UP and DOWN arrow keys to highlight Maint item of interest.
4) To reset an item, press and hold the SEL button.
5) To disable a maintenance item, move to the item of interest and press the MINUS (-) key.
6) To enable a maintenance item, move to the item of interest and press the PLUS (+) key.
7) An alarm will generate if the Current miles driven exceed the Scheduled (Sched.) miles
driven. Turn off the alarm by resetting the current value.
27
INFO
Trip Statistics (Trip)
Trip statistics provide the operator with information while traveling. This information can include,
traveling time, gallons of fuel used, average miles per gallon etc.
Note: The statistics available depend on the make and model of the recreational vehicle.
Trip Statistics Buttons & Controls
Reviewing and Selecting Trip Statistic Items
1) Press the INFO button until Trip is highlighted. Press the SEL button or wait until Trip is
selected automatically.
2) Use the LEFT and RIGHT arrow keys to select the desired Trip Information page. Trip
information is organized into DAY, LEG and TRIP.
3) To view a trip information item in the background window, use the UP and DOWN arrow
keys to highlight the Trip item of interest. Press the SEL button to check the item to be
displayed. To remove the item from the background window, uncheck the item by
pressing the SEL button.
4) To reset trip information, press and hold the SEL button.
28
INFO
Operator’s Checklist (Check)
The Operator’s Checklist provides the operator with a series of predefined lists to use as a
reference for typical procedures including Departure, Arrival, Preparation for Storage and
Removal from Storage.
Operator Checklist Screen Descriptions Table
Screen
Description
Departure
A list of common departure tasks
Arrival
A list of common arrival tasks
Preparation for Storage
A list of common tasks to prepare for storage
Removal from Storage
A list of common tasks for removal from storage
Note: The above checklists are a representative list of common tasks and may not include all
tasks for your vehicle. Consult your vehicle’s operator’s manual for more information.
Operator Checklist Buttons & Controls
Reviewing and Selecting Checklist Items
1) Press the INFO button until Check is highlighted. Press the SEL button or wait until
Check is selected automatically.
2) Use the LEFT and RIGHT arrow keys to select the desired checklist.
3) Use the UP and DOWN arrow keys to highlight the Check item of interest. Press the
SEL button to check or uncheck an item.
4) To uncheck all items, press and hold the SEL button.
29
INFO
Clock and Date
The R5000’s clock and date are always displayed on the main screen in the lower left hand
corner.
Clock and Date Buttons & Controls
Viewing Clock and Date in the Active Window
1) Press the INFO button until Clock is highlighted.
2) Press the SEL button or wait until Clock is selected automatically.
Caution
If power is removed from the R5000, the clock and date will
need to be reset.
30
INFO
Setting the Clock and Date
1) Press the INFO button repeatedly until Clock is highlighted.
2) Press the SEL button to select Clock or wait until clock is automatically selected.
3) Press SEL button to edit the time and date values.
4) Use the LEFT and RIGHT arrow keys to select the field you want to modify.
5) Use the UP and DOWN arrow keys to change the highlighted field
6) When all of the changes have been made, press the SEL button to return to the Clock
display.
Setting Clock and Date Buttons & Controls
31
INFO
Tire Pressure Monitor (Tires)
Using the optional tire pressure sensors installed on each tire, the R5000 can monitor the
vehicle’s tire pressure and alert you to possible tire pressure problems.
Tire Pressure Monitor Controls & Buttons
Tire Pressure Sensor Operation
Tire pressure is monitored approximately every 5 minutes with sensors placed on each tire. If a
low pressure condition exists, the tire pressure is monitored more frequently (approximately every
15 seconds). When there is a tire pressure alarm condition such as low pressure or low sensor
battery, an alarm in red will appear on your screen, alerting you to the potential problem. The
system generates four different alarm conditions which are described in the following table.
Tire Pressure Alarms and Conditions Table
Alarm
Condition
Low pressure
Tire pressure is 12.5% below its initial value.
PULL OVER, INSPECT TIRE AND REPAIR.
Critical low pressure
Tire pressure is 25% below its initial value.
PULL OVER, INSPECT TIRE AND REPAIR.
Missing alarm
R5000 has not received a status update from the
sensor in the last 15-30 minutes.
Low battery
Sensor’s battery is low – the sensor should be
replaced.
32
INFO
Installing Tire Pressure Sensors
The sensors determine operating pressure of the tire when the sensor is first installed. Therefore
the tire pressure at the time of installation is CRITICAL! All tires MUST be inflated to the
manufacturer’s recommended cold pressures while the tires are cold. Refer to the owner’s
manual.
Caution
Install the tire pressure sensors on the tires when they are
still cold. Failure to install at this “cold” temperature may
cause false alerts.
Carefully inspect tires and valve stems prior to installation of the system to ensure that they are in
good condition. DEFECTIVE VALVE STEMS MUST BE REPLACED. THE DILL VALVE (small
valve inside the valve stem) MUST DEPRESS FULLY AND RELEASE AIR FOR THE SENSOR
TO ACTIVATE. The sensor will not activate properly if the dill valve is not the proper length (a
common problem).
1) Press the INFO button repeatedly until Tires is highlighted.
2) Press SEL or wait until Tires is automatically selected.
3) Using the FOUR-WAY arrow keys, select the tire to add a tire pressure sensor.
4) Hold SEL until the system prompts you to add a sensor. To abort adding a sensor, tap
the SEL button.
5) Screw the tire pressure sensor onto the tire selected. TIGHTEN FIRMLY BY HAND.
You should hear the “hiss” of released air when the sensor is being screwed on. Hold the
valve stem with your free hand and tighten the sensor securely.
Caution
Using a tool to tighten the sensor can damage the sensor and
nullify the warranty.
6) Wait for system to report new tire added (a green tire icon appears). This can take up to
one minute.
In the unlikely event that the system has not detected the sensor within one minute after
screwing on the sensor, remove the sensor, wait one minute, and then reattach the
sensor to tire. (The system can be left in ‘add sensor’ mode during this process.) Repeat
this step until the sensor is detected.
7) Repeat steps 1-6 for each tire.
After installing the sensors, check for leaks by thoroughly covering the sensor, extension and
valve stem with a solution of one part liquid soap to two parts water and look for bubbles
indicating a leak.
Note: Once a sensor is added to the system, the sensor remains associated with that tire position
until deleted, regardless of attachment/removal from the actual tire.
33
INFO
Removing Tire Pressure Sensors
1) Press the INFO button repeatedly until Tires is highlighted.
2) Press SEL or wait until Tires is automatically selected.
3) Using the FOUR-WAY arrow keys, select the tire where the tire pressure sensor is to be
removed.
4) Hold SEL until the system prompts you to delete a sensor.
5) Use the FOUR-WAY arrow keys to toggle between Yes and No.
6) Press SEL to confirm or cancel the operation.
7) Remove the tire pressure sensor from the selected tire.
Replacing Tire Pressure Sensors
To replace a tire pressure sensor, the existing tire pressure sensor must be removed from the tire
then a new sensor must be added to the tire.
1) Follow the “Remove Tire Pressure Sensors” instructions to remove the current sensor
from the tire.
2) Add the new tire pressure sensor by following the “Installing Tire Pressure Sensors’
instructions.
Tire Pressure Alarms
A red alarm notification will appear in the Background Window if there is a tire pressure alarm
condition. If there is an alarm, PULL OVER, INSPECT TIRE AND REPAIR.
To view alarm conditions:
1) Press the INFO button repeatedly until Tires is highlighted.
2) Press SEL or wait until Tires is automatically selected. The tires with the alarm condition
will be shown in RED.
3) To view the tire pressure use the FOUR-WAY arrow keys to select the tire. The pressure
will display will be displayed for the selected tire.
To disable and enable an alarm:
1) Press the INFO button until Alarm is highlighted.
2) When in the Alarm screen, use the UP and DOWN arrow keys to highlight the alarm of
interest.
3) Press the MINUS (-) key to disable the Alarm.
4) To enable an alarm, press the PLUS (+) key.
34
NAV
Navigation (NAV)
The R5000 includes support for the optional Garmin GVN52 Navigation system. Please refer to
the Garmin User’s Manual included with your RV for information regarding this Application.
When navigating, carefully compare information displayed on the unit to all available
navigation sources, including information from street signs, visual sightings, and maps.
Do not enter destinations, change settings or access any functions requiring prolonged
use of the controls of the unit while operating your motor vehicle. For safety, pull off the
road before making any adjustments to the system or resolving any navigation
discrepancies or questions.
Warning
You assume total responsibility and risk for using this
device. Failure to pay attention to the operation of your
vehicle could result in death, serious injury, or property
damage. Do not attempt to adjust this device while
driving or permit viewing the screen to distract you from
safe vehicle operation.
Navigation Screen Buttons & Controls
Accessing the Navigation MAP
1) Press the NAV button to access the GARMIN navigation system.
2) Use the FOUR-WAY arrow keys to pan around a map.
3) Use the MINUS (-) and PLUS (+) keys to zoom out and into the map.
35
NAV
4) The GARMIN remote control can also be used for navigation.
Refer to the GARMIN GVN 52 manual for information on the use of the GARMIN
Navigation system.
5) Press the MENU button quickly to access the GARMIN menus.
Use the FOUR-WAY arrow keys to move around the GARMIN menus. The menu item
will be highlighted when selected.
Use SEL to select the highlighted menu.
Refer to the GARMIN GVN 52 manual for information on the use of the GARMIN
Navigation system.
36
NAV
Configuring Navigation Options
Navigation options allow you to hear navigation prompts and audio through the R5000. The
options are:
Route Audio to Main Speakers – Navigation prompts will interrupt current audio source so that
navigation prompts can be heard. This would not normally be checked, if the Garmin GVN52 has
the external speaker. It would be checked if there is no external speaker attached to the Garmin
GVN52.
Always Listen – When Navigation is selected as the primary application, Garmin audio is always
heard regardless of selected audio application. This is typically used when the Garmin GVN52
unit has XM radio support.
1) Press and hold the MENU button to view the options.
2) Move to the Settings tab with the LEFT or RIGHT arrow key.
3) Use the UP and DOWN arrow key to highlight the option.
4) Press the SEL button to check the desired selection.
5) Press the MENU button again to return Navigation display.
37
Maintenance
Your product is designed and manufactured to ensure a minimum of maintenance. Cleaning
hints follow.
1)
Keep the display clean of dust and debris.
2) Use a dry soft cloth for routine exterior cleaning. Never use benzene, thinner or other
solvents.
3) Do not put or spray liquids directly on the screen. Avoid using ammonia-based
cleaners and solvents such as acetone. Moisture intrusion into the unit may cause a
malfunction.
4) Use a duster or a soft, lint-free cloth (no paper towels) to gently clean the display and
front panel controls. When needed, slightly moisten a soft lint-free cloth with water and
gently buff the screen.
5) To avoid damaging the unit, do not touch the screen with your fingers or any other items.
Do not put pressure on the screen because it could damage it.
6) Avoid spilling liquids or food on the unit, as it may cause the system to malfunction.
38
Troubleshooting
If You Suspect Something is Wrong
Check and take steps as described below. If the described suggestions do not solve the
problem, contact Lectronix, Inc (see Appendix B). Only qualified personnel should service the
product. Always refer diagnostics and repair to professionals. Lectronix, Inc. shall not be liable
for any accidents arising out of neglect or attempts to repair the unit.
Warning
Do not use the unit if you suspect faulty operation. Never try
to repair the unit by yourself.
Common Problems
The following tables provide possible solutions to common system problems.
Problem
Possible Cause
Possible Solution
No power to the unit
The power cord (battery, power and
ground) is connected improperly.
Check the wiring.
No Sound
Mute is set to on.
Set mute to off. Push the volume
knob momentarily.
No Sound
The speaker lines are not wired
correctly, or there is a break or poor
contact.
Check the wiring in accordance
with the wiring diagram.
(Installation Instructions)
Noise
The contact of the ground lead is
poor.
Make sure that the ground lead is
securely connected to an
unpainted part of the chassis.
Noise is made in
step with engine
revolutions
Alternator noise comes from the
vehicle.
Change the wiring position of the
ground lead.
Mount a noise filter on the power
supply.
Some operations are
not executable
Some operations are not executable
in particular modes such as menu
mode.
The speaker
channels are
reversed between
right and left
The plus and minus terminals at right
and left channels of speakers are
reversed.
Read the operating instructions
carefully and cancel the mode. If
the unit is still out of order, consult
your dealer.
Consult the wiring diagram and
correct wiring problems.
Radio Problems
Problem
Poor reception
or noise
Possible Cause
Possible Solution
Antenna installation or wiring of the
antenna cable is faulty.
39
Check whether the antenna mounting
position and its wiring are correct.
CD Problems
Problem
Possible Cause
Possible Solution
No playback
The disc is inserted upside down.
Insert the disc correctly.
No playback
There is a flaw or foreign object on the
disc.
Remove the foreign object, or use
a flawless disc.
Sound skipping
or noise
There is a flaw or foreign object on the
disc.
Remove the foreign object, or use
a flawless disc.
Playing MP3 / WMA File Problems Table
Problem
Possible Cause
Possible Solution
No playback or disc
ejected
The disc has unplayable
formatted data.
Refer to the description about
MP3/WMA for playable sound data.
The CD-R/RWs that are
playable on other
devices are not playable
on this unit
The playability of some CDR/RWs may depend on the
combination of media,
recording software and
recorder used even if these
CD-R/RWs are playable on
other devices such as a PC.
Make CD-R/RWs in a different
combination of media, recording
software and recorder after referring
to the description about MP3/WMA.
Sound skipping or noise
There is a flaw or foreign
objects on the disc.
Remove the foreign objects, or use a
flawless disc
Sound skipping or noise
Playing VBR (Variable Bit
Rate) files may cause sound
skipping.
Play Non-VBR files.
Display Setting Problems
Problem
Possible Cause
The picture is dark. The picture is
whitish. Something is wrong with the
picture. The picture is light in color.
The screen is not
adjusted properly.
Possible Solution
Adjust the display through
the MENU option. See the
Adjusting the Display
section.
Sound Problems
Problem
Possible Cause
Possible Solutions
No sound from speaker
Cables are not connected
correctly.
Connect the cables correctly.
Left and right sounds are
reversed
The speakers are not
connected correctly.
Connect the speaker wires to the
correct speaker.
40
Appendix A: One Year Limited Warranty
This R5000 is warranted to be free from defects in material or workmanship for one year from the
date of purchase. During this period, Lectronix, Inc. will replace any R5000 that fail in normal use
where used in accordance with this users’ manual. This warranty does not cover failures due to
abuse, misuse, improper installation, accident, or unauthorized alteration or repairs. This
warranty does not extend to any add-on modules including the Garmin GVN 52 navigation
system or the Sirius Satellite Radio. This warranty is for replacement R5000 units only and does
not cover any cost of removal of the defective unit or installation of the replacement unit.
Replacement units may include rebuilt or refurbished components.
THE WARRANTIES AND REMEDIES CONTAINED HEREIN ARE EXCLUSIVE AND IN LIEU 0F
ALL OTHER STATUTORY, EXPRESS OR IMPLIED WARRANTIES, INCLUDING WITHOUT
LIMITATION, IMPLIED WARRANTIES OF MERCHANTABILITY AND FITNESS FOR A
PARTICULAR PURPOSE OR ANY WARRANTY REGARDING THE ACCURACY OF
INFORMATIONAL CONTENT INCLUDED OR DISPLAYED BY THE R5000. THIS WARRANTY
GIVES YOU SPECIFIC LEGAL RIGHTS, WHICH MAY VARY FROM STATE TO STATE.
IN NO EVENT SHALL LECTRONIX OR ITS LICENSORS OR ITS SUPPLIERS BE LIABLE FOR
ANY INCIDENTAL, SPECIAL, INDIRECT OR CONSEQUENTIAL DAMAGES, WHETHER
RESULTING FROM THE USE, MISUSE, OR INABILITY TO USE THE R5000 OR FROM ANY
DEFECTS IN THE PRODUCT. Some states do not allow the exclusion of incidental or
consequential damages, so the above limitations may not apply to you.
Lectronix retains the exclusive right to replace the R5000 or offer a full refund of the purchase
price at its sole discretion. SUCH REMEDY SHALL BE YOUR SOLE AND EXCLUSIVE
REMEDY FOR ANY BREACH OF WARRANTY.
To obtain warranty service, contact your dealer or alternatively contact Lectronix, Inc. at 1-888423-1183. A copy of the original sales receipt is required as the proof of purchase for warranty
services.
Lectronix, Inc.
5858 Enterprise Drive
Lansing, MI 48911
41
Appendix B: Service and Technical Support
There are no user serviceable components within the R5000. Service is provided by Authorized
Service providers only.
Contact Lectronix, Inc.
For help or service, contact Lectronix, Inc. at 1-888-423-1183.
When contacting Lectronix, please have the following system information on hand. To obtain the
system information:
1) Press the MENU button.
2) Use the LEFT or RIGHT arrow key to select the System Tab.
3) When finished, press the MENU button again
The system information screen appears as shown below:
R5000 System Information Screen
.
42
Appendix C: Software Notice
Software Notice
The product described in this manual includes copyrighted, patented, or patent pending Lectronix,
Inc. and third party software. Laws in the United States and other countries preserve for
Lectronix, Inc. and third party software providers certain exclusive rights, such as the rights to
distribute or reproduce the software. Accordingly, any protected software contained in the
product may not be modified, ported, reverse-engineered, distributed, or reproduced in any
manner. Furthermore, the purchase of the product shall not be deemed to grant either directly or
by implication, estoppel, or otherwise, any license under the copyrights, patents, or patent
applications of Lectronix, Inc. or third party software providers except for the normal, nonexclusive, royalty-free license to use the software that arises by operation of law in the sale of this
product.
Open Source Software
Lectronix uses open source software in the R5000. The open source software used is shown in
the following table.
Open Source Software Table
Package
Package
Version
Provided As
License
Type
ffmpeg
Latest
Revision
in Use
source
LGPL
id3lib
3.8.3
source
LGPL
u-boot
1.1.1
source
GPL
zlib
1.1.4
source
Custom
CD copies of the source code shown in the above table can be obtained by sending a check in
the amount of $10.00 payable to Lectronix, Inc to:
R5000 Open Source Software
Lectronix, Inc.
5858 Enterprise Drive
Lansing, Michigan 48911
Make sure you include your return address.
Your request will be processed within 8 to 12 weeks.
43
Appendix D: R5000 Technical Specifications
The specifications noted herein are subject to change without notice.
Rear Panel System Connections
NAVION R5000
PWR/SPEAKERS
Audio
Line Outs
TPMS Antenna
16Pin
Molex
CAMERA INPUTS
AM/FM
REAR
LEFT
RIGHT
NAV
Video
Out
SDAR
Vehicle Input
J1939
USB
20Pin
Molex
External Connections
External Connections
Audio Out:
Speakers
Line out
Video In: Aux Video
Video Out
Audio In: Aux Stereo (Two Rear and
one Front)
Camera Inputs: NTSC with
Microphone
Vehicle Inputs:
Accessory & Ignition
Turn Indicators
Reverse Transmission Input
Information Bus
IR Input: Remote Controller (Front)
Antenna: AM/FM Radio
Antenna TPMS
USB: Inputs (One Front, two back)
SDAR: Input
Four (4) amplified speaker outputs for cockpit
One (1) Stereo Pair
One (1) NTSC auxiliary composite video input.
One (1) NTSC auxiliary composite video output
Three (3) stereo aux line inputs. One for satellite radio
and one auxiliary on the rear of the unit or one for
MP3 players on the front panel.
Three (3) NTSC composite camera inputs with one (1)
microphone input for the rear camera
Input status for key accessory and ignition indications
Optional input signal for camera control
Optional input signal for camera control
J1939 CAN network interface to vehicle information
Input IR for system control via remote control
Connection for the vehicle AM/FM/WB radio antenna.
Connection for the Tire Pressure Monitoring antenna.
USB port Version 1.1 (Support for Mass Storage
interface)
Satellite Radio (SDAR) control and Audio inputs
44
Technical Performance Specifications
Power and Grounding
Automotive nominal 12 volt, negative ground
power.
AM Tuner
Frequency Range
Sensitivity
Mechanical Form Factor
Main Unit
Width
8”
Height
6”
Depth
6”
WB Tuner
Frequency Range
Environmental
Operating range:
Storage range:
530-1710 kHz
36.2 dBf
(17.7 uV/ 75 ohm)
162.4-162.55 MHz
Channel 1 to 7
Sensitivity (20 dB SNR) 19.2 dBf
(2.5 uV / 75 ohm)
– 10 to 55 °C
– 40 to 85 °C
Auxiliary Inputs
Inputs used for auxiliary expansion including
Satellite radio or Navigation
Cockpit Audio
Speakers
• Four outputs for front and rear
stereo, each output a separate BTL
amplifier
• Power output of 22W RMS minimum
per channel, into 4 Ohms, all
channels driven, at 1 KHz, with
14.4V and no more than 5% THD
• Peak Power 50W x 4
• Frequency response 20 to 22,000
Hz at rated power
• All outputs fully short-circuit
protected (supply, ground, or across
load)
Aux Stereo Audio
• Two (2) stereo audio input pairs
• Voltage 5.6 Vpp
Aux Video
• One (1) NTSC composite video
input
• Video input level 1 Vpp (75 ohms).
Equalizer
• Five (5) band parametric equalizer
• Preset equalizer curves
• Band adjustments +/-12 dB
Tone Controls
• Bass gain +/- 12 dB
• Tone gain +/- 12 dB
Radio Tuner
FM Tuner
Frequency Range
87.7-107.9 MHz
Sensitivity (20 dB SNR) 19.2 dBf
(2.5 uV/75 ohms)
SNR Mono
55.0 dB
SNR Stereo
48.0 dB
Stereo separation
40.0 dB
Distortion Stereo
0.9%
45
Auxiliary Outputs
File System Support
Outputs used for auxiliary expansion
including video monitor expansion and audio
to vehicle surround sound.
ISO9660 and Joliet CD file systems
Audio Digital Formats and Decode
Aux Stereo Audio
•
•
Digital audio decoders
•
•
•
One (1) stereo audio output pair
Voltage 2.8 Vpp
Aux Video
•
•
One (1) NTSC composite video
Output
Video Output level 1 Vpp (75 ohms).
Digital audio related formats
•
•
•
Camera Inputs
•
•
•
•
Three (3) NTSC Video
One (1) Mono microphone inputs
Video level 1 Vpp (75 ohms).
Camera Power 8.1V at 150 ma
Standard In-Dash Display
•
•
•
•
•
•
•
•
TFT LCD Flat Panel
Resolution: 480 x 234 pixels
Diagonal size: 7.0 inch
Luminance: 400 cd/m2
Response time: 50 msec
Contrast ratio: 150
Minimum lamp life: 10,000 hrs
Inverter dimming option
Optical Disc Media Formats
•
•
•
MP3 (32 to 320 kbps and VBR)
WMA (48 to 192 kbps)
Linear PCM 16-bit 44.1 KHz
(Standard audio CD)
CD-DA – Red Book
CD-R/RW – Orange Book (MP3)
CD-I, CD-ROM XA
46
ID3-Tag (v1 and v2)
Playlists
CD-Text
Appendix E: Tire Pressure Monitoring Option
The R5000 includes the RF receiver needed to monitor the tire pressure sensors. The setup,
control, and monitoring is all done from the R5000 LCD display.
Contact Lectronix, Inc. to purchase the optional Tire Pressure monitoring kit (see Appendix B for
contact information). The Tire Pressure monitoring kit includes the following:
•
•
•
Tire Pressure Sensors (mount to valve stem)
Coax wiring and antenna
Setup instructions
Tire Pressure Sensors
Sensor Specifications
Pressure Pro Sensor Specifications
Sensor Transmit Range
Over 100 ft. Line-of-Sight
Operating Frequency
433.92 MHz FM
Sensor Weight
Approx 2/3 oz.
Sensor Dimensions
1.011” High x 1.11” Diameter
Sensor Battery
Internal Non Rechargeable / Non Replaceable
Sensor Pressure Range
10 +/-1 psi to 150 +/- 5 psi
Sensor Low Voltage Shutdown
2.2 Volts
The tire pressure sensors comply with Part 15, Class B of the FCC rules. Any unauthorized
changes or modifications to the tire pressure sensors would void the user’s authority to operate
the devices.
47