1
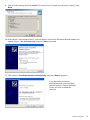
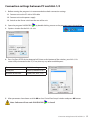
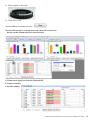
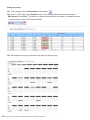
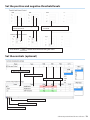
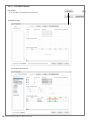
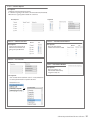
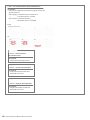
Medical–Biological
Research & Technologies
ALA-1/4, Multi Channel
Fluorometer Software Manual
Author:
Pavel Bankovsky
Riga, Latvia, 2012
All right reserved © Biosan Ltd.
Version: 2
Table of Contents
Getting Started:
•• Software Installation . . . . . . . . . . . . . . . . . . . . . . . . . . . . . . . . . . . page 1
•• Connection settings between PC and ALA-1/4 . . . . . . . . . . . . . . . . . . . page 5
•• Software Operation Manual: End-point analysis of PCR products (FEP) . . . page 7
•• Software Operation Manual: How to add a test . . . . . . . . . . . . . . . . . . page 12
Software Installation
1. Turn on ALA-1/4 and connect it to your computer
2. Open SetupFEP.exe
3. Chose the setup language
4. In the Setup Wizard click Next, to start installation
5. Read and accept the License Agreement
Software Installation
1
6. Enter the Username and Organization name
7. It is recommended to use default destination folder and click Next to see next window
8. Actual window offers to create a desktop icon. It is possible to refuse creating by removing tick
“Create a desktop icon”
2
Software Installation
9. Please, check settings and click Install. If it is necessary to change some previous settings, click
Back
10.After device is connected to the PC and switched on: Found New Hardware Wizard window will
appear. Chose “Yes, this time only”and press Next to proceed
11.Then choose “Install the software automatically” and press Next to proceed.
If you do not have internet
connection choose to install from
specific location. Choose the folder
where you have installed the
software.
Software Installation
3
12.Then choose “Yes, connect and search for software on the Internet” and click Next, to start
installation
13. Upon finishing driver installation press Finish
14.Run the program for the first time: If Windows firewall blocks
Fluorometer and NASBA DRV programs click unblock
15.If there are any problems during installation, then contact your system administrator
4
Software Installation
Connection settings between PC and ALA-1/4
1. Before running the program it is recommended to check connection settings
1.1 Connect unit to the PC with a USB cable
1.2 Connect unit to the power supply
1.3 Switch on the Power switch on the rear of the unit
2. Open the program NASBA DRV
by double clicking mouse on the program icon in the task bar.
3. Options window for the ALA 1/4 unit
4. Press Set Port, if FEP device detected will show on the bottom of the window, your ALA-1/4 is
successfully connected to the PC, if not, then try any other available ports.
Parameters
ALA-1/4 settings
Serial port
Virtual (COM from 3 to7)
Number of channels
4 (FAM, HEX, ROX, CY5)
5. After parameters have been set click OK to close “Serial Port Setup” window and press OK button
Note: Software will not work if NASBA DRV
is closed!
Connection settings between PC and ALA-1/4
5
Before measuring
1. After successful installation of software and driver, setting of connection of unit with computer
check connection with computer through USB cable.
2. Switch on the unit on the rear side of the unit. After switching on the display readouts are
following: ALA_1 V 4.0
Note: Before detection the unit must be warmed for 15 min after switching on.
Note: If the unit was not used for more than 7 days, it must be warmed for 8 hours.
3. Test measurement must be performed for reliable connection evaluation between unit and
computer. It can be performed with prearranged test measurement tubes, empty tubes, or even
with the empty rotor. It
4. Before the measurement read carefully point User’s manual, then set the measurement and sample
parameters according to the given instructions.
5. Check the Fluorometer status in the left lower part of the program window, the status
must be: Connected
If status is Not Connected — there are some problems in communication between PC and
external unit, see Software Installation (page 1).
6
Before measuring
Software Operation Manual: End-point analysis of PCR
products (FEP)
1. Turn on the ALA-1/4, check the connection between the computer and the ALA-1/4,
and launch “FEP” program
2. The Step 1 window: Setting Measurements parameters will appear
3. Chose New Run from the program list
4. Then select the rotor type
* Click *
Software Operation Manual: End-point analysis of PCR products (FEP)
7
5. Optionally you can set number of measurements (we advise to put at least 2)
6. After all the parameters are set click Next button to go to Step 2: Setting Samples
7. In the Step 2 “Samples window” fill in samples name, test and type.
Not Filled
Adding multiple samples:
Type in the Name or select Test field, press Add
button.
+
or
or
* Click *
* Click *
Adding a single sample
* Click *
By selecting and typing in sample’s name, selecting
the needed test and giving type of the sample (by
default type is “Sample“)
Deleting sample/multiple samples:
1. By holding down left mouse button and
moving it across the fields you want to select,
then pressing Delete button.
2. Pressing Discard All Setting button.
Note: this command will delete all added
samples information.
Filled
Note: In order to proceed to measurement step, at least one background sample must be set!
To save the protocol for future use press
and press OK.
8
enter the name
Software Operation Manual: End-point analysis of PCR products (FEP)
8. Place samples in the rotor
9. Close ALA-1/4 lid
10.Press Run to start measurement
Results will be ready in a couple of minutes (from 30 sec to 2 min):
Results can be viewed only after measurements
A. Fluorescence Signal on channels FAM and HEX
B. Progress window
C. Results window:
Software Operation Manual: End-point analysis of PCR products (FEP)
9
Saving the results:
10.1 In the program: press Save button in the toolbar
10.2 Save as a PDF report: press Report button in the Results Table control panel or choose
PDF report in the toolbar . The report can also be printed. When the button is clicked the report
is automatically saved in FEP/Protocols folder
10.3 Electrophoresis image: Scroll down the report to the last page
10 Software Operation Manual: End-point analysis of PCR products (FEP)
10.4 As Excel file: press Excel button in the Results table control panel or choose Excel report in the
toolbar and click Save.
Note: you must have Microsoft Excel to save the results
10.5 As a JPG image: press Picture button in “Relative fluorescence units” window for the required
channel and click Save.
11.After finishing using ALA-1/4 fluorometer clo se the software.
Software Operation Manual: End-point analysis of PCR products (FEP) 11
Software Operation Manual: How to add a test
1. Type in Test’s name
2. Press Add Button
Select the channels
1. Select channels
2. Select which channel is
for Internal Control
12 Software Operation Manual: How to add a test
3. Select the testing for
4. Type in any information
Set the positive and negative threshold levels
1. Set the Positive (T+) and Negative (T-)
Threshold values
Press Enter or
2. Set the value for Internal Control (IC)
threshold
button when finished entering the values
Set the controls (optional)
1. Type in the control name
2. Type in the control type
3. Select the result for control
Saves selected control
Deletes selected control
Adds new control
Software Operation Manual: How to add a test 13
Save the test
Press Save or OK buttons
Save your time
Press this button to make a template protocol of a selected test
Press this button to make to save
this template protocol for future
use
14 Software Operation Manual: How to add a test
3.4.1-f — Adding/Saving/Deleting a test
Description:
Commands for Adding/Saving/Deleting a test
Empty
Filled
3.4.1.2-f — Add new test button
3.4.1.1-f — Test name field
Description:
Button adds a new test with name
entered in 3.4.1.1-f — Test name field
Description:
Text field for naming tests or infections.
New Test was added
3.4.1.3-f — Delete test button
Description:
Button deletes selected test.
3.4.1.4-f — Save test changes button
3.4.1.4-f — Create Test Protocol
Description:
Button saves changes made to an existing test.
Description:
Button creates a template in Step 2 for a test
selected in Tests infections List.
3.4.2-f — Tests/Infections list
Description:
List of Tests/Infections available for testing.
Completed tests are indicated with Bold font
Not completed tests are indicated with regular font.
Not completed tests can be used as a test names for a MultiPlex test.
Software Operation Manual: How to add a test 15
3.4-f — Tests Editor Window
Description:
In this windows user Adds/Edits/Deletes Tests
Tests Database is empty
Tests database is filled with 6 tests.
16 Software Operation Manual: How to add a test
3.4.3-f — Channel Options
Description:
Setting the measurement channels.
If a channel is going to be used as Internal Control (if needed).
What illness is going to be tested on a channel.
Not completed
Completed
3.4.3.1-f — Channel Selection
Not set
Set
Description:
User sets the channels on
which measurements are
going to be performed
3.4.3.2-f — Internal Control Channel
Description:
User sets the internal
control channel if needed
Not set
Set
3.4.3.3-f — Test Selection
Not set
Set
3.4.4-f — Information Window
Description:
User can type in any
information about tests,
reagents used, etc.
Description:
User selects which test from 3.4.2-f — Tests/Infections
list to be performed on a specific channel
Software Operation Manual: How to add a test 17
3.4.4-f — Threshold and Internal Control Parameters
Description:
User sets the coefficients provided in reagents manual for
specific channels.
If the channel is used for Internal Control, then
1 threshold level is available.
If the channel is used for infections
2 threshold levels are available.
Not set
Set
3.4.4.1-f — Internal Control
Threshold level (IC)
Description:
Internal Control Threshold level
3.4.4.2-f — Positive Threshold value
Description:
Positive Threshold level for Two
Threshold levels’ tests
3.4.4.3-f — Negative Threshold value
Description:
Negative Threshold level for Two
Threshold levels’ tests
18 Software Operation Manual: How to add a test
3.4.5-f — Controls settings table
Description:
Adds controls supplied with parameters taken from reagent’s manual.
Empty Control’s table
Filled Control’s table
Default controls list
Default controls type
Entering a control
3.4.5.1-f — Control’s name field
3.4.5.2-f — Control’s type field
Description:
User sets the name of the standards
Description:
Enter the type of the standards via keyboard
Default table
Entering standard
3.4.5.3-f — Threshold value for controls for each channel
Description:
User sets the value for thresholds:
“+ / – “ values for 3.4.4.1-f — Internal Control Threshold level (IC) (page 18) (FAM in example above).
“pos/neg/eq/nd” values for 3.4.4.2-f — Positive Threshold value (page 18) (CY-5 in example above).
Controls with value “––– “means that value is not set or channel is not used.
Entering threshold value
Software Operation Manual: How to add a test 19