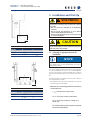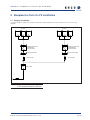
1
Instruction Manual • Operator • Authorized Installer blueplanet 6400xi blueplanet 7600xi For the operator For authorized electricians Operating Instructions Installation Instructions I n s tru c tio n s b e g in o n p a g e 17 blueplanet 6400xi / 7600xi 1 1.1 1.2 1.3 2 3 3.1 3.2 3.3 4 4.1 4.2 4.3 4.4 4.5 4.6 4.7 4.8 4.9 5 6 7 General Notes About This Documentation Retention of documents Symbols used in this document Name plate Safety Instructions and Regulations Notes on Installation and Operation Intended use Factory warranty and liability Service Operation Overview of controls and displays LED displays Keys “1” and “2” Level 1 menu – Display mode Level 2 menu – Configuration mode DC switch Night time start switch The RS485 interface Display Accessories Troubleshooting Recycling and Disposal blueplanet Operating and Installation Instructions 6400xi - 7600xi 4 4 4 4 4 5 5 5 6 6 6 6 7 7 8 9 10 10 10 10 13 14 16 Page 3 S e c tio n 1 · About This Documenta tion General Notes By purchasing an inverter from KACO new energy GmbH, you have opted for a reliable, high-performance technology and will profit from KACO new energy’s many years of experience in the field of current inverter technology and power electronics. The blueplanet 6400xi and 7600xi inverters are transformerless, robust, high-efficiency inverters. 1 About This Documentation The following notes guide you through all of the documentation. Additional documents are applicable in conjunction with these operating and installation instructions. We assume no liability for any damage caused by failure to observe these instructions. NOTICE ! CAUTION CAUTION indicates a hazardous situation which, if not avoided, could result in minor or moderate injury. NOTICE Failure to observe a warning indicated in this manner may lead to damage to property. NOTE Useful information and notes. Read the manual! We assume no liability for any damage caused by failure to observe these instructions. Other applicable documents Operators, please read any additional operation instructions which may have been included with the inverter. Installers, please refer to the installation manual and any instruction which may have been included with the inverter for information regarding installation of the inverter. 1.1 Retention of documents ACTION This symbol indicates that a certain action is required. IMPORTANT Failure to observe this information may result in reduced convenience or impaired functionality. Please pass these operating and installation instructions on to the installation operator. These documents must be stored near the installation and must be available at all times. Electrical voltage! 1.2 Symbols used in this document When operating the inverter, observe the safety instructions provided in these operating instructions. Risk of burns! ! DANGER DANGER indicates a hazardous situation which, if not avoided, will result in death or serious injury. ! Read the manual! 1.3 Name plate WARNING The name plate showing the exact designation of the unit is located on the left side of the housing. WARNING indicates a hazardous situation which, if not avoided, could result in death or serious injury. Page 4 blueplanet Operating and Installation Instructions 6400xi - 7600xi Sec tio n 2 · S a fety Instructions a nd R eg ulat ions Sec tio n 3 · Note s on Insta lla tion and O p er at ion 2 Safety Instructions and Regulations ! DANGER – Danger due to lethal voltages. – Lethal voltages are present within the unit and on the power supply lines. Therefore, only authorized electricians may install and open the unit. – Even when the unit is disconnected, high contact voltages may still be present within the unit. Accident prevention regulations The inverter must be installed by an authorized electrician who is responsible for observing existing standards and regulations. The proper and safe operation of this unit requires proper transportation, storage, assembly and installation, as well as careful operation and maintenance. The inverter may only be operated by persons who have read and understood the operating instructions. Modifications It is generally not permitted to make changes to the inverter. Always consult an authorized electrician for modifications to the installation of the inverter, as they are qualified to undertake such work. ! CAUTION Risk of damage due to improper modifications. Never modify or manipulate the inverter or other components of the installation. Transportation The inverter is subjected to extensive testing and inspections in our test field. This is how we ensure the high quality of our products. Our inverters leave our factory in proper electrical and mechanical condition. Special packaging ensures safe and careful transportation. However, transport damage may still occur. The shipping company is responsible in such cases. Thoroughly inspect the inverter upon delivery. Immediately notify the responsible shipping company if you discover any damage to the packaging which indicates that the inverter may have been damaged or if you discover any visible damage to the inverter. If necessary, your solar installer or KACO new energy GmbH will assist you. Damage reports must be received by the shipping company in writing within six days of receipt of the goods. When transporting the inverter, the original or equivalent packaging is to be used, as this ensures safe transport. blueplanet Operating and Installation Instructions 6400xi - 7600xi NOTE FCC Compliance NOTE: This equipment has been tested and found to comply with the limits for a Class B digital device, pursuant to part 15 of the FCC Rules. These limits are designed to provide reasonable protection against harmful interference in a residential installation. This equipment generates, uses and can radiate radio frequency energy and, if not installed and used in accordance with the instructions, may cause harmful interference to radio communications. However, there is no guarantee that interference will not occur in a particular installation. If this equipment does cause harmful interference to radio or television reception, which can be determined by turning the equipment off and on, the user is encouraged to try to correct the interference by one or more of the following measures: – Reorient or relocate the receiving antenna. – Increase the separation between the equipment and receiver. – Connect the equipment into an outlet on a circuit different from that to which the receiver is connected. – Consult the dealer or an experienced radio/TV technician for help. IMPORTANT Limitation of flicker: The inverter shall not create objectionable flicker for other customers on the area. Flicker is considered objectionable when it either causes a modulation of the light level of lamps sufficient to be irritating to humans, or causes equipment misoperation. 3 Notes on Installation and Operation 3.1 Intended use The unit converts the DC voltage generated by the photovoltaic (PV) modules into AC voltage and feeds this into the utility grid. blueplanet inverters are built according to all required safety rules. Nevertheless, improper use may cause lethal hazards for the operator or third parties, or may result in damage to the units and other property. The inverter may only be operated with a permanent connection to the public power grid. The inverter is not intended for mobile use. Any other or additional use is not considered the intended use. The manufacturer/supplier is not liable for damage caused by such unintended use. Damage caused by such unintended use is at the sole risk of the operator. Intended use also includes adherence to the operating and installation instructions. Your authorized electrician undertakes the registration with your power supply company and obtains approval for your photovoltaic installation from the supply grid operator on your behalf. Some of the documents that you require in order to register your photovoltaic installation and have it approved are included in the installation instructions. Page 5 S e c tio n 3 · Notes on Insta lla tion a nd Op er at ion S e c tio n 4 · Ope ra tion 3.2 Factory warranty and liability KACO new energy GmbH issues a warranty of ten years or 120 months on the blueplanet inverter starting from the date of installation, but at most 130 months after shipment by KACO new energy GmbH. During this time, KACO new energy GmbH guarantees the proper function of the units and to undertake repairs at the factory free of charge in the event of a defect for which we are responsible. Contact your specialty dealer or installer if your unit exhibits a defect or fault during the warranty period. Warranty claims are excluded in the following cases: – Use of the units in ways not intended – Improper installation and installation that does not comply with standards – Improper operation – Operation of units with defective protective equipment – Unauthorized modifications to the units or repair attempts – Influence of foreign objects and force majeure (lightning, overvoltage, severe weather, fire) – Insufficient ventilation of the unit – Failure to observe the relevant safety regulations – Transport damage ! CAUTION Incorrect use is prohibited. 4 Operation The grid-feed process begins in the morning if sufficient insolation is available, and, therefore, if a certain minimum voltage is present in the inverter. If, as nightfall approaches, the voltage drops below the minimum voltage value, grid-feed mode ends and the inverter switches off. 4.1 Overview of controls and displays All warranty claims must be handled at the premises of KACO new energy GmbH. The unit must, where possible, be returned in its original or equivalent packaging. The costs for these services cannot be borne by KACO new energy GmbH. KACO new energy GmbH will perform warranty services only if the defective unit is returned to KACO new energy GmbH together with a copy of the invoice which was issued to the user by the dealer and the completed warranty card. The name plate on the unit must be fully legible. If these requirements are not fulfilled, KACO new energy GmbH reserves the right to deny warranty services. The warranty period for repairs or replacement deliveries is six months after delivery. However, it continues at least until the end of the original warranty period for the delivery item. 3.3 Service We place special emphasis on the quality and longevity of our inverters, starting with the product development phase. More than 60 years of experience in the field of power conversion device manufacturing support our philosophy. 1 2 3 4 5 Figure 4.1: Overview blueplanet Legend 1 LED displays Displays of the operating state 2 Display See measured values and configuration parameters 3 Control keys Switch between displays and configuration of parameters 4 DC switch Disconnects DC power from the inverter 5 Night time start switch For activating the display after nightfall However, despite all quality assurance measures, faults may occur in exceptional cases. In such cases, KACO new energy GmbH will provide you with the maximum possible support. KACO new energy GmbH will make every effort to remedy such faults in an expeditious manner and without a great deal of bureaucracy. Contact our service department directly by telephone at + 1 866 522 6765 Page 6 blueplanet Operating and Installation Instructions 6400xi - 7600xi Sec tio n 4 · Ope ra tion 4.2 LED displays 4.3 Keys “1” and “2” The inverter is equipped with three LEDs that give information about the various operating statuses as follows: ok 1 2 ! 3 Figure 4.3: blueplanet control keys Figure 4.2: LED displays LED (1) (green): The LED begins to light up when the minimum voltage from a photovoltaic array is present and goes out again if the array voltage is lower than the minimum operating voltage. The LED signals that the inverter is in stand-by mode. If it is illuminated the inverter is ready for operation or is currently operating. LED (2) (green): The LED is lit when the inverter is feeding into the grid. LED (3) (red): The LED indicates that the grid-feed was stopped due to a fault. Key “1” is used to switch between the various displays for measured values and data. You use key “2” to configure settings. Here, menu navigation is divided into two levels. In level 1 (display mode), measured values such as the solar generator voltage can be read. Here, only key “1” is activated. In level 2 (configuration mode), key “1” is used to navigate through the individual displays and settings. ACTION By pressing key “1” you can choose which measured value is to be displayed. The menus are continuous, which means that when you arrive at the last entry in a menu, the first entry is displayed again the next time key “1” is pressed (see Figure 4.4). Wait approx. 10 mins. to see if the fault is temporary. If this is not the case, notify your authorized electrician. IMPORTANT If there is a power failure on the public grid, LED (3) does not light up. If this happens, all LEDs and the display go out. The inverter is shut down completely. The inverter can only resume its normal operation when the public utility grid is available again. Check whether the fault in question relates to a general power failure or whether the circuit breaker between the utility service and the inverter has tripped. If the circuit breaker has tripped, notify your authorized technician. If there was a power failure, simply wait until the fault has been cleared. The system automatically re-starts. blueplanet Operating and Installation Instructions 6400xi - 7600xi Page 7 S ectio n 4 · Ope ra tion 4.4 Level 1 menu – Display mode Explanation of the individual menu items: The display menu is shown once the blueplanet inverter starts up. Measured values and all of the counters are displayed here. Key “1” is used to navigate through the individual menu items. Display of inverter type Inverter type - blueplanet 6400xi/7600xi display Generator voltage and current The current voltage and current of the PV solar generator that is connected to the inverter. Display of inverter type Generator voltage and current Grid voltage, current and power Daily peak capacity Grid voltage, current and power The current line voltage, line current, and the power that is currently being fed into the power grid. Daily peak capacity The respective day’s peak power that was fed into the grid for a short time. Temperature inside unit Displays the current heat sink temperature. If the unit becomes too hot, the unit will reduct power output or switch off. Temperature inside unit Counter yield Counter yield This counter totals all yields until it is reset. The customer can configure the time periods for this counter, e.g. as a monthly counter. The counter can be cleared in configuration mode “Clear yield”. Yield today Total yield (Total) economy of CO2 Yield today The power that has been fed into the grid during the current day. This value resets to zero each morning. Total yield The power that has been fed into the grid since installation of the inverter. The initial value can be set in configuration mode. Counter oper. hours Operating hours today Total operating hours Figure 4.4: Display mode menu (Total) economy of CO2 Shows the CO2 savings of this PV installation compared to the German electricity mix. The CO2 savings are calculated from the total yield counter and can also be cleared with this counter. Counter oper. hours This counter totals all yields until it is reset again. The customer can configure the time periods for this counter, e.g. as a monthly counter. It can be cleared in configuration mode “Clear yield”. Operating hours today Today’s hours of operation. As soon as the inverter is in standby mode (i.e. when LED (1) lights up), the running time is added up. Total operating hours The hours of operation since installation of the inverter. As soon as the inverter is in stand-by mode (i.e. when LED (1) lights up), the running time is added up. Page 8 blueplanet Operating and Installation Instructions 6400xi - 7600xi Sec tio n 4 · Opera tion 4.5 Level 2 menu – Configuration mode ACTION To access configuration mode, press both keys at the same time. The software version display appears. Pressing key “1” now switches to the next menu item and changes can be made in the respective menu item by pressing key “2”. The setting value increases each time key “2” is pressed. If the maximum value has been reached, the value returns to the minimum setting choice. Explanation of the individual menu items: Software version The current software version is displayed here. Configuration version: The current configuration version is displayed here. Serial number Display of the serial number specific to the unit. Current country Display of the current country settings. Language selection The language of the display interface can be selected here. Software version Configuration version Serial number Current country Language selection Clear the grid-feed counter Define the initial value of the total yield (Yes/no) No Yes Enter the initial value of the total yield Settings of the RS485 address S0 interface Power Boost Quick start Figure 4.5: Configuration mode menu blueplanet Operating and Installation Instructions 6400xi - 7600xi Clear the grid-feed counter When you clear the grid-feed counter, all counters (Counter yield and Counter oper. hours) are reset to zero. To clear the counters, select “Yes” with key “2”, and confirm your selection by pressing the “1” key. The required code is “2” and is entered using key “2”. By means of an additional confirmation with key “1”, all counter are cleared. The display “Grid-feed counter cleared!” confirms that the counters have been cleared. “Counter yield” and “Counter oper. hours” can be cleared separately from the other counters. These counters are cleared in the configuration menu using key 2 and the code 2. ”Counter yield” and “Counter oper. hours” are always cleared together. Define the initial value of the total yield Use this menu setting to define or reset the intial value of the total yield of the inverter. Settings of the RS485 address You can reach the address setting by pressing key “1”. By pressing key “2”, the address can be set in a consecutive manner from 1 to 32. The address then jumps back to 1. The RS485 interface is used to communicate with the KACO proLOG, watchDOG or other monitor. If several inverters are connected to a KACO proLOG, watchDOG or other monitor each address may only be used once. It is possible to monitor 32 blueplanet inverters with one KACO proLOG. To connect the RS485 interface, please contact your installer. S0 interface pulse rate The S0 interface is designed as a galvanically isolated transistor output. This interface is designed according to “DIN 43864 – Current interface for transmitting pulses from a pulsing meter to a tariff metering device”. The S0 interface pulse rate can be chosen in three unit intervals: 500, 1,000 and 2,000 pulses/kWh. To connect the S0 interface, please contact your installer. Page 9 S ectio n 4 · Ope ra tion Power Boost The power boost mode can be activated to increase the efficiency of the unit. The operating frequency of he inverter changes to 9 kHz. NOTE The operating frequency of 9 kHz causes a noise emmision of the inverter. It is only useful where the noise emmision are acceptable. You can now scroll through the menu and retrieve the saved values. If over one minute elapses without a key being pressed, the unit switches off automatically once again. The “Counter oper. hours “, “Total operating hours”, “Counter yield”, and “Total yield” data are permanently saved and totaled. This data remains in memory even if the inverter is switched off for a long time. The daily yield, daily hours of operation and the max. daily grid-feed power are available until the following morning and are cleared when PV generator voltage is present again. 4.8 The RS485 interface ACTION Settings are saved only upon exiting configuration mode. If 2 minutes elapse without a key being pressed, the configuration mode is automatically exited. The configuration mode can also be immediately exited by pressing both keys. As a confirmation, “Settings saved” appears on the display. The settings are now permanently saved in the blueplanet inverter. Quick start The inverter can also be started up without any waiting period for the purpose of testing or for the purpose of acceptance by your power supply company. If the inverter is already feeding into the grid, this menu item is not available. If there is insufficient solar generator power, the inverter stops feeding into the grid after a short period of time. Blueplanet inverters are also equipped with an RS485 interface in order to enable remote monitoring of your photovoltaic installation. Several inverters can be monitored over this interface at the same time. Using the KACO proLOG, watchDOG or other monitoring device you can receive yield and operating data as well as error messages by SMS (text message) or e-mail. These monitoring options are especially recommended for situations where you are unable to check the functionality of the installation on-site at regular intervals, e.g. if you live far away from the installation site. Contact your installer if you wish to integrate remote monitoring into your system. 4.9 Display Inverters in the blueplanet series are equipped with a back-lit LCD (see figure 4.1 – (1) which displays measured values and data. In normal mode, the backlighting is switched off. As soon as you press one of the keys, the backlighting is activated. If approx. 1 minute elapses without a key being pressed, it switches off once again. 4.6 DC switch The inverters include a connection box with an internal DC disconnect switch, which allows for the inverter to be disconnected from the photovoltaic generator and removed for service. To disconnect the inverter from the photovoltaic generator, turn the internal DC disconnect switch on the right side of the connection box from the ON (1) position to the OFF (0) position (see Fig. 4.1). The ON (1) position is pointing up and the OFF (0) position is pointing toward the front. The AC power grid must be disconnected external to this enclosure. 4.7 Night time start switch The unit switches off in the evening as nightfall approaches. The display is no longer shown. In order to retrieve the values from the current day (daily yield, daily hours of operation and max. grid-feed power) after the display switches off, the unit can be activated during the night by pressing the start switch on the right side of the connection box. ACTION NOTE Calculating efficiency by measuring the current and voltage values leads to unusable results due to the tolerances of the measuring devices. The sole purpose of these values is to monitor the basic operation of the system. IMPORTANT Due to measuring tolerances, the measured values may not always correspond to the actual values. The inverter’s measuring elements have been selected to ensure maximum solar yields. Due to these tolerances, the daily yields displayed on the inverter may deviate from the values on your supply grid operator’s grid-feed counter by up to 15 %. At low power operation the sensors within the unit are not as accurate as when at higher power therefore long term operation may cause this high deviation. Under normal operating conditions this deviation is minimal. To do this, press the “5” switch (see Figure 4.1 – (5)) on the right side of the connection box for approx. 5 seconds until a display appears. Page 10 blueplanet Operating and Installation Instructions 6400xi - 7600xi Sec tio n 4 · Opera tion Operating States Status Explanation Comment 0 Inverter has just switched on Only for a brief period after being first switched on in the morning. 1 Waiting to start Grid parameters and generator voltage are checked. 2 Waiting to switch off Insufficient generator voltage and generator power. The status before it switches over to night shutdown mode. 3 Constant voltage regulator The inverter continues to operate with minimum MPP voltage when the grid-feed power is low. 4 Grid-feed mode The inverter is feeding into the grid. 8 Self test The line relay and the shutdown of the power electronics are tested prior to the commencement of grid-feed mode. 9 Test mode For internal operation only. 11 Power limitation If the generator is producing too much power, the inverter limits to the max. power. This can occur in the midday hours if the generator has been too largely dimensioned. This is not a malfunction. 57 Waiting time after a fault After a fault, the inverter waits a defined country-specific amount of time before it switches on (Installation Instructions, section 4, Technical Data). 60 PV voltage is too high for feeding into Protective function of the inverter. The inverter can only begin feeding into the the grid grid once the PV voltage falls below a specified value. The PV voltage is below the maximum permissible no-load voltage, this status is not an error. 62 Standalone mode The inverter was switched to standalone mode by the blueplanet Grid-Save. function. The inverter is disconnected from the public utility grid. The power indicator percentage refers to the maximum AC power. 64 Output current limit The AC current is limited once the specified maximum value has been reached. Table 4.1: Explanation of the operating states Fault signals When these error messages are displayed, the grid-feed is interrupted, the red LED (3) lights up, and the fault signal relay has switched. This error correction takes a country-specific length of time (see Installation Instructions, section 3, Technical Data). Afterwards the red fault LED (3) goes out, the fault signal relay drops out again, and the display signals that it is ready to feed into the grid once again. Once the fault is gone, the blueplanet inverter feeds in again. Many of these fault signals point to a fault in the grid, and are, therefore, not an operational fault on the part of the blueplanet inverter. The minimum triggering levels are determined by applicable standards (e.g. VDE0126-1-1 or UL 1741), and the inverter must switch off if the permitted values are exceeded. blueplanet Operating and Installation Instructions 6400xi - 7600xi Page 11 S e c tio n 4 · Ope ra tion Status Display Explanation 10 Temperature too high inside The temperature in the unit has become too high (> 176 °F). When the internal reaches 158 °F, the inverter limits the power. An internal temperature of 176 °F is only reached if convection cooling is impeded by external factors, e.g. by covering the cooling fins. 18 Error current switch-off An error current was detected by the RCD module. Notify your authorized electrican. 19 Error isolation Generator The insolation resistance of the PV+/PV- to ground is too low. Notify your authorized electrican, 30 Error Measurement The current and voltage measurements in the inverter are not plausible. This can be caused by very dynamic weather conditions if there are quick changes between low grid-feed power (e.g. 200 W) and high grid-feed power (e.g. the maximum grid-feed power). 31 Error RCD module An error was detected on the RCD module. 32 Error Selftest The internal grid separation relay test has failed. If this internal error occurs several times, notify your authorized electrician. 33 Error DC-gridfeeding The DC feed into the grid has exceeded the permitted limit value. This gridfeed can be impressed from the grid on the blueplanet inverter so that no inverter fault exists. If this error occurs several times, notify your authorized electrician. 34 Error Communication A communication error has occurred in the internal data transmission. If this error occurs several times, notify the service department. 35 Protection shutdown Protection shutdown of the software (AC overvoltage, AC overcurrent, DC link overvoltage). This is not an error, but instead a grid-related shutdown. 36 Protection shutdown HW Protection shutdown of the hardware (AC overvoltage, AC overcurrent, DC link overvoltage). This is not an error, but instead a grid-related shutdown. 38 Failure PV-Overvoltage The voltage of the PV generator is too high. The solar generator is wrongly dimensioned. Notify your authorized electrician. 41 Line failure Undervoltage The voltage of the grid-feed phase is too low. The grid cannot be fed into. This error can be grid-related. 42 Line failure Overvoltage The voltage of the grid-feed phase is too high. The grid cannot be fed into. This error can be grid-related. 48 Line failure Underfrequency The line frequency is too low. This error can be grid-related. 49 Line failure Overfrequency The line frequency is too high. This error can be grid-related. 51 Line failure overvoltage L1 Phase voltage L1 is above the set maximum phase voltage. 52 Line failure undervoltage L1 Phase voltage L1 is below the set maximum phase voltage. 53 Line failure overvoltage L2 Phase voltage L2 is above the set maximum phase voltage. 54 Line failure undervoltage L2 Phase voltage L2 is below the set maximum phase voltage. 55 Error DC link The voltage at the DC link is too high, or the DC link cannot be charged (IGBT damage). 57 Waiting for reactivation Waiting for reactivation after an error. 58 Overtemperature controlling unit The temperature is too high. To avoid damage, the grid-feed was stopped. Provide for sufficient ventilation. 59 Error self test An error occurred during the buffer inspection. Internal error EPROM An error occurred in the EPROM. No parameters Error, no parameters. Table 4.2: Fault signals Page 12 blueplanet Operating and Installation Instructions 6400xi - 7600xi Sec tio n 5 · Accessories 5 Accessories KACO offers its customers a comprehensive range of helpful accessories. The array of products includes monitoring, display, visualisation and data transmission equipment of the highest quality. KACO-proLOG Are you looking for professional monitoring and data logging equipment? The KACO-proLOG is the high-end solution for your PV installation. Error messages by SMS (text message), fax or e-mail, remote access to the installation, the presentation of the PV installation on the Internet and much more are no problem whatsoever for the KACO-proLOG. Up to 32 inverters can be connected to the KACO-proLOG via the RS485 interface. KACO-watchDOG The KACO-watchDOG card is the integrated communication option from KACO for monitoring your PV installation. Up to three inverters can be monitored with one affordable card. The KACO-watchDOG can be installed inside the blueplanet inverter in a few easy steps. For more about the functions and installation of the KACO-watchDOG and KACO-proLOG please visit www.kacosolar.com where you may download the installation manuals for all KACO products. You can access your PV data at: www.kaco-newenergy.com/blueplanetweblogin.php Figure 5.2: KACO-watchDOG Figure 5.1: KACO-proLOG blueplanet Operating and Installation Instructions 6400xi - 7600xi Information about additional accessories can be found in our general catalogue, price list and website. Page 13 S e c tio n 6 · Tr ouble shooting 6 Troubleshooting In line with our continuously expanding quality assurance system, we endeavor to eliminate all errors and faults. You have purchased a product which left our factory in proper condition. Each individual unit has successfully passed an endurance test as well as extensive tests for the purpose of assessing the operating behavior and the protective equipment. If your photovoltaic installation does not function properly despite these measures, we suggest the following troubleshooting procedures: The first step is to monitor the inverter closely and, where applicable, make a note of the displays and LEDs. The next step is to contact your installer and explain the problem encountered. The following faults may occur and should be remedied as described. Error Cause of error Troubleshooting/Explanation Inverter displays an impossible daily peak value. Faults in the line voltage. The inverter continues to operate as normal without losses to the yield, even when an erroneous daily peak value is displayed. The value is reset overnight. To immediately reset the value, the inverter must be switched off and switched on again by using the DC/AC switch in the connection box. Daily energy yields do not correspond with the yields on the energy supply company’s gridfeed counter. Tolerances of the measuring elements in the inverter. The measuring sensors of the inverter have been selected to ensure maximum solar yields. Due to these tolerances, the daily yields displayed on the inverter may deviate from the values on your supply grid operator’s grid-feed counter by up to 15 %, especially if operating at very low power for extended periods of time. (see section 4.9) The display is blank and the LEDs are not lighting up. – The unit is in night shutdown mode. – There is no AC line voltage. – The solar generator voltage is too low. – DC/AC switch is OFF (0). The inverter switches to night shutdown mode as soon as the solar generator voltage is below the minimum grid-feed voltage for a longer period of time. In this case, the display will also switch off. In order to still be able to view the currently measured values, you can switch on the inverter via the night start-up key. A grid failure will also cause the display to go blank and the gridfeed to stop. Wait until the public utility grid is available again. Also check to see if the DC/AC switch is OFF (0) and if so, switch it to ON (1). If the display does not light up during normal daytime hours, please contact your solar installer. The inverter is active but does not feed into the grid. – Insufficient generator voltage available. – The line voltage or the solar generator voltage is not stable. After sunrise, at sunset and when there is not enough solar insolation due to bad weather conditions or due to the solar modules being covered with snow, the generator voltage or the generator power that comes from the roof may be too low to be able to feed in. Before the grid-feed process begins, the inverter has to check the line parameters for a certain period of time. The length of the switch-on time differs by country according to applicable standards and regulations and can take several minutes. The inverter is active but does not feed into the grid. The insolation is sufficient. The inverter has interrupted the grid-feed due to a fault. After an interruption of the grid-feed due to a fault (line failure, overtemperature, overload, etc.), the inverter checks the line parameters for certain period of time. The length of time it takes to switch back on again differs by country according to applicable standards and regulations and can take several minutes. With faulty grids, interruptions can occur during the day. Notify your solar installer if the inverter shuts down regularly over a period of several weeks (more than 10 times per day). For an explanation of the individual display error texts, please see the fault signals. Page 14 blueplanet Operating and Installation Instructions 6400xi - 7600xi Sec tio n 6 · T roubleshooting Error Cause of error Troubleshooting/Explanation The inverter stops Faulty grid separation relay Although there is sufficient sunlight, the inverter feeds into the supplying power to in the inverter. grid only for a few seconds before switching off again. During the the grid shortly after short grid-feed period, the inverter shows that the power being being switched on, even fed into the grid is between 0 and 5 W. If the inverter is definitely though there is sufficient receiving sufficient generator power, the grid separation relay is sunlight. presumably faulty, thus preventing the inverter from connecting. Please contact your solar installer. The line fuse trips. The line fuse capacity is too low. Damage to the inverter’s hardware. In cases of high insolation, the inverter can – depending on the solar generator – exceed its rated current for a short period. For this reason, the capacity of the inverter’s pre-fuse should be somewhat higher than the maximum grid-feed current. If the line fuse immediately trips when the inverter switches to gridfeed mode (after the start-up period is complete), the inverter’s hardware is probably damaged. Contact your solar installer. Noise emission from the inverter. Particular ambient conditions. Power boost mode is active. When there are certain ambient conditions, the units may emit audible noises. The following causes may be determining factors in this regard: – Line interference or line failure caused by particular loads (motors, machines, etc.) which are either connected to the same point on the grid or located in the vicinity of the inverter. – In cases of dynamic weather conditions (frequent switching between sunny and cloudy conditions) or strong solar insolation, a light hum may be audible due to the high output. – With particular grid conditions, resonances may form between the unit’s input filter and the grid, which may be audible even when the inverter is switched off. – People with very sensitive hearing (particularly children) may be able to hear the high-frequency hum caused by the inverter’s operating frequency of approx. 17 kHz. Such noise emissions do not affect the operation of the inverter. Nor can they lead to loss of efficiency, failure, damage or to a shortening of the unit’s service life. When the power boost mode is activated, the operating frequency of the inverter changes to 9 kHz. The operating frequency of 9 kHz causes a noise emission from the inverter. In spite of high insolation, the inverter does not feed in the maximum power into low-voltage grid. Unit is too hot and the power is reduced. The temperature inside the unit became too high. The inverter reduced the power to prevent damage to the unit. Above an internal temperature of 158 °F, the inverter limits the power and levels off at a temperature between 158 °F and 176 °F. An internal temperature of 185 °C is only reached if convection cooling is impeded by external factors, e. g. by covering the cooling fins. Provide for sufficient cooling of the unit. Table 6.1: Troubleshooting If the measures described in this guide do not assist in clearing the fault, please notify your installer. In order for our factory customer service department to respond in an appropriate and expeditious manner, some details are imperative: Details pertaining to the inverter – The unit’s serial number – Model – A short description of the error – Is the error reproducible? If yes, how? – Does the error occur sporadically? – Describe the prevailing insolation conditions when the error occurred? – Time of day blueplanet Operating and Installation Instructions 6400xi - 7600xi Details pertaining to the photovoltaic module – Module type, manufacturer (if available, also send the data sheet) – The number of modules in series – The number of strings – Generator power Page 15 S e c tio n 7 · Re cycling a nd Disposa l 7 Recycling and Disposal For the most part, both the inverter and the corresponding transport packaging are made from recyclable materials. KACO does it’s best to ensure our vendors follow a low carbon manufacturing process as we do ourselves. It is not always possible but if you have questions about our products or the components in our products don’t hesitate to call +1 (866) 522-6765 and ask. Device Do not dispose of faulty inverters or accessories together with household waste. Ensure that the old unit and, where applicable, any accessories are disposed of in a proper manner. Most areas have public electronic waste disposal and/or recycling plants. Feel free to contact KACO at +1 (866) 522-6765 to request information about e-waste recycling in your area. Packaging Ensure that the transport packaging is recycled. Page 16 blueplanet Operating and Installation Instructions 6400xi - 7600xi For authorized electricians Installation Instructions 1 1.1 1.2 1.3 2 3 4 4.1 4.2 4.3 4.4 4.5 5 5.1 5.2 5.3 5.4 (A) (B) 5.5 5.6 (A) 5.7 (A) (B) (C) (D) 5.8 5.9 5.10 5.11 5.12 6 7 7.1 7.2 8 8.1 8.2 9 10 10.1 10.2 About This Documentation Retention of documents Symbols used in this document Name plate Safety Instructions and Regulations Technical Data Unit Description Included in box Designing the PV array Protection concepts Dimensions and weights Inverter knockout dimensioning Installation and Start-Up Selecting an appropriate place for installation Installing the inverter Connection box with DC disconnect Grounding the inverter Grounding single inverters: Grounding multiple inverters: Connecting to the Public Grid Electrical connection Grid Connection Interfaces Connecting the fault signal relay Connecting the S0 output The RS485 interface connection SYM-bus connection: Starting up the inverter Parameter programming Limiting during asymmetric supply The communications connection between the inverters SYM bus test Two-Stage Shutdown in Accordance with IEEE (standard values for < 30 kW) Maintenance Cleaning the fan Removing the fan blueplanet as Part of a PV Installation Design of installation Installation with multiple inverters on a three phase system Troubleshooting Certificate US 72110280 01 US 72110280 02 blueplanet Operating and Installation Instructions 6400xi - 7600xi 18 18 18 18 19 20 23 23 23 23 24 24 25 25 26 28 29 29 30 31 32 32 33 34 34 34 34 35 35 37 37 37 38 39 39 39 41 41 43 44 45 45 46 Page 17 S e c tio n 1 · About This Documenta tion 1 About This Documentation The following notes guide you through all of the documentation. Additional documents are applicable in conjunction with these operating and installation instructions. NOTICE Failure to observe a warning indicated in this manner may lead to damage to property. NOTICE Read the manual! We assume no liability for any damage caused by failure to observe these instructions. Other applicable documents When installing the inverters, be sure to observe all assembly and installation instructions for components and other parts of the installation. These instructions are delivered together with the respective components and additional parts of the installation. Please refer to the installation manual and any instructions which may have been included with the inverter for information regarding installation of the inverter. 1.1 Retention of documents Please pass these operating and installation instructions on to the installation operator. The installation operator retains the documents. The instructions must be available whenever they are needed. NOTE Useful information and notes. ACTION This symbol indicates that a certain action is required. IMPORTANT Failure to observe this information may result in reduced convenience or impaired functionality. Electrical voltage! 1.2 Symbols used in this document When installing the inverter, observe the safety instructions included in these installation instructions. ! DANGER DANGER indicates a hazardous situation which, if not avoided, will result in death or serious injury. ! WARNING WARNING indicates a hazardous situation which, if not avoided, could result in death or serious injury. ! Risk of fire or explosion! Risk of burns! Read the manual! Switch off the power! 1.3 Name plate The name plate showing the exact designation of the unit is located on the left side of the housing. CAUTION CAUTION indicates a hazardous situation which, if not avoided, could result in minor or moderate injury. Page 18 blueplanet Operating and Installation Instructions 6400xi - 7600xi Sec tio n 2 · S a fety Instructions a nd R eg ulat ions 2 Safety Instructions and Regulations ! DANGER – Danger due to lethal voltages. – Lethal voltages are present within the unit and on the power supply lines. Therefore, only authorized electricians may install and open the unit. – Even when the unit is disconnected, high contact voltages may still be present within the unit. ! WARNING These servicing instructions are for use by qualified personnel only. To reduce the risk of electric shock, do not perform any servicing other than that specified in the operating instructions unless you are qualified to do so. Standards and regulations Electrical conformity according to U.S., Canadian and international safety operating standards and code requirements: – UL 1741-1:1999 Rev. May 2007 – CSA 22.2 No. 107-1:2001 Rev 2006 – IEEE Std. 1547-2003 – IEEE Std. 1547.1-2005 – FCC Part 15 Class B – NEC Sections 690 (ANSI/NFPA 70) – Directive concerning Electromagnetic Compatibility with Class B (Council Directive 2004/108/EC) – Low Voltage Directive (Council Directive 2006/95/EC) The blueplanet inverter has complete on-board overcurrent, over-temperature and anti-islanding protection. Technical rules The installation must be suited to the on-site conditions and comply with local regulations and technical rules. This symbol designates the Equipment Grounding Conductor Accident prevention regulations The inverter must be installed by a licensed and authorizedelectrician. The electrician is responsible for observing existing standards and regulations. Only authorized electricians who have read and fully understood all of the safety instructions contained in these operating and installation instructions, as well as other instructions concerning assembly, operation and maintenance, may work on this unit. When this unit is operating, certain parts of the unit unavoidably carry hazardous voltages, which can lead to death or serious bodily injury. The precautions listed below must be followed in order to minimise the risk of death or injury. – The unit must be installed in compliance with safety regulations, as well as all other relevant national or local regulations. To ensure operational safety, proper grounding, conductor dimensioning and appropriate protection against short circuiting must be provided. – Keep all covers on the unit closed during operation. – Prior to performing any visual inspections or maintenance, ensure that the power supply has been switched off and is prevented from being inadvertently switched back on. – Never touch the electrical connections when you have to take measurements while the power supply is switched on. – Remove all jewellery from your wrists and fingers. – Make sure that the testing equipment is in good and safe operating condition. – When working on the unit while it is switched on, stand on an insulated surface, ensuring that there is no grounding connection. – Follow the instructions contained in these operating and installation instructions and observe all danger, warning and safety information. – This list does not constitute a complete listing of all measures required for the safe operation of the unit. Contact your specialty dealer if any specific problems arise which are not sufficiently covered for the purposes of the buyer. Modifications It is generally not permitted to make changes to the inverter. Changes to the installation of the inverter are only permitted if they comply with local and national standards. ! CAUTION Risk of damage due to improper modifications. Never modify or manipulate the inverter or other components of the installation. Information regarding the following topics can be found in the Operating Instructions.: • • • • Transportation Intended use Factory warranty and liability Service The proper and safe operation of this unit requires proper transportation, storage, assembly and installation, as well as careful operation and maintenance. blueplanet Operating and Installation Instructions 6400xi - 7600xi Page 19 S e c tio n 3 · Technica l Da ta 3 Technical Data Input – Electrical data Model 6400xi 7600xi Max. recommended PV generator power 7600 W 9000 W MPP range 365-510 V @ 240 VAC 320-510 V @ 208 VAC 365-510 V @ 240 VAC 320-510 V @ 208 VAC No-load voltage 600 V / 550 V* 600 V / 550 V* Monitoring input voltage Stand-by from Vin < 300 V Stand-by from Vin < 300 V Max. DC input current (Isc) 21 A 24 A Polarity safeguard Short-circuit diode * Feed-In only, if PV-Voltage is smaller 550 V Output – Electrical data Model 6400xi 7600xi Rated power 6400 W 7600 W Maximum power 6400 W 7600 W Line voltage 212 V-264 V @ 240 VAC 184 V-228 V @ 208 VAC Rated current 27 A @ 240 VAC 31 A @ 208 VAC 32 A @ 240 VAC 37 A @ 208 VAC Max. current 27 A @ 240 VAC 31 A @ 208 VAC 32 A @ 240 VAC 37 A @ 208 VAC Power factor ≈1 Rated frequency 60.0 Hz Frequency range 59.3 Hz-60.5 Hz Distortion factor according to VDE0838 part 2 (EN 61000-3-2) Fault signal relay S0 output Overvoltage protection Page 20 < 3 % at rated power < 5 % over the entire range Potential-free NO contact (make contact), max. 30 V / 3 A Open collector-output max. 30 V / 50 mA Varistors and spark gaps blueplanet Operating and Installation Instructions 6400xi - 7600xi Sec tio n 3 · T echnica l Da ta Inverter – Electrical data Model 6400xi 7600xi Max. degree of efficiency 97.2 % @ 240 VAC 96.9 % @ 208 VAC 97.1 % @ 240 VAC 97.0 % @ 208 VAC CEC degree of efficiency 96.5 % @ 240 VAC 96.5 % @ 208 VAC 96.5 % @ 240 VAC 96 5 % @ 208 VAC Internal consumption Minimum grid-feed power Maximum Output Fault Current (AC) and Duration Night shutdown: 0.4 W @ 240 VAC / 0.3 W @ 208 VAC Operation: < 5 W 35 W 120 A / 100 μs Maximum Input Short Circuit Current 36 A Maximum Input Source Backfeed Current to Input Source 0A Synchronization In-Rush Current 0A Surge protection Voltage and Frequency Trip Time Voltage Trip Limit Accuracy Frequency Trip Limit Accuracy Trip Time Accuracy Circuit design tested to 6 kV < 160 ms 1.5 % of nominal value ± 0.06 Hz ± 0.1 % self-commutated inverter Clock frequency 17 kHz / 9 kHz Grid monitoring complies with IEEE 1547 blueplanet Operating and Installation Instructions 6400xi - 7600xi Page 21 S e c tio n 3 · Technica l Da ta Inverter – Mechanical and technical data Model 6400xi 7600xi Visual displays LEDs: PV generator (green) Grid-feed (green) Fault (red) LCD (2 x 16 characters) LEDs: PV generator (green) Grid-feed (green) Fault (red) LCD (2 x 16 characters) Controls 2 keys for display operation and configuration of parameters DC cut-off point Connections Pre-installed and separable DC rotary disconnect switch Screw compression terminals in the connection box Cable connection via conduit fittings using 3/4” or 1/2” knockouts on connection box Terminals accept AWG 4 to AWG 12, 75’C, copper wire. Torque to 20lb-in (2.2N-m). Interfaces RS485, S0, error transmitting relay Ambient temperature –4 °F ... +140 °F (> 104 °F power derating) > 167 °F temperature-dependent power limiting > 185 °F disconnection from the grid Internal Temperature monitoring Max. humidity 95 % (not-condensing) Cooling Free convection (fan assist) Protection class NEMA-3R Noise emission <45 dB (fan operation) Housing Aluminium wall-mounted housing Dimensions W x D x H 44 3/8 x 14 x 8 6/8 in. 44 3/8 x 14 x 8 6/8 in. Weight 108 lbs 108 lbs Page 22 blueplanet Operating and Installation Instructions 6400xi - 7600xi Sec tio n 4 · Unit Description 4 Unit Description ! CAUTION Incorrect use is prohibited. The galvanically isolated blueplanet units are available with different power ratings. The appropriate inverter type is selected according to the maximum output of the photovoltaic modules that have been installed. The maximum output values can be found in the data sheet (see Technical Data, section 3). You can find the name of your inverter on the name plate on the left side of the inverter. 4.1 Included in box – blueplanet inverter with pre-installed connection box – Wall bracket – Documentation 4.2 Designing the PV array The selection of the PV array is of great importance when designing a PV installation. When doing so, you must ensure that the solar array is compatible with the inverter. Observe the data provided in the data sheet (see section 3, Technical Data) when designing your solar array. NOTE KACO Calc PRO, a dimensioning program for the easy selection of PV modules, can be downloaded at no cost at the following address: http://www.kaco-newenergy.com Designing the PV array: – The number of PV modules connected in series must be selected in such a way that the output voltage of the PV generator stays within the permitted input voltage range of the inverter – even during extreme outside temperatures. Depending on the way in which the modules are installed and the geographic location, a suitable temperature should be used when calculating the voltage. The temperature coefficients of the solar modules should be taken into account. The following criteria must be met for calculating the voltage of the PV generator: – U0 (voltage open circuit) < max. input voltage of the inverter. Even at very low outside temperatures, the open circuit voltage of the connected string must lie within the permitted input voltage range. The open circuit voltage of the entire string must be less than the max. input voltage under all conditions. blueplanet Operating and Installation Instructions 6400xi - 7600xi – UMpp (voltage maximum power point) > min. input voltage. Even at very high outside temperatures, the MPP voltage of the connected string should lie within the permitted input voltage range. The MPP voltage of the entire string must always be greater than the lowest MPP voltage of the inverter. If the MPP voltage moves outside of the permitted input range, the installation may still appear to function properly. In this situation, the maximum possible amount of power is not fed into the grid; instead, a smaller amount is back fed to the utility grid. The amount of energy fed into the grid will depend on what point the inverter is operating on the PV generator Voltage/Current curve. Provided that the input voltage is within the permitted input voltage range, the inverter will not be damaged if a connected PV generator provides current that is above the max. usable input current. The solar generator still represents the largest factor in the cost of a solar installation. For this reason, it is extremely important to obtain maximum energy yields from the solar generator. To achieve this, solar generators in the northern hemisphere should be oriented to the south at an angle of inclination best suited for the location. The PV generator should never be shaded. This orientation is quite often not possible due to structural reasons. In order to achieve the same energy yield as an optimally oriented solar generator, the solar generator power can be increased. For roofs with an east-west orientation, we recommend a multi-string PV installation. To achieve an optimum yield from the installation, half of the strings must be installed on the east side of the roof; the second half on the west side. For exposed locations in mountains or in southern regions with higher than normal solar radiation, we recommend that the power generator be reduced appropriately. Please consult with us or your specialty dealer about this matter. 4.3 Protection concepts The following monitoring and protective functions are integrated into blueplanet inverters: – Overvoltage conductors/varistors to protect the power semiconductors from high-energy transients on the grid side. – Temperature monitoring of the heat sink. – EMC filters to protect the inverter from high-frequency line interference. – PV generator grounded varistors to protect the inverter against bursts and surge pulses. – Islanding detection according to IEEE 1547. – AC/DC sensitive residual current circuit breaker RCD type B switch (Residual Current protective Device), which monitors the leakage current from the Powadors grid connection to the PV generator and interrupts the feed to the grid when the residual current exceeds 30 mA. The RCD type B switch triggers, when a cable has a fault in the insulation, a frame fault or an earth fault. Page 23 S e c tio n 4 · U nit Description 4.4 Dimensions and weights 4.5 Inverter knockout dimensioning D X H Y W Figure 5.1 (A): Inverter bottom knockout dimensions Figure 4.1: blueplanet dimensions refer to table below for dimensions Model Height Width Depth Weight (H) (W) (D) 6400xi 44 1/8 in. 14 in. 8 7/8 in. 95 lbs 7600xi 44 1/8 in. 14 in. 8 7/8 in. 95 lbs Model X Y 6400xi 5 5/32“ 8 19/32“ 7600xi 5 5/32“ 8 19/32“ Y X Figure 5.1 (B): Inverter left view knockout dimensions Page 24 Model X Y 6400xi 5 5/32“ 3 25/32“ 7600xi 5 5/32“ 3 25/32“ blueplanet Operating and Installation Instructions 6400xi - 7600xi Sec tio n 4 · Unit Description Sec tio n 5 · Insta lla tion a nd Sta rt-U p 5 Installation and Start-Up ! WARNING Risk of fatal injury from fi re or explosions. The blueplanet’s housing may become hot during operation. – Do not mount the blueplanet on fl ammable materials. – Do not install the blueplanet in areas which contain highly flammable materials. – Do not install the blueplanet in areas where there is a risk of explosion. Y ! X Figure 5.1 (C): Inverter right view dimensions Model X Y 6400xi 5 5/32“ 7600xi 5 5/32“ 3 25/32“ 3 25/32“ CAUTION Risk of burns from hot housing components. Install the blueplanet so that unintentional contact with heat sink is not possible. 5.1 Selecting an appropriate place for installation NOTE blueplanet inverters meet the requirements of protection class NEMA 3R if all cable feedthroughs are used or appropriately sealed. The units should be installed in areas that are as dry as possible in order to extend their service life. It is recommended that the units are installed in climate-controlled areas in order to protect them from overheating. This also extends their service life. X Y Figure 5.1 (D): Inverter back plate access dimensions Model X 6400xi 6 7/32“ 7600xi 6 7/32“ Y 3“ 3“ The following items are important when you select the place of installation for the inverter: – Ensure good access to the unit for installation or any service work that may later be required. – Maintain the following minimum clearances around the unit: 7 7/8” side clearance to other units, 27 1/ ” clearance to other stacked units, 2 19 5/8” clearance to cabinets, ceilings and above unit, 36” from bottom of connection box to ground when mounted outdoors. blueplanet Operating and Installation Instructions 6400xi - 7600xi Page 25 S e c tio n 5 · Insta lla tion a nd Sta rt-Up – The unit is designed for vertical wall installation. – Air must be allowed to circulate freely around the housing and through the heat sink on the rear side. – If the inverter is built into a switching cabinet or similar, provide forced ventilation to ensure that heat is sufficiently dissipated. – The heat sink may reach a max. temperature of 194 °F. Therefore, mount the inverter only on walls made from heat-resistant material. – Ensure that the wall has adequate load-bearing capacity and use appropriate installation material. – Be sure to install the inverter in a sufficiently elevated place, especially in areas prone to flooding, however it is important to note that the minimum distance to ground is 3 feet when mounted outdoors. – Installation at eye level makes it easier to read the display. – Mount the inverter in a location where the ambient temperature is ideally in the range of -4 °F to +104 °F. 5.2 Installing the inverter Figure 5.1: installing the wall bracket Page 26 blueplanet Operating and Installation Instructions 6400xi - 7600xi Sec tio n 5 · Insta lla tion a nd S ta rt-U p 16,00 40,42 4,00 33 0, 2,99 6,22 6 0,2 5,24 Figure 5.2: blueplanet 6400xi and 7600xi wall bracket dimensions Check the composition and condition of the wall before installation. If necessary, use an alternate means of installing the inverter to the wall. blueplanet Operating and Installation Instructions 6400xi - 7600xi Page 27 S e c tio n 5 · Insta lla tion a nd Sta rt-Up ACTION – Mount the inverter so that the wall bracket fits into the notch on the rear of the inverter assembly mounting plate. – Then secure the inverter assembly mounting plate with the help of the lower screw. 5.3 Connection box with DC disconnect Intended use The blueplanet connection box is intended to be installed with the inverter as one unit during the initial installation. If an inverter must be removed for service, the connection box must remain installed to protect persons from contact with the live DC conductors inside. The connection box contains an integrated DC disconnect switch to comply with the NEC article 690 disconnecting means. The switch disconnects only the DC conductors. The switch has a hole used for locking into the OFF position during inverter replacement. When the switch is in the off position the DC wiring inside the inverter is disconnected. The AC power grid must be disconnected external to the connection box. The connection box has a shield which is secured by Torx type screws which protect service personnel from electric shock as the circuits inside are energized by the photovotaic array. For servcing the connections inside the shielded area, the photovoltaic array must be de-energized by applying an opaque cover over the array or other means and the AC circuit must be de-energized by switching off the breaker or other means. ! DANGER When replacing the inverter section, the installer must turn off the DC switch in the connection boxand turn off the external AC switch. Lock both and measure the AC and DC wiring to be sure it is not energized. ! WARNING Electric shock hazard. The DC Conductors of this photovoltaic system are ungrounded and may be energized. Description of components The DC switch is located on the right side of the connection box. When pointed to the front of the unit it is in the OFF position. When pointed in the UP position the unit is in the ON position. Clearly visible labels can be provided upon request. Safety of components The Authority Having Jurisdiction (AHJ) has a difficult charge and maintains ultimate authority of the solar electric system’s final inspection. The AHJ must be well versed with the requirements of the NEC, understand the local utilities’ ruling on the use of a utility external disconnect switch (UEDS), and applicable use of a UL 1741 approved product. The following NEC 2008 subsections provide an overview of the solar electric system disconnect requirements: 690.13; 690:14, 690.15, 690.17; 690.64, 230.82.6. Subsections are summarized below. For the complete text refer to the applicable NEC version approved for use in your jurisdiction. 690.13: The means to disconnect all current carrying conductors of a solar electric system from all other conductors in a building. 690.14, sections A through D: Section A, the disconnection means are not required to be suitable for service equipment and should be rated in accordance with 690.17. Section B, equipment specific to the photovoltaic source circuits such as over current devices, circuit isolation switches, and blocking diodes are permitted on the solar electric side of the disconnection means. Section C, the disconnection means should be located in a readily accessible location, preferably near the points of building entrance, be marked as a solar electric system disconnect, suitable for use for the prevailing conditions, and limits the grouping of disconnects to six per enclosure. Section D, permits utility interactive, or grid tied inverters to be located in areas that are not readily accessible, and details the switch requirements. The AC and DC disconnect should be line of sight with the inverter and be readily accessible. 690.15: The means for disconnecting all aspects of a solar electric system must be provided, and if the equipment is energized from more than one source, the disconnecting means should be grouped and identified. Allowances for several AC circuits to be disconnected is allowed as long as the disconnect complies with 690.17. 690.17: The means for disconnect all ungrounded conductors should be readily accessible, externally operable with exposing the operator to live circuits, and plainly indicate the open and closed positions. The disconnect shall have an interrupting rating sufficient for the nominal circuit voltage and current that is available at the line terminals of the equipment. 690.64: The supply side of the inverter shall be permitted to be connected to the supply side of the service discon necting means as permitted in 230.82.6. The load side is permitted as long as each interconnection is made with a dedicated circuit breaker rated for the appropri ate current back feed rating. I Designates the ON or energized position. O Designates the OFF or non-energized position. Page 28 blueplanet Operating and Installation Instructions 6400xi - 7600xi Sec tio n 5 · Insta lla tion a nd S ta rt-u p 230.82.6: The type of equipment connected to the supply is listed, with subsection six identifying solar electric systems as permissible. All components within a UL 1741 compliant inverter must pass evaluation spacing, voltages and currents that the inverter is rated for. The UL 508 standard, industrial control equipment, auxiliary devices has provisions for testing manually operated switches. The integrated switch passed the UL 508 standard under the file E304888 for use within a UL 1741 approved grid tied inverter. The switch was tested 6000 operating cycles at the nominal AC and DC voltages and currents as noted in table one below. Additional operating cycles of 4000 resulted in a total of 10000 successful operating cycles. The switch was de constructed and evaluated under a pass fail criteria. As referenced in the NEC, subsection 690.17, the switch must meet applicable voltage and current ratings. The AC and DC switch ratings are detailed in this table: Inverter Models AC / DC Disconnect 6400xi 7600xi DC Nominal Voltage: VDC 600 V 550 V 550 V DC Nominal Current: IDC 4 x 16 A 21 A 24 A The disconnect solution offered by KACO new energy complies with all applicable NEC, and UL 1741 requirements. The use of an integrated disconnect with the inverter is potentially safer due to less electro mechanical connections. The only requirement which would necessitate an individual disconnect would be the specific ruling of the utility requiring a UEDS. 5.4 Grounding the inverter Grounding must be done according to the NEC (National Electric Code) and any applicable local electric codes! The inverter has two sides of grounding we need to consider. System ground (grounding): connecting the circuit to ground (i.e. neutral of a split single phase). Equipment ground (bonding): Connecting all non-current carrying metal parts to ground (array structure, metal enclosure, module frame) The AC Grounding Electrode Conductor (GEC) shall be sized as required by NEC 250.66 and the GEC does not have to be larger than #6 copper or #4 aluminum if connected to Rod, Pipe or Plate Electrodes! The DC Equipment Grounding Conductor (EGC) shall be sized in accordance with NEC 250.122, if ground fault protection is used. Otherwise, it should be the same size as the current carrying conductor! (A) Grounding single inverters: For the AC side (system ground) use a continuous irreversibly appropriately sized conductor bare or insulated conductor (GEC) to ground the Inverter to the AC GE (Grounding Electrode - ground rod or in some cases the main water line). If the ground rod is unavailable, splice irreversibly to the AC GEC. The DC side (equipment ground) should start at the PV array. All non-current carrying exposed metal parts of equipment, raceways, and other enclosures of the PV system shall be grounded according to NEC 690.43 (e.g. each PV module, combiner and junction box, metal roofing, mounting structure, DC disconnect, and Inverter). The grounding equipment must be listed and labeled. Figure 5.4: DC and night switch The night time start switch is located on the right side of the connection box. Press and hold the start switch for up to 5 seconds to wake the inverter when there is no DC input voltage. This allows the user to display the power that was produced during that day. blueplanet Operating and Installation Instructions 6400xi - 7600xi Figure 5.5: System grounding Page 29 S e c tio n 5 · Insta lla tion a nd Sta rt-Up (B) Grounding multiple inverters: Use a DC GE (Grounding Electrode – ground rod) and run an appropriately sized conductor from the DC GE to the AC GE. This will become a GEC for the inverters. Then use a short appropriately sized conductor jumper to each inverter that is irreversibly spliced to the GEC. ! CAUTION The voltage of the solar generator must be measured before connecting the DC leads to the inverter terminals. The DC voltage must not exceed the max. generator voltage because this would destroy the unit. ACTION Figure 5.6: System grounding-multiple inverters ! DANGER To ensure maximum protection against hazardous contact voltages while assembling photovoltaic installations, both the positive and the negative leads must be strictly isolated electrically from the ground potential (GP). ! CAUTION Risk of damage. Be sure that the polarity is correct when you make the connection. Connecting it wrongly will cause damage to the inverter. Before connecting the PV generator to the blueplanet, check that the PV generator is not grounded. – Measure the DC voltage between the protective ground (PG) and the positive lead and between the protective ground (PG) and the negative lead of the PV generator. – If stable voltages can be measured, this indicates a ground fault in the PV generator or its wiring. The ratio between the measured voltages gives an indication as to the location of this fault. Rectify this fault before taking any further measurements. – Measure the electrical resistance between the protective ground (PG) and the positive lead and between the protective ground (PG) and the negative lead of the PV generator. – Low resistance (< 2 MΩ) indicates a high-impedance ground fault of the PV generator, which must be fixed prior to continuing with the installation. Once the wiring in the connection box is installed the protective cover over the terminals must be secured using the included screws and must not be opened unless the switch is in the off position, the AC breaker is in the off position, and the PV array is powered down with an opaque cover or other equivalent method to assure there is no DC voltage present in the box. The connection box should be considered the same as any other external DC disconnect switch which has live conductors inside. Circuit board fuse The power section has two internal circuit board fuses. These are labelled F801 or F0901 on the circuit board. F0901: Model: 179200 5x20 time-lag 250 VAC / 1.6 A Manufacturer: SIBA ! WARNING For continued protection against risk of fire, replace only with same type and ratings of fuse. Page 30 blueplanet Operating and Installation Instructions 6400xi - 7600xi Sec tio n 5 · Insta lla tion a nd Sta rt-U p 5.5 Connecting to the Public Grid L1 The inverter can be installed on the following grid-types: 120° L3 = 208V ~ 120° 240V N 120° L2 = L1 120V 120° 208V 120° 120V 120V 120° L3 L2 ~ N 120V 240V = 208V 120V ~ Figure 5.14: 208 V / 120V WYE = ~ Country setting on the display: USA 208 V Figure 5.11: 240 V Delta: 120 V Stinger L1 Country setting on the display: USA 240 V 120° = = 208V 208V ~ ~ 240V 120° L3 180° L2 L2 208V L1 N 120V 120V 120° = ~ Figure 5.15: 208 V Delta = ~ Country setting on the display: USA 208 V no neut Figure 5.12: 240/120 V Split Phase L1 Country setting on the display: USA 240 V 120° = = 480V 480V ~ L1 ~ 120° 120° = ~ = 240V 240V L3 120° 480V L2 ~ = ~ 120° L3 120° 240V L2 Figure 5.16: 480 V Delta or 480 / 277 V WYE = ~ Figure 5.13: 240 V Delta Country setting on the display: USA 240 V no neut blueplanet Operating and Installation Instructions 6400xi - 7600xi ! WARNING Do not connect the inverter to the 480 V Delta or 480 V / 277 V WYE power grids. Page 31 S e c tio n 5 · Insta lla tion a nd Sta rt-Up 5.6 Electrical connection (A) Grid Connection General information The electrical connections can be established after the inverter is installed in its fixed location. Knockouts are provided on the sides, bottom, and rear of the connection box to easily run conduit to the desired locations. NOTE Only conduit pipes according to UL 514 B can be used. ! WARNING Inputs and output circuits of this unit are isolated from the enclosure. System grounding must be done in accordance with the National Electrical Code (NEC), ANSI/NFPA 70 and is the responsibility of the installer. Interfaces ACTION DC Connection Area AC Connection Area Figure 5.17: Connection of the connection box blueplanet 6400xi und 7600xi To connect the inverter, the AC and DC sides must be disconnected from all power sources and secured against being inadvertently energized. GND String 4 PV- L2 String 3 PV- L1 String 2 PV- N String 1 String 4 PV+ PV- String 3 PV+ GND String 2 WARNING PV+ ! String 1 You must adhere to all mandatory safety regulations, the currently required technical connection specifications of the responsible power supply company, as well as to other generally applicable regulations. PV+ Guide the wiring through the conduit pipe. Connect the wiring to the appropriate terminal labeled in the connection box. Field Wiring Terminals to 20 in. lbs. AC Connections are a 3 or 4 wire connection. In 4 wire systems incorporating a Neutral there will be the following connections; Line-1, Line-2, Neutral, and Ground. In 3 wire systems not incorporating a Neutral there will be the following connections; Line-1, Line-2, and Ground. We recommend the following conductor cross-sections for cable lengths up to 60 feet: – blueplanet 6400xi: – blueplanet 7600xi: AWG 10 up to AWG 4 75 °C Copper Wire AWG 10 up to AWG 4 75 °C Copper Wire Larger cross-sections should be used for longer leads. Page 32 blueplanet Operating and Installation Instructions 6400xi - 7600xi Sec tio n 5 · Insta lla tion a nd S ta rt-U p NOTE Use Copper Conductors only. The following AC over-current protection must be used for the installation of the inverter. – blueplanet 6400xi – blueplanet 7600xi → → PV generator connection The PV generator leads are connected on the fuse holders inside of the connection box terminal block. Fuse for PV+ and PV-: Model: PV- 10 A10F, 10 A, 1000 V, 10 x 38 mm, Manufacturer: Bussmann ! 40 A Breaker 50 A Breaker WARNING For continued protection against risk of fire, replace only with same type and ratings of fuse. ! DANGER Risk of electric shock at live connections. Check that the power lead is voltage-free before inserting it into the connection box. ! WARNING To reduce the risk of fire, connect only to a circuit provided with the required branch-circuit overcurrent device sized in accordance with the National Electrical Code, ANSI/NFPA 70. The maximum size overcurrent device shall not be more than 50 A for the 6400xi and the 7600xi. ! CAUTION Do not open the fuse holder under load. Before opening the fuse holder switch off the DC disconnect switch. 5.7 Interfaces NOTE Be sure to use cables with a sufficiently large cross-section to avoid excessive line impedance between the building’s distribution box and the respective blueplanet unit. Once again, ensure that all connected leads are firmly connected. blueplanet Operating and Installation Instructions 6400xi - 7600xi + 5 V, 100 mA RS485 A RS485 B S+ Error + SYM + SYM - RS485 A RS485 B S- Error - SYM + SYM - ACTION - Check that the leads are properly connected. GND CAUTION GND ! lower level upper level When the line impedance is high, i.e. long AC-side leads, the voltage at the line terminals of the inverter will increase as power is being fed in to the grid. The inverter measures this voltage. If the voltage at the grid terminals exceeds the line overvoltage limit, the inverter will switch off due to line overvoltage. This condition must be taken into consideration when wiring the AC and dimensioning the AC lead. Figure 5.20: Interface terminals Page 33 S e c tio n 5 · Insta lla tion a nd Sta rt-Up (A) Connecting the fault signal relay The inverter is equipped with a potential-free relay contact to signal faults. This contact closes if a fault occurs. The contact is designed as a NO contact and marked as “ERR” on the connection terminal. Maximum contact load • DC: 30 V / 3 A. • AC: 250 V / 1.5 A. (D) SYM-bus connection: In the event of failure of the grid-feed phase (power failure on the public grid), the relay will not trigger. If this happens, all LEDs and the display go out. The inverter is shut down completely. A fault signal cannot be sent. (B) Connecting the S0 output The inverter is equipped with an S0 pulse output. Items such as a large display can be connected to it. The pulse rate is adjustable (see section 5.9, “Parameter programming”). (C) The RS485 interface connection The connection terminal (Figure 5.20) is on the blueplanet communication circuit board. To connect several blueplanet inverters, terminal A of one blueplanet is connected to terminal A of the other blueplanet. Terminal B is connected in the same manner. A twisted, shielded data cable is required for this. The connection to the KACO proLOG is established similarly to the interconnection of inverters. A connection diagram is displayed in figure 5.21. The total length of the RS485 wiring should not exceed 4,000 feet. Proper polarity must be maintained or devices will not be able to communicate. blueplanet blueplanet RS485 A B OFF To connect several blueplanet inverters, terminal SYM+ of one blueplanet is connected to terminal SYM+ of the other blueplanet. Terminal SYM- is connected in the same manner. A twisted shielded data cable is required for this. A connection diagram is displayed in figure 5.22. The total length of the CAN bus wiring should not exceed 650 feet with standard wire. With a high quality CAT5 CAN-cable a total length of 4000 feet is possible. Proper polarity must be maintained or devices will not be able to communicate. In figure 5.22, a terminating resistor is activated (set to “ON”) in the first and to the last inverter in the chain. For proper signal transmission, the first and the last unit in a chain must have a terminating resistor. The terminating resistors in the other inverters of the chain must be deactivated (set to “OFF”). In the first and the last unit of the chain, switch “CAN” is set to “ON”. The switch is on circuit board mounted inside the door of the inverter. With a bus system such as the CAN, each unit sharing this bus must possess a unique address. The address range can be selected between 1 and 32. You can define the address for each inverter using the parameter menu. blueplanet RS485 RS485 RS485 ON Term IMPORTANT Ensure that the A and B wires are properly connected. Communication is not possible if the wires are reversed. IMPORTANT Term For inverters, the address range can be selected between 1 and 32. You can define the address for each inverter using the configuration menu (see Operating Instructions). Term RS485 proLOG blueplanet blueplanet blueplanet RS485 A B OFF A B A B Term SYM CAN ON Term SYM CAN + - GND OFF Term SYM CAN + - GND ON + - GND Figure 5.21: Connection diagram for the RS485 interface using the KACO proLOG Figure 5.22: Connection diagram for the RS485 interface using the KACO proLOG The terminating resistors in the inverters of the chain must be deactivated (set to “OFF”). In the last unit of the chain, switch “RS485” to “ON”. The switch is on the circuit board mounted inside the door of the inverter. With a bus system such as the RS485, each unit sharing this bus must possess a unique address, regardless of whether it is an inverter or any other device. The exception is the monitoring device which is the master. This unit does not need an address. Page 34 blueplanet Operating and Installation Instructions 6400xi - 7600xi Sec tio n 5 · Insta lla tion a nd S ta rt-U p 5.8 Starting up the inverter 5.9 Parameter programming After completing the mechanical and electrical installation, the inverter is put into operation as follows: Various operating mode parameters can be set in the parameter mode menu of blueplanet units. NOTE The inverter can be put into operation only under daylight conditions (i.e. at a solar generator voltage of > 300 V). If no daylight or solar generator voltage is present, the inverter can be activated by pressing the night start key if there is AC voltage present (see section 4.4 in the Operating Instructions). However, normal operation is not possible in this condition. Only the values can be read off the display. Parameter menu Country / grid type selection (Yes / no) Yes No Select country / grid type Line under voltage switch-off stage 2 Line under voltage switch-off stage 1 ACTION Switch on the line voltage and the solar generator with the aid of the external AC and the internal DC disconnect switch (O → I). During the initial start-up, the corresponding country and language must be selected. Select the appropriate language using the ‘2’ (right) key, press the ‘1’ (left) key to advance to the country selection. Press the ‘2’ key to advance through the various grid types. Once the proper grid type is selected press the ‘1’ key then press both the ‘1’ and ‘2’ keys at the same time to save the settings. If the improper grid settings were selected, hold down the ‘2’ key to start the process again. NOTE If the power is cycled or 10 minutes elapse the settings for the grid type are locked and a password will need to be obtained from tech support. The top green LED “OK” lights when DC voltage is available and indicates that it is ready to be put into operation. The display now indicates the current PV generator voltage “Start from xx V, meas.: xxx V”. If the measured voltage is greater than the starting voltage, the unit will start grid-feeding after a country-specific waiting time. This start-up waiting period is required in order to ensure that the generator voltage is continuously above the power delivery limit of 410 V. A quick start routine is provided for startup and test purposes. This routine circumvents the start-up delay period. This quick start routine is found in the configuration mode menu (see Operating Instructions). During the normal start-up procedure, the line relays audibly switch on after a country-specific waiting time and the feeding of the grid starts. This is indicated by the middle green LED with the house and power line symbol next to it. The display now shows the power being fed into the grid. Key ‘1’ (left) can now be used to display the various measured values (see Operating Instructions section 4.4). blueplanet Operating and Installation Instructions 6400xi - 7600xi Line over votage switch-off stage 1 Line over voltage switch-off stage 2 Disconnection time min line voltage stage 1 Disconnection time max line voltage stage 1 Under frequency switch-off stage 2 Under frequency switch-off stage 1 Over frequency switch-oo stage 1 Disconnection time min line frequency stage 1 Starting votage SYM Bus active (Yes/no) No Yes Select SYM bus address (1 ... 32) Select phase Set max unsymmetry SYM bus test active (Yes/no) Page 35 S e c tio n 5 · Insta lla tion a nd Sta rt-Up ! WARNING Wrong parameter settings can lead to loss of functionality as well as render your system unsafe. Modifications may be made only in exceptional cases and only after having consulted with the manufacturer and the utility company. ACTION To switch to programming mode, hold down key “2” for approx. 20 seconds. Use key “1” to scroll through the various menu items. The menu is continuous. When you reach the end, the display automatically returns to the first item. NOTE After the country and grid type have been set, and either the inverter is powered down or 10 minutes have elapsed, and a change to the country or grid type is needed, a pass code must be obtained from KACO support. Please have the inverter serial number available when calling to obtain the pass code. Explanation of the individual parameters: Country selection During the initial start-up, the country can be selected and changed again without entering a code. If no entry is made for 10 minutes or the unit is switched off, the country selection is stored. For further changes, a code is needed that can be obtained from service. Line under and overvoltage switch-off: The inverter is equipped with 1-phase monitoring. If the line voltage drops below the value set for “Minimum line voltage”, or exeeds the value set for “Maximum line votage”, the inverter switches off. The minimum cut-off threshold can be set in 1 V increments. Under and overfrequency switch-off: The line frequency is also monitored. If the line frequency drops below the value set in “Minimum line frequency” or exceeds the value set in “Maximum line frequency”, the inverter switches off. Both limit values can be set in 0.1 Hz increments. Disconnection time: The disconnection time value for the under and overvotage switch off stage 1, and the disconnection time value for the under and overfrequency switch off stage 1 can be set in 0.01 sec increments. Starting voltage for grid-feeding: After sunrise, the inverter will begin to feed into the grid once the voltage has reached 410 V (display: “Start from 410 V”). This setting enables safe operation in any solar generator configuration. In rare cases, it may be necessary to adjust this starting voltage threshold. At a low generator voltage (few modules connected in series), the starting voltage may be reduced to ensure a safe start-up, even during unfavorable weather conditions. At a high generator voltage, the starting voltage may be increased to ensure that the inverter does not switch itself on and off too often with low power. The starting voltage can be set within a range from 370 V to 500 V in 10 V increments. ACTION Use the “Settings” key to change the parameter that is shown. The value then either increases or decreases, depending on the parameter. The values here are also continuous, i.e. after you reach the maximum value, they return to the minimum value. ACTION To leave the parameter menu, press both keys at once. Upon leaving the menu, the settings are saved. Page 36 blueplanet Operating and Installation Instructions 6400xi - 7600xi Sec tio n 5 · Insta lla tion a nd S ta rt-U p 5.10 Limiting during asymmetric supply 5.12 SYM bus test In Order to limit the asymmetry between the phases while supplying power to the grid to the max. permitted value, Powador blueplanet 6400xi and 7600xi units are equipped with an additional communication processor. This processor cyclically determines the power that is currently being fed into the grid from the connected inverters in its group at intervals of an few seconds. From this, it calculates the maximum permissible supply power (taking the max. permitted value mentioned above into account). The Powador 6400xi and 7600xi have an integrated SYM bus test to test the wiring and the software settings of the inverters in the group that are connected together. This can only be activated if the SYM bus itself is activated. To do this, use key “2” to select “yes” in the “SYM bus active” menu of all units. In order to begin the SYM bus test, use key “2” to select “yes” in the “SYM bus test active” menu on one inverter. Each inverter will display the feed in phase the number of the inverters connected to this phase and the total nominal output power of the inverters connected to this phase. 5.11 The communications connection between the inverters The blueplanet 6400xi and 7600xi units are designed to be used in groups consisting of max. 32 inverters. The inverters are distributed over all three phases for this. In addition, a communications connection must be established between the inverters in the group. This is described below. All the inverters of a group must be connected with each other. In Order for the inverters to communicate with each other, all inverters must be connected via the CAN bus interface that is labelled “SYM-Bus”. To do this, the “SYM+” terminals of the SYM block of all inverters in the group should be connected to each other. The “SYM-” terminals should be connected in the same manner (see figure 4.8). A twisted pair, shielded data cable, such as CAT5 cable, is required for this. Select SYM bus All inverters of a group require a unique adress. The inverters in the group must be distingishable from each other in order to communicate with them. To do this,they must be assigned a unique address in the range from 1 to 32. Select phase For each inverter the phase where the terminal L1 is connected to must be selected. As long as the phase is not selected the red LED flashes. Set max. unsymmetry Set the maximum grid unsymmetry for each inverter. Example: Number of inverters: 6 maximum permitted unsymmetry between the phases: 6 kW Connection: connect the actual phases L1 and L2 to terminals L1 and L2 on the first two units. On the second two units, connect phases L2 and L3 to terminals L1 and L2. On the third two units, connect phases L3 and L1 to terminals L1 and L2. Settings: Select phase: Set the phase of the first two units to L1, the second two units to L2 and the third two units to L3. Set the max. unsymmetry: Set this value on all units to 6 kW (see figure 8.2). blueplanet Operating and Installation Instructions 6400xi - 7600xi Page 37 S e c tio n 6 · Two-S ta ge Shutdown 6 Two-Stage Shutdown in Accordance with IEEE (standard values for < 30 kW) The shutdown times and the shutdown values for the line voltage and frequency can be narrowed to within a specified range for the blueplanet inverters. The allowed values can be taken from the following tables. The specifications of the grid operator and the applicable standard must be observed. It is particularly important that systems < 30 kW comply with the applicable shutdown values for the line frequency. The clearing time, is the time between the start of the abnormal condition and the inverter stops to feed in. Voltage – USA 208 V Voltage range Clearing time Undervoltage range 2 104 V * < V < 184 V 0.16 sec (fixed) Undervoltage range 1 184 V * < V < 208 V 0.16 sec * - 2 sec Overvoltage range 1 208 V < V < 228 V * 0.16 sec * - 1 sec Overvoltage range 2 228 V < V < 249 V 0.16 sec (fixed) Voltage – USA 240 V Undervoltage range 2 Voltage range Clearing time 120 V * < V < 212 V 0.16 sec (fixed) Undervoltage range 1 212 V * < V < 240 V 0.16 sec * - 2 sec Overvoltage range 1 240 V < V < 264 V * 0.16 sec * - 1 sec Overvoltage range 2 264 V < V < 288 V * 0.16 sec (fixed) Voltage range Clearing time Voltage – Mexico 220 V Undervoltage 198 V *< V < 220 V 0.16 sec (fixed) Overvoltage 220 V < V < 242 V * 0.16 sec (fixed) Frequency Solar system size Overfrequency range 1 Underfrequency range 1 ≤ 30 kW Overfrequency range 1 Underfrequency range 1 Underfrequency range 2 > 30 kW Frequency range Clearing time 60.0 Hz 0,16 sec (fixed) < f < 60.5 Hz * 59.3 Hz * < f < 60.0 Hz 0,16 sec (fixed) 60.0 Hz < f < 60.5 Hz 0,16 sec (fixed) 57.0 Hz < f < 59.8 Hz 0,16 sec * - 300 sec f < 57.0 Hz 0,16 sec (fixed) * = default Page 38 blueplanet Operating and Installation Instructions 6400xi - 7600xi Sec tio n 7 · Ma intena nce 7 Maintenance ! DANGER – Risk of fatal injury by electric shock at live connections. Lethal voltages are still present in the inverter and the connection box even after the electrical connections have been disconnected. – Wait fi ve minutes before reaching into the inverter and the connection box. – When working on the photovoltaic modules, the current must be switched off on the inverter and the solar installation with the aid of the DC disconnect switch on the connection box and the external AC disconnect switch. ACTION Switch off the line voltage and the solar generator with the aid of the DC disconnector (I = on or energized / O = off or deenergized) and the external AC switch. 7.1 Cleaning the fan If the fan is only covered with loose dust, it can be cleaned with the help of a vacuum cleaner or a soft brush. 3. Remove the two inverter hinged door screws and open door. If the fan is very dirty, or if it s defective, it can be removed. 4. Disconnect the fan connections, labeled with „Lüfter“. 7.2 Removing the fan If the fan is very dirty or defective, proceed as follows: ! DANGER Danger due to lethal voltages. 1. Switch the DC disconnect and the external AC discon nect to the OFF (0) position to de-energize the inverter and lock out to prevent inadvertent energizing of the inverter during service. 2. Wait 5 minutes for the internal components of the inverter to discharge. blueplanet Operating and Installation Instructions 6400xi - 7600xi Page 39 S e c tio n 7 · Ma inte na nce 5. Remove the fours screws from the mounting bracket. 6. The fan can be removed along with the mounting bracket. 7. After cleaning or replacing the fan, perform this sequence in reverse to reinstall the fan. Page 40 blueplanet Operating and Installation Instructions 6400xi - 7600xi Sec tio n 8 · blue pla ne t a s Pa rt of a P V I ns t allat ion 8 blueplanet as Part of a PV Installation 8.1 Design of installation A sample design of a grid-connected PV installation using a blueplanet is shown below in the overview circuit diagram. PV array KWh PV array blueplanet inverter with pre-installed DC disconnect switch blueplanet inverter with pre-installed DC disconnect switch AC-disconnect switch AC-disconnect switch Circuit breaker Circuit breaker Utility meter Main circuit breaker Figure 8.1 Single-line overview circuit diagram for an installation with two inverters blueplanet Operating and Installation Instructions 6400xi - 7600xi Page 41 S e c tio n 8 · bluepla net a s Pa rt of a PV I ns t allat ion A summary of the components: DC terminal point: Two PV strings can be connected in parallel either at a DC terminal point between the solar generator and the inverter or directly on the inverter (terminals for three strings are provided on the inverter). Of course, you can also connect the strings directly to the solar generator and then run just one negative and one positive lead to the inverter. External fusing may be required, refer local and national electric codes. DC disconnect: In order to be able to disconnect the inverter on the PV generator side from sources of voltage, the inverter comes equipped with an pre-installed DC disconnect switch. As a result, the installation of an external DC disconnect switch is not required. NOTE: Be sure to check with local electrical codes and utility requirements as some inspectors will require a separate visible blade disconnect. AC disconnect: In Order to be able to disconnect the inverter on the grid side from sources of voltage, a AC disconnect switch is required. Line overcurrent protection: In order to protect the wiring, the inverter’s supply leads should be secured with circuit breakers or fuses as appropriate. The circuit breakers or fuses that are used should be appropriate to the length and cross-section of the wiring and fulfill applicable standards and directives (5.3: Electrical connection – grid connection). Utility power meter: The required utility power meter is specified and installed by the responsible power company. Main circuit breaker: Contact your utility and check with local and national electrical codes if you have questions concerning the required main circuit breaker. Page 42 blueplanet Operating and Installation Instructions 6400xi - 7600xi Sec tio n 8 · bluepla net a s Pa rt of a P V I ns t allat ion 8.2 Installation with multiple inverters on a three phase system Observe the following regarding installations with multiple inverters on a three phase system: Asymmetric grid-feed: The power should be distributed as equally as possible over the three phases. In the US, typically the asymmetry between the phases may be a maximum of 6 kW (This number can vary depending on utility transformer size and codes). Figure 8.2: Three phase grid connection for installations with multiple inverters Electrical connection: The blueplanet feeds only on two phases. In order to avoid asymmetries on a 3 phase grid, installations with multiple inverters should be designed so that the inverters feed into the grid in differing phases. The inverter feeds into the connections labelled L1 and L2. If you have multiple inverters, connect the actual phases L1 and L2 to terminals L1 and L2 on the first unit. On the second unit, connect phases L2and L3 to terminals L1 and L2. On the third unit, connect phases L3 and L1 to terminals L1 and L2. Continue as above. This distributes the power optimally. blueplanet Operating and Installation Instructions 6400xi - 7600xi Page 43 S e c tio n 9 · Tr ouble shooting 9 Troubleshooting In line with our continuously expanding quality assurance system, we endeavor to eliminate all errors and faults. You have purchased a product which left our factory in proper working condition. Each individual unit has successfully passed an endurance test as well as extensive tests for the purpose of assessing the operating behavior and the protective equipment. If your photovoltaic installation does not function properly despite these measures, we suggest the following troubleshooting procedures:The first step is to check that the solar generator and grid connections are properly connected to the blueplanet. In doing so, observe all the safety instructions specified in this manual. Monitor the inverter closely and, where applicable, make a note of the displays and LEDs. The following faults may occur and should be remedied as described. Error Cause of error Troubleshooting/Explanation The display is blank and the LEDs are not lighting up. – There is no line voltage. – The solar generator voltage is too low. The inverter switches to night shutdown mode as soon as the solar generator voltage is below the minimum grid-feed voltage for a longer period of time. For this reason, check first to see if the solar generator voltage is sufficiently high. The inverter changes to stand-by status once 80 % of the minimum grid-feed voltage is reached. Check the AC voltage as well. The permissible voltage ranges for gridfeed can be found in the technical data. If despite these measures the display stays blank, please contact KACO new energy service. The inverter stops Faulty grid separation relay in supplying power to the the inverter. grid shortly after being switched on, even though there is sufficient sunlight. Although there is sufficient sunlight, the inverter feeds into the grid only for a few seconds before switching off again. During the short gridfeed period, the inverter shows that the power being fed into the grid is between 0 and 5 W. If the inverter is definitely receiving sufficient generator power, the grid separation relay is presumably faulty, thus preventing the inverter from connecting. Please contact KACO new energy service. The inverter is active but does not feed into the grid. The display indicates a line failure. The inverter has interrupted the grid-feed due to a line failure. Due to a line failure (line impedance too high, over/undervoltage, over/ underfrequency), the inverter stopped the grid-feed and disconnected from the low-voltage grid for safety reasons. Many grid parameters can be changed within the permissible operating limits. More information can be found in the section “Starting up the inverter”. If the line failure exists for a long time, please contact the grid operator. The line overcurrent protection trips. The line overcurrent In cases of high insolation, the inverter can – depending on the solar protection capacity is too low. generator – exceed its rated current for a short period. For this reason, the capacity of the inverter’s overcurrent protection should be somewhat higher than the maximum grid-feed current. You can find a dimensioning of the line overcurrent protection in the section “Installation and StartUp”. The line overcurrent protection trips. Damage to the inverter’s hardware. If the line overcurrent protection immediately trips when the inverter switches to grid-feed mode (after the start-up period is complete), the inverter’s hardware is possibly damaged. Please contact KACO new energy service. If the measures described in this guide do not assist in clearing the fault, please notify KACO technical support at +1 (866) 522-6765. In order for our factory customer service department to respond in an appropriate and expeditious manner, some details are imperative: Details pertaining to the inverter – The unit’s serial number – Model – A short description of the error and error code if applicable – Is the error reproducible? If yes, how? – Does the error occur sporadically? – Describe the prevailing insolation conditions when the error occurred? – Time of day Page 44 blueplanet Operating and Installation Instructions 6400xi - 7600xi Sec tio n 10 · Ce rtifica te 10 Certificate 10.1 US 72110280 01 blueplanet Operating and Installation Instructions 6400xi - 7600xi Page 45 KACO new energy (866) 522 6765 [email protected] www.kaco-newenergy.com The text and figures reflect the current technical state at the time of printing. Subject to technical changes. Errors and omissions excepted. 31001161-01-111810 S e c tio n 10 · Ce rtifica te 10.2 Page 46 US 72110280 02 blueplanet Operating and Installation Instructions 6400xi - 7600xi