1
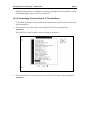
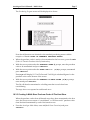
Autologue User’s Manual – Multi-Store
Page i
Table Of Contents
18. Introduction – Multi-Store ............................................................................................... 1
18.1 Definitions Of Vocabulary ............................................................................................ 2
18.2 Accessing A Remote Store ............................................................................................. 3
18.3 Multi-Store Purchasing Overview ............................................................................... 3
18.3.1 Creating Purchase Orders At The Branch Stores ............................................. 3
18.3.2 Transmitting Purchase Orders To The Host Store .......................................... 4
18.3.3 Creating A Multi-Store Purchase Order At The Host Store........................... 5
18.3.3.1 Sample Transmitted Purchase Order Report .......................................... 9
18.3.3.2 Sample Not Found Part Report .................................................................. 9
18.3.3.3 Sample Incorrect Quantity Report ............................................................ 9
18.3.4 Editing A Consolidated Purchase Order ........................................................... 10
18.3.4.1 Performing A Consolidated Edit ............................................................... 10
18.3.4.2 Performing An Individual Edit.................................................................. 11
18.3.5 Fill From Stock Option ......................................................................................... 12
18.3.5.1 Performing A Fill From Stock .................................................................... 13
18.3.6 Printing Multi-Store Purchase Orders ............................................................... 15
18.3.6.1 Printing A Consolidated Purchase Order ................................................ 16
18.3.6.2 Printing A Fill From Stock Purchase Order ............................................. 17
18.3.7 Updating The Branch Store’s Inventory File .................................................... 17
18.4 Consolidated Statements Overview ............................................................................ 18
18.4.1 Assigning Common Customer Numbers .......................................................... 18
18.4.2 Transmitting Statement Detail To The Host Store .......................................... 19
18.4.2.1 Transmitting Statements For A Range Of Customers ........................... 21
18.4.2.2 Transmitting Statements For A Range Of Vendors ............................... 21
18.4.2.3 Printing Statements By Salesman Code ................................................... 21
18.4.2.4 Printing Statements By Report Code ........................................................ 21
18.4.3 Printing Multi-Store Statements At The Host Store ....................................... 22
18.4.3.1 Printing Common Customer Statements ................................................. 23
18.4.3.2 Printing Non-Common Customer Statements ........................................ 24
18.5 Stock Replenishment Report Overview...................................................................... 25
18.5.1 Transmitting The Replenishment Data To The Host Store ........................... 26
18.5.2 Printing The Stock Replenishment Report ....................................................... 27
18.6 Remote Daily Sales Analysis Report Overview ........................................................ 27
18.6.1 Transmitting The Daily Sales Activity To The Host Store ............................ 28
18.6.2 Printing The Consolidated Daily Sales Analysis ............................................ 29
18.7 Consolidated Inventory Report Overview ................................................................. 30
18.7.1 Printing The Consolidated Inventory Report By Product Line .................... 31
18.7.2 Displaying The Consolidated Inventory Information.................................... 32
18.7.3 Printing The Consolidated Inventory Report By Purchase Order................ 34
18.8 Centralized Inventory Control Overview ................................................................... 34
18.8.1 Specify Changes & Additions To The Inventory File..................................... 35
18.8.2 Specify Manufacturer’s Price Updates ............................................................... 36
18.8.3 Review Pending Change Files ............................................................................. 37
18.8.4 Specify Automatic Price Adjustments ............................................................... 38
18.8.5 Review Pending Automatic Price Adjustments ............................................... 38
18.8.6 Apply Pending Change Files ............................................................................... 39
Revision 11/07
Linux Version 7.1
Autologue User’s Manual – Multi-Store
Page ii
18.8.7 Display Application & Communication Status Logs ...................................... 40
18.8.7.1 Sample Application & Communication Status Log............................... 41
18.9 Remote Part Lookup Overview..................................................................................... 41
18.9.1 Performing A Remote Part Lookup .................................................................... 41
18.10 Transferred Parts Report Overview ........................................................................... 43
18.10.1 Using The Transferred Parts Reports ............................................................... 43
18.11 Print/Clear Common Customer Numbers Overview ............................................. 44
18.11.1 Printing Or Clearing Common Customer Numbers ..................................... 44
18.11.2 Sample Common Customer Report .................................................................. 46
Revision 11/07
Linux Version 7.1
Autologue User’s Manual – Multi-Store
Page 1
18. Introduction – Multi-Store
This document describes the functions available through the use of the Autologue
Multi-Store Software. Listed below is a short summary of the major functions:
PURCHASING - BRANCH STORE
•
Create and transmit purchase orders to the host store.
PURCHASING - HOST STORE
•
Create consolidated or fill from stock purchase orders.
•
Edit consolidated or individual purchase orders.
•
Print purchase orders for an individual or all stores.
STOCK REPLENISHMENT REPORT - BRANCH STORE
•
Transmit stock replenishment data to the host store.
STOCK REPLENISHMENT REPORT - HOST STORE
•
Print stock replenishment data for each store.
DAILY SALES ANALYSIS - BRANCH STORE
•
Transmit daily and month to date sales analysis information to the host store.
DAILY SALES ANALYSIS - HOST STORE
•
Print daily and month to date sales analysis for each branch store and supply grand
totals of all stores.
STATEMENTS - BRANCH STORE
•
Transmit statement detail to the host store.
•
Set date limits when transmitting statement detail.
STATEMENTS - HOST STORE
•
Print consolidated statements for common customers.
•
Print non-common customer for each branch store at the host store.
CONSOLIDATED INVENTORY REPORTS - ALL STORES
•
Print inventory pricing, sales and quantities from each branch store.
•
Display on screen, inventory pricing or quantity information from each branch store.
CENTRALIZED INVENTORY CONTROL - ALL STORES
•
Specify Pricing, Min/Max, Unit Pack, Per Car, Unit Weight, Pop Code, Description
Changes and apply them to some or all of the branch stores’ inventory file.
•
Specify part number additions, deletions, moves and apply these changes to all or
some branch stores.
Autologue User’s Manual – Multi-Store
Page 2
•
Perform automatic price adjustments and have it adjust each stores inventory prices
if selected.
•
Report inventory changes to be applied.
•
Create a copy inventory change file to a disk
REMOTE PART LOOK UP/TRANSFER - ALL STORES
•
Look up and transfer merchandise from one store to another store.
TRANSFERRED PARTS REPORT - ALL STORES
•
Print or Screen Display all items transferred from one store to another.
PRINT/CLEAR COMMON CUSTOMERS - ALL STORES
•
Print Customer Number, Name and Common Customer Number from each branch
store on the local computer system.
•
Reset common customer numbers to zero for each branch store on the local
computer system.
Multi-Store functions are intended to provide a host store with the ability to monitor
and control the functions of inventory, purchasing, accounts receivable and daily
sales activity for each branch store.
With the Multi-Store software, the host store manager can access any branch store
and perform any function from one central location. This concept is known as a
“Virtual Terminal”.
18.1 Definitions Of Vocabulary
Store:
Multi-Store Single-System
Configuration:
A collection of the following files: system, customer, product line,
inventory, description, counterman, lost sales, corebank, and kits files. A
store, with this data, usually represents a single location.
A single system with more than one store on its hard disk. Terminals and
printers are linked to the branch stores via modems and telephone lines.
In each multi-store configuration, one store must be designated as the HOST store.
It is from the host store where all consolidated functions are performed.
Host Store:
Satellite Store:
Common Customer:
Common Customer
Number:
Non-Common Customer:
A designated main store among all the stores. All consolidating functions
take place at the host store.
Each branch store is a satellite store. The main store is both the host and a
satellite at the same time.
When other stores share the same account as the host. A common customer
does not need to have the same account number at each branch store.
Is the customer number of the main store. All branch stores, at which this
customer has an account, must also have the customer’s Common Customer
Number in the customer record.
A customer who does not have a common customer number. Such a
customer has an account with only one store.
Autologue User’s Manual – Multi-Store
Page 3
18.2 Accessing A Remote Store
Users can log into a branch store from any terminal on the computer system. When
the computer displays the login: prompt, enter in the specific branch store login
setup and press <Return>.
Next the system may prompt for a password before permitting access to the
requested branch store.
All functions, including Point of Sale, Purchasing and Month End for the branch
store can be performed from the host store by logging into the desired branch store.
18.3 Multi-Store Purchasing Overview
Through Multi-Store Purchasing, purchase orders created at a branch store can be
transmitted to the host store to be either consolidated into one large order or filled
from the stock of the host store.
Consolidating branch store purchase orders allows pooling of orders to receive
volume discounts by buying direct from a manufacturer. Filling purchase orders
from the inventory of the host store automatically adjusts the inventory of the host
store without the need of creating an invoice.
The first step in Multi-Store Purchasing is to actually create individual purchase
orders at each branch store and transmit the information to the host store. Purchase
Orders at each branch store may be created by the local manager or by the
owner/manager of the host store, who can log into any branch store.
Once each store has transmitted its purchase order to the host store, a consolidated
or fill from stock purchase order can be created. Additional functions of Multi-Store
Purchasing include the ability to edit or print Multi-Store Purchase Orders
collectively or individually.
18.3.1 Creating Purchase Orders At The Branch Stores
Purchase Orders can be created, printed and edited at the satellite stores through the
use of the menu selection 7 (Purchasing) from the Main Menu of each branch store.
Purchase Orders can be created based upon one of four methods listed below:
♦
♦
♦
♦
Min1 / Max1
Replenishment
Min2 / Max2
Special Orders
Multi-Store Purchasing requires that the host and all branch stores use identical
product line numbers for all part numbers to be consolidated or filled from the host
store’s inventory.
Example: If AC Delco Spark Plugs is Product Line #10 at the Host Store, Product
Line #10 at all branch stores should be AC Delco Spark Plugs.
Autologue User’s Manual – Multi-Store
Page 4
Additional information is available on creating, printing and editing purchase orders
in the Purchasing section of the User’s Manual.
18.3.2 Transmitting Purchase Orders To The Host Store
To transmit a purchase order created from a branch store to the host store, follow the
steps listed below:
•
From the Autologue Main Menu, enter 15 (Multi-Store Functions) and press
<Return>.
The Multi-Store Functions Menu screen will appear as shown:
•
From the Multi-Store Functions Menu, enter 1 (Transmit Purchase Orders) and press
<Return>.
Autologue User’s Manual – Multi-Store
Page 5
The Purchasing Program screen will be displayed as shown:
Note that all functions are identical to the standard purchasing menu with the
exception of the F2 PRINT OR TRANSMIT PURCHASE ORDERS.
•
When the purchase order is ready to be transmitted to the host store, press the <F2>
(Print Or Transmit Purchase Orders) function key.
•
With the cursor positioned at the PURCHASE ORDER # prompt, enter the purchase
order to be transmitted and press <Return>.
•
With the cursor positioned at the PRINT THE P.O. (Y/N)? prompt, enter N and
press <Return>.
Entering N will display PO Total Dollars and Total Weight calculated figures for the
purchase order on the bottom of the screen.
•
With the cursor positioned at the TRANSMIT TO MAIN STORE (Y/N)? prompt,
enter Y and press <Return>.
The file will then be transmitted to a holding area that is used when later
consolidating.
The steps above are repeated at each branch store.
18.3.3 Creating A Multi-Store Purchase Order At The Host Store
When the purchase orders from all branch stores have been transmitted to the host
store, the host store can create a “consolidated” or “fill from stock” purchase order
from the detail transmitted by each of the branch stores.
•
From the Autologue Main Menu, enter 15 (Multi-Store Functions) and press
<Return>.
Autologue User’s Manual – Multi-Store
Page 6
The Multi-Store Functions Menu will be displayed.
•
From the Multi-Store Functions Menu, enter 6 (Consolidate Purchase Orders) and press
<Return>.
The Consolidated Purchasing Program screen will appear as below:
•
With the cursor positioned at the MENU OPTION DESIRED prompt, press the <F1>
(Create New Purchase Order) function key to create a purchase order.
The <F1> (Create New Purchase Order) function key allows for the creation of
consolidated or fill from stock orders from each of the branch store’s transmitted
purchase orders.
Autologue User’s Manual – Multi-Store
Page 7
The Consolidated Purchasing Program screen will appear as below:
•
With the cursor positioned at the VENDOR # prompt, enter the vendor’s account
number and press <Return>.
•
With the cursor positioned at the FIRST PRODUCT LINE prompt, enter the
beginning product line number to start scanning from and press <Return>.
•
With the cursor positioned at the LAST PRODUCT LINE prompt, enter the ending
product line number to scan to and press <Return>.
•
With the cursor positioned at the REPORT CODES : prompt, enter the specific
report code characters to filter part selection by or just press <Return> to not filter
by report code.
When report codes are entered, purchasing will only scan those parts that have
matching codes!
•
With the cursor positioned at the POP CODES : prompt, enter the specific report
code characters to filter part selection by or just press <Return> to not filter by
popularity code.
When popularity codes are entered, purchasing will only scan those parts that have
matching codes!
•
With the cursor positioned at the PURCHASE ORDERS _ prompt, enter the Y to
create a purchase order and press <Return>.
The next two prompts, CORE RETURNS _ and WARRANTY RETURNS _, will be
skipped and automatically defaulted to N.
•
With the cursor positioned at the VENDOR DISCOUNT _ prompt, enter Y or N and
press <Return>.
Autologue User’s Manual – Multi-Store
Page 8
Enter Y to include any discounts in the host store’s product line file on the
multi-store purchasing creation report.
•
With the cursor positioned at the FILL FROM INVENTORY _ prompt, enter Y or N
and press <Return>.
Enter Y to create a purchase order to be filled from the stock of the host store. When
creating a purchase order to be filled from the stock of the host store, no branch store
purchase orders should be transmitted from the host store on the product lines being
filled.
Enter N to create a consolidated purchase order to be ordered from a supplier other
than the host store.
Once all the prompts have been answered, the system will begin READING
TRANSMITTED FILES. Once all the transmitted files are read, the following screen
will be displayed:
The Consolidated Purchasing Program screen will appear as below:
•
With the cursor positioned at the DO YOU WANT TO PRINT EVERY TRANSMITTED
P.O.? prompt, enter Y or N and press <Return>.
Entering Y will begin printing a report for each branch store listing the part number,
quantity and branch store purchase order number of each item to be consolidated or
filled from stock. After printing each branch store, the system will then generate a
total for all of the stores combined.
Next the system will display the time and date of the last transmitted purchase order
from each branch store.
•
With the cursor positioned at the DO YOU WANT TO GO AHEAD WITH
CONSOLIDATION? (Y/N) prompt, enter Y or N and press <Return>.
Autologue User’s Manual – Multi-Store
Page 9
The following page will list examples of the reports that can be generated during the
creation of a Multi-Store Purchase Order.
Once all branch stores have successfully transmitted the purchasing detail, enter Y
and press <Return> and the system will continue creating the multi-store purchase
order. The message CONSOLIDATION IN PROGRESS will be displayed.
18.3.3.1 Sample Transmitted Purchase Order Report
TIME PRINTED : 11:02
MM/DD/YY
PAGE 1
TRANSMITTED PURCHASE ORDER REPORT
STORE NAME: STR1
* PURCHASE ORDER *
PL#
1
1
1
1
PART NUMBER
ACD-55-30
ACD-87-40
ACD-87-40
ACD-311
DESCRIPTION
AC DELCO BATT
AC DELCO BATT
AC DELCO BATT
AC DELCO BATT
QTY
10
5
1
1
UNIT/PR
40.93
32.86
32.86
43.94
CORE
0.00
0.00
0.00
0.00
TOTAL
409.30
164.30
32.86
43.94
PO#
15
15
13
13
The Transmitted Purchase Order Report will list by store and product line, part
numbers to order and return. This report can be used for developing individual
picking tickets for each branch store.
18.3.3.2 Sample Not Found Part Report
TIME PRINTED : 11:15
MM/DD/YY
PAGE 1
NOT FOUND PART REPORT
STORE NAME : STR1
PURCHASE ORDER # : 15
PART NUMBER
ACD-59-30
ACD-59-30
QUANTITY
26
1
DATE : MM/DD/YY
* TYPE OF ORDER *
PURCHASE ORDER
WARRANTY RETURN
The Not Found Part Report lists part numbers transmitted but not found in the
inventory file of the host store. To add these part numbers to a purchase order use
the <F5> (Add Parts) function key.
18.3.3.3 Sample Incorrect Quantity Report
TIME PRINTED: 11:26
MM/DD/YY
PAGE 1
INCORRECT QUANTITY REPORT
STORE OF
ORIGIN
STR1
ORIGINAL
PO #
16
PART NUMBER
ACD-R45TS
INCORRECT
QUANTITY
ORDERED
11
CORRECT
UNITS PER
PACKAGE
8
The Incorrect Quantity Report lists part numbers transmitted with an ordered
quantity in disagreement with the unit pack quantity of the host store’s inventory
file.
Consolidated purchase orders will be numbered according to the next available
purchase order number of the host store. After the purchase order has been created,
the screen will return to the Consolidated Purchasing Program screen.
Autologue User’s Manual – Multi-Store
Page 10
18.3.4 Editing A Consolidated Purchase Order
After the purchase order has been created, the host store can edit the order either
individually or collectively. Editing a purchase order individually allows the
quantity ordered and received to be edited for an individual branch store. Parts
numbers can also be added or deleted from the order. Editing a purchase order
collectively allows the quantity ordered and received to be edited simultaneously for
all branch stores. User’s cannot add or delete from the order when editing
collectively.
To edit a consolidated purchase order, perform the following steps:
•
From the Consolidated Purchasing Program screen, press the <F3> (Edit Purchase
Orders) function key.
The Edit Consolidated Purchase Orders screen will appear as shown:
•
With the cursor positioned at the PURCHASE ORDER # prompt, enter the purchase
order number to edit and press <Return>.
18.3.4.1 Performing A Consolidated Edit
•
With the cursor positioned at the INDIVIDUAL OR CONSOLIDATED EDIT (I/C)?
prompt, enter C (Consolidated) and press <Return>.
Autologue User’s Manual – Multi-Store
Page 11
The Purchase Order Edit screen will appear as shown:
When performing a consolidated edit, each item’s ordered and received quantities
can be viewed for all branch stores simultaneously. The ordered or received
quantities can be edited, but user’s cannot add or delete items from the purchase
order while in the consolidated edit mode.
) Note: Editing the quantity ordered or received by a branch store does NOT update
the original purchase order created and transmitted at the branch store.
18.3.4.2 Performing An Individual Edit
•
With the cursor positioned at the INDIVIDUAL OR CONSOLIDATED EDIT (I/C)?
prompt, enter I (Individual) and press <Return>.
•
With the cursor positioned at the STORES NUMBER (or ‘A’ FOR ALL) prompt,
enter the number corresponding to the store number to be edited or A (All) and press
<Return>.
Autologue User’s Manual – Multi-Store
Page 12
The Purchase Order Edit screen will appear as shown:
When performing an individual edit, the top left corner of the screen will display the
branch store number of each item being edited. Performing an individual edit
allows the quantity ordered or received, in addition to the ability to add or delete
part numbers to the purchase order for the branch store listed. Editing the quantity
ordered or received by a branch store does not update the original purchase order
created and transmitted at the branch store.
) Note: Adding a part number to the purchase order, not stocked by the host store,
will cause the system to create a part number record in product line zero of the
host store.
As in the normal editing of a purchase order, <F1> will allow a particular item
number to be displayed, <F8> will scroll forward throughout the purchase order,
<F9> will scroll backwards, <F10> will record all changes and <F11> will exit the
edit function.
Always press <Return> and <F10> after performing all edits of the quantity
ordered or received for each item.
18.3.5 Fill From Stock Option
Purchase orders created by a branch store can be filled from the inventory of the host
store when the FILL FROM STOCK prompt is answered Y during the creation of the
multi-store purchase order.
Autologue User’s Manual – Multi-Store
Page 13
Filling purchase orders from the inventory of the host store will reduce the quantity
on hand of host store by the quantity ordered by the branch store. When the branch
store orders a quantity greater than what is on hand at the host store, users have the
option to backorder or cancel the quantity unable to be filled.
Backordering items ordered, but not filled, will update the Fill Backorder field within
the inventory file of the host store. Fill backorders are also maintained in the
multi-store purchasing menu as open purchase orders if not deleted.
18.3.5.1 Performing A Fill From Stock
To fill a branch store’s purchase order from the inventory of the host store, follow
the steps listed below:
•
From the Multi-Store Functions Menu, enter 6 (Consolidate Purchase Orders) and press
<Return>.
•
With the cursor positioned at the MENU OPTION DESIRED prompt, press the <F1>
(Create New Purchase Order) function key to create a purchase order.
•
With the cursor positioned at the VENDOR # prompt, enter the vendor’s account
number and press <Return>.
•
With the cursor positioned at the FIRST PRODUCT LINE prompt, enter the
beginning product line number to start scanning from and press <Return>.
•
With the cursor positioned at the LAST PRODUCT LINE prompt, enter the ending
product line number to scan to and press <Return>.
•
With the cursor positioned at the REPORT CODES : prompt, enter the specific
report code characters to filter part selection by or just press <Return> to not filter
by report code.
•
With the cursor positioned at the POP CODES : prompt, enter the specific report
code characters to filter part selection by or just press <Return> to not filter by
popularity code.
•
With the cursor positioned at the PURCHASE ORDERS _ prompt, enter the Y to
create a purchase order and press <Return>.
The next two prompts, CORE RETURNS _ and WARRANTY RETURNS _, will be
skipped and automatically defaulted to N.
•
With the cursor positioned at the VENDOR DISCOUNT _ prompt, enter Y or N and
press <Return>.
•
With the cursor positioned at the FILL FROM INVENTORY _ prompt, enter Y and
press <Return>.
Enter Y to create a purchase order to be filled from the stock of the host store. When
creating a purchase order to be filled from the stock of the host store, no purchase
orders from the host store should be transmitted on the product lines being filled.
Autologue User’s Manual – Multi-Store
Page 14
Once all the prompts have been answered, the system will begin READING
TRANSMITTED FILES. Once all the transmitted files are read, the following screen
will be displayed:
•
With the cursor positioned at the DO YOU WANT TO PRINT EVERY TRANSMITTED
P.O.? prompt, enter Y or N and press <Return>.
Entering Y will begin printing a report for branch store listing the part number,
quantity and branch store purchase order number of each item to be consolidated or
filled from stock. After printing each branch store, the system will then generate
total the information of all store combined.
Next the system will display the time and date of the last transmitted purchase order
from each branch store.
•
With the cursor positioned at the DO YOU WANT TO GO AHEAD WITH
CONSOLIDATION? (Y/N) prompt, enter Y and press <Return>.
A Fill From Stock purchase order will now be created and the purchase order
number will be displayed.
•
After the fill from stock purchase order has been edited, press the <F6> (Fill From
Inventory) key.
The Fill Purchase Orders From Inventory screen will appear as shown:
•
With the cursor positioned at the PURCHASE ORDER # prompt, enter the multi-store
purchase order number to be filled and press <Return>.
•
With the cursor positioned at the STORE NUMBER (or ‘A’ FOR ALL)? prompt,
enter a store number or A for all stores and press <Return>.
Autologue User’s Manual – Multi-Store
Page 15
The host store item quantities will be reduced by the quantities ordered from the
branch stores. Users can choose to fill the orders from each branch store separately
or as a group. When filling orders as a group, the system will automatically fill in
sequential store number order.
If six stores each order ten units of a part number and the host store only has thirty
units on hand, it would fill 100% of the orders from the first three stores and fill
backorder the quantities ordered by the remaining stores.
Immediately upon filling the orders of a branch store from the host store, the
inventory of the host store will be adjusted.
Users have the option to use the consolidated edit function to display and modify
the fill quantities of each branch store.
•
To print packing slips for each branch store, use the <F2> (Print Purchase Orders)
function from the Consolidated Purchasing Program menu.
•
After printing packing slips for each branch store, select the <F5> (Delete Filled Items
& Backorder Remainder) key to delete all items filled and backorder any items not
filled.
•
If no backorders are maintained for the branch stores, select the <F4> (Delete
Purchase Orders) key to delete the remaining backordered items from the purchase
order.
Items backordered using the Fill From Stock function will update the Fill B/O field
within the host store’s inventory file.
The host store’s inventory file is updated, but the branch store’s inventory files are
not. The original purchase orders created at each branch store must be received,
edited and applied through the Main Menu of each branch store.
Receiving the original purchase order at each branch store and applying receipts will
update both the branch store’s inventory and vendor files. Using vendor statements,
the dollar value of merchandise shipped from the host store to each branch store can
be tracked and printed during month end.
18.3.6 Printing Multi-Store Purchase Orders
When printing a multi-store purchase order, there are several options that allow for
the following:
♦
♦
♦
♦
Print totals of all stores, all stores individually, or one particular branch store only
Print the report with or without prices
Include the vendor discount when printing prices
Print the quantity ordered or shipped
To print a purchase order, follow the steps listed below:
•
From the Multi-Store Functions Menu, enter 6 (Consolidate Purchase Orders) and press
<Return>.
Autologue User’s Manual – Multi-Store
•
Page 16
With the cursor positioned at the MENU OPTION DESIRED prompt, press the <F2>
(Print Purchase Orders) function key to print a purchase order report.
The Print Consolidated Purchase Orders screen will appear as shown:
18.3.6.1 Printing A Consolidated Purchase Order
•
With the cursor positioned at the PURCHASE ORDER # prompt, enter the multi-store
purchase order number to be printed and press <Return>.
If the entered number is a consolidated purchase order, the cursor will appear at the
PRINT TOTAL QUANTITIES (Y/N)? prompt.
•
With the cursor positioned at the PRINT TOTAL QUANTITIES (Y/N)? prompt,
enter Y or N and press <Return>.
Entering Y will print one line for each part number ordered, with the total quantity,
ordered or received, for all stores on the report. The cursor will be positioned at the
PRINT QUANTITIES ORDERED (Y/N)? prompt.
Entering N will list part numbers ordered by individual store on the reports. The
cursor will appear at the STORE NUMBER (or ‘A’ FOR ALL)? prompt.
To print only the items ordered or received by one branch store, enter N at the PRINT
QUANTITIES ORDERED (Y/N)? prompt and enter the branch store number at the
STORE NUMBER (or ‘A’ FOR ALL)? prompt.
•
With the cursor positioned at the STORE NUMBER (or ‘A’ FOR ALL)? prompt,
enter a store number or A for all stores and press <Return>.
Entering A will print a separate report for each branch store. Entering a specific store
number will only print a report for the specific store.
Autologue User’s Manual – Multi-Store
•
Page 17
With the cursor positioned at the PRINT QUANTITIES ORDERED prompt, enter Y or
N and press <Return>.
Entering N will print a quantity-received column. By printing the quantity received,
it’s possible to print packing slips for each branch store.
•
With the cursor positioned at the PRINT PRICES (Y/N)? prompt, enter Y or N and
press <Return>.
If Y was entered, the cursor will be positioned at the INCLUDE VENDOR DISCOUNT
(Y/N)? prompt.
•
With the cursor positioned at the INCLUDE VENDOR DISCOUNT (Y/N)? prompt,
enter Y or N and press <Return>.
The report will begin printing.
18.3.6.2 Printing A Fill From Stock Purchase Order
•
With the cursor positioned at the PURCHASE ORDER # prompt, enter the multi-store
fill purchase order number to be printed and press <Return>.
If the entered number is a fill from stock purchase order, the cursor will appear at
the STORE NUMBER (or ‘A’ FOR ALL)? prompt.
•
With the cursor positioned at the STORE NUMBER (or ‘A’ FOR ALL)? prompt,
enter a store number or A for all stores and press <Return>.
Entering A will print a separate report for each branch store. Entering a specific store
number will only print a report for the specific store.
•
With the cursor positioned at the PRINT QUANTITIES ORDERED prompt, enter Y or
N and press <Return>.
Entering N will print a quantity-received column. By printing the quantity received,
it’s possible to print packing slips for each branch store.
•
With the cursor positioned at the PRINT PRICES (Y/N)? prompt, enter Y or N and
press <Return>.
If Y was entered, the cursor will be positioned at the INCLUDE VENDOR DISCOUNT
(Y/N)? prompt.
•
With the cursor positioned at the INCLUDE VENDOR DISCOUNT (Y/N)? prompt,
enter Y or N and press <Return>.
The report will begin printing.
18.3.7 Updating The Branch Store’s Inventory File
When the purchase order is received at the branch store, updating the inventory file
is identical to the standard purchasing process. The original purchase order that was
transmitted to the host store is still open.
Autologue User’s Manual – Multi-Store
Page 18
The original purchase order should be received as ordered, edited and then applied.
See the Purchasing section of the user’s manual for step-by-step instructions on
receiving and applying a purchase order.
18.4 Consolidated Statements Overview
Through Multi-Store Statements, statement detail from common and non-common
customers of each branch store can be transmitted to the host store for consolidating
and printing.
Consolidating the statement detail of a common customer from several branch stores
allows one statement to be printed for each customer, regardless of the number of
stores purchased from. The consolidated statement will list the detail from all stores
onto one statement. Both Open Item and Balance Forward accounts can be
consolidated.
An additional feature of Multi-Store Statements is its ability to impose date limits
when transmitting statement detail from a branch store to the host store.
The first step in Consolidated Statements is to transmit the statement detail from
each branch store to the host store.
18.4.1 Assigning Common Customer Numbers
Before statement detail from branch store customers can be consolidated at the host
store, common customer numbers must be assigned and entered at each branch
store.
A common customer number is assigned to allow a customer to purchase
merchandise from more than one branch store and still only receive one statement at
the end of each week or month.
The common customer assigned is that of the customer’s standard customer number
at the host store.
For consolidated statements to function properly, the branch stores must know the
common customer number of each common customer.
To enter the common customer number at each branch store, follow the steps listed
below:
•
From the Autologue Main Menu of the branch store, enter 3 (Customer/Vendor File) and
press <Return>.
The Customer/Vendor Update program will be displayed and the cursor will be
positioned at the ENTER CUSTOMER NAME OR NUMBER: prompt.
•
Enter the customer number and press <Return>.
Autologue User’s Manual – Multi-Store
Page 19
•
From the Customer/Vendor Update screen, press the F4 (Show Common Customers) key
and the Common Customer Number screen will appear as shown:
•
With the cursor positioned next to the COMMON CUSTOMER NUMBER prompt, enter
the common customer number and press <Return>.
The common customer number of each account must match the customer’s standard
account number at the host store.
•
Press the <F10> (Record Changes) key to save the changes.
Repeat the steps above at each branch store. Common customer numbers of a
branch store can be printed out through the Common Customer Report.
18.4.2 Transmitting Statement Detail To The Host Store
To transmit statement details of common and/or non-common customers from a
branch store, follow the steps listed below:
•
From the Multi-Store Functions Menu, enter 4 (Transmit Statements) and press
<Return>.
Autologue User’s Manual – Multi-Store
Page 20
The following screen will now be displayed as shown:
•
With the cursor positioned at the ENTER ‘1’ OR ‘2’ prompt, enter 1 (Current
Month) or 2 (Prior Month) and press <Return>.
The Send Charges And Credits screen will now be displayed as shown:
Autologue User’s Manual – Multi-Store
Page 21
18.4.2.1 Transmitting Statements For A Range Of Customers
•
With the cursor positioned at the ENTER 1, 2, 3, OR 4 prompt, enter a 1
(Customer) and press <Return>.
•
With the cursor positioned at the BEGINNING CUSTOMER: prompt, enter the
beginning customer number and press <Return>.
•
With the cursor positioned at the ENDING CUSTOMER: prompt, enter the ending
customer number and press <Return>.
The cursor will move to the DATE LIMITS? (Y/N) prompt.
18.4.2.2 Transmitting Statements For A Range Of Vendors
•
With the cursor positioned at the ENTER 1, 2, 3, OR 4 prompt, enter a 2
(Vendors) and press <Return>.
•
With the cursor positioned at the BEGINNING VENDOR: prompt, enter the
beginning vendor number and press <Return>.
•
With the cursor positioned at the ENDING VENDOR: prompt, enter the ending
vendor number and press <Return>.
The cursor will move to the DATE LIMITS? (Y/N) prompt.
18.4.2.3 Printing Statements By Salesman Code
•
With the cursor positioned at the ENTER 1, 2, 3, OR 4 prompt, enter a 3
(Salesman) and press <Return>.
•
With the cursor positioned at the BEGINNING SALESMAN: prompt, enter the
beginning salesman code and press <Return>.
•
With the cursor positioned at the ENDING SALESMAN: prompt, enter the ending
salesman code and press <Return>.
) Valid salesman codes are (A - Z and 0 - 9).
•
With the cursor positioned at the CUSTOMERS (C), VENDORS (V) OR BOTH
(B)? prompt, enter a C, V or B to print customer and/or vendor statements and
press <Return>.
The cursor will move to the DATE LIMITS? (Y/N) prompt.
18.4.2.4 Printing Statements By Report Code
•
With the cursor positioned at the ENTER 1, 2, 3, OR 4 prompt, enter a 4 (Report
Code) and press <Return>.
•
With the cursor positioned at the REPORT CODE: prompt, enter the report code and
press <Return>.
Autologue User’s Manual – Multi-Store
Page 22
) Valid report codes are (A - Z and 0 - 9).
•
With the cursor positioned at the CUSTOMERS (C), VENDORS (V) OR BOTH
(B)? prompt, enter a C, V or B to print customer and/or vendor statements and
press <Return>.
The cursor will move to the DATE LIMITS? (Y/N) prompt.
•
With the cursor positioned at the DATE LIMITS? (Y/N) prompt, enter Y or N and
press <Return>.
Entering N will transmit all details regardless of dates. The cursor will then be
positioned at the ACCOUNTS WITH COMMON NUMBER? (Y/N) prompt.
Entering Y allows statement details within a date range to be transmitted.
•
With the cursor positioned at the STARTING MM/DD/YY prompt, enter the starting
date and press <Return>.
•
With the cursor positioned at the ENDING MM/DD/YY prompt, enter the ending date
and press <Return>.
•
With the cursor positioned at the ACCOUNTS WITH COMMON NUMBER? (Y/N)
prompt, enter Y or N and press <Return>.
Entering Y will transmit statement detail of common customer accounts to the host
store.
•
With the cursor positioned at the ACCOUNTS WITH NON-COMMON NUMBER? (Y/N)
prompt, enter Y or N and press <Return>.
Entering Y will transmit statement detail of non-common customer accounts to the
host store.
•
With the cursor positioned at the BEGIN TRANSMISSION? (Y/N) prompt, enter Y
and press <Return> to begin transmission of statement detail from the branch store
to the host store.
Perform the steps above at each branch store.
Do not send a second statement detail file to the host store until the first file has been
consolidated and printed. Transmission of a second file will overwrite the previous
statement detail file.
Statements transmitted with date limits will also include a “Previous Current
Balance” value if any statement detail does not fall into the date limits specified.
18.4.3 Printing Multi-Store Statements At The Host Store
When all branch stores have transmitted their statement detail files, statements may
be printed at the host for common and/or non-common customers.
When printing common customer statements the system will consolidate the details
of all branch stores onto one statement. When printing common customers the
system will scan the transmitted statement files of all branch stores.
Autologue User’s Manual – Multi-Store
Page 23
If details from the host store are to be included on the consolidated statement, the
host store must first transmit the detail before consolidating.
When printing non-common customer statements, the system will print the
statements of one branch store or all branch stores.
To print statements follow the steps listed below:
•
From the Multi-Store Functions Menu, enter 5 (Consolidate Statements) and press
<Return>.
The Consolidated Statements screen will now be displayed as shown:
18.4.3.1 Printing Common Customer Statements
•
With the cursor positioned at the COMMON OR NON-COMMON CUSTOMERS? (C/N)
prompt, enter C and press <Return>.
•
With the cursor positioned at the CUSTOMERS OR VENDORS (C/V)? prompt, enter
C or V and press <Return>.
Enter a C to print consolidated customer statements or V to print consolidated
vendor statements.
•
With the cursor positioned at the FIRST CUSTOMER NUMBER? prompt, enter the
first customer (or vendor) number and press <Return>.
•
With the cursor positioned at the LAST CUSTOMER NUMBER? prompt, enter the last
customer (or vendor) number and press <Return>.
•
With the cursor positioned at the PRINT STATEMENT MESSAGE AT: (1)TOP
(2)MIDDLE (3)BOTTOM prompt, enter a 1, 2, or 3 and press <Return>.
Autologue User’s Manual – Multi-Store
•
Page 24
With the cursor positioned at the PRINT YOUR STORE'S NAME AT TOP? (Y/N)
prompt, enter Y or N and press <Return>.
Entering Y will print the name and address information of customer #0 on the top of
each statement page.
•
With the cursor positioned at the AT BOTTOM? (Y/N) prompt, enter Y or N and
press <Return>.
Entering Y will print the name of customer #0 on the bottom of each statement.
•
With the cursor positioned at the INCLUDE THIS MONTH'S FINANCE CHARGES?
(Y/N) prompt, enter Y or N and press <Return>.
Entering Y will calculate a finance charge for all statements printed with an unpaid
old balance based upon the total outstanding old balance of all stores and the finance
charge percent of the host store.
) Note: Finance charges are only calculated on customer statements. The service
total dollar amounts within the customer records are NOT updated! This prompt
should be answered Y when printing statements as part of the month end
procedure.
•
With the cursor positioned at the PRINT A TEST PATTERN? (Y/N) prompt, enter
Y or N and press <Return>.
Entering Y will print several rows of XXXXXX’s that allows the user to check that the
statements are properly loaded and aligned.
Entering N will begin sorting and printing of the consolidated statements.
Only the last transmitted statement detail file of each branch store will be sorted and
printed.
18.4.3.2 Printing Non-Common Customer Statements
Statements for non-common customers can be printed by following the steps listed
below:
•
With the cursor positioned at the COMMON OR NON-COMMON CUSTOMERS? (C/N)
prompt, enter N and press <Return>.
•
With the cursor positioned at the STORE NAME (ENTER ‘A’ FOR ALL STORES)?
prompt, enter a store or A for all stores and press <Return>.
Non-common customer (or vendor) statements will only be printed for the store
requested.
•
With the cursor positioned at the CUSTOMERS OR VENDORS (C/V)? prompt, enter
C or V and press <Return>.
Enter a C to print consolidated customer statements or V to print consolidated
vendor statements.
•
With the cursor positioned at the FIRST CUSTOMER NUMBER? prompt, enter the
first customer (or vendor) number and press <Return>.
Autologue User’s Manual – Multi-Store
Page 25
•
With the cursor positioned at the LAST CUSTOMER NUMBER? prompt, enter the last
customer (or vendor) number and press <Return>.
•
With the cursor positioned at the PRINT STATEMENT MESSAGE AT: (1)TOP
(2)MIDDLE (3)BOTTOM prompt, enter a 1, 2, or 3 and press <Return>.
•
With the cursor positioned at the PRINT YOUR STORE'S NAME AT TOP? (Y/N)
prompt, enter Y or N and press <Return>.
Entering Y will print the name and address information of customer #0 on the top of
each statement page.
•
With the cursor positioned at the AT BOTTOM? (Y/N) prompt, enter Y or N and
press <Return>.
Entering Y will print the name of customer #0 on the bottom of each statement.
•
With the cursor positioned at the INCLUDE THIS MONTH'S FINANCE CHARGES?
(Y/N) prompt, enter Y or N and press <Return>.
Entering Y will calculate a finance charge for all statements printed with an unpaid
old balance based upon the total outstanding old balance of all stores and the finance
charge percent of the host store.
) Note: Finance charges are only calculated on customer statements. The service
total dollar amounts within the customer records are NOT updated! This prompt
should be answered Y when printing statements as part of the month end
procedure.
•
With the cursor positioned at the PRINT A TEST PATTERN? (Y/N) prompt, enter
Y or N and press <Return>.
Entering Y will print several rows of XXXXXX’s that allows the user to check that the
statements are properly loaded and aligned.
Entering N will begin sorting and printing of the consolidated statements.
18.5 Stock Replenishment Report Overview
The Stock Replenishment Report is printed at the host store and lists unit sales, core
returns and warranty returns by part number for each branch store. One report is
generated for each store with no system wide consolidation.
The Stock Replenishment Report is useful for determining inventory replenishment
and monitoring core and warranty returns at each branch store.
The first step in generating a Stock Replenishment Report is for each branch store to
transmit its replenishment data to the host store. Once each branch store has
transmitted it’s data, the host store can print the Stock Replenishment Report for
each store.
Autologue User’s Manual – Multi-Store
PAGE 1
Page 26
PRINTED MM/DD/YY 12:41:20
STORE: STR1
STOCK REPLENISHMENT REPORT
PART
DESCRIPTION
ACD-49-30
ACD-R45TS
ACD-46
CAP-M112
CAP-M112
CSP-N9YC
ECI-11A
MAE-3041
WIX-51040
AC DELCO BATTERIES
AC DELCO SPARK PLUGS
AC DELCO SPARK PLUGS
REMANUFACTURED WATER PUMP
REMANUFACTURED WATER PUMP
CHAMPION SPARK PLUGS
BRASS FITTINGS
MONROE SHOCKS
WIX OIL FILTER
SALES
9
64
16
1
0
-12
2
0
1
CORES
0
0
0
0
1
0
0
0
0
WARRANTIES
0
0
0
0
0
0
0
2
0
) Note: Inventory returns will subtract from the unit sales column.
18.5.1 Transmitting The Replenishment Data To The Host Store
To send the stock replenishment data from each branch store, follow the steps listed
below:
•
From the Multi-Store Functions Menu, enter 2 (Transmit Stock Replenishment Data) and
press <Return>.
The Transmit Stock Replenishment Data screen will now be displayed as shown:
The system will begin checking product line by product line for sales, core and
warranty returns. When all product lines are checked, the data will be transmitted
to the host store and the sales totals at the branch store will be reset to zero.
Repeat the steps above at each branch store. The sales data transferred will include
items currently on open workspaces. To omit this information transferred, delete all
open workspaces before accessing the Transmit Stock Replenishment Data screen.
Autologue User’s Manual – Multi-Store
Page 27
18.5.2 Printing The Stock Replenishment Report
Once the stock replenishment data from each store has been transmitted to the host
store, follow the steps listed below to print a Stock Replenishment Report:
•
From the Multi-Store Functions Menu of the host store, enter 7 (Print Stock
Replenishment Data) and press <Return>.
The Stock Replenishment Report screen will now be displayed as shown:
•
With the cursor positioned at the PRINT THE REPORT (Y/N)? prompt, enter Y
and press <Return> to begin printing the report.
•
After the report is finished printing, the cursor will be positioned at the IS THE
REPORT COMPLETE (Y/N)? prompt. Enter Y and press <Return> to delete the
stock replenishment files of all transmitted branch stores.
18.6 Remote Daily Sales Analysis Report Overview
The Remote Daily Sales Analysis Report lists daily and month to date sales totals for
each store by counterman and supplies grand totals for all stores. The following
totals are supplied for each counterman and store:
♦
♦
♦
♦
♦
Net Sales
Taxable Sales
A/R Receipts
Cost of Sales
Tax Collected
♦
♦
♦
♦
♦
Gross Receipts
Profit Percent
Core Sales
# of Invoices
Cash Sales
♦
♦
♦
♦
♦
Labor Sales
# Of Line Items
Charge Sales
Misc Sales
Profit Dollars
Autologue User’s Manual – Multi-Store
Page 28
In addition, for each store a listing of Receipts, Open Orders and Outstanding
Special Orders is also printed.
The movement of daily sales analysis data from each store to the host store can be
done by local manager at each branch store or by someone from the host location.
The Remote Daily Sales Analysis Report is printed at the host store. It prints data
from each branch store’s Daily Sales Analysis sent to the host store. Each store is
printed individually on a separate set of pages. In addition, consolidated totals for
all stores are supplied on the final page.
18.6.1 Transmitting The Daily Sales Activity To The Host Store
To transmit the daily sales activity from a branch store to the host store follow the
steps listed below:
•
From the Multi-Store Functions Menu of the branch store, enter 3 (Transmit Daily Sales
Analysis) and press <Return>.
The Daily Sales Analysis By Counterman screen will now be displayed as shown:
) Note: Point of Sale activity should be halted at the branch store during the
transmitting of the daily sales activity!
The screen will display the default Dsa field values that are setup through the System
Command - Specify System Setup Options menu selection.
•
With the cursor positioned at the FIRST DAY OF NEW MONTH (Y/N)? prompt,
enter Y or N and press <Return> or just press <Return> to use the default value.
Autologue User’s Manual – Multi-Store
Page 29
Typically you will want to answer N to this prompt. See the Daily Sales Analysis
section of the User’s Manual for additional information on running the daily sales
analysis report.
•
Enter Y at the UPDATE MONTHLY TOTALS (Y/N)? prompt at the end of each day
and press <Return>. Entering Y will add the counterman’s daily sales totals to the
counterman’s monthly sales totals and clear out the daily totals to prepare for the
next day’s business activity.
To generate a test Daily Sales Analysis report, enter N to both the FIRST DAY OF
NEW MONTH (Y/N)? and UPDATE MONTHLY TOTALS (Y/N)? prompts. The
report will print and none of the daily or monthly sales totals will be updated or
cleared.
•
With the cursor positioned at the BEGINNING COUNTERMAN (A-Z OR 0-9)?
prompt, enter the beginning counterman code to run the report from and press
<Return> or just press <Return> to use the default value.
It is recommended that the beginning counterman code be A to begin the report and
eliminate any chance of forgetting to update a counterman’s monthly sales totals by
mistake.
•
With the cursor positioned at the ENDING COUNTERMAN (A-Z OR 0-9)? prompt,
enter the ending counterman code to run the report to and press <Return> or just
press <Return> to use the default value.
It is recommended that the ending counterman code be 9 to end the report and
eliminate any chance of forgetting to update a counterman’s monthly sales totals by
mistake.
•
With the cursor positioned at the PRINT DAILY SALES TOTAL ONLY? prompt,
enter Y or N and press <Return> or just press <Return> to use the default value.
Entering Y will print only the daily sales activity and a listing of all applied receipts.
Entering N will print the full six-page Daily Sales Analysis report.
•
With the cursor positioned at the PRINT REPORT (Y/N)? prompt, enter Y or N and
press <Return> or just press <Return> to use the default value.
Entering N will return the cursor to the first prompt and allows new values to be
entered.
•
With the cursor positioned at the TRANSMIT THE DATA (Y/N)? prompt, enter Y
and press <Return>.
The information will be transferred to the host store.
Repeat the steps above at each branch store.
18.6.2 Printing The Consolidated Daily Sales Analysis
Once the daily sales activity from each branch store has been transmitted to the host
store, following the steps listed below to print a Consolidated Daily Sales Activity
Report:
Autologue User’s Manual – Multi-Store
•
Page 30
From the Multi-Store Functions Menu of the host store, enter 8 (Print Remote Daily
Sales Analysis) and press <Return>.
The Consolidated Daily Sales Analysis screen will now be displayed as shown:
•
With the cursor positioned at the PRINT DAILY SALES TOTAL ONLY? prompt,
enter Y or N and press <Return> or just press <Return> to use the default value.
Entering Y will print only the daily sales activity and a listing of all applied receipts.
Entering N will print the full six-page Daily Sales Analysis report.
•
With the cursor positioned at the KEEP TRANSMISSION FILES? prompt, enter Y or
N and press <Return>.
Entering N will remove the Daily Sales Analysis transmission files once this program
is exited.
Entering Y will retain the Daily Sales Analysis transmission files so a consolidated
report can again be run without having to retransmit the sales information again.
•
With the cursor positioned at the START PRINTING REPORT (Y/N)? prompt,
enter Y and press <Return> to begin printing the report.
After the report is completed, the screen will return to the Multi-Store Functions
Menu.
18.7 Consolidated Inventory Report Overview
The Consolidated Inventory Report function can be performed from any branch
store. Information can be screen displayed or printed from all stores on the system.
Autologue User’s Manual – Multi-Store
Page 31
The following information will be included on the printed consolidated inventory
report by part number and store:
♦
♦
♦
♦
♦
on hand
unit pack
min1/max1
min2/max2
on order
♦
♦
♦
♦
♦
♦
♦
♦
♦
back order
current qtr
last qtr
stockouts
price 0
price 3
price 5
core cost
core sell
The following information will be included on the printed consolidated inventory
report by product line and store:
♦ Beginning Month
Inventory
♦ Net Sales
♦ Profit Percent
♦ Cores Sales
♦ Net Purchases
♦ Cost of Sales
When displaying the information, the user will be prompted to display either Prices
or Quantities. If displaying quantities, the following information will be included:
♦
♦
♦
♦
pop code
on hand
min1/max1
min2/max2
♦ on order
♦ back order
♦ price 0
If pricing is selected, the following information will be displayed:
♦
♦
♦
♦
core cost
core sell
price 1
price 2
♦ price 3
♦ price 4
♦ price 5
18.7.1 Printing The Consolidated Inventory Report By Product Line
The report prints the parts in the order of the current store it was performed from.
The rest of the part numbers are then printed according to the ASCII order within
the rest of the stores (sorted).
To print the consolidated inventory report, follow the steps listed below:
•
From the Multi-Store Functions Menu of the host store, enter 9 (Consolidated Inventory
Report) and press <Return>.
Autologue User’s Manual – Multi-Store
Page 32
The Consolidated Inventory Price List screen will now be displayed as shown:
•
With the cursor positioned at the ENTER 1, 2 OR 3 prompt, enter 1 (Print Report
By Product Line) and press <Return> to print a report.
•
With the cursor positioned at the INCLUDE VENDOR DISCOUNT (Y/N)? prompt,
enter Y or N to include the vendor discount and press <Return>.
•
With the cursor positioned at the STOCKED/NON-STOCKED/BOTH(S/N/B) prompt,
enter an S (Stocked), N (Non-Stocked) or B (Both) and press <Return>.
Enter S to only print “stocked” parts, N to only print “non-stocked” parts or B to
print all parts (regardless of stocked/non-stocked status).
Stocked parts are those where the following criterion is true: ((min1 + max1) > 0 or
(quantity on hand > 0)).
•
With the cursor positioned at the BEGINNING PRODUCT LINE prompt, enter the
beginning product line number and press <Return>.
•
With the cursor positioned at the ENDING PRODUCT LINE prompt, enter the ending
product line number and press <Return>.
•
With the cursor positioned at the BEGIN REPORT? (Y/N) prompt, enter Y and
press <Return>.
18.7.2 Displaying The Consolidated Inventory Information
•
From the Multi-Store Functions Menu of the host store, enter 9 (Consolidated Inventory
Report) and press <Return>.
Autologue User’s Manual – Multi-Store
Page 33
The Consolidated Inventory Price List screen will now be displayed.
•
With the cursor positioned at the ENTER 1, 2 OR 3 prompt, enter 2 (Screen
Display By Part Number) and press <Return> to screen view a specific part number.
•
With the cursor positioned at the INCLUDE VENDOR DISCOUNT (Y/N)? prompt,
enter Y or N to include the vendor discount and press <Return>.
•
With the cursor positioned at the STOCKED/NON-STOCKED/BOTH(S/N/B) prompt,
enter an S (Stocked), N (Non-Stocked) or B (Both) and press <Return>.
Enter S to only print “stocked” parts, N to only print “non-stocked” parts or B to
print all parts (regardless of stocked/non-stocked status).
Stocked parts are those where the following criterion is true: ((min1 + max1) > 0 or
(quantity on hand > 0)).
The Consolidated Inventory Screen Display screen will now be displayed as shown:
•
With the cursor positioned at the ENTER 1 OR 2 prompt, enter a 1 to display
quantities or a 2 to display pricing information and press <Return>.
•
With the cursor positioned at the PART NUMBER: prompt, enter a part number to
view information for and press <Return>.
The screen will display the requested pricing or quantities information for the
entered part number and the cursor will again be positioned at the PART NUMBER:
prompt.
•
Enter another part number to be viewed or press the <F1> (Restart Screen) key to
position the cursor back at the ENTER 1 OR 2 prompt or press the <F11> (Return
To Previous Screen) key to return to the Consolidate Inventory Price List screen.
Autologue User’s Manual – Multi-Store
Page 34
18.7.3 Printing The Consolidated Inventory Report By Purchase Order
The report prints the parts in the order they are in on the purchase order.
To print the consolidated inventory report by purchase order, follow the steps listed
below:
•
From the Multi-Store Functions Menu of the host store, enter 9 (Consolidated Inventory
Report) and press <Return>.
The Consolidated Inventory Price List screen will now be displayed.
•
With the cursor positioned at the ENTER 1, 2 OR 3 prompt, enter 3 (Print Report
By Purchase Order) and press <Return>.
•
With the cursor positioned at the INCLUDE VENDOR DISCOUNT (Y/N)? prompt,
enter Y or N to include the vendor discount and press <Return>.
•
With the cursor positioned at the STOCKED/NON-STOCKED/BOTH(S/N/B) prompt,
enter an S (Stocked), N (Non-Stocked) or B (Both) and press <Return>.
Enter S to only print “stocked” parts, N to only print “non-stocked” parts or B to
print all parts (regardless of stocked/non-stocked status).
Stocked parts are those where the following criterion is true: ((min1 + max1) > 0 or
(quantity on hand > 0)).
•
With the cursor positioned at the PURCHASE ORDER NUMBER prompt, enter the
purchase order number and press <Return>.
•
With the cursor positioned at the BEGIN REPORT? (Y/N) prompt, enter Y and
press <Return>.
18.8 Centralized Inventory Control Overview
Centralized Inventory Control provides the ability to specify changes to be made to
the inventory of one store, several stores or all stores with a single operation.
The Centralized Inventory Control program can perform the following changes:
♦ Add new Part Numbers;
♦ Delete or Move existing Part Numbers;
♦ Change Per Car, Unit Pack, Unit Weight, Min1/Max1, Min2/Max2, Descriptions and
Prices of existing Part Numbers;
♦ Apply Manufacturer’s Price Updates;
♦ Perform Automatic Price Adjustments.
Using the Centralized Inventory Control functions, change files are first created
containing the changes to be made. These change files remain pending in a
temporary file until the user decides to apply them.
While pending, the change files can be modified, adjusted or printed. When
satisfied, the user selects which stores are to be updated. Next the system will
Autologue User’s Manual – Multi-Store
Page 35
transmit the pending file to each selected store, where the changes will be applied
automatically. Later, the results of each change file can be reviewed for each store.
18.8.1 Specify Changes & Additions To The Inventory File
To specify changes and/or additions to the inventory file, follow the steps listed
below:
•
From the Multi-Store Functions Menu, enter 10 (Centralized Inventory Control) and
press <Return>.
The Centralized Inventory Control Menu screen will now be displayed as shown:
•
With the cursor positioned at the ENTER A SELECTION: prompt, press the <F1>
(Specify Changes And Additions To Inventory File) key to specify changes and additions
to the inventory file.
Autologue User’s Manual – Multi-Store
Page 36
The Product Line Change/Addition screen will now be displayed as shown:
•
With the cursor positioned at the PRODUCT LINE NO: enter a product line number
(0 - 255) and press <Return>.
The screen will display the first part number in the product line entered. As each
part is displayed, the current values for the various fields are shown to the right of
each field heading. To the right of each field value are fields that can be used to
enter change values and the cursor will be positioned at the first field.
Use the <F1> (Call Part), <F5> (New Product Line), <F8> (Scroll Forward), and <F9>
(Scroll Backward) keys to display the part numbers to be changed. Use the <F2>
(Insert New Part), <F3> (Move Part) and <F4> (Delete Part) keys to add, move or
delete part numbers.
After each change is entered, press the <F10> (Write Change To Pending File) key to
write the change to the pending change file. Changes are only permitted on part
numbers that are in the inventory file of the host store.
18.8.2 Specify Manufacturer’s Price Updates
To specify Manufacturer’s Price Updates, follow the steps listed below:
•
From the Multi-Store Functions Menu, enter 10 (Centralized Inventory Control) and
press <Return>.
The Centralized Inventory Control Menu screen will be displayed.
•
Press the <F2> (Specify Manufacturer’s Price Updates) key to specify manufacturer’s
price updates.
Autologue User’s Manual – Multi-Store
Page 37
The Product Line Price Updates screen will now be displayed as shown:
•
With the cursor positioned at the IS THE PRICE UPDATE DISKETTE IN THE
DRIVE (Y/N)? prompt, place the price update diskette in the drive and enter Y and
press <Return>.
The screen will display all available price-updating files on the diskette.
•
With the cursor positioned at the ENTER PRODUCT LINE FILE NAME: prompt,
enter the price updating file name and press <Return>.
The system will create a pending change file for the new prices and the cursor will
return to the ENTER PRODUCT LINE FILE NAME: prompt.
•
Enter a new product line file name and press <Return> or press <F11> to return to
the Multi-Store Functions Menu.
18.8.3 Review Pending Change Files
To review or print the current pending file, prior to applying the changes, follow the
steps listed below:
•
From the Multi-Store Functions Menu, enter 10 (Centralized Inventory Control) and
press <Return>.
The Centralized Inventory Control Menu screen will be displayed.
•
Press the <F6> (Review Pending Changes, Additions And Updates) key to review the
pending change files.
Autologue User’s Manual – Multi-Store
Page 38
The screen will change and display the first pending change from the lowest product
line number to be changed. As each part is displayed, the current values for the
fields are shown under the ORIGINAL column and the pending changes under the
CHANGES column.
Press the <F8> (Scroll Forward) and <F9> (Scroll Backward) keys to display the part
numbers to be modified. Press the <F4> (Cancel Change/Addition To This Parts) key to
delete any pending changes to a particular part number. Press the <F5> (Print Entire
Pending File) key to print the entire pending change file.
After each change, press the <F10> (Write Update To Pending File) key to rewrite the
change to the pending change file. Changes are only permitted on part numbers that
are in the inventory file of the host store.
The STATUS field indicates the type of change (or addition) that will occur to the
displayed part number record (i.e. PART CHANGED, INSERTED AFTER PART
XXXX, MOVED AFTER PART XXXXX, DELETED).
18.8.4 Specify Automatic Price Adjustments
To specify the adjustments of prices to specific product lines, follow the steps listed
below:
•
From the Multi-Store Functions Menu, enter 10 (Centralized Inventory Control) and
press <Return>.
The Centralized Inventory Control Menu screen will be displayed.
•
Press the <F3> (Specify Automatic Price Adjustments) key to specify automatic price
adjustments.
The screen will change and display the automatic price adjustment screen.
•
Enter the price adjustment changes for the desired pop codes, price levels, and so on.
When all appropriate price adjustments have been entered, press the <F3> key and
the BEGINNING PRODUCT LINE and ENDING PRODUCT LINE prompts will be
displayed.
•
Enter the beginning product line and press <Return>.
•
Enter the ending product line number and press <Return>.
Once the product lines have been specified, the price adjustment file is pending.
Press the <F7> function key to begin applying the adjustments, or press the <F11>
key to save the changes.
18.8.5 Review Pending Automatic Price Adjustments
To review pending automatic price adjustments, follow the steps listed below:
•
From the Multi-Store Functions Menu, enter 10 (Centralized Inventory Control) and
press <Return>.
Autologue User’s Manual – Multi-Store
Page 39
The Centralized Inventory Control Menu screen will be displayed.
•
Press the <F5> (Review Pending Automatic Price Adjustments) key to review automatic
price adjustments.
The screen will change and display the pending automatic price adjustment.
Press the <F1> key to clear the screen and to delete the pending automatic
adjustment file. Up the Ï arrow key and press <Return> to change any particular
entry.
Press the <F11> key to exit the program and save the pending automatic price
change file. The adjustment will be pending until applied.
18.8.6 Apply Pending Change Files
To apply pending inventory change files, follow the steps listed below:
•
From the Multi-Store Functions Menu, enter 10 (Centralized Inventory Control) and
press <Return>.
The Centralized Inventory Control Menu screen will be displayed.
•
Press the <F7> (Apply Pending Change Files) key to apply pending change files.
The Apply Pending Changes/Updates screen will be displayed as shown:
•
With the cursor positioned at the _ :ALL prompt, enter X and press <Return> to
apply the pending change files to all stores or just press <Return>.
Pressing <Return> without entering an X allows only selected stores to be updated.
•
Press the <F5> key when ready to apply pending change files.
Autologue User’s Manual – Multi-Store
•
Page 40
With the cursor positioned at the ARE YOU SURE prompt, enter Y and press
<Return> to apply the pending change files to the selected stores.
The system will begin automatically transferring the change files to each selected
store and invoke the inventory change programs in the “background”. The changes
can require from five to twenty minutes to apply, depending upon the amount of
changes applied.
As each store applies the specified changes, it logs all problems encountered and
reports these back to the Centralized Inventory Status Logs. Later, the user can
check these logs to determine the result of all inventory changes and updates.
After the pending change files are successfully initiated and given a “job number”,
the pending change files are deleted so that it is possible to begin specifying new
changes.
18.8.7 Display Application & Communication Status Logs
Pending change files are applied to branch stores in the “background”, allowing the
terminals of each store to be free for performing point of sale or other activity.
The amount of time required for applying the changes to each branch store will
depend upon the amount of changes and additions made and the type of multi-store
configuration in use. A distributed configuration will require additional time for the
phone transfer of the change files.
The background programs applying the pending changes at each store will “send”
the result and status of the changes to a status log file that can be reviewed at a later
time.
To display the applications and communications status logs, follow the steps listed
below:
•
From the Multi-Store Functions Menu, enter 10 (Centralized Inventory Control) and
press <Return>.
The Centralized Inventory Control Menu screen will be displayed.
•
Press the <F10> (Display Applications And Communications Status Logs) key to review
the application and communication status logs.
The screen will change and display the Multi-Store Centralized Inventory Status menu.
•
With the cursor positioned at the Selection: prompt, enter the corresponding
status log number to review and press <Return>.
When displaying a status logs, press the <Space Bar> key to scroll forward one
full screen and the <Return> key will scroll forward one line.
•
With the cursor positioned at the Selection: prompt, enter 10 (Exit) and press
<Return> to exit back to the Centralized Inventory Control Menu screen.
Autologue User’s Manual – Multi-Store
Page 41
18.8.7.1 Sample Application & Communication Status Log
18.9 Remote Part Lookup Overview
Remote Part Lookup allows a counterman, through point-of-sale, to examine and
transfer inventory from a different branch store to his store. In addition, the Remote
Part Lookup program can also be accesses by management through the Multi-Store
Functions Menu.
Management can allow any branch store’s inventory to be examined by countermen
at all other stores. Optionally, restrictions can be setup as to which stores can
examine the inventory of other stores.
The Remote Part Look Up screen displays the following information per part number:
quantity on hand, description, quantity on order, and quantity on backorder.
18.9.1 Performing A Remote Part Lookup
To look up a part number at another store, follows the steps listed below:
•
Within an open workspace within point of sale and with the cursor positioned under
the MFR-PART NO column field, press the <SEND> key.
Autologue User’s Manual – Multi-Store
Page 42
The Remote Part Look Up screen will now be displayed as shown:
If a part number was previously called up within the workspace, the last part
number called up will be automatically looked up and the quantity and ordering
information will be displayed.
If a part number was not previously called up within the workspace, the cursor will
be positioned at the ENTER PART # prompt.
•
With the cursor positioned at the ENTER PART # prompt, enter the desired part
number to be looked up and press <Return>.
Remote part lookup reads the inventory file for the part at all the branch stores and
displays the information on the screen. If entered part is not found in one the branch
stores’ inventory, the screen will beep and will display a NOT FOUND OR BUSY
message under the parts description. If the part was found, the on-hand, on-order,
backorder and description information will be displayed for each store the part was
found within.
After the part look up information is displayed, the cursor will be positioned at the
DO YOU WANT TO ORDER (Y/N)? prompt.
•
With the cursor positioned at the DO YOU WANT TO ORDER (Y/N)? prompt, enter
Y or N and press <Return>.
•
If Y is entered and with the cursor positioned under the STORE # column heading,
enter the store number and press <Return>.
•
With the cursor positioned under the QTY column heading, enter the quantity to
transfer and press <Return>.
Autologue User’s Manual – Multi-Store
•
Page 43
With the cursor positioned under the COMMENT column heading, enter a comment
message of up to 54 alphanumeric characters and press <Return>. The comment
message will print on the inter-store transfer pick ticket at the branch store.
The inventory levels of both stores will be adjusted and the cursor will return to the
STORE # prompt allowing inventory from another store to be transferred.
Transferring inventory from one store to another will print a pick ticket at the store
from which the items are being transferred.
Parts Transfers will print out for both 17 and 8 line invoices.
All transferred parts activity is recorded in both stores and can be reviewed from the
Transferred Parts Report program.
Press the <F2> (Search Another Part) key to return the cursor to the ENTER PART #
prompt.
18.10 Transferred Parts Report Overview
The Transferred Parts Report allows information to be screen displayed or printed
on all transferred parts activity. In addition, the user has the ability to delete
transactions created before a specified date.
For each transfer activity, a record will be created in both the store merchandise is
being transferred to and the store merchandise is being transferred from. The record
will contain the following information:
♦
♦
♦
♦
Part Number Transferred
Date of Transfer
Quantity Transferred
Counterman Performing Transfer
♦
♦
♦
♦
Store Shipped From
Store Shipped To
Unit Price
Total Cost
When printing a Transferred Parts Report the total dollar value of merchandise
transferred between each store will also be listed.
18.10.1 Using The Transferred Parts Reports
To use the Transferred Part Report program, follow the steps listed below:
•
From the Multi-Store Functions Menu, enter 12 (Transferred Parts Report) and press
<Return>.
Autologue User’s Manual – Multi-Store
Page 44
The Transferred Part Report screen will be displayed as shown:
•
Select the desired option by pressing the correct function key.
Press the <F1> (Call Part) key to screen display transfer details, one transaction at a
time. The oldest transfer detail will be displayed. Use <F1>, <F8> and <F9> keys to
display other transfer details.
Press the <F4> (Delete Transactions) key to delete transactions before a specified date.
The screen will prompt for the date and then delete all transactions before that date.
Press <F7> (Print Report) key to print a Transferred Parts report. Three prompts will
appear, allowing a report to be printed for all stores, all parts send from one store or
all parts sent to one store.
18.11 Print/Clear Common Customer Numbers Overview
The Print Or Clear Common Customer Numbers menu option allows the common
customer numbers for a single store or groups of stores to be printed or cleared.
18.11.1 Printing Or Clearing Common Customer Numbers
To print or clear common customer numbers, perform the following steps:
•
From the Multi-Store Functions Menu, enter 13 (Print Common Customer Numbers) and
press <Return>.
Autologue User’s Manual – Multi-Store
Page 45
The Clear Common Customers screen will be displayed as shown:
•
With the cursor positioned at the FIRST CUSTOMER NUMBER prompt, enter the first
common customer number and press <Return>.
•
With the cursor positioned at the LAST CUSTOMER NUMBER prompt, enter the last
common customer number and press <Return>.
•
Enter the store number (or A for all stores) and press <Return>.
•
Select the desired option by pressing the correct function key.
Press the <F2> (Print Common Customers) key to print the common customer
numbers for the range and stores given.
Press the <F4> (Clear Common Customers) key to clear the common customer
numbers for the range and stores given.
Autologue User’s Manual – Multi-Store
Page 46
18.11.2 Sample Common Customer Report
PRINTED FROM STR1
DATE
MM/DD/YY 15:07:59
PAGE
COMMON CUSTOMER REPORT FOR STORE STR4
CUSTOMER
NUMBER
300
305
310
324
328
352
362
371
377
CUSTOMER
NAME
M AND K MOTOR REBUIL
GOODYEAR AUTOMOTIVE
R D TRUCK AND TRAILE
AUTOMOTIVE JOBBERS S
MISSION AUTO SUPPLY
ANAHEIM AUTO REPAIR
FREEHOLD EXXON
GENERAL BRAKE SUPPLY
JOES ALIGNMENT
COMMON
CUSTOMER
NUMBER
270
260
250
310
312
325
340
344
361
1