1
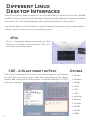
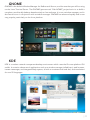
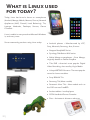
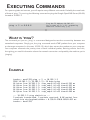
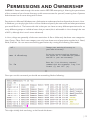
An Introduction
to Linux
by Tristan Findley
|1
Before we Begin
Commands
All commands in the following guide are highlighted inside grey boxes with the command as it
should be typed in the left and the description on the right. All commands are case sensitive and are
dependent on having the correct number of spaces / characters. Please be sure to copy it exactly.
ping -c 5 -n 10.203.1.5
Ping the IP Address 10.203.1.5
for a count of 5 (-c 5), outputting
numerical values only (-n)
Special Characters
Be aware of special characters and don’t get them confused with standard letters.
| = this is the Pipe character, used to pipe output from one command into another.
To type Pipe, use Shift + \ (located on the left side of the keyboard, next to the shift key)
Example Command: man -k directory | grep ls
Usernames
Throughout this document, the username ‘msai135’ is refered to as a sample account. When you are
working through this document, you should use your username in place of ‘msai135’.
Beyond this Workbook
There is more included in this worksheet than you can accomplish in the session time allotted. This is
so you can continue your study of Linux outside of the session, using this workbook as your starting
point. Even if you do not have access to a Linux environment to work with, you should still be able to
read through and gain knowledge and understanding from the examples in this workbook.
2|
Contents
Contents
What is Linux?5
A brief History of Linux6
Different Linux Distributions8
Different Linux10
Desktop Interfaces10
What is Linux used for today?12
Before we get started13
Accessing the Linux Command Prompt14
Introduction to the Command Line Interface
14
The Linux Filesystem15
The Command Line Interface (CLI)16
Executing Commands20
Improving your productivity in the CLI
21
Getting Help and Searching22
Creating Files24
Permissions and Ownership25
Setting Permissions27
Editing Files30
Nano Quick Reference31
Useful commands to research and try
32
Other things to try33
|3
4|
What is LInux?
Linux is an operating system, much like Microsoft Windows or Apple Mac OS. Unlike other mainstream
Operating Systems, Linux is made freely available and is Open Source.
A (very) brief history of Linux
Back in August of 1991, a student from Finland began a post to the comp.os.minix newsgroup with
the words:
Hello everybody out there using minix I’m doing a (free) operating system (just a
hobby, won’t be big and professional like gnu)
for 386(486) AT clones.
The student was Linus Torvalds, and the “hobby” he spoke of eventually
became what we know today as Linux.
A full-featured POSIX-like (Portable Operating System Interface Unix)
operating system, Linux has been developed not just by Linus, but by hundreds of programmers
around the world.
This massive, world-wide development effort is largely uncoordinated. Sure, Linus calls the shots
where the kernel is concerned, but Linux is more than just the kernel. There’s no management
infrastructure; a student in Russia gets a new motherboard, and writes a driver to support a neat
feature the motherboard has. A system administrator in Maryland needs backup software, writes it,
and gives it away to anyone that needs it. The right things just seem to happen at the right time.
|5
A brief History
of Linux
6|
|7
Different Linux
Distributions
Different distributions of Linux exist because
different people all have different opinions
Ubuntu – Designed to be friendly to the
on what is most important. Each distribution
average user, and the best desktop
represents the diverse choice of a group
operating system that it can be.
of individuals. As you can see from the
Ubuntu is based on Debian, and
previous Linux Distribution Timeline, each
has a number of forks, including Kubuntu,
distro originates from somewhere. Many
Edubuntu, and Xubuntu. Today, Ubuntu (and
distributions have a colourful and interesting
its derivatives) is one of the more popular
history, most of which can be discovered
Linux Desktop operating system, and is
from a little reading on the homepage of the
currently in use on home computers, servers,
distro in question.
business,
education,
government,
and
charity machines.
Most modern day distros spring from ‘core’
distributions, such as Redhat and Debian,
SUSE – Incorporating many features and
however some distros merge over time, or
aspects of Redhat, SUSE was
diverge where mandates and opinions have
a
differed.
Desktops, with its acquisition
popular
choice
on
by Novell in 2003. Novell quickly used the
Below are the major distributions that you
OS to launch a counter-offensive against
are likely to run across. All have their positive
Microsoft,
and negative points, and all have a different
scheme similar to that of RedHat, giving
focus.
companies an enterprise level OS with
offering
a
paid-for
support
enterprise level support, but with the
Debian – A distribution based on Stability.
flexibility and low implementation and
Debian pride themselves on testing
maintenance costs of Linux. A free home
each and every package in the OS
version of SUSE (OpenSUSE) was released
with every other package. This
by Novell during the acquisition, drawing a
ensures no conflicts, and no issues of
parallel with CentOS / Fedora from Redhat.
stability. This approach does sometimes
In 2006, Novell signed a controversial
slow progress, with packages in the Debian
agreement
distro being behind current versions. Debian
interoperability between Novel SUSE &
is a popular server Operating System due to
Microsoft Windows.
its stability, and has multiple flavours
designed purely for devices as an integrated
OS
8|
with
Microsoft
to
improve
and the support for their pre-written
configuration files and installation files.
Redhat – Redhat is known for it’s RPM
(Redhat
Package
Manager)
installation system, and for their
Other Distributions – There are lots and lots
goal
of Linux distributions out there. The best
supported,
to
and
provide
viable
a
stable,
alternative
to
way to find out about each and every distro
Microsoft Server operating systems. Offering
is to visit the homepages for each one, and
paid-for support packages with its operating
read up on their features and benefits.
systems, Redhat makes for an attractive
desktop and server platform for business.
The important thing to remember; is that all
Redhat was originally available for free with
Linux distributions are more or less the same
support packages being an optional extra
underneath. The commands you will learn in
for those that required it, but has now
this introduction can be used with any of the
become a pay-for only product. Redhat are
above distros with the same affect. Some
allowed to continue this practice as long as
distros have proprietary commands that only
(un-compiled) source code remains freely
work in that distro (such as ‘rpm’ and ‘dpkg’
available.
etc), however these are clearly documented
by the creators.
Today, Redhat finds its home in various
businesses, education establishments, and
With so many distros, the trick is to find the
government facilities.
one that works for you, and stick with it.
Here in the ISG, we recommend Ubuntu for
Desktops, and Debian for servers, however
Two major forks sprang from this restriction
the reasoning behind your choice of OS
on the availability of Redhat:
will be different from ours. Linux gives you
freedom by giving you choice.
CentOS – focusing on creating a free
‘Redhat Server’ based OS to
use
on
hardware.
became
a
pay-for
dedicated
server
When
Redhat
product,
CentOS
became a very popular OS among the
desktop Redhat community.
Fedora – ‘Redhat Desktop’ based OS,
designed to run on all desktop
and mobile machines. Upon the
move to a pay-for scheme, many
Redhat users moved to Fedora, allowing
them to retain their familiarity with the OS,
|9
Different Linux
Desktop Interfaces
There are two primary desktop interfaces in the Linux world that you are likely to encounter. GNOME
and KDE. These are known as Window Managers. Below the Window Manager sits the actual desktop
environment - X11. The Window Managers give the Desktop Interface its look and feel.
Like with the different Linux Distributions, whichever Desktop interface you choose is dependent on
which you prefer, and which one fits your specific purpose.
XFce
XFce is a lightweight desktop environment for UNIX
platforms. It is similar to the commercial CDE, and is
now based on the GTK+ toolkit.
CDE - A Blast from the Past
CDE (Common Desktop Environment) is a commercial Graphical User Interface
for UNIX and various other flavors, which was jointly developed by Hewlett
Others
• FluxBox
Packard, IBM, Novell and Sun Microsystems. The Window Manager for CDE is
• BlackBox
dtwm (pictured right)
• Sawfish
• LXDE
• EDE
• JD4X
• AfterStep
• Metacity
• AmiWM
• SCWM
• FVWM
• MWM
10 |
GNOME
GNOME is the default Window Manager for Redhat and Ubuntu, and the one that you will be using
on the Linux Terminal Server. The GNOME (pronounced “Gah-NOME”) project’s aim is to build a
complete, user-friendly desktop based entirely on free software. It is not a window manager, and in
fact has to be run in conjunction with a window manager. GNOME has advanced rapidly and is now
very popular, particularly on the Linux platform.
KDE
KDE is a modern network transparent desktop environment which uses the Qt cross-platform GUI
toolkit. It contains a base set of applications such as a window manager (called kwm), web browser,
instant messenger, and integrated help system, all with a consistent look and feel, and translations
for over 50 languages.
| 11
What is Linux used
for today?
Today, Linux has found a home on smartphones
(Android, Meego, Moblin, Maemo, Zaurus), Network
Appliances (NAS, Firewall, Load Balancing), TVs,
Laptops, Netbooks, Desktops, Servers, Games
Consoles...
Linux is usable in every area that Microsoft Windows
is, and many more.
Some noteworthy products using Linux today:
• Android phones – Manufactured by HTC,
Sony, Motorola, Samsung, Acer, & more
• Netgear ReadyNAS Series
• Synology DiskStation NAS series
• Nokia Meego smartphones – Runs Meego,
originally based on Debian BusyBox
• TiVo DVR – America’s most popular Digital
Video Recording, also used by Virgin Media
• Linksys WRT54G* Routers – The most popular
router for home-modders.
• Sony BRAVIA TVs
• Samsung TVs (Most models)
• Panasonic Viera TVs – New models such as
the G20 now use FreeBSD
• Archos tablets / media players
• GP2X Handheld Games Consoles
• Pleo – Animatronic dinosaur robot toy
12 |
Before we get started
Why the command prompt?
Why would we use a command prompt over
updating regularly. The CLI is a more
the Graphic User Interface that we all know
static environment, requiring little to no
and love? The reason is simple: Control. A
documentation changes.
command prompt gives us greater control
and flexibility over the system or software
While you are studying the ISG course,
we are creating. We have no way of knowing
you will be asked to use certain tools and
if configuring a service using a graphical user
commands from within Linux. These tools
interface is doing exactly what we want it to,
are usually run from the command line.
or if it’s doing something that its interpreted
Most people today will be brought up with
as what we want. In the world of security, the
computers only knowing how to use a WIMP
risk is not worth taking.
(Window Icon Menu Pointer) interface.
People rarely understand how to interact
The command line can be used if you
with the computer when we take away the
wanted to perform a task multiple times.
mouse and limit them to a Command Line
You could script the command, and then run
Interface. This guide has been written to
the script, making sure that the command
help eliminate at least some of the confusion
run is 100% accurate. If you wanted to run a
associated with text-based interfaces. As
command once a year, you would probably
part of your grounding in the world of
use the CLI (Command Line Interface) over
Information Security, you will increasingly be
the GUI (Graphic User Interface). GUI’s
expected to interact with systems in a more
will change, and documentation will need
direct way.
Some brief warnings
• The command line interface is case-sensitive. It does understand the difference between
a lower case t and an upper case T – Check what you’re typing as one wrong character can
cause a lot of problems.
• Unlike in Windows, Linux has no magic ‘Undo’ command, and no safety net that is the
Recycle Bin. Anything that you execute (run) in the command prompt would need to be
fixed manually. Double Check EVERY command that you type, to make sure it is correct. The
command line is a very powerful tool, and it requires a little more finesse and learning than
the GUI (Graphic User Interface).
REMEMBER: If you delete something, it is gone! Check everything BEFORE you press enter!
IMPORTANT: EVERYTHING in Linux is Case Sensitive. This is important when typing commands!
| 13
Accessing the Linux
Command Prompt
To begin working through this guide, you will need to establish a connection to a Linux server.
Please refer to the guide: ‘Connecting to the ISG Linux Terminal Server (Saturn)’ guide as issued by
the Information Security Group. Establish a connection to Saturn (saturn.isg.rhul.ac.uk) using PuTTY
as detailed in the guide.
IMPORTANT: During password entry, you will not see any characters (e.g: ‘*’) appear – this is normal
behaviour for Linux. - Passwords are Case Sensitive!
Introduction to the
Command Line Interface
Once you have successfully logged in, you will be presented with the Command Line Interface, also
known as the ‘Command Prompt’.
The prompt should read:
so for example;
<username>@<computer>:<path>$
msai135@lab-tl243-008:/home/msai135$
The anatomy of a command line interface is as follows:
IF YOU GET LOST: The Tilde ( ~ ) icon is used to represent your home directory. If you ever
need to get back home, you can type the following to return to your home directory
cd ~
The ~ parameter can be passed in a string of commands, as you will see further on, to directly access
the Home directory when you are in other parts of the system.
On most systems, your home directory should be /home/<username>/ , however on some centrally
managed or network systems, your home path could be different. Run ‘cd ~’ to change directory to
your home directory, then ‘pwd’ to find the full path of your home directory.
14 |
The Linux Filesystem
The linux File System is different to that of Windows, in that the File System is not represented by
Hard Drives and CD Drives like c:\ & d:\ etc. Instead, the whole system is represented by the root
directory, or ‘/’. Files, folders, and drives, all exist within this.
Within ‘/’, exists a standard core directory structure:
The folder you operate in 95% of the time, is ‘~’, which usually equates to ‘/home/<username>’ (See
previous page for notes on the location of your home directory and how to find it), e.g: ‘/home/
msai135/’.
Even devices exist as files within a Unix system. They are located in ‘/dev/’, If you insert a CD, the
drive will be mounted to ‘/media/cdrom’. Some systems do this automatically, however sometimes
this needs to be done manually. An example command to run to do this would be: ‘mount /dev/sdb1
/media/cdrom’. This would allow you to access the CD-ROM by browsing ‘/media/cdrom/’. Before
ejecting the disk, you would exit from the mounted directory, then run ‘umount /media/cdrom’, and
then eject the disk from the computer. Some systems will respond to the command ‘eject’ for CDROMs, automatically unmounting and ejecting the drive in one command.
USB Sticks, Memory Cards, and Hard Disks are all mounted in the same way, having a corresponding
‘/dev/<filename>’ file, and a location to mount it to. This could be in ‘/home/<username>/Storage’,
or in ‘/mnt’. It makes no difference to Linux, making it a very flexible and scalable OS.
| 15
The Command Line
Interface (CLI)
The Command Line Interface is the most important interface to learn for Linux. Linux users will often
be asked to perform commands through the use of the CLI, and not through a GUI. As many of the
ISG courses require the use of a CLI, it is important that you are comfortable with working with it. To
this end, we will work through all of the following exercises using the CLI, and not the GUI.
However, all of the following ‘can’ be accomplished through the GUI. Running the same commands
on the CLI will give you a better understanding of how Linux works behind the scenes, and allow you
to appreciate the complexities of the system.
IMPORTANT: The following practical exercises have been written with the user ‘msai135’ as an
example. When attempting the following commands for yourself, please substitute ‘msai135’ for
your own username which has been pre-issued to you by Royal Holloway University. This username
should consist of four letters and three numbers.
Navigating the File System
First we need to learn how to move around the Linux file system. At this point you should already
have logged into the Linux Environment using PuTTY.
Once you have logged in, the directory you start in is your home directory. Each user is given their
own local home directory which is independent from everyone else’s. First you need to take note of
your home directory, as this is different for every user.
pwd
‘pwd’ or ‘print working directory’
is a useful command to check the
full path of where you are currently
located within the Linux File System.
This can save you from getting lost,
or as a confirmation that you are
working in the correct directory.
My Home directory is: ___________________________________________________________
i.e: /nas/ganymede/msc/home/msai135
Your home directory cannot be accessed by others, and nothing that you do within this directory can
have a system-wide effect. You are safe to explore without fear of breaking something.
IMPORTANT: Your Home Directory at Royal Holloway may be different to that on a standard
Linux Machine. Normally your home path would be /home/<username>, but because the Royal
Holloway utilise Network Storage, your home path could be something like: /nas/ganymede/home/
msc/<username>
16 |
Now we will move to the root directory / and then run a command to list all directories inside of it.
cd ~
pwd
cd /
pwd
Changes Directory to your home
directory (donated by ~)
Print the current working directory You should be in /nas/ganymede/home/
msc/msai135 (where msai135 is your
own username)
The command ‘cd’ stands for ‘change
directory’. This is used to move to
different directories, and can be
used with absolute or relative paths.
/ tells the system to navigate to the
root directory of the filing system,
irrespective of your current working
directory.
Print the current Working Directory
You can also move deeper into the file system using relative paths:
cd ~
pwd
ls
First, return to your home directory
Print the current working directory
to check out location.
This will print (display on screen)
a list of files and folders stored in
the current working directory. In
this instance, we’re printing the
contents of your Home Directory.
You will see a list of folders and files appear. This is the current contents of your home directory. We
are going to move into the directory ‘Desktop’ using a relative path.
cd Desktop
This changes the current working
directory to ‘Desktop’, which is
located in your current working
directory
IMPORTANT: All Commands are Case
Sensitive!
pwd
Print the current working directory
to check out location.
| 17
Now we will return to your home directory and use commands to move around using relative and
absolute paths.
IMPORTANT: In the following list of commands, replace <your home directory path> with
the path to your home directory that you wrote down on Page 16.
cd ~
pwd
cd <your home directory path>
pwd
cd ~
pwd
cd ~/Desktop
pwd
cd ../
pwd
Changes Directory to your home
directory (donated by ~)
Print the current working directory You should be in /home/msai135 (where
msai135 is your own username)
Changes directory using an absolute
path. the ‘/’ denotes the root of the
filing system.
Print the current Working Directory
to confirm your current location
Return to your home directory
Print the current Working Directory
to confirm your current location
Change Directory to your Desktop
folder, which is absolute to the
root(/) of the system.
Print the current working directory
to confirm your current location
The ../ tells the system to navigate
up exactly one level, relative to
your current working directory.
Print the current working directory
to confirm your current location
As you can see, you can chain different folders together to move between many levels in a single
command.
The command you ran was ‘cd /’ The ‘../’ part of this is the path that you are moving to. This is what
is known as a relative path, as you moved up one level (to /home) relative to your starting position
(from /home/msai135).
18 |
Working with Files
First, create a directory (i.e. folder) for today’s session, move to it, and verify where you are:
cd ~
Change directory to your home
directory
mkdir unixintro
Make directory ‘unixintro’
cd unixintro
Change directory to ‘unixintro’
Now copy some files to it and get a directory listing. Be careful with your typing, and don’t ignore
error messages!
cp /usr/share/unixintro/* .
ls
Copy all the files in a directory to
the current working directory.
Asterisk (*) means ‘all files’.
Dot (.) means ‘current working
directory’.
IMPORTANT: There is a space between
the Asterisk (*) and the Dot(.)
List all files in the current working
directory
The command ‘ls ’ simply lists the contents of the directory you are in.
Now to learn how to rename files and delete them.
cp phonebook junk
Copy file (or folder) phonebook to
junk
mv junk junk2
Move a file (in this instance, we’re
moving the file ‘junk’ to ‘junk2’,
effectively renaming it.
ls
List all files in the current working
directory
rm junk2
Remove the file (or folder) junk2
ls
List all files in the current working
directory
| 19
Executing Commands
For upcoming labs and courses, you will require many different commands. Probably the most basic
of these is ‘ping ’. Try running the following command to ping the Google OpenDNS Server (8.8.8.8)
located at 10.203.1.5
ping -c 5 -n 8.8.8.8
Ping the IP Address 10.203.1.5
for a count of 5 (-c 5), outputting
numerical values only (-n)
What is ‘ping’?
The command you just ran, ‘ping’, is a command designed to test the connectivity between two
networked computers. Simply put, the ping command sends ICMP packets from your computer
to the target computer (in this case, 10.203.1.5), which then returns the packets to your computer.
Your computer measures the journey time of each individual packet, deriving metrics from this,
thus giving you useful information about the network connection and possibly the machine you’re
‘pinging’.
Example
tundra:~ msai135$ ping -c 5 -n 10.203.1.5
PING 10.203.1.5 (10.203.1.5): 56 data bytes
64 bytes from 10.203.1.5: icmp_seq=0 ttl=63
64 bytes from 10.203.1.5: icmp_seq=1 ttl=63
64 bytes from 10.203.1.5: icmp_seq=2 ttl=63
64 bytes from 10.203.1.5: icmp_seq=3 ttl=63
64 bytes from 10.203.1.5: icmp_seq=4 ttl=63
time=0.536
time=0.562
time=0.645
time=0.668
time=0.640
ms
ms
ms
ms
ms
--- 10.203.1.5 ping statistics --5 packets transmitted, 5 packets received, 0.0% packet loss
round-trip min/avg/max/stddev = 0.536/0.610/0.668/0.052 ms
tundra:~ msai135$
20 |
Improving your
productivity in the CLI
Working within the confines of the Command Line Interface can sometimes be frustrating. The lack
of a ‘copy / paste’ menu on the right click of the mouse can be a major headache when it comes to
repeating commands
Tab-to-complete
If you begin typing a command or path in the CLI, you can ‘auto-complete’ this by pressing the
‘tab’ key. For example, if you want to navigate to ‘/etc/samba/’, you can just type ‘/et’ and then hit
tab, which will auto-complete it to ‘/etc/’. You can then append ‘sam’ and hit tab, and it will autocomplete to ‘/etc/samba/’. This is incredibly useful when accomplishing tasks quickly.
If the command does not complete after a single tab, press it again and the system will display a list
of options that matches what you have entered so far.
Editing a command
You can use the Left (back) and Right (forward) arrows on the keyboard to move backwards and
forwards through a typed command. Very useful if you want to modify something right at the
beginning of the long line you just typed.
History
At any point, you can recall previous commands that you typed by using the Up and Down arrows on
the keyboard. Up goes back through the commands you’ve used, in reverse order going back into
the past. Down brings you back to the present until you reach a blank line to input a new command.
Your history is stored in ‘~/.bash_history’ .
You can view it by running the command cat ~/.bash_history
Your history does not store the output from the terminal, nor your interaction with any programs or
applications that have been run - only the commands that you inputted straight into the command
line are stored.
| 21
Getting Help and Searching
The behaviour of many commands can be modified by using ‘switches’ or ‘arguments’. These are
described in the online manuals (man-pages), which can be ready using the ‘man ’ command.
Information is also available about programming libraries and other operating system features.
To advance through the text, use the Page Up & Page Down keys. Type ‘h’ to discover more
sophisticated commands, and type ‘q’ to quit the man page.
ls -l
man ls
Get a list of files and folders in
long format - now you need to know
how to interpret it...
Opens the man (User Manual) page for
the ‘ls’ command. Read this to find
out how to interpret the output.
If you’re not sure what manual page you want to see, you can use the –k option:
man -k <keyword>
man <result>
Replace <keyword> with your search
term. Once you have found your
desired man page you can go ahead and
open it like before...
Replace <result> with the desired
result from your previous search.
This will open the man page.
Sometimes -k will give you a surprisingly long list of results. So long that it will scroll off the screen.
You can scroll back up the screen by using Shift + Page Up & Shift + Page Down. Another method
of reading all the results is to pipe(|) the results into ‘less ’. Try the following commands:
clear
man -k directory
man -k directory | less
This will clear the visible terminal
of all previous output. You can still
return to the previous screen by
using Shift + Page Up / Page Down to
scroll back through the terminal.
This will search for a keyword that
displays lots of results.
By piping this output to another
command, we can filter these results.
Use the | character to try piping hte
output into less - see what happens.
With the ‘ | less ‘ pipe invoked, the output from the ‘man –k directory ’ part of the command gets
piped into less, which then displays it on the screen. You will notice that at the end of the list, there
is a blank line with ‘:’ displayed. You can now use the return or spacebar key to move down through
the list. Type ‘q’ at any time to return to the command prompt.
22 |
Piping output from one command into another is a very useful way of working at the command
prompt. It can allow you to output the results of a command into a file, or even allow you to search
through the output for a specific string. Let’s try looking for the same man pages again, but this time
we will redirect the output to the Linux search system ‘grep ’, and search for a specific line of text.
clear
man -k directory | grep ls
Clear all previous output
This pipes the output from the man-k
command into grep. In this instance,
we have told grep to search for the
string ‘ls’
NOTE: Pipe (|) is not a capital ‘i’
As you can see, now only a few results are displayed. Only the results from ‘man –k directory ’
containing that search string ‘ls ’ are displayed, and the lines not meeting the search criteria are
discarded.
Grep can be useful when searching through a long list of files/folders for one specific entry, or
when working with any large amounts of data. In this case, we simply used it to filter search results.
Using the command ‘man –k directory | grep <keyword> ’, try searching for some other keywords,
replacing <keyword> with the word of your choice. For example: run, NT, ACL, ln.
Need More Help?
If at any point you require more help than the ‘man’ pages can provide, there are a number of other
resources. One of these resources is ‘TLDP’ (The Linux Documentation Project). Not only does this
contain a copy of all the man pages, but there are Howto, guides, and FAQs on various Linux-related
subjects. Take a look at http://www.tldp.org in your own time.
By far, the best source of information for Linux is ‘Google’. If you are ever stuck, try Googling for
the solution. You will always feel a greater sense of accomplishment if you solve a problem yourself.
Never underestimate forums or newsgroups. While a solution may not immediately be apparent
(especially from the first few posts), the users that have posted will normally work toward a solution,
and the forum is a very good way of finding out what has worked and not worked previously.
When Googling, remember to put exactly what you’re looking for. It is recommended that you put
your linux distro into the search string, as some problems and solutions may be distro-specific.
Another key word to use is ‘howto ’. If you are looking for a guide, this can provide the best results.
Try it by Googling for; ‘linux dhcp howto ’ in your free time, and take a look at the results.
After (and only) after you have exhausted ALL other avenues for help, ask someone. People are more
willing to help if you have tried to solve things yourself.
REMEMBER: Always try to help yourself first by researching the problem!
| 23
Creating Files
Please note: To complete this exercise, you must have completed the previous exercises, and have
a directory called ‘unixintro’ in your home directory
cd ~
pwd
Changes Directory to your home
directory (donated by ~)
Print the current working directory You should be in /home/msai135 (where
msai135 is your own username)
touch unixintro/sample.txt
Create a Text file in hte folder
‘unixintro’ called sample.txt
cd unixintro
Change your Working Directory to
‘unixintro’
ls -la
List the contents of the working
directory.
What does ‘-la’ do?
echo “Hello World” > sample.txt
Write the text “Hello World” to the
file you created (sample.txt)
cat sample.txt
Concatenate (read) the file ‘sample.
txt. ‘cat’ will print the contents.
In this exercise, we created a new file called ‘sample.txt’, and then wrote the text ‘Hello World’ to
it. This was done using the command ‘echo’. ‘echo’ will print whatever text you feed into it. Try it
now on the command line by typing: ‘echo “Hello everyone” ‘. This will print ‘Hello everyone’ on
the command line. To write this text to a file, we redirected the output using the ‘>’ option. This
redirected the example text ‘Hello World’ into the file called ‘sample.txt’. Once we did this, we then
read the contents of the file by using the ‘cat’ command (short for concatenate).
Try running the command again, but this time replace ‘Hello World’ with some text of your own.
Make sure to write to the file ‘sample.txt’. Remember; if you use spaces in a command, you must
encapsulate that section of the command in speech-marks (“) (as per the example).
Now cat the file. What do you notice?
The words ‘Hello World’ have now vanished and been replaced with the text you inputted. This is
not very useful if we want to ‘append’ (add) text to the file. This time, run the command again (with
different text), but instead of a single ‘>’ use two: ‘>>’. Now ‘cat’ the file again. This time you should
see that the text was added to the bottom of the file.
Play around with the ‘echo’ command, and use the ‘man’ pages to find out more about it.
24 |
Permissions and Ownership
WARNING: Please read through this entire section BEFORE attempting it. Altering the permissions
of the contents of your home directory could remove access for yourself, meaning that a Systems
Administrator has to come along and fix them.
Permissions in Microsoft Windows are a little easier to understand and configure than those in Linux.
In Windows, you simply right click on a file or folder and specify the username and what permissions
you would like for it. The bonus with this is that you can have as many different permissions for as
many different groups or individual users that you want (this is achievable in Linux through the use
of ACL’s, although this is much more advanced)
In Linux, things are generally a little more restrictive. A file or folder only has three user categories:
User, Group, Other. Each user category can only have three sorts of permission applied to it. Read,
Write, Execute. You can see some existing permissions by running the following commands:
cd ~
Change your working directory to
your home directory.
man -k directory
Print the current working directory You should be in /home/msai135 (where
msai135 is your own username)
ls -la
Runs the ‘List directory contents’
command with the arguments ‘long list
format’ (l) and ‘all’ (a).
Once you run this command you should see something like the following:
This might initially look confusing, so let’s break this down...
| 25
26 |
Setting Permissions
Permissions can be set on a file or folder using two simple methods. The two methods available are
The Binary Method, and The Symbolic Method. Choose the one that is easiest for you.
Using the Binary Method
Through the binary method, each permission is assigned a binary value and added together to give
a three digit number, one digit for each party (user, group, other). The end result will be something
along the lines of ‘chmod 755 test.sh’, which assigns the permissions of User=Read, Write Execute;
Group=Read, Execute; Other=Read, Execute. The binary values for each permission are Execute=1,
Write=2, Read=4. If you wanted to assign a party read and write only permissions, then it would be
a total of 6, while a party with permissions of read only would be 4. E.g:
To change a file called ‘phonebook’ (located
in the same folder you are currently inside) to
User=RWX, Group=RX, Other=R (as above),
you would therefore run the command ‘chmod
754 phonebook’ . Lets try this now:
cd ~/unixintro
pwd
ls -la
Changes Directory to ‘unixintro’,
located inside your home directory
Print the current working directory
and check it’s correct.
List the contents of the working
directory
Make a note of the original
permissions for ‘phonebook’ - you
will need to restore them!
cat phonebook
Read the contents of the file
‘phonebook’
chmod 044 phonebook
Change permissions of ‘phonebook’
cat phonebook
Now try to read the file ‘phonebook’.
What happened?
Now restore the original permissions
and try again
| 27
Using the Symbolic Method
Using the Symbolic Method, you can set permissions exactly like you do using the Binary method.
The only difference is you use a verbose way of setting the permissions instead of a mathematical
way. To do set the same permissions as in the Binary Method example, we would use the commands:
‘chmod u=rwx,g=rx,o=r test.sh’. You can work out how to build the command up each time using
a very simple table. Note that in the example above we have used commas (,) to separate each
permissions for each party.
Some other examples of chmod using the Symbolic method are as follows:
Lets try this using the same example as in the binary method.
cd ~/unixintro
pwd
ls -la
Changes Directory to ‘unixintro’,
located inside your home directory
Print the current working directory
and check it’s correct.
List the contents of the working
directory
Make a note of the original
permissions for ‘phonebook’ - you
will need to restore them!
cat phonebook
Read the contents of the file
‘phonebook’
chmod u=,g=r,o=r phonebook
Change permissions of ‘phonebook’
cat phonebook
Now try to read the file ‘phonebook’.
What happened?
Now restore the original permissions
and try again
28 |
Changing Owner and Group
WARNING - DO NOT ATTEMPT THIS! – If you change the permissions of your own files you will
not be able to recover them!
In order to change the owner and group of a file, the commands ‘chown’ and ‘chgrp’ are used. To
change the owner and group simultaneously, one can simply issue the ‘chown’ command, specifying
a group after the username separated by a colon ( : ) .
If we attempt to change the ownership of a file to something other than ourselves, then we could
potentially lose the ability to manage it (delete, move, rename, etc).
Changing permissions on files can be problematic if you do not have super-user (admin / root)
access to the system you are working on, and will generally result in a rather annoyed Systems
Administrator having to fix permissions on the changed files.
| 29
Editing Files
Nano (formerly pico)
‘echo ’ is a very useful command if we want to add text to a file, however it cannot be used to modify
an existing file. For this, we have to use a text editor. The two standard text editors in Linux are
‘vim’ and ‘pico ’ (now known as ‘nano’). ‘vim ’ (also known as ‘vi’ (vee-eye)) is a rather hardcore text
editor, which is remarkably non-user-friendly. It is the preferred text editor by the highly experienced
of console users; however it is very complicated to learn. Feel free to read up on ‘vim’ in your own
time by looking at its ‘man’ page and looking online for help. For today, we will learn to use ‘pico ’
to modify the contents of a file.
Pico is very much like ‘Notepad’ but without a mouse. All commands are executed through the use
of the keyboard, using the <CTRL> key modifier. It can be used to edit virtually any kind of text file
from the command line, and is frequently used to configure services after they have been installed.
This is a standard (blank) Pico window, as you will see if you run the command ‘pico ’ from the
command prompt. At the bottom of the screen, there are commands with a ‘^’ symbol in front.
These are the commands that can be used. The ‘^’ shows that you need to hold down the Control
(Ctrl) key, and then press the corresponding letter of the command you wish to use. For Example:
Ctrl+X will exit Pico and return you to the Command Line.
30 |
Nano Quick Reference
• Ctrl+X Exit the editor. If you’ve edited text without saving, you’ll be prompted as to whether you
really want to exit.
• Ctrl+O Write (output) the current contents of the text buffer to a file. A filename prompt will
appear; press Ctrl+T to open the file navigator shown above.
• Ctrl+R Read a text file into the current editing session. At the filename prompt, hit Ctrl+T for the
file navigator.
• Ctrl+K Cut a line into the clipboard. You can press this repeatedly to copy multiple lines, which
are then stored as one chunk.
• Ctrl+J Justify (fill out) a paragraph of text. By default, this reflows text to match the width of the
editing window.
• Ctrl+U Uncut text, or rather, paste it from the clipboard. Note that after a Justify operation, this
turns into unjustify.
• Ctrl+T Check spelling.
• Ctrl+W Find a word or phrase. At the prompt, use the cursor keys to go through previous search
terms, or hit Ctrl+R to move into replace mode. Alternatively you can hit Ctrl+T to go to a specific
line.
• Ctrl+C Show current line number and file information.
• Ctrl+G Get help; this provides information on navigating through files and common keyboard
commands.
| 31
•
Useful commands to
research and try
ssh – Secure Shell – used to remote control a system via the command prompt
•
scp – Secure Copy – used to transfer files between computers over SSH
•
cat – Concatenate – used to print a view the contents of a file.
•
chmod – Change file mode bits – used to change permissions of a file for user, group & other
•
chown – Change Owner – used to change the user ownership of a file
•
chgrp – Change Group – used to change the group ownership of a file
•
gzip – Gunzip – file compression / decompression command for the .gz format
•
tar – file compression / decompression command for the .tar format
•
sudo – command to gain root access to a system (useful when combine with su. e.g: ‘sudo su’)
•
lynx – console-based web-browser
•
alpine / pine – an email client
•
nano – text editor (See previous pages for a brief How-to)
•
vim – advanced text editor – not for the faint hearted (try the command ‘vimtutor’)
•
ping – Sends ICMP ECHO_REQUEST to network hosts to determine their connectivity status
•
nc – netcat, used to listen / send TCP & UDP packets
•
nmap – Network Mapper – Tool for network exploration & Security auditing – Very involved
•
telnet – basic (unencrypted) method of controlling a system. Useful for interrogating ports
Some simple projects to attempt
•
Bash Scripting
•
Building a Fileserver using SMB (Samba) / CIFS
•
Building a Router using IP-Tables (Tip: IP-Masquerade How-to)
•
Building a Webserver using a LAMP platform (Linux / Apache / MySQL / PHP)
Useful links
http://tldp.org
The Linux Documentation Project – Number one go-to place for How-to guides and FAQ’s
http://www.tuxfiles.org/linuxhelp/shell.html
TuxFiles Linux Help – The Shell, Terminology
http://www.freesoftwaremagazine.com/articles/command_line_intro
Free Software Magazine – Beginners’ Introduction to the GNU/Linux Command Line
http://www.unixguide.net/linux/linuxshortcuts.shtml
Linux Newbie Guide – Shortcuts & Commands
http://dsl.org/cookbook/cookbook_5.html
32 |
The Linux Cookbook – Chapter 5, The Shell
Other things to try
A great way of learning Linux is to install it onto one of your own computers. This could be a desktop
or a laptop.
If you are unfamiliar with Linux, we would not recommend attempting this on your main computer,
but in a Virtual Machine (available for free with Virtual Box - https://www.virtualbox.org) or on older
equipment that you may own. If you make a mistake during the installation on your main computer,
you could erase your data and/or operating system from your computer – not something you want
if you’ve only got one computer to use!
We recommend and support OpenSUSE and Ubuntu Linux. These can be downloaded from:
www.opensuse.org and www.ubuntu.com, burnt to a CD, then installed onto a computer.
Of course, the Teaching.CIM Server will always be available. While you won’t be able to install
your own software, you are free to explore the system and try out commands. You will not be able
to cause any damage to the system, so don’t be afraid of breaking things. Just make sure you’ve
backed up your own documents first, just in case...
| 33
Introduction to Linux
by Tristan Findley
Updated September 2015
Copyright Royal Holloway University © 2015
34 |