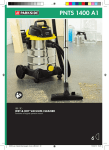
1
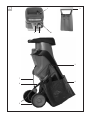
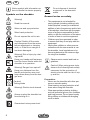
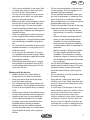
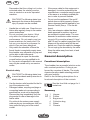
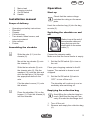
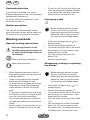
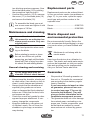
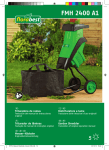
®
FMH 2400 A1
Garden Shredder
Translation of original operation manual
6
57372_Messer-Haecksler_Cover_LB6.indd 17
05.10.10 13:53
Before reading, unfold the page containing the illustrations and familiarise yourself with all functions
of the device.
GB / IE
Translation of original operation manual
57372_Messer-Haecksler_Cover_LB6.indd 18
Page
5
05.10.10 13:53
A
2
1
8
9
10
3
7
6
5
4
B
C
5
11
6
6.1
12
14
13
6
1
D
15
16
17
18
8
19
GB
IE
Contents
Intended purpose
Intended purpose ................................. 5
Safety precautions ............................... 5
Symbols used in the instructions ...... 5
Symbols on the shredder ................. 6
General notes on safety .................. 6
General description .............................. 8
Functional description ...................... 8
Summary .......................................... 8
Installation manual ............................... 9
Scope of delivery .............................. 9
Assembling the shredder ................. 9
Operation............................................... 9
Start-up ............................................ 9
Switching the shredder on and off .... 9
Emptying the collection bag ............. 9
Overload protection ........................ 10
Restart prevention .......................... 10
Working methods ............................... 10
General working instructions .......... 10
Freeing up a jam ............................ 10
Sharpening, turning or
replacing the blades ....................... 10
Maintenance and cleaning ..................11
General cleaning and servicing ......11
Replacement parts ..............................11
Waste disposal and environmental
protection .............................................11
Guarantee .............................................11
Technical specifications .................... 12
Troubleshooting ................................. 13
EU declaration of conformity ............ 15
Exploded Drawing .............................. 16
Grizzly Service-Center ....................... 17
The shredder is intended for compacting
fibrous and wood-related materials such
as hedge and tree cuttings, branches,
bark and pine cones.
Any use not expressly permitted in this
manual may damage the shredder and
pose a serious danger to the user.
Do not fell the shredder with stones,
glass, metal, bones, plastics or fabrics.
The operator or user is responsible for
accidents and injury or damage to third
parties.
The manufacturer will not be held responsible for any damage caused by improper
operation or use beyond the purpose
intended.
Safety precautions
This shredder may cause serious
injuries if improperly used. Before
using the shredder, read the user
manual carefully and familiarise
yourself with all of the controls. In
cases of uncertainty, ask an expert
for advice. Keep the manual in a
safe place and pass it on to any
subsequent owner to ensure that
the information contained therein is
available at all times.
Symbols used in the instructions
Hazardsymbolswithinformationonpreventionofpersonal
injuryandpropertydamage.
Precaution symbol (explanation of
precaution instead of exclamation
mark) with information on prevention of harm / damage.
5
GB
IE
Notice symbol with information on
how to handle the device properly.
Symbols on the shredder
Warning!
Read the manual.
Do not dispose of electrical
equipment in the domestic
waste.
General notes on safety
•
Wear ear and eye protection.
Wear hand protection.
Do not expose the unit to rain.
Caution! Switch off the motor
and disconnect from the mains
before adjustment or cleaning
work, or if the flex is caught or
has been damaged.
Warning! Risk of injury by rotating blade!
Keep your hands and feet away
from the funnel feeder while the
shredder is in operation.
Warning! Danger from spin-off.
Keep your distance from the
feeder and ejection area, and
keep others away from the danger area.
Caution!
Trailing blade
Warning! Electric shock hazard.
Always unplug the shredder before working on it.
Guaranteed noise power level
6
•
•
This equipment is not intended for
use by people (including children) with
limited physical, sensory or intellectual
abilities or lack of experience and/or lack
of knowledge, other than with the supervision of a person responsible for their
safety or with the instruction of the same
in terms of how to use the equipment.
Children must be supervised in order
to ensure that they do not play with the
equipment.
Never allow children or other persons
unfamiliar with the user manual to use
the shredder. Local regulations or bylaws may determine the minimum age
for using the shredder.
Observe noise control and local regulations.
Caution! When using power tools,
observe the following basic safety
measures for the prevention of
electric shocks and the risk of injury and fire:
Preparation:
• Never use the shredder with other persons or animals nearby.
• Wear hearing and eye protection at all
times when using the shredder.
• Wear appropriate protective clothing
such as protective gloves, firm footwear
and long trousers. Do not wear loosely
fitting clothes or clothes with dangling
cords or belts.
GB
•
•
•
•
•
•
•
Only use the shredder in the open (that
is, away from walls or other rigid structures) on a firm, level surface.
Do not use the machine on a paved,
gravelled area, which could be damaged by ejected material.
Before you start up the shredder, check
that all of the nuts, bolts and other fastenings are tight. Covers and shields
must be fastened properly and in good
working order. Replace any damaged or
illegible stickers.
Only use replacement parts and accessories supplied and recommended by
the manufacturer. Using third-party parts
will immediately invalidate the guarantee.
Do not leave the shredder working unattended and keep it in a dry place out of
children’s reach.
Only connect the shredder to a properly earthed mains power supply. Make
sure that the extension cable and socket
are properly earthed.
While being used in the open, connect
the shredder to a residual current (RC)
circuit breaker with a trip current of not
more than 30 mA.
Working with the device:
• Make sure that the funnel feeder is
empty before you start the shredder.
• Keep your head, hair and body away
from the intake opening.
• Do not reach into the funnel feeder during operation. The shredder will continue
to run for a short period after you switch
it off.
• Always stay outside of the ejection zone
during initial operation of the equipment.
• Always make sure you are standing in
a firm, balanced position. Do not lean
forwards, and never stand above the
shredder when inserting materials.
• Make sure that the material inserted
into the shredder does not contain hard
objects made of metal, stone, glass or
similar.
•
•
•
•
•
•
•
IE
Do not use the shredder in the rain and
in bad weather. Work in daylight or under good lighting conditions.
Do not operate the shredder when you
are tired or distracted, or under the influence of alcohol or medication. Always
take a break when you need one and be
sensible about how you work.
Switch the shredder off and pull the plug
under the following circumstances:
- when you are not using the device,
- transporting it or leaving it unattended;
- before releasing a jammed blade.
- when you are checking the device,
cleaning it or removing blockages;
- when you are carrying out cleaning
or maintenance work or replacing accessories;
- Before moving or lifting the shredder
- If foreign objects should enter the
shredder, if the shredder is making
unfamiliar noises or vibrations (check
the shredder for damage before starting it up again)
Do not allow shredded material to accumulate near the ejection area. This may
otherwise hinder proper ejection and
force the material back up through the
feeder.
Do not transport or tip the shredder with
the motor running.
Keep hands, other body parts and
clothing out of the filling chamber and
ejection channel and away from other
moving parts.
In the event of blockages in the machine intake or ejection, switch off the
motor and disconnect the machine
from the mains before removing
leftover material in the intake opening
or ejection channel. Ensure that the
motor is free of rubbish and other accumulations in order to safeguard the
motor from damage or possible fire.
7
GB
IE
Remember that the cutting tool is also
activated when the starting mechanism is started on a motor operated
machine.
CAUTION! The following states how
damage to the trimmer and possible
injury to people can be avoided:
•
•
•
•
Handle the unit with care. Clean the ventilation slits regularly; keep to the maintenance instructions.
Do not overload your device. Work
only within the indicated range of
performance. Do not employ any low
power machines for heavy work. Do
not use your device for purposes for
which it has not been designed.
Only switch the shredder off once the
funnel feeder is completely empty since
the shredder may otherwise clog up and
not be able to start afterwards.
Do not attempt to repair the shredder
yourself unless you are qualified to do
so. Any work not specified in this manual
may only be carried out by our service
centre.
Electrical safety
CAUTION! The following states how
to avoid accidents and injuries due to
electric shock:
•
•
8
Use the tension relief provided for the fixing of the extension cord.
Damaged cables, coupling and plugs or
connecting leads not corresponding to
specifications, must not be employed.
Remove the plug immediately from the
plug socket in case of damage to the
mains cable.
Do not touch the mains power supply
cable under any circumstances until you
have pulled the plug out of the mains
socket.
•
•
•
•
If the power cable for this equipment is
damaged, it must be replaced by the
manufacturer, a customer service agent
of the same or a similarly qualified person in order to prevent hazards.
Do not use the appliance if the on/off
switch does not work properly. Always
have a damaged switch repaired by our
Service Centre (See p. 17 for the address).
Only use extension cables that have
been approved for outdoor use and
are resistant to splash water. The core
diameter for extension cables measuring up to 25 m must be at least 1.5 mm²,
and 2.5 mm² for cables longer than 25m.
Always roll the whole cable off the reel
before use. Check the cable for damage.
Do not unplug the shredder by the cable.
Keep the cable away from heat, oil and
sharp edges.
General description
Functional description
The shredder has a powerful electric motor
with overload protection. Cutting is performed by a system of blades. The sturdy
chassis ensures a stable standing position
with good mobility.
Refer to the following descriptions for a
functional description of the controls.
See the front fold-out page for illustrations.
Summary
A
1
2
3
4
5
6
Hopper
Pusher
Bag mount
Collection bag
Wheel
Chassis
GB
7
8
9
10
Mains lead
Housing interlock
On/Off switch
Handle
Installation manual
Scope of delivery
•
•
•
•
•
•
•
Operating and safety instructions
Shredder
Chassis
Collection bag
Two wheels, wheel covers, and
mounting material
Allen wrench
Pusher
Assembling the shredder
B
Operation
Start-up
Check that the mains voltage
matches the rating on the name
plate.
Hook the collection bag (4) into the bag
mounts (3).
Switching the shredder on and
off
Make a loop at the end of
the extension cable and
hang the loop onto the
strain relief on the mains
cable (7).
Slide the axle (6.1) into the
chassis (6).
Connect the extension cable.
Make sure that the funnel feeder is empty.
Mount the two wheels (5) onto
the chassis (6).
1. Set the On/Off switch (9) to turn on
the unit.
Slide the two wheels (5) onto
the chassis axle (6). Slip the
washers (12) onto the axle and
stick the split pins (14) through
the appropriate holes in the
axle.
Place your chopping material in the fill
hopper. The material is drawn in and
chopped.
Clip the wheel covers (11) onto
the wheels.
C
IE
Place the shredder (14) on the
hopper (1). Push the chassis (6)
into the shredder.
2. Set the On/Off switch (9) back to
“OFF” to turn off the unit.
The shredder will continue to run immediately after switching off.
Emptying the collection bag
Avoid filling the collection bag too
much. Mind that the bag will unevenly fill under the discharge duct!
1. Turn off the unit.
2. Remove and empty the collection bag
(4).
9
GB
IE
Overload protection
In the event of overload, e.g. due to
branches that are too thick, the equipment
automatically switches off.
To restart, allow the equipment to cool
then switch it back on.
•
Freeing up a jam
D
Restart prevention
Before starting to service or clean
the unit, turn off the unit, pull the
power plug, and wait until the blade
stands still. Risk of injury from electric shock, fire and rotating blades.
The unit will not automatically restart
when the power returns after a power cut.
To restart the unit, press the On switch.
Working methods
General working instructions
Keepenoughdistancetothe
shreddersincelongbranchescan
bespunoffwhilebeingdrawninto
theshredder.
•
•
•
•
•
•
10
Do not turn off the unit until all the material has passed the blades. Remaining material may otherwise block the
blade when you restart the unit.
•
•
•
•
Check that the power plug ( A 7) is
pulled properly.
Unlock the housing interlock (8).
Tip forward the front part of the shredder housing. You can remove it completely and put it aside.
You now have full access to the
blades (18).
Remove the blockage.
Wear ear and eye protection
•
Wear hand protection
Sharpening, turning or replacing
the blades
When feeding branches to the unit,
keep holding them until they are automatically drawn in.
Adapt to the speed of the shredder
and avoid overloading the unit.
To avoid the unit clogging up, mix the
branches with twigs and gardening
waste allowed to wither for several
days.
To prevent the blades from becoming
blunt quickly, remove mud and stones
from the roots before shredding.
Do not shred but directly compost all
soft and wet material such as kitchen
waste.
Keep a couple of dry branches to use
them for cleaning the unit at the end.
Before starting to service or clean
the unit, turn off the unit, pull the
power plug, and wait until the blade
stands still. Risk of injury from electric shock, fire and rotating blades.
•
•
•
•
•
Check that the power plug ( A 7) is
pulled properly.
Unlock the housing interlock (8).
Tip forward the front part of the shredder housing. You can remove it completely and put it aside.
You now have full access to the blade
(18).
Use a screwdriver to block the blade
plate (16). Slot the screwdriver into
the access hole (19) and carefully turn
the blade plate (16) until one of the
GB
•
two blocking apertures appears. Now
block the blade plate (16) by slotting
the screwdriver right through it.
Use the Allen wrench (15) to unscrew
the screw (17) in the blade plate (16)
and remove the blade (18).
To assemble the blade you must
use a new screw and tighten it with
an torque of 16 Nm.
Maintenance and cleaning
Leaveallworknotdescribedin
thismanualtoanauthorisedcustomerservicecentre.Onlyuse
originalparts.
Wear hand protection when working on the blade.
Before starting to service or clean
the unit, turn off the unit, pull the
power plug, and wait until the blade
stands still. Risk of injury from electric shock, fire and rotating blades.
General cleaning and servicing
Donotspraywaterontothe
shredder.Electricshockhazard.
•
•
•
•
Always keep the shredder, wheels and
air vents clean. Use a brush or cloth to
clean it, avoid cleaners and solvents.
Always check that the shredder and
especially the guards are not worn
down or damaged but firmly attached
before use. Check that the nuts, bolts
and screws are tight.
Check the covers and guards for damage and improper attachment. If necessary, change the components
Keep the shredder in a dry place out
of children’s reach. Do not cover the
shredder in nylon bags, as moisture
may develop.
IE
Replacement parts
Replacement parts can be ordered directly from our service centre (see address on
page 17). In your order, quote the equipment type and position number in the
exploded view.
Screw........................................ 91097183
Blade ........................................ 91093080
Waste disposal and
environmental protection
Be environmentally friendly. Return the
tool, accessories and packaging to a recycling centre when you have finished with
them.
Machines do not belong with domestic waste.
Hand over the device at an utilization location. The plastic and metal parts employed can be separated out into pure materials and recycling can be implemented.
Ask your Service Center about this.
Guarantee
•
•
We provide a 36-month guarantee on
this unit, or 12 months for commercial
use according to the statutory regulations in Germany.
If you have reason to launch a claim
on guarantee, please call our service centre (see page 17 for our tel.,
fax and e-mail address). They will
give you further information on the
complaints management process.
The guarantee does not cover damage
from natural wear, overloading or improper use. Certain components, such
as the blade are subject to normal
wear and are not covered by guarantee.
11
GB
•
•
•
•
•
•
IE
Guarantee is conditional on adherence
to instructions on cleaning and servicing instructions.
Damage resulting from material or
manufacturing defects shall be remedied by replacement or repair free of
charge.
Our service centre will also repair parts
not covered by guarantee for a fee.
The service centre will be pleased to
give you a cost estimate.
We can only repair equipment with sufficient postage and packaging by the
sender.
This requires you to return the nondismantled unit together with its
receipt slip and warranty card to our
Service Centre.
We will not accept bulk consignments, express or other special
freight where postage has not been
paid for.
We will dispose of your equipment free
of charge.
Technical specifications
Blade-type shredder .......... FMH 2400 A1
Nominal power intake ................... 2400 W
Nominal voltage .......... 220V-240 V, 50 Hz
Safety class .......................................
II
Degree of protection .......................... IP24
Idling speed (n0)........................3940 min-1
Branch thickness ................. max. 40 mm*
Volume of collection bag................ca. 60 l
Weight ..............................................12 kg
Guaranteed sound power level
...................................................107 dB(A)
Measured sound power level (LwA)
..........................106 dB(A); KwA= 1 dB(A)
Acoustic pressure level (LpA)
.........................86,4 dB(A); KpA = 1 dB(A)
The sound levels have been determined
in accordance with noise measuring process EN 13683:2009-09, appendix F.
12
*
The max. branch thickness that can be chaffed is
dependent on the type of wood and the quality of
the goods being cut.
For hard wood (e.g. oak/beech branches), the
max. branch thickness that can be chaffed is less
than for soft wood (e.g. pine/spruce wood). For
dry or knotted wood, the cutting thickness may
also be less.
≥100A
The equipment is intended only
for use in premises in which the
current bearing capacity of the
network is >=100 A per phase
and which are supplied by a
distribution grid with a nominal
voltage of 400/230V.
To be on the safe side, check with your
local electric utility to verify that the
junction point of the mains has enough
continuous current carrying capacity for
the unit.
Noise and vibration values were determined according to the standards and
stipulations mentioned in the declaration
of conformity.
Technical and optical changes can be carried out in the course of further development without notice. All dimensions, references and information of this instruction
manual are therefore without guarantee.
Legal claims, which are made on the basis of the instruction manual, cannot thus
be considered as valid.
GB
IE
Troubleshooting
Problem
Possible cause
Remedy
Check the socket, cable, lead and
plug for damage, and if necessary,
have any damage repaired by
qualified repair personnel.
Motor will not
Wait until the motor has cooled down,
start
Overload protection tripped then press the Reset button and restart
the unit
Lid of housing not closed
Tightly screw in the housing interlock
properly
Shredding material is too
Use the pusher or add dry twigs/
soft
branches
Garden waste is
Unit blocked
See section „Removing blockages“
not drawn in
Shredding material in
Remove shredding material from
discharge duct
discharge duct
Check and turn, sharpen or replace
Unit won‘t shred
blades as necessary (see section
Blades are blunt
properly
„Sharpening, turning, replacing the
blades“)
No mains power
supply
13
14
GB
EU declaration of conformity
IE
We hereby confirm that the
Blade-type shredder
Design Series FMH 2400 A1
Serial number 100900001 - 101128000
conforms with the following applicable relevant version of the EU guidelines as of model year 2010 :
2006/42/EC • 2004/108/EC • 2000/14/EC
In order to guarantee consistency, the following harmonised standards as well as national standards and stipulations have been applied:
EN 61000-3-2:2006 • EN 61000-3-11:2000 • EN 55014-1:2006
EN 55014-2:1997/A1:2001/A2:2008 • EN 60335-1/A13:2008 • EN 13683/A1:2009
FprEN 50434:2005 • EN 62233:2008
We additionally confirm the following in accordance with the 2000/14/EC emissions guideline:
Guaranteed sound power level: 107 dB(A)
Measured sound power level: 106 dB(A)
Compliance evaluation process carried out in accordance with Appendix V, 2000/14/EC
Labelled with CE identification mark in 2010
Grizzly Gartengeräte GmbH & Co. KG
Am Gewerbepark 2
D-64823 Groß-Umstadt / 28.12.2010
(Andreas Gröschl, Technical Director
and Documentation Representative)
15
Exploded Drawing
informative
16
Grizzly Service-Center
DES UK Ltd.
Unit B7
Oxford Street Industrial Park
Vulcan Road
Bilston, West Midlands WV14 7LF
Tel:
0870 7876177
Tel from Ireland: 0044 870 787 6177
Fax:
0870 7876168
Fax from Ireland: 0044 870 787 6168
Email: [email protected]
2010-11-08-rev02-op
17
IAN 57372
Grizzly Gartengeräte GmbH & Co. KG
Am Gewerbepark 2
D-64823 Groß-Umstadt
Last Information Update: 10 / 2010
Ident.-No.: 72081409102010 - 6
57372_Messer-Haecksler_Cover_LB6.indd 16
6
05.10.10 13:53