1
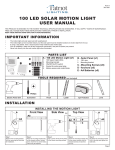
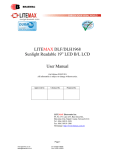
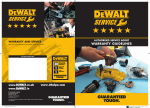
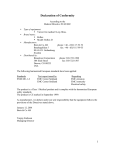
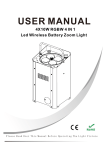
Contact details
Head Office:
No 50, Kiepersol Crescent, Atlas Gardens,
Contermanskloof, Durbanville, 7550,
Cape Town, South Africa
Tel: +27 21 557 7257
Fax: +27 21 557 7381
Email: [email protected]
Website: www.leatt.com
Postal Address:
Suite 109, Private Bag X3, Bloubergrant,
7443, South Africa
USA:
Tel: 661 287 9258
Toll Free: 1.800.691.3314
Fax: 661 287 9688
USER MANUAL
Europe:
235-12
Email: [email protected]
Copyright © 2013, Leatt® Corporation
Copyright © 2013, Leatt® Corporation
All motorsports are hazardous.
USER MANUAL
Leatt-Brace® MRX
Participants can suffer severe brain, head, or neck injuries causing permanent paralysis or
even death.
A properly fitted Leatt-Brace®, worn in conjunction with a full-face helmet, can help reduce the
incidence or severity of neck injuries, but no known safety device can eliminate the physical
risks inherent in any motorsport activity.
Read and follow all safety instructions
A Leatt-Brace® is not a substitute for skill or experience. Do not attempt potentially hazardous maneuvers while wearing
a Leatt-Brace® that you would not attempt without a brace.
The Leatt-Brace® must be correctly fitted to the wearer’s body. Follow the sizing and fitment directions in this manual
to ensure that your brace fits properly.
Failure to achieve a correct fit of the Leatt-Brace® will reduce the effectiveness of the brace and may subject the
wearer to unexpected risks.
A cracked, bent, or deformed Leatt-Brace®, or any Leatt-Brace® worn by a user during an injury-producing accident or fall,
should not be used again by anyone. Damage affecting the structural integrity and performance of the brace may not be
visible to the naked eye.
01
Copyright © 2013, Leatt® Corporation
Table of Contents
•
Instruction Manual Introduction ................................................. Page 03
•
MRX parts and Components ..................................................... Page 04
•
MRX fitment .............................................................................. Page 05
•
Correct fitment .......................................................................... Page 06
•
Set up the External Tether Helmet Mount ...............................
Page 07 - 09
•
Buckling up with your MRX .............................................
Page 09
•
Releasing the harness with your MRX neck brace .................. Page 11
•
Looking after your Leatt-Brace® ................................................ Page 12
•
Indemnity and Warranty Disclaimer .......................................... Page 12
Copyright © 2013, Leatt® Corporation
02
MRX exploded view
Instruction Manual Leatt-Brace® MRX
This is a list of parts that might be mentioned in the manual and where they are situated.
Spare parts are available.
9
10
8
Welcome to the world of Leatt® and thank you for choosing our product. The Leatt-Brace®
you have purchased is based on years of academic research, extensive evaluation of the
mechanisms of head and neck injuries, together with testing, both in test facilities and with
simulation software.
12
11
7
6
5
Our design philosophy has always been to produce an effective neck injury prevention device
with practical appeal, as determined by our test drivers. We will therefore always appreciate
your feedback with regards to comfort and practicality for your chosen application of our
product. We value your input, so please feel free to contact us on [email protected].
4
13
3
14
This product has also undergone and passed SFI 38.1 which is a test standard evaluating
the effectiveness of a Head and Neck Restraint (HNR) device. It utilises a dummy seated in a
frontal test sled accelerated at 68G in order to generate high neck forces such as which may
be found during an actual severe frontal crash. Neck tension/compression and the Neck Injury
Criterion (Nij) are measured and evaluated against pre-determined injury threshold values.
Two direct frontal (0deg) impacts and one side (30deg) impact is required for certification.
2
15
To ensure you utilize this product to its full potential please read the manual. If you have any
other enquiries mail [email protected] or contact your closest dealer.
16
1
MRX Parts
Parts/Components List
03
Copyright © 2013, Leatt® Corporation
QTY
Parts/Components List
QTY
1
MRX Padding
1
9
Bookscrew 8x12mm
2
2
MRX Main Body
1
10
Helmet Pad
2
3
Front Rubbers
2
11
Tether
1
4
Post Anchor Backplate
2
12
Back Tether Unit
1
5
Post Anchor Frontplate
2
13
MRX Tether Attachment
2
6
Post Anchor Tab
2
14
Back Rubber
2
7
Countersunk Screw M6 x 20
2
15
Small Wing
2
8
Bookscrew 8x7mm
2
16
MRX Spanner
1
Copyright © 2013, Leatt® Corporation
04
MRX Fitment
1
First step is to get your MRX on, clear the
tethers of the inside padding and place the
two front wings on the side of your neck,
pulling and flexing the MRX open if necessary.
3
Correct fitment
Please make sure the MRX is always fitted correctly. If the MRX is not fitted correctly it might
impede the brace’s functionality.
2
Proceed to pull the MRX forward until you feel
the back of your lower neck hit the padding.
The MRX Should always be in line with your neck and head.
4
±90o
Once you have the MRX on you can proceed
to fit your helmet and attach the tether system
( please see p7).
05
Fit the right tether point over the right hook.
Rotate the point towards the visor for ± 90o
degrees and pull down. Repeat on the left
sideside side.
Copyright © 2013, Leatt® Corporation
Make sure the MRX is positioned correctly on your shoulders, too far forward or back could create
discomfort once you get in your seat.
Copyright © 2013, Leatt® Corporation
06
CAUTION
Two extra horizontal
line markings
The Leatt-Brace® MRX brace must be used with / installed on new generation safety/
racing helmets which come from the manufacturer with pre-drilled mounting holes
(Helmet / Tether Terminals) for this type of equipment.
All tightening of screws on the brace and its tether system should be maintained at a
torque setting of 2Nm (18lbf-in) to ensure optimum effectiveness.
40mm from the
rubber lining
join the 2
centre points
Validation of Pre-Drilled Hole Positioning:
Leatt®
recommends that you only use a new generation helmet with pre-drilled mounting holes
(tether terminals). These terminals should be within a ±10mm (±3/8”) tolerance for proper and
correct installation and use of the MRX brace. Helmets without tether terminals, or helmets with
tether terminals that fall outside of the specified tolerance, cannot be used.
2. Mark your helmet’s horizontal line:
Carefully join the 2 centre points to make the centre line of your helmet. Measure 40mm (~1 1/2”)
from the top of the rubber lining & make the first horizontal mark. Now make 2 extra horizontal line
markings on each side of your helmet. Keep measuring 40mm from the rubber lining for each of
these markings.
The following instructions are provided to allow you to verify that the existing Tether Terminals
are located in the correct locations for proper and correct installation and use of your MRX brace.
Follow steps 1 through 3 to determine if such tether terminals are within the ±10mm (±3/8”)
tolerance necessary for proper and correct installation and use of your MRX brace. If the tether
terminals are within the specified tolerance, continue with steps 4 through 8.
mark the measure point
150mm (~6”) from the
centre line
centre line
3. Mark the tolerence center point for the
mounting hole/Helmet-Tether-Terminal:
Align your measuring tape from the centre line
at the rear of your helmet & along the 2 marked
horizontal lines. Measure 150mm (~6”) from
the centerline; this is where your mounting hole
(Helmet-Tether-Terminal) should be located.
Repeat this step for the other side of your
helmet.
What you’ll need: • Your Helmet
2nd center point
2nd measurement
from a fixed point
measure from a fixed point
1st centre point
masking tape
• 4mm (~5/32”) Allen Key (supplied)
• Leatt® Moto R Spanner (supplied)
• Leatt® Tether System (supplied)
• Masking Tape
• Flexible Measuring Tape
• Felt Tip Marker or Dark Pencil
1. Find your helmet’s centre:
Apply masking tape to the rear of your
helmet to prepare for markings. Use a flexible
measuring tape & measure from an identical
point on each side of the helmet. Calculate the
half way point on the measuring tape & make
your first mark. Now find your second centre
point in the same way & mark above the first
centre point.
back plate
front plate
helmet
inner
padding
helmet shell
post anchor
tab
helmet-tetherterminal
External Tether Helmet Mount
07
Copyright © 2013, Leatt® Corporation
Leatt®
tether end
fitting
Copyright © 2013, Leatt® Corporation
capscrew
M6 x 16mm
4. Assembling the External Tether
Helmet Mount:
Align the Back Plate underneath the Helmet
Tether Terminal between the Padding & Shell.
Fit the cap screw into the Post Anchor Tab that
fits into the Front Plate. The remaining end
of the cap screw must fit through the hole &
must be screwed to the Back Plate using the
supplied 4mm Allen Key.
Make sure you do not over tighten as over
tightening may crack and/or damage your
helmet, which may compromise rider safety
and helmet effectiveness.
08
3mm Allen Key
Point Post Anchor
Tab horizontally to
back of helmet
5. Tightening the External Tether
Helmet Mount:
Slip the supplied 10mm (~3/8”) spanner
between the padding & the shell. Now secure
the spanner head over the Back Plate’s fixed
nut. Tighten the cap screw (~2Nm (18lbf-in)),
one full rotation, with the supplied 3mm Allen
Key while securing the Back Plate’s fixed nut
with the spanner. It is important to align the Post
Anchor Tab horizontally & ensure that it points
to the rear of the helmet.
Buckling up with the MRX brace fitted:
Do not over tighten.
Belt Fitment in vehicle
Before proceeding to with the belt fitment, please note that the MRX was designed to
accomodate all seating angles.
Ensure that the safety belts / multi-point harness are correctly installed in your vehicle. Belt adjusters
should be set at the centre of the chest, below the side members of the MRX Race brace if possible and
not at the base of your neck. This will assist in comfort and brace compatibility.
1. Assume a comfortable driving position once
in your racing seat before tightening your
safety harness.
2. Hold the safety harness over your
shoulders. Run your hands forward over
the belts while guiding them into the
locating wings and side channel of the
MRX brace.
3. Apply moderate tension to the belt adjusters
and ensure that the harness runs through
the wings and over the chest belt guides.
4. Now tighten the belts completely as you
would normally do.
There are wings on either side of the MRX (see Figure2), which are designed to accommodate
the mandatory three-inch safety harness or optional 2-inch harness. These are belt guides and
the belt must sit inside them. The belt guides are there to keep the belts away from soft tissue
neck structures. This, together with the Side Tether design of the Leatt-Brace®, will help reduce
the likelihood of neck injury in a side impact. The design of the MRX brace eliminates the need for
harness padding sleeves. Hydration and communication lines may be routed via the safety belt.
Figure 2
Seat Belt
Belt positively
located in wing
09
Belt adjusters in correct
place over front wing
the Belt should not go over the wing,
if it exceeds the shoulder area let it
curl up on the inside
Copyright © 2013, Leatt® Corporation
Copyright © 2013, Leatt® Corporation
10
Proper care and Maintenance
Releasing the harness with the MRX brace fitted:
Figure 3a
Figure 3b
Make it a habit to inspect your Leatt-Brace® as you would other safety equipment. Frequently worn
braces should be discarded and replaced every three years.
Do not make any alterations or modifications to your Leatt-Brace®. If you lose or damage
adjustment pins, hinges, struts, padding, or other components, purchase replacements from Leatt®.
Keep your Leatt-Brace® clean by washing it with plain soap and water. Solvents, abrasive
cleaners, and high heat can damage the brace and reduce its effectiveness just when you
need it the most.
LIMITED WARRANTY
1. Release the harness at the buckle and grab the belts (see Figure 3a). Pull the safety harness
in your forward direction.
2. Now, move the safety harness to your sides and in an upward and outward motion to ensure
the belts are released from the wings on the MRX brace (see Figure 3b).
YOUR LEATT-BRACE® IS WARRANTED TO BE FREE OF DEFECTS IN MATERIALS OR MANUFACTURING FOR ONE
YEAR FROM THE DATE OF PURCHASE. THE LEATT-BRACE® IS DESIGNED TO YIELD OR BREAK UNDER CERTAIN
CONDITIONS OF USE, SO DAMAGE CAUSED BY ACCIDENTS, FALLS, ABUSE OR MISUSE IS NOT COVERED BY THIS
LIMITED WARRANTY.
TO MAKE A WARRANTY CLAIM, GO TO WWW.LEATT.COM OR SEND AN EMAIL TO [email protected].
3. With the harness located adjacent to your sides, you may now exit the vehicle.
4. We encourage you to practice getting in (ingress) and out of your vehicle (egress) with your
Leatt-Brace® on. This Ingress and Egress practice will help you become more efficient
on race day.
LEATT CORPORATION EXPRESSLY DISCLAIMS ALL OTHER WARRANTIES, EXPRESS OR IMPLIED, INCLUDING THE
WARRANTIES OF MERCHANTABILITY AND FITNESS FOR A PARTICULAR PURPOSE.
In the event of a crash
1. Should your Leatt-Brace® be damaged as result of a serious accident,
no Warranty Claim is possible.
2. Leatt® Corporation would like to hear from you if you have been involved in a crash
event. The feedback is used to advance the understanding of crash dynamics in the
Leatt® Lab and assist in improving our products.
3. In event of a crash, if you have supporting footage, photos or medical information, gather all the
supporting information and submit it to the address below.
4. After evaluation by the Leatt® Lab and subject to the Leatt® Lab discretion incentives
may be offered for fully completed Injury Assessment forms;
You can fill in our online crash form at: www.leatt.com/customer-support/accident-form/
11
Copyright © 2013, Leatt® Corporation
Copyright © 2013, Leatt® Corporation
12
Notes
Copyright © 2013, Leatt® Corporation
Copyright © 2013, Leatt® Corporation