1
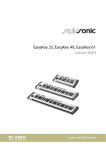
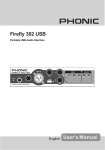
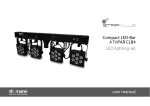
EASY FIREWIRE
Audio Interface
ENGLISH
USER’S MANUAL
IMPORTANT SAFETY INSTRUCTIONS
shall be placed on the apparatus. The MAINS plug is used as the disconnect device, the disconnect device shall
remain readily operable.
Warning
can be easily accessible.
1. Read these instructions before operating this
apparatus.
CAUTION
2. Keep these instructions for future reference.
RISK OF ELECTRIC SHOCK
DO NOT OPEN
3. Heed all warnings to ensure safe operation.
4. Follow all instructions provided in this document.
5. Do not use this apparatus near water or in locations
where condensation may occur.
6. Clean only with dry cloth. Do not use aerosol or liquid
cleaners. Unplug this apparatus before cleaning.
7. Do not block any of the ventilation openings. Install
in accordance with the manufacturer s instructions.
8. Do not install near any heat sources such as radiators,
heat registers, stoves, or other apparatus (including
CAUTION: TO REDUCE THE RISK OF ELECTRIC SHOCK,
DO NOT REMOVE COVER (OR BACK)
NO USER SERVICEABLE PARTS INSIDE
REFER SERVICING TO QUALIFIED PERSONNEL
The lightning flash with arrowhead symbol, within an
equilateral triangle, is intended to alert the user to the
presence of uninsulated dangerous voltage within the
product
magnitude to constitute a risk of electric shock to persons.
The exclamation point within an equilateral triangle is in-
9. Do not defeat the safety purpose of the polarized or
grounding-type plug. A polarized plug has two blades
with one wider than the other. A grounding type plug
has two blades and a third grounding prong. The wide
blade or the third prong is provided for your safety. If
an electrician for replacement of the obsolete outlet.
10. Protect the power cord from being walked on or
pinched particularly at plug, convenience receptacles,
and the point where they exit from the apparatus.
manufacturer.
12. Use only with a cart, stand, tripod, bracket, or
the apparatus. When a cart is used, use caution
when moving the cart/apparatus
combination to avoid injury from tipover.
13. Unplug this apparatus during lighting
storms or when unused for long
periods of time.
Servicing is required when the apparatus has been
damaged in any way, such as power-supply cord or
plug is damaged, liquid has been spilled or objects
have fallen into the apparatus, the apparatus has
been exposed to rain or moisture, does not operate
normally, or has been dropped.
2
tended to alert the user to the presence of important operating and maintenance (servicing) instructions in the literature
accompanying the appliance.
WARNING:
not expose this apparatus to rain or moisture.
CAUTION: Use of controls or adjustments or performance
hazardous radiation exposure.
EASY FIREWIRE USER’S MANUAL
CONTENTS
4
INTRODUCTION
4
FEATURES
4
INCLUDED ITEMS
4
SYSTEM REQUIREMENTS
5
QUICK INSTALLATION (WINDOWS)
5
QUICK INSTALLATION (MAC)
6
PRODUCT OVERVIEW
7
EASY FIREWIRE CONTROL PANEL
11
DIGITAL AUDIO WORKSTATION
12
TROUBLESHOOTING
13
SPECIFICATIONS
14
BLOCK DIAGRAM
15
DISPOSAL
FEB, 2009
3
EASY FIREWIRE USER’S MANUAL
INTRODUCTION
Congratulations on your purchase of the Swissonic ‘Easy FireWire’
portable FireWire audio interface. Offering two balanced 1/4” phone
jack inputs and two balanced 1/4” phone jack outputs, as well as a
stereo headphones output with volume control, the Easy FireWire
offers users the ability to record either two mono channels or a single
stereo channel to their computer anywhere they go.
This user’s manual was created with the express purpose of creating
an easy reference guide for operating the Easy FireWire. It is
recommended that you read the manual before operating the unit
then store the manual for future reference.
FEATURES
●
●
●
●
●
●
●
●
2 x 2 24-bit/96kHz FireWire stream I/O
Headphone output with dedicated level control
Two 1/4” TRS inputs and two 1/4” TRS outputs
6-pin FireWire connector
Low-latency ASIO software direct monitoring
FireWire LED indicator
Powered via included DC power supply or FireWire connection
Mac and Windows compatible
INCLUDED ITEMS
● Easy FireWire Unit ● 12V DC Power Adapter
● FireWire Cable ● Driver Installation CD
● User’s Manual
SYSTEM REQUIREMENTS
The following are the minimum required specifications for use with the
Easy FireWire. If your computer does not meet these requirements,
you will experience lagging of audio and possible freezing of your
computer when attempting to operate the unit.
4
EASY FIREWIRE USER’S MANUAL
Windows
● Microsoft Windows XP with SP2 or Windows Vista
● Available FireWire port (we suggest the ADS Pyro PCI 64 or 64R2
cards)
● Intel Pentium 4 processor or equivalent AMD Athlon processor
● Motherboard with Intel or VIA chipset
● 5400 RPM or faster hard disk drive (7200 RPM or faster with 8 MB
cache recommended)
● 256 MB or more of RAM (512 MB recommended)
Macintosh
● OS X 10.3.5 or later with native FireWire support (OS X 10.4.7
may have some stability issues)
● G4 or newer processor
● 256 MB or more of RAM
QUICK INSTALLATION (WINDOWS)
The Easy FireWire requires the installation of a driver to function
correctly. Please do not connect the Easy FireWire to the computer
until you have read the following installation instructions.
1. Insert the installation CD that accompanied your Easy FireWire.
2. If the installation program does not run immediate, please find the
‘setup.exe’ file in the appropriate driver subdirectory.
3. Follow the onscreen instructions to install the Easy FireWire driver.
4. When instructed to ‘disconnect and reconnect’ the Easy FireWire,
connect the unit to the computer and turn the power is on.
5. Finalize the installation process.
QUICK INSTALLATION (MAC)
The Easy FireWire operates as a plug-and-play device with Macintosh
computers. Simply connect the Easy FireWire to your Mac through
the FireWire connection and it should be immediately recognized by
the Mac. To ensure your Easy FireWire is working, enter the Utilities
folder and double-click the Audio MIDI Setup icon. Here you should
be able to select the Easy FireWire as your default audio input and
output device.
5
EASY FIREWIRE USER’S MANUAL
PRODUCT OVERVIEW
5
3
1
2
6
7
1. 1/4” TRS Inputs
Connect your balanced line-level input signals here using 1/4” TRS
phone jack plugs. The signals from these connections are sent
through the FireWire interface to the computer for recording.
2. 1/4” TRS Outputs
These jacks accept 1/4” TRS phone jack connectors and are for
the output of balanced line-level signals. The signal sent through
these outputs is taken from the FireWire interface. Typically this
signal is defined by the user in their digital audio workstation (DAW)
software.
3. Headphones Output
Plug standard stereo headphones or in-ear monitors into this 1/4”
TRS phone jack connection. The headphones output is taken from
the FireWire interface and is identical to that sent through the 1/4”
TRS Outputs.
4. Level Control
This large jog wheel control allows users
to adjust the output level of the signal that
is sent to the headphones output.
5. FireWire Indicator
This small LED indicator will light up when
a FireWire connection is established.
6
4
EASY FIREWIRE USER’S MANUAL
6. FireWire port
Connect the Easy FireWire to your computer through this 6-pin
FireWire connection. As the Easy FireWire supports bus powering
through the FireWire interface, users can connect to their computer’s
6-pin FireWire connector and avoid the necessity of using the DC
power input. Computers with 4-pin FireWire connectors can also be
used, however the DC power supply will be required.
7. DC Power Input
Connect the Easy FireWire’s DC power supply here. EASY FIREWIRE CONTROL PANEL
Using the Easy FireWire control panel, users can adjust various
properties of their FireWire audio signals. The control panel is
currently only available on PC computers.
Devices: In the Devices section, users are able to view and edit the
name of the Easy FireWire when it is connected to the computer.
7
EASY FIREWIRE USER’S MANUAL
Input Channels: The Input Channels section allows users to view
and edit the name of the various input channels received from the
FireWire input.
Output Channels: By entering the Output Channels section, users
can view and edit the names of the two output channels from the
computer to the Easy FireWire.
8
EASY FIREWIRE USER’S MANUAL
When setting up inputs and outputs in your DAW software, the Easy
FireWire inputs and outputs will appear as follows.
Unit Input
ASIO display name
Unit Output
ASIO display name
Input 1
EasyFW – Line In 1
Output 1
EasyFW – Line Out 1
Input 2
EasyFW – Line In 2
Output 2
EasyFW – Line Out 2
Synchronization: In the Synchronization section, users can adjust
the sampling rate (between 44.1, 48, 88.2 and 96 kHz) and other
synchronization properties. These properties are set for optimum
performance and, unless you are an experienced user, are probably
best left alone.
9
EASY FIREWIRE USER’S MANUAL
Settings: Users are able to adjust various buffer times in the Settings
section.
The Stream Buffer Depth is adjustable between 0.5 and 20
milliseconds. It adjusts the buffer used when streaming a signal from
the Easy FireWire. If the depth is set too high, an obvious latency will
become evident. If the depth is too low, various clicks and pops may
become evident. It is best to set the Stream Buffer Depth to a level that
allows users to get the lowest latency while still maintaining optimal
performance. The default settings are ideal for most computers.
The ASIO Buffer Depth is adjustable between 4 and 40 milliseconds.
This allows users to adjust the latency of the stream received by
ASIO driver based software.
The WDM (Windows Driver Model) Sound Buffer Depth is adjustable
between 4 and 40 milliseconds. This allows users to adjust the
latency of the stream received by WDM based programs.
10
EASY FIREWIRE USER’S MANUAL
Streams: In the Streams section, the Easy FireWire device properties
can be viewed. Each input and output stream can be scrutinized, and
the isochronous stream number, and its supported sampling rates,
can be viewed.
DIGITAL AUDIO WORKSTATION
The Swissonic Easy FireWire’s ASIO driver is compatible with the
most popular DAW software, including (but definitely not limited to)
Steinberg Cubase, Steinberg Nuendo, Cakewalk Sonar, Sony Sound
Forge and Apple’s Logic Pro. To activate the Easy FireWire in your
DAW software, simply go into the program’s ‘devices’ setup section
and select the appropriate ASIO driver, or consult your program’s
manual for detailed instructions.
11
EASY FIREWIRE USER’S MANUAL
TROUBLESHOOTING
Driver won’t install
● Be sure not to connect the Easy FireWire until the installation
instructs you ‘disconnect and reconnect’ the unit.
● Uninstall any previously installed driver. Even an unsuccessful
installation attempt may have installed the control panel, so check
the “Install/Uninstall Programs” menu in the Control Panel.
● Try disabling/closing any virus protection programs or firewalls
you may have installed.
No audio is being recorded
● Make sure you have a signal connected to the Easy FireWire’s
inputs.
● Is the AC-DC power adapter connected and the unit is powered?
● Check the Easy FireWire control panel. If a connection has been
established between the computer and the unit, then the cause is
more likely software-based.
● Route all of your input signals in your DAW software correctly. Be sure to select the ASIO driver as your default driver in that
program, and assign your input channels to your project’s tracks
or buses (whichever may be the case for your software). Check
your DAW software’s operation manual for detailed instructions.
Distorted Sound or unexplained drop-outs
● Try increasing the buffer values in the Easy FireWire control
panel.
● Close all unnecessary background programs or processes. Many
programs may run in the background with no indication. It’s
important to either disable these or completely remove them.
● Reduce the amount of graphics acceleration your computer uses. This is typically done in the Control Panel’s “Appearance” menu.
12
EASY FIREWIRE USER’S MANUAL
SPECIFICATIONS
Inputs (1 & 2)
2 x 1/4" TRS, Bal.
Outputs (1 & 2)
2 x 1/4" TRS, Bal.
Phones Output
1 x 1/4" TRS, Bal.
FireWire Interface
2 in & 2 out, 24-bit / 96 kHz
Control
1
Volume Controls
Rotary
Phones Level Control
Yes
Frequency Response (Input to output)
20Hz ~ 20KHz
+0/-1 dB
S/N ratio
<-88 dBu
THD+N (Any output, 1KHz @ 0dBu,
20Hz to 20KHz, channel inputs)
<0.05%
Maximum Level
Input
+16.1 dBu
Output
+6 dBu
Phone Output
+2 dBu/100 ohm (1/100W)
Impedance
Input
10 K ohms
Output
100 ohms
Phones
50 ohms
Power Requirement (external power
supply, depends on region)
AC-DC adaptor, output 12V
750mA (6 Watt)
As we continuously strive to improve our products, all specifications
and appearance are subject to change without prior notice.
13
14
INPUT 2
INPUT 1
ELEC. SWAP
+12V
Digital Signal Prosessor
FIREWIRE
DC IN +12V
IEEE1394
PHONES
OUTPUT 2
OUTPUT 1
PHONES OUT
EASY FIREWIRE USER’S MANUAL
BLOCK DIAGRAM
EASY FIREWIRE USER’S MANUAL
DISPOSAL
Do not dispose of the device at the end of his operating life
in your normal domestic waste. This device is subject to the
European Guidelines 2002/96/EC.
• Have the product disposed of by a professional disposal
company of by your communal disposal facility.
• Observe the currently applicable regulations. In case of doubt
contact your disposal facility.
• Dispose of packaging materials in an environmentally
responsible manner.
15
Contact:
Musikhaus Thomann
Treppendorf 30
96138 Burgebrach
Germany
www.thomann.de