1
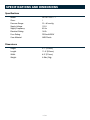
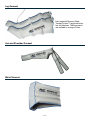
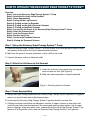
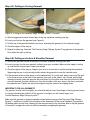
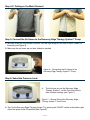
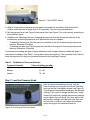
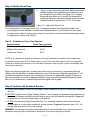
USER MANUAL
TABLE OF CONTENTS
Introduction.................................................................................................................................... 2
Specifications and Dimensions................................................................................................. 3
SAFETY GUIDE.................................................................................................................................. 4-6
General Usage Guidelines.................................................................................................................. 4
General Health Guidelines.................................................................................................................. 4
Health Safety Warnings...................................................................................................................... 4
Electrical Safety.................................................................................................................................. 5
Operating Safety Guidelines............................................................................................................... 6
Product Safety Features..................................................................................................................... 6
Components of the Recovery Edge Therapy System™................................................ 7-8
The Pump........................................................................................................................................... 7
Hose Bundle....................................................................................................................................... 7
Prong Plug.......................................................................................................................................... 7
Leg Garment....................................................................................................................................... 8
Arm and Shoulder Garment................................................................................................................ 8
Waist Garment.................................................................................................................................... 8
How to Operate the Recovery Edge Therapy System™............................................. 9-14
Step 1: Set up the Recovery Edge Therapy System™ Pump............................................................. 9
Step 2: Attach the Air Hoses to the Garment...................................................................................... 9
Step 3: Dress Appropriately................................................................................................................ 9
Step 4-A: Putting on the Leg Garment.............................................................................................. 10
Step 4-B: Putting on the Arm / Shoulder Garment............................................................................ 10
Step 4-C: Putting on the Waist Garment........................................................................................... 11
Step 5: Connect the Air Hoses to the Recovery Edge Therapy System™ Pump............................. 11
Step 6: Select the Pressure Level..................................................................................................... 11
Step 7: Lock the Pressure Knob....................................................................................................... 12
Step 8: Set the Pause Time.............................................................................................................. 13
Step 9: Continue the Treatment Session........................................................................................... 13
Step 10: Ending the Treatment Session............................................................................................ 14
maintenance and storage........................................................................................................ 15
Troubleshooting......................................................................................................................... 16
Warranty......................................................................................................................................... 17
Product Returns and Repairs................................................................................................ 18
—1—
INTRODUCTION
Thank you for purchasing our product. Our goal is to provide you with a quality
manufactured product designed for regular use and superior operating performance.
This user’s manual contains the information how to use, keep and repair this product.
Please keep this manual with this system and read it before using the system for
the first time.
Please review this manual periodically for best use of this product and to prevent
potential malfunctions.
This product is an Advanced Air Compression Therapy System. The Recovery
Edge Therapy System™ takes air from the room environment and sends it through
hoses into four individual air chambers inside the Recovery Edge Therapy System™
garment. The Recovery Edge Therapy System™ fills the four chambers with air,
one after the other, moving the treatment wave up the treated area, from the
base of the leg or arm towards the torso. After all the chambers have been filled
with air, the Recovery Edge Therapy System™ deflates the garment for a brief
pause. Then the treatment wave repeats. The air chambers in the Recovery Edge
Therapy System™ garment are specially designed to overlap each other, for fluent,
comfortable treatment, without gaps. You can adjust both the pressure level of the
treatment and the pause time in between inflation cycles.
—2—
SPECIFICATIONS AND DIMENSIONS
Specifications
Model:
RETS P1000 – T
Class:I
Pressure Range:
20 - 80 mmHg
Supply Voltage:
120 V
Supply Frequency:
60 Hz
Electrical Rating:
14VA
Fuse Rating:
F500mAH250V
Case Material:
ABS Plastic
Dimensions
Height:
Length:
Width:
Weight:
5.1” (130mm)
11.8” (300mm)
8.3” (210mm)
4.5lbs (2kg)
—3—
SAFETY GUIDE
Overview
General Usage Guidelines
General Health Guidelines
Health Safety Warnings
Electrical Safety
Operating Safety Guidelines
Product Safety Features
General Usage Guidelines
Read the entire instruction manual before using the Recovery Edge Therapy System.
Proper application and connection to the pump is essential.
Garments should be removed if the patient experiences tingling, numbness or pain.
Do not use any garment other than official Garments with the Recovery Edge Therapy System™ pump.
Do not use if under the influence of alcohol or drugs.
Do not use the device in high humidity place such as a Bathroom or sauna where fire accidents or
electric shocks are possible.
General Health Guidelines
This device is intended for use by people in good health.
This device is not recommended for people who have heart problems, or vascular problems, have
a condition requiring the use of any medical device, or have any condition that might affect their
normal well-being. Do not use this device over insensitive or numb areas, or in the presence of poor
circulation. Do not use if you have been diagnosed with blood clots, deep vein thrombosis or phlebitis.
This device should not be used over swollen or inflamed areas or skin eruptions. Do not use in the
presence of unexplained calf pain.
If you are, or may be, pregnant, consult with your physician before use.
If you have questions or concerns, consult your physician prior to use.
Health Safety Warnings
The unit should NOT be used in the following conditions:
• Severe arteriosclerosis or other ischemic vascular diseases
• Known or suspected acute deep vein thrombosis
• Severe congestive cardiac failure
• Any local condition in which garments would interfere, for example:
•Dermatitis
• Untreated, infected leg wounds
• Recent skin graft
•Gangrene
—4—
Do not use this product if you are under the care of a physician or have a contraindication requiring
the use of any medical device.
Do not use this product on sensitive skin or in the presence of poor circulation.
Do not use this product if you have any of the following conditions:
•
•
•
•
•
•
•
•
Acute congestive cardiac failure;
Acute infections;
Acute pulmonary edema;
Acute thrombophlebitis;
Bone fractures or dislocations at, or in the vicinity of, application
Deep vein thrombosis (dvt) or blood clots;
Episodes of pulmonary embolism;
Wounds, lesions or tumors at, or in the vicinity of, application; where increased venous and
lymphatic return is undesirable
Electrical Safety
This product contains electronic components. When using an electrical appliance, basic safety precautions
should always be followed to reduce the risk of burns, fire, electric shock, or injury to persons.
NOTE: This product complies with the requirements of applicable Electromagnetic compatibility (EMC)
Standards. The use of accessories not specified by the manufacturer may result in increased emissions
by, or decreased immunity of, the equipment, affecting its performance.
Always unplug this product from the electrical outlet immediately after use.
Use this product only for its intended use as described in this manual.
Do not use with any accessories not recommended by the Manufacturer.
Never use pins or other metallic fasteners with this product.
Never operate this product if it has a damaged cord or plug, if it is not working properly, if it has
been dropped or damaged in any manner, or dropped into water, or if the product shows any sign
of damage or deterioration, such as cracks or worn parts. Call Recovery Edge Therapy System for
examination and repair.
Do not operate pump on a soft surface such as a pillow or mattress, or under a blanket or other covering.
Keep this product out of reach of children and pets.
Keep the equipment dry. Do not operate while bathing, in a shower, in or around water, or in a wet or
moist condition.
Do not reach for the product if it has fallen into water. Unplug immediately.
Do not carry this product by the power cord or use the cord as a handle.
Keep the cord away from heated surfaces.
Do not use where aerosol (spray) products are being used or oxygen is being administered.
To disconnect, turn the ON/OFF switch to the OFF position, then remove the plug from the wall outlet.
—5—
Operating Safety Guidelines
Garments
Do not use garments on an undressed body (bare skin)
Use the garments with wearing clothing, as the garment’s endurance can be weakened due to sweat,
cosmetics and sebum
Do not use other manufacturer air compression pumps to blow air into the garments
Do not use oil, benzene, alcohol, gasoline on the garments
Do not use garments together with accessories such as watches or jewelry that can physically damage
the garment
Do not keep or use garments near heating materials such as stove or cigarettes
Pump
Keep the device horizontally
The pump’s rear case should only be removed by authorized technical personnel
Do not use the pump in the presence of flammable gases such as anesthetic agent
Make sure that the main power cable is positioned to avoid causing a trip or other hazard, and is clear
of moving bed mechanisms or other possible entrapment areas.
Cleaning
Do not use oil, benzene, alcohol, gasoline, chemicals when cleaning the device and garments. (Use
dry towels)
Do not use oil, benzene, alcohol, gasoline, chemicals when cleaning garments. (Use wet dust cloths.)
Be careful to not put clips, staples, needles, metals or food into the device.
Do not repair the device by yourself
Product Safety Features
Automatic Deflation In Case of Power Failure
If a power outage occurs during use, the Recovery Edge Therapy System™ pump will deflate the air
out the garments.
One-way Hose Connection
To ensure the air chambers will fill in the correct sequence, the Recovery Edge Therapy System™ has
one-way connection. The connector on the hose can be inserted into the pump in one orientation only.
Overload Protection Fuse
The Recovery Edge Therapy System™ is equipped with an overload fuse.
Locking Knob
The Lock knob locks the pressure adjustment knob in place, preventing the pressure knob from being
moved inadvertently.
—6—
Components of the Recovery Edge Therapy System™
The Pump
The Recovery Edge Therapy System™ Pump is powered by
electricity. You will need to plug it into a wall outlet with a grounding
connection. The pump takes air from the room environment, and
sends it to the individual air chambers in the garment in a sequence
that starts from the base of the garment and continues to the top.
The pump then vents the air from the garments, there is a brief
pause, and the treatment cycle repeats.
Hose Bundle
The hose bundle transfers the air from the pump to the Recovery Edge Therapy System™ garments.
It includes four hoses, a connector that attaches to the front of the pump on the Recovery Edge
Therapy System™.
Prong Plug
Insert the plug into the
Recovery Edge Therapy
System™ pump, to seal
it off and prevent air
from escaping.
—7—
Leg Garment
Each zippered Recovery Edge
Therapy System™ leg garment has
four air chambers. These garments
are available in a range of sizes.
Arm and Shoulder Garment
Waist Garment
—8—
How to Operate the Recovery Edge Therapy System™
Overview
Step 1: Set up the Recovery Edge Therapy System™ Pump
Step 2: Attach the Air Hoses to the Garment
Step 3: Dress Appropriately
Step 4: Putting on the Leg Garment
Step 4-A: Putting on the Leg Extender
Step 4-B: Putting on the Arm & Shoulder Garment
Step 4-C: Putting on the Waist Garment
Step 5: Connect the Air Hoses to the Recovery Edge Therapy System™ Pump
Step 6: Select the Pressure Level
Step 7: Lock the Pressure Knob
Step 8: Set the Pause Time
Step 9: Continue the Treatment Session
Step 10: Ending the Treatment Session
Step 1: Set up the Recovery Edge Therapy System™ Pump
A.Place the Recovery Edge Therapy System™ on a flat surface. You should be able to reach it easily
and operate all the controls from your relaxed treatment position.
B. Make sure the pump is securely positioned, so that it will not slip or fall.
C.Connect the power cord to an electrical outlet.
Step 2: Attach the Air Hoses to the Garment
A.Attach the air hoses to the garment by inserting the
hose into each air inlet. (See Figure 3).
B. Make sure each connection is securely attached.
Figure 3 - Attaching Hoses to Garment
Step 3: Dress Appropriately
A.Always wear light clothing underneath the Recovery Edge Therapy System™garment, for hygienic
reasons, to avoid irritation and to absorb perspiration.
B. Do not wear the Recovery Edge Therapy System™ garment directly over bare skin.
C.Clothing should be unrestrictive and absorbent, and free of zippers, buttons or other items that
could rub and chafe under the treatment. We recommend wearing cotton clothes such as sweat
pants or leggings, along with cotton socks, underneath the Recovery Edge Therapy System™ leg
garment, or a long sleeve t-shirt under the Recovery Edge Therapy System™ arm garment.
—9—
Step 4-A: Putting on the Leg Garment
Figure 4 – Putting on the Recovery Edge Therapy System™ Garment
A.Zip the leg garment closed at least part of the way up before inserting your leg
B. Insert your foot into the garment (see Figure 4).
C.Pull the top of the garment towards your torso, extending the garment to its maximum length.
D. Close the zipper all the way up.
E.Repeat for other leg, if desired. The Recovery Edge Therapy System™ leg garment is designed to
fit on either the right or left leg.
Step 4-B: Putting on the Arm & Shoulder Garment
A.Zip the arm garment closed at least part of the way up before inserting your arm.
B. Insert your arm into the arm garment, pulling it over your shoulder. Make sure the zipper is facing
up, and that the cutout area is under your armpit.
C.Close the zipper all the way up. Support your arm on an armrest or a pillow during the treatment.
Supporting the arm in a horizontal position allows the garment to cover the shoulder area.
D. If the garment tends to slide down, use the optional belt. To use the belt, attach one end of the belt
to the snap closure at the back of the garment, then pull on the sleeve, zip it closed, pull the belt
around your body under the opposite arm and fasten it to the other snap closure at the front. When
correctly fastened, the belt should cross from the shoulder of the arm, across the chest and under
the opposite arm. Tighten the belt just enough to keep the sleeve from slipping down.
IMPORTANT: For all Garments
The garment should not fit too tightly; you should be able to insert three fingers into the garment when
it is zipped closed before inflation. If the garment is too tight, you will need a larger size.
Contact Recovery Edge Therapy System™.
Make sure the garment is zipped completely closed before turning on the Recovery Edge Therapy
System™, and leave it closed for the duration of the treatment. At the end of treatment, the garment
will deflate within a short time, allowing it to be removed easily. You should be able to slip the garment
off and pull it on again for each use without completely unzipping the garment.
— 10 —
Step 4-C: Putting on the Waist Garment
Step 5: Connect the Air Hoses to the Recovery Edge Therapy System™ Pump
A.Securely insert the hose bundle connector, with the logo facing up, into one of the air sockets on
the pump (see Figure 5).
B. Make sure the air hoses are not bent, kinked or pinched.
Figure 5 – Connecting the Air Hoses to the
Recovery Edge Therapy System™ Pump
Step 6: Select the Pressure Level
A.
The first time you use the Recovery Edge
Therapy System™, set the Pressure Knob to
their minimum settings (see Figure 7).
Figure 7 – General View of the Recovery Edge
Therapy System™ Front Panel
B. Turn On the Recovery Edge Therapy System™ by pressing the ON/OFF switch at the bottom right
side of the pump to the ON position (See Figure 8).
— 11 —
Figure 8 – The ON/OFF Switch
C.Wait for a few cycles to become accustomed to the treatment sensations. Note that the first
inflation cycle may take a longer time to fill, especially if you are using two garments.
D. Set the pressure level (see Figure 9) and pause time (see Figure 10) to your comfort, according to
the guidelines below.
E.Guidelines for Selecting Pressure: Changing the pressure level will change the intensity of the
treatment by increasing the amount of air pushed into each air chamber.
• To decrease the pressure Turn the pressure controller to the left for decreasing the pressure
intensity. (Minimum 20mmHg)
• To increase the pressure Turn the pressure controller to the right for increasing the pressure
intensity. (Maximum 200mmHg)
A lower pressure setting will apply a lighter treatment; while a higher pressure setting will apply a
more intense treatment (see Table 1 as a guide for pressure selection). If the treatment is too intense,
lower the pressure. You may also increase the pause time (see Step 8, below).
Table 1 – Guideline for Pressure Selection
Treatment IntensityPressure Setting (mmHg)
Light 20 - 30
Medium 40 - 60
Intense 70 – 80
Step 7: Lock the Pressure Knob
After you have selected the pressure, lock the
Pressure Knob by turning the Lock Knob clockwise
until you feel the knob tighten closed (see Figure 9).
This will prevent an inadvertent change in the pressure
settings. If you want to change the pressure, simply
loosen the Lock Knob, change the pressure settings,
and re-tighten the Lock Knob. (You may wait to lock
the pressure settings until after you have tried your
first session, so that you can adjust the pressure
easily during your first treatment session.)
Figure 9 – Locking the Pressure Knob
— 12 —
Step 8: Set the Pause Time
A.
“Pause” is the time that the garments deflate and remain
relaxed between each treatment cycle. Select this time
by turning the Pause Knob (see Figure 10). Changing
the pause time allows you to modify the treatment by
increasing the pause interval in between treatment waves.
Standard setting for pause time is 10 to 15 seconds.
Figure 10 – Setting the Pause Time
B. Considerations for Choosing Pause Time. Changing the pause time adjusts the length of the
time the garments are deflated in between each treatment wave. If you would like a more rapid
treatment pace, select a shorter pause interval. If you want to slow down the treatment pace, select
a longer pause interval (see Table 2).
Table 2 – Guideline for Pause Time Selection
Pause Duration Pause Time (seconds)
Short Pause Interval 10-20
Medium Pause Interval 30-50
Long Pause Interval 60-70
NOTE: If you experience tingling or numbness during the treatment anywhere in the treated area,
increase the pause time to 30 to 45 seconds or more. If this sensation persists after increasing the
pause time, reduce the pressure. If this sensation continues, stop using the system immediately and
consult your physician.
When using two large garments, a longer pause time may be necessary to ensure that all the air
deflates from the garments in between treatment cycles. The Recovery Edge Therapy System™ will
not inflate the garments if the air from the previous cycle has not adequately emptied. If the pause
time you selected is too short for adequate deflation, the pump will automatically double the pause
time. If this is bothersome, increase the pause time slightly and try again
Step 9: Continue the Treatment Session
A.Continue the treatment session for the length of time you desire, for up to 60 minutes per treatment
session.
B.BEFORE: Using Recovery Edge Therapy System™ as a relaxing, invigorating treatment before you
exercise will increase circulation and can help to get you into the workout more quickly. Suggested
treatment time is 15 to 30 minutes before your workout.
C.AFTER: Use Recovery Edge Therapy System™ for a relaxing treatment at the end of the day,
or after exercise, to relax and soothe tired, aching muscles. Suggested treatment time is 30 – 45
minutes after your work out or in the evening.
Warning: The treatment sensation should be pleasant and comfortable. If you experience pain or
discomfort during or after the treatment, discontinue use and consult your physician.
— 13 —
Step 10: Ending the Treatment Session
A.To end treatment, shut OFF the Recovery Edge Therapy System™ using the ON/OFF switch.
B. Remove the garments.
C.Unplug the pump from the wall socket.
D. We recommend that you do not disconnect the hoses from the garment. If you need to disconnect
the hoses from the garment, do this by gently working the end fitting free from the air inlet using a
twisting/pulling motion.
NOTE: If the Recovery Edge Therapy System™ stops working and the warning signal beeps, it means
that the time needed to fill up the garment is too long. Usually this is due to air leakage because the
air hoses are not properly connected, or because one of the air outlets on the pump is unplugged.
If this happens, turn Off the pump at the ON/OFF switch, and then:
A. Check that all the hose ends are correctly inserted into the air inlets.
B. Check that the hose connectors are properly connected to the air outlets on the pump.
C. If using only one garment, make sure that the unused outlet is plugged with the Prong Plug. If all
the connections are OK and the problem persists, contact the Company.
D. In the case of a power failure or malfunction:
1. Turn Off the pump at the ON/OFF switch.
2. Take off the garment(s)
3. Remove the electrical cord from the wall outlet.
4. If the system has malfunctioned, contact the Company. For more details,
see Section 10 – Troubleshooting.
— 14 —
Maintenance and Storage
Warnings:
1. Only an authorized technician may open the pump
2. Before cleaning the pump, disconnect the power cord from the electrical wall outlet
3. Clean only according to instructions
4. Do not hand or machine wash, dry clean, hand or power wring, iron, tumble or force heat dry
5. Surface wipe only
6. Do not use bleach
Cleaning the Recovery Edge Therapy System™ Pump
1. Gently wipe the outside of the pump using a nonabrasive cloth
2. Do not spill any liquids on the pump
Cleaning the Recovery Edge Therapy System™ Garments
1. Never submerge the garments in liquid.
2. They are cleanable by surface wiping only.
3. Gently wipe the inner and outer surfaces of the garment using a soft cloth moistened with warm
water (not exceeding 100°F / 40°C) and a mild detergent. Do not allow water to enter the air inlets
of the garment at any time.
4. If needed, a soft brush can be used to remove stubborn dirt.
5. Towel dry and surface wipe again with a soft cloth moistened in water to remove all detergent
residue, again taking care not to allow liquid to enter the air inlets. Towel dry and then allow the
garment to air dry completely before use.
6. If desired, the inner and outer surfaces of the garment may be wiped down with a cloth or wipe
moistened with a small quantity of 50% alcohol.
7. Work in a well-ventilated area, and wear gloves.
8. Allow the garment to air dry completely before use.
Storage
1. Store in a dry, shaded place at temperatures between -4°F to 158°F
2. Roll up the power cord neatly before storing the pump. Do not bend or kink the cord
3. Since the garment is inflated by air, it must remain airtight. Therefore, avoid contact with pins,
needles and any other sharp objects or instruments. If one of the inflatable chambers is damaged,
the garment must be replaced.
4. The hoses should be kept untwisted and unfolded. Roll them up neatly.
Transport
1. Transport in original packaging or in luggage with padding.
— 15 —
TROUBLESHOOTING
Symptom
The pump is not working.
Possible Cause
No electricity.
Corrective Action
Check the electrical wall outlet.
Check the power cord visually for any defects.
Check the fuses and replace if necessary.
Symptom:
The pump starts working and stops immediately.
Possible Cause:
The air cannot move through the hose bundle
Corrective Action:
Check hose bundles for kinks, twists and folds
Symptom:
One garment inflates but the second one does not.
Possible Cause:
The second garment does not receive air.
Corrective Action:
Check its hose bundle for kinks, twists and folds.
Symptom:
The pump stops working and buzzer beeps
Possible Cause:
Hose bundle is not connected properly to garment or pump,
or Prong Plug is not inserted into unused air outlet.
Corrective Action:
Check and fasten all air connections. If treating only one limb,
make sure the unused air outlet is plugged with the prong
plug provided with the pump. If all air connections are OK
and problem persists, contact the Company
Symptom:
The pump works at a very low pressure, regardless of the
pressure set by the user.
Possible Cause:
Defective garment Replace garment and check again.
Corrective Action
An internal problem Contact the Company
Symptom:
An irregular noise
Possible Cause:
Pump transferring vibrations to a surface
Corrective Action:
Make sure the pump is standing evenly on all four of its bumpers
An internal problem. Contact the Company
— 16 —
WARRANTY
Standard Warranty Terms
TIME PERIOD.
a) Pump Devices. The Company warrants each Pump device to be free from defects in workmanship
and materials for the period of twelve (12) months from the date of shipment and under normal use
and service.
b) Accessories. Pump accessories are warranted for a period of six (6) months from the date of
shipment, and include the full leg, half leg, arm and waist garments.
AUTHORIZATION. The Company’s obligation under this warranty is limited to providing any and all
necessary product repairs upon the Company’s examination and final determination as to cause or
existence of defect and, at its option to repair or replace the products, which prove to be defective
during the warranty period.
REPLACED PRODUCTS. Products replaced under warranty will be warranted only for the balance of
the warranty period from the original supplied equipment.
ORIGINAL PURCHASER. This warranty extends only to the original purchaser of the equipment from
the Company or its authorized distributor.
TRANSFER OF WARRANTY. Any transfer of warranty must be approved in writing from the Company.
Standard Warranty Conditions
This Standard Warranty will not apply to those products which have been:
(i) repaired or altered other than in accordance with the terms of this Agreement, or
(ii) abused, misused, improper handling in use, or storage, or used in an unauthorized or improper
manner or without following written procedures supplied by the Company or(iii) original identification
markings or labels have been removed, defaced or altered, or
(iv) any other claims not arising directly from material defects in material or workmanship.
This Standard Warranty is the exclusive warranty made by Recovery Edge Therapy and is in lieu of
all other warranties, whether written, oral, or implied, including any warranty of merchantability or
fitness for a particular purpose, and shall be owner’s sole remedy and RE’s sole liability on contract
or warranty of otherwise for the products. This warranty shall not be modified or amended without the
written approval of an officer of the Company.
Extended Warranties
The Company may make available an extended warranty(s) for additional years beyond the Standard
Warranty Plan. Please contact the Company for specific details regarding the costs for Extended
Warranty Plans.
NOTICE: In no event shall the company be liable for any indirect, special, incidental or consequential
damages resulting from the failure to perform or use or improper use of any goods or services
sold pursuant hereto, whether due to breach of contract, breach of warranty, negligence or otherwise.
— 17 —
PRODUCT RETURNS AND REPAIRS
Return Materials Authorization (RMA) Required and Issuance of RMA Number
RMA number must be obtained from customer service or a sales representative for any and all returns.
The customer agrees that any product to be serviced, repaired or returned to the Company shall
maintain the following procedures:
1.Notification
The customer must notify the Company within 15 days of first noticing the defect and promptly return
the defective product upon receipt of RMA number(s) before expiration of the warranty period.
2.Prior Approval
Contact the Company directly to obtain a Return Materials Authorization (RMA) number for
shipping purposes: Customer Service Toll Free 1-855-525-EDGE
3.Proper Labeling
The RMA number must appear on the outside of the shipping container. Return shipments will not
be accepted if the RMA number is not clearly visible.
4.Written Description
Please provide a written statement indicating the model number, serial number, and a brief
description of the reason for return.
5. Shipping Address
Send returns to:
AUTHORIZED REPAIR CENTER:
Attn: Warranty Department
Recovery Edge Therapy Systems
9601 Owensmouth Ave. # 8 Chatsworth, CA 91311
Shipping Instructions and Charges
1.Packaging
The unit must be shipped to the Company’s Authorized Repair Center in either its original package
or similar package affording an equal degree of protection. Failure to provide this may result in
voiding the warranty.
2.Customer Return Address
Instructions must be provided indicating an address to which the repaired unit must be returned.
3. Shipping Charges Under Warranty
The Company is responsible for the freight & insurance charges for any product that is being
repaired or replaced that is under the warranty.
4. Shipping Charges Out of Warranty
For any product that is not covered under the warranty, the customer is responsible for any freight
and insurance charges.
— 18 —