1
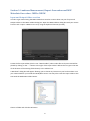
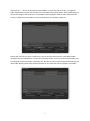
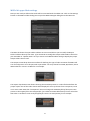
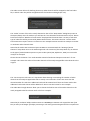
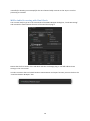
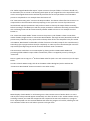
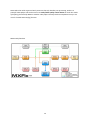
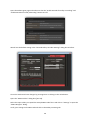
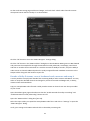
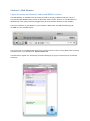
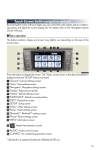
MXFix™ How-to Guide EBU R128/ITU.1770 (ATSC) Level Magic® loudness compliance, Final Check™ loudness reporting, Dolby E® and MXF metadata batch processor Merging Technologies MXFix™ MXFix™ How-to guide First things first- What does MXFix actually do? .........................................................….….2 Measure & fix loudness, fix metadata and wrap it all up with Dolby E ..................................... 3 Tasks performed by MXFix ......................................................................................................... 4 What software licenses do I need? ............................................................................................ 5 Let’s get started MXFix-ing (ehm-ecks-fixing…) ......................................................................... 5 Section 1: Loudness Measurement, Report Generation and MXF Metadata Correction - MXFix CHECK ............................................................................................................. 6 Input and Output folder creation ............................................................................................... 6 MXFix Wrapper Main settings .................................................................................................... 8 MXFix Audio Processing with Final Check ................................................................................ 10 Launching MXFix “One-Shot” or Continuous Mode................................................................. 11 So what happened? .................................................................................................................. 13 Section 2: Loudness Compliance Correction – MXFix CHECK | LOUD .......................... 16 What does LevelMagic® do anyhow? ...................................................................................... 16 Level Magic Plug-in Settings ..................................................................................................... 16 Level correction à la Jünger ..................................................................................................... 19 Section 3: Dolby E Decoding and (Re)-Encoding – MXFix CHECK | E ............................ 20 How does MXFix handle embedded Dolby E audio streams? ................................................. 20 Identifying Dolby E content ...................................................................................................... 20 Where are the Dolby E settings? .............................................................................................. 21 Dolby E Encode and Decode status indicator .......................................................................... 22 Listening to a decoded Dolby E stream in real-time playback ................................................. 23 Decoding Dolby E streams to discrete PCM channels and wrapping ...................................... 24 Decoding Dolby E audio streams for Loudness Measurement ................................................ 26 Encoding discrete PCM channels to a Dolby E stream and wrapping ..................................... 27 Decode a Dolby E Stream, correct loudness, measure loudness, re-encode to Dolby E and wrap it ...................................................................................................................................... 29 Decode a Dolby E stream, correct loudness levels, measure and wrap it ............................... 31 Section 4 : Web Monitor .............................................................................................................. 33 Log on from any web browser and watch MXFix in action ...................................................... 33 Section 5 : MXFix Watchdog ....................................................................................................... 36 Launch MXFix with the watchdog application and it re-launches itself in the event of a crash .................................................................................................................................................. 36 1 First things first- What does MXFix actually do? Merging Technologies MXFix™ batch wrapper is designed to make wrap processing of large amounts of broadcast quality video files as simple as possible for all users in a video workflow. MXFix essentially enables a user to define a series of audio and video wrapping tasks to be performed on a specific type of video file and then associates those tasks to a single “watch folder” (Input Folder). Multiple watch folders may be created to suit the different types of media in your workflow, each with their own specific wrap parameters. Once the watch folders and their tasks are all defined in MXFix it is then launched in one-shot mode to process the files currently present in all watch folders, halting when finished or is placed in “Continuous Watch Mode” where it processes all files as they are added by users at any time. After each file is successfully processed the newly wrapped video files are pushed to their respective Output Folders. The originals are either moved to a sub folder called “Done” or are erased (according to the watch folder’s parameters). If for any reason a file does not meet the requirements to be wrapped properly, MXFix detects the file and moves the original to a sub folder called, “Errors” and continues processing the next file in line. It’s that simple. 2 Measure & fix loudness, fix metadata and wrap it all up with Dolby E The first version of MXFix (as of version 3.1 of VCube) allows for audio and video wrapping of MXF files as well as compatible QuickTime® MOV files and AVI files. MXFix fixes MXF files’ metadata as well as the content of embedded audio channels of files. For example a specific MXF metadata correction parameter of the video aspect ratio allows for cross compatibility of files which do not have this field properly defined by the machine that originally created them. If a series of MXF files does not display at the proper aspect ratio MXFix will fix them without degrading the original video essence at all by simply re-wrapping the metadata fields of the MXF. MXFix creates detailed EBU R-128/ITU.1770 (ATSC) compliant loudness measurement of any audio content in the embedded audio channels of a video file including channels that are contained within a Dolby E® encoded audio stream through the use of Merging’s Final Check™ loudness measurement technology and the SurCode for Dolby E® plug-in algorithms. In addition to measuring loudness and generating a detailed report file of audio present in either discrete PCM or Dolby E encoded channels, MXFix also enables loudness levels to be corrected through the use of exclusive licensing of Jünger Audio’s renowned LevelMagic® levelizer as part of MXFix in the form of a software plug-in. 3 MXFix re-wraps the corrected and measured audio channels to embedded audio channels as either discrete PCM channels or Dolby E encoded audio streams. Tasks performed by MXFix MXFix scans watch folders actively for files to be processed. Each watch folder has its own set of tasks to be performed on the files that are copied to it. The following list describes these tasks. They may be performed individually or in combination with one another, as needed, to simplify complex jobs into a single process pass. Parse multiple files in multiple watch folders determining process priority and compatibility Decode Dolby E audio streams to PCM (for re-wrapping or measurement) with the SurCode for Dolby E® decoder plug-in Scan and correct loudness levels of stereo and surround channels to user defined target values with Jünger Audio’s Level Magic® Measure EBU R-128/ITU.1770 (ATSC) loudness levels of any stereo or surround channels with Merging’s FinalCheck™ loudness meter technology Generate a loudness level report file in .fcm (xml) format with Final Check Correct MXF aspect ratio metadata Correct audio word length values Correct audio track counts to fit MXF hardware manufacturers’ standards Encode Dolby E audio streams Wrap it all to a new video file Push that newly wrapped video file to an Output Folder for deployment Erase or move the original file away from the watch folder for archiving 4 What software licenses do I need? MXFix consists of three additive software bundles. The entry level “MXFix CHECK” bundle includes; “MXFix” itself (allowing for the MXFix Export menu wrap batch-processor to be activated giving you access to the “MXFix Folders” dialog box), the FinalCheck offline loudness meter plug-in, all optional containers and codecs available for VCube (except AVC-Intra) and a VCube XE HD software license. The second “MXFix CHECK | LOUD” bundle includes the Jünger Audio Level Magic plug-in in addition to all of the above software options listed in the “Measurement” bundle. The third “MXFix CHECK | E” bundle includes the SurCode for Dolby E encoder and decoder plug-ins in addition to the software options listed in the MXFix CHECK bundle. See our website for additional bundle combinations like MXFix CHECK | LOUD | E combining all features in a single bundle. Let’s get started MXFix-ing (ehm-ecks-fixing…) This guide assumes you have the latest VCube v3.1 properly installed, the full range of all three MXFix license bundles as well as our two MXF video file examples with embedded PCM and Dolby E channels (available for download by request from Merging) in order to perform all of the tasks in the following sections. For all other general VCube operational information outside of the scope of these MXFix specific operations, please refer to the VCube User Manual. MXFix Web Monitor interface 5 Section 1: Loudness Measurement, Report Generation and MXF Metadata Correction - MXFix CHECK Input and Output folder creation In order to get started using the MXFix module we need to create at least one pair of Input and Output Folders in the MXFix Folders dialog box. Open the MXFix Folders dialog box with your mouse from the File > Export > MXFix menu or by using the keyboard shortcut [ALT+M]. Create the first Input Folder (which is our “Watch Folder”) where video files to be processed will be placed by clicking on the “…” button to the right of the Input Folder’s address box or type in the URL of the location of the existing folder directly in the address box. A Windows® dialog box will appear allowing you to choose any location on your local machine or on your network where your VCube has Read/Write access. You may also create the Input Folder at this time with the Make New Folder button. Choose a folder and click the OK button. 6 Now click the “…” button of the Output Folder address, or enter the URL manually, of a different folder designated to receive the files that are successfully processed by MXFix. Click the OK button to choose the Output Folder and return to the MXFix Folder dialog box. Now click the Add Folder Pair button to define these two folders as a pair and add them to the MXFix Folder list. Notice that now that you have a Folder Pair in the list that the other buttons in the MXFix Folder dialog box are now available for use such as the Settings button. You may create multiple folder pairs by repeating the previous steps. Each folder pair will have its own unique settings associated with the Input folder defining what tasks will be performed on the video files that are placed in that folder. 7 MXFix Wrapper Main settings Now you are ready to define what tasks will be associated with the Folder Pair. Click on the Settings button on the MXFix Folders dialog box to open the MXFix Wrapper dialog box to the Main tab. The Main tab shows the Input Folder address once more and allows you to modify the Output Folder’s address directly from here. If you do decide to modify this Output Folder address here then just remember to “Update Paths” once you return to the MXFix Folders dialog to display the proper Output Folder there as well. The Output Format drop-down menu allows for defining the type of video container file MXFix will scan for and process-to in this particular Input Folder. You may choose from MXF, QuickTime, AVI or WAV audio files. Leave it on MXF for our example. The Aspect drop-down menu allows choosing the metadata present in a video file that defines the proper aspect ratio of the video content when displayed. You may choose from Transparent, Force 4:3 or Force 16:9. Note that “Transparent” does not change the metadata field of the aspect ratio present in the original file to the wrapped file. If it is blank it remains blank and if it has a value then that value is carried on to the newly wrapped file. Leave it on Transparent for our example. 8 The Audio section allows for defining how many audio channels will be wrapped to the final video file, in which order they will be wrapped and the final audio word length (bit rate). The “Audio” section of this tab is nearly identical to that of the “Wrap Audio” dialog box present in the Export/Wrap menu of VCube so you will see the “Use the Audio Card Connection Layout” button but there will be no “Number of Audio Tracks” displayed here because there is no way to tell what type of video files will be processed by MXFix ahead of time. This means that the “Use the Audio Card Connection Layout” button is irrelevant to our example because we will not attempt to reorder or mix-down audio channels here. Note that the audio card connection layout in MXFix is associated with the “Routing of 8 First Channels” drop-down menu in the Audio Engine tab. The contents of this drop-down vary in relation to the type of audio hardware present in your VCube system (AJA, Mykerinos, ASIO) so it cannot be used for our example. Please choose the button “Use Track Number Instead of Audio Card Output Connection” for our example. This causes the order of the audio channels of the newly wrapped file to be identical to the original. The “Force output tracks count to” drop-down allows limiting or extending the number of audio channels in the newly wrapped video file to exactly 4 or 8 channels. If there are more than the desired number of Tracks then additional tracks will be omitted and if there are fewer tracks then additional tracks with silence will be added to fit. Do not use this button for our example. The Audio Word Length buttons allow you to choose the final bit rate of the audio channels in the newly wrapped video file. Choose 24 for all of our examples. Note that for 8 channel Dolby E audio streams it is necessary to maintain the original bit rate of 20 bits (or more) at all stages of Dolby E processing or the newly processed signals will be corrupted and 9 unusable for decoding. Our example file has an 8 channel Dolby E stream so this step is crucial to preserving its contents. MXFix Audio Processing with Final Check You are now ready to go on to the second tab of the MXFix Wrapper dialog box; “Audio Processing” and activate the measurement function of the Final Check plug-in. Notice that the first section of the tab deals with the Level Magic plug-in. We will address those settings in the next section. In order to activate the Final Check loudness measurement and report function you must click on the “Final Check Meter & Report” box. 10 Then you must click the appropriate “Audio channel content description” table buttons to describe which channels you wish to measure with Final Check and whether the audio programme on the selected channel is stereo or 5.1 Surround as shown below. Note that we will leave the Dolby E content description buttons for section 3 of this guide describing Dolby E processes. Do not activate the Dolby E buttons at this stage as they will override the “Process On/Off” buttons’ statuses. The MXF file I use in this example has 8 embedded PCM audio channels. Channels 1 – 6 contain a typical 5.1 surround mix in ITU mode (L-R-C-LFE-Ls-Rs) and channels 7 and 8 contain a stereo mix. Click on the “ch 1-6” Process On/Off button and then on the Channels input description “5.1 Surround” button in the same row to describe that you wish to include these channels in your measurement and report as an ITU ordered 5.1 surround mix (as shown in the above screenshot). Notice that when you click on the “5.1 Surround” button the “Channels input description” buttons of rows 3-4 and 5-6 become greyed-out. Now Click on “ch 7-8” and click on “Stereo” of that row to include a second measure in your report file of the stereo program channels 7 and 8. TIP: Every video file placed in the Input Folder will now be considered to have these exact traits and will be analyzed accordingly so it is a good idea to include these criteria in the name of the folder that is clear to users. For example we could call this input folder “Input 8ch Loud Report PCM 5.1-St” so that every operator understands at a glance what this watch folder will do with video files placed inside of it. When you have selected these parameters (as shown in the screenshot above) click Ok to return to the MXFix Folders Dialog box. Launching MXFix “One-Shot” or Continuous Mode You are now almost ready to launch MXFix for the first time but first let’s look at the remaining options in the MXFix Folders dialog box. 11 The “Delete original Media after Export” option concerns the Input folders. This button should only be activated if you are certain to be working with copies of your original files in the input folders and not the true originals because this will literally erase the files in the input folders once the MXFix process is completed. For our example leave this button off. The ”Overwrite Existing Files” concerns the Output Folders. This button allows files that remain in an output Folder to be overwritten without prompting in case a process or series of processes was launched with improper parameters and you do not wish to clean up the output folders manually before launching a new MXFix pass with the proper parameters. Otherwise the newly processed files with conflicting names will be incremented by number added to them. For our example turn this button on. The “Continuous Watch Mode” button concerns the process cycle of MXFix. There are two basic modes of MXFix; Single Process or Continuous Watch Mode. The Single Process (One-Shot) mode will process every video file in every Input Folder and stop when all files are completed. This puts VCube in the MXFix “Batch Mode” and disables all other functions of VCube (except for the cancel buttons). Cancelling a file in progress aborts that file completely. In order to process the aborted file it must be reprocessed from beginning to end the next time the batch mode is activated. The Continuous mode does as its name implies by placing VCube in MXFix Batch Mode and processing all files added to Input Folders continuously until it is stopped by a user by clicking on “Cancel All” Now is a good time to copy our 1st 8 channel MXF video file (with a 5.1 and a stereo mix) to the Input Folder. In order to launch MXFix simply click Ok in the MXFix Folders dialog box (with or without the “Continuous Watch Mode” button activated to use either mode). MXFix displays “Batch Mode” in red lettering across the Preview screen of VCube while it is active and any files to be processed appear momentarily one after the other in the VCube timeline as they are being scanned, corrected and wrapped in their respective formats and resolutions. A progress bar is superimposed over the Preview Window and shows the progress of each file, allowing for realtime estimates of the time it will take to process each type of file. 12 If a single file being processed is considered to be taking too long and you would like to skip it without stopping the MXFix Batch Mode, just click on the Cancel button. To leave the MXFix Batch Mode immediately and abort the process in progress click on the Cancel All button. Otherwise for our example just let MXFix run until the file is completed. So what happened? Our example processed this MXF video file and created the loudness report file in an .fcm (xml) format placing it and the newly wrapped (metadata corrected but otherwise unchanged) video file into the Output Folder. Both the Newly wrapped video file and the .fcm report have the exact same name as the original MXF file that was placed in the Input Folder before launching MXFix. Our Loudness Report looks something like this after being opened in Notepad: <?xml version="1.0" encoding="UTF-8"?> <FinalCheck_Metering> This example shows two stereo programmes <Stereo_chans_1-2> <Stereo> <Loudness_INT>0.51</Loudness_INT> <Loudness_Range_LRA>1.59</Loudness_Range_LRA> <Max_TruePeak>7.63</Max_TruePeak> <MML>1.16</MML> <MSL>1.04</MSL> </Stereo> </Stereo_chans_1-2> <Stereo_chans_3-4> <Stereo> <Loudness_INT>-70.00</Loudness_INT> <Loudness_Range_LRA>0.00</Loudness_Range_LRA> <Max_TruePeak>-144.50</Max_TruePeak> <MML>-70.00</MML> <MSL>-70.00</MSL> </Stereo> </Stereo_chans_3-4> </FinalCheck_Metering> Source channels 1 & 2 Pan channel type Integrated Loudness Loudness Range Maximum True Peak Maximum Momentary Loudness Maximum Short-term Loudness For further details as to analyzing the Final Check report results, please refer to the VCube User manual. The Daily report is also generated at the first instance of MXFix and placed in the first Output folder in a .txt format. This daily report gives an overall view of all tasks processed by MXFix during the course of a day. It helps to analyze the activity of all task at a glance and centralize the reporting in a 13 single file. The daily report amended to even if MXFix is rebooted and re-launched. At midnight a new daily report is generated. The Daily Report looks something like this after being opened in Notepad: The following table explains the column abbreviation codes in the Daily Report: Wrap result Error LM FCM Chans LINT LRA MaxTP MML MSL 0 if file is OK / negative if file has an error / positive in case of a warning (ex: a loudness value exceeding tolerances) Description of error found Level Magic Final Check Meter Number of channels processed Loudness integrated (=averaged) on the whole file in LUFS Loudness Range Maximum True Peak value in dBFS Maximum momentary loudness (Max M) Maximum long-term loudness (Max S) As we chose not to erase our original Video file after processing, it was moved to the sub folder within its respective Input Folder called “DONE”. This is where all the originals that pass MXFix go when they are successfully processed. Otherwise if a file fails due to some incompatibility or corruption issue, it is also moved to a sub folder of its respective Input Folder called “ERRORS”. In this manner any file that fails does not remain in the Input Folder gumming up the works continuously. We have successfully completed the metadata re-wrapping and loudness compliance measurement and report generation of our first MXF video file so let’s move on to Loudness compliance correction in the next section. 14 Remember that unlike a generic batch processor that only handles pure processing, VCube is a powerful video player and can be used as an audio/video quality control device to check the results of anything processed by MXFix or another video player instantly without complicated set-ups. Just use the “Load & Auto-Config” function. MXFix Task flowchart 15 Section 2: Loudness Compliance Correction – MXFix CHECK | LOUD What does LevelMagic® do anyhow? The loudness correction software bundle MXFix CHECK|LOUD includes all the previous functions discussed in section 1 of MXFix CHECK with the addition of Jünger Audio’s exclusively licensed LevelMagic plug-in algorithm. LevelMagic (as a plug-in) is designed to scan audio mixes in either 5.1 surround or stereo formats for EBU R-128/ITU.1770 (ATSC) compliant loudness and maximum True Peak level values and then correct those levels according to user defined target values. The resulting compliant audio channels are subsequently re-wrapped by MXFix directly replacing the previous audio channels at a rate much faster than real-time. If an embedded audio mix needs loudness compliance correction or True Peak limiting don’t send it back to a mixing stage, run it through MXFix with Level Magic instead and be done with it! Level Magic Plug-in Settings Open the MXFix Folders dialog box (ALT+M) and click on the “Settings” button to open the MXFix Wrapper dialog box. Click on the “Audio Processing” tab to display the Level Magic loudness and True Peak level correction settings. To activate Level Magic, click on the “LevelMagic loudness correction (by Jünger Audio)” button. 16 Define the target Loudness from the “Target Loudness” drop-down menu. Define the target Maximum True Peak limiter value from the “Max Peak” drop-down menu (values range from 0 to -20 dB). Exactly as with the Final Check loudness measurements and report we performed in the first section, you must also define which audio channels to process and what type of mixes they contain (5.1 surround or stereo). The MXF file I use in this example has 8 embedded PCM audio channels. Channels 1 – 6 contain a typical 5.1 Surround mix in ITU mode (L-R-C-LFE-Ls-Rs) and channels 7 and 8 contain a stereo mix so we will use the exact same setup to define the audio channel content description like we did in section 1 (as shown in the following screenshot). 17 There are a couple settings that will define which variant of the Level Magic algorithm will be applied to achieve precise conformity with a specific standard relative to your demographic location; EBU R128 or ITU.1770 (ATSC). Or you may wish to be entirely compliant with the results achieved when using a real-time Jünger Level Magic hardware device by choosing the default “Level Magic” button. There are three additional presets of parameters that work in conjunction with the way Level Magic interprets dynamic transitions in an audio mix to achieve the least amount of perceptible loudness correction for each type of source material while still keeping it within targeted tolerances. The fourth preset “No (Expert settings)” indicates that you have chosen to fine tune the default preset settings by making changes to the parameters found on the “Expert settings” page. Standard – Designed for the reduced dynamic range of a typical mix for television or radio broadcast. Light (Movie) – Designed for the potentially higher dynamic range of a film content mix while maintaining a subtler perceptual aural effect through correction transitions. Strong (Live) – Designed to bullet proof any sudden dynamic transitions that may occur in a live situation (or action-adventure type film) with less focus on perceptual aural effects caused by correction. 18 The Expert settings dialog box appears when you click on the “Expert settings” button on the Audio Processing dialog box. Level correction à la Jünger Now that we have set up the proper setting to process our example MXF file, let’s copy it to our Input Folder and run MXFix. Click “Ok” on the MXFix Wrapper dialog box and then click “Ok” on the MXFix Folders dialog box to place MXFix in Batch Mode. If you left the Final Check Meter & Report button on you will now see MXFix processing and wrapping the newly level-compliance-corrected audio channels and MXF metadata to a new MXF file in the Output Folder along with an accompanying Loudness report file in .xml format. The new report reflects changes carried out by Level Magic and the newly wrapped file is ready for deployment. As before, if you chose not to erase the original video file, it has been moved to the “DONE” sub folder of its respective Input Folder. 19 Section 3: Dolby E Decoding and (Re)-Encoding – MXFix CHECK | E How does MXFix handle embedded Dolby E audio streams? The “MXFix E” software bundle of MXFix includes all the functions of MXFix CHECK described in section 1 plus the addition of Minnetonka’s OEM SurCode for Dolby E® encoder and decoder plug-ins licensed to Merging for use in VCube. Unlike the VST variants of the SurCode for Dolby E plug-ins available on the market, VCube and MXFix interact directly with the SurCode for Dolby E plug-ins. The decoder allows for real-time decoding and monitoring of audio streams as well as off-line decoding. This means that you can use the real-time decoder to actually listen to and check the validity of a Dolby E encoded audio stream along with picture or use the decoder to extrapolate the Dolby E audio streams. The encoder may be used to wrap up to 8 channels of discrete embedded audio to a Dolby E stream or used in-line to automatically re-wrap a Dolby E audio stream that was decoded by MXFix. Think about what a time saver MXFix with Dolby E really is for your broadcast workflow. Decode, measure, correct, re-encode and re-wrap Dolby E material unattended around the clock by simply dropping files into an Input Folder. Identifying Dolby E content First let’s look at the second example MXF file, this time with a simple embedded stereo mix on channels 1-2 and a Dolby E audio stream on channels 3-4. If you use VCube to place the file in the timeline with the “Load & Auto-Config” function in the “Media File Browser” you will notice that the Dolby E audio stream (on channels 3-4 in our example file) looks like full scale noise. If you zoom in to the scale of frames you will also notice that it is separated by breaks in the “noise”. These little breaks correspond to the frame rate format of the originally encoded stream and are called “Safety Gaps”. They must be centered around the frame edges of the time line (within strict video line tolerances) otherwise the Dolby E audio stream is detected as “out of sync” and cannot be decoded. 20 Where are the Dolby E settings? To show the “Audio Settings” tab, where the Dolby E encoder and decoder settings are, you must first activate the “Toggle Show/Hide Settings” button in the “User Interface” menu (F2). This places all the Settings pages of VCube to the right of the Preview Window. Now click on the “Settings” tab (written vertically) and navigate to the Audio Engine page using the arrows or icons in the navigation bar (as pictured below). This is where you will find the Dolby E decoder and encoder settings as well as the “Audio Outputs Quick Routing” drop-down and the “ASIO driver” enable button. If your system is not equipped with an AJA video board or a Mykerinos audio board them you will need to choose an ASIO interface here in the ASIO driver drop-down menu. You may wish to install and use “Asio4All” which allows VCube to use your PC’s built-in audio device for monitoring. Click “Enable ASIO” for our example. This allows you to route individual audio tracks from VCube’s timeline to the available outputs of your PC for playout. The Quick Routing drop-down automatically routes all VCube audio channels to your specific default audio hardware. By default it is set to route all tracks in pairs to your stereo outputs, in this case the ASIO driver. 21 Warning: This means that if you place any video clips with embedded Dolby E channels (or other very loud content) into the timeline and hit play at this stage, the full scale noise of the non-decoded Dolby E channels, as well as all other channels, will play out of speakers or headphones. Take care to selectively mute the audio tracks with data streams in them before ever pressing play. Dolby E Encode and Decode status indicator Activating the Dolby E decoder always mutes playback of all other audio tracks from VCube’s timeline and plays only the Dolby E decoded audio. We have included an indicator in the lower right-hand side of the VCube interface to show the status of the Dolby E decoder and encoder at a glance. PLUG-IN STATUS INDICATOR AUDIO MONITOR Dolby E Decode On Dolby E playout Dolby E Encode On PCM playout Dolby E Decode and Encode On Dolby E playout Dolby E Decode and Encode Off PCM playout 22 Listening to a decoded Dolby E stream in real-time playback Although real-time decoding of Dolby E audio streams is not specifically an off-line function of MXFix it is still useful to understand how it works at this point and is a good way to introduce all the other functions on the Audio Engine page. In order to use the Dolby E decoder to monitor a Dolby E encoded audio stream in real-time you must first place the video file into the VCube timeline according to its original time code by using the “Load & Auto-Config” button in the Media File Browser. Using the Load & Auto-Config button ensures that the Safety Gaps of any Dolby E streams are aligned perfectly at the frame edges of the timeline and that the overall video format of VCube corresponds to the video file used. Please refer to the VCube User Manual for more details on media handling and the timeline in general if needed. Activate the “Enable SurCode for Dolby E decoding” button. Since our example file has a Dolby E encoded audio stream in channels 3-4 you will choose “Audio channels 3 & 4” in the Dolby E input drop-down menu. The “Out channels Re-ordering” drop-down allows you to choose a different speaker set order for outputting the decoded Dolby E stream to your audio device. This means that if we press play now we will hear the first two channels of the 8 channel Dolby E stream output to the stereo output of your PC’s built-in audio device. You may also use the “Audio Meters” on the “Output Page” to see PPM meters of the 8 channel playback. The Dolby E status box indicates if the channels designated in the Dolby E input drop-down actually contain a detectable Dolby E stream that is properly aligned with the frame edges of the timeline or if that stream is not able to be decoded successfully during playback. The screenshot above shows a valid “2 Programs 5.1+2” signal being decoded. Note that an error message will appear here if for any reason the decoder is not able to properly identify and decode a Dolby E stream so this is a valuable tool to use to test any Dolby E file that fails an offline Dolby E decoding process or does not appear to work on an external decoder device. The following is a link to consult the “Dolby E recommended line position” chart on Dolby’s web site: http://www.dolby.com/uploadedFiles/Assets/US/Doc/Professional/DolbyERecommendedLinePositio nTable.pdf 23 Decoding Dolby E streams to discrete PCM channels and wrapping When you have the SurCode for Dolby E decoder installed and authorized on your VCube, MXFix enables you to decode the 8 audio channels in a Dolby E stream and create a new video with those discrete PCM audio channels in one task. This example will decode the audio of our Dolby E stream on channels 3-4 to 8 PCM audio channels, fix the metadata and create a newly wrapped MXF video file with the newly replaced audio channels. No loudness measurement, loudness report or level correction will be performed in this example. Copy our example MXF video file with a Dolby E audio stream on channels 3-4 into the Input Folder of your choice. Open the Audio Engine page and activate the “Enable SurCode for Dolby E decoding” button. Choose Audio Channels 3 & 4 from the Dolby E input drop-down. Make sure the “Enable SurCode for Dolby E encoding” button is de-activated as shown below. Open the “MXFix Folders” dialog box [ALT+M]. Select the Input Folder you copied the example MXF video file to and click on “Settings” to open the “MXFix Wrapper” dialog. 24 Verify your settings on the Main tab and click on the Audio processing tab. Verify that all functions on the Audio Processing tab are deactivated (Level Magic, Final Check and Process On/Off buttons) as shown below. Click the “Ok” button to close the “MXFix Wrapper” settings dialog. 25 Click the “Ok” button in the “MXFix Folders” dialog box to launch MXFix. MXFix goes into Batch Mode and processes the example file and pushes the newly wrapped file with 8 channels of discrete PCM to the Output Folder. You may use the “Load & Auto-Config function in the Media File Browser now to check this newly wrapped file. Just remember to turn off the “Enable SurCode for Dolby E decoding” button at this point on the Audio Engine page to be able to hear the PCM channels instead of (non-existent) Dolby E stream channels when VCube is in playback. Decoding Dolby E audio streams for Loudness Measurement When you have the SurCode Dolby E decoder MXFix enables you to decode the 8 audio channels in a Dolby E stream and measure them with Final Check, including generation of a loudness report .xml file. This example will use MXFix to decode the audio of our Dolby E stream on channels 3-4 to 8 PCM audio channels and measure the two 5.1 surround and stereo audio mixes therein, generate a loudness report, fix the metadata and create a newly wrapped MXF video file. Copy our example MXF video file with a Dolby E audio stream on channels 3-4 into the Input Folder of your choice. Open the Audio Engine page and activate the “Enable SurCode for Dolby E decoding” button. Choose Audio Channels 3 & 4 from the Dolby E input drop-down. Make sure the “Enable SurCode for Dolby E encoding” button is de-activated. Open the “MXFix Folders” dialog box [ALT+M]. Select the Input Folder you copied the example MXF video file to and click on “Settings” to open the “MXFix Wrapper” dialog. Verify your settings on the Main tab and click on the Audio processing tab. 26 In the Audio Processing tab activate the “FinalCheck meter & report” button. In the Process On/Off column activate only Ch 3-4 and Choose Dolby E as the Channel input description. Note that any active Dolby E button overrides any other Processes activated in the audio channels content description table as of MXFix for VCube v3.1. Future releases of MXFix will allow for multiple audio channels and Dolby E streams to be processed in a single task. Click the “Ok” button to close the “MXFix Wrapper” settings dialog. Click the “Ok” button in the “MXFix Folders” dialog box to launch MXFix. MXFix goes into Batch Mode and processes the example file through Final Check and pushes the newly wrapped file with metadata corrections to the Output Folder. The .fcm loudness report file of the 5.1 and stereo mixes is also placed in the Output Folder with the same name as the original MXF video file. Encoding discrete PCM channels to a Dolby E stream and wrapping The use of the Dolby E encoder is partially handled in VCube and partially covered in the SurCode for Dolby E encoder settings dialog box. The full process of Encoding Dolby E for broadcast use requires an in-depth understanding of the underlying technology itself and typically several days of formal training to become fully qualified in order to generate and successfully duplicate Dolby E audio streams in a broadcast video workflow. This guide’s purpose is to inform MXFix users on how to use the specific functions of MXFix fully but not as a handbook for detailed Dolby E encoding so we will look at an operational example of how to encode Dolby E audio streams from an MXFix point of view and not detail all the sub functions of the SurCode Dolby E encoder settings. For detailed information please refer to the User Manual of the SurCode for Dolby E encoder plug-in on Minnetonka’s website: http://www.minnetonkaaudio.com/info/PDFs/Manuals/SurCode%20for%20Dolby%20E%20Encoder %20Manual.pdf For this example we will use the first example file that contained 8 channels of embedded audio in a 5.1 surround and a stereo mix. This example will encode the audio of our 8 discrete PCM channels, fix the MXF metadata and create a newly wrapped MXF video file with a Dolby E audio stream on channels 3-4 Copy our first example MXF video file with 8 PCM channels into the Input Folder of your choice. 27 Open the Audio Engine page and activate the “Enable SurCode for Dolby E encoding” button. Choose Audio Channels 1-8 from the “Audio input (8 channels)” drop-down. Make sure the “Enable SurCode for Dolby E decoding” button is de-activated as shown in the following screenshot. To prepare the encoder’s advanced settings click on the “SurCode Dolby E encoder Settings” button. For our example we will use the default settings for all programs and metadata to create a 5.1+2 audio stream as pictured below. 28 For our example I have altered the Dialog levels from -27 to -23 as an exercise. To close this window and save changes push Enter on your keyboard. Open the “MXFix Folders” dialog box [ALT+M]. Select the Input Folder you copied the example MXF video file to and click on “Settings” to open the “MXFix Wrapper” dialog. Verify your settings on the Main tab and click on the Audio processing tab. Verify that all functions on the Audio Processing page are also turned off as shown below. Click the “Ok” button to close the “MXFix Wrapper” settings dialog. Click the “Ok” button in the “MXFix Folders” dialog box to launch MXFix. MXFix goes into Batch Mode and processes the example file through the SurCode Dolby E encoder and pushes the newly wrapped file with metadata corrections to the Output Folder. Decode a Dolby E Stream, correct loudness, measure loudness, re-encode to Dolby E and wrap it Now that we have seen examples of what individual task may be performed in relation to Dolby E decoding and encoding, let’s combine them all to illustrate how MXFix can do quite a lot in a single process pass. In this example we will use the 2nd example file with a Dolby E audio stream on channels 3-4 to decode them, measure and correct the loudness levels and limit the True Peaks with Level Magic, re-measure the loudness with Final Check, generate a loudness report .xml file, correct the MXF metadata, re-wrap the discrete audio tracks back into a Dolby Audio stream and push the newly wrapped file to the Output folder. Copy our example MXF video file with a Dolby E audio stream on channels 3-4 into the Input Folder of your choice. 29 Open the Audio Engine page and make sure that the “Enable SurCode for Dolby E encoding” and “Enable SurCode for Dolby E decoding” buttons are off. We will use the default setting in the “SurCode Dolby E encoder Settings” dialog box as before. Close this window and save changes by pressing Enter or clicking on the red X button. Open the “MXFix Folders” dialog box ([ALT+M]. Select the Input Folder you copied the example MXF video file to and click on “Settings” to open the “MXFix Wrapper” dialog. Verify your settings on the Main tab and click on the Audio processing tab. 30 On the Audio Processing page enable Level Magic, and Final check. Check Audio channels content description button 3&4 and “Dolby E” as shown below. Click the “Ok” button to close the “MXFix Wrapper” settings dialog. Click the “Ok” button in the “MXFix Folders” dialog box to launch MXFix. MXFix goes into Batch Mode and processes the example file through the SurCode for Dolby E decoder, Level Magic, Final Check and then re-encodes the 8 tracks back to 2 with the Surcode for Dolby E encoder, wraps the Dolby E audio stream to channels 3&4 and pushes the newly wrapped file with metadata corrections to the Output Folder along with the loudness report file. Decode a Dolby E stream, correct loudness levels, measure and wrap it It is also possible to simply batch decode files containing Dolby E audio streams with MXFix. You may either re-wrap the decoded channels unchanged or process them with LevelMagic and, as always, measure them with FinalCheck. Copy our example MXF video file with a Dolby E audio stream on channels 3-4 into the Input Folder of your choice. Open the Audio Engine page and make sure that the “Enable SurCode for Dolby E encoding” and “Enable SurCode for Dolby E decoding” buttons are off. Open the “MXFix Folders” dialog box ([ALT+M]. Select the Input Folder you copied the example MXF video file to and click on “Settings” to open the “MXFix Wrapper” dialog. Verify your settings on the Main tab and click on the Audio processing tab. 31 On the Audio Processing page enable Level Magic, and Final check. Check Audio channels content description button 3&4 and “DEC Dol…” as shown below. Choose “to 1-8” in the drop-down to specify that the newly decoded audio channels will placed in channels 1-8. Click the “Ok” button to close the “MXFix Wrapper” settings dialog. Click the “Ok” button in the “MXFix Folders” dialog box to launch MXFix. MXFix goes into Batch Mode and processes the example file through the SurCode for Dolby E decoder, Level Magic, Final Check and then wraps the discrete PCM channels 1-8 and pushes the newly wrapped file with metadata corrections to the Output Folder along with the loudness report file. 32 Section 4 : Web Monitor Log on from any web browser and watch MXFix in action The Web Monitor is available from the moment VCube is running in MXFix mode [Alt + M]. It is accessed through Web Browsers on PCs or Macs like: Safari, Firefox, Chrome, or a mobile device’s Web browser. You simply need to be logged onto the same network domain as that of MXFix. Enter the IP address of your MXFix’s in your browser’s address bar and add the following URL of :7777 as in the example below : You may also log on to the MXFix Web Monitor from a browser located on the PC running MXFix itself by entering the following URL in your Web Browser: http://localhost:7777 The Web Monitor appears as in the following screenshot displaying one group of status boxes per Input/Output Folder pair. 33 The grey Queue box displays the basic properties of the tasks to be performed in each queue and its current priority level. The lavender blue Input Folder box shows the current tasks of the Input Folder queue awaiting processing. Once MXFix is activated, the bisque colored progress bar shows the task being processed in real-time. As each task is completed the Web Monitor displays its status in the mint green Output Folder box and moves on to the next task. 34 In the Web Monitor page you will notice buttons that enable you to re-prioritize tasks by moving a task to the head of a queue, canceling a task, skipping a task or canceling an entire queue list. The Process Now button cancels the current task in progress and begins immediately processing the selected task. The Process Next button places the selected task at the head of the queue without cancelling the task currently being processed. The cancel button (within a task in a queue) cancels the task before it is processed and moves the media from the Watch Folder to the ERRORS sub folder so that it is not re-queued. The Cancel button (within the bisque colored process box) becomes the “Skip Task” button. It cancels the selected task and places its media in the “SKIPPED” sub folder in the current queue’s Input Folder so that it is not re-queued. The Skip Queue button places all the tasks in a queue in the SKIPPED sub folder in the Input Folder. The File Information button displays the results of a processed task. It displays a brief description of the Loudness levels measured, error messages for failed tasks and general file status. 35 Section 5 : MXFix Watchdog Launch MXFix with the watchdog application and it re-launches itself in the event of a crash MXFix was designed to run non-stop around the clock once it is setup and running. However due to the nature of the material it may process some files may be corrupted themselves before being processed by MXFix and when they are introduced into the system, they may provoke a crash. To avoid this stopping all tasks from being processed we created the MXFix watchdog. It is installed along with VCube and an icon is placed on the Windows desktop that appears in the form of the MXFix logo. It is also accessible from the Start Menu under Merging Technologies/VCube/MXFix Once MXFix is setup for continuous batch processing you may close VCube and launch MXFix Watchdog. It automatically launches VCube in MXFix continuous watch mode and gives real-time updates of all logged activity of MXFix without having to display the VCube user interface which can be reduced and hidden from view completely until the next time you need to change a watch folder’s settings. If VCube is detected as not running, either because of a crash or an accidental closure, the Watchdog will re-open VCube and re-launch MXFix where it left off. If a file that was being processed was the cause of the crash then it remains in the PROCESS sub folder of the Input folder and the error is logged in the daily report located in the primary Output Folder. This watchdog helps monitor all activity of MXFix and keeps the tasks flowing through even when no one is around to watch. MXFix™ 36 Come and explore our products and find out more about VCube and MXFix from our website at: www.merging.com Head Office Merging Technologies SA le Verney 4, 1070 Puidoux Switzerland T +41 21 946 0444 37