1
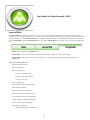
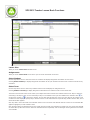
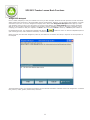
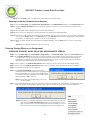
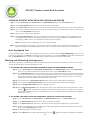
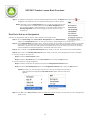
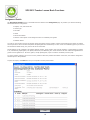
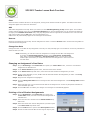
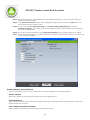
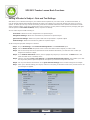
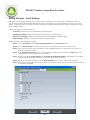
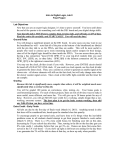
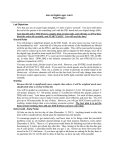
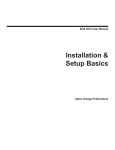
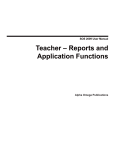
SOS 2012 User Manual
Teacher - Lesson Book
Functions
Alpha Omega Publications
MMVI Alpha Omega Publications, Inc.
Switched-On Schoolhouse® 2012, Switched-On Schoolhouse®. Switched-On®, and their logos are registered trademarks of Alpha
Omega Publications, Inc.® All Rights Reserved.
No part of this publication may be reproduced, stored in an electronic retrieval system, or transmitted in any form by any
means – electronic, mechanical, photocopy, recording, or otherwise – without the prior written permission of Alpha Omega
Publications, Inc.® Brief quotations may be used in literary review.
Table of Contents
Lesson Book...............................................................................................................4
Assignments Screen..............................................................................................5
Sorting Student Assignments...........................................................................6
Student Schoolwork...............................................................................................6
Lesson Plan Screen..............................................................................................7
Opening an Assignment........................................................................................9
Presentation Sections.....................................................................................10
Assignment Notepad...................................................................................... 11
Problems Section...........................................................................................12
Problem Notepad...................................................................................................12
Grading an Assignment..........................................................................................13
Viewing an Answer Key...................................................................................14
Assigning, Reassigning, or Skipping a Problem.............................................14
Viewing Problems Students Have Skipped.....................................................15
Clearing Student Work on an Assignment.............................................................15
Clear Highlighted Text............................................................................................16
Blocking and Unblocking Assignments..................................................................16
Zero Out an Assignment........................................................................................17
Assignment Details................................................................................................18
Editing a Day’s Assignments.................................................................................19
Removing an Assignment..............................................................................20
Changing Assignment Due Dates..................................................................20
Printing a List of Student Assignments..................................................................20
Printing an Assignment..........................................................................................21
Editing a Student’s Subject...................................................................................21
Editing a Subject - Assignment Settings................................................................24
Editing a Subject - Quiz and Test Settings............................................................27
Editing a Subject - Grade Settings........................................................................29
3
Switched-On Schoolhouse® 2012
Lesson Book
The Lesson Book is a valuable teacher tool. You can use it to view and grade schoolwork as well as keep track of student
progress. You can also edit subjects in the curriculum or change the status of assignments. If you have students working within
time frameworks you set, the Lesson Book offers a specially-designed calendar for managing their schoolwork and activities.
On your Home Page, click the Lesson Book button. The default Lesson Book screen opens, where you see three tabs at the
top:
Home—Takes you back to your Home Page
Lesson Plan—Lets you access student schoolwork and activities through an easy-to-use calendar.
Assignments—Lets you see a teacher list of things-to-do, view student assignments and grades, and enter into
assignments.
Use your Lesson Book to:
Sort Student Assignments
Open an Assignment
Grade an Assignment Change a Student’s Grade
Assign or Reassign a Problem View an Answer Key
Print an Assignment
View Problems Students Have Skipped Edit a Student’s Subject
Block and Unblock an Assignment Clear Student Work on an Assignment Clear Highlighted Text in an Assignment Change a Subject’s Start and End Dates Print a List of Student Assignments Edit a Day’s Assignments Change an Assignment’s Due Dates
4
SOS 2012 Teacher Lesson Book Functions
Assignments Screen
Let’s look at the Assignments screen first since it is the one that appears when you open your Lesson Book.
Student List
Use the drop-down menu to select the name of a student and display his/her assignment information on this screen.
Teacher To-Do List
The area in the top part of the screen displays either a list of your grading tasks or a list of problems your students have
skipped. Think of this as your teacher to-do list. It offers links you can click in order to go directly into an assignment. When
you complete a necessary task, it is automatically removed from your to-do list. If you decide you don’t want or need to do the
task, click the checkbox next to it to remove it from the list.
Grading Tasks
Click this to see a list of your teacher grading tasks. This button always displays the total number of grading tasks
you have. If it is selected, it appears darker in color than the Skipped Problems button next to it. Double-click any
assignment to open it to the first problem needing to be graded.
Skipped Problems
Click this to see a list of problems your students have skipped in their assignments. This button always displays the total
number of skipped problems in your list. If it is selected, it appears darker in color than the Grading Tasks button next
to it. Double-click any assignment to open to the skipped problem.
5
SOS 2012 Teacher Lesson Book Functions
Sorting Student Assignments
You can sort any of the assignment information in the top window according to student, subject, unit, assignment or type,
helping you to organize and view the items. To do this:
Step 1: Click the name of the column heading you’d like to sort by.
Step 2: Each time you click, the information is alphabetically or numerically sorted in ascending or descending order.
TIP: Can’t read the whole name of a unit or assignment because it’s too long? Try adjusting
the columns to make them wider. In the bar with the column headings, put your cursor
just to the left of a column heading. When you see the cursor change in appearance, click
and hold your left mouse button down, dragging the cursor to the left or right. Make your
columns wider or narrower any time you need to adjust so you can see.
Hint: When you put your cursor between any sections on the screen, it changes appearance.
This means you can click and drag your cursor in different directions, making the windows
bigger or smaller, enabling you to see more or less information.
Student Schoolwork
This is all the schoolwork you assigned to a student in a school term. You are able to see grades for subjects, units, and
assignments that the student has already completed as well as view schoolwork yet to come.
NOTE: If a student was assigned schoolwork in more than one school term, use the term dropdown menu (located directly beneath the Student Schoolwork bar) to select another
term and see all the schoolwork for that term displayed on the screen.
Subjects
You can see a list of all the subjects you assigned to a student. If the student has completed any work in a subject, the grade
earned for that subject is also displayed.
Units
You can view all the units you assigned within a subject. If the units aren’t displayed, click the subject name, and they appear
below the subject in the order you assigned. Notice that they appear in a smaller font than subject titles, enabling you to
quickly and easily see the difference between subjects and units. Notice that if a student has completed any work in a unit, the
grade for that unit shows up here. When you no longer want units displayed, click a subject name and the units disappear.
Assignments
If you click any unit name on the left side of the screen, all the assignments for that unit appear on the right side of the screen.
At the same time, the unit name is highlighted on the left, showing that you’re looking at the assignments for that particular
unit. To view an assignment, click any assignment title.
Assignment Types
You can see the types of assignments you assigned. These can be lessons, quizzes, tests, or projects.
Assignment Scores
Use the grades you see on the screen to help you keep track of how a student is progressing.
Edit Subject
This button opens a window that allows you to edit assigned subjects. Use Edit to add, delete, or rearrange units and
assignments. Edit also allows you to remove subjects for particular students.
Unit Details / Assignment Details
This button opens a window that allows you to view and print detailed information about a unit or an assignment depending
on which of the two Details buttons you select. Unit Details, on the left side of the screen provides information on a unit.
Assignment Details, on the right side of the screen provides details of a selected assignment.
Unit Functions / Assignment Functions
Click the function button to display a menu of function options to perform for the selected unit or assignment. You can also
right-click your mouse to display this same menu. The functions differ somewhat, if you clicked the Unit Functions or
Assignment Functions button.
6
SOS 2012 Teacher Lesson Book Functions
Unit functions include:
Edit the Subject - equivalent to the Edit Subject button.
Block or Unblock the Unit - allows you to block or unblock all quizzes and/or tests in the selected
unit.
View the Unit Details - equivalent to the Unit Details button.
Set the Unit Grade to Zero - permits you to set the grade for the entire unit to zero, permitting the
student to continue to the next unit in the subject.
Assignment functions include:
Open - lets you open the assignment
Block Assignment - lets you block or unblock an assignment (acts as a toggle). When an assignment
is blocked, you see
next to it.
Change Due Date - makes it easy to change the due date for the selected assignment.
Clear and Reassign - clears any work student has alread done in the assignment, erasing all
answers and grades. Student must then redo the assignment.
Clear Highlighting - permits you to remove any highlighting in the assignment.
Print Assignment - lets you print the assignment (or any part of it) without opening it.
Remove Assignment - lets you remove (delete) the assignment for the student, so the student does
not have to do it, nor is it included in the unit or course score.
Set Assignment Grade to Zero - enables you to assign a grade of zero to the assignment,
permitting the student to continue to the next assignment in the subject.
View Assignment Details - equivalent to the Assignment Details button.
Lesson Plan Screen
Now, let’s take a look at your Lesson Plan screen. This tab lets you view student schoolwork in calendar form. If you’ve
assigned work to a student in a school term structured around due dates, use the Lesson Plan screen to keep track of
his information. This screen takes all the same assignment information from the Student Schoolwork section of the
Assignments screen and places it into an easy-to-use calendar.
NOTE: If you assigned work to a student in a school term not driven by due dates, that
information does not show up on the Lesson Plan calendar screen. Keep track of this
student’s schoolwork in the Student Schoolwork section of the Assignments screen
instead.
7
SOS 2012 Teacher Lesson Book Functions
Lesson Plan
Takes you to the Lesson Plan calendar screen.
Assignments
Takes you to the Lesson Book screen where you see all the schoolwork in list form.
Select Student
Use this drop-down menu to select the name of a student and display assignment information on this screen.
Choose [Active Students] to display assignment information for all your students who have work in school terms driven by
due dates.
Select Term
Use this drop-down menu to select any student’s school term and display the assignments in it.
Choose [Student’s Current] to display assignment information for a student’s most current school term.
The area on the left side of the screen shows you multiple consecutive months of a student’s school term. Days in white are
school days, and days in gray are non-school days. Days in red indicate events you have added to the calendar. Click
to
see previous months or
to see future months. You can also click and hold your cursor over the name of any month to see
a small menu that helps you quickly skip to another month. To edit information for a specific day, double-click the date, and a
small edit window appears.
Click any date in the multi-month-view calendar section or the one-week-view calendar section to select it. The selected date
appears highlighted, in both calendar views.
Click anywhere along the bar between the one-month and five-month view calendars to expand your one-week-view calendar
so that it takes up the entire screen. When the calendar has been expanded, click the bar again to bring back the five-monthview calendar.
8
SOS 2012 Teacher Lesson Book Functions
The range of dates for the week displayed in the one-week-view calendar is displayed above it. Click the left arrow to display
previous weeks or the right arrow to display future weeks.
The calendar allows you to view any week of a student’s school term. Days in yellow are school days, days in gray are nonschool days, and days in red indicate events have been added to the calendar for this day. If you are viewing schoolwork for
one student, you see a list of all the assignments a student is expected to do on the dates you assigned them. If you are
viewing schoolwork for multiple students, you see a list of students with a number next to each student’s name that indicates
how many assignments he/she has on any given day. Double-click on the date to edit information for a specific day or see a list
of a student’s assignments. A small edit window appears.
Note: To view an assignment, click any black-colored assignment title on this screen to open
that assignment.
Notice the icons (small pictures) next to each assignment title in the Lesson Plan.
- means this is a lesson
- tells you this assignment is a project or experiment
- lets you know the student has a quiz
- alerts you to a test the student has scheduled
Reschedule
Sets new start or end dates for any subject in a student’s curriculum. Click the Reschedule button. A small window opens.
Place a checkmark beside any subjects for which you want to set new dates. Click any start or end date for a subject to
manually type in a new date or make a tiny drop-down calendar appear. Use the left and right arrows in the mini-calendar to
find the month you want; then click a date to select it. If you click the Reschedule button in this small window, all the new
dates you set are applied. They appear in schoolwork lists and on the Lesson Plan calendar screen.
Today
Returns you to today’s date on both the five-month-view calendar and the one-week-view calendar.
Print
Prints out a list of assignments due on different days. A small window appears. Choose the start and end dates for the range of
days to print. Click the Preview button to see what your printed page will look like.
Opening an Assignment
Since you have two views of your student’s assignments, from the Assignment screen and from the Lesson Plan screen, you
can open an assignment from either screen. You see the same screen either way. You are able to view the presentation part of
the assignment as well as any work a student has done on the problems. Grades for completed problems are displayed as well.
While an assignment is open, you can also grade a problem or use the Assignment or Problem Notepad.
To open from an Assignment screen:
Step 1: On your Home Page, click Assignments in the Lesson Book widget.
Step 2: Select a student’s name from the Select Student drop-down menu.
Step 3: In the Student Schoolwork section, click a subject name to display the units.
Step 4: Click a unit name to display the assignments in that unit.
Step 5: Click any assignment title to go to that assignment.
To open from a Lesson Plan screen:
Step 1: On your Home Page, click Lesson Plan in the Lesson Book widget.
Step 2: Select a student’s name from the Select Student drop-down menu.
Step 3: Select a term from the Term drop-down menu.
Step 4: Double-click the assignment you want to open.
9
SOS 2012 Teacher Lesson Book Functions
The Assignment screen you see looks very much like the assignment screen your students see when they are working in
assignments. Several buttons and features are specialized, allowing you to perform any number of teacher tasks within the
assignment. If there are specific teacher notes associated with the lesson, they usually appear at the top of the lesson. Also,
you may find “Teacher Only” help associated with some questions in the Problem section of assignments.
Student Assignment screens are usually made up of two major parts:
Presentation sections—present most of the instructional material students see in their assignments
Problems area—display problems and answers to already-completed problems
Presentation sections
Sometimes, when there’s a lot of information to cover, it’s easier for students to see new information if it’s broken up
into smaller, bite-sized pieces. This area tells you how many sections there are to an assignment presentation. Click any
section number to see the information in that section. The highlighted section number lets you know which section you are
viewing. Click
to view either the previous or the next presentation sections.
To the right of the section number are a series of colored circles. These are highlighters. Use the highlighters to mark up text
in an assignment. To highlight text, select the text with your mouse and click the color you want to use. Text stays highlighted
even after you exit and return to the assignment. If you want to remove the highlighting from the text, click
. This does
NOT completely remove the highlighting, it only makes it disappear from the lesson. To completely remove the highlighting, the
teacher must do this from either the Lesson Plan screen or the Assignments screen. See page 16 for instructions.
NOTE: When you open a student assignent from SOS Teacher, you are able to see text exactly as
your students highlighted it in SOS Student.
10
SOS 2012 Teacher Lesson Book Functions
Assignment Notepad
Here’s a handy notepad you and your students can use to jot down thoughts. Students can ask questions or make comments
about anything they encounter in the presentation part of an assignment. Similarly, you can answer their questions or include
comments of your own. To use the assignment notepad, click it and a small Assignment Notepad window pops up. Read
your students’ notes or type in your own where you see the cursor blinking. The Notify Student box is already checked by
SOS. If you do not want to send the message to the student, click the checkbox to remove it, otherwise a message is sent
notifying your students to read your response. Hit Save to save your note, Cancel to cancel it, or Print to print it. Back on
the assignment screen, your assignment notepad looks like this
open it and type more, read a student’s comments, or delete text.
if there’s a note in it. Click the notepad anytime to
Notes previously sent from this assignment, either by the student or the teacher are saved, in sequence in the top section of
the notepad.
The presentation section of an assignment displays the instructional information a student learns in an assignment. It contains
text, pictures, videos, games, Internet links, and more.
11
SOS 2012 Teacher Lesson Book Functions
Problem Section
Every presentation section in an assignment includes problems that assess students’ understanding of what they’ve been
learning. In this area you also see how many total problems an assignment has and will see them displayed in batches of
10. Click any problem number to highlight it and display the problem below. You may also click F12 to advance through the
problems.
Click
to view either the previous or the next problem.
NOTE: Notice that, as you click through problems, the presentation section that introduced the
information for them always displays at the top. Refer to it at any time to see where
students drew their answers from.
The
on the far right side of the bar with the problems can be clicked to open a description of each specific problem type.
After you display a problem, click it for a description and instructions.
Problem numbers appear in different colors on the problems toolbar:
•
gray—problems not yet completed
•
green—problems students have answered correctly
•
red—problems students have either answered incorrectly or only received partial credit for
•
blue with a line through it—problems you decided to allow your students to skip
•
black—problems you must manually-grade
Problem Notepad
This problem notepad works just like the assignment notepad above. Use it to respond to students’ questions or comments
about problems. To open it, click it and a small Problem Notepad window pops up. Read, compose, print, or delete notes
in this window, the Notify Student box is already checked. Click the checkbox if you do not want the student to receive a
message to view your changes. Click Save to save your note. Click this notepad at any time to open it again.
The bottom window displays the problems for an assignment, as well as student answers to any of these problems.
Place your cursor between the presentation and problems sections and notice that the cursor changes in appearance.
This means you can click and drag your cursor up or down, changing your window sizes, enabling you to see more or less
information.
Click the “up” arrow on the right side of the screen to make your problem section fill the whole screen. It changes into a
“down” arrow you can then click to make your problems section small again.
Status area—Find out how students scored on different problems by clicking a problem number and looking here. You are
able to see a percentage score, the total number of points earned, and the number of attempts it took to correctly answer the
problem.
Click any of the boxes in the lower left-hand corner to manually type in the score you want a student to receive on a problem
(or change the score for an already-graded problem). You are able to type in the number of points, the percentage, or the
letter grade. Click the Save button when you’re done.
NOTE: When you type in one of these boxes, the other two automatically adjust.
Show Answer
Displays the correct answer for any problem. Clicking Enter also displays an answer key window.
Skip
Allows your student to skip a specific problem in an assignment and not have that problem considered part of the assignment
grade. Select any problem number and click this button. The number turns gray and is crossed-out. Once a problem is skipped,
the Skip button changes into an Assign button, so you can click it if you want to reassign the problem.
12
SOS 2012 Teacher Lesson Book Functions
Reassign
Select any problem number; click this button to erase the grade, allowing the student to rework the problem. The problem
number is changed to gray in color, meaning that it was reassigned. Your student sees the assignment in his/her to-do list and
knows it is not complete until the assigned problems in it are all worked. When you click this button, you have the option to
also clear the student’s current answers or not.
Next
Advances you to the next problem.
Save
Saves any changes you make to the assignment.
Resource Center
Lets you access the tools in the Resource Center while in the assignment.
Messages
Lets you send messages to or receive messages from your students.
Print
Prints an assignment. A small pop-up window appears, letting you decide how you want the assignment to display—with
presentations, problems, graphics, grades, student answers, or any combination of these. Before printing, you have the option
to click a Preview button to view what your selections will look like on the printed page.
Depending on the type of assignment you are viewing, the information in the presentation and problems sections may slightly
vary:
•
Quizzes and tests don’t usually display much text in the presentation sections because they are testing students for
previously-learned information. Most of the content is found in the problems section instead.
•
Projects are dynamic and can consist of reading/writing activities, hands-on experiments, library research,
interviews, artwork, or anything else you decide to assign. Because of this, the presentation sections may display
instructions and background information students need to complete them. They may offer text, graphics, videos, or
web links. The problems sections may display more instructions or provide links for students that open up writing
space.
Exit
Lets you exit the assignment and return to the previous screen.
Grading an Assignment
Most assignments are automatically graded by SOS. Some assignments require you to manually grade problems such as those
requiring students to write paragraph responses to problems. Your lesson book offers an easy teacher to-do list, so you can see
all grading tasks you have at any given time.
Step 1: On your Home Page, click Lesson Book in the Administration widget. Your Lesson Book opens.
Step 2: Make sure the Assignments tab is selected. Click the Grading Tasks button (in the upper left-hand corner)
for one or all of your students in order to view a list of assignments or problems you must grade.
Step 3: Click any completed assignment title to open that assignment.
Step 4: Once you’re in the assignment, SOS automatically takes you to the first problem to be graded. Click Next to
move to the next problem to grade.
Step 5: Grade the problems and record the scores (by point value, percentage or letter grade) in the grade boxes at the
lower left-hand corner of the assignment screen.
13
SOS 2012 Teacher Lesson Book Functions
Step 6: Click the Save button to save your changes. Your changes are automatically applied.
Step 7: Click the Exit button to return to the previous screen. Notice that the grading task is removed from your task
list.
Grading Shortcut Keys
There are several functions keys (Fx) available for you to use while grading student work.
F2
- allows you to save the grade and advance to the next problem to be graded.
F4
- lets you save the grade you just entered and exit the assignment
F11 - enables you to return to the previous problem
F12 - advances you to the next problem
Viewing an Answer Key
Step 1: On your Home Page click Lesson Book- Assignments in the Administration widget. Your Lesson Book
opens.
Step 2: Click any assignment title to open that assignment.
NOTE: If you don’t see the assignment you’re looking for, check to make sure the student’s
name (from the Select Student drop-down menu) and the term (from the term dropdown menu) are correct. Click a subject name, a unit name, and then the assignment
title in the Student Schoolwork section to display all the schoolwork you assigned that
student in the given term.
Step 3: Once you’re in the correct assignment, find the problem you want to see.
Step 4: Click the Show Answer button. A small window appears, displaying the correct answer for that problem. All
answers to this problem that the computer considers correct are displayed. You, as the teacher, always have
the option to mark an answer correct. Repeat this process to see answer keys for any problem.
Assigning, Reassigning, or Skipping a Problem
If you want to assign a skipped problem or ask a student to completely rework a problem:
Step 1: On your Home Page click Lesson Book- Assignments in the Administration widget. Your Lesson Book
opens.
Step 2: Choose the correct student from the Select Student drop-down menu. Make sure the correct term is selected
also (under Student Schoolwork).
Step 3: Select the correct subject and unit under Student Schoolwork. Double-click the assignment containing the
problem you want to assign/reassign.
Step 4: Once you are in the correct assignment, find the problem you want to assign/reassign.
Step 5: If the problem is currently a skipped problem, click the Assign button to assign it. If you want the student to
rework the problem, click the Rework button to reassign it. In either case, the problem appears gray in color,
meaning the problem is now (re)assigned. The assignment will reappear in the student’s to-do list.
To Completely Skip a Problem
If there is a problem that you want a student to skip completely without being returned to the assignment:
Step 1: On your Home Page click Lesson Book- Assignments in the Administration widget. Your Lesson Book
opens.
Step 2: Choose the correct student from the Select Student drop-down menu. Make sure the correct term is selected
also (under Student Schoolwork).
Step 3: Select the correct subject and unit under Student Schoolwork. Double-click the assignment containing the
problem you want to assign/reassign.
Step 4: Once you are in the correct assignment, find the problem you want to assign/reassign.
14
SOS 2012 Teacher Lesson Book Functions
Step 5: Click the Skip button. The problem is removed from the student’s work.
Viewing Problems Students Have Skipped
Step 1: On your Home Page click Lesson Book- Assignments in the Administration widget. Your Lesson Book opens.
Step 2: Click the Skipped Problems button (in the upper left-hand corner) to view a list of problems that have been
skipped.
Step 3: Click any black-colored assignment title to open that assignment.
Step 4: Once you’re in the assignment, the program takes you directly to the skipped problem.
Step 5: Decide if you want to allow the student to skip the problem or if you want to reassign it. If you decide to reassign it,
click either the Assign button or the Rework button. (The Rework button clears the problem score and reassigns
the problem.) It appears in the student’s to-do list to be completed.
Step 6: When you finish viewing all of an assignment’s skipped problems, click the Exit button to return to your lesson
book.
Notice that the skipped problems are off your to-do list.
Clearing Student Work on an Assignment
CLEARING STUDENT WORK FROM THE ASSIGNMENTS SCREEN
Step 1: On your Home Page click Lesson Book- Assignments in the Administration widget. Your Lesson Book opens.
Step 2: In the Select Student drop-down menu, select the student. If the student currently has subjects in more than
one school term, you may need to also use the term drop-down menu (directly beneath the words “Student
Schoolwork”) to select the term that contains the assignment for which you want to clear work. The student’s
assignment information appears in the bottom half of the screen.
Step 3: Click a subject in the Student Schoolwork section. After you do this, all the units for that subject display.
Step 4: Click a unit in the Student Schoolwork section. After you do this, all the assignments for that unit display.
Step 5: Single-click the assignment to highlight it.
Step 6: Click Clear and Reassign to clear all the work a
student has done for that assignment. If the assignment
has any highlighted text, you first see a prompt asking
if you want to clear the highlighting. Click Yes to clear
the highlighting, or No to leave it.
NOTE: If the lesson has no highlighting, you do not
see this prompt.
Step 7: A second prompt then asks you if you would like to clear the student’s work and grades for the assignment. Click
Yes. The changes are immediately applied, and it is as if the student never did any work in the assignment.
NOTE: Alternately, you can also right-click the row of the assignment you want to
clear and select Clear and Reassign from the menu that appears (see at
right) to remove all the work the student has done and reassign it. You can
also use this menu to just clear any highlighted text from an assignment.
15
SOS 2012 Teacher Lesson Book Functions
CLEARING STUDENT WORK FROM THE LESSON PLAN SCREEN
Step 1: On your Home Page click Lesson Plan in the Administration widget. Your Lesson Plan opens.
Step 2: In the Select Student drop-down menu, select the name of the student.
Step 3: In the Select Term drop-down menu, select the term that contains the assignment where you want to clear work.
Step 4: On any of the calendars, double-click the day of the week that contains the assignment for which you want to clear
work. A small Day Detail window opens.
Step 5: Single-click the assignment to highlight it.
Step 6: Click Clear and Reassign to clear all the work a student has done for that assignment. If the assignment has
any highlighted text, you first see a prompt asking if you want to clear the highlighting. Click Yes to clear the
highlighting, or No to leave it. (see examples of prompts on previous page.)
NOTE: If the lesson has no highlighting, you do not see this prompt.
Step 7: A second prompt then asks you if you would like to clear the student’s work and grades for the assignment. Click
Yes. The changes are immediately applied, and it is as if the student never did any work in the assignment.
Clear Highlighted Text
To clear highlighting from a lesson without clearing the lesson, you can either select the Clear Highlighting option when you
right-click as described in the Note at the bottom of the previous page, or you can follow Steps 1-7 for clearing student work
from the Assignments screen, and then select No on the prompt to clear and reassign the assignment.
Blocking and Unblocking an Assignment
SOS gives you the ability to block assignments, preventing students from working on them before you think they are ready.
You also need to be able to unblock assignments as well.
1. BLOCKING AND UNBLOCKING AND ASSIGNMENT FROM THE ASSIGNMENTS SCREEN
Step 1: On your Home Page click Lesson Book- Assignments in the Administration widget. Your Lesson Book
opens. You can block and unblock assignments from either of your Lesson Book screens.
Step 2: In the Select Student drop-down menu, select the name of a student. If the student currently has subjects in
more than one school term, you may need to select the term that contains the assignment you want to block.
Use the term drop-down menu (directly beneath the words “Student Schoolwork”) to do this. The student’s
assignment information appears in the bottom half of the screen.
Step 3: Click a subject in the Student Schoolwork section. All the units for that subject are displayed.
Step 4: Click a unit in the Student Schoolwork section. All the assignments for that unit are displayed.
Step 5: Click the Assignment Functions button to display the menu.
Step 6: Click the Block Assignment option. This acts as a toggle. If the assignment was not blocked before, a small
graphic (
) appears, indicating that the assignment is blocked and the student is not able to open it. If the
assignment was blocked before you clicked this option, the icon disappears and the assignment is available to
the student to work.
2. BLOCKING AND UNBLOCKING AN ASSIGNMENT FROM THE LESSON PLAN SCREEN
Step 1: On your Home Page click Lesson Plan in the Administration widget. Your Lesson Plan opens.
Step 2: In the Select Student drop-down menu, select the name of a student.
Step 3: In the Select Term drop-down menu, select the term that contains the assignment you want to block.
Step 4: On any of the calendars you see, double-click the day of the week that contains the assignment you want to
block. A small Day Detail window opens.
Step 5: Click the assignment you want to block.
Step 6: Click the Block button to block that assignment. The icon (
16
) appears, indicating the assignment is blocked.
SOS 2012 Teacher Lesson Book Functions
Step 7: To unblock an assignment, select the blocked assignment and click the Block button again. The
disappears. The assignment is now unblocked and a student is able to open it.
icon
NOTE: Alternately, from the Assignments screen, you can also right-click the row
of the assignment you want to block and select Block Assignment from
the menu that appears. If the assignment is currently blocked, simply click
Block Assignment and it acts as a toggle to remove the block on the
assignment.
Zero Out a Unit or an Assignment
If there is an assignement that you want to mark complete with a grade of zero:
Step 1: On your Home Page click Lesson Book- Assignments in the Administration
widget. Your Lesson Book opens. You can zero out either a single assignment or an entire unit.
Step 2: In the Select Student drop-down menu, select the student. If the student currently has subjects in more than
one school term, you may need to also use the term drop-down menu (directly beneath the words “Student
Schoolwork”) to select the term that contains the assignment for which you want to zero work. The student’s
unit and assignment information appears in the bottom half of the screen.
Step 3: Click a subject in the Student Schoolwork section. After you do this, all the units for that subject display.
Step 4: Click a unit in the Student Schoolwork section. After you do this, all the assignments for that unit display.
If you are zeroing out an entire unit:
Step 5: Click the Unit Functions button.
Step 6: Click the Zero Unit option on the Unit Funtions menu and go to Step 7 below.
If you are zeroing out a single assignment,
Step 5: Click the assignment to highlight it and click the Assignment Functions button.
Step 6: Click the Zero Assignment option on the Assignment Funtions menu and go to Step 7 below.
NOTE Alternately, you can also right-click the row of the unit or assignment you want to
block and select the appropriate Set Grade to Zero option from the menu that
appears.
Step 7: Click Yes on the Are you sure? window to completely erase all student work and give the unit or assignment a
grade of zero.
17
SOS 2012 Teacher Lesson Book Functions
Assignment Details
The Assignment Details screen is accessible from the bottom of the Assignment page. It provides you with the following
information about an assignment:
~ Subject, unit, and lesson title
~ Lesson type
~ Due date
~ Grade
~ Access information
~ Amount of time spent on the assignment and on vocabulary and games
~ Problem details
You can see the number of times the student played the games and the number of points earned playing the games. A student
earns 5 points for each successful completion of Spelling Bee and Vocabulocity. For the rest of the vocabulary games (the ones in
the Arcade and Flash Cards), one point is earned for each word.
Arcade Games are all vocabulary and spelling practice games. These include, Pick a Pail for grades 3-5, Moon Match for grades
6-12, Vocabulocity, Spelling Bee, Full Speed, Word Hike, and Balancing Act. These last three all have a different appearance for
grades 3-5 and grades 6-12. All of the games, except Spelling Bee, require at least 4 vocabulary words to play.
To view a problem, position your cursor over the problem. When the problem information turns blue, click and the assignment
window opens to the problems.
To print this report, click Print and use your computer’s normal print function.
18
SOS 2012 Teacher Lesson Book Functions
Editing a Day’s Assignments
Step 1: On your Home Page, click Lesson Plan. This opens your Lesson Plan screen, a screen to view student
assignments in calendar form.
Step 2: In the Select Student drop-down menu, select the name of a student.
NOTE: If you do not select a student, and choose Active Students instead, you see a list of
all the students who have school terms with due dates. You are able to view student
assignments for any day that you click, but you are not able to edit them.
Step 3: In the Select Term drop-down menu, select the school term that contains the assignments you want to edit.
Step 4: Double-click any date in either the multi-month-view calendar or the one-week-view calendar to open a small
window listing the day’s assignments. The Day Detail window lets you edit the day’s schoolwork.
Step 5: Use any of the buttons and features on the Day Detail window to make changes to the student’s day. The
changes are automatically applied in the student calendar.
The top of the window tells you the day selected. Click the left or right arrows on either side to view previous or future days.
The area in the middle gives you information about all of a student’s assignments, including grades the student has received on
already-completed assignments. Click any assignment title to open that assignment.
Move Up and Move Down
When you have assignments from the same subjects that start on the same dates, you can rearrange their order, deciding
which you want a student to do first. Single-click to select one of these assignments. The Move Up and Move Down buttons
are now enabled, so you can click them to move the selected assignment up or down in the list.
Block
Blocks an assignment, preventing a student from working on it until you unblock it. Block a quiz, for example, making sure a
student has done enough review before taking the quiz. When an assignment is blocked, you see a
next to it.
NOTE: This button also unblocks assignments. If you globally blocked all quizzes or tests, see
Global Blocking and Unblocking for assistance.
19
SOS 2012 Teacher Lesson Book Functions
Clear
Clears the work a student has done in an assignment, erasing all the answers and all the grades. The student must do the
assignment again as if it had never been done.
Add Adds extra assignments to the day. When you click this, a small Add Assignment(s) to Day window opens. The student’s
existing subjects appear on the left (in the Student’s Subjects area), and the assignments you can choose from appear on
the right (in the Available Curriculum area). Drag any assignment from the right side of the window into a unit in the leftside of the window. Click the OK button, and any assignments you
added to the day automatically appear in the existing list of schoolwork.
Remove
Removes an assignment from the day. Click an assignment to select it. Click the Remove button. All the work and grades are
removed with the assignment.
Change Due Date
Changes the start or end date for any assignment in the day. You may manually type in a new date or use the tiny calendars to
select the date you want.
NOTE: Alternately, you can also remove an assignment or change the due date of an assignment
by clicking the Assignment Functions button on the Lesson Book - Assignments
page. Next, selecting the Remove or Change Due Date option. You then see a small
window open where either you confirm the removal of the assignment or select new start
and end dates.
Changing an Assignment’s Due Dates
Step 1: On your Home Page, click Lesson Plan. This opens your Lesson Plan screen, a screen to view student
assignments in calendar form.
Step 2: In the Select Student drop-down menu, select the name of the student.
Step 3: In the Select Term drop-down menu, select the term that contains the assignment you want.
Step 4: On any of the calendars you see, double-click the date that contains the assignment you want. A small Day
Detail window opens.
Step 5: Single-click an assignment to highlight it.
Step 6: Click the Change Due Date button to change the due date of that assignment. A small Change Dates window
appears.
Step 7: Either manually type in a new start and end date for the assignment or use the tiny drop-down calendars to
select the dates you want.
Step 8: Click the Ok button to confirm your changes. Your changes are automatically applied.
Printing a List of Student Assignments
Step 1: On your Home Page, click Lesson Plan. This opens your
Lesson Plan screen, a screen to view student assignments in
calendar form.
Step 2: Select the name of a student from the Select Student dropdown menu.
Step 3: Select the school term with the assignments you want to print
in the Select Term drop-down menu.
Step 4: Click the Print button to open a small Print Options window.
Step 5: Choose the start and end dates for the range of days to print. 20
SOS 2012 Teacher Lesson Book Functions
Step 6: Click the Preview button to open a window that offers you a preview of what the printed page will look like. It
displays the range of dates you selected as well as all the schoolwork assigned on any of those days.
Step 7: Click the Print button when you’re ready to print the list of assignments.
Printing an Assignment
Step 1: On your Home Page, click Lesson Book-Assignments. Your Lesson Book will open.
Step 2: Double-click the assignment title to go to that assignment. Alternately, you can choose to right-click the
assignment, and select the Print Assignment option to display the window below.
NOTE: If you don’t see the assignment you’re looking for:
Check to make sure the student’s name (from the Select Student drop-down menu) is correct
Check to make sure the term (from the term drop-down menu) is correct
Click a subject name
Click a unit name
Double-click the assignment title in the Student Schoolwork section
Step 3: Once you’re in the correct assignment, click the Print button. A small pop-up window appears, allowing you
to decide how you want the assignment to display—with presentations, problems, graphics, grades, student
answers, or any combination of these. Before printing, you have the option to click the Preview button to view
what your selections will look like on the printed page. Click Print when you’re ready.
Editing a Student’s Subject
SOS allows you to customize learning for your students and set options for your entire school, for individual students, or
even for specific subjects that individual students are taking. The subject level is the most specific level where you can set
options. It allows you not only to meet the learning needs of an individual student but also to address each student’s needs
within a specific subject.
You can edit a subject in SOS according to:
Curriculum—affects the units or assignments in a specific subject
Assignment Settings—affects how information is presented in a specific subject
Quiz/Test Settings—affects how quizzes and tests are presented in a specific subject
Grade Settings—affects how a student is graded in a specific subject
21
SOS 2012 Teacher Lesson Book Functions
To edit a subject’s subject settings for a student:
Step 1: On your Home Page, click Lesson Book-Assignments. Your Lesson Book opens.
Step 2: Use the Select Student drop-down menu to select the student whose subjects you want to edit.
Step 3: Use the term drop-down menu (beneath the words “Student Schoolwork”) to select the term in which you
assigned the student’s subject.
Step 4: In the Student Schoolwork section, click to highlight any subject you want to edit. The Edit button in the
lower left-hand corner is enabled, click it.
Step 5: Click the subject name on the Edit Student Subject window that appears. This enables you to edit the
subject. Step 6: Use any of the buttons and features on the Student Subject Settings screen to make changes to the subject.
Step 7: When you’re finished editing your subject, make sure everything is saved and return to the previous screen. All
of your changes are applied.
Student Subject Setup Sections
Tells you which settings screen you are currently able to set different options for in the subject selected.
Subject
This area displays the subject, units, and assignments selected. Any changes you make in this window affect the student’s
subject.
NOTE: Hide or display any curriculum subject by double-clicking its name.
Available Curriculum
This area holds the curriculum you can use to edit the student’s subject. Hide ordisplay any of it by clicking the + beside a
folder or by double-clicking a subject or unit folder. When you’re ready to edit the subject, drag assignments or units from here
and drop them into the subject to the left.
22
SOS 2012 Teacher Lesson Book Functions
Remove
Removes a unit or assignment (and all the work and grades within it). To do this, highlight the item to remove in your
Subjects window and click this button.
When you click Save after you remove an assignment or unit from a student with Advanced Planning Enabled, the Select
Due Dates window appears. (See example on the next page.) You can change the Start and End Dates as necessary. You can
also choose to change the days of the week when coursework in this subject is assigned to this student. If you decide to check
a day that is not currently selected, make sure it is already designated as a regular schoolday. Click the checkbox beside the
weekday to add or remove the checkmark. Only days with checkmarks will have coursework assigned to them.
Click Ok when you are finished.
If you click Cancel, your changes are not saved.
Click the Close button to exit the Edit Student Subject window.
NOTE: Changing due dates for assignments happens because you are removing assignments, which changes when subsequent
assignments in the subject are due.
Add Unit
Adds a new unit to the subject. Click this and then drag available curriculum into the new unit. You can also create a custom
subject from this screen.
Edit Title
Changes the title of a subject or unit. Highlight the subject or unit and click this button. A cursor appears over the current
name, so you can type in a new title.
.
NOTE: You can also edit an assignment title for any assignment after it has been assigned to a student
23
SOS 2012 Teacher Lesson Book Functions
1. Expand the unit containing the assignment by clicking the + sign.
2. Click Edit Title.
3. Make your changes and press Enter.
4. Click Save and close the Edit Student Subject window.
Edit Icon
Allows you to choose an icon to go with a particular subject. Select the subject name in the Subject window and click this
button. A tiny window opens, displaying a number of small icons. The icon you click appears next to the subject name, helping
you to easily recognize it and associate it with the subject.
Save
Saves any changes you make to the student’s subject.
Cancel
Cancels any changes not yet saved.
Move Up and Move Down
Lets you decide the order a unit or assignment is presented to the student. Select the name of a unit or assignment in the
Subject window. Click either of these buttons to move the unit/assignment up or down in the list.
Step 6: Use any of the buttons and features on the Curriculum screen to make changes to your subject.
Step 7: When you finish editing the subject, be sure everything is saved and return to the previous screen. All of
your changes are applied.
Create Assignment
Opens the Custom Assignment form, after you select a unit. This allows you to create a project, lesson, quiz or test and
include it in the selected unit. (See the Creating Custom Assignments in the Teacher Administration Functions Guide.)
Editing a Subject - Assignment Settings
SOS allows you to customize learning for your students and set options for your entire school, for individual students, or
even for specific subjects that individual students are taking. The subject level is the most specific level where you can set
options. It allows you not only to meet the learning needs of an individual student but also to address each student’s needs
within a specific subject.
Suppose you set options that allow a student to have two chances to answer a problem correctly. You find that this student
struggles with math and could work better without the pressure of being given only two attempts. At the subject level, you can
set options in math so that this student has an unlimited number of attempts at a problem. This means that the student can
get the extra help needed in math but still continue to be challenged differently in other subjects.
You can edit a subject in SOS according to:
Curriculum—affects the units or assignments in a specific subject
Assignment Settings—affects how information is presented in a specific subject
Quiz/Test Settings—affects how quizzes and tests are presented in a specific subject
Grade Settings—affects how a student is graded in a specific subject
To edit a subject’s assignment settings for a student:
Step 1: On your Home Page, click Lesson Book-Assignments. Your Lesson Book opens.
Step 2: Use the Select Student drop-down menu to select the student whose subjects you want to edit.
24
SOS 2012 Teacher Lesson Book Functions
Step 3: Use the term drop-down menu (beneath the words “Student Schoolwork”) to select the term in which you
assigned the student’s subject.
Step 4: In the Student Schoolwork section, click to highlight any subject you want to edit. The Edit button in the
lower left-hand corner is enabled, click it.
Step 5: Click the circle beside Assignment Settings in the Student Subject Setup Sections to open the
Assignment Settings. This enables you to edit the subject but places a special emphasis on the options you
can set for its assignments. Step 6: Use any of the buttons and features on the Assignment Settings screen to make changes to the subject.
Step 7: When you’re finished editing your subject, make sure everything is saved and return to the previous screen. All
of your changes are applied. Student Subject Setup Sections
Tells you which settings screen you are currently able to set different options for in the subject selected.
Lesson options
Allows you to decide how a student goes through lessons in the subject selected.
Internet access
Allows a student to be able to click www links in lessons. Removing the checkmark from this box blocks his/her access to the
Internet through the curriculum.
Leave skipped problem message
Allows a student to skip problems in lessons after providing reasons to skip.
25
SOS 2012 Teacher Lesson Book Functions
Access answer key
Allows a student to see correct answers to completed and graded problems.
Easy spelling
If Easy spelling is checked, all words less that 7 characters long are spell checked instead of marking the entire answer as
incorrect if it includes a misspelled word. (All words 7 or more characters are automatically spell checked. If Easy spelling is
checked, words less than 7 characters are also spell checked.)
Spelling penalty
Gives students partial credit for correct answers if there are misspelled words (as opposed to counting the entire answer
incorrect if it includes a misspelled word). This is true for all words regardless of length. To require exact spelling in all student
answers, set the Spelling penalty to 100%.
NOTE: Percentages you set here may not always apply. In some units, such as in Language Arts,
the curriculum requires exact spelling and punctuation.
Maximum problem attempts
The maximum number of chances a student has to answer a problem correctly. After using all available attempts, the student
receives a score based on the final answers.
Unlimited problem attempts
Enables a student to rework problems as many times as necessary until all of them are answered correctly
NOTE: If the student is stuck on a problem and cannot exit a lesson, you may need to permit the
use of the Help button. (Student Help button)
True/False problem attempts
Controls the number of attempts a student has to answer a True/False question correctly.
Problem attempts penalty
Deducts a certain number of percentage points each time a student reattempts a problem. In the box, enter the number of
percentage points you want deducted each time a student reworks an incorrect problem.
Notification Threshold
Allows you to receive a message if the student does not achieve the percentage score you set for this subject.
Games Options
Allows a student to play educational games in the curriculum. You have the ability to determine each individual student’s
access by game type.
Save
Saves any changes you make to the student’s subject.
Use default
Returns all the options on the student’s subject screens to student level settings, the settings most recommended for general
use. Even if you change and save certain options on this screen, you can always come back to click this button and be returned
to options you selected in Student Setup. NOTE: This button resets not only the subject’s Assignment Settings (displayed in the
screenshot) but also the subject’s Quiz and Test Settings and Grade Settings as well.
This does NOT affect changes to the Home Page Settings.
Cancel
Cancels any changes not yet saved. 26
SOS 2012 Teacher Lesson Book Functions
Editing a Student’s Subject - Quiz and Test Settings
SOS allows you to customize learning for your students and set options for your entire school, for individual students, or
even for specific subjects that individual students are taking. The subject level is the most specific level where you can set
options. It allows you not only to meet the learning needs of an individual student but also to address each student’s needs
within a specific subject. If you have a student who excels in Science, you may want to challenge them by changing their Quiz
and Test options to No answer feedback, so they only have on attempt.
You can edit a subject in SOS according to:
Curriculum—affects the units or assignments in a specific subject
Assignment Settings—affects how information is presented in a specific subject
Quiz and Test Settings—affects how quizzes and tests are presented in a specific subject
Grade Settings—affects how a student is graded in a specific subject
To edit a subject’s Quiz/Test settings for a student:
Step 1: On your Home Page, click Lesson Book-Assignments. Your Lesson Book opens.
Step 2: Use the Select Student drop-down menu to select the student whose subjects you want to edit.
Step 3: Use the term drop-down menu (beneath the words “Student Schoolwork”) to select the term in which you
assigned the student’s subject.
Step 4: In the Student Schoolwork section, click to highlight any subject you want to edit. The Edit button in the
lower left-hand corner is enabled, click it.
Step 5: Click the circle beside Quiz/ Test Settings in the Student Subject Setup Sections. This enables you to edit
the subject but places a special emphasis on the options you can set for its quizzes and tests. Step 6: Use any of the buttons and features on the Quiz and Test Settings screen to make changes to the subject.
Step 7: When you’re finished editing your subject, make sure everything is saved and return to the previous screen. All
your changes are applied.
27
SOS 2012 Teacher Lesson Book Functions
Student Subject Setup Sections
Tells you which settings screen you are currently able to set different options for in the subject selected.
Quiz Options
Allows you to decide how a student goes through quizzes in the subject selected.
Test Options
Allows you to decide how a student goes through tests in the subject selected.
Immediate answer feedback
Allows a student to view scores on problems during quizzes and tests. The student has only one attempt at answering.
No answer feedback
Does not allow a student to see scores to problems until an entire quiz or test is completed. The student then receives a score
of zero for any still-unanswered problems. The student answers one question at a time and has only one attempt at answering.
Open page
Lets the student review and modify answers to problems multiple times, until the quiz or test is officially exited.
NOTE: This is the SOS default. Unless you change the option, all quizzes and tests are presented
to this student in this subject in Open Page format.
Open book
Allows a student to exit and re-enter a quiz or test as many times as he/she wants until deciding to officially exit.
Leave skipped problem message
Allows a student to skip problems in lessons after providing reasons to skip.
Access answer key
Allows a student to see correct answers to completed and graded problems.
Easy spelling
If Easy spelling is checked, all words less that 7 characters long are spell checked instead of marking the entire answer as
incorrect if it includes a misspelled word. (All words 7 or more characters are automatically spell checked. If Easy spelling is
checked, words less than 7 characters are also spell checked.)
Spelling penalty
Gives students partial credit for correct answers if there are misspelled words (as opposed to counting the entire answer
incorrect if it includes a misspelled word). This is true for all words regardless of length. To require exact spelling in all student
answers, set the Spelling penalty to 100%.
NOTE: Percentages you set here may not always apply. In some units, such as in Language Arts,
the curriculum requires exact spelling and punctuation.
Save
Saves any changes you make to the student’s subject.
Use default
Returns all the options on the student’s subject screens to student level settings, the settings most recommended for general
use. Even if you change and save certain options on this screen, you can always come back to click this button and be returned
to options you selected in Student Setup. NOTE: This button resets not only the subject’s Quiz and Test Settings (displayed in the
screenshot) but also the subject’s Assignment Settings and Grade Settings as well.
This does NOT affect changes to the Home Page Settings.
Cancel
Cancels any changes not yet saved.
28
SOS 2012 Teacher Lesson Book Functions
Editing a Subject - Grade Settings
SOS allows you to customize learning for your students and set options for your entire school, for individual students, or
even for specific subjects that individual students are taking. The subject level is the most specific level where you can set
options. It allows you not only to meet the learning needs of an individual student but also to address each student’s needs
within a specific subject.
You can edit a subject in SOS according to:
Curriculum—affects the units or assignments in a specific subject
Assignment Settings—affects how information is presented in a specific subject
Quiz and Test Settings—affects how quizzes and tests are presented in a specific subject
Grade Settings—affects how a student is graded in a specific subject
To edit a subject’s grade settings for a student:
Step 1: On your Home Page, click Lesson Book-Assignments. Your Lesson Book opens.
Step 2: Use the Select Student drop-down menu to select the student whose subjects you want to edit.
Step 3: Use the term drop-down menu (beneath the words “Student Schoolwork”) to select the term in which you
assigned the student’s subject.
Step 4: In the Student Schoolwork section, click to highlight any subject you want to edit. The Edit button in the
lower left-hand corner is enabled, so you can click it.
Step 5: Click the circle beside Grade Settings in the Student Setup Subject Sections. This enables you to edit the
subject but places a special emphasis on the options you can set for its grading.
Step 6: Use any of the buttons and features on the Grade Settings screen to make changes to your subject.
Step 7: When you’re finished editing your subject, make sure everything is saved and return to the previous screen. All
your changes are applied.
29
SOS 2012 Teacher Lesson Book Functions
Student Subject Setup Sections
Tells you which settings screen you are currently able to set different options for in the subject selected. Grading scale
Lets you customize how you want the subject’s scores to be calculated. Enter a percentage for each letter grade.
Assignment weighting
Allows you to decide how different assignment types affect a student’s subject grade. The percentage you give to lessons,
projects, quizzes, and tests in this subject should add up to 100%.
Grade display options
Lets you decide how you want a student’s subject grade to be displayed on the screen and printed in reports.
Save
Saves any changes you make to the student’s subject.
Use default
Returns all the options on the student’s subject screens to SOS’s student default settings. Even if you change and save certain
options on this screen, you can always come back to click this button and be returned to options you selected in Student
Setup. NOTE: This button resets not only the subject’s Grade Settings (displayed in the screenshot)
but also the subject’s Assignment Settings and Quiz/Test Settings as well. This does
NOT affect changes to the Home Page Settings.
Cancel
Cancels any changes not yet saved.
Remember: To edit assignment, quiz and test, grade or term settings at the school or student
level, use the administrative functions in the Administration widget from your
Home Page. You can find instructions either in the electronic Help file or the
Teacher Administration Functions User Guide.
30