1
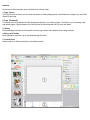
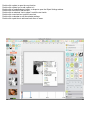
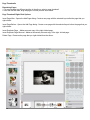
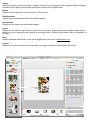
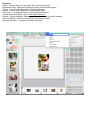
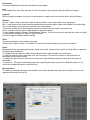
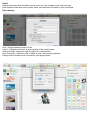
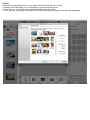
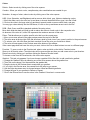
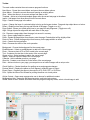
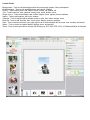
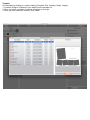
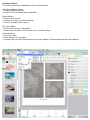
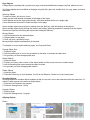
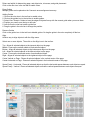
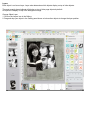
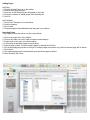
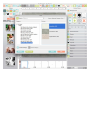
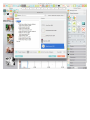
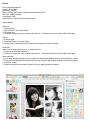
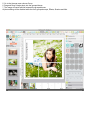
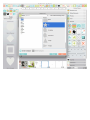
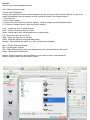
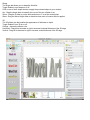
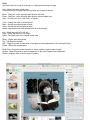
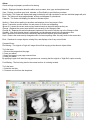
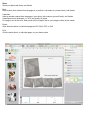
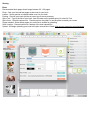
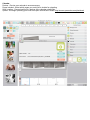
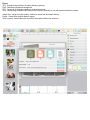
My Memories Suite 5 User Guide
My Memories Suite is a fun and creative way to keep and share memories.
Use templates to quickly create beautiful pages, albums, and more. The easy to use design tools will help you build
entire albums effortlessly. Easily share your created pages with home printing, as JPG, PNG, PDF, or professionally
print photobooks and calendars.
Inspire your creativity with even more papers, embellishments, and templates from www.mymemories.com.
User Guide
This guide is separated into 4 sections:
1. Installation.
2. Interface.
3. Using.
4. Sharing.
Support
If you have questions that are not found in the user guide, or you experience any software issues please contact us.
Website: www.mymemories.com
Customer Service: http://www.mymemories.com/contact
Technical Support: http://www.mymemories.com/support/contact_us
E-mail: [email protected]
Copyright Information
My Memories Suite
Copyright © 2007-2013 StoryRock, Inc. and its licensors. All Rights Reserved. Unauthorized reproduction of the
software is a violation of applicable copyright laws.
Design Elements and Page Layouts
Copyright © 2007-2013 StoryRock, Inc. and its licensors. All Rights Reserved. Unauthorized reproduction is a violation
of applicable copyright laws. Content cannot be used in any form for commercial use without express written consent
from StoryRock.
The Sentry Spelling-Checker Engine
Copyright © 2000 Wintertree Software Inc.
Trademarks
The MyMemories Suite and StoryRock logos are trademarks of StoryRock, Inc.
Copyright © 2007-2013 StoryRock, Inc. All rights reserved. This document and the software that it describes are
furnished under license and may only be used in accordance with the terms of such license.
Installation
Downloading & Installing:
Updates
Important Album Information
Interface
Page Canvas
Right-Click Options
Double-Click Options
Page Thumbnails
Gallery
Preferences
Object Settings
Fast Fill
Colors
Using
New Album
Template
Design
Opening an Album
Page Objects
Grouping Objects
Aligning Objects
Adding Pages
Importing Pages
Backgrounds
Embellishments
Photos
Text
Shapes
Imprints
Word Art
Album
Share
Sharing
Book
Calendar
Export
Print
4 5 5 6 7 8 8 8 10 11 15 16 17 18 21 21 22 23 24 25 25 25 28 28 29 31 33 38 40 42 45 48 49 50 50 51 52 53 Installation
Computer System Requirements
Prior to installing MyMemories Suite 5, ensure that your computer meets the following technical specifications:
Windows:
• Windows® XP, Windows Vista®, Windows® 7, Windows® 8
• Pentium® IV 2 GHz or better or comparable AMD processor
• 2 GB RAM
• 64 MB Video RAM
• DVD-ROM drive
• Available Hard Disk Space: 10 GB
Macintosh:
• OS X 10.6.8 or later (with the latest JavaTM updates)
• Intel® Core™ 2 Duo 2 GHz or better processor
• 2 GB RAM
• 64 MB Video RAM
• DVD-ROM drive
• Available Hard Disk Space: 10 GB
System Settings
• Monitor Resolution: 1152 x 864 or higher
Other Recommendations
• Broadband Internet
• Digital Camera
• Printer
• Scanner
Downloading & Installing:
1. Login to your account at www.mymemories.com
2. Go to My Downloads. http://www.mymemories.com/my_accounts/downloads
3. Click on the download link for My Memories Suite Version 5.
4. Download will begin, please be patient while it downloads.
1. If you are using Safari or Google Chrome, it will download automatically once clicked.
2. If you are using Internet Explorer or FireFox, you may be prompted to Save or Open, choose Save.
5. After download completes the installer will be in your Downloads folder. (unless another location was chosen.)
6. Go to your Downloads folder. (HD or C: /Users/<Current User>/Downloads)
7. Double-click on the MMS_5 installer.
8. You may be prompted to install Java if you currently do not have it installed, click Install.
9. You will be prompted to open or run the downloaded application, click Open or Run.
10. If prompted, Enter your computer password, click OK. or if prompted with UAC selected Yes.
11. Select Recommended, then click Next.
12. Accept the agreement, then click Next.
13. Enter your Name, Zip, and Product Key, then click Next.
14. During install it will bring up www.mymemories.com to register your software online.
1. If you do not have an account, fill out the Create New Account fields, then click Register.
2. If you have an account, enter your Email & Password, then click Login.
3. When done registering, close the Web Browser to return to the installer.
15. When installation completes, click Finish.
Install Disc:
1. Insert the My Memories Suite installation disc into your DVD drive.
2. The disc should open automatically. If it does not, double-click on the disc icon.
3. Double-click on the My Memories Suite Installer icon.
4. You may be prompted to install Java if you currently do not have it installed, click Install.
5. You will be prompted to open or run the application, click Open or Run.
6. If prompted, Enter your computer password, click OK. or if prompted with UAC selected Yes.
7. Select Recommended, then click Next.
8. Accept the agreement, then click Next.
9. Enter your Name, Zip, and Product Key, then click Next.
10. During install it will bring up www.mymemories.com to register your software online.
1. If you do not have an account, fill out the Create New Account fields, then click Register.
2. If you have an account, enter your Email & Password, then click Login.
3. When done registering, close the Web Browser to return to the installer.
11. When installation completes, click Finish.
Updates
Occasional updates include enhanced features & fixes. We recommend installing any updates as they become
available.
To update My Memories.
1. Open My Memories.
2. Select the Help menu.
3. Click Check for Updates.
Important Album Information
Avoid problems with created albums.
Do Not Delete Album Files.
Keep all album related files on your hard drive.
Exit the Software.
Always exit the software before turning off your computer to avoid corruption.
Adequate Hard Drive Space.
Albums require large amounts of space. Ensure you have a minimum of 10GB available disk space. If you run out of
space while you are building your album, you may lose some of your work.
Backup Your Albums.
To avoid losing your work, we recommend backing up your albums to an external drive. (File / Save As)
Check Album.
Check your album for errors and spelling prior to sharing.
Trim Area. 1/4”
Prevent any images from being trimmed or cut when professionally printed, by keeping images out of the Trim Area.
Interface
My Memories Suite interface can be divided into five basic areas.
1. Page Canvas
The Page Canvas is where you will create the album by adding backgrounds, embellishments, images, text, and other
objects to the page.
2. Page Thumbnails
The bottom area of My Memories Suite displays thumbnails of your album pages. And allows you to rearrange, add,
and delete pages. Page changes will not be reflected in the thumbnails until you save the album.
3. Gallery
Easily add page elements from this panel onto the page canvas with a double-click or drag and drop.
4. Menus and Toolbar
Most application functions can be accessed through this area.
5. Control Panel
Add and edit your album elements by using these panels.
Page Canvas
Add backgrounds, embellishments, images, text, and other objects to create your pages.
Right-Click Options
Right-clicking on an empty page canvas brings up paste options.
Right-click on an object to bring up the following options:
Bring to Front - Places the object on top of all other objects.
Send to Back - Places the object behind all other objects.
Bring Forward - Moves the object up one layer.
Send Backward - Pushes the object back one layer.
Align - Provides the following options for aligning objects with each other or the page:
Top - Aligns all selected objects to the topmost object on the page.
Middle - Lines up the vertical middle of each selected object.
Bottom - Aligns all selected objects to the bottommost object on the page.
Left - Aligns all selected objects to the leftmost object on the page.
Center - Lines up the horizontal center of each selected object.
Right - Aligns all selected objects to the rightmost object on the page.
Center Vertically - Places all selected objects in the vertical center of the page.
Center Horizontally - Places all selected objects in the horizontal center of the page.
Space Evenly - Horizontal - Places all selected objects so that the horizontal spaces between each object are equal.
Space Evenly - Vertical - Places all selected objects so that the vertical spaces between each object are equal.
Group - Fixes the position of objects in relation to one another so that they can be moved without changing their
position relative to each other.
Mirror Group - Mirrors all objects in the selected group horizontally
Flip Group - Flips all objects in the selected group vertically
Ungroup - Reverts grouped objects to individual objects.
Round Corners - Allows you to toggle each corner of the image to round or sharp.
Set Photo as Background - Sets the selected photo as the page background.
Rip Photo Edges - Randomly rips one or more edges of the selected photo.
Attach to Shape - Select a text box and a shape, then right-click and select the Attach to Shape option. Text will fill the
shape, as if it were a shaped text box.
Detach from Shape - Removes the text from an attached “text to shape” object.
Hi-Res Preview - Shows a print quality preview of the photo, embellishment, or imprint selected.
Cut - Removes a page object from the page, but saves it in memory.
Copy - Saves a page object in memory.
Paste - Pastes the page object from memory onto the page. Pasted object will be slightly offset.
Object Info - Displays object size, and info. Also lets you adjust the size.
Delete - Removes object from the page.
Lock Object - Locks the object so that it cannot be edited or changed.
Unlock Page Object - If you right-click on a locked object you can unlock it to edit it.
Span Pages - If you have page spreads enabled, use this feature to allow the image to continue between pages.
Rather than being cut when it reaches the edge of the canvas.
Double-Click Options
Double-click a photo to open the crop function.
Double-click a photo box to add a photo to it.
Double-click an embellishment, imprint, or shape to open the Object Settings window.
Double-click a text box to edit the text.
Double-click an attached “text to shape” to edit the text inside.
Double-click a word art box to edit the word art.
Double-click a calendar to edit the calendar settings.
Double-click a paint box to add new brush lines or erase.
Page Thumbnails
Reordering Pages
1. To move a page to a different position in the album, select a page thumbnail.
2. With the left-click held, drag the page to its new position and release.
Page Thumbnail Right-Click Options
Insert Page After - Opens the Add Page dialog. Create a new page with the selected layout after the page that you
right-clicked.
Insert Page Before - Opens the Add Page dialog. Create a new page with the selected layout before the page that you
right-clicked.
Insert Duplicate Page - Makes an exact copy of the right-clicked page.
Insert Duplicate Page Mirrored - Makes a horizontally mirrored copy of the right- clicked page.
Delete Page - Removes the page that you right-clicked from the album.
Gallery
Displays all images in the current folder or category. Select an icon to change what list is displayed. Easily add page
elements from the gallery onto the page canvas with a double-click or drag and drop.
Photos
Displays a list of images from a selected folder, or iPhoto event.
Embellishments
Displays a list of embellishments from the selected category.
Backgrounds
Displays a list of papers from the selected category.
Layers
Displays a list in order from top to bottom of the items on your page. Simply drag and drop an object below or above
another in the list to change the layer position on your page canvas. Double-click an image in the list to highlight it on
the page.
Store
Displays templates and kits that you can add to MyMemories Suite from the MyMemories.com.
Layouts
Displays a list of photo layouts that you may add to your page, or change the current photo layout with.
Menus
My Memories Suite (Mac Only)
About My Memories Suite - Copyright and version information.
Preferences - Change default program settings.
Services - Services for Operating System.
Hide My Memories Suite - Hides the MyMemories Suite Program from view.
Hide Others - Hides all other open window applications from view.
Quit My Memories Suite - Quits MyMemories Suite.
File Menu
New Album - Closes the current album and opens the new album options.
Open Album - Closes the current album and opening an existing album.
Recent Albums - Displays a list of recently opened albums. Click on an album name to open it.
Find Albums - Choose a folder to search for albums.
Close Album - Closes the current album.
Save - Writes the album in its current settings and state to disk.
Save As - Writes the album in its current state to disk in a custom location with a new name.
Save Photo Layout - Uses the photo and text boxes on the page to create a new layout, which can be used later.
Print Setup - Opens the standard print setup window.
Print - Opens a print window for printing the album or individual pages.
Exit - Quits MyMemories Suite. (Windows only)
Edit Menu
Undo - Cancels the last operation.
Redo - Reverses the effect of the undo operation.
Cut - Removes a page object from the page, but saves it in memory.
Copy - Saves a page object in memory.
Paste - Pastes the page object from memory onto the page. Pasted object will be slightly offset.
Paste in Place - Places the page object from memory on the page without an offset.
Text Options - Updates case on selected text boxes (UPPER, lower, Title, Sentence).
Set all Text Fonts - Change every text box in an album to a specified font.
Find and Replace - Search and replace specific words.
Delete Object - Removes the selected object from the page.
Delete Page - Removes the currently selected page from the album.
Preferences - Change default program settings. (Windows only)
Arrange Menu
Order - Adjusts the layer order of objects on the current album page.
Align - Brings objects into alignment with each other or the page.
Group - Fixes the position of objects in relation to one another.
Ungroup - Returns a group of objects to individual objects.
Select All - Selects all objects on the current page.
Select All Embellishments - Selects all embellishments on the page.
Select All Photos - Selects all photos on the page.
Lock Object - Object cannot be changed or deleted.
Unlock All Page Objects - Enables changes to all objects on a page.
Object Info - Displays object size, and info. Also lets you adjust the size.
Lock Page - Page cannot be changed or deleted.
Insert Menu
Page - Creates a new page in the album.
Template - Add a set of selected template pages after the current last page to the album.
Import - Add pages from other albums into the current album.
FastFill- Add a group of photos to the current album which will fill any empty photo boxes automatically.
Duplicate Page - Makes an exact copy of the current page.
Duplicate Page Mirrored - Makes a horizontally mirrored copy of the current page.
Global Search & Add - Search all content within the program using key words, select a found image to add.
Background - Choose the background for the current page.
Embellishment - Select an embellishment to add to the current page.
Photo - Choose a photo JPG or PNG to add to the current page.
Text - Creates a new text box in the center of the current page.
Word Art - Creates a new Word Art in the center of the current page.
Shape or Line - Select a shape to add to the current page.
Imprint - Select an imprint to add to the current page.
Online Content - Opens www.mymemories.com to browse for additional content.
View Menu
Rulers - Displays rulers along the top and left side of the page.
Page Guides - Allows you to add guide lines to your page for easy alignment.
Snap To Guides - Aligns the edges of objects to the guides when they are moved.
Clear Guides - Removes all added guides from the page.
Page Spreads - Displays two pages side by side for easier editing and overlap.
Trim Area - Displays a darkened grey area around the page that may be cut when printed professionally.
Canvas Zoom - Opens a drop-down menu allowing you to zoom in or out on the canvas.
Previous Page - Selects the previous page in the album for editing.
Next Page - Selects the next page in the album for editing.
Show Position - Displays the position of the mouse pointer in the top left corner of the canvas.
Hide/Show Toolbar - Hides or displays the tool bar across the top of the interface.
Hide/Show Resource Gallery - Hides or displays the Gallery on the left of the interface.
Album Menu
Preview Album - Displays the album as it will appear in different types of output.
Change Size - Change the album from its current album size (width & height) (Landscape, Portrait, or Square).
Check Spelling - Checks the album for spelling errors and suggests changes.
Check Page for Errors - Checks for problems on the current page and displays a printable list of results.
Check Album for Errors - Checks for problems in the album and displays a printable list of results.
Details - Change the author, date, and check current album details.
Rename Album - Change the current name of the album.
Delete an Album - Allows you to select an album to delete permanently.
Project Supply List - Displays a printable list of all objects used in the album, and each objects original location.
Share Menu
Export Pages - Prepares the album to be output to JPG, PNG, PDF, or SVG files.
Print - Opens the Album Print Wizard for printing the album on a local printer.
Photo Album - Prepares the album to be made into a professionally printed Photo book.
Calendar - Prepares the album to be made into a professionally printed Calendar.
Help Menu
Search - Quickly search the User Guide for key word related topics.
MyMemories Help - Opens the My Memories topics, and index help system.
Tutorial - Links to the My Memories YouTube tutorials page.
Support - Links to the My Memories Contact Support Page.
User Guide - A Printable document for using My Memories Suite.
Visit My Memories Website - Opens www.mymemories.com.
Register - Opens registration window so you can register your trial version software.
Check for updates - Check for and install the latest version update.
About My Memories - Copyright and version information.
Preferences
Customize MyMemories Suite and set defaults for the program.
Font
Set the default font, size, style, and color for text in the album. New text boxes will start with these settings.
Captions
With auto captions enabled, every time you add a photo to a page a text box below the photo with the filename.
Shadow
Opacity - Higher values on the slider make the shadow darker, lower values make it more transparent.
Blur - Lower values for the slider make the shadow darker around the edges, higher values lighten the shadow edge.
Click on the Shadow Color square to adjust the color of the shadow.
To move the shadow left-click and drag the shadow in the preview on the right, or use arrow keys.
Select or deselect the check box to Add shadows to photos by default.
To apply shadow settings to Photos, Embellishments, Shapes, Text, and Imprints click the check box, then click Apply.
To reset shadow settings, click Reset to System Default.
Click OK to apply the default shadow settings.
Ruler
Choose the settings for rulers and the page grid.
Display Ruler in pixels, inches, or millimeters. This will be the default display unit for rulers in all albums.
Photo
MyMemories Suite uses caching technology, which stores small versions of your photos in a local folder, to speed up
the displaying of thumbnails.
To change where the cache is located, click the Browse button, select a folder, then click Select.
To clear the contents of the cache folder, click the Clear button. This will free up space on the hard drive, but
thumbnails will take longer to load.
To disable the cache, clear the check next to Use Cache. Note: disabling caching will slow down the display of
thumbnails.
Crop After Fill - This option automatically opens the crop dialog box when a photo box is filled with a photo. If you
would like to disable this option, uncheck the box.
Message Reset
To enable any messages that have been disabled (such as the pixilation warning), clear the checkbox next to the
appropriate warning, and click OK.
Details
Displays information about the album such as name, size, type, templates used, and cover type.
Enter additional information such as author, dates, and notes about the album by filling in the fields.
Object Settings
Units - Change between Inches or Pixels.
X and Y- Change the horizontal & vertical position of the selected object.
Width and Height- Change the width & height of the selected object.
Keep Proportions - Adjusts the width or height to keep it from becoming distorted.
Displays object information such as resolution, and original location.
Fast Fill
Quickly fill any empty photo boxes in your album with photos selected from a folder.
1. Browse to an image folder on your computer by using the drop down menu.
2. Click Select all, or hold shift and select multiple images from your folder.
3. Once you have your photos selected click ok. Photos will be placed on pages in the order that they appear.
Colors
Palette - Select a color by clicking one of the color squares.
Combos - When you select a color, complimentary color combinations are created for you.
Swatches - A range of colors, select a color by clicking one of the color squares.
HSB - (Hue, Saturation, and Brightness) add or remove white, black, gray, lighten or darkening a color.
1. Move the slider next to the color bar up and down to choose the desired hue or type it into the H field.
2. Click on the circle in the large color box and drag it around to add or remove white, black, and gray.
You may type values directly into the HSB boxes, or click on the up and down arrows next to the box.
RGB - (Red, Green, and Blue) standard method of choosing colors.
Move each slider bar back and forth to add or reduce the amount of each color in the composite color.
An absence of the color is 0, while 255 represents the maximum amount of that color.
Picker- This tab allows you to pick a specific color that is on the current page.
1. Move your mouse around in the page preview area at the top left of the tab.
2. The zoom area at the top right of the tab will show a pixel by pixel view of your cursor’s position in the preview area.
3. To select a color, left-click when the black crosshair is over the color you would like to select.
4. The color will now appear in the Preview area at the bottom of the window.
If the current page does not have the color you want, click on the Prev or Next buttons to move to a different page.
Favorites - To save a color to the Favorites tab, select a color and click on the Add to Favorites button.
Store up to 40 favorite colors. The oldest color will be removed the next time you add a new color to your favorites.
Remove a color by clicking on it and then clicking the Remove Favorite button.
To choose a color from the Favorites tab, click on the color square.
Gradient - This tab, only appears if you have chosen a gradient fill for Word Art, to add a multicolor gradient.
1. Change the Gradient Colors by selecting one of the color squares above the gradient bar.
2. Then click on the larger Color square below the gradient bar.
3. Drag the circles in the Preview area to manipulate your gradient.
4. If you click in the Preview area, the nearest circle will jump to your mouse.
5. Use the Style drop-down menu to choose between Linear and Radial gradients.
6. Change the type of your gradient to Reflect or Repeat.
7. Click in the Reverse box to use the colors in the Gradient Colors bar in reverse order.
Toolbar
The main toolbar contains the most common program functions.
New Album - Closes the current album and opens the new album options.
Open Album - Closes the current album and opening an existing album.
Save - Writes the album in its current settings and state to disk.
Template - Add a set of selected template pages after the current last page to the album.
Import - Add pages from other albums into the current album.
Page - Creates a new page in the album.
Layers - Change the layer of a selected object or bring up the layers window. Drag and drop object above or below.
Rulers - Displays rulers along the top and left side of the page. (Toggle on or off.)
Page Guides - Allows you to add guide lines to your page for easy alignment. (Toggle on or off.)
Align - Brings objects into alignment with each other or the page.
Cut - Removes a page object from the page, but saves it in memory.
Copy - Saves a page object in memory.
Paste - Pastes the page object from memory onto the page. Pasted object will be slightly offset.
Paste in Place - Places the page object from memory on the page without an offset.
Undo - Cancels the last operation.
Redo - Reverses the effect of the undo operation.
Background - Choose the background for the current page.
Embellishment - Select an embellishment to add to the current page.
Photo - Choose a photo JPG or PNG to add to the current page.
Text - Creates a new text box in the center of the current page.
Shape or Line - Select a shape to add to the current page.
Imprint - Select an imprint to add to the current page.
Calendar - Add a calendar month to your page.
Word Art - Creates a new Word Art in the center of the current page.
Paint - Add a color box to your page, you can paint over or behind images with a unique color.
Check Spelling - Checks the album for spelling errors and suggests changes.
Preview Album - Displays the album as it will appear in different types of output.
Export Pages - Prepares the album to be output to JPG, PNG, PDF, or SVG files.
Print - Opens the Album Print Wizard for printing the album on a local printer.
Online Content - Opens www.mymemories.com to browse for additional content.
MyMemories Help - Opens the My Memories topics, and index help system.
Global Search & Add - Search all content within the program using key words, select a found image to add.
Control Panels
Backgrounds - Tools to edit the background for the current page, papers, colors, transparent.
Embellishments - Tools to edit embellishments, add, recolor, shadow.
Photos - Tools to edit a photo, add, shape, recolor, effects, rip, shadow, tile.
Text - Tools to edit text, titles, captions, casing, fonts, styles, shapes, curve.
Shape or Line - Tools to edit shapes, add, custom shapes, colors, papers, photos, shadows.
Imprint - Tools to edit imprints, add, color, shadow.
Calendar - Tools to add and edit a calendar month or year, lines, days, months, colors.
Word Art - Tools to add Word Art, titles, fonts, styles, shapes, textures, gradients.
Paint - Tools to add a color box to your page, paint over or behind images with a unique color, brushes, and eraser.
Album - Tools to check your album details, spelling, errors, and preview.
Share - Tools to share your album at home with Printing, as JPG, PNG, PDF, SVG, or Professional Book & Calendar.
Using
When you first start My Memories it will bring you to the New Album Options.
New Album
There are three options when creating a new album. Click on one of the options to continue.
Template - Creates an album from professionally designed layouts.
Design - Gives you complete control over all design decisions one element at a time.
Open - Allows you to open an existing My Memories Suite album.
Template
Sort templates by clicking on a column heading (Template, Size, Category, Pages, Images).
1. Choose a Designer Template for your album from the template list.
2. When you select a template. A preview will appear on the right.
3. Once you have made your selection, click Create.
Design
Select from Professional Print Sizes, Quick Sizes, or Custom.
Professional Print Sizes
Create single or multiple pages of that size. You may also upload it to be printed professionally.
Quick Sizes
Create single or multiple pages of that size. These are not available for professional printing. However, you can print
them at home, export them as JPG, PNG, or PDF which can be printed elsewhere.
Custom
Use the drop downs to create a custom size. When the size is entered click create.
Opening an Album
To return to a previously created album, do one of the following:
New Album Options, Recent
1. Reopen MyMemories Suite.
2. Click on one of the Recent album thumbnails.
Recent Albums
1. Click on the File menu.
2. Position your cursor over Recent Albums.
3. Click on an album name to open it.
File / Open Album
1. Click on the File menu / Open Album.
2. Double-click your album, or click select it, then click Open Album.
Saving an Album
1. Go to File / Save.
2. Enter the name for your album.
3. Choose where you would like the album to be saved. (default is Documents/My Memories Suite Albums)
Page Objects
A Page Object is anything that you place on a page, such as embellishments, shapes, imprints, photos, text, etc.
All of these objects can be modified on the page using left-click, right-click, double-click, cut, copy, paste, and move
operations.
Selecting Objects
To select an object, left-click on it once.
A light gray box with handles will appear at the edges of the object.
Corner handles resize the object proportionally, while side handles stretch out a single edge.
Corner handles are also used to rotate the object on the page.
Select multiple objects one at a time by holding down the Shift key, while left-clicking on the objects.
Select multiple objects by left-clicking the canvas, and holding, then drag a selection rectangle over the objects.
Deselect an object by left-clicking the object while holding the Shift key.
Moving Objects
1. Left-click and hold on the selected object.
2. Drag anywhere on the page.
3. Once you have it positioned, let go.
Moving multiple objects simultaneously is the same.
To duplicate, or move objects between pages, use Copy and Paste.
Change Object Size.
1. Select an object.
2. Left-click and drag in or out on corner handles to decrease, or increase the object size.
3. Let go when you have the appropriate size.
Rotate Objects.
1. Select an object.
2. Position your cursor near a corner of the object handle until the cursor turns into a rotation arrow.
3. Left-click and drag the mouse around the object to rotate.
4. Let go when you have the appropriate rotation.
Delete Objects
1. Select an object.
2. Press the Delete key on your keyboard. Or click on the Remove / Delete icon in the control panel.
Grouping Objects
Grouping objects will combine objects together so that you can size, move, and rotate them all at the same time. To
resize or rotate a group is the same as single objects.
1. Select all of the objects to be grouped.
2. Select the Arrange menu / Group.
Ungroup Objects
1. Select a group
2. Select the Arrange menu / Ungroup.
Aligning Objects
Rulers
Rulers are helpful for determining page, and object size, trim areas, and guide placement.
Click on the ruler icon in the tool bar to enable rulers.
Page Guides
Multiple guides can be placed on the Canvas to ensure alignment accuracy.
Adding Guides
1. Click on the ruler icon in the tool bar to enable rulers.
2. Click on the guides icon in the tool bar to enable guides.
3. Select View / Snap to Guides to have the edges of objects line up with the nearest guide when you move them.
4. Position your cursor over the top or left ruler.
5. Left-click on the ruler bar to add a guide line.
6. Drag the guide in the ruler bar to change the position.
Remove Guides
Click on the guides icon in the tool bar to disable guides. Or drag the guide in the ruler completely off the bar.
Align
Another way to align objects is with the Align menu.
Select one or more objects. Then click on the Align icon in the tool bar.
Top - Aligns all selected objects to the topmost object on the page.
Middle - Lines up the vertical middle of each selected object.
Bottom - Aligns all selected objects to the bottommost object on the page.
Left - Aligns all selected objects to the leftmost object on the page.
Center - Lines up the horizontal center of each selected object.
Right - Aligns all selected objects to the rightmost object on the page.
Center Vertical on Page - Places all selected objects in the vertical center of the page.
Center Horizontal on Page - Places all selected objects in the horizontal center of the page.
Space Evenly - Horizontal - Places all selected objects so that the horizontal spaces between each object are equal.
Space Evenly - Vertical - Places all selected objects so that the vertical spaces between each object are equal.
Layers
Each object is on its own layer. Layer order determines which objects display on top of other objects.
The most recently placed objects will display on top of older page objects by default.
All objects will display on top of the background image.
Change Object Layer
1. Click on the Layers icon in the Gallery.
2. Drag and drop your object in the Gallery panel above or below other objects to change the layer position.
Adding Pages
Add Page
1. Click on the Add Page icon in the toolbar.
2. Select a blank page or layout.
3. A preview of the selected layout will appear on the right.
4. Choose the number of added pages in the Quantity box.
5. Click Ok.
Add Template
1. Click on the Template icon in the toolbar.
2. Select a template.
3. Click Create.
4. Template pages will be added after the last page in your album.
Importing Pages
Copy pages from another album into the current album.
1. Click on the import icon in the toolbar.
2. Click on the folder icon on the right to browse created albums.
3. Double-click on the name of a created album.
4. It will display all available pages from that album.
5. Select a page number. Or select multiple pages by holding the Shift key.
6. The selected page will preview to the right. If multiple pages are selected, only the first selected page will be shown.
7. Click Import.
8. The imported pages will be inserted after your last album page by default.
9. When finished, click Close.
Control Panels
Backgrounds
Background papers serve as the bottom layer of a page. Albums start with a transparent background. If you add
objects to your page and Export as PNG it will stay transparent. If you export as JPG, or PDF it will default to a white
background.
Adding Background Papers
1. Select a page.
2. Open Backgrounds in the Control Panel.
3. Click Add icon.
4. Choose a paper from the dialog and click ok.
Add Background as Photo Object
1. Select a page.
2. Open Backgrounds in the Control Panel.
3. Click Add icon.
4. Select a paper.
5. Click the Add as Photo object.
6. The paper will be added as photo.
Custom Backgrounds
1. Select a page.
2. Open Backgrounds in the Control Panel.
3. Click Add icon.
4. in the dialog click on Browse.
5. Select any image that is saved on your computer, then click open.
Custom Background Categories
Arrange your papers into custom created categories, so they are easy to find for specific albums or custom use. A
copy of the paper will be added to the new category and the original will remain in the original category.
1. Click Add icon.
2. Click Create Category.
3. Drag and drop any papers into the new category. Category papers are sorted by date added.
4. To remove a category select it, then click Delete Category.
Color Background
1. Select a page.
2. Open Backgrounds in the Control Panel.
3. Quickly add a White or Black background to you page by clicking the icons.
4. For a specific color Click on the Color icon.
5. Use the color palette to pick a color, then click ok.
Mirror - Flip the background horizontally.
Flip - Flip icon to flip the background vertically.
Apply - Apply the background from the current page to all other pages in the project.
Remove - Delete the selected background. The page will return to its original transparent background.
Opacity - Drag the slider to the left to make a background more transparent or to the right to make it less transparent.
Embellishments
Embellishments are graphic objects that act as decoration on a page. They can be added from the control panel,
gallery or insert menu.
Adding Embellishments
1. Select a page.
2. Open Embellishments in the Control Panel.
3. Click Add icon.
4. Choose an embellishment from the dialog and click Add.
Custom Embellishments
1. Select a page.
2. Open Embellishments in the Control Panel.
3. Click Add icon.
4. in the dialog click on Browse.
5. Select any image that is saved on your computer, then click open.
Custom Embellishment Categories
Arrange your embellishments into custom created categories, so they are easy to find for specific albums. A copy of
the embellishment will be added to the new category and the original will remain in the original category.
1. Click Add icon.
2. Click Create Category.
3. Drag and drop any embellishments into the new category. Category embellishments are sorted by date added.
4. To remove a category select it, then click Delete Category.
Recolor
1. Select an embellishment
2. Click on the Recolor icon.
3. Select a color from the palette, click ok.
Left - Rotate the embellishment 90° to the left.
Right - Rotate the embellishment 90° to the right.
Reset - Return the embellishment to a default state.
Shadow - Add a shadow to an embellishment or to edit an embellishment’s existing shadow.
Mirror - Flip the embellishment horizontally.
Flip - Flip the embellishment vertically.
Edit - Change the size and location of the embellishment. Also displays image information.
Remove - Delete the currently selected embellishment.
Rotate - Drag the slider to set the angle of rotation.
Opacity - Drag the slider to the left to increase transparency, to the right less transparent.
Photos
Photo Recommendations
Format: JPG or PNG.
Resolution: 300DPI
Ratio: 1600 by 1200 pixels or larger recommended for print.
File Size: 10MB or smaller.
Color Mode: RGB
Save the file in PNG to preserve transparency.
Adding photos
Add icon
1. Select a page.
2. Open Photos in the Control Panel.
3. Click Add icon.
4. Choose an image from your computer and click ok. It will place the photo in the middle of the page.
Gallery
1. Select a page.
2. Select the Photo icon in the Gallery
3. Double-click or drag and drop an image from the gallery list onto your page.
Photo Box
Add or use an empty photo box on your page canvas.
1. Double-click the empty photo box.
2. Choose an image from your computer and click ok. It will place the photo in the middle of the page.
Drag-and-Drop
You can drag and drop images onto your page from outside the software such as your desktop or a folder.
1. Reduce the My Memories window size so you can view both the program and your photo source folder.
2. Select the image.
3. Drag the image from the source location onto your page canvas and release.
Shadow - Add a shadow to a Photo or to edit an existing photo shadow.
Recolor
1. Select a photo.
2. Click on the Recolor icon.
3. Select a color from the palette, click ok.
Effects
Black & White - Transforms a color photo into a black and white photo.
Sepia - Applies a brown and white coloration to the photo like early 20th century photographs.
Blue - Applies blue coloration to the photo.
Red - Applies red coloration to the photo.
Brighten - Moves the balance of light and dark shades in the photo more toward the light shades.
Darken - Moves the balance of light and dark shades in the photo more toward the dark shades.
Mirror - Flip the image horizontally.
Flip - Flip the image vertically.
Blur - Softens the focus, reducing the definition of the photo.
Sharpen - Increases the focus, or definition, of the photo.
Negative - Reverses the colors in a photo, as if viewing a film/photo negative.
Gamma Correction - Changes the brightness values of the gray tones.
Emboss - look like foil has been placed over the photo, sculpted to the photo’s contours, and then colorized.
Sketch - Simulates a pencil drawing of the photo.
Impressionist Painting - Gives the photo an artistic, brushed look.
Fish Eye - Distorts photos to make the middle portion of the photo appear larger and the outer edges smaller.
Effect Amount - Drag to increase or decrease the amount of the selected effect.
Apply - Add the effect to the photo. You can add more effects after clicking Apply.
Box - Add a photo box to your page to create predetermined photo sizes, photo tiling, and shapes.
Shape - Change the Photo Shape
Rip
Apply a random rip to one or more edges of a photo.
Select the check box next to the side or sides that you want apply the ripped effect.
The preview will show you a basic rip pattern, not an exact preview.
To change the pattern, simply uncheck and recheck the box.
Each time you uncheck and recheck the box the random pattern will change.
Drag the slider to increase or decrease the rip effect.
Matte
Add a matte to a photo or edit an existing matte.
To remove matte, clear the check box next to Enable Matte.
Click Change to choose a color for the matte.
To add a matte with the same settings to all photos on the current page or album, select the Apply to all check boxes.
Click Remove to remove a matte from the selected photo, page, or album of photos.
In - Zoom in to increase the displayed photo area, while maintaining size.
Out - Zoom out to decrease the displayed photo area, while maintaining size.
Nudge
Quickly adjust the displayed position of a photo within the crop area.
Click on an arrow to nudge the photo in the direction of the arrow. Clicking on the corners of the icon will nudge the
photo diagonally.
Crop
Display only desired section of a photo.
Position your cursor crosshair in a desired starting area.
Left-click and hold while dragging to define a crop area.
Release left-click when you have the desired area selected.
The grayed areas will not be shown on the page. Your photo will be the same size as the crop area.
To move the selection Left-click and hold in the middle of the selection, then drag it to a new position on the photo.
To increase or decrease the crop area size drag the handle at the bottom right corner of the selection.
Clear Crop will display the entire photo.
Left - Rotate the photo 90° to the left.
Right - Rotate the photo 90° to the right.
Replace - Set a different photo in the place of a current photo.
Red
Remove red eye from an image.
Drag a selection area around the red eye.
Increase the slider to increase the remove red effect.
Round Shape Filter will limit red replacement to circular.
Click on the remove red eye button when ready.
Mirror - Flip the photo horizontally.
Flip - Flip the photo vertically.
Edit - Object Settings dialog, make exact adjustments to the size and location of the photo.
Delete - Delete the selected photo.
Opacity - Drag left to make it more transparent or to the right to make it less transparent.
Rotate - Drag the slider to set the angle of rotation.
Photo Tiling
Photo tiling allows you to fill multiple photo boxes with a single photo.
1. Open the Photos tab in the Control Panel.
2. Click on the Box icon to add a photo box.
3. Place and position as many boxes as you would like. Each box will be a “tile” for your photo.
4. Select all of the photo boxes by clicking on each box while holding shift.
5. Go to the Arrange menu choose Group.
6. Drag and Drop a single photo into the grouped boxes.
7. The image will center and tile between the grouped boxes.
All photo editing will be disabled while the tile is grouped except, Effects, Shadow and Mat.
Text
Add - Add text to your page.
Single-click a text box to edit the entire box settings using the control panel options.
Double-click to type in the text box
To edit a specific portion of the text, highlight it after double-clicking on the text box.
Note: If a text box has a red border, your text exceeds the size of the box. Expand the text box, or reduce text size.
Case - Updates case on selected text boxes (UPPER, lower, Title, Sentence).
Curve - Curve your text around or inside a square or a circle.
Set All - Change every text box in an album to a specified font.
Color - Change the color of selected text.
Black - Quickly set selected text to black.
White - Quickly set selected text to white.
Match - Match text color with selected color on a album page.
Left - Rotate the text 90° to the left.
Right - Rotate the text 90° to the right.
Shadow - Add a drop shadow to your text or to edit an existing drop shadow.
Mirror - Flip the text horizontally.
Flip - Flip the text vertically.
Edit - Enters into “type” or “edit” mode for the selected box, so you can type in the box.
Delete - Removes selected text box.
Font.
Loads a drop-down menu of fonts for selected box.
Click on the font you would like to apply to the entire text box.
To apply font to portion of the text, double-click on the text box and highlight desired text. Then select the font.
Bold, Underline, and Italic
Toggle the B (bold), U (underline), or I (italic) to apply the style.
To apply style to portion of the text, double-click on the text box and highlight desired text. Then select the style.
Horizontal Alignment
Click on an alignment icon to set Justify Left, Center, or Right.
Vertical Alignment
Click on an alignment icon to set Top, Center, or Bottom.
Size
Change how large the text characters are by choosing a number from the size drop-down list.
Line Spacing
Click the up or down arrows to change the space between the lines of text in the text box.
Tracking
Click the up or down arrows to change the space between the individual letters of text in the text box.
Opacity - Drag left to make it more transparent, or to the right to make it less transparent.
Rotate - Drag the slider to set the angle of rotation.
Shapes
Add - Add shapes to your page.
The follow shapes in the originals category have unique Edit options.
Line - Adjust the line thickness.
Picture Frame - Adjust the frame thickness.
Polygon - Adjust the number of sides.
Rounded Corners - Adjust the amount rounded to the corners.
Star - Adjust the number of points, & star depth.
Note: Originals category shapes will not export as SVG.
Custom Shape Categories
Arrange your shapes into custom created categories, so they are easy to find for specific albums. A copy of the shape
will be added to the new category and the original will remain in the original category.
1. Click Add icon.
2. Click Create Category.
3. Drag and drop any shape into the new category. Category shapes are sorted by date added.
4. To remove a category select it, then click Delete Category.
Shape Editor:
To create custom shapes, select a shape then click the Edit button.
Toggle the Show Anchors box to display or hide the handles of the shape.
Drag an anchor to increase or decrease the area of a shape and change its form.
Selecting a line (edge) enables the line segment options:
Delete Line removes the selected line and connects the nearest two anchor points.
Insert Point adds an anchor at the midpoint of the line (divides the line in two).
Insert Curve turns half of the selected line into a curve segment.
Change to Line will replace a selected curve with a straight line.
Change to Curve will replace a selected line with a curve segment.
Paper - Fill a shape with an installed background paper.
Photo - Fill a shape with a photo.
Matte - Click on this button to add a matte (a border or frame) to a shape.
Color - Change the color of selected shape.
Black - Quickly set selected shape to black.
White - Quickly set selected shape to white.
Match - Match shape color with selected color on a album page.
Left - Rotate the shape 90° to the left.
Right - Rotate the shape 90° to the right.
Change - Set a different shape in the place of a current shape.
Shadow - Add a shadow to a shape or to edit an existing shape shadow.
Mirror - Flip the shape horizontally.
Flip - Flip the shape vertically.
Edit - Object Settings dialog, make exact adjustments to the size and location of the shape.
Delete - Delete the selected shape.
Opacity - Drag left to make it more transparent, or to the right to make it less transparent.
Rotate - Drag the slider to set the angle of rotation.
Imprints
Imprints can be used as design elements.
Add - Add an imprint to a page.
Custom Imprint Categories
Arrange your imprints into custom created categories, so they are easy to find for specific albums. A copy of the
shape will be added to the new category and the original will remain in the original category.
1. Click Add icon.
2. Click Create Category.
3. Drag and drop any imprint into the new category. Category imprints are sorted by date added.
4. To remove a category select it, then click Delete Category.
Color - Change the color of selected imprint.
White - Quickly set selected imprint to white.
Match - Match imprint color with selected color on a album page.
Left - Rotate the imprint 90° to the left.
Right - Rotate the imprint 90° to the right.
Reset - Reset the imprint to the original added state.
Shadow - Add a shadow to a imprint or to edit an existing imprint shadow.
Mirror - Flip the imprint horizontally.
Flip - Flip the imprint vertically.
Edit - Object Settings dialog, make exact adjustments to the size and location of the imprint.
Delete - Delete the selected imprint.
Opacity - Drag left to make it more transparent, or to the right to make it less transparent.
Rotate - Drag the slider to set the angle of rotation.
Calendars
Display a month or year calendar grid on the current page.
Month - Add a calendar for a specific month.
Year - Add a calendar for the entire year.
Edit - Settings for the calendar header, lines, numbers, font, size, & style.
Delete - Remove selected calendar.
Month - Choose the month to display from the Month drop-down menu.
Year - Choose the year to display from the Year drop-down menu.
Header - Display the month, year, and day above the calendar grid.
Lines - Display the calendar grid lines.
Numbers - Display the calendar numbers in the calendar grid.
Calendar Settings
Header
Toggle the Month to display or hide the month name.
Toggle the Year to display or hide the year.
Toggle the Weekday Names to display or hide the weekday names.
Font - Choose a font from the drop-down.
Size - Change size from the drop down.
Bold, Underline - Toggle the B (bold), I (italic) to apply the style.
Change - Change text color.
Opacity - Drag left to make it more transparent or to the right to make it less transparent.
Line
Opacity - Drag left to make it more transparent or to the right to make it less transparent.
Thickness - Drag left to make thiner or right to make it thicker.
Change - Change line color.
Toggle - The Outline Header box to put a box around the header.
Numbers
Select an area in the Number Position box to choose where to display the day numbers.
Font - Choose a font from the drop-down.
Size - Change size from the drop down.
Bold, Underline - Toggle the B (bold), I (italic) to apply the style.
Change - Change text color.
Opacity - Drag left to make it more transparent, or to the right to make it less transparent.
Word Art
Add
Add a word art box to your page.
Type in the white text area to change the text in the word art box.
Font - Loads a drop-down menu of fonts for word art.
Size - Change size from the drop down.
Spacing - Click the up or down arrows to change the space between the lines.
Bold and Italic - Toggle the B (bold) or I (italic) to apply the selected formatting style.
Opacity - Drag left to make it more transparent or to the right to make it less transparent.
Rotate - Drag the slider to set the angle of rotation.
Fill
Change the color inside the Word Art.
Toggle Enable to turn the fill on and off.
Click on the drop-down to choose what type of fill to use.
Solid Color - Fill Word Art with one solid color. Click Change button to change the color.
Gradient Color - Fill your Word Art with a gradient. Click Change button to change the color.
Image - Choose an image of your own to fill the Word Art with.
Position - Change the postion, or Zoom in and Out on the image.
Texture - A drop-down menu of textures select a texture to apply it.
Opacity - Drag the slider to the left to make more transparent to the right to make less transparent.
Stroke
The Stroke tab allows you to add and edit a border around the outside of the Word Art.
Toggle Enable to turn the stroke on and off.
Solid Color - This will border your Word Art with one solid color.
Gradient Color - This will border your Word Art with a gradient.
Neon - This will add a neon effect to the stroke.
Glow - This will add a glow effect to the stroke.
Width - Drag the Width slider to make the stroke thicker or thinner.
Opacity - Drag the slider to the left to make more transparent to the right to make less transparent.
Shadow
The Shadow tab allows you to add and edit a shadow behind the Word Art.
Toggle Enable to turn the shadow on and off.
Move the shadow by changing the X and Y box values. Click on the up or down arrows
Blur - Drag the slider to make the shadow larger and more diffuse or smaller and darker.
Opacity - Drag the slider to the left to make more transparent to the right to make less transparent.
Bevel
The Bevel tab allows you to add and edit a bevel effect on the Word Art.
Toggle Enable Bevel checkbox to turn the bevel on and off.
Click on the Shape drop-down menu to change the type of bevel used.
Height - Drag the Height slider to make the bevel more or less pronounced.
Softness - Drag the Bevel Softness slider to make the shadow more or less transparent.
Shape
The Shape tab allows you to shape the Word Art.
Toggle Enable to turn shape on or off.
Click on one of the 8 shape choices to apply the previewed shape to your word art.
Arc - Drag the Angle slider to intensify the curve of the arc or flatten it out.
Shear - Drag the X slider to set the horizontal slant or Y to set the vertical slant.
Wave - Drag the Wave Height slider to determine how much of a wave effect is applied.
3D
The 3D effects give the headline the appearance of thickness or depth.
Toggle Enable to turn 3D on or off.
Change - choose the effect’s color.
Horizontal - Drag left to decrease or right to increase horizontal thickness of the 3D edge.
Vertical - Drag left to decrease or right to increase vertical thickness of the 3D edge.
Paint
Add color behind or on top of an image, or to add simple drawing to a page.
Add - Add a paint layer to your page.
Double-clicking on this paint layer box will allow you to draw in the box.
Brush - Drag your cursor within the paint layer to add color.
Erase - Drag your cursor within the paint layer to remove added color.
Style - Choose from Circle, Half Circle, or Square.
Color - Change the color of selected paint.
Black - Quickly set selected patin to black.
White - Quickly set selected paint to white.
Match - Match paint color with selected color on a album page.
Left - Rotate the paint 90° to the left.
Right - Rotate the paint 90° to the right.
Reset - Reset the paint to the original added state.
Mirror - Flip the paint horizontally.
Flip - Flip the paint vertically.
Edit - Toggle in and out of paint mode to add paint or make adjustments to the entire paint layer.
Delete - Delete the selected paint.
Brush Size - Drag left to make the brush or eraser smaller or right to make it larger.
Opacity - Drag left to make it more transparent or to the right to make it less transparent.
Rotate - Drag the slider to set the angle of rotation.
Album
Check settings and prepare your album for sharing.
Details - Displays information about the album such as name, size, type, and templates used.
View - Preview your album as a book, calendar, or Print Quality to proof before you share.
Print Quality- The Viewer will display each page individually at a high resolution to see how individual pages will print.
Book - The Viewer will show page spreads, as they would appear in a photobook.
Calendar - The Viewer will display your album in calendar layout.
Spelling - Check all text spelling in the album and displays a list of any errors it finds.
Ignore - Leaves the current word as it is and moves on to the next misspelling.
Ignore All - Leaves the current word and any identical words in the entire album as they are.
Change - Replaces the current word with the one currently in the Change to field.
Change All - Replaces this and all subsequent instances of the word in with the one in the Change to field.
Suggest - If the spell checker doesn’t automatically provide alternate words in the Suggestions area.
Add - Places the current word into the dictionary and continues with the spell check process.
Undo - Returns the most recently changed word to its former spelling. Note: this only works in the current box.
Error - Searches for corrupt objects, missing files, and displays a list of any errors it finds.
Common Errors:
File Missing - The original or "high res" image did not finish copying to the album's objects folder.
To fix the issue
1. Remove the images from the page.
2. Save your album.
3. Apply the image to your page a second time
4. Save your album.
By applying it again it will start the copy process over, ensuring that the original or "High Res" copies correctly.
Font Missing - The font being used in the current text box is not being located.
To fix the issue
1. Select the text box.
2. Choose a new font from the drop down.
Share
Share your album with family and friends.
Book
Order a photo book created from the pages in your album, ship orders to yourself, family, and friends.
Calendars
Order a calendar created from the pages in your album, ship orders to yourself, family, and friends.
Calendars must be landscape - 11"x8.5" and exactly 25 pages.
First page is set as the cover, Each month will be 2 pages, top for your images, bottom for the month.
Export
Save the entire album, or individual pages as JPG, PNG, PDF, or SVG.
Print
Print the entire album, or individual pages, on your home printer.
Sharing
Book
Recommended book pages should range between 26 - 100 pages.
Photo - Sets your first and last pages as the cover for your book.
Leather - Sets a genuine or bonded leather cover for your book.
Preview - Preview your book with the set cover type to ensure accuracy.
Spine Text - Type in the title of your book. (text will center on the printed spine) Or select No Text.
Spine Color - Select the spine color. Choose one from the pallet, or use the picker to match your covers.
Pages Included - Select which pages you would like to include for uploading.
Save Location - Choose location for a backup of the book upload files.
Upload - Will begin uploading your book to the print services site. Details: http://www.mymemories.com/photobook
Calendar
Preview - Preview your calendar to ensure accuracy.
Pages Included - Select which pages you would like to include for uploading.
Save Location - Choose location for a backup of the calendar upload files.
Upload - Will begin uploading your book to the print services site. Details: http://www.mymemories.com/photobook
Export
JPG - Standard image format, for easily sharing or printing.
PNG - Maintains transparent background.
PDF - Saving all of the pages together in a single document.
SVG - Saves shape outlines to be imported into 3rd party software for use with personal electronic cutters.
Image Size - Larger for better quality, smaller for easier web and email sharing.
Pages - Select which project pages to export.
Save Location - Select where you would like the exported files to be saved too.
Print
Choosing a Printer - Click on the drop-down menu at the top of the Print Options window to choose a printer.
Copies - You can choose the number of copies you would like to print.
Borderless - A check box for borderless printing will appear, if supported by your printer.
Selecting Pages - Select which pages in your album to print:
Range - print the selected pages, enter numbers, separated by commas (1-3,5).
Select Pages - Toggle pages you would like to print.
Paper Size/Media Type - Select paper type and size, only your printer support types and sizes will be shown.
Orientation - Determine the direction the pages will print portrait or landscape.
Scale - Actual size or scale to fit. Scale to fit will scale the album page to fit the paper size chosen.
Image Size - Choose the Preset size or customize the image size to print.
Preview your project before printing, to ensure that you are satisfied with the finished project.
More Settings
Position - Customize the placement of the page.
Images per page - Customize the number of pages to be printed on the page.
Space Between- Specify how much space to put between the images
Resolution - Determine the quality of the printing. A higher resolution will look better.
Quality - Adjust the print quality.
Select All - This button will select all pages in the album for printing.
Clear All - This button will deselect all pages in the album for printing.
After Previewing the project and verifying the project is complete, choose Print.