1
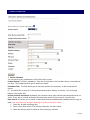
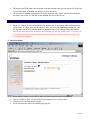
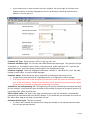
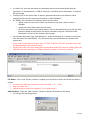
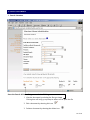
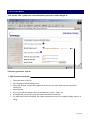
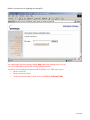
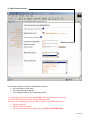
Literature Library User Manual
Contents
I.
Searching the Library
II.
Add Literature
III.
Delete Literature
IV.
Edit Literature
V.
More on User Type (because it is so important!)
VI.
Library Navigation
VII.
Relationships
VIII.
BIG Rules!
IX.
How the pages on the salesweb work
X.
Future Enhancements
A note on security:
The Library was designed for maximum flexibility and scalability. This being
said, if you have access to the Library, you have access to ALL documents in
the library. Please only edit the documents that you and/or your team
are responsible for.
Manual v. 2.0
August 26, 2003
1 of 16
I. SEARCH LITERATURE
1. Search Literature
You can search on any combination of the fields on this screen:
Product Brand: This field is mandatory. Only one of the brands in the literature library is searchable at
one time. This dropdown allows you to select your brand.
Document Title: This field allows you to search by the title of a document. It does accept partial
entries.
Ex: You would like to see a list of all documents that mention ‘battery’ in the title. You would type
battery in the search field.
Include archived documents: By default, the Literature Library only searches those documents that are
active. If you wish to include documents that have been archived in your search, check this box.
Date Search: This allows you to search on documents that were added and/or updated within a range of
dates. You must check the ‘Include Date Range’ in order to search by a date!
1. Check the ‘Include Date Range’ box
2. Select a From Date and/or a To Date by clicking the ‘set date’ button.
3. Select the date you wish to search on from the pop-up calendar.
2 of 16
4. By leaving a box blank, you limit your search to only one date criteria (ex: By leaving the From
Date blank, and the To Date filled, you search for everything up to the date in the Date To box.)
This search option allows you to search for a document when you know the date it was uploaded, but are
not sure about the rest of the details. (ex: you left off adding documents last week, but you don’t
remember where you were on your list. You can search by date to pull all of the documents added on a
certain day.)
Product Category: Products are linked to overarching, broader categories. This option allows you to
search on those broad categories. (ex: If you would like to search on all of the Three Phase Literature, you
could select ‘Three Phase’ from this list, as opposed to pulling a separate search for each Three Phase
product).
Product: Use this drop-down if you would like to limit your search to one particular product. (ex. If you
are only interested in documentation for the 9330, you would select ‘Powerware 9330’ from the dropdown)
File Type: File type contains a list of the file formats found in the literature library. You would use this
field if you only wanted a list of all of the AutoCAD files available for the sites.
Document Type: Document type allows you to search based on the type of document that you are
looking for. Some examples of document types include Advertisements, Application Notes and Product
Literature. Use this field to perform searches where you would like to limit your search to a certain
category (like Technical Drawings).
Owner: The Owner field notes who is responsible for that document in the Literature Library. Use this
drop-down to narrow your search to only one document owner.
Language: The Language drop-down allows you to filter your search based on the Language of the file.
This is the field you would use if you were only interested in the Spanish documentation in the Library.
Country: This field allows you to filter by the Countries that can view the document. If you are
performing a search on documents that are viewable by Salesweb users in Argentina, you would select
‘Argentina’ from the Country drop-down.
2. Export Function
• You can select “export to excel” after your file list has been generated..
3 of 16
•
•
This delivers an HTML page in excel format (rows and columns) that you can select File Æ Save As
Æ Excel Workbook by naming and saving it to your hard drive.
This file returns valuable information such as the document title, owner, name of the actual file,
the date it was “born on” the date it was updated, the size of the file, etc.
II. ADD LITERATURE
1. Search Literature
• Be sure to “search” first on the document you want to add, to be sure an older version does not
already exist. If it does exist, you will want to “edit” that record by uploading the new file. You
will also have the ability to edit the details of that document. See “Editing Existing Documents”
BEFORE you add a document, ALWAYS search the library to see if it already exists. If it exists, you
can “update” that file with the new file rather than creating 2 records, one that is current, and
one that will be outdated.
2. Select the Brand
•
•
•
•
When adding Literature, you will first select the Brand associated with that literature.
This is to enable a “filter” on the product drop down list so it is not too long.
Every product is associated with a brand.
Once you select the brand, the following will pop up.
4 of 16
3. Enter the Document Details
Enter the Document Title: This shows up as the title of the document and link for the user to click on
to open or save the file to their hard drive.
• Do not use the following characters in the title of the document: + ‘ & “ ; $ % @
Enter the Literature Code: Enter the publication or literature code in this field.
• Typically found in the bottom left of the last page
• Typically found on pieces of literature created by Creative Services group
Born On Date: This is automatically set to today’s date.
• It can be set in the past if you are uploading older information.
• Select the “Set Date” button next to the field to change the date from today to another date.
• This is the date that will show up next to the document on the Salesweb.
• When adding a NEW document or REPLACING (edit) an existing document, this date will
automatically change to the date that the change was made. It will NOT change if you’re just
changing the document details, such as the title, the user types, countries, etc.
• If you set the Born On Date less than 30 days into the past, the ‘New’ graphic will appear next to
its listing on the web pages.
Allowed User Type/s: This is a very important field as it determines who can see the document and
which site it is shown on.
NOTE: User Type is very important. This determines WHO will see your document on WHAT SITE
All:
All users of the World Wide Web
5 of 16
Distributor:
Resellers and distributors in countries outside the USA
Employee:
Employees of Powerware
International
Service:
For service agencies outside the USA
Lambda Partner:
Only for use by Lambda, a part of the Development Division
Power Alliance
Member:
USA and CA Single phase reseller channel
Rep:
Single/Three phase USA reseller channel
Vendor/Supplier:
Typically used for Global Services
Intergy Service
Technician
For Intergy Service personnel only
Associated Product(s): Select one or more products to associate this document to – the document will
show up on each product’s page that you select. Hold down the “Ctrl” (control) key to select multiple
products. Only associate a document with products that you are responsible for!
Regions: If you select a “region”, it will associate the document to all countries associated with that
region.
• Once you select the region(s), the countries associated with that region(s) will pop up in the
“Assigned” box on the right side.
• To remove a country, highlight it in the “Assigned” box and then select he “<” button (hold down
the ctrl key to remove multiple countries).
• To select all countries, press the “>>” button.
• To deselect all countries, press the “<<” button.
Countries:
• You can either select a region AND additional countries
• Select a region and REMOVE one or more countries,
• OR you can just select specific countries
6 of 16
•
If you remove one or more countries from the “Assigned” box on the right, it will show at the
bottom of the list in the Non-Assigned box (this is a technicality of JavaScript and cannot be
altered, it’s just the way it is).
Literature File Type: Select the type of file it is (.gif, .jpg, .doc, etc.)
Literature Document Type: You can only select ONE literature document type. This describes the type
of literature it is, for example a press release, pricing document, product literature, etc. If you are the
slightest bit unsure, check the existing product page for the appropriate file type.
Literature Language: Select the language the document is written in. Hold down the <Ctrl> key while
clicking on each option, to select multiple languages.
Literature Owner: Select the person that is responsible for keeping the document current.
• It might be the same person that is uploading the file, or it might be a product manager.
• If an archive date is set on the document, the Literature Owner will receive an email five (5) days
prior to the file archiving. Therefore, the Literature Owner should be the person that can replace
the document if necessary or extend the archive date if necessary.
Available for use on Engineering CD: The Engineering CD will only include those documents that have
this box checked. If you would like your document to be included in the pool of documents that the CD
is generated from, please check this box.
Show in What’s New: The ‘What’s New’ page (currently only on the UPS Salesweb), is automatically
generated from documents that have this box checked. If you would like your document to be listed on
the ‘What’s New’ page for the week, please check this box.
Document Archive Date: This field is optional.
• If a date is NOT selected, the document will always be viewable on the websites associated with
the user type that was selected.
7 of 16
•
•
•
•
•
•
If a date IS set, once the date passes, the document does not show automatically with the
product(s) it is associated with. It CAN be retrieved if “Include Archived Documents” is ticked on
the search page.
Five days prior to the archive date, an email is generated and sent to the Literature Owner
notifying him/her that the document will archive on date DD/MM/YY.
By “Editing” the document, the Literature Owner can then either
o upload a more current version (which can be done at any time a newer version is
available)
o extend the Archive date further into the future
o OR let the document expire (which means it will not automatically show up with the other
literature related to that product, but will be retrievable using the “Include Archived
Documents” tick box on the Literature Search pages
For Literature Document Type “Sales Bulletin(s)”, set the archive date to 12 months in the future
from the date of the Sales Bulletin. This will ensure that your Sales Bulletin will archive at the
proper time.
If you set the archive date in the past, set it AT LEAST 5 DAYS IN THE PAST. Otherwise and email
will be generated to the Literature Owner.
Set the date in the PAST when adding OLD literature that should NOT show on product pages, but
SHOULD show when searching on literature when the “Archive” check box is checked.
File Name: Click on the “Browse” button to navigate your hard drive to select the file that you want to
upload
• Do not use the following characters in your file names: + ‘ & “ ; $ % @
• Keep file names short
• Instead of gaps or spaces use a hyphen [-] or an underscore[_]
Add Literature: Select the “Add Literature” button to add your document to the library.
• You will get the following prompt
8 of 16
•
•
•
Select “OK” if all is correct.
Select “Cancel” if you see that information is not all correct and make the changes.
Once you select “OK” from this box, another notice box will pop up letting you know your
document was successfully added to the Library:
Yeah! You’re done adding a new document. If you did not set the born on date further in the past than
31 days, then you will see a ‘New’ graphic next to the document listing on the web pages.
9 of 16
III. DELETE DOCUMENTS
1. Search Literature
Once the Search delivers a list, you can do 1 of 3 things:
1. View the document by selecting the file type image
Clicking here will bring up a prompt to either save or open the file.
2. Edit a document by selecting this icon:
3. Delete a document by selecting the delete icon:
10 of 16
IV. EDIT DOCUMENTS
Click on the “Edit” symbol next to the document you want to make changes to.
From here you have 2 choices:
1. Edit Literature Document:
•
•
•
•
•
•
•
Select the name of the file
This will pop up the following screen
Select the “Browse” button and navigate to the file on your hard drive that will replace the
existing file
Select Upload
A pop up screen will appear asking if the details are correct. Select Yes.
A message will pop up saying the document was edited successfully
On pages that list the documents, the edited document will show an ‘Updated’ graphic next to its
listing.
11 of 16
Below is a screen shot of replacing an existing file.
You cannot both edit the literature details AND replace the existing files in one go.
You can EITHER replace the file OR edit the literature details.
Therefore, when updating a document AND it’s details, it is a TWO step process.
• Edit the Literature
• Edit the Literature Details
• These can be performed in either order, just NOT AT THE SAME TIME
12 of 16
2. Edit Literature Details
Edit Literature Details is similar to Adding New Literature.
• All of the fields are the same.
• The same information applies.
• See “Adding Literature” for further information.
You cannot both edit the literature details AND replace the existing files in one go.
You can EITHER replace the file OR edit the literature details.
Therefore, when updating a document AND it’s details, it is a TWO step process.
• Edit the Literature
• Edit the Literature Details
• These can be performed in either order, just NOT AT THE SAME TIME
13 of 16
V. MORE ON USER TYPE (because it is so important!)
Powerware.com and User Type
If the document can be viewed by all users of the World Wide Web, select the following:
• All
Note: this should be selected for any literature that you want posted on Powerware.com
SALESWEB and User Type
If the document pertains to single phase, select the following:
• Distributor
• Employee
• Power Alliance Member
• Rep
If the document pertains to three phase products NOT sold by Power Alliance Members, select the
following:
• Distributor
• Employee
• Rep
If the document pertains to three phase products sold by BOTH reps and power alliance members, select
the following:
• Distributor
• Employee
• Power Alliance Member
• Rep
VI. LIBRARY NAVIGATION
The links along the left side allow you to view the information listed for each of those components of the
Literature Library. Once in the view page, you can sort by columns by clicking on the column header.
More Info: The more info link opens a new page that allows you to view all document by a particular
PRODUCT and USER TYPE. This is a good way to check that the correct documents are showing for the
correct user type.
VII. RELATIONSHIPS
•
•
You can select multiple products for a single document
You can only select one literature type (sales bulletin, competitive comparison, white paper, etc.).
VIII. BIG RULES
14 of 16
This section focuses on MAJOR big rules to the Library so that your literature shows up properly on the
right pages of Powerware.com and the Salesweb.
Entering NEW Documents to the Library:
BEFORE you add a document, ALWAYS search the library to see if it already exists. If it exists, you can
“update” that file with the new file rather than creating 2 records, one that is current, and one that will
be outdated.
Entering the Document Title:
Do not use the following characters in the title of the document: + ‘ & “ ; % @ $
Born On Date:
This defaults to today’s date.
• It can be set in the past if you are uploading older information or to the future if you wish to load
documents prior to them being viewable on the web (helpful for new product launches, etc.)
• Select the “Set Date” button next to the field to change the date from today to another date.
• This is the date that will show up next to the document on the Salesweb.
• When you add a NEW document or REPLACE (edit) and existing document, this date will
automatically change to the date that change was made. It should NOT change if you’re just
changing the document details, such as the title, the user types that can see the document, the
country or language selections, etc.
User Type:
NOTE: User Type is very important. This determines WHO will see your document on WHAT SITE
(currently either salesweb or Powerware.com)
Selecting the Literature Owner:
If an archive date is set on the document, the Literature Owner will receive an email five (5) days prior to
the file archiving. Therefore, the Literature Owner should be the person that can replace the document if
necessary or extend the archive date if necessary.
Setting the Archive date to the PAST:
If you set the archive date in the past, set it AT LEAST 5 DAYS IN THE PAST. Otherwise and email will be
generated to the Literature Owner.
Naming the Literature file (.pdf, .xls, .doc, etc.):
• Do not use the following characters in your file names: + ‘ & “ ; $ % @
• Keep file names short
Instead of gaps or spaces use a hyphen [-] or an underscore[_]
Editing the Literature and the Literature Details:
You cannot both edit the literature details AND replace the existing files in one go.
You can EITHER replace the file OR edit the literature details.
Therefore, when updating a document AND it’s details, it is a TWO step process.
15 of 16
•
•
These
•
Edit the Literature
Edit the Literature Details
can be performed in either order, just NOT AT THE SAME TIME.
If you do try to edit the Literature Details, then try to upload the files, the edits you made to the
Literature Details will not “stick.”
IX. HOW THE SALESWEB PAGES WORK
What’s New Page:
• If you are adding OLD information that you do NOT want to show on the “What’s New” page, do
not check the ‘What’s New’ box on the ‘Add Literature’ page.
• The 'What’s New' page shows files loaded to the library with the ‘What’s New’ box flagged, broken
out by week, for the last eight weeks.
Sales Bulletin Page:
2003 Sales Bulletins page shows all bulletins loaded to the library during 2003.
2002 Sales Bulletins page shows all bulletins loaded to the library during 2002 – ALL OF THESE SALES
BULLETINS ARE “ARCHIVED”
All CURRENT YEAR bulletins should be set to archive 12 months in the future from the date listed on the
Sales Bulletin.
Product Pages:
All documents related to an individual product that are NOT archived will show on this page.
X. FUTURE ENHANCEMENTS
We are always looking to improve the use of our tools.
Please contact Traci Johnson if you have suggestions for improvements to this application and/ or if you
have difficulty in uploading/editing/deleting your documents.
Traci Johnson
[email protected]
16 of 16