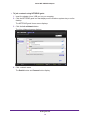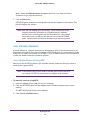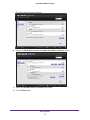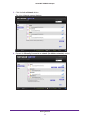
1
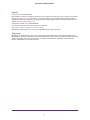
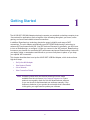
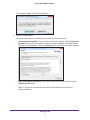
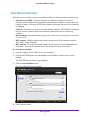
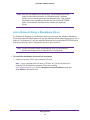
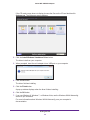
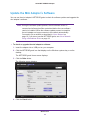
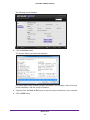
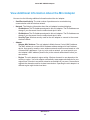
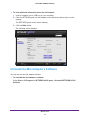
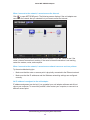
A6100 WiFi USB Mini Adapter User Manual September 2013 202-11274-01 350 East Plumeria Drive San Jose, CA 95134 USA A6100 WiFi USB Mini Adapter Support Thank you for choosing NETGEAR. After installing your device, locate the serial number on the label of your product and use it to register your product at https://my.netgear.com. You must register your product before you can use NETGEAR telephone support. NETGEAR recommends registering your product through the NETGEAR website. For product updates and web support, visit http://support.netgear.com. Phone (US & Canada only): 1-888-NETGEAR. Phone (Other Countries): Check the list of phone numbers at http://support.netgear.com/general/contact/default.aspx. NETGEAR recommends that you use only the official NETGEAR support resources. Trademarks NETGEAR, the NETGEAR logo, and Connect with Innovation are trademarks and/or registered trademarks of NETGEAR, Inc. and/or its subsidiaries in the United States and/or other countries. Information is subject to change without notice. Other brand and product names are registered trademarks or trademarks of their respective holders. © NETGEAR, Inc. All rights reserved. 2 Contents Chapter 1 Getting Started Set Up the Mini Adapter . . . . . . . . . . . . . . . . . . . . . . . . . . . . . . . . . . . . . . . . 5 View Network Details . . . . . . . . . . . . . . . . . . . . . . . . . . . . . . . . . . . . . . . . . . 9 Join a Network . . . . . . . . . . . . . . . . . . . . . . . . . . . . . . . . . . . . . . . . . . . . . . 10 Join a Network Using WPS . . . . . . . . . . . . . . . . . . . . . . . . . . . . . . . . . . 11 Join a Network Using NETGEAR genie . . . . . . . . . . . . . . . . . . . . . . . . . 11 Join a Hidden Network . . . . . . . . . . . . . . . . . . . . . . . . . . . . . . . . . . . . . . 14 Join a Network Using a Standalone Driver. . . . . . . . . . . . . . . . . . . . . . . 19 View Connection Details. . . . . . . . . . . . . . . . . . . . . . . . . . . . . . . . . . . . . . . 21 Chapter 2 Maintenance Update the Mini Adapter’s Software . . . . . . . . . . . . . . . . . . . . . . . . . . . . . . 23 Get Diagnostic Information for the Mini Adapter. . . . . . . . . . . . . . . . . . . . . 24 View Additional Information About the Mini Adapter . . . . . . . . . . . . . . . . . 26 Uninstall the Mini Adapter’s Software. . . . . . . . . . . . . . . . . . . . . . . . . . . . . 27 Chapter 3 Troubleshooting and Frequently Asked Questions Troubleshooting . . . . . . . . . . . . . . . . . . . . . . . . . . . . . . . . . . . . . . . . . . . . . 29 Frequently Asked Questions . . . . . . . . . . . . . . . . . . . . . . . . . . . . . . . . . . . 31 Appendix A Factory Default Settings and Technical Specifications Factory Default Settings . . . . . . . . . . . . . . . . . . . . . . . . . . . . . . . . . . . . . . . 33 Technical Specifications . . . . . . . . . . . . . . . . . . . . . . . . . . . . . . . . . . . . . . . 34 Appendix B Notification of Compliance 3 1. 1 Getting Started The A6100 WiFi USB Mini Adapter wirelessly connects your notebook or desktop computer to an 11ac network for applications such as lag-free video streaming throughout your home, online gaming, and secure and reliable Internet connections. In addition, Beamforming+ technology boosts the speed, reliability, and range of WiFi connections. The mini adapter automatically uses NETGEAR Beamforming+ technology to enhance WiFi performance with 802.11ac WiFi devices. Because it's automatic, you don't have to turn on Beamforming+ or configure it. When you connect to the WiFi network, Beamforming+ focuses on your location for even better WiFi performance and speed. Beamforming+ locks onto your laptop, tablet, or smartphone and follows as you move from place to place, so you keep your optimal WiFi connection. This chapter describes how to set up the A6100 WiFi USB Mini Adapter, which involves these high-level steps: • Set Up the Mini Adapter • View Network Details • Join a Network • View Connection Details Note: Software updates with new features and bug fixes are made available from time to time on http://support.netgear.com. Some products can regularly check the site and download new software, or you can check for and download new software manually. If the features or behavior of your product do not match what is described in this guide, you might need to update your software. 4 A6100 WiFi USB Mini Adapter Set Up the Mini Adapter Before you begin using your mini adapter, set up the mini adapter using the resource CD that came in the package. To set up your mini adapter: 1. Insert the resource CD in your computer CD drive. Note: If your computer does not have a CD drive, or if you do not have your resource CD, download the resource CD driver by visiting http://support.netgear.com. Click the Support for Home Products button and enter A6100 in the search field. If the NETGEAR Resource CD screen does not display, browse the files on the CD and double-click Autorun.exe. The NETGEAR Resource CD screen displays: 2. Click the Setup button. Getting Started 5 A6100 WiFi USB Mini Adapter The Software Update Check screen displays: 3. Install the setup software. Choose an option based on whether you are connected to the Internet: • Connected to the Internet. If you are connected to the Internet, click the Check for Updates button. After the software checks for software updates, the Update Check Complete screen displays. Click the Continue button. The Welcome screen displays: • Not Connected to the Internet. If you are not connected to the Internet, click the Install from CD button. Note: If you are not connected to the Internet, the software cannot check for software updates. Getting Started 6 A6100 WiFi USB Mini Adapter The Welcome screen displays: 4. Click the I agree radio button to accept the license agreement and click the Next button. A message displays asking you to wait while the software is installed. After a few minutes, NETGEAR genie prompts you to insert your mini adapter. Getting Started 7 A6100 WiFi USB Mini Adapter 5. Insert the mini adapter into a USB port on your computer. The NETGEAR genie screen displays: The NETGEAR genie icon also displays in the Windows system try and on the desktop. The color of the icon indicates the strength of your wireless connection: • White. 3–5 bars (strong connection) • Yellow. 1–2 bars (weak connection) • Red. 0 (zero) bars (no connection) Note: If you remove your mini adapter, NETGEAR genie is not available, and the icon is not displayed. When you insert the mini adapter again, the icon returns. 6. (Optional) In NETGEAR genie, from the Select Language drop-down menu, select a language. NETGEAR genie screens are displayed in the language that you select. Getting Started 8 A6100 WiFi USB Mini Adapter View Network Details Before you join a network, you can view details to help you determine which network to join: • Network name (SSID). The name assigned to a wireless network. As a security measure, some wireless access points do not broadcast their SSIDs. In such cases, the network is hidden. The name (SSID) field is blank even though the rest of the information is displayed. • Channel. The channel on which the wireless network operates. NETGEAR recommends that you choose a network that uses a different channel from that of neighboring networks. • Wireless Mode. The wireless technology used for the router or access point, such as N, A, G, B, or AC. • WPS support. Identifies whether the router or access point for this network supports WPS (Wi-Fi Protected Setup). • MAC address. The unique hardware address of the wireless device broadcasting this information. Typically, the wireless device is a wireless router or access point. To view network details: 1. Insert the adapter into a USB port on your computer. 2. Click the NETGEAR genie icon that displays on the Windows systems tray or on the desktop. The NETGEAR genie Home screen displays. 3. Click the Join a Network button. The Join a Network screen displays: 4. Click a network name. Getting Started 9 A6100 WiFi USB Mini Adapter The Details button and Connect button display. 5. Click the Details button. The Details pop-up window displays: 6. Click the OK button to close the Details pop-up window. Join a Network The mini adapter can join a network using the Wi-Fi Protected Setup (WPS) method, through the mini adapter’s NETGEAR genie, or by installing the mini adapter’s standalone driver. You can also join hidden networks. For more information, see Join a Hidden Network on page 14. Getting Started 10 A6100 WiFi USB Mini Adapter Join a Network Using WPS Wi-Fi Protected Setup (WPS) is a standard for easily adding computers and other devices to a home network while maintaining security. Before you use the WPS method to join a network, make sure that your router or access point supports WPS. Note: If the security type on your router or access point is set to WEP, you cannot use WPS to connect the mini adapter to the network. To use WPS to join a wireless network: 1. Insert the adapter into a USB port on your computer. 2. Press and hold the WPS button on the mini adapter for two seconds. The WPS LED blinks. WPS button 3. Within two minutes, press the WPS button on your wireless router or access point. The mini adapter joins the network, which can take a few minutes. Your settings are saved in a profile. Note: After the mini adapter joins the network, it automatically saves the network connection information to a Windows profile. Windows profiles can be used by genie and the Windows utility. If the network information does not change, the next time you launch NETGEAR genie, it automatically connects to the network you previously joined. Join a Network Using NETGEAR genie You can use the mini adapter’s NETGEAR genie to join a network. Getting Started 11 A6100 WiFi USB Mini Adapter To join a network using NETGEAR genie: 1. Insert the adapter into a USB port on your computer. 2. Click the NETGEAR genie icon that displays on the Windows systems tray or on the desktop. The NETEGAR genie Home screen displays. 3. Click the Join a Network button. The Join a Network screen displays: 4. Click a network name. The Details button and Connect button display. Getting Started 12 A6100 WiFi USB Mini Adapter 5. Click the Connect button. Note: If your network does not display in the network list, click the Refresh button. If the network name is not displayed, that indicates a hidden network that does not broadcast its SSID. You can use the NETGEAR genie to join a hidden network. For more information, see Join a Hidden Network on page 14. The Connecting to your Wireless Network pop-up window displays: 6. In the Security Key (Password) field, enter the network password. Getting Started 13 A6100 WiFi USB Mini Adapter Note: Select the Hide characters as I type check box if you want to hide the characters as you type the password. 7. Click the Next button. NETGEAR genie validates the settings and connects the adapter to the network. This process might a few minutes. Note: After the mini adapter joins the network, it automatically saves the network connection information to a Windows profile. Windows profiles can be used by genie and the Windows utility. If the network information does not change, the next time you launch NETGEAR genie, it automatically connects to the network you previously joined. Join a Hidden Network A hidden network is a network that does not broadcast its SSID. If the network name is not displayed in the network list in the mini adapter’s NETGEAR genie, the network that you are trying to join is either not functioning or is hidden. To join a hidden network, you can use WPS or enter the hidden network’s information yourself. Join a Hidden Network Using WPS Before you use the WPS method to join a hidden network, make sure that your router or access point supports WPS. Note: If the security type on your router or access point is set to the WEP, you cannot use WPS to connect the mini adapter to the network. To manually connect using WPS: 1. Insert the adapter into a USB port on your computer. 2. Click the NETGEAR genie icon that displays on the Windows systems tray or on the desktop. The NETGEAR genie Home screen displays. 3. Click the Join a Network button. Getting Started 14 A6100 WiFi USB Mini Adapter The Join a Network screen displays: 4. Expand the Manually Connect to a network (for hidden networks) section. 5. Select the Use WPS Push ‘N’ Connect radio button. 6. Click the Start button. Getting Started 15 A6100 WiFi USB Mini Adapter A WPS instructions window displays: 7. (Optional) Click the Learn More button to learn more about how to connect to the network using WPS. 8. Press and hold the WPS button on the mini adapter for two seconds. The WPS LED blinks. 9. Within two minutes, press the WPS button on your wireless router or access point. The mini adapter joins the network, which can take a few minutes. Your settings are saved in a profile. Note: After the mini adapter joins the network, it automatically saves the network connection information to a Windows profile. Windows profiles can be used by genie and the Windows utility. If the network information does not change, the next time you launch NETGEAR genie, it automatically connects to the network you previously joined. Manually Join a Hidden Network To manually join a hidden network, you need to know the SSID, security type, and password of the network you want to join. To manually connect without WPS: 1. Insert the adapter into a USB port on your computer. 2. Click the NETGEAR genie icon that displays on the Windows systems tray or on the desktop. The NETGEAR genie Home screen displays. Getting Started 16 A6100 WiFi USB Mini Adapter 3. Click the Join a Network button. The Join a Network screen displays: 4. Expand the Manually Connect to a network (for hidden networks) section. Getting Started 17 A6100 WiFi USB Mini Adapter 5. Select the Enter wireless information myself radio button. 6. Type the network name (SSID) in the Network Name (SSID) field. 7. Select the network’s security type from the Security Type drop-down menu: • None. The network does not require a password. • WEP. The password (key) is a 10 or 26 hexadecimal digit. • WPA-PSK. The password (passphrase) is 8–63 characters in length or a 64 hexadecimal digit. • WPA2-PSK. The password (passphrase) is 8–63 characters in length or a 64 hexadecimal digit. Note: NETGEAR genie does not support the WPA or WPA2 security type. Windows 8, Windows 7, and Windows Vista, use the Windows WLAN Autoconfig service to enter WPA or WPA2 credentials to join the network. For Windows XP, use the Wireless Zero Configuration service to enter WPA or WPA2 credentials to join the network. 8. Type the network’s password (passphrase) in the passphrase field. If you selected the WEP security type, type the WEP key in the Key field. 9. Click the Connect button. The mini adapter joins the network, which can take a few minutes. Your settings are saved in a profile. Getting Started 18 A6100 WiFi USB Mini Adapter Note: After the mini adapter joins the network, it automatically saves the network connection information to a Windows profile. Windows profiles can be used by genie and the Windows utility. If the network information does not change, the next time you launch NETGEAR genie, it automatically connects to the network you previously joined. Join a Network Using a Standalone Driver For Windows 8, Windows 7, and Windows Vista, you can install the Windows standalone driver without the NETGEAR genie and use the Windows WLAN Autoconfig service to join a network. For Windows XP, you can install the Windows driver without the NETGEAR genie and use the Wireless Zero Configuration service to join a network. Note: You do not need to install the standalone driver to use Windows WLAN Autoconfig service or Wireless Zero Configuration. To install the standalone driver and join a network: 1. Insert the resource CD in your computer CD drive. Note: If your computer does not have a CD drive, or if you do not have your resource CD, download the resource CD driver by visiting http://support.netgear.com. Click the Support for Home Products button and enter A6100 in the search field. Getting Started 19 A6100 WiFi USB Mini Adapter If the CD main screen does not display, browse the files on the CD and double-click Autorun.exe. The Welcome screen displays: 2. Click the Install Windows Standalone Driver button. The driver installs on your computer. 3. When prompted, insert the mini adapter into a USB port on your computer. 4. Click the OK button. The driver finishes installing. 5. Click the Finish button. A pop-up window displays when the diver finishes installing. 6. Click the OK button. 7. If you use Windows 8, Windows 7, or Windows Vista, use the Windows WLAN Autoconfig service to join a network. For more information about Windows WLAN Autoconfig, see your computer’s documentation. Getting Started 20 A6100 WiFi USB Mini Adapter For Windows XP, use the Wireless Zero Configuration service. For more information, see your computer’s documentation. Note: After the mini adapter joins the network, it automatically saves the network connection information to a Windows profile. Windows profiles can be used by genie and the Windows utility. If the network information does not change, the next time you launch NETGEAR genie, it automatically connects to the network you previously joined. View Connection Details After you join a network, you can view the mini adapter’s connection details in the NETGEAR genie’s status bar. To view connection details: 1. Join a network using your mini adapter. For more information, see Join a Network on page 10. 2. Scroll to the bottom of the NETEGEAR genie screen to view the mini adapter’s connection details. Network name IPv4 address Network security Wireless Physical rate channel Signal strength You can view the following connection details: • Network name. The network name (SSID) of the wireless network to which the mini adapter is connected. • IPv4 address. The IPv4 address of the wireless network to which the mini adapter is connected. • Network security. The lock symbol shows whether the network you are connected to uses wireless security. An open lock indicates an open network without wireless security, such as one that you might use in a coffee shop. • Wireless channel. The wireless channel of the network to which the mini adapter is connected. • Physical rate. The physical transmission rate for wireless communication. • Signal strength. The strength of the wireless signal. Three to five bars indicate a good signal. One or two bars indicate a weak signal. Getting Started 21 2. 2 Maintenance This chapter includes the following sections: • Update the Mini Adapter’s Software • Get Diagnostic Information for the Mini Adapter • View Additional Information About the Mini Adapter • Uninstall the Mini Adapter’s Software 22 A6100 WiFi USB Mini Adapter Update the Mini Adapter’s Software You can use the mini adapter’s NETGEAR genie to check for software updates and upgrade the mini adapter’s software. Note: During the software update process, the old software version is removed and all saved profiles are deleted before the new software version is installed. When the software update process is complete, the mini adapter no longer connects to the network automatically. You need to join a network as described in Join a Network on page 10. If you do not use the NETGEAR genie, see Join a Network Using a Standalone Driver on page 19. To check or upgrade the mini adapter’s software: 1. Insert the adapter into a USB port on your computer. 2. Click the NETGEAR genie icon that displays on the Windows systems tray or on the desktop. The NETGEAR genie Home screen displays. 3. Click the Other button. The following screen displays: 4. Click the Check button. Maintenance 23 A6100 WiFi USB Mini Adapter The Live Check pop-up window displays. NETGEAR genie checks for available software upgrades. If new software is found, the following screen displays: 5. Click the OK button. The mini adapter software is updated. Get Diagnostic Information for the Mini Adapter Your mini adapter provides the following diagnostic information: • System information • IP information • Client driver and profile information • Site survey information To get diagnostic information about the mini adapter: 1. Insert the adapter into a USB port on your computer. 2. Click the NETGEAR genie icon that displays on the Windows systems tray or on the desktop. The NETGEAR genie Home screen displays. 3. Click the Other button. Maintenance 24 A6100 WiFi USB Mini Adapter The following screen displays: 4. Click the Get Info button. The System Status pop-up window displays: NETGEAR genie starts collecting system information, IP information, client driver and profile information, and site survey information. 5. (Optional) Click the Save to File button to save the system information to your computer. 6. Click the Exit button. Maintenance 25 A6100 WiFi USB Mini Adapter View Additional Information About the Mini Adapter You can view the following additional information about the mini adapter: • Sent/Received Activity. The total number of packets sent or received during communication with the wireless network. • Network. The following information about the mini adapter’s network displays: • - IPv4 Address. The IPv4 address assigned to this mini adapter. The IPv4 address can change if you disconnect from the network and rejoin it later. - IPv6 Address. The IPv6 address assigned to this mini adapter. The IPv6 address can change if you disconnect from the network and rejoin it later. - Security Type. Wireless security used for the mini adapter to connect to the current wireless network. Adapter: - Adapter MAC Address. The mini adapter’s Media Access Control (MAC) address. The MAC address is a unique 48-bit hardware address assigned to each wireless device. As a security measure, some wireless networks restrict access based on a list of known MAC addresses. If you try to join such a network, you must provide your mini adapter’s MAC address (shown here) to the network administrator before you can connect. - Region. The mini adapter’s region setting. Wireless channels in use depend on the country or region. Your mini adapter automatically scans approved channels for your region when it checks to see which networks are available in your area. Governments regulate the channels used for wireless transmission. Operating the mini adapter in a different region might violate local laws. Maintenance 26 A6100 WiFi USB Mini Adapter To view additional information about the mini adapter: 1. Insert the adapter into a USB port on your computer. 2. Click the NETGEAR genie icon that displays on the Windows systems tray or on the desktop. The NETGEAR genie Home screen displays. 3. Click the Other button. The following screen displays. Uninstall the Mini Adapter’s Software You can remove the mini adapter software. To uninstall the mini adapter’s software: Select Start > All Programs > NETGEAR A6100 genie > Uninstall NETGEAR A6100 Software. Maintenance 27 3. Troubleshooting and Frequently Asked Questions This chapter covers the following topics: • Troubleshooting • Frequently Asked Questions 28 3 A6100 WiFi USB Mini Adapter Troubleshooting The mini adapter LED is not lit. Try these troubleshooting tips: • Remove and reinsert the mini adapter. • Check the Windows device manager to see if the mini adapter is recognized and enabled. Reinstall the mini adapter software, if necessary. • Insert the mini adapter in a different USB port on your computer if one is available. I do not see the icon. Check to make sure that your mini adapter is inserted in the USB port. If it is removed, the icon does not display. When you insert the mini adapter into the USB port, the icon returns to your desktop and the Windows system tray. I cannot connect to a wireless network. • Make sure that your mini adapter is inserted securely into the USB port on your computer. • Click the icon to open NETGEAR genie. The following screen displays if the mini adapter cannot connect to the network that you selected: • If the network uses wireless security, you need to either know the wireless security settings or use Push 'N' Connect if the network supports WPS. Some networks also restrict use to only computers or wireless devices with known MAC addresses. If that is the case, follow the steps in View Additional Information About the Mini Adapter on page 26 to find the MAC address for your mini adapter and provide it to your network administrator. Troubleshooting and Frequently Asked Questions 29 A6100 WiFi USB Mini Adapter When I connect to the network, I cannot access the Internet. to open NETGEAR genie. The following screen displays if the mini adapter can Click connect to the network that you selected but you cannot access the Internet: Make sure that you are connected to the correct network. If you are, check to see if the router’s Internet connection is working. If the router’s Internet connection is not working, restart the modem, router, and computer. When I connect to the network, I cannot access shared resources such as printers. Try these troubleshooting tips: • Make sure that the router or access point is physically connected to the Ethernet network. • Make sure that the IP addresses and the Windows networking settings are configured correctly. No IP address is assigned to the mini adapter. IP address assignment can be lost if you upgraded your mini adapter software and did not reboot your computer. To correct this problem, either restart your computer, or connect to a different access point. Troubleshooting and Frequently Asked Questions 30 A6100 WiFi USB Mini Adapter Frequently Asked Questions Do USB ports go into a sleep mode if no traffic is going to or from the port? USB devices go into sleep mode if a USB feature called Selective Suspend is enabled, which it is by default. If a USB device goes into Selective Suspend mode, the network disconnects. To prevent this type of network disconnection, disable Selective Suspend. To disable Selective Suspend mode: 1. Select Start > Control Panel > Hardware and Sound > Power Options > Edit Plan Settings > Change Advanced Power Settings > USB Settings. 2. Change the setting for Selective Suspend mode to Disabled. How can I improve the speed of my wireless connection? The connection speed can vary depending on the type of USB port on your computer, the capacity of the router or access point for the wireless network, and the type of Internet connection. You can view the physical rate in the status bar at the bottom of the NETGEAR genie screen: • If the physical rate is 54 Mbps, you might be connected to an 802.11g network, or the wireless-N network might be set with WPA (TKIP) security. When WPA (TKIP) security mode is configured on the router or access point, WiFi regulations allow the mini adapter to connect at up to 54 Mbps only. For a faster connection, configure the security for the router or access point as WPA2 or WPA + WPA2 mixed wireless security. The connection speed still depends on the wireless capacity of the router or access point. • If you do not have a USB 2.0 port on your computer, the physical rate is limited to the 14 Mbps of the older USB 1.1 standard. How can I view the IP address for the mini adapter? Click the address. icon to open NETGEAR genie and click the Other button to view the IP Troubleshooting and Frequently Asked Questions 31 A. Factory Default Settings and Technical Specifications This appendix covers the following topics: • Factory Default Settings • Technical Specifications 32 A A6100 WiFi USB Mini Adapter Factory Default Settings The following table lists the default settings of your mini adapter. Table 1. Factory Default Settings Default Settings Wireless communication Enabled Country/region United States (varies by region) Operating mode 802.11ac draft 2.0, 802.11n, 802.11a, 802.11g, or 802.11b Data rate • • Up to 433 Mbps with a router or access point that supports 802.11ac Up to 150 Mbps with a router or access point that supports 802.11n Factory Default Settings and Technical Specifications 33 A6100 WiFi USB Mini Adapter Technical Specifications The following table provides technical specifications for the mini adapter. Table 2. Technical Specifications Feature Description Antenna 1 PIFA antenna Standards • • • • • Radio data rate Autosensing Frequency • • 2.4 GHz to 2.5 GHz CCK and OFDM Modulation 5 GHz OFDM, 802.11n MCS0-7, and 802.11ac MCS0-9 coding scheme Encryption • • • • WPA2-PSK [AES] WPA-PSK [TKIP] 40-bit (also called 64-bit) WEP data encryption 128-bit WEP data encryption Power 5V bus powered Bus interface USB 3.0, USB 2.0, compatible with USB 1.1 Provided drivers • • • • Dimensions 37 x 20 x 8.1 mm (1.46 x 0.79 x.0.32 in.) Weight 5 g (0.18 oz) Operating temperature 0–40C (32–104F) Emissions FCC, CE 802.11ac draft 2.0 802.11n 802.11g 802.11b 802.11a Microsoft Microsoft Microsoft Microsoft Windows 8 Windows 7 Vista Windows XP (32/64-bit) Factory Default Settings and Technical Specifications 34 B. Notification of Compliance B Regulatory Compliance Information This section includes user requirements for operating this product in accordance with National laws for usage of radio spectrum and operation of radio devices. Failure of the end-user to comply with the applicable requirements may result in unlawful operation and adverse action against the end-user by the applicable National regulatory authority. This product’s firmware limits operation to only the channels allowed in a particular Region or Country. Therefore, all options described in this user's guide may not be available in your version of the product. Europe – EU Declaration of Conformity Products bearing the marking comply with the following EU directives: • EMC Directive 2004/108/EC • Low Voltage Directive 2006/95/EC If this product has telecommunications functionality, it also complies with the requirements of the following EU Directive: • R&TTE Directive 1999/5/EC Compliance with these directives implies conformity to harmonized European standards that are noted in the EU Declaration of Conformity. For indoor use only. Valid in all EU member states, EFTA states, and Switzerland. This device may not be used for setting up outdoor radio links in France and in some areas the RF output power may be limited to 10 mW EIRP in the frequency range of 2454 - 2483.5 MHz. For detailed information the end-user should contact the national spectrum authority in France. FCC Requirements for Operation in the United States FCC Information to User This product does not contain any user serviceable components and is to be used with approved antennas only. Any product changes or modifications will invalidate all applicable regulatory certifications and approvals Devices operating within the frequency range of 5.15–5.25GHz are for indoor use only. FCC RF Radiation Exposure and SAR Statements SAR Statement This product has been tested for body-worn Specific Absorption Rate (SAR) compliance. The FCC has established detailed SAR requirements and has established that these requirements have been met while the product was installed in a host notebook computer. The SAR limit set by the FCC is 1.6 W/kg. RF Exposure Information The radio module has been evaluated under FCC Bulletin OET 65C (01-01) and found to be compliant to the requirements as set forth in CFR 47 Sections, 2.1093, and 15.247 (b) (4) addressing RF Exposure from radio 35 A6100 WiFi USB Mini Adapter frequency devices. This model meets the applicable government requirements for exposure to radio frequency waves. The highest SAR level measured for this device was 1.17 W/kg. This product complies with the US / Canada portable RF exposure limit set forth for an uncontrolled environment and are safe for intended operation as described in this manual. The further RF exposure reduction can be achieved if the product can be kept as far as possible from the user body or set the device to lower output power if such function is available. This transmitter must not be co-located or operating in conjunction with any other antenna or transmitter. SAR compliance has been established in typical laptop computer(s) with USB slot, and product could be used in typical laptop computer with USB slot. Other application like handheld PC or similar device has not been verified and may not compliance with related RF exposure rule and such use shall be prohibited. The USB dongle transmitter is approved for use in typical laptop computers. To comply with FCC RF exposure requirements, it should not be used in other devices or certain laptop and tablet computer configurations where the USB connectors on the host computer are unable to provide or ensure the necessary operating configurations intended for the device and its users or bystanders to satisfy RF exposure compliance requirements. Note: The country code selection is for non-US model only and is not available to all US model. Per FCC regulation, all WiFi product marketed in US must fixed to US operation channels only. FCC Declaration of Conformity We, NETGEAR, Inc., 350 East Plumeria Drive, San Jose, CA 95134, declare under our sole responsibility that the A6100 WiFi USB Mini Adapter complies with Part 15 Subpart B of FCC CFR47 Rules. Operation is subject to the following two conditions: • This device may not cause harmful interference, and • This device must accept any interference received, including interference that may cause undesired operation. FCC Radio Frequency Interference Warnings and Instructions This equipment has been tested and found to comply with the limits for a Class B digital device, pursuant to Part 15 of the FCC Rules. These limits are designed to provide reasonable protection against harmful interference in a residential installation. This equipment uses and can radiate radio frequency energy and, if not installed and used in accordance with the instructions, may cause harmful interference to radio communications. However, there is no guarantee that interference will not occur in a particular installation. If this equipment does cause harmful interference to radio or television reception, which can be determined by turning the equipment off and on, the user is encouraged to try to correct the interference by one or more of the following methods: • Reorient or relocate the receiving antenna. • Increase the separation between the equipment and the receiver. • Connect the equipment into an electrical outlet on a circuit different from that which the radio receiver is connected. • Consult the dealer or an experienced radio/TV technician for help. Canadian Department of Communications Radio Interference Regulations This digital apparatus (A6100 WiFi USB Mini Adapter) does not exceed the Class B limits for radio-noise emissions from digital apparatus as set out in the Radio Interference Regulations of the Canadian Department of Communications. This Class [B] digital apparatus complies with Canadian ICES-003. Cet appareil numérique de la classe [B] est conforme à la norme NMB-003 du Canada Industry Canada This device complies with Industry Canada licence-exempt RSS standard(s). Operation is subject to the following two conditions: (1) this device may not cause interference, and (2) this device must accept any interference, including interference that may cause undesired operation of the device. Le présent appareil est conforme aux CNR d'Industrie Canada applicables aux appareils radio exempts de licence. L'exploitation est autorisée aux deux conditions suivantes: (1) l'appareil ne doit pas produire de brouillage, et (2) l'utilisateur de l'appareil doit accepter tout brouillage radioélectrique subi, même si le brouillage est susceptible d'en compromettre le fonctionnement. Notification of Compliance 36 A6100 WiFi USB Mini Adapter Caution: (i) The device for operation in the band 5150–5250 MHz is only for indoor use to reduce the potential for harmful interference to co-channel mobile satellite systems; (ii) The maximum antenna gain permitted for devices in the bands 5250–5350 MHz and 5470-5725 MHz shall comply with the e.i.r.p. limit. (iii) The maximum antenna gain permitted for devices in the band 5725–5825 MHz shall comply with the e.i.r.p. limits specified for point-to-point and non point-to-point operation as appropriate. (iv) Users should also be advised that high-power radars are allocated as primary users (i.e. priority users) of the bands 5250–5350 MHz and 5650–5850 MHz and that these radars could cause interference and/or damage to LE-LAN devices. Advertissement Le guide d’utilisation des dispositifs pour réseaux locaux doit inclure des instructions précises sur les restrictions susmentionnées, notamment : (i) Les dispositifs fonctionnant dans la bande 5150–5250 MHz sont réservés uniquement pour une utilisation à l’intérieur afin de réduire les risques de brouillage préjudiciable aux systèmes de satellites mobiles utilisant les mêmes canaux; (ii) Le gain maximal d’antenne permis pour les dispositifs utilisant les bandes 5250–5350 MHz et 5470–5725 MHz doit se conformer à la limite de p.i.r.e.; (iii) Le gain maximal d’antenne permis (pour les dispositifs utilisant la bande 5725–5825 MHz) doit se conformer à la limite de p.i.r.e. spécifiée pour l’exploitation point à point et non point à point, selon le cas. (iv) De plus, les utilisateurs devraient aussi être avisés que les utilisateurs de radars de haute puissance sont désignés utilisateurs principaux (c.-à-d., qu’ils ont la priorité) pour les bandes 5250–5350 MHz et 5650–5850 MHz et que ces radars pourraient causer du brouillage et/ou des dommages aux dispositifs LAN-EL. Radiation Exposure Statement The product complies with the Canada portable RF exposure limit set forth for an uncontrolled environment and are safe for intended operation as described in this manual. The further RF exposure reduction can be achieved if the product can be kept as far as possible from the user body or set the device to lower output power if such function is available. Déclaration d'exposition aux radiations: Le produit est conforme aux limites d'exposition pour les appareils portables RF pour les Etats-Unis et le Canada établies pour un environnement non contrôlé. Le produit est sûr pour un fonctionnement tel que décrit dans ce manuel. La réduction aux expositions RF peut être augmentée si l'appareil peut être conservé aussi loin que possible du corps de l'utilisateur ou que le dispositif est réglé sur la puissance de sortie la plus faible si une telle fonction est disponible. Warning for Installations in Japan It is established by Radio Law that 5GHz transmitters are allowed to be used only indoors. 㟁Ἴἲࡼࡾ ,W52, W53 ࡣᒇእ࡛ࡢ⏝ࡣ⚗Ṇ࡛ࡍࠋ Notification of Compliance 37 A6100 WiFi USB Mini Adapter Interference Reduction Table The following table shows the recommended minimum distance between NETGEAR equipment and household appliances to reduce interference (in feet and meters). Household Appliance Recommended Minimum Distance (in feet and meters) Microwave ovens 30 feet / 9 meters Baby Monitor - Analog 20 feet / 6 meters Baby Monitor - Digital 40 feet / 12 meters Cordless phone - Analog 20 feet / 6 meters Cordless phone - Digital 30 feet / 9 meters Bluetooth devices 20 feet / 6 meters ZigBee 20 feet / 6 meters Notification of Compliance 38