1
TELE / TELE Info 2.2 Quick Guide___________________________________________________________________
TELE / TELE Info 2.2
Quick Guide
Attention! This is only a Quick Guide to help you start using the software.
For more detailed information please read TELE User’s Manual.
Contents:
Overview
3
Creating a New Project
Adding Clips to Project
Creating a Video Block
Adding Secondary Events to Video Block
4
4
5
6
Clip editor
8
Adding objects to the Schedule
Adding Clips and/or Video Blocks to the Schedule
Adding a Logo
Anchors
10
Logo Editor
Adding Static Text
Adding Logo (.logo or .tga file)
Adding Clock
Adding Crawl (available in TELE Info only)
Adding Roll (available in TELE Info only)
Adding Window (available in TELE Info only)
Creating a Template
11
11
12
13
13
14
14
16
Schedule Playback
17
F ile Converter
18
Version 3.0
________________________________________________ Page 1
TELE / TELE Info 2.2 Quick Guide___________________________________________________________________
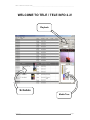
WELCOME TO TELE / TELE INFO 2.2!
Playback
Schedule
Media Tree
Version 3.0
________________________________________________ Page 2
TELE / TELE Info 2.2 Quick Guide___________________________________________________________________
Overview
WITH TELE 2.2 YOU CAN:
Automate your TV station broadcast by scheduling programs playout.
Insert local (regional) commercials into central channel broadcasting network.
Combine content from other channels with various CG effects like: Logos, Clocks, Animated
Banners, Text Overlays, etc.
Schedule output of crawls, banners, ad blocks and full-screen video in-sync with sound.
Playout professional quality video files in formats created by various hardware and software
manufacturers like Pinnacle, Matrox, Canopus and others in real time without preliminary
checking.
Playout video compressed in various formats – MPEG-1/4, QuickTime, Windows Media, Indeo
and Cinepak codecs, etc. It does not necessarily require 25 frames -per-second frequency.
Playout DVD files (PAL/NTSC).
Playout whole video files as well as their fragments.
Combine source video files of various formats into video blocks using the simplest montage
methods (trimming, direct patching) and tweak video clip visual parameters (brightnes s,
contrast, saturation, etc.).
WITH TELE INFO 2.2 YOU CAN:
Design programs for round-the-clock broadcast with commercials and informational messages .
Simplify the process of playlist compilation with built-i n rotation mechanism . For example, o
t
organize a personal music channel, you can put together an entirely automated rotation of clips
with titles (song name, performer, etc.).
Scale video data and display it in one or two "windows" surrounded by various graphics
elements – L ogos, Crawls, Stock/Sport Tickers, Time/Temp Displays, etc.
Playout Crawls “on the fly” and use them for real time data visualization, like SMS-chat support.
Crawl can run directly over the video file displayed by the system.
Start a D V-recorder, receive video signal via FireWire interface or other digital source and
perform operative insert of this signal without using mixer or p reliminary saving into computer.
Show rectangular area of Windows Desktop on TV screen.
In addition, system open program interface (SDK) can help develop your own applications for
live broadcast programs and integrate them into existing studio complex.
The package also contains SMS Terminal application, which is des igned for SMS and MMS
messages output, captions on animated tickers, crawls, vote results , etc.
Version 3.0
________________________________________________ Page 3
TELE / TELE Info 2.2 Quick Guide___________________________________________________________________
Creating a new project
1. Right click on the Media Tree.
2. Click Add Project .
This will create a new folder named New Project01.
You can change the name of this folder by selecting
it and clicking on its name.
Adding clips to project
1. Right click on project folder ( the folder you want to add the clip to).
2. Click Add Clip. It will open a dialog box to choose the file on your hard disk.
3. Select the desired file and click Open. Clip Editor window will open.
4. Click OK.
Clips can also be dragged and dropped from Windows folders straight into Media Tree or
Schedule . The program will automatically create an “Inbox” folder and add your clips to it.
Version 3.0
________________________________________________ Page 4
TELE / TELE Info 2.2 Quick Guide___________________________________________________________________
Creating a Video Block
1. In your project folder right click on one of the clips.
2. Click Add Video Block.
3. Drag the clip from the Media Tree list and drop it into the timeline.
4. Do the same for every clip you wish to add .
5. When finished, click OK.
Version 3.0
________________________________________________ Page 5
TELE / TELE Info 2.2 Quick Guide___________________________________________________________________
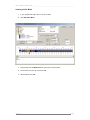
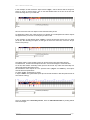
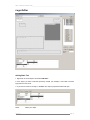
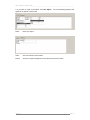
Adding Secondary Events to Video Block
To add a new Secondary Event, right click on the timeline at the place you wish to add it.
th
In this example, the Secondary Event was added at the 30 second.
Click Add Secondary Event.
The application will place an arrow showing the starting point of the event.
The Secondary Event settings will appear in the lower part of the window.
There, you can choose which objects you wish to add and configure their properties .
To do this, click on click here... and select the object from the list of available objects.
Once the object is selected, you can configure the parameters it will show on the screen.
For example, if it is a Logo object, you can set its location and the name of the file it should
show. If it is a Static one, you can write the text it should show.
Version 3.0
________________________________________________ Page 6
TELE / TELE Info 2.2 Quick Guide___________________________________________________________________
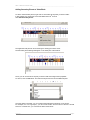
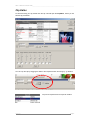
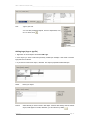
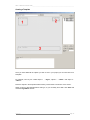
In this example, we will choose the object named “logo1 ”, and set the file with the image we
want it to show. To set the image, click on the three-dotted button at the end of the line and
locate the image file on your hard disk.
We can insert more than one object into the same Secondary Event.
To add another object, click under the object you already set. The dropdown list with the objects
will appear where you choose a new object you wish to add.
In this example, we will add the object “static1”, and we will write the text we want it to show
(to do this, after selecting the object, we will type the text in the same line, next to the list (as
shown in the picture).
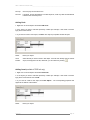
The objects used i n one S econdary Event can be also used in other Secondary Events.
To illustrate this, we will make the objects we set in second 30 disappear 10 seconds later.
To do this, add another Secondary Event (this time at second 40 ). Follow the same steps we
used to add the first Secondary Event.
We inserted the same objects as in the previous Event (“logo1” and “static1 ”), each object
was set with these parameters:
To object “logo1” we assigned a .tga file.
In object “static1” we typed a blank space (this is because we want to take the previous text off
air and show nothing).
Once you added all the Secondary Events , close the Video Block Editor by clicking O K to
save the changes.
Version 3.0
________________________________________________ Page 7
TELE / TELE Info 2.2 Quick Guide___________________________________________________________________
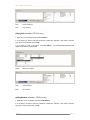
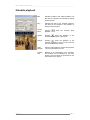
Clip Editor
To edit and modify your clip, double click the clip. This will open the Clip Editor , where you can
edit the clip parameters .
You can crop the clip by dragging the slider to the required location and using “{“ “}” buttons.
Clip can be looped and set to a specific duration.
Version 3.0
________________________________________________ Page 8
TELE / TELE Info 2.2 Quick Guide___________________________________________________________________
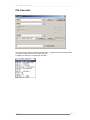
Normalize will equalize the volumes of different
clips.
DVD Audio Track allows to choose a track from the
list of available DVD audio channels when you play
a DVD file.
In the lower part of Clip Editor window (click More >> if it is hidden ) you can modify the clip’s
visual and audio properties.
Version 3.0
________________________________________________ Page 9
TELE / TELE Info 2.2 Quick Guide___________________________________________________________________
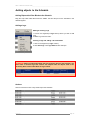
Adding objects to the Schedule
Add ing Clips and/or Video Blocks to the Schedule
Drag the Clip and/or Video Block from the Media Tree and drop it into the S ch edule in the
desired segment.
Adding a Logo
Adding an existing Logo
1. Click on the segment (i n Logo column) where you wish to add
Logo.
2. Select L ogo from the menu .
Creating a Logo and adding it to the Schedule
1. Click on the segment (in Logo column).
2. Click Add Logo. The Logo Editor window will open.
ATTENTION! When you add Video Block that has Secondary Event to the Schedule, you
must select a relevant Logo that contains the template with the objects used in the
Secondary Event of this Video Block in Logo column.
Anchors
Anchors cannot be moved. They divide clips in the Schedule.
Version 3.0
_______________________________________________ Page 10
TELE / TELE Info 2.2 Quick Guide___________________________________________________________________
Logo Editor
Adding Static Text
1. Right click on the workspace and select Add Static .
2. If the object you want to add was previously created (for example, it was used in another
logo ) select it from t he list.
3. If you want to create a new object, click New. The object’s properties window will open .
Name:
Version 3.0
Name your object.
_______________________________________________ Page 11
TELE / TELE Info 2.2 Quick Guide___________________________________________________________________
Text:
Type in your text.
You can add pre-defined objects, such as temperature, hour,
etc. To do this, click
Adding Logo (.logo or .tga file )
1. Right click on the workspace and select Add Logo.
2. If the object you wish to add was previously created (for example, it was used in another
logo) select it from the list .
3. If you want to create a new object, click New. The object’s properties window will open .
Name:
Name your object.
Picture:
Select the file you wish to show in this object. If the file was already used in another
object, it will appear in the list; otherwise, you can select it by clicking
.
Version 3.0
_______________________________________________ Page 12
TELE / TELE Info 2.2 Quick Guide___________________________________________________________________
No Loop
Check to play the animation once.
No Anim
If checked, and the selected file is a TGA sequence, it will only take the selected file
instead of the whole sequence.
Adding Clock
1. Right click on the workspace and select Add Clock .
2. If the object you wish to add was previously created (for example, it was used in another
logo) select it from the list.
3. If you want to create a new object, click New. The object’s properties window will open.
Name:
Name your object.
Clock
location :
Select the file you wish to show in this object. If the file was already used in another
object, it will appear in the list; otherwise, you can select it by clicking
.
Adding Crawl (available in TELE Info only)
1. Right click on the workspace and select Add Crawl.
2. If the object you wish to add was previously created (for example, it was used in another
logo) select it from the list and click O K.
3. If you want to create a new object, click New Object... The corresponding properties will
appear at the bottom of the window.
Name:
Version 3.0
Name your object.
_______________________________________________ Page 13
TELE / TELE Info 2.2 Quick Guide___________________________________________________________________
Text:
Enter Crawl text.
Font:
Choose font.
Adding Roll (available in TELE Info only)
1. Right click on the workspace and select Add Roll.
2. If the object you wish to add was previously created (for example, it was used in another
logo) select it from the list and click O K.
3. If you want to create a new object, click New Object... The corresponding properties will
appear at the bottom of the window.
Name:
Name your object.
Text:
Enter Roll text.
Font:
Choose font.
Adding Window (available in TELE Info only)
1. Right click on the workspace and select Add Window .
2. If the object you wish to add was previously created (for example, it was used in another
logo) select it from the list and click O K.
Version 3.0
_______________________________________________ Page 14
TELE / TELE Info 2.2 Quick Guide___________________________________________________________________
3. If you want to create a new object, click New Object... The corresponding properties will
appear at the bottom of the window.
Name:
Name your object.
Scale:
Check to scale the video window.
Picture:
Shows an image as background in the external area of the window .
Version 3.0
_______________________________________________ Page 15
TELE / TELE Info 2.2 Quick Guide___________________________________________________________________
Creating a Template
Once you have added all the objects you wish to use in your project you can save them as a
Template.
For example, let’s say we created object 1 - “logo1”, object 2 - “clock1” and object 3 “static1”.
Place the objects in the Template window where you want them to be shown on the screen .
Assign a name to this template before saving it, so you can easily find it later. Click Save and
close the Logo Editor window.
Version 3.0
_______________________________________________ Page 16
TELE / TELE Info 2.2 Quick Guide___________________________________________________________________
Schedule playback
Version 3.0
Edit:
Indicates the date of the edited schedule. This
date can be changed in the calendar by clicking
the arrow button .
Play:
Indicates the date of the schedule playback.
This date can be changed i n the calendar by
clicking the arrow button .
Current
Block:
Pressing
playback.
System:
Pressing
starts the playback of
schedule according the system clock.
Custom:
Pressing
starts the playback of the
schedule according to the hour set in the text
box (in HH:MM:SS:FF format).
Video
Window:
Opens a video window to preview the playback,
1 to 2 seconds before it’s on air
Preview
only:
Disables on air reproduction of the schedule.
The schedule will be displayed in the video
window. The input signal is reproduced on the
output without any change.
starts
the
selected
block
the
_______________________________________________ Page 17
TELE / TELE Info 2.2 Quick Guide___________________________________________________________________
File Converter
The system uses its own file format for animation files – .logo files. File Converter application
can convert a TGA sequence into a single .logo file.
In addition, the following conversions can be made :
Version 3.0
_______________________________________________ Page 18