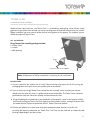
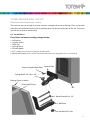
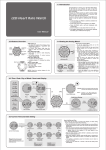
1
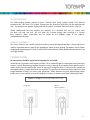
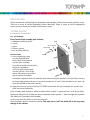
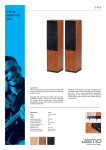
Discover yours.
CONGRATULATIONS
We sincerely thank you for having granted Totem the special place in your living environment. These
speakers are designed to redefine your musical understanding and open up corridors of new experiences.
We hope you not only enjoy but experience Totem as your guide to a new and rewarding listening
environment! You will without a doubt experience a Totem moment.
OUR VISION
Totem Acoustics’ mission is to develop loudspeakers capable of reproducing a truly musical and involving
performance. Our goal is to provide designs that are both affordable and real ‘soul movers’ for the music
lover and surround lover. Music of any period, country or style is accurately and emotionally rendered with
a powerful focus that is yet soul stirring.
Each speaker is a ‘piece de resistance’ that attests to the profound sound staging that can be reproduced
by flexible and innovative engineering. Listen and believe...
totemacoustic.com
TABLE OF CONTENTS
_____________________________________________________________________________________________________________________________
Totem
Limited Warranty
3
_____________________________________________________________________________________________________________________________
User
Manual
4
_____________________________________________________________________________________________________________________________
Unpacking4
_____________________________________________________________________________________________________________________________
Our
Thoughts on Grills
4
_____________________________________________________________________________________________________________________________
Speaker
Position
4
_____________________________________________________________________________________________________________________________
Bookshelf4
_____________________________________________________________________________________________________________________________
Floorstanding5
_____________________________________________________________________________________________________________________________
Center
Channels
5
_____________________________________________________________________________________________________________________________
Connections5
_____________________________________________________________________________________________________________________________
Troubleshooting
Guide
6
_____________________________________________________________________________________________________________________________
Amplifier
Distortion
6
_____________________________________________________________________________________________________________________________
Volume6
_____________________________________________________________________________________________________________________________
Limits6
_____________________________________________________________________________________________________________________________
Environmental
Information
6
_____________________________________________________________________________________________________________________________
Decoupling
Totem PLINTH
7
_____________________________________________________________________________________________________________________________
Decoupling
Totem CLAW
8
_____________________________________________________________________________________________________________________________
Totem
Speaker Wall Mount
9
_____________________________________________________________________________________________________________________________
Totem Beak (sound enhancement)
10
_____________________________________________________________________________________________________________________________
Mass
Loading Instructions
11
_____________________________________________________________________________________________________________________________
Grill
Instructions
12
_____________________________________________________________________________________________________________________________
2
TOTEM LIMITED WARRANTY
Please register online at www.totemacoustic.com within two weeks of the purchase date.
The Totem speakers must be purchased from a TOTEM AUTHORIZED DEALER.
Keep your original bill or receipt obtained from your Totem Authorized Dealer.
All Totem products are created with the utmost care and quality in mind. If ever a problem should arise,
Totem’s speaker are covered by a five (5) year limited warranty, (excluding subwoofers) starting from
the date of purchase. The Totem limited warranty applies to products in normal home use only. The
warranty is void if serial numbers have been altered or removed. The warranty is void if products show
signs of abuse. The warranty is void if the speakers have been tampered with.
The speakers require at least 85-90 hours of actual music playing time as a minimal break-in period. During
this time, refrain from playing them at very loud levels. You will notice a definite gradual improvement in
the cohesiveness of the music reproduction as this occurs.
Retain the sturdy carton and all packing material; if needed, it will prove invaluable for damage-free
transport or storage and upgrade purposes.
We reserve the right to any future change or modification without notice. If you have any further queries
or require any classifications, feel free to contact your Totem Authorized Dealer.
For further assistance contact your TOTEM AUTHORIZED DEALER
or visit the Support Section of the Totem website at www.totemacoustic.com.
totemacoustic.com
3
USER MANUAL
Thank you for choosing Totem Acoustic. Please take the time to fully read this manual prior to beginning
set-up. The manual will clearly guide you to achieve the best possible sound that these newly acquired
Totem speakers are capable of providing.
UNPACKING
Totem Acoustic keeps to a strict quality control regimen and all factory-sealed products leave our facility
in perfect condition. If there is any damages visible or concealed that has occurred in handling it must be
reported immediately to your Authorized Totem Dealer.
Carefully remove the speaker(s) from the box(es); take caution as the size often deceives the actual weight.
Save all custom cartons and packaging foam for future use. They are rather expensive and may come in
handy for future upgrades.
OUR THOUGHTS ON GRILLS
We firmly believe that our chosen drivers are of the highest quality making them esthetically appealing;
therefore speaker grills remain optional on all Totem speakers and subwoofers. The soundstage is
also slightly altered and in order to achieve ideal performance Totem recommends the removal of
grills in intense listening sessions. Take note that our architectural series along with our lifestyle series
(Dreamcatcher and KIN speakers) are packaged with grills.
SPEAKER POSITIONING
Totem produces speakers with great dispersion, both on the vertical and horizontal axis. They can
be placed in extremely varied positions and still produce a large and accommodating, non-shifting
soundstage. Keep in mind that a room with a variety of materials will deliver a much more harmonized
sound. These speakers are of a superior design and will perform remarkably well in a variety of spaces.
Special care should be taken to ensure proper placement. Below are some guidelines for general inroom placement than can help optimize performance.
BOOKSHELF
Bookshelf speakers should be placed on appropriate stands, or shelves, at ear level or above.
If they are placed extremely close to the ceiling, you may place them vertically with tweeter facing
downwards. (Upside down)
Take into account that Totem speakers not only image in-between their individual positions but also
towards the outside of their axis (both vertical and horizontal). In placing the monitors in room, one may
actually optimize their performance by placing them closer to one another.
4
FLOORSTANDING
Our floorstanding speakers require no toe-in. Position them facing straight ahead if the distance
between them is less than 2.5 m (8 foot). Greater than this distance a small toe-in can be experimented
with. Try toeing-in one speaker slightly and then the other as needed. Experimentation is the key.
Totem recommends that you position the speakers at a minimum 305 mm (12 inches) from
the back wall and side wall, this will allow for a better energy flow resulting in a cleaner
bass response. More information can be found on the Support page of our website.
www.totemacoustic.com
CENTER CHANNELS
Our Center Channels are carefully voiced to seamlessly match the appropriate Mains. Please refer to our
website www.totemacoustic.com for the appropriate center channel pairing. For optimal results Totem
recommends positioning the Center Channel 20-30 inches above the floor, equidistant between the Left
and Right speaker.
CONNECTIONS
All connections should be made with the equipment turned off.
Totem delivers all speakers with jumpers installed. For a standard single wire connection simply leave the
jumpers in place. Be certain to connect the positive red (+) terminal of the speaker to the positive red (+)
output terminal on the amplifier. Be certain to connect the negative black (-) terminal of the speaker to
the negative black (-) output terminal on the amplifier. The speakers will sound out of phase (bass loss and
image distortion) if there is an error in your connection. Totem speakers can be bi-amped and bi-wired,
please consult your amplifier manual for detailed instructions or contact your Totem Authorized Dealer.
Caution: For a bi-amp connection jumpers MUST be removed.
Single wire
Bi-wire
Remove jumpers
5
TROUBLESHOOTING GUIDE
No sound: Verify that your pre-amp and/or amplifier, and receiver are plugged into the AC PLUG and are
turned on. Verify that the wall AC outlet is functional and that your system is not on mute.
Sound from one speaker only: Verify the balance control on your system. Swap speaker sides to verify
if speaker is functional. Verify power cords on all sources. (Amplifier, preamp, receiver, CD, DVR)
Lack of bass or image: Verify the polarity of speaker connections.
AMPLIFIER DISTORTION
The most common source of speaker damage results from amplifier distortion. Your amplifier may run out
of clean power upon listening at loud levels. A direct consequence of such an overuse is distorted power,
producing a greater quantity of distortion than its rated output power. This provides a threat of damage
to any loudspeaker.
The greater the amplifier power, the safer the loudness potential. A 50 watt/channel amplifier, if driven
above this 50 watt/channel limit, will naturally produce multiplicatively more distortion than at 50 watts.
A 120 watt/channel amplifier will have substantial distortion above 120 watts, but will not allow any
significant distortion below 100 watts. To conclude, more amplifier power provides cleaner power and
less possibility for damage.
VOLUME
Volume controls on the amplifier/ receiver/preamplifier are very misleading. Please note that the volume
control does not address power-output, but simply adjusts the audible level of music. It is the type of music
being played that has an incidence on the amount of power used at a given volume level. Less dynamic
music utilizes lesser amplifier power than more dynamic music does. With most music, the amplifier
reaches its maximum power between the 11 and 1 o’clock position on the volume dial.
Distortion is inevitable when the amplifier is pushed above its rated output level, which may result in
speaker damage. This occurs with any type of speaker. This type of damage constitutes abuse and may
not be covered by warranty. Be attentive to the instant distortion commences, turning the volume control
down to prevent speaker and/or amplifier damage.
LIMITS
Be wary of providing more power than is appropriate for your speakers and damaging them. Although
a more powerful amplifier may provide better sound, it is very important to utilize speakers within their
power-range rating to prevent damage.
ENVIRONMENTAL INFORMATION
All Totem products are designed to comply with international Restriction of Hazardous Substances (RoHS)
and CARB certification.
6
DECOUPLING
Totem recommends a decoupling the loudspeaker to break down cabinet resonance for optimum results.
There are a variety of unique decoupling systems offered by Totem. In order to find the appropriate
system you must match your speaker to the correct system.
TOTEM PLINTH
Included with Arro and Sttaf
list of material
Every Totem Plinth assembly pack includes:
Plinth
• 2 wood-painted black plinths
• 8 screws
Silicone Washer
• 8 spikes
HNut-10-24
• 8 silicone washers
• 8 pcs of yellow adhesive
instructions
1 Insert a tightening screw
into the threaded spike.
Next slide a silicone washer
into the spike assembly.
Insert the assembly into the plinths.
Repeat this procedure
until all 8 spikes are fastened
into the 2 plinths. Once all the
spikes and washers are installed
level the plinth to the floor.
Box
Adhesif
Spikes
Precautions to protect the finish should be taken when placing the speaker on its head. Please use one
of the packaging foam end caps to secure the speaker on its head. Once the adhesive has been set,
place the speaker on the plinth squarely.
2 Apply firm pressure to secure the bond. TOTEM recommends that you leave both the speaker and plinth connected indefinitely.
Every assembly pack includes a yellow reusable adhesive which is separated into 8 units (4 per plinth).
Separate 4 adhesive units and place them on the bottom of the speaker, 1” from the edge of the speaker
(the adhesive will spread out once loaded).
In the event that the plinths need to be removed:
Twist the plinths slowly in a clockwise fashion. Take note not to “pull” the plinth off, as this may cause
damage to the cabinet.
7
TOTEM CLAW
Included with Hawk and Forest
Can also be used on Arro and Sttaf (purchased separately)
Machined from solid aluminum, the Totem Claw is a revolutionary decoupling system whose unique
geometric shape allows them to break up surface standing waves and control resonances on any surface.
Before installation you may want to locate the final resting place of the speaker. The speakers are predrilled to accept the Totem Claws.
list of material
Every Totem Claw assembly package includes: • 6 Totem Claws
• 6 screws
• 6 ball bearings
Bearing
Claw
Round Hex Head Socket Screw-M5X30
Note: A Robertson or Phillips screwdriver is necessary for this installation.
instructions
1 You must position the speaker on its head. Take precaution to protect the finish by using the packaging foam end cap to secure your speaker prior to installation.
2 Insert a screw into a single Totem Claw and position the assembly (screw and claw) over the pre-
drilled hole; the screw will serve as a guide to find the pre-drilled hole. The Totem Claws should be positioned on each rear side of the speaker and one centered in front.
3 Using the appropriate screwdriver or low speed drill, with proper bit, screw in the fastener carefully while firmly pushing the Totem Claw flush against the front speaker surface, making full contact with the wood surfaces. Repeat the procedure for all 3 Totem Claws and speakers.
4 Position the speaker on its claws after finding the appropriate room location. Insert the self–
centering ball bearing underneath the Totem Claw. The Claws can be used with or without the ball
bearings depending on the floor surface.
8
TOTEM SPEAKER WALL MOUNT
Recommended for Dreamcatcher and Mite
These mounts are constructed of steel for maximum strength and minimum vibration. They are tested to
more than the stated load (20 lbs) and the weakest points will be the attachment to the wall. Fasten the
speaker only to stud or solid masonry.
list of materials
Every Totem wall mount assembly package includes:
• 2 wall plates
• 2 speaker plates
• 1 Allen key
• 2 joining screws
• 2 fastening bolts
• 6 x 2” screws (to be used if mounting into wooden studs)
• 6 plastic wall anchors (to be used in conjunction with screws if mounting into brick or cement block)
Screws of Speaker Back Plate
Speaker Plate
Carriage Bolt 5/16”-18nc x 3/4”
Existing Gyproc or others
Existing Wall Frame
Box
Wood Screw #10 x 2 1/2”
Wall Plate
Hex.Nut 5/16”-18nc
9
Instructions
1 To fasten the wall plate to the wall with wooden stud: Drill two 1/8 pilot holes 2 inches deep and screw
the wall plate to the wall. Into brick or cement wall: Drill two ¼ inch holes 2 inches deep.
Fit the plastic wall anchors and screw the wall plate to the wall.
2 To fasten the speaker plate to the speaker: Unscrew the two bottom screws of the speaker back plate
with the supplied Allen key. Place your bracket up against the speaker back plate as shown and reinsert
the screws firmly with the Allen key provided.
3 To assemble the speaker plate to the wall: Bolt the speaker plate on top of the wall plate and adjust to
desired position. Tighten the bottom nut firmly. The bottom knob can be replaced by 5/16” – 18
locknuts to make the installation tamper resistant.
TOTEM BEAK
research and development
The “Beak” was developed to control parasitic vibrations that occur
on top of a speaker cabinet. These resonances actually interfere with
speaker performance, specifically the waveform symmetry emitted by
tweeters.
Implementing a Beak on any speaker can actually control and
provide a better interaction between speaker, tweeter and housing.
Careful thought and research were poured into the development of
the Beak. Its precisely defined contour was carefully designed; if any
of its properties were altered, it would impact the flux created within
and render the unit ineffective.
the shape
The “Beak” is milled in a prescribed form, which controls resonance
and directs emanation. These distortions occur within a strict range.
The Beak can actually channel common distortion and move it through
its cavity to the discharge point on top, hence its shape and name.
As the beak on a bird or whale channels sound, this Beak channels
the negative effects of dynamic speaker housings.
10
mass and detail
The mass of the Beak is crucial to proper holography and image integration. In addition to the proper size
and curve ratio, tests were done to determine the texture on the surface of the Beak. The spacing of the
micro ribs increases from the bottom part to the peak. In fact, the line structure (micro ribs) controls the
velocity at which the Beak dissipates distortion, actually helping the tweeter extend its range. This surface
texture actually helps alter frequency and phase, allowing you to lock in a proper height and correct threedimensional image.
placement
The placement of the Totem Acoustic “Beak” on a smaller speaker is usually towards the outer front corner
of a speaker pair. If one looks at the top of the “Arro” (our smallest surface area speaker), the placements
of the Beaks are right up front toward the outside. Other small speakers benefit from approximately the
same arrangements. On larger speakers or on units with top mounted tweeters, a proper location must
be derived. Experimentation is the key to determining the proper location.
specs
The high frequency difference when using the “Beak” is measurable and quite apparent. The tweeter
generally has better linearity in the 8 kHz to 20 kHz range. Therefore, better staging and imaging is evident.
At the crucial crossover point, frequency dips both on and off axis can be alleviated by as much as 1.5 dB.
Outcome: better harmony between woofer and tweeter, resulting in enhanced speed, impact and transients.
TOTEM MASS LOADING INSTRUCTIONS
Recommended for Arro, Sttaf, Hawk and Forest
caution
Overloading has a tendency to reduce overall image.
Please experiment with small increments of loading to achieve optimal results.
to load totem speakers
Sand Box
Speaker Box
Speaker Box
Cover
Funnel
11
1 Lay one speaker against a low piece of furniture (example: couch) with the speaker facing the ground.
Take care not to crush the dome tweeter or scratch the finish. The packaging foam may also be used
to secure the cabinet.
2 Fill only the lower opening, not the upper (Black plastic lined) cavity. The upper cavity is for bass reflex
and air control and will cause damage to the speaker if filled.
3 Use a funnel or any device which will facilitate loading;
4 Peel off one of the clear plastic mass loading covers, from the plastic backing. Two (2) mass loading covers are provided.
5 Apply it to the opening to seal the cavity;
6 Repeat this procedure on the next speaker.
note
Always remember to apply the plastic adhesive stopper to seal the cavity.
To prevent damage, the speakers, should never be transported with mass inside. The cavity must be emptied prior to
transport by using a shop vac and also sealed thereafter using a sturdy tape to avoid any loose sand from migrating.
Totem recommends you use of either: Kiln dried sand; Silica sand or lead shots.
TOTEM GRILLS INSTRUCTIONS
Dreamcatcher, Mite and Rainmaker Bookshelfs and Center Channels
Arro, Sttaf, Hawk and Forest Floorstanders
Storm Sub and Thunder Sub Subwoofers
We do not recommend the application of the grills if you wish maximum performance, however if for
aesthetic or safety reasons you desire to use the grills just follow these easy instructions:
list of materials
• Optional
grill cover
• Velcro circlets (female)
• Velcro circlets (male)
The grills do not come with the Totem Speakers and have to be purchased separately.
To mount the grills, first apply Velcro circlets to the four corners of each grill.
Center over the speaker opening making sure that you do not press down on the grill frame.
Once centered over the speaker opening, gently apply pressure to affix the Velcro to the speaker cabinet.
12