1
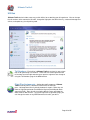
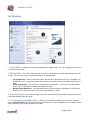
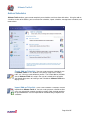
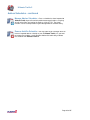
Ultimate Traffic 2
•
Welcome to Ultimate Traffic 2
2
•
What to expect in Flight Simulator X
3
•
Using the Interface
5
o
Statistics and Operations
6
o
Traffic Options
7
o
o
Global Traffic Options
9
Commercial Aircraft
11
General Aviation Aircraft
13
AI Labels
14
Timetables
Printable
17
Electronic Status Board
19
Flight View Map Setup
20
Flight View Map Display
21
•
24
Utilities
Tail Numbers
26
Flight Plan Assignments
27
Add-on Schedules
29
o
15
Creating
31
Importing
39
Managing
40
Removing
41
Parking Codes
42
Updates
43
Credits
44
Page 1 of 45
Ultimate Traffic 2
Welcome to Ultimate Traffic 2.
You are about to enter an exciting new world of AI traffic. Redeveloped from the ground up, Ultimate Traffic 2
provides the definitive answer to AI traffic needs. Based on over 3 years of research and development, UT2
takes advantage of the latest in AI technology and gives a never before seen look to AI traffic.
Gone are traffic.bgl files and the need for aircraft to fly a 'round robin' style of flight. Gone are the days of seeing
airlines fly from one airport to the next in a straight line. Ultimate Traffic 2 revolutionizes the AI traffic
experience. All scheduled flights, for over 940 of the worlds airlines, totaling over 550,000 weekly flights are now
included. Every airline flight has filed and flies a real flight plan between airports. Turn up the contrails and
experience the 'Highways in the Sky'. Get the correct feel at airports as the actually scheduled flights arrive and
depart.
Ultimate Traffic 2 will make you rethink AI traffic design.
Page 2 of 45
Ultimate Traffic 2
What to expect in Flight Simulator X
Planes, planes, planes, and a pause....
Ultimate Traffic 2 uses a completely new method of injecting AI traffic into Microsoft's Flight Simulator X. The
traffic.bgl file is no longer used and UT2 controls when and where all aircraft are placed in FSX. These means
you will get more scheduled flights, more accurate schedules, more realistic general aviation, and flights flying
using actual flight plans (not the great circle direct routing between airports). This also means that when you start
up FSX, change sim time, or move from one airport to another you will not initially see traffic. Within a second or
two, Ultimate Traffic 2 will determine your new position or time and start injecting its traffic. During the initial
injection of traffic, FSX will freeze for a very short period of time, usually no more than 2 seconds. This is just like
the usual loading of traffic message you see on the FSX progress bar, it just happens after you enter the sim.
Busy skies and clear skies...
Expect to see very busy skies, unless you are in an unbusy area. Wait, what?!? Since Ultimate Traffic 2 is
using real airline schedules on real flight plans some areas of the world will be a lot busier than others. Go to
New York or London, VERY busy; go to Montana or Northern Canada, not very busy. The traffic is placed
realistically and mimics the real world. You would not expect a traffic jam in the skies of Montana in the real world
and Ultimate Traffic 2 will not give it to you in FSX.
Page 3 of 45
Ultimate Traffic 2
What to expect in Flight Simulator X - continued
Delta 1238, go around...
A bunch of flights will be competing for the runways in FSX just like they do in the real world. Do not be surprised
if coming down final you have to accurately fly the approach in order to make sure that you do not overtake the
aircraft in front of you. If you do not want to worry about that, no problem, Ultimate Traffic 2 has you
covered. There is nothing worse than having to go-around after a great 2 hour flight because some AI pilot is
slow to clear the runway. Just get rid of him. If you are on a flight plan in FSX (under FSX ATC control) you can
clear the runways and approach momentarily to make room for yourself. Just press CTRL + SHIFT + S all at
once. UT2 will reinject the traffic in a minute and the aircraft will not be permanently removed, but just out of your
way.
Take control of your traffic...
Ultimate Traffic 2 will let you restart or stop the AI traffic at will. Just access the Ultimate Traffic 2 menu option
in FSX [Add-ons | Ultimate Traffic 2] and use the stop or restart options.
Page 4 of 45
Ultimate Traffic 2
Using the Interface
1. Window Controls - Standard window controls for minimizing or closing Ultimate Traffic 2.
2. Navigation Controls - Use this section of the interface to move from page to page within Ultimate
Traffic 2. Clicking on any of the main functions will open a set of sub pages that Ultimate Traffic 2 can display.
Page 5 of 45
Ultimate Traffic 2
Statistics and Operations
The Home page of Ultimate Traffic 2 contains useful statistical information about the aircraft flying in Microsoft's
Flight Simulator X. On this page information about the default commercial and general aviation flights can be
viewed. The page can also be used to view operational information for any airport in the FSX world.
1. Ultimate Traffic 2 Traffic Statistics - This section on the Home page details the currently available
flights in Ultimate Traffic 2. The section is divided into information about commercial flights, followed by
information about general aviation flights. The two columns show the difference in total available flights and the
currently active flight information. You can change the amount of active flights with the use of the traffic sliders on
the Traffic Options page.
2. Airport Operations - Use this section to find flight information about any airport in the FSX world. Begin
by entering a search pattern in the 'Search for...' box. You may enter partial names, cities, or ICAO or IATA
codes. A list of possible matches will be displayed in the 'Select Airport' drop down list. Select the airport you
would like to view, and then press the view button. Once the operation information is loaded for the selected
airport, a graph will be displayed showing operations for the field. You may then use the 'Select Day of Week' list
to select a specific day of the week to view. The graph displays arriving aircraft in Red and departing aircraft in
Blue. The lighter color in each bar represents active flights and the darker color is for the complete
schedule. Like the traffic statistics above, the active flights are set on the Traffic Options page. Only
commercial airline traffic is displayed in this graph.
Page 6 of 45
Ultimate Traffic 2
Traffic Options
The first major section in Ultimate Traffic 2 is the Traffic Options group of pages. These pages are designed to
allow you to take control over which aircraft will be visible in Microsoft's Flight Simulator X. Four pages in the
interface are devoted to aircraft display selections; Traffic Options, Commercial Aircraft, General Aviation, and AI
Labels.
Traffic Options - The Traffic Options page of Ultimate Traffic 2 allows
you to select which aircraft will be visible in FSX. Two traffic sliders are
available to adjust percentage of commercial and general aviation traffic that
will be injected into FSX. Specific airlines can be displayed or not by
selecting them from the airline display list. The default airline 'Daedalus' can
be selected on or off to display non-painted aircraft with the provided
checkbox. You may also select to enable or disable animated jet ways on
Ultimate Traffic 2 aircraft.
Commercial Aircraft - The Commercial Aircraft page allows for the
assignment of specific models and repaints to commercial airline flights in
Ultimate Traffic 2. You can select to view the aircraft by their paint status;
Any repaint, Default repaint, or No repaint. You can select any UT2 aircraft
and then assign any FSX aircraft to be displayed in the sim for that
aircraft. Multiple models/repaints can be assigned to an Ultimate Traffic 2
aircraft to provide for variation when airlines fly special repaints or currently
use more than one paint scheme on a flight.
Page 7 of 45
Ultimate Traffic 2
Traffic Options – continued
General Aviation Aircraft - There are 6 different categories of general
aviation flights in Ultimate Traffic 2; Trainer, Personal Prop, Large Prop, and
3 classes of business jets. UT2 uses a unique planning algorithm to
randomly create flights for the ga aircraft. This function designs flights based
on real world tendencies. Training aircraft will only fly during the day,
personal prop and large prop aircraft will fly during the day and into the early
evening hours, while business jets have more extended operating
hours. Gone are the days of seeing a Piper Cub trolling the skies at
3am. This does not happen with any frequency in the real world and
Ultimate Traffic 2 mimics that. On the General Aviation Aircraft page you
will be able to assign any FSX aircraft into these ga categories and the
interface will assign them to individual ga flights.
AI Labels - The final page in the Traffic Options group is the AI Labels
page. One this page you may set the options for what information you would
like to see on the AI traffic labels. This is the text that appears above an AI
aircraft in FSX. You can control the color and individual data blocks that are
displayed. This page also allows you to tailor the length on contrails on the
AI aircraft. The contrail length is assigned in total seconds that the contrail is
visible and can provide a dramatic punch to FSX by extending the default 30
second contrails. Caution should be used on this setting as the longer the
contrail length, the more FSX has to draw and with many long contrails a
faster computer is required.
Page 8 of 45
Ultimate Traffic 2
Global Traffic Options
1. Traffic Sliders and Switches - The two sets of traffic sliders and switches control the volume of either
commercial or general aviation traffic in Ultimate Traffic 2. You can select to not show any traffic at all by
unchecking the 'Display Traffic' checkbox, or you can select a percentage of traffic to display by adjusting the
slider. The 'Update' button must be pressed to update the settings in Ultimate Traffic 2. When pressed, the
button will reset UT2 settings and signal to FSX to reload traffic if it is running.
2. Airline Selection - Individual airlines can be turned on or off by selecting them in the available list. This is
a hierarchal list based on the geographic region where the airline is based. As an example, in order to change
the setting for Alaska Airlines, you would need to open North America, then United States, and then finally Alaska
Airlines. You may make global changes with the 'select all' and 'clear all' buttons. All changes must be saved in
order for the changes to take effect in FSX.
3. Display Generic Repaints - Ultimate Traffic 2 includes over 1700 aircraft that are repainted, but this
does not include every possible combination of aircraft and airline. Some airlines will be flying in the default
'Daeduls' paint scheme. If you wish to not see this scheme displayed, unselect the 'Display generic repaints
(Daedalus) checkbox. This setting does not need to be saved.
4. Enable Moving Jetways - One nice feaute in FSX is the inclusion of animated jet ways at the airline
parking gates. As an aircraft parks at the gate, the jet way will move into position enabling the virtual passengers
to deplane. Unfortunately this nice feature comes at a cost of frame rate for some computers. Mindful that not
every user will want this feature, Ultimate Traffic 2 provides you with the option to enable or disable the moving
jet ways on UT2 aircraft. Just check the option if you would like to see the moving jet ways, or uncheck to
Page 9 of 45
Ultimate Traffic 2
disable. You will need to change this setting while NOT in FSX. If you make the change during a flight in FSX,
the change will not be visible until the next time to restart the sim.
Page 10 of 45
Ultimate Traffic 2
Commercial Aircraft Traffic Options
1. Ultimate Traffic Aircraft Display Options - Use this option to select which type of aircraft you would
like to see in the 'UT2 Aircraft Selection' area. You can select 'Any repaint' which will show all aircraft, 'Default
repaint' which will show aircraft that have a model assigned but are displaying the default Daedalus repaint, or 'No
repaint' which will display aircraft that do not have a model assigned.
2. UT2 Aircraft Selection - These boxes allow you to 'drill down' to a specific aircraft/airline
combination. You may elect to start the drill down process by aircraft type (select the equipment option) or by
airline (select the airline option). Each box will display the aircraft or airlines associated with the level selected
above it. Once a complete selection is made, equipment, carrier, operator, then the currently assigned repaints
will be show in the lower section of the page.
3. FSX Aircraft Selection - Select any of your installed FSX aircraft to be used as the visual model for the
selected UT2 aircraft with this section. A standard manufacturer, type, variation drill down is used to select an
individual FSX aircraft. When you are ready to assign this repaint to an aircraft, press the 'Add Assignments'
button. You can limit the number of times the aircraft will be assigned to UT2 aircraft with the 'Max Usage'
list. This is very useful for unique repaints used by the airlines, such as the 'Shamu' repaint on Southwest or any
'Star Alliance' repaint used by various airlines. The values to select from are 'unlimited' which needs to be
assigned to at least one aircraft in your list of assignments, then a list of numeric values up to 50. The numbers
are actual aircraft that the repaint will be applied to, NOT a percentage. If you want to have 2 different repaints
each flying roughly 50% of the schedule, you would add 2 repaints each set to unlimited. If you want 4 repaints
each flying 25% of the schedule, set four repaints each with unlimited. Ultimate Traffic 2 will balance between all
of the unlimited repaints. If you want to only see a special repaint 10 times and the regular repaint the rest of the
time, you would select the special to show 10 for the max usage and the regular repaint would be at unlimited.
Page 11 of 45
Ultimate Traffic 2
Commercial Aircraft Traffic Options - continued
4. Currently Assigned Repaints - This area will display the currently assigned repaints for the selected
UT2 aircraft/airline combination. You can see each of the assigned aircraft and the max usage value associated
with that assignment.
5. Remove Aircraft - When adding a new repaint to a UT2 aircraft/airline combination you may want to
remove one of the existing assignments. To do this, highlight the assignment to remove in the 'Currently
Assigned FSX Aircraft' list by clicking on it, and then press the 'Remove Aircraft' button. This will tell the UT2
interface that you wish to remove the assignment. In order for the removal to be completed, you will need to save
the change using the 'Save Assignments' button.
6. Save Assignments - After completing all changes you wish to make, either adding or removing
assignments, you must press the 'Save Assignments' button for the changes to take affect. You can make
multiple changes before pressing the 'Save Assignments' button and all changes will be processed. These
changes will not be visible in FSX (if you are currently running it) until you 'restart traffic' in FSX.
Page 12 of 45
Ultimate Traffic 2
General Aviation Aircraft Traffic Options
1. General Aviation Category - Use this list to select the category of general aviation aircraft that you
would like to change. There are six ga categories; Trainer, Personal Prop, Large Prop, Small Biz Jet, Medium Biz
Jet, and Large Biz Jet.
2. FSX Aircraft Selection - Select any or your installed FSX aircraft to be used as the visual model for the
selected UT2 aircraft. A standard manufacturer, type, variation drill down is used to select an individual FSX
aircraft. When you are ready to assign this repaint to an aircraft, press the 'Add Assignments' button.
3. Currently Assigned Repaints - This area will display the currently assigned repaints for the selected
UT2 ga category.
4. Remove Aircraft - When adding a new repaint to a UT2 general aviation category you may want to
remove one of the existing assignments. To do this, highlight the assignment to remove in the 'Currently
Assigned FSX Aircraft' list by clicking on it, and then press the 'Remove Aircraft' button. This will tell the UT2
interface that you wish to remove the assignment. In order for the removal to be completed, you will need to save
the change using the 'Save Assignments' button.
5. Save Assignments - After completing all changes you wish to make, either adding or removing
assignments, you must press the 'Save Assignments' button for the changes to take affect. You can make
multiple changes before pressing the 'Save Assignments' button and all changes will be processed. These
changes will not be visible in FSX (if you are currently running it) until you 'restart traffic' in FSX.
Page 13 of 45
Ultimate Traffic 2
AI Aircraft Labels
1. Contrail Length - Select a new length for your contrails in FSX using the provided list. Longer contrails
persist for more time in FSX and can provide a dramatic skyscape when viewing AI flights. Using longer contrails
requires FSX to store more information about the contrails and draw them on screen longer, this could negatively
affect performance on slower computers.
2. Aircraft Label Options - Check or uncheck any option to update the displayed AI labels in FSX. The
UT2 interface provides access to all of the supported FSX AI label options.
3. Preview - This picture will draw a preview of what each of your AI label option selections will look like in
FSX.
4. Color and Time Selection - You can change the color that AI labels use as well as how long it takes to
cycle from one data point to another using these options. Avoid blue colors as they can have trouble being seen
on the day time sky.
5. Save Button - When satisfied with all changes, press the 'Save' button. If you are currently running FSX,
you may run into a conflict on saving where FSX will overwrite your changes when it shuts down. It is
recommended that changes on this page are only done and saved when FSX is not active.
Page 14 of 45
Ultimate Traffic 2
Timetables
Other than seeing the airline traffic in FSX, Ultimate Traffic 2 allows you to view realistic presentations of the
flights with timetables. Three different displays of the airline data are available in UT2, these are the Printed
Timetables, Status Board, and Flight View Map.
Printed Timetables - A formatted, printable timetable for all selected
flight information is available on this page. You can select to print timetables
that include all flights for an airline, all flights from a departure airport, or all
flights from an arrival airport. The timetables are created as pdf documents
and will automatically be displayed by the UT2 interface. You can then
optionally print them if desired. Each timetable is automatically saved in the
Flight One Software\Ultimate Traffic 2\Timetables directory. This directory is
found in User Name\AppData\Roaming on Windows Vista computers and
User Name\Documents and Settings\ on Windows XP machines.
Status Board - Just like the flight status boards seen in airports across
the world, Ultimate Traffic 2 will display flights for a specific airport in a
rendition of a status board in the UT2 interface. You can select to view any
airport in the Ultimate Traffic 2 world as well as change the time and day
settings to view flights. This board is not tied into FSX, and runs completely
stand alone via the interface, so it will not show what is currently occurring in
FSX. It shows all possible flights in UT2 and does not take into
account traffic option settings.
Page 15 of 45
Ultimate Traffic 2
Timetables – continued
Flight View Map - The Flight View Map provides a dynamic view of all
the commercial airline flights in Ultimate Traffic 2 with their positions
displayed on a map. You can select to view different parts of the world as
well as different times of the day or week. All displayed flights show an
accurate presentation on where the aircraft will be in FSX at a given time of
the day and week. The aircraft can be selected to see full flight information
as well as the route of flight that the aircraft will be flying. You may also
increase the simulation rate of the aircraft flying on the map and watch the
trends of air traffic develop throughout the day.
Page 16 of 45
Ultimate Traffic 2
Printable Timetables
1. Select Timetable Type - Select the type of timetable to be created with these options. Selecting 'By
Departure Airport' will create a timetable showing all flights departing from the selected airport. Selecting 'By
Arrival Airport' will display all flights arriving to a selected airport. Selecting 'By Airline / Operator Combination' will
show all flights for the selected carrier / operator combination.
2. Select Airline/ Operator Combination - If you have selected to create an airline / operator timetable
this area of the screen will become active. Select the base airline you wish to display in the first list. You may
type in this box to facilitate finding the desired airline. Once the base airline is selected, you can choose to
display all of the operators for the airline or only a single operator. For example, you may choose Delta Airlines
and All operators or Delta Airlines and just Comair.
3. Select Timetable Airport - If you have elected to create an airport based timetable this section of the
interface will become active. Enter a search pattern in the 'Search for...' box and the 'Select Airport' list will
display all matching results. You may enter a complete airport name, partial airport name, city, ICAO code, or
IATA code in the 'Search for..' box. Ultimate Traffic 2 will find all available matches based on your search criteria
and display them in the 'Select Airport' list. Highlight the desired airport in the list to select that airport.
Page 17 of 45
Ultimate Traffic 2
Printable Timetables - continued
4. Timetable Color Option - You may choose to create a timetable in black and white or full color. The
black and white option is available for those who would like to print the timetable and do not want to use the color
ink in their printer.
5. Clock Format - Select to display times in the timetable in either 24 hour clock format (1600) or 12 hour
clock format (4pm).
6. Create Timetable - Once all choices have been made press the 'Create Timetable' button to create the
pdf document. Ultimate Traffic 2 will display the pdf as soon as it is generated. A copy will be saved to your
Ultimate Traffic 2\Timetables directory.
Page 18 of 45
Ultimate Traffic 2
Electronic Status Board
1. Select Status Board Options - All status boards will display information for a requested airport at a
given time of the day and week. Use the available options to select the airport you would like to view and what
day of week you would like to display. When you have completed your selections, press the 'View' button to
generate the status board information. The status board will be initially created to match the current system time
on your computer clock.
2. Status Board Display - The display area will display all flight information for arrivals or departures from
the selected airport. All times are displayed using the 12 hour clock format. The current status board time can be
changed by clicking on the time display on the status board; this is indicated by the yellow rectangle in the image
above. Four other mouse hot spots are available for use as seen in the image above. To switch between the
Arrival and Departures displays, click the word 'Arrivals' or 'Departures'. This will toggle the board between the
two displays. You can select to sort the list of flights displayed on the status board by selecting flight no, to/from,
or time.
3. Page Selection - At larger, busy airports, multiple pages of flights will be available. Use the arrow buttons
to move forward or backward through the available pages. The From/To field will display which page of available
pages you are currently viewing.
Page 19 of 45
Ultimate Traffic 2
Flight View Map Setup
1. Select Location - The first step in setting up a Flight View map is to select the center location for the
map. The list provides all known map locations that can be used. Once you are on the map, you can move the
center location by right clicking on the map to recenter it. New center locations can be saved as well while on the
flight view map.
2. Starting Time - Select the day of the week to view as well as the starting time for the flight view map
simulation. The time selected must be in zulu hours as the map is able to display large sections of the world at
once. Once you have selected a start day and time, select the simulation rate that the map will run. When
viewing full zoom on the map, the 30x sim rate will be disabled.
3. Limit Aircraft Displayed Options - By default the flight view map will display all aircraft that should be
visible on the map. If you would like to limit the aircraft displayed, use these options. You can select to limit
aircraft to only those flying to and from a specific airport by using the 'Limit to Airport' option. Check the option
then select an airport to limit the flights to and from. If you want to limit to just a specific airline to view, use the
'Limit by Airline Selection' option. Check the box then select the airline from the list provided. Finally you can limit
by an aircraft type using the 'Limit by Aircraft Type' selection. Check the box then select the aircraft type from the
list provided.
4. Create Map - Once your option selections have been made, press the 'Create Map' button to create a
Flight View Map. Depending on your selections, the generation of the map could take up to a
minute. Once generated a full screen flight view map will be displayed.
Page 20 of 45
Ultimate Traffic 2
Flight View Map Display
The Flight View Map display will show a complete map based on the options selected on the Flight View Map
setup page. Below is a screen shot of a typical map centered on the Atlanta area.
To navigate around the map, right click on any area of the map to recenter to that spot. Use the plus and minus
keys to zoom in or out. Double click anywhere on the map to reset to the default location for the selected map.
The map display will be a full screen map showing all flights, or those limited by the display options, as they can
be found in Flight Simulator X. You will be able to see all the flights in a simulated mode flying the actual routes
they will be using in FSX. To view the flight plan route for the aircraft, select the aircraft by left clicking on it. The
aircraft will be highlighted and show basic flight information as well as having its route of flight drawn on the map.
Page 21 of 45
Ultimate Traffic 2
Flight View Map Display - continued
For those users who have more than one monitor, Ultimate Traffic 2 will display the flight view map as large as
the screen will allow. Below is a screen shot showing a map centered on the United States with the zoom at
max. This shot was taken on a computer using the Matrox Triple Head to Go.
When the map is displayed you can create a new center point, for use in viewing maps, by clicking on the screen
to adjust your center point and then pressing the . (period) key. The following dialog window will appear allowing
you to enter the name for the new map location. Press 'Save' to save the new location or 'Cancel' to reject.
Page 22 of 45
Ultimate Traffic 2
Flight View Map Display - continued
The colors of the aircraft can be changed to make it easier to differentiate between airlines. To set the color of an
airline, left click an aircraft to find the airline you want. Once you have selected the aircraft, Hold <SHIFT> then
left click again. The following dialog will appear allowing you to set the color for the airline.
Page 23 of 45
Ultimate Traffic 2
Utilities
Ultimate Traffic 2 also includes some very useful utilities for customizing your AI experience. You can change
the tail numbers of the commercial AI traffic, change the flight plans that the airlines fly, create and manage new
airlines, and update any aircraft parking code.
Tail Numbers - Each airline in Ultimate Traffic 2 can have its own unique
rule set for generating a tail number. These rules are used to generate new
tail numbers for each flight whenever their repaint assignments are change or
using the Tail Numbers page in the UT2 interface.
Flight Plan Assignments - Unlike other traffic programs, Ultimate
Traffic 2 actually flies its commercial airline traffic on real flight
plans. No longer do airlines fly directly between 2 airports, rather they are
flown on flight planned routes that follow the High and Low Altitude routes
around the Earth. Even aircraft crossing the Atlantic Ocean will follow the
routes know as NATS tracks. Using the Flight Plan Assignments page, you
can change the routes on any UT2 commercial aircraft if you desire.
Page 24 of 45
Ultimate Traffic 2
Utilities – continued
Add-on Schedules - The most powerful utility in Ultimate Traffic 2 is
the Add-on schedule group. You can import schedules created by other
users, create your own schedules, or manage add-on schedules using this
section.
Airline Parking Codes - Microsoft's Flight Simulator X allows for aircraft
to be directed to park at specific gates. This requires the use of a parking
code for the aircraft. All the aircraft that come included with UT2 already
have parking codes for the aircraft. If you import new aircraft or just want to
change the codes of any of your FSX aircraft you can use this utility.
Page 25 of 45
Ultimate Traffic 2
Tail Numbers
1. Select Airline - Select the airline that you would like to modify with this list. You may type the name in the
list in order to find it faster.
2. Modify Rules - This is the section to setup the specific rules that will be used for the generation of the tail
number. You can enter rules in a few different formats as outlined below.
•
•
•
Single Characters - Enter a single capital letter and that will be the defined rule. Also, single digits can
be entered as well. If you always want the first letter of a tail number to be G you would enter that in this
field.
Range of Characters - You may enter a range of letters and numbers. 1-9 will pick a random number
from 1 to 9; A-Z would pick a random letter between A and Z.
Multiple Range Characters - If you wanted to have a possible character set between 2-7 OR A-H you
would enter 2-7:A-H for the rule. Each range is separated by a : (colon)
3. Preview Display - As you make changes to the rules, a preview will be generated showing a possible tail
number generated by your rules entry.
4. Save Changes and Update Airline - Once you have made all changes, press the 'Save Changes'
button. Ultimate Traffic 2 will now store the new rules for future use. You can update all the tail numbers for the
selected airline by pressing the 'Update Airline' button.
Page 26 of 45
Ultimate Traffic 2
Flight Plan Assignments
1. Select Airline - Select the airline carrier and operator that you would like to view with the available
selection lists. Once you have selected the combination to view, press the 'Load' button to view all flights for the
selected airline/operator combination.
2. Currently Assigned Flight Plans - This section of the screen will show all the flights for the selected
airline and what flight plan is currently being flown by the flight. The list can be sorted by clicking on the column
headers at the top. To select a flight for modification, click on the flight number.
3. Remove Plan and Add Plan Buttons - If you would like to assign a new flight plan to be used by a
flight, press the 'Add Plan' button. To remove a flight plan you have assigned and return the flight back to the
default Ultimate Traffic 2 flight plan, press the 'Remove Plan' button. When a new flight plan is being added to a
flight, the following screen will appear.
Page 27 of 45
Ultimate Traffic 2
Flight Plan Assignments - continued
Use this screen to review both the Ultimate Traffic 2 flight plan (in blue) and the new flight plan you want to add
(in red). If you are satisfied with the new plan press the 'Yes, Replace Current' plan button. All plans to be
imported into Ultimate Traffic 2 MUST conform to either the FSX or FS9 standard .pln file format.
Page 28 of 45
Ultimate Traffic 2
Add-on Schedules
Ultimate Traffic 2 allows you to create completely new schedules and share them with others. Using the add-on
schedules section of the Utilities, you can create new schedules, import schedules, manage those schedules, and
remove them.
Create Add-on Schedule - You can create your own schedule for use
in Ultimate Traffic 2. This could be a new airline, cargo carrier, military
traffic, etc. You may create whatever you like. The Create Add-on Schedule
area of Ultimate Traffic 2 is setup in the style of a wizard which will guide
you through the process of creating a new schedule for Ultimate Traffic 2 to
display in FSX.
Import Add-on Schedule - Once a new schedule is created, it must be
imported into Ultimate Traffic 2. You can create your own schedule or other
users may upload their created schedules to various flight simulator websites
for you to download. Use the Import Add-on Schedule utility to import these
schedules.
Page 29 of 45
Ultimate Traffic 2
Add-on Schedules – continued
Manage Add-on Schedules - Once a schedule has been imported to
Ultimate Traffic 2 you will need to handle two manage functions; assigning
aircraft to the flights and setting the flight as visible in FSX. These two
functions can be accomplished using the Manage Add-on Schedule Utility.
Remove Add-On Schedule - You may find that you no longer desire to
have an imported add-on schedule as part of Ultimate Traffic 2. If you want
to remove the schedule, use the Remove Add-on Schedule utility to delete
the schedule from Ultimate Traffic 2.
Page 30 of 45
Ultimate Traffic 2
Creating Add-on Schedules
The Create Add-on Schedule wizard will walk you through the process of creating a completely new schedule for
Ultimate Traffic 2. Before getting started it is best to have all the information you will need for a new schedule
ready. Below are the items you will need in order to create a new schedule.
•
•
•
•
•
List of airports to be used by the schedule. If it is a new airport not known by Ultimate Traffic 2, you will
need to supply basic information about the airport including position and time zone information.
List of airlines to be used. If you are creating a completely new airline you will need to know the airlines
IATA code and in which country it is based.
List of aircraft to be flown by the airline(s). Ultimate Traffic 2 will most likely contain all the aircraft
information that you need, but if you must create a new aircraft you will need basic operating information
about that aircraft.
Flight Plans. This is the biggest item to get ready. If the airports that your new schedule will fly into and
out of do not already contain service by Ultimate Traffic 2 you will have to provide the flight plan routes
between the airport pairs. All flights must use a flight plan and the plans must be in either FS9 or
FSX flight plan file format.
Schedule Information. This will be the actual flight schedule flown by your new airline. You will enter the
information on the last step of the Create Add-on Schedule wizard.
1. Schedule Status Information and Navigation Buttons - At the bottom of every Create Add-on
Schedule page is the status display and navigation buttons. The status display will let you know what items have
yet to be accomplished in order to create the add-on schedule. You can use the navigation buttons to 'Save' your
schedule, move forward or backwards in the wizard, and 'Load' or 'Create a New' schedule.
Page 31 of 45
Ultimate Traffic 2
Creating Add-on Schedules - continued
1. Default Ultimate Traffic 2 Airport Selection - If your new add-on schedule will make use of default
UT2 airports then you will need to select them here. Enter a search pattern to find the airport then select it in the
provided list. Once it is select press the 'Add' button to add it to the add-on schedule. If the airport is not part of
the default UT2 airport list, you will have to create a new airport. To create a new airport, press the 'New' button.
2. Add-on Schedule Airports - All airports, either default or new, that have been selected for use in the
add-on schedule will be shown in this list. Only airports in this list will be available for schedule assignments later
in the wizard.
3. Creating a New Airport - If you need to create a new airport for use in your schedule you will use this
section of the page. Each piece of information listed below is required information and must be entered before
the airport can be created.
•
•
•
•
•
•
IATA Code - The IATA code for the airport. Typically a 3 character code. Example: ATL for Atlanta
ICAO Code - The ICAO code for the airport. Typically a 4 character alphanumeric code but can be 3
characters. Example: KATL for Atlanta
Airport Name - Enter the full name of the airport in this field.
City - The city where the airport is located. This is usually the major metropolitan area near the airport.
Country - Select the country where the airport is located for the provided list. For countries with included
states, select the correct entry.
Latitude - Enter either N or S for the first character, and then enter the degrees, minutes, and seconds of
the latitude.
Page 32 of 45
Ultimate Traffic 2
Creating Add-on Schedules - continued
•
•
•
•
Longitude - Enter either E or W for the first character, then enter the degrees minutes, and seconds of
the longitude.
GMT Offset - This is the time in hours and minutes that the airport time differs from zulu time. For an
airport that is 5 hours behind zulu the value would be -500, for 4 hours before zulu it would be 400 and for
10 and a half hours behind zulu it would be -1030.
Observes DST - Check this box if the location of the airport observes daylight savings time.
Start and Stop Times - If you have selected that the airport observes DST then these two items will be
enabled. Select a new date and time for the start and end of daylight savings time.
4. Status Area and Navigation Buttons - Area providing information about the status of the Create
Add-on Wizard and buttons allowing you to 'Save' the schedule or move forward or backward in the wizard.
1. Default Ultimate Traffic 2 Airline Selection - If your new add-on schedule will make use of default
UT2 airlines then you will need to select them here. To select an airline, find it in the list and drag it from the
Existing list on the left to the 'Airlines to be Used' list on the right.
2. Airlines to be Used - All airlines, either default or new, that have been selected for use in the add-on
schedule will be shown in this list. Only airlines in this list will be available for schedule assignments later in the
wizard. To remove a selected airline from the list, press the 'Remove' button. To create a completely new airline,
press the 'New' button.
Page 33 of 45
Ultimate Traffic 2
Creating Add-on Schedules - continued
3. Creating a New Airline - If you need to create a new airline for use in your schedule you will use this
section of the page. Each piece of information listed below is required information and must be entered before
the airline can be created.
•
•
•
IATA Code - The IATA code for the airline. Typically a 2 character code. Example: DL for Delta Airlines
Airline Name - Enter the full name of the airline in this field.
Country - Select the country where the airline is based with the provided list.
Once the above information has been entered, press the 'Create and Add' button to create the new airline and
add it to the 'Airlines to be Used' list.
4. Status Area and Navigation Buttons - Area providing information about the status of the Create
Add-on Wizard and buttons allowing you to 'Save' the schedule or move forward or backward in the wizard.
1. Default Ultimate Traffic 2 Aircraft Selection - If your new add-on schedule will make use of default
UT2 aircraft then you will need to select them here. To select an aircraft, find it in the list and drag it from the
Existing list on the left to the Aircraft to be Used' list on the right.
2. Aircraft to be Used - All aircraft, either default or new, that have been selected for use in the add-on
schedule will be shown in this list. Only aircraft in this list will be available for schedule assignments later in the
wizard. To remove a selected aircraft from the list, press the 'Remove' button. To create a completely new
aircraft type, press the 'New' button.
Page 34 of 45
Ultimate Traffic 2
3. Creating a New Aircraft Type - If you need to create a new aircraft type for use in your schedule you
will use this section of the page. Each piece of information listed below is required information and must be
entered before the aircraft can be created.
Page 35 of 45
Ultimate Traffic 2
Creating Add-on Schedules - continued
•
•
•
•
•
•
•
•
Code - The equipment code for the aircraft. Typically a 3 character code. Example: 734 for a Boeing
737-400.
Aircraft Name - Enter the full name of the aircraft in this field.
Size - Select the generic size for the aircraft; Large, Medium, or Small.
Is Cargo - Select whether or not the aircraft will be used exclusively for cargo flights.
Cruise Altitude - Select the typical cruise altitude for the aircraft.
Max Range - Select the maximum range that the aircraft can fly.
Runway Type - Select the type of runway required by the aircraft; Hard, Soft, or Either.
Minimum Runway Required - Minimum runway length required by the aircraft for takeoff or landing.
Once the above information has been entered, press the 'Create and Add' button to create the new aircraft and
add it to the Aircraft to be Used' list.
4. Status Area and Navigation Buttons - Area providing information about the status of the Create
Add-on Wizard and buttons allowing you to 'Save' the schedule or move forward or backward in the wizard.
1. Default Ultimate Traffic 2 Flight Plan Selection - If your new add-on schedule will make use of
default UT2 flight plans then you will need to select them here. To select a plan, find it in the list and drag it from
the Existing list on the left to the 'Plans to be Used' list on the right.
Page 36 of 45
Ultimate Traffic 2
Creating Add-on Schedules - continued
2. Plans to be Used - All flight plans, either default or new, that have been selected for use in the add-on
schedule will be shown in this list. Only flight plans in this list will be available for schedule assignments later in
the wizard. To remove a selected plan from the list, press the 'Remove Plan' button. To load a new flight plan,
press the 'Load and Add' button.
3. Load and Add - If you desire to include a completely new flight plan for use on your add-on schedule
routes you will need to load it and add it to the list of 'Plans to be Used'. When you press the 'Load and Add'
button a standard Windows file open dialog window will be displayed allowing you to select the plan you want to
load. These plans must be in either default FSX or FS9 flight plan file format.
4. Status Area and Navigation Buttons - Area providing information about the status of the Create
Add-on Wizard and buttons allowing you to 'Save' the schedule or move forward or backward in the wizard.
1. Current Schedule Information - As you create new schedule entries, basic information about each
flight will be added to the list provided here.
2. Remove, Edit, Create New - You can choose to remove a currently scheduled flight by highlighting it in
the list and pressing the 'Remove' button. If you would like to change information about the flight use the 'Edit'
button. You will mostly use the 'Create New' button as you create all of the new flights for your schedule. Press
the 'Create New' button to view the creation screen shown below.
Page 37 of 45
Ultimate Traffic 2
Creating Add-on Schedules - continued
You can only manually enter the flight number for the flight and it must be a numeric value. All other entries are
selections of the data that you added on the previous Create Add-on Schedule wizard pages. Once you have
entered a flight number and selected all of the correct information, press the 'OK' button to add the flight to your
schedule.
3. Status Area and Navigation Buttons - Area providing information about the status of the Create
Add-on Wizard and buttons allowing you to 'Save' the schedule or move forward or backward in the wizard.
You should always 'Save' periodically during the creation of your schedule to make sure you never loose
information.
Page 38 of 45
Ultimate Traffic 2
Importing Add-on Schedules
1. Load - This button will open a standard Windows open file dialog. Select the UT2 database file you would
like to import.
2. Flight List - This section of the page will show all of the flights, included in the add-on schedule, that you
will be importing. You can review the included flights in the schedule before finalizing the import.
3. Import - When you have reviewed the flights, and are ready to import the schedule into Ultimate Traffic 2,
press the 'Import' button.
Page 39 of 45
Ultimate Traffic 2
Managing Add-on Schedules
1. Add-on Schedule Aircraft Assignments - Before an add-on schedule will be visible in FSX,
Ultimate Traffic 2 needs to know what aircraft to display for each of the flights. Press the icon or blue text in this
section to open the add-on schedules aircraft assignments page. This page is exactly like the Commercial
Aircraft Assignments page, directions for the use of the page are found here.
2. Airline Selection - This area will include all airlines that have been imported into Ultimate Traffic 2. This
area will operate exactly like the airline selection area on the Traffic Options page.
3. Save Display Options - You must press the 'Save Display Options' button before changes will become
visible in FSX. If you are currently running FSX when this button is pressed, the traffic will reset itself so that you
can immediately see the changes.
Page 40 of 45
Ultimate Traffic 2
Removing Add-on Schedules
1. Select- You must provide the original schedule database for Ultimate Traffic 2 to know which flights to
remove. Pressing this button will open a standard Windows file open dialog window. Select the schedule you
would like to remove from UT2.
2. Flight List - This section of the page will show all of the flights, included in the add-on schedule, that you
will be removing. You can review the included flights in the schedule before finalizing the removal.
3. Remove- When you have reviewed the flights, and are ready to remove the schedule from Ultimate Traffic
2, press the 'Remove' button.
Page 41 of 45
Ultimate Traffic 2
Parking Codes
1. Select FSX Aircraft - Select the FSX aircraft that you would like to update using the standard
manufacturer, type, variation drill down lists. Once an aircraft is selected, the current parking codes for that
aircraft will be displayed in the Parking Type and Parking Codes fields.
2. Parking Code Selection - Select the name of the airline, that you would like to know the code for, in the
lists provided. Once you have selected the airline name, a code preview will be displayed. In order to add that
code to the Parking Codes field, press the 'Add Code' button.
3. Parking Fields - All aircraft include a 'Parking Type' and 'Parking Code' entry in their aircraft configuration
file. The parking type can be one of several entries; GATE, RAMP, or CARGO. The 'Parking Code' field needs to
correspond to the values provided in Ultimate Traffic 2. Once all changes to these fields have been made, press
the 'Save Codes' button to update your aircraft.cfg files.
Page 42 of 45
Ultimate Traffic 2
Updating Ultimate Traffic 2
The update page is a simple and easy place for you to keep tabs on any upgrades that Ultimate Traffic 2 might
have to offer. Check this page routinely to see if you are using the latest in program files and for any
announcements with replacement airline schedules as the database is kept up to date.
You must have an active internet connection in order to receive the information about updates.
If an update is available, just click on the blue header text for that update and Ultimate Traffic 2 will open your
default web browser and direct you to the correct page to download the update.
Page 43 of 45
Ultimate Traffic 2
Ultimate Traffic 2 - Credits
Any great product takes a lot of people to get right, Ultimate Traffic 2 is no exception. Listed below are all the
individuals who contributed to make Ultimate Traffic 2 what it is.
Programming Development
•
•
•
Tom Murdock - Flag Mountain Software
Hardin Brothers - Flag Mountain Software
Thomas Main - Flight One Software
Aircraft Development
•
•
•
•
•
David Rawlins - AI Aardvark
Craig Crawley - AI Aardvark
Craig Ritchie - The Fruit Stand
Burkhard Renk - My Traffic
Tiberiu Nicu
Aircraft Repainting
•
•
•
•
•
•
•
•
•
•
•
•
Boback Shahsafdari
Boris LeVeve
Denis Schranz
Federico Permutti
Tony Fosler
Heiko Schmidt
Jakob Tischler
John Massey
David Rawlins
Phillip Tan
Steve Tran
Burkhard Renk
Website Development
•
Jeff Smith - Flight One Software
Page 44 of 45
Ultimate Traffic 2
Ultimate Traffic 2 Credits - continued
Beta Testing (includes all above individuals)
•
•
•
•
•
•
•
•
•
•
Brian Dempsey - Flag Mountain Software
Dave Logan - Flag Mountain Software
David Hanstater
Doug Horton
Dustin Hand
Hans Hiltemann
John Goodwin
John Patterson
Ken Hammond
Steve Masson
Ultimate Traffic 2 was developed by Flight One Software in partnership with Flag Mountain Software and with the
help of all the individuals listed above.
Ultimate Traffic 2 is a copyrighted product of Flight One Software
UT2Services and FMSim are copyrighted works of Flag Mountain Software
Most aircraft copyrighted to AI Aardvark and The Fruit Stand. See individual aircraft.cfg for information.
Page 45 of 45