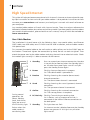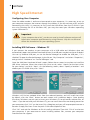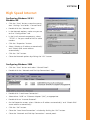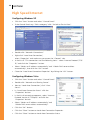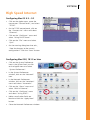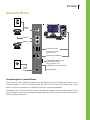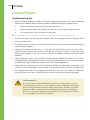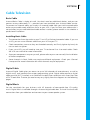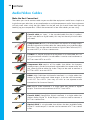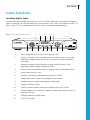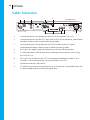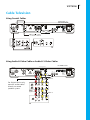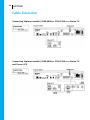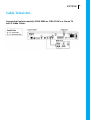
1
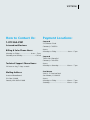
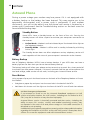
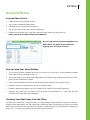
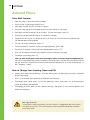
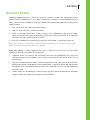
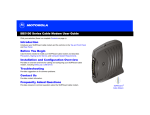
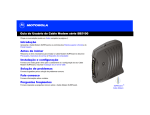
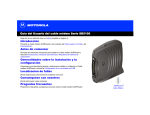
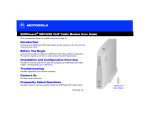
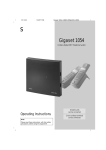
Small Business User’s Guide
Table of Contents
Welcome...............................................................................................3
Payment Options..................................................................................4
How to Contact Us/Payment Locations..................................................5
High Speed Internet
Your Cable Modem........................................................................6
Installing Cable Modem
Configuring Your Computer...........................................................8
Astound Email..............................................................................12
Getting Set Up
Server Settings
High Speed Internet Troubleshooting............................................13
Astound Phone
Phone Equipment.........................................................................14
Connecting the Phone..................................................................15
Standby Button & Battery Backup.................................................16
Astound Phone Portal..................................................................17
Astound Voicemail.......................................................................17
Setting Up
Changing Your Greeting, Name and PIN
Features
Astound Phone Troubleshooting...................................................22
Cable Services
Basic Cable...................................................................................23
Installing Basic Cable
Audio/Video Cables......................................................................24
Digital Cable.................................................................................25
Installing Digital Receiver
Digital Cable Troubleshooting.......................................................30
Small Business
User’s Guide
3
Welcome To Astound Business Solutions!
Thank you for choosing Astound.
Astound is your premier local provider of high speed internet, phone and video services. No
matter which package you select we hope you will be impressed with our service – from the
speed of our internet access, to the reliability of our phone service, to the ease of reaching a
support representative when you need them.
Astound prides itself on being number one in hassle-free maintenance, offering FREE service
calls and live 24x7 customer care.
This User’s Guide will help you install and get acquainted with your new service, and help you
to reinstall your existing connection should you get new business equipment.
Questions? Contact us!
With Astound Business Solutions you get prompt, courteous local service. Technical Support
is available 24 hours a day, 7 days a week. If you have questions, please call us at 1-877-2642951 or visit our web site at Astound.net/Business.
3
4
Small Business
User’s Guide
Payment Options:
Pay Online
You can view your account and make payments at our billing website:
http://www.astound.net/wsc
You will need to register your account and select a PIN the first time you access your account
online.
Pay by Check
Separate the payment slip portion of your bill and mail it, along with your payment check,
in the envelope provided with your bill. Make your check payable to “Astound Broadband”
and write your account number on your check.
Automatic Payment Program
You can set up your account to automatically debit your credit card or checking account
each month. Contact us at 1-877-264-2951 to complete the one-time set up.
Online Banking or Bill Pay
You can also pay your Astound Broadband bill through your financial institution’s or another
third party’s bill payment program. Enter “Astound Broadband” as the payee and enter the
payment address and account number as they appear on your bill.
Paperless Billing
Save paper and save time by getting your billing statement delivered electronically each month.
Go to http://www.astound.net/wsc to sign up today!
Pay in Person
In addition to the methods mentioned above you may stop by one of our designated
payment locations to pay your bill in person. Check for the location nearest you on the
following page.
4
Small Business
User’s Guide
How to Contact Us:
Payment Locations:
1-877-264-2951
Concord
215 Mason Circle
Concord, CA 9520
Astound.net/Business
Billing & Sales Phone Hours:
Monday to Friday.......................8 am – 5 pm
Saturday and Sunday........................... Closed
Technical Support Phone Hours:
24 hours a day, 7 days a week
Mailing Address:
Astound Broadband
P.O. Box 34889
Seattle, WA 98124-1889
5
Hours:
Monday to Friday........................8 am – 5 pm
Concord
785H Oak Grove Rd
Concord, CA 94518
Hours:
Monday to Saturday.................. 10 am – 7 pm
San Mateo
2841 S. El Camino Real
San Mateo, CA 94403
Hours:
Monday to Friday...................... 10 am – 7 pm
Saturday.................................... 10 am – 2 pm
5
6
Small Business
User’s Guide
High Speed Internet
This guide will help you become acquainted with Astound’s internet service and provide stepby-step instructions on how to install your cable modem. It also provides instructions on how
to create your astound.net email account, and configure it to work with email software on
your computer.
Any standard cable modem will work with Astound service. These instructions reference the
Motorola Surfboard modem, but can be used with any model. If you have specific questions about
your model of cable modem, please check the user’s manual, many of which are available on
www.astound.net.
Your Cable Modem
The installation kit should come with the following items: two coaxial cables, one Ethernet
(RJ45) cable, one USB cable, one CD-ROM used for USB installation, and one cable modem
with power cord.
First, connect the coaxial cable to the wall outlet or cable splitter, and to the CABLE port on
the modem. Thread and tighten the connections by hand; do not use tools to tighten. Then
attach the power cord to the cable modem and plug the cord into an electrical outlet. Check
the modem lights to verify it is able to connect to the internet.
1 1 Standby
2
3
WE R
E CEIV
E
R
PO
4
SEND
D
T AN B
Y
S
/ACTIVI
TY
PC
ON LIN E
SB5100
SURF b oard®
Ca b le Mo de m
5
6
2 Power
Flashing: Startup diagnostics in progress
On: The cable modem is powered on.
3 Receive
Flashing: Scanning for a receive (downstream)
channel connection
On: The downstream channel is connected
7 4 Send
During normal
operation, the
Power, Receive,
Send, and Online
lights are on and
the PC/Activity light
flashes when the
cable modem is
transferring data.
6
Press to suspend your Internet connection. No data
is transmitted or received when the Standby light is
on. All other front panel lights turn off until you
press the Standby button again.
Flashing: Scanning for a send (upstream) channel
connection
On: The upstream channel is connected
5 Online
Flashing: Scanning for a network connection
On: The startup process is complete
6 PC/Activity
Flashing: Transmitting or receiving data
On: A device, such as a computer or hub, is
connected to the USB or Ethernet connectors on
the back panel
7 Standby
This light does not flash
On: Internet service is blocked because the Standby
button was pressed. If this light is on, all other
lights are off.
Small Business
User’s Guide
7
High Speed Internet
Most cable modems other than the Motorola Surfboard indicate online status with a single
cable light. If the cable light is flashing, the modem is acquiring a connection to the internet;
if it is solid, the modem is online.
If the modem is not able to connect to the internet, then the cable wall outlet may need to be
adjusted. Please call our support department to schedule a time when an Astound technician
can perform this work. If you are using a cable splitter to connect both the modem and your
TV, it will affect the signal received by the modem. You can bypass the splitter and connect
the modem directly to the wall outlet, to see if the modem can connect to the internet
without using the splitter.
Once the modem is connected to the internet, connect the cable modem to your computer
using either the Ethernet cable, or the USB cable.
Ethernet or USB?
Your computer may have a NIC, also called an Ethernet
card. The NIC can be found in the back of your computer with a port that looks similar to a telephone jack,
but somewhat larger.
Alternatively, most computers have one or more USB
ports built in. This is a small rectangular port on the
front or rear panel of the case, and will be labeled USB.
ETHERNE T
USB
1
2
C AB LE
CUSTOMER S/N:BCDFGHJKLMNP
HFC MAC ID: ABCDEF012345
S/ N: PPPPMMYJJJSSSSSCAABBCCCC
USB CPE MAC ID: ABDCEF0123 45
4
USB Port
1 Ethernet
The Ethernet port provides a connection
to Ethernet equipped computers using a
cable terminated with an RJ-45 connector.
2 USB
The USB port provides a connection to
USB equipped computers.
3 Cable
The Cable port provides a connection to
the coaxial cable (coax) outlet.
4 +12VDC
This connector provides power to the
cable modem.
3
+12VDC
NIC Port
7
8
Small Business
User’s Guide
High Speed Internet
Configuring Your Computer
Once the cable modem is online and connected to your computer, it is necessary to set up
your computer to access the internet through the modem. If you do not have a NIC and are
connecting with USB, it is necessary to first install the USB drivers from the CD-ROM. If you
are using Windows 98 SE or Windows ME, you may also need your Windows operating
system software CD.
Important
If your computer has a NIC, you do not need to install software and you will
have better computer performance by using Ethernet. Skip this section and
follow the instructions for your operating system.
Installing USB Software – Windows PC
If you connect the modem to your computer with a USB cable and Windows does not
automatically open the Add New Hardware Wizard, the USB port may be inactive or disabled.
You can try another USB port, or use the Device Manager to enable the USB port, if it is
disabled. To open the Device Manager, right-click on “My Computer” and select “Properties”,
and go to the “Hardware” or “Device Manager” tab.
Once the Add New Hardware Wizard is open, follow the on-screen instructions to install the
USB driver software. When the wizard asks what to do, select “Search for the best driver
for your device.” and click “Next”. On the following screen, select “Specify a location:” and
choose your CD-ROM drive; click “Next”.
Windows will find an updated driver from the selected location, and will install that driver
by default; click the “Next” button on each screen until installation begins. Once loading
the driver, Windows may ask you to insert your Windows CD to add certain cabinet files, or
“cabs”. If you do not have your Windows CD, you can see if these files are already present on
your computer; click “OK” on the Insert Disk dialog box and you will be prompted to enter a
location to copy files from. Enter the path C:\Windows\Options\Cabs
Click “OK” and wait for Windows to finish installing software. Then click “Finish” and restart
your computer. If you encounter an error installing cabinet files, contact your computer
manufacturer for support.
8
Small Business
User’s Guide
9
High Speed Internet
Configuring Windows 98 SE /
Windows ME
• Click the “Start” button, move the mouse
over “Settings” and select “Control Panel”.
• Double-click the “Network” icon.
• In the Network options, make sure you are
on the “Configuration” tab.
• In the list of network components, select
“TCP/IP ->” for your model of NIC or cable
modem.
• Click the “Properties” button.
• Select “Obtain an IP address automatically”
and “Obtain DNS server address
automatically”.
• Click the “OK” button.
• Close the Network options by clicking the “OK” button
Configuring Windows 2000
• Click the “Start” button and select “Control Panel”.
• Double-click the “Network and Dial-Up Connections” icon.
• Double-click “Local Area Connection”.
• Select either “USB” or “Ethernet Adapter” (NIC), as appropriate.
• Double-click on “Internet Protocol”.
• On the Properties screen, select “Obtain an IP address automatically” and “Obtain DNS
server address automatically”.
• Click the “OK” button.
• Close the “Local Area Connection” window by clicking the “OK” button.
• Close the “Network and Dial-Up Connections” control panel.
9
10
Small Business
User’s Guide
High Speed Internet
Configuring Windows XP
• Click the “Start” button and select “Control Panel”.
• If the Control Panel says “Pick a category” click “Switch to Classic View”.
• Double-click “Network Connections”
• Right-click “Local Area Connection”,
select “Properties” and make sure you are on the “General” tab.
• In the list of “This connection uses the following items:” select “Internet Protocol (TCP/
IP)” and click the “Properties” button.
• Select “Obtain an IP address automatically” and “Obtain DNS server address
automatically”, then click the “OK” button.
• Close the “Local Area Connection Properties” by clicking the “OK” button.
Configuring Windows Vista
• Click the “Start” button and select “Control Panel”.
• Double-click “Network and Sharing Center”.
• Next to “Local Area Connection”, click “View
Status”.
• In “Local Area Connection Status” click the
“Properties” button.
• In the list of network components, select “Internet
Protocol Version 4 (TCP/Ipv4)” and click the
“Properties” button.
• Select “Obtain an IP address automatically” and
“Obtain DNS server address automatically”.
• Click the “OK” button.
• Click the “Close” button on Local Area Connection Properties.
• Click the “Close” button on Local Area Connection Status.
10
Small Business
User’s Guide
11
High Speed Internet
Configuring Mac OS 8.5 – 9.2
• Click on the Apple menu, move the
mouse over “Control Panel”, and select
“TCP/IP”
• On the TCP/IP control panel, click on
the “Connect via:” menu and select
“Ethernet”.
• Click on the “Configure:” menu and
select “Using DHCP Server”.
• Click on the “File” menu and select
“Quit”.
• On the warning dialog box that asks,
“Save the changes to the current
configuration?” click the “Save” button.
Configuring Mac OSX, 10.1.5 or later
• Click on the System Preferences
icon in the System Dock, or click
on the Apple menu and select
“System Preferences”.
• In the System Preferences
window, click on the “Network”
icon.
• In the Network Preferences
window, click on the “Locations”
menu and select “Automatic”.
• Click on the “Show” menu and
select “Built-in Ethernet”.
• Click on the “Configure” menu
and select “Using DHCP”.
• Make sure all other fields are
black and click the “Apply Now”
button.
• Close the Network Preferences window.
11
12
Small Business
User’s Guide
High Speed Internet
Astound Email
While you can use any email provider you choose with Astound High Speed Internet, up to
ten astound.net email addresses are included with your service. Each email address can
store up to 100 MB of messages on Astound’s mail server. You can create an email address
by going to www.astound.net, and browse the “Support” menu. Alternately, you can call
our technical support department, and our staff can create one or more email addresses for
you, and help you configure your computer.
Once your email address is created, you can configure email client software on your computer
to access it, such as Windows Mail, Outlook Express or Mac Mail. Any email software you
use will need the following information to send and receive email for your astound.net
address:
Display Name:
Your full name as you want it to appear in emails
Email Address:
Your email address, eg. [email protected]
Incoming Mail Server:
mail.ca.astound.net
Outgoing Mail Server:
smtp.ca.astound.net
Account Name:
The first part of your address, eg. johndoe
Password:
The password you used when creating the address
For complete instructions on how to set up the most common email client programs, visit
www.astound.net, and browse the “Support” menu.
Webmail
Any time you are away from your business location and wish to check for new mail, or if
you have not set up an email client program on your computer, you also have the option
of accessing your email through our Webmail program. Webmail is available by going to
www.astound.net, selecting “Webmail”. Alternately, you can access Webmail directly at
http://webmail.ca.astound.net
When you login, your Login Name is the first part of your email address, eg. if your email
address is [email protected], your Login Name is johndoe. If you are connecting from a
computer using some forms of network security, you may need to select one or both of the
check-mark boxes below the Login Name and Password.
Internet Account Manager
Additional tools for managing your internet account can be found online within the Internet
Account Manager at www.astound.net/iam. From there you can add new email accounts
or update the ones you have, and track the data transfer usage on your account.
12
Small Business
User’s Guide
13
High Speed Internet
High Speed Internet Troubleshooting
If you are unable to connect to the internet, first check your cable modem to see if it is online
(see diagram, p.6). If it is not online, power-cycle the modem by unplugging the power for 30
seconds. If the modem cannot establish the connection to the internet within a few minutes
after the power-cycle, please call our technical support department for more help. If you are
using a cable splitter to connect both the modem and your TV, you can bypass the splitter
and connect the modem directly to the wall outlet to see if the modem can connect to the
internet without using the splitter.
If you have created a network using a router, you will want to power-cycle both pieces of
equipment:
1. Unplug power to both the modem and the router.
2. After 30 seconds without power, restore power to the modem.
3. Once the modem is online, restore power to the router.
4. Once the lights on the router indicate a connection, repair the internet connection on
each computer. This may require restarting the computer.
If the cable modem indicates a connection to the internet, but your computer cannot connect
through a router, you will need to bypass the router and plug one computer directly into the
modem:
1. Unplug the power to both the modem and the router.
2. Use a single Ethernet cable to connect the modem and one computer.
3. After 30 seconds without power, restore power to the modem.
4. Once the modem is online, repair the internet connection on the computer. This may
require restarting the computer.
If you are able to connect to the internet using a computer plugged directly into the modem,
but cannot connect using your router, then your Astound internet service is working. You
will want to contact the support department for the manufacturer of your router. If you
received the router from Astound Broadband as part of our Wireless Networking service,
please contact our technical support department for problems connecting with the router.
If you are able to connect to the internet, but have another issue with your internet
service, please check our website for a number of troubleshooting guides and tips. Go to
www.astound.net, and select “Support”.
13
14
Small Business
User’s Guide
Astound Phone
Astound Phone works just like other business phone services you may be used to, though
it does require some equipment that you may not be familiar with. An Astound Technician
will connect a small device called a Multimedia Terminal Adaptor (MTA) between your cable
line and the existing phone jacks in your office to enable the service. If you have high-speed
internet service from Astound, the MTA may also act as your internet cable modem.
Phone Equipment
Note: Not all Multimedia Terminal Adapters (MTAs) look alike. The one you receive may vary
slightly from the diagram below.
1. Power Light:
indicates whether AC power is available to the unit
1
2
3
4
5
6
7
8
2. DS (Downstream):
indicates downstream connectivity
3. US (Upstream):
indicates upstream connectivity
4. Online:
indicates internet data transmission status
5. Link:
indicates Ethernet or USB connectivity between the MTA
and computer
6. Telephone Line 1:
indicates status of line 1
7. Telephone Line 2:
indicates status of line 2
8. Battery:
indicates status of the battery in the MTA
Operation Safety
Connecting the Telephony Modem (MTA) to your existing telephone wiring
should be performed by a professional installer. Failure to do so may result
in electrical shock, loss of phone service, loss of 911/E911 service and/or
permanent damage to the Telephony Modem.
14
Small Business
User’s Guide
15
Astound Phone
(
(
Power
Outlet
Phone 1
Phone 2
Computer USB
(choice of either
connection)
Computer Ethernet
Standby Button on the
front of the MTA
(It terminates the
USB/Ethernet connection.)
Cable
Wall
Outlet
Reset Button
Connecting the Astound Phone
The Astound Phone Telephony Modem can be connected to your computer to work as an
internet modem as well as a phone. While the MTA has two lines, the second line is only
active if you have purchased an additional line from Astound Broadband.
If problems exist with your phone service, connecting a phone directly into the back of the
MTA will bypass your existing wiring and help determine if the issue exists with the service or
the wiring at your location.
15
16
Small Business
User’s Guide
Astound Phone
During a power outage your modem may lose power if it is not equipped with
a battery backup or the battery has been drained. This may require you to be
temporarily disconnected until a power cycle is performed. If your modem
disconnects, you will not be able to use the phone until service is restored or a
power cycle is performed. See the Troubleshooting section on the back cover for
more troubleshooting steps.
Standby Button
Some MTAs have a Standby button on the front of the unit. Pressing the
Standby button will either suspend or activate your computers connection to
the Internet.
• Online Mode – Modem is online indicated by an illuminated Online light on
the Telephony Modem.
• Standby Mode – Modem is offline and in standby indicated by a blinking
Online light.
The Standby button does not affect telephone service; telephony service will
work regardless of the status of your computer’s connection to the internet.
Battery Backup
Not all Telephony Modems (MTAs) have a battery backup. If your MTA does not have a
battery light on the front then you do not have a battery backup.
The battery backup will allow your phone service to continue to work for a short period of
time should you lose power. However, if Astound’s network facilities are without power due
to a local outage, cable service will not work, including your Astound Phone service.
Reset Button
Using a paper clip to push the Reset button on the back of the Telephony Modem will reset
the modem.
• Straighten a paper clip and press into the reset hole in the back of the MTA.
• Hold down this button until the lights on the front of the MTA turn off and then release.
911/E911 Emergency Information
If you attempt to install or use the Astound Broadband equipment or VoIP
services at another location, the VoIP services, including but not limited to 911/
E911, may fail to function or may function improperly.
Astound Phone service is electrically powered and that service, including the
ability to access 911 services, security and medical monitoring services, may
not operate in the event of an area power outage or if the cable connection is
disrupted or not operating.
Included with your equipment are advisory warning stickers that provide information
regarding the limitations of 911/E911 service with VoIP services. Please place these
stickers on or near the equipment used with Astound Phone services.
16
Small Business
User’s Guide
17
Astound Phone
Astound Phone Portal
• Check voice mail messages online.
• Set up your voicemail preferences.
• Manage your Astound Phone features.
• Get e-mail alerts when you receive voicemails.
• Detailed instructions for using the Astound Phone Portal can be found at
http://www.astound.net/myastoundphone
Go to: http://www.myastoundphone.net
Your PIN is the default password for
logging into the Phone Portal.
How to Setup Your Voice Mailbox
• To set up your voice mailbox for the first time you must dial your 10-digit phone number
from your business phone or dial *9.
• Enter the default pass code when prompted. The default pass code will be the last four
digits of the telephone number.
• You will be prompted to create a personalized pass code of four to eight digits.
• Record a name announcement (up to 10 seconds long).
• Record a personal greeting (up to 30 seconds) or select the standard greeting.
• Prompts will allow you to correct and re-record announcements in case you are not
satisfied with what you have recorded.
Checking Voice Mail Away from the Office
To check your voice mail, simply dial your 10-digit phone number and enter the pass code you
created when prompted. You can check your voice mail from any location as long as you have
done the initial setup from your business phone. Simply dial your 10-digit phone number and
press star (*) during the greeting, then enter your pass code.
17
18
Small Business
User’s Guide
Astound Phone
Voice Mail Features
• Each message is time and date stamped
• Pressing the (0) key plays helpful hints
• Messages can be up to 2 minutes in length
• You can store up to 30 messages or 60 minutes worth of messages
• Messages can be saved for up to 30 days. To save messages, press (2)
• Greetings can be recorded up to 30 seconds in length
• To pause all activity for 30 seconds, press (8). Press (8) to resume activity before the
30 seconds pause has expired
• To listen to a new voicemail, press (1)
• To fast-forward 5 seconds during message playback, press (99)
• To rewind 5 seconds during the message playback, press (77)
• Press (#) to keep the current message and skip to the next message
• To delete a message, press (3)
• You can also check your voice mail messages online at http://myastoundphone.net.
Your PIN is the default password. Detailed instructions for using the Astound Phone Portal
can be found at http://www.astound.net/myastoundphone or at www.astound.net, in
the “Support” menu.
How to Change Your Greeting, Name and PIN
• Access your voice mail by dialing (* 9) or by dialing your 10-digit phone number, followed
by your passcode
• Press (3) to change your greeting and follow the prompts
• To change your name, press (3) for the greetings menu, then press (3) to change your
name and follow the prompts
• To change your PIN, press (4) for mailbox settings, then press (3) for security options and
follow the prompts
Message Indicator
If you have a new voice mail, you will notice a “staggered” dial tone when
you pick up the line. This will continue until you have called and checked
your voice mail.
18
Small Business
User’s Guide
19
Astound Phone
Calling Features
The following features are included with Unlimited Phone or can be added to our other
phone plans for an additional monthly charge.
•
Call Waiting – A tone will announce an incoming call when you are already on the
phone. This feature comes automatically activated when included with or added to your
Astound Phone service.
Cancel Call Waiting (*70) – Turn off call waiting on a per call basis. Enter the code
before making the call.
•
Caller ID & Call Waiting Caller ID – View caller information for incoming calls. These
features come automatically activated when included with or added to your Astound
Phone service.
•
Caller ID Block (*67) – Block your Caller ID information from displaying on outbound
calls on a per call basis. Enter the code before making the call.
•
Disable Caller ID Privacy (*82) – Turn off Caller ID Privacy on a per call basis. Enter the
code before making the call.
Note: This feature is used if you have Caller ID Privacy set as a permanent feature on
your Astound Phone. You will receive a message when calling an individual who does not
accept anonymous calls. Simply hang up, dial *82 and try again.
•
Repeat Dial (*66) – If you receive a busy signal when making a call, you can hang up,
pick up the receiver again and enter the code. The system will continue to call the last
number you dialed for up to 30 minutes. Once that line is free, your phone will ring with
a distinctive ring. You may continue to make and receive phone calls as normal while this
feature is activated.
Cancel Repeat Dial (*86) – Disable repeat dial before the 30 minute time frame is
over.
•
Return Call (*69) – Return the call of the last person who called you. Like Repeat Dial, if
the line is busy it will continue to redial the number for up to 30 minutes.
Note: If the caller is calling you from a cellular phone, this feature will tell you the number
of the last caller but you will receive a busy signal if you attempt to dial them back through
the Return Call menu. Simply hang up and dial the number directly.
Cancel Return Dial (*86) – Disable return call before the 30 minute time frame is over.
19
Small Business
User’s Guide
20
Astound Phone
•
Call Forward (*72) – Forward incoming calls to another telephone number. If you
forward calls to a long distance number, long distance charges may apply depending
on your Astound Phone package. To activate Call Forwarding, press *72, wait for the
confirming beeps, and then enter the phone number you would like calls forwarded
to. You will immediately get a courtesy call at the phone number where calls will be
forwarded. Answer the courtesy call to activate Call Forwarding. If you cannot answer
the courtesy call, you must dial *72 again from your Astound Phone and wait for the
confirmation tone.
Cancel Call Forward (*73) – Disables current call forwarding.
•
Selective Call Forwarding (*63) – Forward calls from a list of up to 12 people to
another phone line. All other calls will ring through normally. Enter code again to edit or
cancel Selective Call Forwarding. Simply listen to the helpful prompts that will walk you
through setting up, adding and removing numbers or turning off this feature.
Note: Selective Call Forwarding and Call Forwarding can be available on the same line,
but only one can be active at a time.
20
•
Selective Call Rejection (*60) – Screen calls from up to 12 numbers that you specify.
Enter code again to edit or cancel Selective Call Rejection. Simply listen to the helpful
prompts that will walk you through setting up, adding and removing numbers or turning
off this feature.
•
Selective Call Acceptance (*64) – Accept calls only from phone numbers that you
specify. Simply listen to the helpful prompts that will walk you through setting up, adding
and removing numbers or turning off this feature.
•
Anonymous Call Rejection (*77) – Automatically block numbers that have disabled
their Caller ID information. They will hear a message that you are not receiving anonymous
calls with instructions on how to disable their Caller ID privacy.
Cancel Anonymous Call Rejection (*87) – Disables anonymous call rejection.
•
Distinctive Alert (*61) – Assign up to 12 phone numbers a distinctive ring. To set up this
feature, dial *61, then follow the helpful prompts to add or remove numbers.
•
Speed Dial (*74) – Store up to eight unique numbers for convenience and speed. It is
as easy as pressing a one-digit number followed by the # key. Adding a new number on
speed dial automatically replaces the previously saved number.
1. Pick up the line and listen for the dial tone.
2. Dial *74 and listen for a second dial tone
3. Enter a one-digit code from two to nine, followed by the local or long-distance
number you want to store exactly how you would need to dial it to make the call and
then press the # button to store it
4. Listen for two beeps or a recording to confirm the number is stored and hang up.
Small Business
User’s Guide
21
Astound Phone
•
Two-Digit Speed Dial (*75) - Store up to thirty unique numbers for convenience and
speed. Similar to Speed Dial, it is as easy as pressing a two-digit number followed by the
# key. Adding a new number on two-digit speed dial automatically replaces the previously
saved number.
1. Pick up the line and listen for the dial tone.
2. Dial *75 and listen for a second dial tone
3. Enter a two-digit code from twenty to forty nine, followed by the local or longdistance number you want to store exactly how you would need to dial it to make the
call and then press the # button to store it
4. Listen for two beeps or a recording to confirm the number is stored and hang up.
Note: To remove a speed dial number entirely, simply dial *75, enter the one-digit
code you wish to remove and then press # again.
•
Three Way Calling – Bridge together two lines in addition to your own so that three
separate individuals can speak on a single call.
1. While on a call with one of the individuals you wish to conference with, press the
receiver button for one second. You will get a dial tone and the other caller will be
put on hold.
2. Dial the number of the third party. When you get an answer, press the receiver button
briefly again and all three parties will be connected. If the third party does not answer
the phone, press the receiver button two times to cancel. You will still be connected
to the first call.
3. When either of the people you called hangs up, you remain connected to the other
person. When you hang up, everyone is disconnected.
21
Small Business
User’s Guide
22
Astound Phone
Troubleshooting Tips
• Power-cycling a Telephony Modem will often resolve most phone issues. If your Telephony
Modem has a battery backup, please remove it before attempting a power cycle.
1.
Unplug the power from the MTA for one full minute.
2.
Plug the power back into the MTA and wait for all the lights to become solid.
3.
Pick up your hand set and check for dial-tone
Note: It can take up to 5 minutes for phone service to restore after a power cycle.
• If the Online light is blinking on your modem, press the standby button to take your MTA
out of standby mode.
• If the Downstream (DS) or Upstream (US) lights are blinking, see the internet troubleshooting
steps located on page 13.
• Unplug the phone line from Line 1 in the back of the MTA and set aside. Plug a noncordless phone directly into the MTA and test for dial-tone. If there is a dial-tone, plug
each of your phones in one at a time to try and find the piece of equipment causing the
problem.
• Some equipment such as fax machines, certain cordless phones and caller ID units were
designed before digital phone service was available. Please check with the manufacturer
to determine if your equipment can be used with a digital phone line.
• Voice Mail can interfere with a fax machine by taking the calls and/or confusing a fax
machine into thinking there is no dial tone. Plug a phone directly into the line and listen
for a staggered dial tone. If a staggered dial tone exists you must first check the voice mail
on that line and then call Customer Service to have the voice mail feature removed.
Call Data Records
If you are having technical difficulties with an existing feature of your
Astound Phone service, it is very helpful to have a call data record ready
before calling technical support. Simply write down the date, time and
phone number or feature you are attempting to dial as an example to
give to our technical support representative. This information will allow
us to investigate the error more quickly.
22
Small Business
User’s Guide
23
Cable Television
Basic Cable
Astound Basic Cable is simple to install. You don’t need any additional devices, and you can
connect to any cable-ready TV – provided you have activated your Astound cable service.
To connect to Astound cable, you simply run a coaxial cable from your wall mounted cable
outlet to your cable-ready television set or to your VCR. If you find that your cable outlet is
not activated, or you need additional cable outlets installed, please contact us to schedule a
professional installation.
Installing Basic Cable
• The connection from the outlet to your TV or VCR will always be coaxial cable. If you use
a VCR, you can use a different cable from your VCR to your TV.
• Check connections to ensure they are threaded correctly and firmly tighten by hand; do
not use tools to tighten.
• If you use a VCR, you will need to tune your TV to channel 3 or 4 to watch cable. Check
the VCR user manual for more information.
• Since your components may vary as well, please refer to your user manual(s) for installation
of those components.
• Some channels in Basic Cable may require additional equipment. Check your Channel
Lineup card for more information on which channels require equipment.
Digital Cable
Astound Digital Cable gives you access to up to 300 channels of entertainment, as well as
digital music, and interactive on-screen programming guide. Digital cable requires a digital
cable terminal (DCT) installed, or a CableCard installed into a television with a card slot. Not
all DCTs look alike. The one you receive may vary slightly from the diagrams on the following
pages.
Digital Music
Set the soundtrack for your business with 45 channels of commercial-free, CD-quality
music. Digital Music is available through a Astound digital cable box. To install use the audio
connections from your cable box and connect to your stereo speaker system.
23
24
Small Business
User’s Guide
Audio/Video Cables
Make the Best Connection!
The cables you use to connect cable to your audio/video equipment could be as simple as a
single line to your television, or as complicated as a multiple component audio. Your equipment
will only work when using the right cables for the job, and you should know how you are
hooking up your components. Check the connectors to see what cables you are using:
Coaxial cable, or “coax,” is the standard cable line that is installed.
If you have basic or digital cable, this may be the only kind of cable
you need.
Composite RCA consists of three cables that deliver an analog output
divided into red and white cables for stereo audio, and a yellow cable
for video. They can be used to connect a Digital Cable Terminal (DCT)
to a non-HDTV, a VCR or a stereo tuner.
S-Video is a sharper alternative to the yellow RCA video cable, but still
using the red and white RCA audio cables. It can be used to connect a
DCT to a non-HDTV or a VCR.
Component RCA consists of five cables that deliver the sharpest
analog output, divided into red and white cables for stereo audio, and
red, green and blue cables for video. They can be used to connect a
DCT to a HDTV or a non-HDTV.
HDMI (High Definition Multimedia Interface) is a single cable that
delivers a digital audio and video output. It can be used to connect
a HD DCT to a HDTV. (You may still wish to use separate audio
connections for Surround Sound.)
DVI (Digital Video Interface) is a single cable that delivers a digital
output. It can be used to connect a HD DCT to a HDTV.
Coaxial SPDIF (Sony/Philips Digital InterFace) is a single cable that
delivers Dolby Digital 5.1 audio output. It can be used to connect a
DCT to a stereo tuner.
Optical SPDIF is a single cable that delivers the best available Dolby
Digital 5.1 audio output. It can be used to connect a DCT to a stereo
tuner.
24
Small Business
User’s Guide
25
Cable Television
Installing Digital Cable
Connect your digital cable terminal to your TV or VCR by referring to the following diagrams.
After installation you may be receiving more channels than what you ordered. Within 24
hours, the DCT will automatically reset itself with your programming package.
Note: Your model may vary.
1
2
3
4
5
DCT2000 Series
CURSOR
REMOTE
MESSAGES
A/ B
GUIDE
INFO
6
7
8
CHANNEL
POWER
MENU
9
SELECT
10
POWER
A/B
11
12
13
1
Lights if optional A/B switch is activated (see #11).
2
Lights to indicate that a message is present. Refer to the “Using Your
Interactive Programming Guide” for instructions on how to retrieve
messages.
3
Normally displays current channel number or time of day; in the
diagnostic mode, displays diagnostic codes.
4
Flashes when an error-free signal is received from the remote control.
5
Lights when the unit is on.
6
Displays the interactive programming guide (i-Guide).
7
Moves the cursor in menu and program guide screens.
8
Displays current channel and program information.
9
Displays the Main Menu.
10
Selects function options and tunes channels from the i-Guide.
11
When enabled, this switches an add-on module from one function to
another function.
12
Changes channel up and down.
13
Turns DCT on/off.
25
26
Small Business
User’s Guide
Cable Television
1
2
3
AUX AUD IO IN
TO
T V/VCR
5
4
SPDIF
TO RF IN
S-V IDEO
RF
IN
CAB LE IN
R
L
AUD IO OU T
DCT2000 Series
V IDEO
HIGH
SPEED
OUT OF
BAND
T V Pass Card
DATA
IR
SWITCHED
105-125V
60Hz
4A MAX
500W MAX
6
7
26
8
1
Coaxial connector used to connect the DCT to a standard TV or VCR.
2
Coaxial connector used for DCT input from the TO RF IN connector. Deactivated
on boxes without a pre-installed connecting cable.
3
Coaxial connector used to connect the TO RF IN port to the RF in port.
Deactivated on boxes without a pre-installed connecting cable.
4
RCA jacks for looping through audio from auxiliary audio equipment.
5
S-Video connector used for high qulity video to external devices such as highend VCRs or TVs.
6
RCA jack used to connect the DCT to a composite (baseband) video TV or a
monitor; in some configurations this jack connects to a VCR.
7
Optional connectors. Not active.
8
AC power outlet that can be configured as a switched or unswitched outlet and
a two-pronged plug for attaching a power cord.
Small Business
User’s Guide
27
Cable Television
Using Coaxial Cables
Using Audio & Video Cable or Audio & S-Video Cables
DCT2000 Series
AUX AUD IO IN
TO
T V/VCR
SPDIF
TO RF IN
S-V IDEO
RF
IN
R
L
AUD IO OU T
CAB LE IN
V IDEO
HIGH
SPEED
OUT OF
BAND
T V Pass Card
DATA
IR
SWITCHED
105-125V
60Hz
4A MAX
500W MAX
Either or
For Digital Music only,
connect audio cables
directly to stereo
speaker system.
CABLE IN
CABLE OUT
R
AUDIO
IN L
AUDIO
R OUT L
VIDEO IN
SVIDEO IN
VIDEO OUT SVIDEO OUT
VCR
(optional)
Either or
AUDIO
IN
R
L
AUDIO
OUT
CABLE IN
R
L
VIDEO
IN
SVIDEO
IN
TV
27
28
Small Business
User’s Guide
Cable Television
Connecting Explorer model(s) 2000-3000 or 2100-3100 to a Stereo TV
Connecting Explorer model(s) 2000-3000 or 2100-3100 to a Stereo TV
and Stereo VCR
28
Small Business
User’s Guide
29
Cable Television
Connecting Explorer model(s) 2000-3000 or 2100-3100 to a Stereo TV
with S-Video Cables
29
30
Small Business
User’s Guide
Cable Television
Digital Cable Troubleshooting
If you subscribe to Digital Cable you can connect any number of television sets for service, but
you will need an additional DCT or CableCard to receive digital channels for each television
you connect. You do not need extra equipment to receive Basic Cable on additional television
sets.
• If you have a VCR, be sure to connect it between the DCT and the TV.
• Make sure to tune your TV or VCR to channel 3 and use the digital remote to watch
cable.
• If you have a TV with multiple inputs for coaxial, S-Video and RCA cables, make sure your
TV is set to the correct input.
• If you have picture but no sound, check to see if the DCT volume has been reset, or if the
TV is muted.
• If you have no sound and are using a stereo tuner, check the cable connections and
settings for the tuner.
• If you are not receiving all of your channels, or if the on-screen i-Guide is showing “One
Moment Please” for more than a few minutes, power-cycle the DCT by unplugging the
power for one minute. Your programming package should reload within a few minutes,
but the on-screen i-Guide and menu, and TV On Demand programming, can each take
up to one hour to reload.
• If the DCT indicates it is downloading programming with “DL” displayed on the front
panel, this process may take up to 30 minutes. If you power-cycle the DCT during this
time, the download will start over. If the display shows “DL” for more than 30 minutes,
you should call our technical support department.
• If the DCT shows another error code on the front panel, please call our technical support
department.
• If you have a TV with a CableCard and you lose some of the programming, unplug the
CableCard and power-cycle the TV by unplugging the power for one minute. Securely
plug the CableCard back into the TV and then restore power to the set.
30
Small Business
User’s Guide
31
Notes
31
05.09
Serving Businesses in California, Oregon & Washington
1-877-264-2951
Astound.net/Business
©2009 WaveDivision Holdings, LLC