1
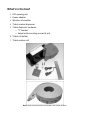
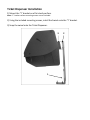
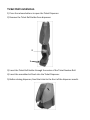
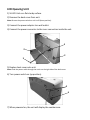
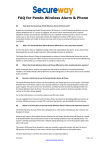
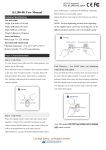
User Manual What’s in the box Ticket Dispenser Installation Ticket Roll Installation LED Queuing Unit Installation Operation / Troubleshooting Contact Us What’s in the box? 1. 2. 3. 4. 5. 6. 7. LED queuing unit Power adaptor Wireless transmitter Ticket number dispenser Ticket dispenser hardware o “L” bracket o Swivel with mounting screws (4 pcs) Ticket roll holder Ticket number roll Note: Some accessory items are stored in the actual product. Ticket Dispenser Installation 1) Mount the “L” bracket on a flat sturdy surface. Note: “L” bracket surface mounting screws are not included. 2) Using the included mounting screws, install the Swivel onto the “L” bracket. 3) Snap the swivel onto the Ticket Dispenser. 3 1 2 Ticket Roll Installation 1) Press the release buttons to open the Ticket Dispenser. 2) Remove the Ticket Roll Holder from dispenser 2 1 3) Insert the Ticket Roll Holder through the center of the Ticket Number Roll. 4) Insert the assembled roll back into the Ticket Dispenser. 5) Before closing dispenser, feed the ticket to the front of the dispenser mouth. LED Queuing Unit 1) Sit LED Unit on a flat sturdy surface. 2) Remove the back cover from unit. Note: Be sure the power switch on unit is off (down position). 3) Connect the power adaptor to a wall outlet. 4) Connect the power connector to the inner connection inside the unit. 4 2 2 3 5) Replace back cover onto unit. Note: Feed the power cable through the notch on the right side of the back cover. 6) Turn power switch on (up position). 5 6 7) When powered on, the unit will display the number zero. Operation Simply press the button on the Wireless Transmitter to advance the number. A beep will sound every time the button is pressed. Troubleshooting The LED Queuing Unit does not turn on. Make sure the light on the power adaptor is on. If it is not on, please try another outlet. Unplug the power connection from the LED unit and reconnect firmly. Make sure the LED unit on/off switch is set to the up position. How do I reset to zero? Turn the LED unit off, and back on. The Wireless Transmitter will not advance the number. Stand 5 feet from the LED unit and try again. Replace battery on the Transmitter. o Use only ALKALINE TYPE 27A (12 Volts). Make sure the Dip Switches on LED unit and Transmitter match (see below). What are the Switches on the back of the LED unit and bottom of transmitter for? The Dip Switches set the operating frequency of the unit. Please do not change unless absolutely necessary. Sometimes there are other wireless devices nearby effecting the communication of the Queuing system. If this is occurring, simply change the Dip Switches on the LED unit to a different setting arrangement and make sure the Transmitter is set identically. LED Unit Dip Switches Transmitter Dip Switches Phone: 714-668-9988 Fax: 714-668-9980 Web: www.pro-lite.com Web Support: www.pro-lite.com/support Email (Sales): [email protected] Email (Support): [email protected]