1
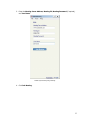
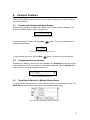
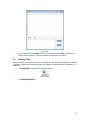
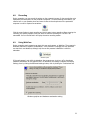
TurboSupport User Manual
For PC Users
Version 4.2
RHUB Communications, Inc.
4340 Stevens Creek Blvd.
Suite 282
San Jose, CA 95129
[email protected]
http://www.rhubcom.com
Contents
PREFACE ..................................................................................................................................................... 4
ORGANIZATION .......................................................................................................................................... 4
TERMINOLOGY ........................................................................................................................................... 4
CONSTRAINTS ............................................................................................................................................. 5
TURBOSUPPORT CONTROL PANEL AND KEY FUNCTIONS FOR PRESENTER ................................................. 5
1.
SETTING UP TURBOSUPPORT..................................................................................................... 6
2.
REMOTE SUPPORT ......................................................................................................................... 8
2.1 STARTING A REMOTE SUPPORT MEETING ............................................................................................. 8
2.2 INVITING THE ATTENDEE ...................................................................................................................... 8
2.3 PROVIDING MULTI-PARTY SUPPORT..................................................................................................... 9
2.4 SWITCHING TO TRAINING MODE........................................................................................................... 9
2.5 REBOOTING FROM REMOTE AND AUTO-REJOINING .............................................................................. 9
2.6 CLOSING REMOTE SUPPORT SESSION AND LOCKING COMPUTER........................................................ 10
2.7 REMOTE SUPPORT ONE TO ONE FILE TRANSFER ................................................................................ 11
3.
JOINING A MEETING ................................................................................................................... 12
4.
COMMON FEATURES................................................................................................................... 14
4.1.
4.2.
4.3.
4.4.
4.5.
4.6.
4.7.
4.8.
4.9.
4.10.
4.11.
4.12.
4.13.
4.14.
4.15.
4.16.
4.17.
4.18.
4.19.
4.20.
4.21.
4.22.
4.23.
4.24.
4.25.
4.26.
4.27.
4.28.
4.29.
PAUSING AND STARTING APPLICATION SHARING ...................................................................... 14
CHANGING APPLICATION SHARING ............................................................................................ 14
SHOW SPECIFIC MONITOR IN MULTIPLE-MONITOR SETUP ......................................................... 14
CHANGING PRESENTER .............................................................................................................. 15
CHANGING CONTROLLER ........................................................................................................... 15
CHATTING .................................................................................................................................. 15
SENDING FILES ........................................................................................................................... 16
RECORDING ................................................................................................................................ 18
USING WEBCAM ........................................................................................................................ 18
USING WHITEBOARD.................................................................................................................. 19
USING ANNOTATION .................................................................................................................. 19
FLOATING TOOLBAR ................................................................................................................... 19
HIDE THE ATTENDEE LIST .......................................................................................................... 20
DISABLE RECORDING FUNCTION ................................................................................................ 20
REPORTING ................................................................................................................................ 20
CHANGING COLORS ................................................................................................................... 20
STOP ADDITIONAL ATTENDEES .................................................................................................. 20
REMOVE ATTENDEES ................................................................................................................. 21
CHANGE LANGUAGE FOR TURBOSUPPORT UI............................................................................ 21
SHOW ALL TURBOSUPPORT WINDOWS ...................................................................................... 21
AUTO-UNINSTALL TURBOSUPPORT FROM ATTENDEE COMPUTERS ........................................... 21
SHOW PRESENTER’S DESKTOP WHEN MEETING STARTS ........................................................... 22
ENABLE TURBOSUPPORT OUTLOOK TOOLBAR ........................................................................... 22
REMOTE PRINTING ..................................................................................................................... 22
OUTLOOK INTEGRATION ............................................................................................................ 23
MULTIPLE MONITORS FOR PRESENTER ...................................................................................... 24
MULTIPLE MONITORS FOR SUPPORTER ...................................................................................... 25
WEBCAM VIDEO ........................................................................................................................ 25
POLLING ..................................................................................................................................... 25
5.
UNATTENDED SUPPORT ............................................................................................................. 28
6.
SCHEDULING MEETINGS ........................................................................................................... 33
2
6.1 SCHEDULING A MEETING .................................................................................................................... 33
6.2 EDITING A SCHEDULED MEETING ....................................................................................................... 34
6.3 STARTING A SCHEDULE MEETING ...................................................................................................... 34
6.4 DELETING A SCHEDULE MEETING ...................................................................................................... 34
7.
MANAGING PROFILE................................................................................................................... 35
8.
SUPPORT CONTACT..................................................................................................................... 36
3
Preface
TurboSupport is a collaborative remote support system. The client-server architecture requires
Internet connectivity for its operation.
In TurboSupport, a support session is called a meeting.
Organization
This manual provides the steps to use the TurboSupport web collaboration system. The User
Manual is organized as follows:
Section
Section
Section
Section
Section
Section
Section
Section
1
2
3
4
5
6
7
8
Setting up TurboSupport
Remote Support
Joining a Meeting
Common Features
Unattended Support
Scheduling Meetings
Managing Profile
Support Contact
Terminology
The following terms are used throughout this manual. In a meeting, a participant can be either
the Host or an Attendee:
• The Host (supporter) is the person who initiates the meeting. The Host must have a
user account in TurboSupport system.
• The Attendee (supportee) is the person invited by the Host to join a meeting. Attendee
does not need an account in TurboSupport system.
The Host or an attendee can either be:
• The presenter showing their computer to all participants
• A controller controlling the Presenter's keyboard and mouse
4
Constraints
Here are a couple of constraints:
•
•
•
There is only one host and one presenter at any moment in a meeting.
The host or the current presenter can assign any participant to be the presenter.
The presenter can assign any participant or all participants to be a controller.
TurboSupport Control Panel and Key Functions for Presenter
TurboSupport Control Panel for Presenter
5
1. Setting up TurboSupport
To host any type of meeting, you need to download and run the TurboSupport client. You can
do a manual or automatic download of TurboSupport.
Manual download
1.
In a web browser, go to your meeting server web address:
Home Page
2. Click the Download TurboSupport link.
3. Download TurboSupport and run it.
Automatic download
1. In a web browser, go to your meeting server web address
2. Click the Host Meeting icon.
3. If a Java Virtual Machine (JVM) is installed in your system, a message will prompt for
your permission to install TurboSupport. Click Accept.
Automatic download
6
After TurboSupport is installed, you can launch it by clicking the TurboSupport shortcut on your
desktop or via your computer’s Start menu Æ Programs Æ TurboSupport Æ Start Meeting.
TurboSupport shortcut
You will have to sign in to host a meeting. Provide the following information:
•
Meeting Server Address
•
Email Address
•
Password
Signing in to host a meeting
7
2. Remote Support
This function simplifies the access to another computer so that you can control and support it. As
the host, you can view and control the attendee’s computer as soon as the attendee joins the
meeting. In addition, this feature provides a unique remote reboot capability.
2.1 Starting a Remote Support Meeting
1. Launch TurboSupport by clicking the TurboSupport shortcut from the desktop
2. Enter the login credentials and Sign In.
3. In the meeting control pane the options displayed are:
o
Host an unscheduled meeting
o
Join a meeting
o
Schedule a meeting
Click Host an unscheduled meeting to host an impromptu support meeting.
4. In the next step, choose the Remote Support meeting type.
5. Enter the Password, which is optional. If you enter a password, the invitees also need
to enter in the same password.
6. Click Continue. This screen displays the Attendees, the Meeting Server Address, and
the Meeting ID.
2.2 Inviting the Attendee
Consider a situation where you are facing a problem with your system and want the technician to
access your system and solve the problem. In such situations the technician hosts a Remote
Support Meeting and invites you to join the meeting.
Another instance could be a situation where more than one person is required to investigate and
solve the problem. Consider for instance a case where you and your team leader have to support
a computer facing some issue. In such a case, your team leader can initiate a Remote Support
Meeting and invite you to support the system facing problems.
By clicking Invite Attendees the meeting details can be emailed.
( The option to Join a view-only meeting is not available for Remote Support.
8
2.3 Providing Multi-Party Support
To join a meeting as a joint-supporter, you need a user account in the TurboSupport system and
follow the steps below.
1. Follow the path Start menu Æ Programs Æ TurboSupport Æ Start Meeting or
double-click the TurboSupport shortcut from the desktop.
2. Enter the login credentials and Sign In.
3. In the meeting control pane the options displayed are:
o
Host an unscheduled meeting
o
Join a meeting
o
Schedule a meeting
Click Join a meeting to join a Remote Support meeting started by someone else.
4. There are two different ways in which you can join the meeting.
Options to join Remote Support Meeting
Here you choose the option I want to work with the Meeting Host to support
other.
2.4 Switching to Training Mode
During a support session, you as the host may want to show your screen to the attendee to
conduct a training session. You can Change Presenter so that you are the presenter. After the
training session, you can change the presenter back to the attendee again.
2.5 Rebooting from Remote and Auto-Rejoining
There are situations where the attendee is not available at the system throughout the support
session. However, the host may have to reboot the attendee’s computer during the support
session.
To reboot the attendee computer, the host simply clicks the Reboot button and chooses the
reboot mode: “Reboot” or “Reboot to Safe Mode”.
9
The view window of the remote support host
You can ask the attendee to input his computer password so that after reboot the remote
computer can auto-login. This is important for unattended support. Follow the steps below:
•
Click the Auto-Login on the meeting panel.
•
Input the password of the computer.
2.6 Closing Remote Support Session and Locking Computer
There are situations where the attendee is not available at the system throughout the support
session. If the host finishes work on the remote computer, the host can click the Close & Lock
button. This will close the remote support session and, as a safety measure, lock the attendee’s
computer. The result is that the attendee’s computer will display the Windows Login screen if
their computer is running Windows.
10
2.7 Remote Support One To One File Transfer
During a support session, you as the host may want to transfer files from your computer to the
attendee’s computer, or vice versa. To transfer files, the host clicks the Send Files button in
TurboSupport. The host then chooses which files and folders to transfer and which direction to
transfer the files. For security reasons, a warning message is displayed if the host tries to
transfer a file from the attendee’s computer.
File Transfer window during Remote Support session
11
3. Joining a Meeting
When you receive an invite from the host, open your browser and
1. Go to the meeting server’s address
2. Click the Join Meeting icon.
3. Fill in the Meeting ID, Meeting Password and Your Name.
4. Click the Join Meeting button.
Joining a meeting
5. If the meeting is a seminar, which does not require any download, you now join the
meeting.
6. If the meeting is not a seminar and you have a Java Virtual Machine (JVM) installed in
your system, a message will prompt for you to install TurboSupport. Click Accept.
Otherwise, you have to download the TurboSupport client and run it.
If you have already installed the TurboSupport client, follow these steps to join a meeting:
1. Launch TurboSupport by clicking the TurboSupport shortcut from the desktop.
2. Click the Join a Meeting button.
Option to join a meeting
12
3. Enter the Meeting Server Address, Meeting ID, Meeting Password (if required),
and Your Name.
Details required while joining a meeting
4. Click Join Meeting.
13
4. Common Features
There are many features that are common to all four types of meetings. This section discusses
the common features.
4.1.
Pausing and Starting Application Sharing
When you start a meeting, by default, your desktop will be shown to meeting attendees. The
green icon indicates that your screen is being shown.
Icon indicating active application sharing
To pause showing your screen, click the Pause
meeting is being paused.
button. The red icon indicates that the
Icon indicating that application sharing is paused
To start showing your screen, click the Start
4.2.
button. The icon will now become green.
Changing Application Sharing
By default, your desktop is shown to the other attendees. The Show My drop-down list displays
all the applications open in your system. To show another application, click the Show My dropdown and choose a running application from the list.
Option to change application sharing
4.3.
Show Specific Monitor in Multiple-Monitor Setup
The presenter can optionally choose to show a specific monitor in a multiple-monitor setup. The
Show My drop-down list shows each monitor as a separate viewable choice.
Option to show single monitor in multiple-monitor setup
14
4.4.
Changing Presenter
The attendees who have joined the interactive meeting can also be the presenter to show his or
her computer screen to meeting participants. By default, the host will be the presenter. However,
during a meeting the host and the current presenter can assign any participant to be the
presenter. To change the presenter, click Change Presenter and choose the presenter.
Option to change presenter
4.5.
Changing Controller
During the meeting, you as the presenter can assign a participant as the controller. A controller is
the person who can control your mouse and keyboard.
To change the controller, click Change Controller. You can assign control directly to a specified
participant or to all.
Change Controller option
Click Change Controller then Reclaim Controller to reclaim control from the specified
controller(s).
4.6.
Chatting
While convening a meeting you can also chat with attendees. To chat with the attendees:
•
Click Chat.
Chat button
•
In the Chat window you have the option of choosing the attendees with whom you want
to chat. Clicking the drop-down arrow lets you choose specific attendees to chat with.
15
Chat window
•
4.7.
Type in the text and click Send. To save the chat transcript click Save. Browse to the
location and save the file. The chat is saved as a text file or a rich text file.
Sending Files
During a meeting, there may be a need to send some files between meeting participants. Instead
of opening a mailing client and sending files, a participant can send files using TurboSupport. To
send files:
•
Click Send Files to open the File Transfer dialog box.
Send Files button
•
Click Add Files/Folders.
16
File Transfer dialog
•
Select a particular folder from the drop-down list. All the folders and files in that
directory are displayed.
Folder Selection dialog
•
Select the files, folders, or both and click OK. They are added to the list of files/folders to
be sent.
•
In the File Transfer dialog, click the drop down-arrow next to the To label, and then
select the participants to whom the files should be sent. By default, the files are sent to
all other participants.
•
Click Send Files.
17
4.8.
Recording
During a meeting, you can record the actions on the presenter’s screen. It also records the voice
captured by the microphone on the presenter’s computer. To record meeting conversation, you
need to turn on your speaker phone and move it close to the microphone on the presenter’s
computer in order to capture conversations.
Click the record button to start recording and click it again to stop recording. When stopping the
recording, the system prompts to ask you where to save the recording file. The file is an
executable. Just run the file and it will replay the entire recording session.
4.9.
Using WebCam
During a meeting, each presenter can start their own web camera, or WebCam. The presenter’s
WebCam video will be visible to all attendees. If the presenter is changed, the new presenter
can start their own WebCam, although only the current presenter’s WebCam is visible to
attendees.
WebCam option
If the web camera is not visible to attendees, the presenter can try to turn off or slow down
hardware acceleration for the graphics card. On Windows, this setting is available via Display
Settings, then by clicking the Advanced settings button, then by clicking the Troubleshoot tab.
Windows graphics card Hardware acceleration setting
18
4.10. Using Whiteboard
While making the presentation you might have to illustrate some points. The Whiteboard option
in TurboSupport is used for this purpose. Click Whiteboard and the Paint application opens,
where you can illustrate certain points or draw diagrams.
Whiteboard option
4.11. Using Annotation
Using the Annotation feature you can highlight topics in your presentation. Click the Annotation
button and choose the type of annotation from Pen, Highlighter, Spot and Arrow. Then,
emphasize the interesting area using the mouse pointer.
Annotation option
When the annotation option is active, normal keyboard and mouse input ceases and essentially
your computer screen freezes. To unfreeze your computer screen, hit the “Esc” key or click the
Annotation button and select “Stop Annotation”.
Emphasis using Annotation feature
You can change the size of the annotation pen. Click the “Tools” menu item then “Annotation
Pen Size” and select a new size.
4.12. Floating toolbar
The floating toolbar has the advantage of using very little of the presenter’s screen space during
a presentation while still providing buttons for the most common features of TurboSupport.
19
Floating toolbar
4.13. Hide the Attendee List
As the meeting host, you can hide the attendee list from your attendees. Click the “Tools” menu
item and then uncheck “Attendees can view attendee list”.
4.14. Disable Recording Function
As the meeting host, you can disable recording functions so that none of the attendees can
record the meeting session. Click the “Tools” menu item and then uncheck “Attendees can
record”.
4.15. Reporting
The reporting feature is covered in the Administrator Manual.
4.16. Changing Colors
There are three color options available in TurboSupport that let you choose between speed and
image precision:
•
Low Quality (fastest)
•
High Quality
•
Truecolor (24-bit slowest)
To change the color, choose the menu item “Tools” then “Change Color” and choose the relevant
option. The High Quality color setting is recommended for its combination of speed and image
quality.
4.17. Stop Additional Attendees
As the meeting presenter, you can stop any further attendees from joining the meeting. Click the
“Tools” menu item then “Options” and check “Stop additional attendees”.
20
4.18. Remove Attendees
As the meeting presenter, you can remove attendees from the meeting. In the Attendees list,
right click the attendee’s name and choose “Remove this attendee”.
4.19. Change Language for TurboSupport UI
Each TurboSupport user can change the language of their TurboSupport user interface. Click the
“Tools” menu item then “Options” and select a language from the drop-down list.
Options dialog
4.20. Show all TurboSupport Windows
As the meeting presenter, you can display all transparent windows on your screen. By default,
attendees cannot see the host’s TurboSupport and its associated windows since these windows
are treated as transparent. To expose the TurboSupport control panel and associated windows,
click the “Tools” menu item then “Options” and check “Show all TurboSupport windows”.
4.21. Auto-Uninstall TurboSupport from Attendee Computers
As the meeting host, you can tell the system to automatically uninstall the TurboSupport client on
the attendee computers at the end of a meeting session. Click the “Tools” menu item then
“Options” and check “Remove TurboSupport from attendee computers at the end of sessions”.
21
4.22. Show Presenter’s Desktop When Meeting Starts
As the meeting presenter, you can display all transparent windows on your screen when a
meeting starts. Click the “Tools” menu item then “Options” and check “Show my desktop when a
meeting starts”.
4.23. Enable TurboSupport Outlook toolbar
Users can add a TurboSupport toolbar to Microsoft Outlook. Click the “Tools” menu item then
“Options” and check “Integrate with Outlook”. The Outlook toolbar looks like this:
TurboSupport Outlook toolbar
4.24. Remote Printing
Remote printing is the ability to print directly from the host computer to a printer on the
attendee’s network. This is useful if the host is printing from an application that is not installed
on the attendee’s computer. To print to an attendee’s printer, open the file to print and select
Print. Choose the TurboSupport Printer and click OK.
Choose TurboSupport Printer to send output to attendee’s printer
22
4.25. Outlook Integration
Outlook messages with calendar events are automatically generated when a TurboSupport user
schedules a meeting. An Outlook message can also be automatically generated when a user
chooses to invites attendees to a future or an active meeting.
Outlook message with calendar information is automatically generated for a scheduled meeting
23
4.26. Multiple Monitors for Presenter
If a meeting presenter has multiple monitors, the presenter can choose to display a specific
monitor or the entire desktop, which is composed of more than one monitor.
Multiple Monitor selection in TurboSupport
24
Below is the view that attendees would see for a presenter that has multiple monitors when the
entire Desktop is displayed:
Multiple Monitor view if entire Desktop shown
4.27. Multiple Monitors for Supporter
A person that is providing Remote Support to a computer with multiple monitors is given the
option in TurboSupport to show the entire Desktop or to show individual monitors as shown
below:
Remote supporter can view entire Desktop or individual monitors
4.28. Webcam Video
During a meeting, the host can display the video from their webcams by clicking the “Start
Webcam” button.
4.29. Polling
The host of a meeting can create a poll with questions and multiple choice answers for the
attendees. Poll questions can be created ahead of time by clicking the Poll link in the user’s “List
of scheduled meetings”. Or the host can create a poll question during the meeting by clicking the
“Tools” menu item then the “Poll” option.
25
Each poll question can have up to five pre-determined answers. The poll can limit the attendees
to voting for just one response or allow the attendees to vote for multiple responses.
Interface for creating a new Poll
After the poll question is created, the host can begin polling the TurboSupport attendees for
responses. The attendees will see a window similar to this:
Attendees voting window
The poll stays open until the host decides to close polling. Once the poll is closed, the results are
tabulated for each answer. The poll is blind: there is no way to determine how each attendee
voted.
26
The host’s “Manage Poll” window provides a Close Polling link. (A Start Polling link initially
appears where Close Polling appears below).
The host’s “Manage Poll” Interface
After the host closes the polling, the host sees a Share link where the Close Polling link used to
be. When the host clicks the Share link, the attendees see a window with the polling results.
Finally, the host can click the Share link to close each attendee’s “Polling result” window.
The attendee’s “Polling result” window
27
5. Unattended Support
Unattended Support is a support session that occurs when the person being supported, the
supportee, is not present when their computer is receiving support.
To enable an Unattended Support session (or meeting), the supporter first starts a Remote
Support meeting and clicks continue:
Supporter starts a Remote Support meeting
28
On the supportee’s system, the supportee installs TurboSupport and joins this Remote Support
meeting with the generated Meeting ID.
Supportee joins the Remote Support meeting
The supportee should accept the default answer: “Control and view your computer”:
Supportee allows supporter to Control and view your computer
29
If the supportee is not a Windows Administrator, the “Run as Admin” option appears. Click the
“Run as Admin” icon and specify an Admin’s Name and Password for the supportee’s computer:
For Windows non-Admin users, specify an admin name and password
30
On the supporter’s computer, choose Tools | “Change to unattended support session”:
Supporter changes to unattended support session
The supporter must enter a Computer Name for the supportee and a Meeting Password:
Supporter enters supportee’s computer name and a meeting password
31
The supportee must accept that the supporter can provide unattended support:
Supportee should accept that the supporter can provide unattended support
This meeting has now become a Remote Access meeting. From now on, the supporter will be
able double click the meeting ID to access this meeting from their Active meeting list:
Supporter will always see this Remote Access meeting in their Active list
32
6. Scheduling Meetings
There might be instances when you have planned a meeting earlier and want to inform the
invitees in advance. In such cases, you can schedule the meeting using the Schedule Meeting
option.
6.1 Scheduling a Meeting
To schedule a meeting:
1. Log into TurboSupport.
2. Click Schedule a meeting.
Scheduling meetings
3. Select the Meeting Type.
33
4. Mention the Subject of the meeting.
5. Enter the Password, which is optional for all meeting types but Remote Access to
this Computer.
6. Select the Date.
7. Select the Start and End time.
8. Select Recurring Meeting to schedule a recurring meeting. If this option is selected,
the Date and Time options are disabled.
9. Click Submit.
When you login to TurboSupport next time, the scheduled meetings and the details are
displayed.
6.2 Editing a Scheduled Meeting
To edit a scheduled meeting:
1. Click the Edit link of the respective meeting.
2. Make the necessary modifications.
3. Click Submit.
6.3 Starting a Schedule Meeting
To start a scheduled meeting, click the Start link for the respective meeting.
6.4 Deleting a Schedule Meeting
To delete a scheduled meeting, click the Delete link of the respective meeting. After a
confirmation dialog, a message box says that the schedule meeting has been deleted.
Alert after the meeting is deleted
34
7. Managing Profile
Follow these steps to manage your profile:
1. Log into TurboSupport.
2. Click Profile.
Managing profile
3. Edit your First Name, Last Name, and E-Mail.
4. Provide a Password and Retype your password to confirm it.
5. Specify your contact number.
6. Choose the relevant time zone.
7. Click Submit.
35
8. Support Contact
RHUB Communications, Inc.
4340 Stevens Creek Blvd.
Suite 282
San Jose, CA 95129
Tel: 408-642-5221
Fax: 408-516-9612
[email protected]
http://www.rhubcom.com
36