1
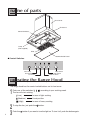
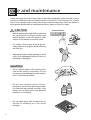
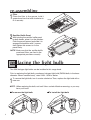
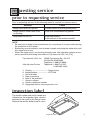
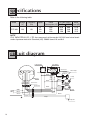
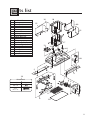
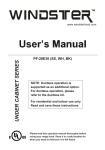
Operation Manual
RANGE HOOD
MODEL: ECP-360
TABLE OF CONTENTS
Safety Instructions .................................................................................................. 2
Name of Parts ......................................................................................................... 4
Operating the Range Hood ..................................................................................... 4
How to Use ............................................................................................................. 5
Care and Maintenance ............................................................................................ 6
Disassembling .................................................................................................... 7
Cleaning ............................................................................................................. 7
Re-assembling ................................................................................................... 8
Replacing the Light Bulb ......................................................................................... 8
Requesting Service ................................................................................................. 9
Prior to Requesting Service ............................................................................... 9
Inspection Label ................................................................................................. 9
Specifications ........................................................................................................ 10
Circuit Diagram ..................................................................................................... 10
Parts List ............................................................................................................... 11
Limited Product Warranty ...................................................................................... 12
READ AND SAVE THESE INSTRUCTIONS.
Keep this manual in a convenient place for future reference.
FUJI INDUSTRIAL CO., LTD.
1U02 1581
SAFETY INSTRUCTIONS
○ ○ ○ ○ ○ ○ ○ ○ ○ ○ ○ ○ ○ ○ ○ ○ ○ ○ ○ ○ ○ ○ ○ ○ ○ ○ ○ ○ ○ ○ ○ ○ ○ ○ ○ ○ ○ ○ ○ ○ ○ ○ ○ ○ ○ ○ ○ ○ ○ ○ ○ ○ ○ ○ ○ ○ ○ ○ ○ ○ ○ ○ ○ ○ ○ ○ ○ ○
Before installation and operation, read these instructions carefully and use this product only in the manner
described by the manufacturer in the operation manual.
The signal words shown below are used to alert you to potential personal injury and property damage hazards.
There are three hazard classifications based on potentially dangerous situations.
Obey all safety instructions that show these symbols to avoid possible injury, death and property damage.
WARNING:
WARNING indicates a potentially hazardous situation which, if not avoided,
could result in death or serious injury.
CAUTION:
CAUTION indicates a potentially hazardous situation which, if not avoided,
may result in minor or moderate injury.
CAUTION:
CAUTION used without the safety alert symbol indicates a potentially
hazardous situation which, if not avoided, may result in property damage.
WARNING
1. TO REDUCE THE RISK OF FIRE, ELECTRIC SHOCK, OR INJURY TO PERSONS, OBSERVE
THE FOLLOWING:
a) Use this unit only in the manner intended by the manufacturer. If you have questions, contact
the manufacturer.
b) Before servicing or cleaning the unit, switch power off at service panel and lock the service
disconnecting means to prevent power from being switched on accidentally. When the service
disconnecting means cannot be locked, securely fasten a prominent warning device, such as
a tag, to the service panel.
2. TO REDUCE THE RISK OF A RANGE TOP GREASE FIRE:
a) Never leave surface units unattended at high settings. Boilovers cause smoking and greasy
spillovers that may ignite. Heat oils slowly on low or medium settings.
b) Always turn hood ON when cooking at high heat or when flambeing foods (i.e. Crepes Suzette,
Cherries Jubilee, Peppercorn Beef Flambe).
c) Clean ventilating fans frequently. Grease should not be allowed to accumulate on fan or filter.
d) Use proper pan size. Always use cookware appropriate for the size of the surface element.
3. TO REDUCE THE RISK OF INJURY TO PERSONS IN THE EVENT OF A RANGE TOP
GREASE FIRE, OBSERVE THE FOLLOWING:
a) SMOTHER FLAMES with a close-fitting lid, cookie sheet, or metal tray, then turn off the burner.
BE CAREFUL TO PREVENT BURNS. If the flames do not go out immediately, EVACUATE
AND CALL THE FIRE DEPARTMENT.
b) NEVER PICK UP A FLAMING PAN - you may be burned.
c) DO NOT USE WATER, including wet dishcloths or towels - a violent steam explosion will result.
d) Use an extinguisher ONLY if:
1) You have a class ABC extinguisher, and know how to operate it.
2) The fire is small and contained in the area where it started.
3) The fire department is being called.
4) You can fight the fire with your back to an exit.
4. Do not place any electrical parts in water or spray water on them. Such a situation could result
in fire or electrical shock.
5. In the situation of a potential gas leakage, do not switch the unit on and off as it could result in
a gas explosion.
6. Do not attempt to modify or repair this product. Refer all servicing to qualified personnel,
otherwise it may result in fire, electric shock, or injury.
2
○ ○ ○ ○ ○ ○ ○ ○ ○ ○ ○ ○ ○ ○ ○ ○ ○ ○ ○ ○ ○ ○ ○ ○ ○ ○ ○ ○ ○ ○ ○ ○ ○ ○ ○ ○ ○ ○ ○ ○ ○ ○ ○ ○ ○ ○ ○ ○ ○ ○ ○ ○ ○ ○ ○ ○ ○ ○ ○ ○ ○ ○ ○ ○ ○ ○ ○ ○
CAUTION
1. For general ventilating use only. Do not use to exhaust hazardous or explosive material and
vapors.
2. To reduce the risk of fire and to properly exhaust air, be sure to duct air outside. Do not vent
exhaust air into spaces within walls, ceilings or into attics, crawl spaces or garages.
3. Read specification label on this product for further information and requirements.
4. Switch power off at the service panel when you won’t be using the range hood for a long
period. If you do not do so, damage to the electrical insulation may result.
5. Fasten the filter and other parts securely. Incorrect attachment may result in personal injury
or damage to property.
6. Do not use a commercially sold filter or filter cover on the filter part as it may affect its
performance and cause trouble.
7. To protect hands from injury from the edges of the sheet metal, wear working gloves while
servicing.
NOTE: The safety instructions are explained with the following
pictographic symbols.
: means prohibition. It indicates actions, if any, that
mustn’t be done.
: means forcible execution. It indicates actions, if any,
that must be done.
3
name of parts
Duct Cover
Enclosure
Control Switches
Lamp
(Not supplied)
Filter
Rectifier Baffle Panel
Control Switches
Pilot Lamp
OFF Switch
Low Switch
Lamp Switch
High Switch
Medium Switch
operating the Range Hood
The range hood has five control switch buttons on its front cover.
1
Push one of the switches ( , ,
The fan will start rotating.
(Low)
In case of light cooking
(Medium)
(High)
4
2
3
Usual position
In case of heavy cooking
To stop the fan, just push the
Push the
) according to your cooking need.
button.
button if you want to turn the light on. To turn it off, push the button again.
how to use
Before operation, make sure that the rectifier baffle panel and filters are attached securely.
CAUTION
•
During cooking, do not touch the rectifier
baffle panel or its screws. If the rectifier
baffle panel is attached incorrectly, it may
become detached and fall down.
•
Do not touch the lamps or their peripheral
areas when they are ON, or your hand may
be burned as they get overheated.
•
Do not use a gas range with nothing on
the burners. Otherwise the range hood
could become overheated and it might be
a cause of failure.
•
Stop running the range hood immediately
if a fire occurs while cooking. Continued
operation of the range hood will add
intensity to the fire.
5
care and maintenance
Clean the range hood as many times as possible (especially, clean the filter once a
month) as it becomes dirty and deteriorates in function if it’s left unclean. For a family
size of 4 to 5 people and cooking twice a day, clean the filter once every two weeks to
avoid grease contamination and grease build-up, which is difficult to clean.
CAUTION
•
Before replacing the light bulb or cleaning
the range hood, be sure to set the lamp
and off switches to the OFF position, then
switch off the breaker of service panel.
•
For safety, always wear working gloves,
safety glasses or goggles while cleaning
the filter, etc.
•
Keep people away when cleaning to avoid
injury from unexpected falling of parts or
splashing of detergent.
CAUTION
6
•
Do not splash water on the electric parts
such as the switch or connectors. Do not
use a spray type detergent to clean electric
parts. It may cause trouble.
•
Do not use solvents such as thinner,
benzine or the like and polishing powder
for cleaning the painted surfaces, face
plates, etc. as these parts may become
lusterless or scratched.
•
Do not wash parts with a hard brush or
the like for cleaning as it can cause
damage.
Control Switches
Breaker
disassembling
1
Rectifier Baffle Panel
After loosening 2 screws fixing the
rectifier baffle panel, slide the panel to
dislocate the keyholes from the screws.
Then, open the panel a little and pull it
to remove from the catches.
NOTE: As the rectifier baffle panel may
have grease built-up, be careful
about oil-drips when removing it.
2
Filter
First, turn the knob counter-clockwise,
then detach the filter with sliding it in
the direction of the arrow to disengage
from the groove.
Knob
Filter
cleaning
Filter
After immersing the filter in water with a mild
detergent for 30 to 40 minutes, wash it with
a toothbrush or the like to remove dirt. Clean
the filter frequently to avoid grease
contamination and grease build-up, which
is difficult to clean.
Enclosure/Rectifier Baffle Panel
After wiping the enclosure and rectifier baffle
panel off with a cloth immersed in a mild
detergent, wipe off moisture thoroughly with
a dry cloth.
7
re-assembling
1
Filter
Place the filter in the groove, hold it
upward and turn the knob clockwise to
fix it securely.
Knob
Filter
2
Rectifier Baffle Panel
With holding the rectifier baffle panel
by both hands, place it on the catches.
Push the panel upward and slide it to
engage the keyholes with 2 screws,
then tighten the screws to fix the
panel firmly.
NOTE: Make sure that the rectifier baffle
panel and filters are fixed in the
appropriate positions correctly.
replacing the light bulb
Two 50W halogen light bulbs can be installed in this range hood.
Prior to replacing the light bulb, purchase a halogen light bulb (PAR20 bulb, in the base
diameter 26mm: medium base), rated 120V - 50W or below.
1
To remove the light bulb, turn it counter-clockwise. Then, replace the light bulb with a
new one.
NOTE: When replacing the bulb, wait until it has cooled off before removing, or you may
burn your hand.
To remove the light bulb
8
To install the light bulb
requesting service
prior to requesting service
Prior to requesting service, do the following check by yourself for common errors.
Situation
Check
Range Hood does not operate.
Is power switch on at the service panel?
Range Hood is noisier than usual
or vibrating.
Is the filter contaminated by grease?
Lamp does not turn on.
Is the bulb broken?
Is the bulb put in the socket correctly?
NOTE
• Service parts are kept at the manufacturer for a maximum of six years after ceasing
the production of this model.
• Requesting service indirectly can be done through contacting the dealer who sold
this range hood to you.
• When the range hood is not working normally even after checking common errors,
please provide the following information to Fuji Industrial USA, Inc. (FIU).
Fuji Industrial USA, Inc.
After Service Division
a.
b.
c.
d.
e.
f.
g.
h.
16300 Christensen Rd., Ste 212
Seattle WA 98188-3403
Telephone: 1-888-547-9880
Telephone: 1-866-FUJI IND
(1-866-385-4463)
Product -------------------------- Range Hood
Model Number ----------------- ECP-360
Serial Number
Date of purchase
What is the problem?
Owner's address
Owner's telephone number
Suggested date for service person's visit
inspection label
The model number and serial number are
indicated on the inspection label, which is
attached to the inside of the Range Hood.
Remove the rectifier baffle panel to see it.
Inspection label
9
specifications
Refer to the following table.
Voltage
(V)
Model
ECP-360
Frequency
(Hz)
Speed
60
Hi
Me
Lo
120
Power
Air Flow (CMF)
Noise
Consumption (W) at 0 Pa at 25 Pa Level (dB)
330
620
600
51.0
255
360
340
39.5
220
180
160
25.5
NOTE
FUJI INDUSTRIAL CO., LTD. has measured airflow under HVI-916 and noise levels
under Japanese Industrial Standard (JIS) C9603 items 8.8 and 8.9.
circuit diagram
Lamp Switch
Black
Fan Switch
Connector
Connector
White
Brown
Blue
White
Orange
Red
Black
Blue
Motor
Brown
Orange
Black
Yellow
White
Yellow
White
Lamp
Black
Connector
Connector
White
Black
White
Black
White
Connector
Black
Lamp
Grey
Grey
Green
Yellow
Black
Connector
120V
60Hz
Grey
Pilot Lamp
White
Purple
Purple
Capacitor
10
parts list
No.
1
2
3
4
5
6
7
8
9
10
11
12
13
14
15
16
17
18
19
18
16
Parts Name
Enclosure
Front Panel
Back Panel
Fan Unit Case
Motor
Sirocco Fan
Bellmouth
Earth Wire Unit
Switch Box Unit
Wire Box Unit
Filter
Rectifier Baffle Panel
Exhaust Pipe Unit
Mounting Bracket
Outer Duct
Inner Duct
Outer Frame
Inner Frame
Attachment
15
16
15
17
13
14
14
1
10
8
2
3
19
7
Attachment
Name of parts
Figure
Screw
M5 × 10
Four(4) Pieces
Screw
M5.1 × 45
Eight(8) Pieces
6
5
4
11
9
12
11
limited product warranty
The Fujioh product warranty is to the original purchaser (consumer) of its products only and is
not transferable. Fujioh warrants that its products will be free from defects in materials or
workmanship for a period of three years from the date of original purchase. THERE ARE NO
OTHER WARRANTIES, EXPRESS OR IMPLIED, INCLUDING, BUT NOT LIMITED TO,
IMPLIED WARRANTIES OF MERCHANTABILITY OR FITNESS FOR A PARTICULAR
PURPOSE.
During this three year warranty period, Fujioh will, at its option, repair or replace, free of
charge, any product or part that is found to be defective under normal use and service.
This warranty does not cover: (1) Normal maintenance and service; or (2) Any products or
parts that have been subject to misuse, negligence, accident, improper maintenance or repair,
faulty installation or installation not in accordance to recommended installation instructions.
(3) Light Bulbs.
The duration of any implied warranty is also limited to the three year period as specified above
for the express warranty. In that case above limitation may not apply to you.
FUJIOH’S OBLIGATION TO REPAIR OR REPLACE PRODUCT OR PARTS, AT FUJIOH’S
OPTION, SHALL BE THE PURCHASER’S SOLE AND EXCLUSIVE REMEDY UNDER THIS
WARRANTY. FUJIOH WILL NOT BE LIABLE FOR INDIRECT INCIDENTAL,
CONSEQUENTIAL OR SPECIAL DAMAGES ARISING OUT OF OR IN CONNECTION WITH
PRODUCT USE OR PERFORMANCE. Some states do not allow the exclusion of incidental or
consequential damages. In that case the above limitation may not apply to you.
This warranty gives the original purchaser (consumer) specific legal rights, and there may also
be other rights that vary from state. This warranty supersedes all prior warranties.
To qualify for warranty service, first; (1) Notify Fujioh at the address shown below or
telephone: 1-888-547-9880; (2) Give the model number and part identification and; (3)
Describe the nature of any defect in the product or part. At the time warranty service is
requested, proof of purchase and evidence showing the original purchase date must be
presented.
Keep this book and your sales slip together for future reference. You must provide proof
of purchase or installation date for in-warranty service.
Write down the following information about your
Dealer Name ________________________
Range Hood to better help you obtain assistance or
Address ____________________________
service if you ever need it. You will need to know
Phone Number ______________________
your complete model number and serial number. You
Model Number _______________________
can find this information on the Inspection Label,
Serial Number _______________________
located on your appliance as shown in the Operation
Purchase Number ____________________
Manual “REQUESTING SERVICE”.
After Service Division
Telephone: 1-866-FUJI IND
(1-866-385-4463)
Fuji Industrial USA, Inc.
16300 Christensen Rd., Ste-212 Seattle, WA 98188-3403
Telephone: 1-888-547-9880
1U02 1581