1
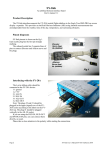
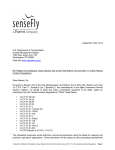
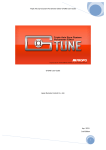
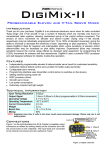
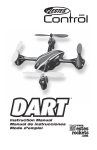
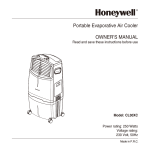
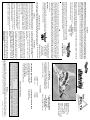
WARRANTY
Great Planes® Model Manufacturing Co. guarantees this kit to be free from defects in both material and workmanship at the date of
purchase. This warranty does not cover any component parts damaged by use or modification. In no case shall Great Planes’ liability
exceed the original cost of the purchased kit. Further, Great Planes reserves the right to change or modify this warranty without notice.
In that Great Planes has no control over the final assembly or material used for final assembly, no liability shall be assumed nor accepted
for any damage resulting from the use by the user of the final user-assembled product. By the act of using the user-assembled product, the
user accepts all resulting liability.
Champaign, Illinois
(217) 398-8970 ext. 5
[email protected]
If the buyer is not prepared to accept the liability associated with the use of this product, the buyer is advised to return this kit
immediately in new and unused condition to the place of purchase.
To make a warranty claim send the defective part
or item to Hobby Services at this address.
Hobby Services
3002 N. Apollo Dr. Suite 1
Champaign IL 61822
USA
Include a letter stating your name, return shipping address, as much contact information
as possible (daytime telephone number, fax number, e-mail address), a detailed
description of the problem and a photocopy of the purchase receipt. Upon receipt of the
package the problem will be evaluated as quickly as possible.
AMA
We urge you to join the AMA (Academy of Model Aeronautics) and a local R/C club. The AMA is the governing body of model
aviation and membership is required to fly at AMA clubs. Though joining the AMA provides many benefits, one of the primary
reasons to join is liability protection. Coverage is not limited to flying at contests or on the club field. It even applies to flying at
public demonstrations and air shows. Failure to comply with the Safety Code (excerpts printed in the back of the manual) may
endanger insurance coverage. Additionally, training programs and instructors are available at AMA club sites to help you get
started the right way. There are over 2,500 AMA chartered clubs across the country. Contact the AMA at the address or toll-free
phone number below:
5) I will not knowingly operate my model within three miles of
any pre-existing flying site except in accordance with the
frequency sharing agreement listed [in the complete AMA
Safety Code].
4) I will operate my model using only radio control frequencies
currently allowed by the Federal Communications Commission.
3) At all flying sites a straight or curved line(s) must be
established in front of which all flying takes place with the other
side for spectators. Only personnel involved with flying the
aircraft are allowed at or in the front of the flight line. Intentional
flying behind the flight line is prohibited.
2) I will not fly my model aircraft in the presence of spectators
until I become a qualified flier, unless assisted by an
experienced helper.
RADIO CONTROL
1) I will have completed a successful radio equipment ground
check before the first flight of a new or repaired model.
Academy of Model Aeronautics
IMPORTANT!!!
5151
East
Memorial Drive
Two of the most important things you can do to preserve the radio
Muncie,
IN 47302-9252
controlled aircraft hobby are to avoid flying near full-scale aircraft
Tele.
(800) 435-9262
and avoid flying near or over groups of people.
Fax (765) 741-0057
Or via the Internet at:
http://www.modelaircraft.org
AMA SAFETY CODE (excerpts)
Read and abide by the following excerpts from the Academy of Model Aeronautics Safety Code. For the complete Safety Code
refer to Model Aviation magazine, the AMA web site or the Code that came with your AMA license.
GENERAL
1) I will not fly my model aircraft in sanctioned events, air shows,
or model flying demonstrations until it has been proven to be
airworthy by having been previously, successfully flight tested.
2) I will not fly my model aircraft higher than approximately 400
feet within 3 miles of an airport without notifying the airport
operator. I will give right-of-way and avoid flying in the proximity
of full-scale aircraft. Where necessary, an observer shall be
utilized to supervise flying to avoid having models fly in the
proximity of full-scale aircraft.
3) Where established, I will abide by the safety rules for the
flying site I use, and I will not willfully and deliberately fly my
models in a careless, reckless and/or dangerous manner.
5) I will not fly my model unless it is identified with my name and
address or AMA number, on or in the model. Note: This does not
apply to models while being flown indoors.
7) I will not operate models with pyrotechnics (any device that
explodes, burns, or propels a projectile of any kind).
9) Under no circumstances may a pilot or other person touch a
powered model in flight; nor should any part of the model
other than the landing gear intentionally touch the ground,
except while landing.
KIT INSPECTION
Before starting to build, take an inventory of this kit to make
sure it is complete, and inspect the parts to make sure they
are of acceptable quality. If any parts are missing or are not
of acceptable quality, or if you need assistance with
assembly, contact Product Support.
Wingspan: 19in [480mm]
Wing Area: 109 sq in [7 dm2]
Weight: 6.7 oz [190 g]
Wing Loading: 8.9 oz/sq ft
[27 g/dm2]
Length: 15.75in [400mm]
Radio: 2-Channel, Two 7-9g servos,
Micro Receiver, 5A ESC with BEC.
Motor: 180-size motor (40-50W)
Great Planes Product Support
3002 N Apollo Drive, Suite 1
Champaign, IL 61822
Telephone: (217) 398-8970, ext. 5
Fax: (217) 398-7721
E-mail: [email protected]
TOOLS NEEDED TO FINISH YOUR MODEL
Philips screwdriver
Foam safe CA or epoxy
2 Pushrods
2 Faslinks
2 Propellers
KIT CONTENTS
1 Fuselage with wing
1 Canopy
1 Receiver cover
PARTS NEEDED TO FINISH YOUR MODEL
3 channel radio with elevon mixing capabilities
Micro receiver (GPML0044 or GPML0045)
Short crystal (GPML20**)
Two 7-9g servos (FUTM0042)
5A speed control (GPMM2000)
8-Cell 350 mAh NiMH battery (GPMP0067)
Failure to follow these safety precautions may result in
severe injury to yourself and others.
Keep your face and body as well as all spectators away from the
plane of rotation of the propeller as you start and run the motor.
MOTOR SAFETY PRECAUTIONS
Use safety glasses when testing the motor.
Keep these items away from the prop: loose clothing, shirt
sleeves, ties, scarfs, long hair or loose objects such as
pencils or screwdrivers that may fall out of shirt or jacket
pockets into the prop.
Do not run the motor in an area of loose gravel or sand; the
propeller may throw such material in your face or eyes.
UPDATES
For the latest technical updates or manual corrections to the Great Planes Mini Delta EP visit the Great Planes web site at
www.greatplanes.com. Open the “Airplanes” link, then select Mini Delta EP. If there is new technical information or changes to
this model a “tech notice” box will appear in the upper left corner of the page.
© Copyright 2005
GPMZ0276 for GPMA1172 V1.0
1
Glue the two servos in place with foam safe CA
as shown.
ASSEMBLY INSTRUCTIONS
2
Install the receiver and the speed control in
the fuselage.
4
Center the servos with the radio. Install the
servo arms, the pushrods and the faslinks.
PREFLIGHT
Range Check
Ground check the operational range of your radio before the first
flight of the day. With the transmitter antenna collapsed and the
receiver and transmitter on, you should be able to walk at least 100
feet away from the model and still have control.
Charge the Batteries
Follow the battery charging instructions that came with your radio
control system to charge the transmitter batteries. Do the same for
your motor batteries.
Identify Your Model
No matter if you fly at an AMA sanctioned R/C club site or if you fly
somewhere on your own, you should always have your name,
address, telephone number and AMA number on or inside your
model. It is required at all AMA R/C club flying sites and AMA
sanctioned flying events.
Make a small hole on the side of the fuselage
and slide the receiver antenna through it. Tape
the antenna to the leading edge of the wing.
3
5
Install the motor battery, canopy and receiver
hatch. Adjust the elevons' neutral point, the
throws and the CG.
Place the decals on the plane using the photo
in the front page as a guide.
Go fly!
GET THE MODEL READY TO FLY
Check the Control Directions
1. With the transmitter and receiver on, check all the control surfaces to see if they are centered. If
necessary, adjust the clevises on the pushrods to center the control surfaces.
2. Make certain that the control surfaces and the throttle respond in the correct direction as shown in
the diagram.
Set the Control Throws
3/8” [9mm] up
3/8” [9mm] down
High Rate
3/16” [4.5mm] up
3/16” [4.5mm] down
3/16” [4.5mm] up
3/16” [4.5mm] down
Low Rate
FULL THROTTLE
RIGHT ELEVON MOVES UP
LEFT ELEVON MOVES DOWN
ELEVONS MOVE UP
RADIO SETUP
4-CHANNEL
TRANSMITTER
4-CHANNEL
TRANSMITTER
4-CHANNEL
TRANSMITTER
5.4" [136mm]
IMPORTANT: Mini Delta EP has been extensively flown
and tested to arrive at the throws at which it flies best. Flying
your model at these throws will provide you with the greatest
chance for successful first flights.
IMPORTANT: For a flying wing to be aerodynamically stable, the neutral position of the elevons needs to
be raised from neutral. To achieve pitch stability, place a ruler on the bottom of the wing and adjust the
neutral position of the elevons so that the trailing edge of each elevon is raised 3/32” [2mm].
ELEVATOR
3/8” [9mm] up
3/8” [9mm] down
These are the recommended control surface throws:
AILERONS
Balance the Model (C.G.)
More than any other factor, the C.G. (balance point) can have the
greatest effect on how a model flies, and may determine whether or not
your first flight will be successful. If you value this model and wish to enjoy
it for many flights, DO NOT OVERLOOK THIS IMPORTANT
PROCEDURE. A model that is not properly balanced will be unstable
and possibly unflyable.
When checking the CG the model should be in ready-to-fly condition with all
of the systems in place including the battery. The C.G. is located 5.4” [136mm]
back from the fuselage along the leading edge of the wing. Change the
location of the motor battery to balance your airplane at that point.
FLYING
Mini Delta EP is a great-flying model that flies smoothly and predictably. Mini Delta EP does not, however, possess the self-recovery
characteristics of a primary R/C trainer and should be flown only by experienced R/C pilots.
Takeoff
Hold the airplane from the fuselage under the wing and point it slightly “up”. Remember to launch the airplane into the wind. Apply
3/4 to full throttle and launch the plane with moderate force.
Flight
This plane can fly fast for about 6 minutes when flown at full throttle. The airplane is fast but predictable. Get used to the plane at low
rates before switching to high rates as the roll and pitch rates will become extremely quick on high rates.
Flight times will increase if throttle management is practiced. The Mini Delta EP can maintain altitude at 1/3 throttle and it can fly
most maneuvers at ½. The Mini Delta EP is still stable and predictable at slow speeds and it also allows the pilot more time to think
about its reactions.
The Mini Delta EP is capable of loops and rolls, inverted flight and any other maneuver that does not require rudder. On high rates,
it can also perform some stalling maneuvers like walls.
Landing
To initiate a landing approach, lower the throttle and let the airplane lose some altitude. When the model is 2-3 feet [60-90 cm] from
the ground, apply up elevator to bleed off speed and land while maintaining the same heading.
GOOD LUCK AND GREAT FLYING!