1
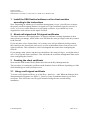
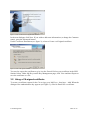
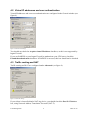
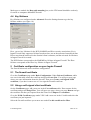
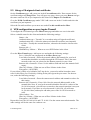
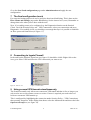
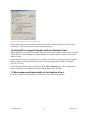
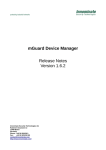
Ingate Firewall
interworking with
SSH Sentinel
Lisa Hallingström
1
2004-12-14
Tested versions:
Ingate Firewall 4.1.3
SSH Sentinel 1.4 (build 177, 190) and 1.4.1 (build 79) on Windows XP
1 Install the SSH Sentinel software on the client machine
according to the instructions
Note: Depending on which type of certificate management you use, you will have to choose
the proper certificate signing method. Accepted are X.509 certificates signed by a local CA
server, a CA server on the Internet or a self-signed certificate. A pre-shared key is not
supported for road warriors on the Ingate Firewall.
2 About self-signed and CA-signed certificates
The choice between a self-signed and a CA-signed certificate is mainly dependent on how
many clients you manage, and if all the users will have the same privileges when they connect
to the firewall.
If you only have a few clients (about 1-4) or many users will get different privileges when
they connect to the firewall, the easiest way is to let each Sentinel client create its own selfsigned certificate. This will make it easier to distinguish the clients when configuring the
firewall.
If you manage many clients, and the users should have the same privileges, you might want to
use a CA to sign the client certificates. This will make the certificate management much easier
when configuring the firewall.
3 Creating the client certificate
Now start the SSH Sentinel Policy Editor and click on the Key Management tab.
The procedure of creating the certificate on the Sentinel client is different, depending on if the
client should sign its own certificate or not.
3.1 Using a self-signed certificate
To create a self-signed certificate, go to My Keys - host keys – Add. When the dialogue New
authentication key appears (see figure 1), select to Create an authentication key pair and a
certificate. This will create a new key pair instead of using the ones created during
installation.
Lisa Hallingström
2
2004-12-14
Figure 1. Create an authentication key pair and a certificate.
In the next dialogue click Next. If you wish to add some information (or change the Common
name), press the Advanced button.
Under Certificate Enrollment (see figure 2), select to Create a self-signed certificate.
Figure 2. Create a self-signed certificate
You need to export the certificate to give it to the firewall. Select your certificate in the SSH
Sentinel client. Under My Keys on the Key Management page, click View and then Export to
save the certificate as a file.
3.2 Using a CA-signed certificate
To create a certificate request for the CA to sign, go to My Keys – host keys – Add. When the
dialogue New authentication key appears (see figure 3), select to Enroll for a certificate.
Lisa Hallingström
3
2004-12-14
Figure 3. Enroll for a certificate
In the next dialogue click Next. If you wish to add some information (or change the Common
name), press the Advanced button.
Under Certificate Enrollment (see figure 4) choose to Create a certification request and save it
in a file for later enrollment. Send or save the *. req file so that the CA server can access it.
Figure 4. Create a certificate request
When the certificate is signed and delivered back the certificate must be imported. You do this
under the Key Management tab. Select My Keys, right-click on Host key (under where the
certificate request is) and then import the certificate.
4 VPN connection configuration on the SSH Sentinel
Start the Policy Editor and click on the Security Policy tab.
Click on VPN Connections - Add . You will get a new window, called Add VPN connection
(see figure 5).
Figure 5. VPN connection
Enter as Gateway name the IP address (or name) of your Ingate Firewall. This is usually the
external IP address of your firewall.
Lisa Hallingström
4
2004-12-14
Remote network is the network behind the firewall that the client is allowed to access. If the
network is not already predefined use the button to the right and add a new network.
Select as Authentication key the certificate you what to use for this connection.
Press OK.
4.1 Encryption and authentication algorithms
Select your newly created VPN connection and press Properties. You will get a window called
Rule Properties (see figure 6).
Figure 6. General VPN settings
Most settings here are already made. You can select to set the preferred values of
authentication and encryption algorithms under the topmost Settings button.
Figure 7. Encryption and authentication
Supported encryption algorithms are AES-128 and 3DES. Supported integrity functions
(authentication algorithms) are (HMAC-)MD5 and (HMAC-)SHA-1. Main mode is the only
supported IKE mode. Supported IKE/PFS groups are groups 2 and 5.
Lisa Hallingström
5
2004-12-14
4.2 Virtual IP addresses and user authentication
Virtual IP addresses and extra user authentication are configured in the General window (see
figure 8).
Figure 8. General VPN settings
You should not check the Acquire virtual IP address checkbox, as this is not supported by
Ingate Firewall.
If you use RADIUS on your Ingate Firewall to authenticate your VPN users, check the
Extended authentication checkbox. If RADIUS is not used, this box should not be checked.
4.3 Traffic routing and NAT
Traffic routing and NAT are configured under Advanced (see figure 9).
Figure 9. Advanced settings
If your client is located behind a NAT:ing device, you should check the Pass NAT devices
box, using Network Address Translation Traversal (NAT-T).
Lisa Hallingström
6
2004-12-14
Make sure to uncheck the Deny split tunneling box, as the VPN tunnel should be used only
for traffic to computers behind the firewall.
4.4 Key lifetimes
Key lifetimes are configured under Advanced. Press the Settings button to get the key
lifetime window (see figure 10).
Figure 10. Key lifetimes
Here, you set key lifetimes for the IKE (ISAKMP) and IPsec security associations (SA:s).
Ingate Firewall only supports a lifetime based on time, not on the amount of transferred data.
Please note that the unit used in the Sentinel client is minutes, and the unit used for lifetimes
in Ingate Firewall is seconds.
The IKE lifetime corresponds to the ISAKMP key lifetime in Ingate Firewall. The IPsec
lifetime corresponds to the IPsec key lifetime in Ingate Firewall.
5 Certificate configuration on your Ingate Firewall
The firewall also needs some certificate configuration.
5.1 The firewall certificate
Go to the Certificates page under Basic Configuration. Under Private Certificates, add a
new row in the table, name the certificate and press Create New. You will get a new page
where you enter information about the firewall. Then press Create a self-signed X.509
certificate, if you don’t want to use a CA to sign the firewall certificate.
5.2 Using a self-signed client certificate
On the Certificates page, add a new row in the CA certificates table. Enter a name for the
certificate and press Change/View. You will get a new page, where you press Browse and get
the certificate file that you exported from the client. Press Import CA certificate.
Go to the X.509 Certificates page under VPN. Add a new row in the CA table and select the
certificate you just imported.
Select the firewall certificate you want to use under Use this certificate for IPsec.
Lisa Hallingström
7
2004-12-14
5.3 Using a CA-signed client certificate
On the Certificates page, add a new row in the CA certificates table. Enter a name for the
certificate and press Change/View. You will get a new page, where you press Browse and get
the same certificate file as you imported to the client. Press Import CA certificate.
Go to the X.509 Certificates page under VPN. Add a new row in the CA table and select the
certificate you just imported.
Select the firewall certificate you want to use under Use this certificate for IPsec.
6 VPN configuration on your Ingate Firewall
To configure the VPN tunnel go to the IPsec Peers page and add a new row in the table.
Select a suitable name for the client and make the following settings:
Status = On
Authentication type = Trusted CA (even when using self-signed certificates)
Authentication info = Select the name used when the certificate was imported.
Local side = Usually the external interface, otherwise the interface closest to the
client.
Remote side = *
ISAKMP key lifetime = What was set as IKE lifetime in the client.
Go to the IPsec Tunnels page. Add a new row and make the following settings:
Peer = Select the one configured on the IPsec Peers page.
Local side of network = Enter the network address and netmask for your local
network that should be accessible through the VPN tunnel. This is the same
network as the one you selected as the Remote network in your client.
Remote side of network = Enter * in the address field and leave the netmask field
empty.
IPsec key lifetime = What was set as IPsec lifetime in the client.
Encryption = AES/3DES.
If your client is likely to be behind a NAT:ing device, you need to add at least three more
rows for this IPsec peer. Do this by clicking on the plus sign at the peer name. For the new
row, make the following settings:
Local side of network = Enter the same network address and netmask as above for
this setting.
Remote side of network = Enter 10.0.0.0 as the network address and 8 as the
netmask/bits. Note: If your local network behind the firewall is a subset of the
10.0.0.0/8 network, you will have to enter here the network part that is not your
local network. If you have as a local network 10.0.0.0/24, you will enter
10.128.0.0/9 here (and maybe add other parts of the 10.0.0.0/8 network as
well).
Allow subset = Yes.
IPsec key lifetime = What was set as IPsec lifetime in the client.
Encryption = AES/3DES.
Repeat this, but with 192.168.0.0/16 and 172.16.0.0/12 as the remote networks/netmasks. The
other settings will be the same for each new row.
Lisa Hallingström
8
2004-12-14
Go to the Save/Load configuration page under Administration and apply the new
configuration.
7 The final configuration touch
For setup and testing purposes it can be useful to deactivate blacklisting. This is done on the
IPsec Status and Settings page under Blacklisting. Set the interval to 0 (zero). Remember to
change that value when you are done with the tests.
Now, if everything seems to be configured, try the Diagnostics function on the Sentinel
Client. Go to the Security Policy tab – VPN Connections, select your connection and press
Diagnostics. If everything is fine you should get a message that says it is possible to establish
an IPsec protected connection (see figure 11).
Figure 11. Successful diagnostics test
8 Connecting to Ingate Firewall
In the task bar the Sentinel Agent Icon (see figure 12) should be visible. Right-click on the
icon, go to Select VPN and select the VPN connection you want to use.
Figure 12. Task bar icon
Figure 13. Task bar menu
9 Using several VPN tunnels simultaneously
The Sentinel normally only allows one concurrent VPN tunnel and that is fine as long as you
only need to access one remote resource at a time. If more is required you need to have at
least two concurrent VPN tunnels up.
This is configured by highlighting the connection under Security Policy – VPN Connections,
then pressing Properties. In the display that shows select the Advanced tab and there check the
Open on start-up box (see figure 14).
Lisa Hallingström
9
2004-12-14
Figure 14. Configure more than one concurrent VPN tunnel
Repeat this for the other concurrent VPN tunnel needed. The step in the previous section
(selecting a VPN) is not required when checking that box.
10 Using SIP on Ingate Firewalls with the Sentinel client
When Ingate Firewall will be used with SIP and a user with a Sentinel client wants to register
on the firewall, some additional configuration has to be done on the firewall as well as the
Sentinel client.
On the Sentinel client, repeat the steps in section 4. Use the same Gateway name/IP address
but the remote network should now be same as the Gateway name/IP address (netmask
255.255.255.255).
On the firewall, add the same information on the IPsec Tunnels page. This configuration
makes it possible to communicate with the SIP module on the firewall.
11 More advanced functionality in the Sentinel client
For more configuration possibilities, please refer to the SSH User Manual.
Lisa Hallingström
10
2004-12-14