1
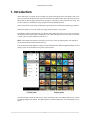
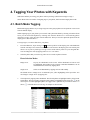
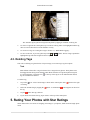
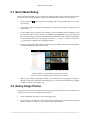
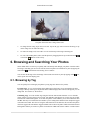
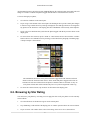
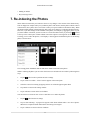
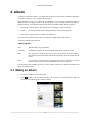
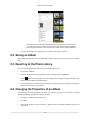
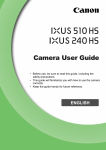
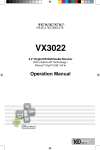
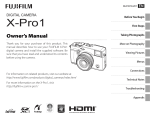
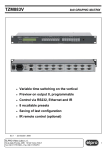
Smart Album User Guide
Roderick Mackenzie
Table of Contents
1. Introduction ................................................................................................................... 2
2. First Run ....................................................................................................................... 3
2.1. Permission to Access Photos .................................................................................. 3
2.2. Example Albums .................................................................................................. 3
3. Help ............................................................................................................................. 3
3.1. Balloon Help ....................................................................................................... 3
3.2. Online Help ......................................................................................................... 3
4. Tagging Your Photos with Keywords ................................................................................. 4
4.1. Batch Mode Tagging ............................................................................................ 4
4.2. Tagging Single Photos .......................................................................................... 5
4.3. Deleting Tags ...................................................................................................... 6
5. Rating Your Photos with Star Ratings ................................................................................ 6
5.1. Batch Mode Rating ............................................................................................... 7
5.2. Rating Single Photos ............................................................................................. 7
6. Browsing and Searching Your Photos ................................................................................. 8
6.1. Browsing by Tag .................................................................................................. 8
6.2. Browsing by Star Rating ........................................................................................ 9
6.3. Searching by Tag ................................................................................................ 10
7. Re-indexing the Photos .................................................................................................. 11
8. Albums ....................................................................................................................... 12
8.1. Making an Album ............................................................................................... 12
8.2. Saving an Album ................................................................................................ 14
8.3. Exporting to the Photo Library .............................................................................. 14
8.4. Changing the Properties of an Album ..................................................................... 14
8.5. Deleting an Album .............................................................................................. 15
9. Filters ......................................................................................................................... 15
9.1. Date Filters. ....................................................................................................... 16
9.2. Keyword (Tag) Filters ......................................................................................... 18
9.3. Camera Model Filter ........................................................................................... 18
9.4. Lens Model Filter ............................................................................................... 18
9.5. Star Rating Filter ................................................................................................ 19
9.6. Album Filter ...................................................................................................... 19
9.7. Deleting a Filter ................................................................................................. 20
10. Slideshow ................................................................................................................... 20
10.1. Manual Control of the Slideshow ......................................................................... 20
10.2. Slideshow Settings ............................................................................................ 20
11. Copy a Photo to the Clipboard ....................................................................................... 21
12. Email a Photo ............................................................................................................. 21
13. Exporting a Photo ........................................................................................................ 21
14. Preferences ................................................................................................................. 21
15. Appendix ................................................................................................................... 22
1
Smart Album User Guide
1. Introduction
Smart Album lets you quickly browse through your photos and organize them into albums. With a few
taps you can find all the photos taken between certain dates, the photos taken with a particular camera or
lens model, the photos tagged with particular keywords, or the photos with a particular star rating. You
can also search for combinations of tags using boolean AND and OR functions.
These various filters can be easily combined into a powerful tool for searching and organizing your photos.
With Smart Album you can now add keyword tags and star ratings to your photos.
In addition to searching and organizing your photos, Smart Album also allows you to easily copy them to
the clipboard and to export them to Facebook, Twitter, Mail, Message, and Print (On iOS 6.0, and later
versions, when account is enabled on your device) .
Films. Smart Album also organizes film clips. However the results of applying filters will depend on
the meta information included with the film clip.
This manual shows Smart Album as it appears on the iPad under iOS7. When using Smart Album you will
usually see the screen divided into two panes as shown below:
The left hand pane, called the control pane, shows information about your albums and also the controls
for making changes to the albums. The right hand pane, called the display pane, shows thumbnails of your
photos.
2
Smart Album User Guide
2. First Run
2.1. Permission to Access Photos
Smart Album works with the photos in the Photo Library but it cannot access them until you grant
permission. When you first run Smart Album it will ask for permission to access your photos.
On iOS 5 a message appears, "Please turn Location Services ON for this application. To do so, go to
'Settings'->'Location Services' and activate the option for the 'Smart Photo Album' application".
On iOS 6, and later versions, a message appears, "'Smart Album' would like to access your photos".
Tap OK. Smart Album starts up.
If you decide not to allow access then tap on "Don't allow". A message says "No access to photos" and
asks you to go to Settings -> Privacy -> Photos and enable image data. Smart Album will not start up until
you grant access to the photos.
2.2. Example Albums
When Smart Album starts up it looks for any existing albums made with a previous version of Smart
Album and displays them in the control pane. If there are no albums present then Smart Album looks at
the dates on your photos and makes ten example albums with a date filter. The example albums are one
for each of the years 2004 to 2013, containing all the photos with a creation date in those years. If there
are no photos for a particular year then that album is not made.
You can change or delete the example albums as you wish.
3. Help
Smart Album provides both onscreen help (in the form of help balloons) and online help (by downloading
the User Manual over the internet).
3.1. Balloon Help
To access Balloon Help,
1.
tap on the help icon,
descriptions.
2.
To dismiss the balloon help, tap on the help icon,
, at the top of the screen. Help balloons appear containing brief text
, again.
3.2. Online Help
Note
You must have internet access for online help to work.
To access the online help,
1.
tap on the menu button, , and select "Show help". The Smart Album User Manual is downloaded
and displayed in a browser window on screen.
2.
To dismiss the User Manual tap on "Done" in the browser window.
3
Smart Album User Guide
4. Tagging Your Photos with Keywords
With Smart Album you can tag your photos with keyword tags (often known simply as "tags").
Smart Album offers two modes of assigning tags to your photos; batch mode and single photo mode.
4.1. Batch Mode Tagging
Batch mode tagging makes it easy to assign a tag to an entire group of photos in one operation. It is accessed
from the albums display.
When assigning tags to your photos you can work with a particular album by selecting it from the album
list or you can work with all photos by selecting "All" from the album list. To work with only photos
which have no tags, select "No tags" from the album list. Then you can select particular photos from the
display pane as described below.
To assign tags to, or remove them from, your photos,
1.
From the album list, tap on the tag icon, , on the top tab bar of the display pane. The thumbnails
from the currently active selection in the album list are shown in the display pane. The control pane
shows a list of your keyword tags. The tags can be sorted either by name or by last assigned date.
You can change the order by tapping either on "a-z" or on "Date".
2.
Select the photos that you wish to tag. There are two modes of photo selection:
Photo Selection Modes
Range select.
Tap any two thumbnails on the screen. All the thumbnails in between will
be highlighted and included in the selection. Individual thumbnails can be
excluded from the selection by tapping them.
Single select
Select several thumbnails by tapping each one individually.
The default mode is "Range select" as indicated by the yellow highlighting in the top tab bar. You
can change to "Single select" by tapping on it.
3.
Choose photos by tapping on the thumbnails. The selected photos are highlighted with a yellow border
around them. The tags currently assigned to these photos are highlighted with a blue dot, , in the
control pane. If all the highlighted photos are tagged with a particular keyword then a letter 'V' is
shown,
, in the blue dot next to the tag. An example is shown below:
4
Smart Album User Guide
The blue dots show that the tag, "animals", is assigned to all three photos in the selection while
"beetle", "birds" and "birds of prey" are assigned to at least one but not to all of the photos.
4.
To assign a tag to the selected photos, tap the tag name in the list. The tag name appears briefly on
the thumbnails, moving downwards from the top edge to the bottom and the number of tags on each
thumbnail increases by one. You can add more tags just by tapping them. The tags you have tapped
move automatically to the top of the list for easier access should you wish to use them again.
5.
To remove a tag from the selected photos, tap the tag name in the list. The tag name appears briefly
on the thumbnails, moving upwards from the bottom edge to the top and the number of tags on each
thumbnail decreases by one.
6.
To create a new tag, tap in the search box at the top of the tag list. The onscreen keyboard appears.
a.
Creating New Tags
Type in the name of the new tag. As you type, Smart Album searches the list of tags and displays
only those which match the text in the search box. At the same time a button "Create tag" appears
at the top of the tag list.
7.
b.
When you have finished typing in the name, tap on the "Create tag" button. If you are working
in slideshow mode the new tag is immediately assigned to the photo on display.
c.
If you decide not to create the tag you can erase the tag name either by pressing the backspace
key on the keyboard or by tapping the
button on the search box.
When you have finished working with tags, you can either switch to allocating star ratings by tapping
on "Star rating" at the bottom of the display pane, or you can return to the album list by tapping on
"Done" at the top of the display pane.
4.2. Tagging Single Photos
Single photos can of course be tagged using the batch mode process described above but it can be more
convenient to use the method describe here:
1.
Tap on a thumbnail. The photo is shown in the display pane.
2.
Tap on the photo. The slideshow overlay appears, showing (among other things) the tags assigned
to the photo.
3.
Tap on "Edit tags" in the top tab bar. The list of tags appears. Any tags currently assigned to the
current photo are highlighted with the blue dot,
4.
. You may have to scroll to see them all.
To assign a tag to the current photo, tap it on the list. The tag name is highlighted with the blue dot
and the name also appears at the foot of the slideshow overlay, as shown below,
5
Smart Album User Guide
The "animals" tag has just been assigned to the photo by tapping on "animals" in the tag list.
5.
To remove a tag from the current photo, tap it on the list. The tag name is un-highlighted and the tag
name is removed from the foot of the slideshow overlay.
6.
To create a new tag see Creating New Tags in Section 4.1, “Batch Mode Tagging”.
7.
To move to the next, or previous, photo tap on the
, or
highlight the tags which are assigned to the new photo.
, symbol. The list of tags is updated to
4.3. Deleting Tags
This refers to deleting a tag from the list of keyword tags, not to removing a tag from a photo.
Note
Smart Album will not allow a tag to be deleted if it is assigned to any photos. These photos must
be untagged before the tag can be deleted. Smart Album will notice if a tag has no photos assigned
to it and will display a wastebin icon, , at the top of the tag list as an indication that unused
tags are available to be deleted.
To delete a tag,
1.
Tap on the
of each tag.
2.
Delete the unwanted tag by tapping the
the tag.
3.
Tap the
4.
If you decide not to delete the tag, tap on "Done" at the top of the control pane.
icon. A list of unused tags is shown in the control pane with a
button. A confirmation,
button to the right
button appears to the left of
button. The tag is deleted.
5. Rating Your Photos with Star Ratings
Smart Album offers two modes of assigning start ratings to your photos; batch mode and single photo
mode.
6
Smart Album User Guide
5.1. Batch Mode Rating
Batch mode Star rating makes it easy to assign a star rating to an entire group of photos in one operation.
It is accessed from the albums display. You first select the album that you want to work with then,
1.
Tap on the tag icon,
keyword tags.
2.
Tap on "Star rating" at the bottom of the display pane. The list of keyword tags is replaced by a list
of star ratings.
3.
Use the "Range select" and "Single select" buttons, as described in Photo Selection Modes to select
the photos you wish to assign a rating to. The thumbnails are highlighted with a yellow border and
their current star ratings are shown on the thumbnails. The ratings currently assigned to these photos
are also indicated on the list of star ratings by a blue dot, . A letter 'V' is shown in the blue dot,
, on the top tab bar of the display pane. The control pane shows a list of your
, if this rating is assigned to all the highlighted photos.
4.
To assign a rating to the selected photos, tap the rating on the rating list. The new Star rating appears
on all the selected thumbnails, as shown below:
The three photos in the selection have just been given a Star
rating of two stars by tapping on the two orange stars in the list.
5.
When you have finished assigning Star ratings, you can either switch to assigning keyword tags by
tapping on "Edit tags" at the bottom of the display pane, or you can return to the album list by tapping
on "Done" at the top of the display pane.
5.2. Rating Single Photos
Single photos can of course be assigned a Star rating using the batch mode process described above but
it can be more convenient to use the method describe here:
1.
Tap on a thumbnail. The photo is shown in the display pane.
2.
Tap on the photo. The slideshow overlay appears, showing (among other things) the star rating of the
photo. The number of orange stars gives the star rating, as shown below:
7
Smart Album User Guide
The photo shown here has a rating of three stars.
3.
To change the star rating, tap on the row of stars. Tap on the grey stars to increase the rating, or tap
on the orange stars to reduce the rating.
4.
To reduce the rating to nil, first reduce it to one star then tap on the single remaining star.
5.
To work with another photo, either scroll the photos by dragging them or tap on the backwards,
or forwards,
, buttons on the overlay.
,
6. Browsing and Searching Your Photos
Smart Album offers several ways to quickly and conveniently look through your photos. Note that while
browsing or searching you can save the current selection of photos as an album at any time by tapping the
menu button, , on the tab bar and selecting "Save as album".
You can also edit the tags or the Star ratings of the current selection at any time by tapping on the
on the top tab bar of the display pane.
icon,
6.1. Browsing by Tag
You can quickly browse through your photos by using tags (also known as keywords).
Favourite Tags. As you work with tags Smart Album notes which tags you use and displays the most
used tags at the top of the tag list. By default Smart Album displays the ten most used tags but you can
change this. See Section 14, “Preferences”.
Combining Tags. You can combine tags using the boolean AND and OR functions. To see what this
means, suppose you have photos of two people, Ann and Bill. Some photos are of Ann, some are of Bill,
and some are of them both together. To see ALL the photos of Ann and Bill, you use the combination Ann
OR Bill. This may seem odd at first but remember you are asking Smart Album to show the photos tagged
with either Ann or Bill. The effect of using the AND function will be different; this will show the photos
which are tagged with Ann and also tagged with Bill. The result will be photos which show both Ann and
Bill together. What if you want to see photos of Ann but not of Bill? This is done with the "exclude" button
8
Smart Album User Guide
(boolean NOT function). Select the tags Ann AND Bill then tap the "include" button next to Bill. This will
change to "exclude" to indicate that photos tagged with Bill will be excluded from the selection.
To browse through your photos,
1.
Go to the list of albums on the control pane.
2.
Tap on "Tags" at the bottom of the control pane. The heading at the top of the control pane changes
to "Browse Tags" and the list of keyword tags is displayed. Note that tags which are not assigned to
any photos are not shown here. The display pane shows thumbnails of the currently selected photos.
3.
Tap on a keyword. Each time that you do this the photos tagged with that keyword are shown in the
display pane.
4.
To narrow down the selection, tap the "AND" or "OR" buttons and use them with the "exclude"
button to browse for combinations of keyword tags, as described in the paragraph, Combining Tags.
A simple example is shown below:
The combination shown here selects photos which are tagged both with "animals" and with
"birds" but the red "Exclude" button next to "birds" means that photos tagged with "birds" are
excluded. The selection will then shows all photos of animals which are not birds. So why are
some photos of birds still visible? Because they have not yet been assigned the "birds" tag.
5.
To cancel the current selection, tap on "Reset" at the bottom of the display pane.
6.2. Browsing by Star Rating
You can browse your photos by star rating. You can apply this filter to all your photos or to the currently
selected album.
1.
Go to the Album list or the Browse Tags list on the control panel.
2.
Tap "Star Rating" on the tab bar of the display pane. A window opens and shows an 'Activate' button.
3.
Tap on 'Activate'. The window shows a list of star ratings, from zero to five as shown below.
9
Smart Album User Guide
The Star Rating window.
The gobal Star Rating filter is applied using the current values of star rating shown in the window.
The display pane shows thumbnails of the selected photos. The 'Star Rating' button changes colour
to yellow to indicate that the Star Rating filter is active.
4.
Select the star ratings that you wish to use by tapping on them. A tick mark appears beside the chosen
ratings.
5.
To dismiss the Star Rating window, tap the screen outside the window. The window closes but the
'Star Rating' button remains yellow to remind you that the Star Rating filter is active.
You can cancel the Star Rating filter as follows:
1.
Tap on the now highlighted 'Star Rating' button. The Star Rating window opens.
2.
Tap on the 'De-activate' button. The Star Rating window closes. The 'Star Rating' button is no longer
highlighted and the Star Rating filter is no longer active.
6.3. Searching by Tag
You can search your photos using a tag or part of a tag:
1.
Go to the list of keyword tags by tapping on "Tags" at the bottom of the control pane.
2.
Tap on the search bar. The onscreen keyboard appears.
3.
Enter the search term. The search is performed as you type and the list of tags in the control pane is
updated to match what you have entered.
4.
Tap "Done" on the keyboard. The onscreen keyboard disappears and the search results, that is, tags
containing the search term, are shown on the control pane.
5.
To view the photos, tap on one of the tags. The thumbnails are shown in the display pane.
6.
To search for another tag tap on the dismiss button,
, located beside the search box. The current
search results are removed and the onscreen keyboard appears again.
7.
To exit the search function, tap "Done" on the keyboard while no text is in the search box.
The search is not case sensitive.
See related information in:
10
Smart Album User Guide
• Making an Album
• Keyword (Tag) Filters
7. Re-indexing the Photos
Smart Album is informed by iOS whenever there are any changes to the contents of the Photo Library.
This can happen for example when you synchronise photos with iTunes, transfer photos with the camera
connection kit, take a photo, take a screen shot or when you export an album to the Photo Library. When
this happens Smart Album will automatically make a new list of photos by re-indexing the Photo Library.
However, if you make changes to the metadata of the photos (for example, by tagging the photos on your
pc) Smart Album will inform you that it wants to re-index the Photo Library by showing a
symbol
at the top of the control pane. If Smart Album notices that a photo is missing from its list then, as well
as asking you to re-index the photos, it will display a "missing photo" thumbnail in place of the missing
photo, as shown below:
The "missing photo" thumbnails indicate that Smart Album cannot find some photos.
When re-indexing the photos you can select which sources to include in the new index by following these
steps:
1.
Tap the
2.
Tap on "Sources to index". A list of sources appears in the control pane.
3.
Select the sources for indexing by tapping on them. A tick mark appears against them.
4.
Tap "Back" to return to the settings window.
5.
Tap on 'Albums' to return to the list of albums.
symbol in the top tab bar and select settings.
You can choose to re-index at once or leave it until later. To re-index the photos:
1.
Tap the
2.
Tap on "Start indexing". A progress bar appears while Smart Album makes a new list of photos.
When this is completed Smart Album shows the settings screen again.
3.
Tap on "Albums" to return to the list of albums.
symbol and select settings.
11
Smart Album User Guide
8. Albums
An album is a collection of photos. You might make an album in order to make a slideshow, photobook,
or calendar, or simply as a way of organizing your photos.
Smart Album shows a list of your albums in the control pane. You can choose to display the albums in
alphabetical order, by tapping on "All" in the bottom tab bar, or you can display them in time order, by
tapping on "Recent". You can make changes to the order of the albums under "Recent" as follows,
1.
Tap on "Edit" in the top tab bar. The "Edit albums" screen appears in the control pane.
2.
Drag the
3.
Tap on "Done" in the top tab bar to return to the album list.
icon next to an album name to drag the album to a new position in the list.
Note that the order of albums under "All" in not altered by changes made under "Recent".
An album has the following properties:
Album Properties
Name
The name that you give the album.
Cover Photo
A thumbnail image that is shown beside the album name in the list of albums.
Order
The date order in which the photos are sorted. The date refers to the date added by
the operating system and not the creation date assigned by the camera which took the
picture.
Filters
You use filters to select photos by keyword tag, by date, by Star rating, by camera
model or by lens model. For more information see the section on Filters.
The only property that an album must have is a name. With no filters set the album will include all the
photos in the Photo Library.
8.1. Making an Album
1.
Go to the list of albums on the control pane.
2.
Tap the
symbol on the top tab bar and select "New album". The control pane now shows the
controls for setting the properties of the new album:
12
Smart Album User Guide
The controls for setting the properties of an album.
3.
Name the album.
a.
Tap on the "Name" text box. The onscreen keyboard appears.
b.
Type in the name of the album.
c.
Tap "Done" on the keyboard. The onscreen keyboard disappears and the album name is shown
in the "Name" text box.
4.
Choose a cover photo. By default Smart Album selects the first photo in the album and displays it
under "Cover photo". To accept this photo you need do nothing further. To choose a different photo
tap it on the display pane.
5.
Set the date order of the photos.
a.
Tap on "Order". The screen shows the possible choices (No sorting, Sort old to new, and Sort
new to old).
No sorting
The photos are in fact sorted but by the date given them by the operating
system. This could be the date when they were last edited. It is not the
creation date from the EXIF properties.
Sort old to new
This sorts the photos by the time they were taken, using the
ExifDateTimeOriginal property.
Sort old to new
Sorts the photos by the time they were taken, using the
ExifDateTimeOriginal property.
The default is "No sorting".
6.
b.
Choose the order you want by tapping on it.
c.
Tap
. The control pane shows the album properties again.
Add one or more filters to the album.
a.
Tap "Add a filter". A list of available filter types appears. They are Album Filter, Camera Model
Filter, Date filter, Keywords Filter, Lens Model Filter, and Star Rating Filter.
b.
Choose the filter types you want by tapping on them. A tick mark appears next to the chosen
filter type. You may choose more than one.
c.
Tap
. The control pane now lists the filter types you have chosen and a reminder that you
have not set a value for the filters, as shown below:
13
Smart Album User Guide
Four filters have been created for the album but none of them has been given a value
yet so they are not active. When you start to add values Smart Album will require
that you begin with the filter at the top of the list, in this case the camera model filter.
7.
Set values for the filters. For details on how to do this see the section on Filters.
8.2. Saving an Album
Smart Album automatically saves any albums that you make. They remain on the device until you delete
them.
8.3. Exporting to the Photo Library
You can export an album to the Photo Library by following these steps:
1.
Go to the list of albums.
2.
Select the album from the list by tapping its name. The album name is highlighted.
3.
Tap the
button on the top right corner of the diplay pane. A dialog box appears and asks if you
want to export the album to the Photo Library.
4.
Tap on the album name in the dialog box. The album is exported. A progress bar appears in the display
pane while the album is being exported.
8.4. Changing the Properties of an Album
You can change any of the properties of an album. For example you can give it a new name, or change
the selected photos by changing the values of the filters.
1.
Go to the list of albums on the control pane.
2.
Tap "Edit".
3.
Select the album that you want to change by tapping its name. The album properties appear in the
control pane.
14
Smart Album User Guide
4.
Tap on the property that you wish to change. The details of that property are shown in the control
pane and you can set them as explained in the relevant sections.
For further details see:
• Name the album.
• Set the date order of the photos.
• Filters
8.5. Deleting an Album
In order to remove an album completely you must delete it from both the "Recent" and the "All" lists on
the control pane.
1.
Go the screen that shows the list of albums.
2.
Swipe right on the name of the album that you wish to delete. A
3.
Tap the
button. The album is deleted and the control pane now shows the list of remaining albums.
However if the "All" tab was active then the album is still in the "Recent" list, and vice-versa.
4.
Bring up the other list by tapping on either "Recent" or "All".
5.
Repeat the steps above to delete the album from the second list. The album is now completely deleted
from Smart Album.
button appears beside that album.
Note
This does not delete albums from the Photo Library. Smart Album cannot delete albums or
photos from the Photo Library.
9. Filters
Smart Album allows you to apply several types of filter to an album. These are Album Filter, Camera
Model Filter, Date filter, Keywords filter, Lens Model Filter, and Star Rating Filter.
If you have not already done so, follow these steps to add one or more filters to an album:
1.
Tap on "Edit" on the top tab bar. An
ignore this.
2.
Tap the album that you wish to work with. The control pane shows the properties of the album.
3.
Tap "Add a filter". A list of available filter types appears. Filter types which are already in use are
not shown.
4.
Choose the filter types you want by tapping on them. A tick mark appears next to the chosen filter
type. You may choose more than one.
5.
Tap
. The control pane lists the album properties along with a reminder that the new filters have
no value set yet, as shown below:
button appears beside each album name but you should
15
Smart Album User Guide
Four filters have been created for the album but none of them has been given a value
yet so they are not active. When you start to add values Smart Album will require
that you begin with the filter at the top of the list, in this case the camera model filter.
9.1. Date Filters.
To set a value for the date filter, follow the steps below:
1.
Tap Date filter. The display pane shows thumbnails of all available photos, that is photos selected by
any other filters which are active, along with their dates. The year is shown at the top of the thumbnail
and the month, day and time are shown at the bottom. The control pane shows a picker with the
different types of date filter, as shown below:
The picker for choosing a date filter.
16
Smart Album User Guide
Types of Date filters.
From date
All photos after the chosen date.
Until date
all photos before the chosen date.
In between dates
all photos between the chosen dates.
2.
Select one of the date filters with the picker.
3.
Set the date for the filter by tapping on a photo. The date of the photo appears on the control pane.
For the "In between dates" filter you must tap two photos to select two dates. You can reset your
selection to one photo by a long press on that photo. The photos selected by the filter are shown by
a yellow border around each photo.
Note
When you tap a photo it sometimes happens that the selection also includes a photo next to
the tapped one. This is because they both have identical dates and times (which can happen
if they were taken within one second of each other or were taken by different people).
4.
For finer control of the date and time:
a.
Tap the date box in the control pane. A date picker and time picker appear as shown below:
The date and time pickers allow finer control of date and time.
b.
Set the date picker and time picker to the date and time you wish. The selection of photos in the
display pane changes to match the date and time that you have selected.
c.
Tap
. This returns you to the previous date filter selection panel.
5.
Tap
. The Date Filter is applied to the album. The display pane now shows the selected photos.
The control pane shows the properties of the album and the type of Date Filter that you have selected.
6.
Tap
to return to the list of albums.
17
Smart Album User Guide
9.2. Keyword (Tag) Filters
To set a value for a keyword filter, from the display of album properties, follow the steps below:
1.
Tap "Keyword filter". The display pane shows thumbnails of all photos selected by any other filters
which are active. The control pane shows an alphabetical list of keywords.
2.
Select a keyword by tapping it. A tick mark appears to the left of the keyword and an "Include" button
appears to the right. The display pane now shows only photos tagged with that keyword.
3.
To reverse the selection tap on the "Include" button. It changes to "Exclude" and the display pane
now shows only photos NOT tagged with that keyword.
4.
To narrow down the selection, tap on more keywords and combine them using the "AND", "OR" and
"Exclude" buttons, as described in the paragraph, Combining Tags.
5.
To remove a keyword from the filter, tap on its tick mark.
6.
To remove all keywords and start over, tap on "Reset" at the bottom of the keyword list.
7.
Tap
. The Keyword Filter is applied to the album. The display pane shows thumbnails of the
selected photos. The control pane shows the album properties and the keywords selected for the filter .
9.3. Camera Model Filter
The Camera Model Fiter allows you to choose only those photos which were taken using a particular
model of camera.
To set a value for the Camera Model Filter, from the display of album properties, follow the steps below:
1.
Tap Camera Model Filter. The display pane shows thumbnails of all the available photos, that is
photos selected by any other filters which are active. The control pane shows a list of camera models
which Smart Album has detected for these photos. If Smart Album is unable to read the camera model
for any of the photos then the option, "unkown", is added to the list of camera models.
2.
Tap on the list to select a camera model. A tick mark appears next to the camera model, and the
display pane shows the photos taken by that camera. You can choose more than one camera model.
You may have to scroll the list to see more camera models.
3.
Tap done. The Camera Model Filter is applied to the album. The display pane now shows the selected
photos. The control pane shows the album properties with one of the chosen camera models next to
the Camera Model Filter.
4.
Tap
to return to the list of albums.
9.4. Lens Model Filter
The Lens Model Filter allows you to choose only those photos taken with a particular lens.
To set a value for the Lens Model Filter, from the display of album properties, follow the steps below:
1.
Tap Lens Model Filter. The display pane shows thumbnails of all the available photos, that is photos
selected by any other filters which are active. The control pane shows a list of lens models which
Smart Album has detected for these photos. If Smart Album is unable to read the lens model for any
of the photos then the option, "unkown", is added to the list of lens models.
18
Smart Album User Guide
2.
Tap on the list to select a lens model. A tick mark appears next to the lens model and the display pane
shows the photos taken with that lens. You can choose more than one lens model. You may have to
scroll the list to see more lens models.
3.
Tap "Done". The Lens Model Filter is applied to the album. The display pane now shows the selected
photos. The control pane shows the album properties with one of the chosen lens models next to the
Lens Model Filter.
4.
Tap
to return to the list of albums.
9.5. Star Rating Filter
The Star Rating Filter allows you to select photos according to their IPTC Star Rating.
To set a value for the Star Rating Filter, from the display of album properties, follow the steps below:
1.
Tap Star Rating Filter. The display pane shows thumbnails of all the available photos, that is photos
selected by any other filters which are active. The thumbnails also show the Star ratings of the photos.
The control pane shows a list of Star ratings from zero (5 grey stars) to 5 (5 orange stars).
2.
Tap on a Star rating to select it. A tick mark appears next to the chosen rating and the selected photos
are shown in the display pane. You may select more than one Star rating.
Note
The Star rating selection box does not allow a "Null selection". To cancel your selection,
either choose another rating value, or tap on "Cancel".
3.
Tap "Done". The Star Rating Filter is applied to the album. The display pane now shows the selected
photos. The control pane shows the album properties with the chosen Star rating next to the Star
Rating Filter.
4.
Tap
to return to the list of albums.
9.6. Album Filter
The album filter allows you to work with an album from the Photo Library. For example, you can sort
the album according to the Exif date and time property rather than by the date and time attached by the
operating system.
To set a value for an album filter, from the display of album properties, follow the steps below:
1.
Tap on Album Filter.
2.
Tap
. The control pane now shows the album properties. The words "no value" appear next to
the album filter to remind you that you have not set a value for the filter yet.
3.
Tap on Album Filter. The control pane shows a list of albums in the photo library.
4.
Select an album from the photo library by tapping its name.
5.
Tap
. The control pane shows the album properties.
6.
Tap
again to return to the list of albums.
19
Smart Album User Guide
9.7. Deleting a Filter
1.
Go to the display of album properties as shown in Changing the Properties of an Album.
2.
Swipe left on the name of the filter that you want to delete. A
3.
To continue with the deletion tap the
button. The filter is deleted. If you decide not to delete after
all, tap the control pane anywhere outside the filter name.
4.
Tap
button appears.
again to return to the list of albums.
10. Slideshow
You can run a slideshow of an album by following these steps:
1.
Go to the display of albums.
2.
If neccessary, scroll the list of albums until the desired album appears.
3.
Tap on the
button beside the album name. The slideshow begins.
10.1. Manual Control of the Slideshow
You can take manual control of the slideshow by tapping the screen while a slideshow is in progress. The
slideshow halts and an overlay appears which shows information about the currently displayed photo (date
and time of creation, keyword tags, and star rating) and controls for operating the slideshow.
Operating the Slideshow
Move back to the previous photo.
Tap on the
button.
Move forward to the next photo.
Tap on the
button.
Zoom in or out.
Pinch or double-tap the photo.
Pan.
Drag the photo.
Continue with the slideshow.
Tap on the
Remove the overlay but keep the
slideshow halted at the current
photo.
Tap the screen.
Stop the slideshow.
Tap on
button.
10.2. Slideshow Settings
You can set the duration of each slide in slideshow settings:
1.
Tap on the
button at the top of the control pane and select "Settings". The settings window opens
on the control pane.
2.
Tap on "Slideshow duration". A list of times appears in the settings window.
20
Smart Album User Guide
3.
Select a time by tapping it. A tick mark appears next to the selected time.
4.
You can return to the settings window by tapping on "Back".
5.
From the settings window tap "Albums" to return to the albums list. The display pane now shows
thumbnails of the currently selected album.
11. Copy a Photo to the Clipboard
To copy a photo to the clipboard follow these steps:
1.
Go to the album list and tap on an album which contains the photo. The display pane shows thumbnails
of the photos in the album.
2.
Tap the thumbnail that you wish to copy. The photo appears in the display pane.
3.
Tap the photo to bring up the slideshow overlay.
4.
Tap the
5.
Tap on 'Copy'. A progess bar appears and notifies you when copying is completed.
button. A box appears with a choice of possible actions
12. Email a Photo
To email a photo follow these steps:
1.
Go to the album list and tap on an album which contains the photo. The display pane shows thumbnails
of the photos in the album.
2.
Tap the thumbnail that you wish to email. The photo appears in the display pane.
3.
Tap the photo to bring up the slideshow overlay.
4.
Tap the
5.
Tap on 'Mail'. Your email application opens and allows you to send the photo.
button. A box appears with a choice of possible actions
13. Exporting a Photo
To export a photo to Facebook or Twitter follow these steps:
1.
Go to the album list and tap on an album which contains the photo. The display pane shows thumbnails
of the photos in the album.
2.
Tap the thumbnail that you wish to email. The photo appears in the display pane.
3.
Tap the photo to bring up the slideshow overlay.
4.
Tap the
button. A standard dialog box appears to allow you to choose your export destination.
14. Preferences
In the preferences view you can:
21
Smart Album User Guide
• Set the slide duration of a slideshow
• Set the number of favourite tags
• Select which sources to use when re-indexing the photos
• Re-index the photos in the Photo Library
To reach the preferences view, tap on the
button at the top of the control pane and select "Settings".
For related information see:
• Slideshow Settings
• Re-indexing the Photos
To close the preferences view, tap on 'Albums'.
15. Appendix
Revision History
Revision 2.3.0
20 November 2013
Loads of new stuff!
Revision 1.4.0
14 April 2013
New slideshow and additional filters
Revision 1.?.0
6 February 2013
Initial version
22